

1. Install SNORT
Snort is an open source network intrusion detection system that can perform real-time traffic analysis and packet logging over IP networks.
It can perform "protocol analysis", "content search" and "matching" and can be used to detect a variety of attacks such as "buffer overflows", "stealth port scans", "CGI attacks", "SMB probes", "OS fingerprinting attempts", "semantic URL attacks" and "server message block probes".
1.1 Install
①Required library installation
|
1 2 3 |
# apt install -y gcc libpcre3-dev zlib1g-dev libluajit-5.1-dev \ libpcap-dev openssl libssl-dev libnghttp2-dev libdumbnet-dev \ bison flex libdnet autoconf libtool |
②Create working directory
|
1 2 |
# mkdir /usr/src/snort_src # cd /usr/src/snort_src |
③Daq download and install
Download the latest DAQ source package from the Snort web site using the wget command.
If a new source is available, please replace the version number of the command
|
1 2 3 4 5 6 |
# wget https://www.snort.org/downloads/snort/daq-2.0.7.tar.gz # tar -xvzf daq-2.0.7.tar.gz # cd daq-2.0.7 # autoreconf -f -i # ./configure && make && make install # cd ../ |
④Download and install SNORT
|
1 2 3 4 5 6 |
# wget https://www.snort.org/downloads/snort/snort-2.9.19.tar.gz # tar -xvzf snort-2.9.19.tar.gz # cd snort-2.9.19 # ./configure --enable-sourcefire && make && make install # ldconfig # ln -s /usr/local/bin/snort /usr/sbin/snort |
1.2 Setting up user and folder structures
In order to run Snort securely without root access, a new unprivileged user and a new user group for running the daemon must be created
|
1 2 3 4 5 6 7 8 9 10 11 12 13 14 15 |
# groupadd snort # useradd snort -r -s /sbin/nologin -c SNORT_IDS -g snort # mkdir -p /etc/snort/rules # mkdir /var/log/snort # mkdir /usr/local/lib/snort_dynamicrules # mkdir /etc/snort/preproc_rules # chmod -R 5775 /etc/snort # chmod -R 5775 /var/log/snort # chmod -R 5775 /usr/local/lib/snort_dynamicrules # chown -R snort:snort /etc/snort # chown -R snort:snort /var/log/snort # chown -R snort:snort /usr/local/lib/snort_dynamicrules |
Create the following files
|
1 2 3 |
# touch /etc/snort/rules/white_list.rules # touch /etc/snort/rules/black_list.rules # touch /etc/snort/rules/local.rules |
1.3 Setting up the configuration file
Copy all files to the configuration directory.
|
1 2 |
# cp /usr/src/snort_src/snort*/etc/*.conf* /etc/snort # cp /usr/src/snort_src/snort*/etc/*.map /etc/snort |
1.4 Use of community rules
Get the freely available community rules.
①Retrieve the community rules and copy them to the configuration folder
|
1 2 3 |
# wget https://www.snort.org/rules/community -O ~/community.tar.gz # tar -xvf ~/community.tar.gz -C ~/ # cp ~/community-rules/* /etc/snort/rules |
②Comment out unwanted lines en masse
|
1 |
# sed -i 's/include \$RULE\_PATH/#include \$RULE\_PATH/' /etc/snort/snort.conf |
1.5 Retrieving registered user rules
Free registration on the website gives you access to an Oink code that allows you to download the registered user ruleset.
①Get Oinkcode
Register as a user on the official Snort website and get the Oinkcode you need to get the community rules
In order to download the latest rule files, you need to register as a user at the official Snort website.
Go to https://www.snort.org/
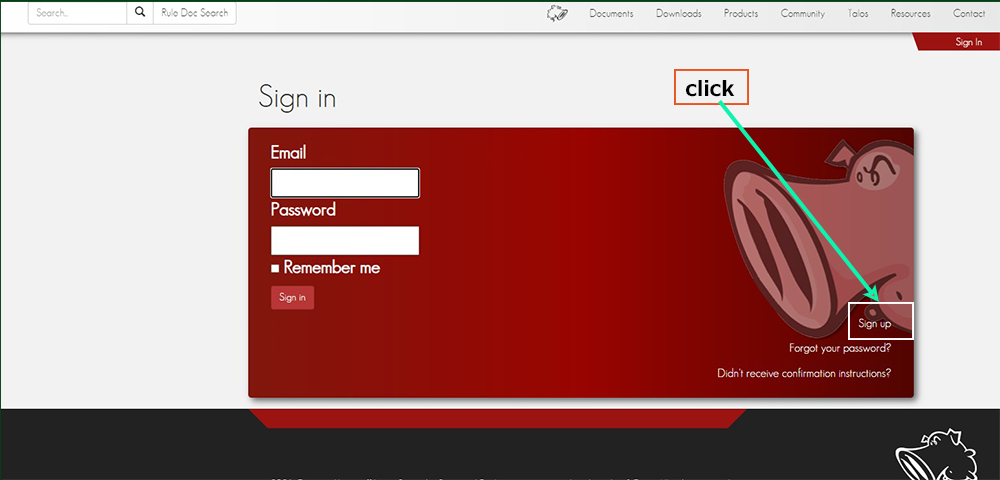
Click on "Sign In"

Click on "Sign Up".
Enter your "Email", "Password", "Password confirmation" and check the other fields, then click "Sign Up".

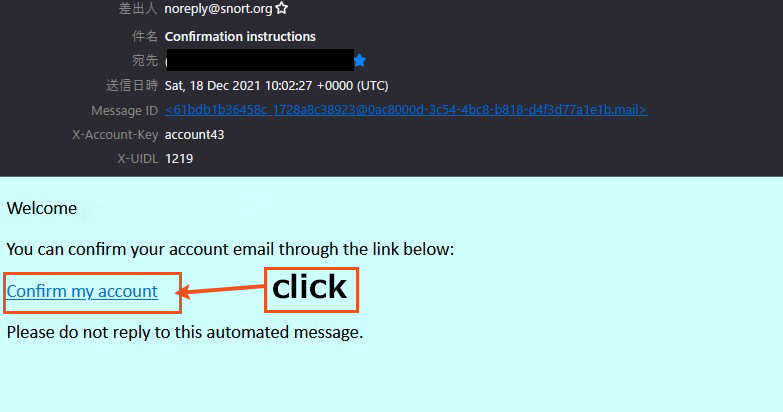
If the "Sign Up" is successful, you will receive the following email to your registered email address
Click on the link in the text
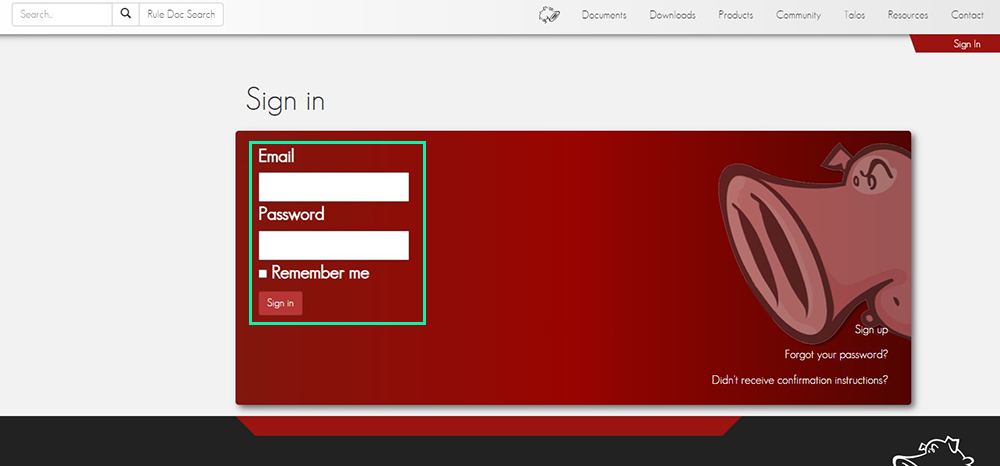
Enter your registration details and login
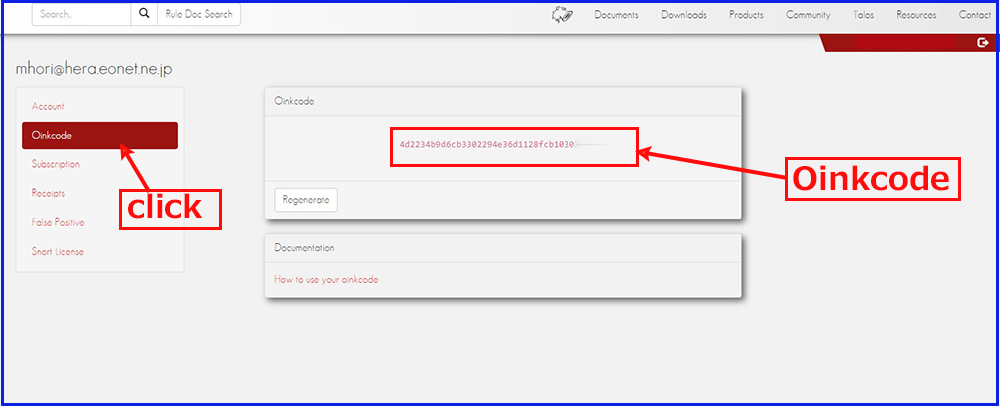
Click on your email address

Click on "Oinkcodes" and save the "Oinkcode" separately.
②Download the registered user rules
Replace the "oinkcode" in the following with the code you got above
|
1 |
# https://www.snort.org/rules/snortrules-snapshot-29181.tar.gz?oinkcode= oinkcode -O ~/registered.tar.gz |
③Extract rules to configuration directory
|
1 |
# tar -xvf ~/registered.tar.gz -C /etc/snort |
1.6 Configuration of network sets and rule sets
①Edit snort.conf
|
1 |
# vi /etc/snort/snort.conf |
Editorial content
|
1 2 3 4 5 6 7 8 9 10 11 12 13 14 15 16 17 18 19 20 21 22 23 24 25 26 27 28 29 30 |
line 45 : 192.168.11.0/24 to match the environment of your server # Setup the network addresses you are protecting ipvar HOME_NET 192.168.11.0/24Line 48 # Set up the external network addresses. Leave as "any" in most situations ipvar EXTERNAL_NET !$HOME_NET Line 104-106 # Path to your rules files (this can be a relative path) var RULE_PATH /etc/snort/rules var SO_RULE_PATH /etc/snort/so_rules var PREPROC_RULE_PATH /etc/snort/preproc_rules Line 113,114 # Set the absolute path appropriately var WHITE_LIST_PATH /etc/snort/rules var BLACK_LIST_PATH /etc/snort/rules Scroll down to Step #6 and configure the output of unified2 to be logged in the snort.log file name as follows Line 526 : Additional entries # unified2 # Recommended for most installs output unified2: filename snort.log, limit 128 Finally, scroll to the bottom of the file to find a list of the rule sets included. In order to allow Snort to read custom rules, you need to uncomment local.rules. Line 547 include $RULE_PATH/local.rules If you are using community rules, add them just below the local.rules line. include $RULE_PATH/community.rules |
Use the parameter -T to test the configuration and enable the test mode
|
1 |
# snort -T -c /etc/snort/rules/snort.conf |
If you get a "file not found" error, copy the file that gives the error to /etc/snort/rules
I had an error with the following file
|
1 2 3 4 |
# cp /usr/src/snort_src/snort-2.9.19/etc/classification.config /etc/snort/rules # cp /usr/src/snort_src/snort-2.9.19/etc/reference.config /etc/snort/rules # cp /usr/src/snort_src/snort-2.9.19/etc/threshold.conf /etc/snort/rules # cp /usr/src/snort_src/snort-2.9.19/etc/unicode.map /etc/snort/rules/ |
If you get an invalid error, you can do the following
|
1 2 3 4 5 6 |
# vi /etc/snort/rules/snort.conf Line 322~324 : Change as follows #decompress_swf {deflate lzma} \ decompress_swf {deflate} \ decompress_pdf {deflate} |
Again try
|
1 |
# snort -T -c /etc/snort/rules/snort.conf |
When you run it, you will see a message like the following example
,,_ -*> Snort! <*-
o" )~ Version 2.9.19 GRE (Build 85)
'''' By Martin Roesch & The Snort Team: http://www.snort.org/contact#team
Copyright (C) 2014-2021 Cisco and/or its affiliates. All rights reserved.
Copyright (C) 1998-2013 Sourcefire, Inc., et al.
Using libpcap version 1.9.1 (with TPACKET_V3)
Using PCRE version: 8.39 2016-06-14
Using ZLIB version: 1.2.11
Rules Engine: SF_SNORT_DETECTION_ENGINE Version 3.2 <Build 1>
Preprocessor Object: SF_SDF Version 1.1 <Build 1>
Preprocessor Object: SF_MODBUS Version 1.1 <Build 1>
Preprocessor Object: SF_POP Version 1.0 <Build 1>
Preprocessor Object: SF_FTPTELNET Version 1.2 <Build 13>
Preprocessor Object: SF_SMTP Version 1.1 <Build 9>
Preprocessor Object: SF_GTP Version 1.1 <Build 1>
Preprocessor Object: SF_DNS Version 1.1 <Build 4>
Preprocessor Object: SF_REPUTATION Version 1.1 <Build 1>
Preprocessor Object: SF_DNP3 Version 1.1 <Build 1>
Preprocessor Object: SF_IMAP Version 1.0 <Build 1>
Preprocessor Object: SF_S7COMMPLUS Version 1.0 <Build 1>
Preprocessor Object: SF_SSH Version 1.1 <Build 3>
Preprocessor Object: SF_DCERPC2 Version 1.0 <Build 3>
Preprocessor Object: appid Version 1.1 <Build 5>
Preprocessor Object: SF_SIP Version 1.1 <Build 1>
Preprocessor Object: SF_SSLPP Version 1.1 <Build 4>
Total snort Fixed Memory Cost - MaxRss:838424
Snort successfully validated the configuration!
Snort exiting
1.7 Testing the configuration
To test that Snort is logging alerts as intended, add a custom detection rule alert for incoming ICMP connections to the local.rules file
|
1 2 3 4 |
# vi /etc/snort/rules/local.rules Add the following to the last line alert icmp any any -> $HOME_NET any (msg:"ICMP test"; sid:10000001; rev:001;) |
Test run
|
1 |
# snort -A console -i eno1 -u snort -g snort -c /etc/snort/snort.conf |
Replace "eno1" with your own network interface.
If the terminal is left in this state and another PC on the same network (e.g. Windows) pings this server, the terminal running Snort will show the following notification for each ICMP call
|
1 2 3 4 5 |
Commencing packet processing (pid=131577) 12/15-21:27:03.928135 [**] [1:10000001:1] ICMP test [**] [Priority: 0] {ICMP} 192.168.11.20 -> 192.168.11.63 12/15-21:27:03.928419 [**] [1:10000001:1] ICMP test [**] [Priority: 0] {ICMP} 192.168.11.63 -> 192.168.11.20 12/15-21:27:04.931973 [**] [1:10000001:1] ICMP test [**] [Priority: 0] {ICMP} 192.168.11.20 -> 192.168.11.63 12/15-21:27:04.932072 [**] [1:10000001:1] ICMP test [**] [Priority: 0] {ICMP} 192.168.11.63 -> 192.168.11.20 |
The log can be read with the following command
|
1 |
# snort -r /var/log/snort/snort.log.<id_number> |
1.8 Run Snort in background
Add a new Snort start-up script to run Snort as a service
|
1 |
# vi /lib/systemd/system/snort.service |
Script content
"eno1" is adapted to your environment
|
1 2 3 4 5 6 7 8 9 10 |
[Unit] Description=Snort NIDS Daemon After=syslog.target network.target [Service] Type=simple ExecStart=/usr/local/bin/snort -q -u snort -g snort -c /etc/snort/snort.conf -i eno1 [Install] WantedBy=multi-user.target |
|
1 2 |
# systemctl daemon-reload # systemctl start snort |
2.Install Tripwire
Install a system to detect tampering of Linux server files by crackers.
This time, we will introduce Tripwire, a host-type IDS (IDS=Intrusion Detection System) as a file tampering detection system.
Tripwire detects the addition/modification/deletion of files by creating a database of the file status at the time of deployment and comparing the database with the current status of the files.
2.1 Installation and configuration
|
1 |
# apt install tripwire |
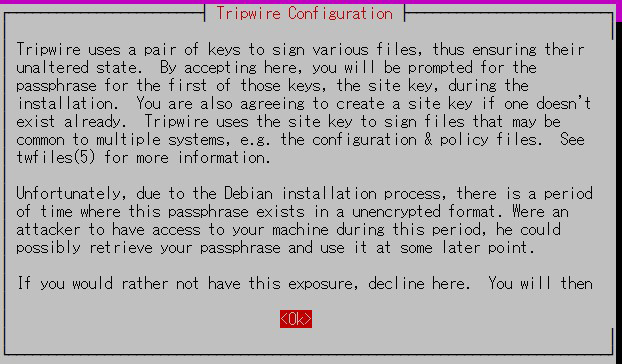


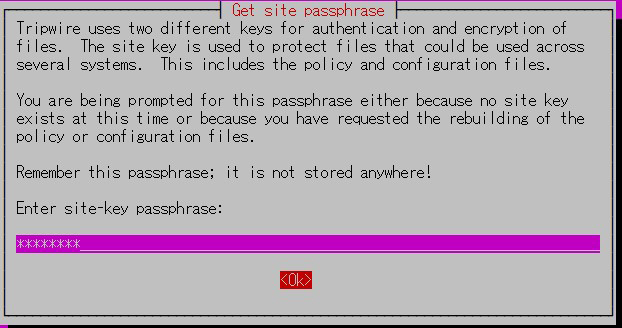
① Create site key
Tripwire requires a site passphrase to secure the "tw.cfg" tripwire configuration file and the "tw.pol" tripwire policy file.
Encrypts both files using the specified passphrase.
The site passphrase is also required for a single instance of tripwire.

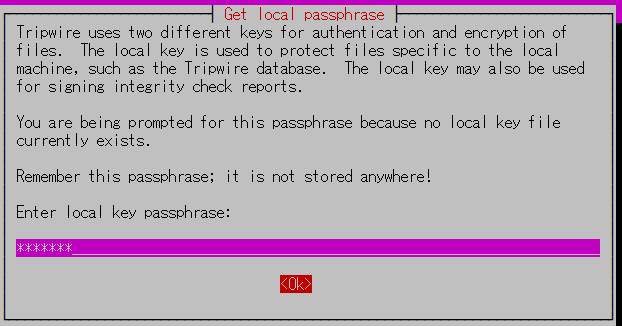
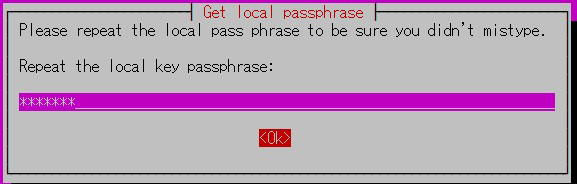
②Local Key Passphrase
A local passphrase is required to protect the tripwire database and report files.
The local key used by tripwire to avoid unauthorised changes to the tripwire baseline database.
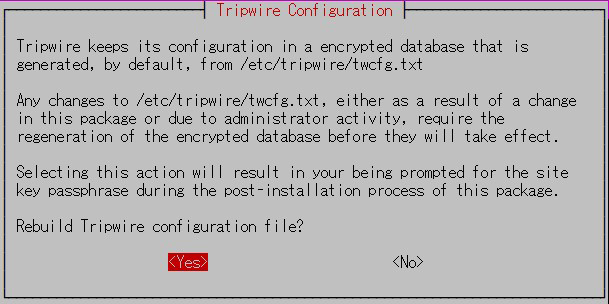
③tripwire configuration path
The tripwire configuration is stored in the /etc/tripwire/twcfg.txt file.
It is used to generate the encrypted configuration file tw.cfg.
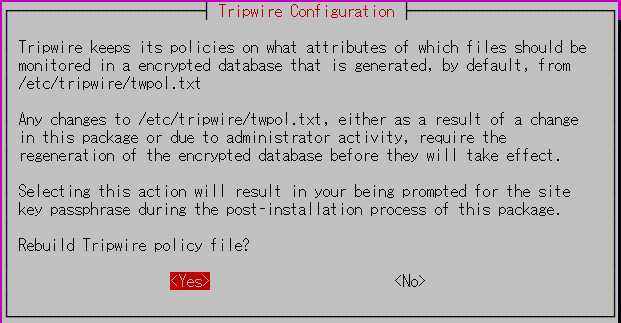
④tripwire Policy Path
tripwire stores the policy in the /etc/tripwire/twpol.txt file.
This is used to generate the encrypted policy file tw.pol which is used by tripwire.
Installation will proceed.

2.2 Configuration file settings
①Tripwire configuration file (twcfg.txt)
The details of the tripwire configuration file (twcfg.txt) are as follows
The paths for the encrypted policy file (tw.pol), site key (site.key) and local key (hostname local.key) are as follows
|
1 2 3 4 5 6 7 8 9 10 11 12 13 14 15 16 17 |
ROOT =/usr/sbin # Executable files POLFILE =/etc/tripwire/tw.pol DBFILE =/var/lib/tripwire/$(HOSTNAME).twd # Data pace file REPORTFILE =/var/lib/tripwire/report/$(HOSTNAME)-$(DATE).twr SITEKEYFILE =/etc/tripwire/site.key LOCALKEYFILE =/etc/tripwire/$(HOSTNAME)-local.key EDITOR =/usr/bin/editor LATEPROMPTING =false LOOSEDIRECTORYCHECKING =false MAILNOVIOLATIONS =true EMAILREPORTLEVEL =3 REPORTLEVEL =3 SYSLOGREPORTING =true MAILMETHOD =SMTP SMTPHOST =localhost SMTPPORT =25 TEMPDIRECTORY =/tmp |
2.3 Initial setup, including key creation and database creation
①Edit twcfg.txt
|
1 |
# cd /etc/tripwire |
|
1 2 3 4 5 6 7 8 |
# vi twcfg.txt Line 9 Add "#" to the beginning of the line and "LOOSEDIRECTORYCHECKING =true" to the line below it #LOOSEDIRECTORYCHECKING =false LOOSEDIRECTORYCHECKING =true Line 12:Change as required (maximum report level: 4) REPORTLEVEL =4 |
② Configuration file generation
|
1 2 3 4 |
# cd /etc/tripwire # twadmin -m F -c tw.cfg -S site.key twcfg.txt Please enter your site passphrase: <Site Key Passphrase> Wrote configuration file: /etc/tripwire/tw.cfg |
③ Optimise your policy
Use the following policy optimisation script to optimise your policy
|
1 |
# vi twpolmake.pl |
Policy optimisation script content
|
1 2 3 4 5 6 7 8 9 10 11 12 13 14 15 16 17 18 19 20 21 22 23 24 25 26 27 28 29 30 31 32 33 34 35 36 37 38 39 40 41 42 43 44 45 46 47 48 49 50 51 52 53 54 55 |
#!/usr/bin/perl # Tripwire Policy File customize tool # ---------------------------------------------------------------- # Copyright (C) 2003 Hiroaki Izumi # This program is free software; you can redistribute it and/or # modify it under the terms of the GNU General Public License # as published by the Free Software Foundation; either version 2 # of the License, or (at your option) any later version. # This program is distributed in the hope that it will be useful, # but WITHOUT ANY WARRANTY; without even the implied warranty of # MERCHANTABILITY or FITNESS FOR A PARTICULAR PURPOSE. See the # GNU General Public License for more details. # You should have received a copy of the GNU General Public License # along with this program; if not, write to the Free Software # Foundation, Inc., 59 Temple Place - Suite 330, Boston, MA 02111-1307, USA. # ---------------------------------------------------------------- # Usage: # perl twpolmake.pl {Pol file} # ---------------------------------------------------------------- # $POLFILE=$ARGV[0]; open(POL,"$POLFILE") or die "open error: $POLFILE" ; my($myhost,$thost) ; my($sharp,$tpath,$cond) ; my($INRULE) = 0 ; while (<POL>) { chomp; if (($thost) = /^HOSTNAME\s*=\s*(.*)\s*;/) { $myhost = `hostname` ; chomp($myhost) ; if ($thost ne $myhost) { $_="HOSTNAME=\"$myhost\";" ; } } elsif ( /^{/ ) { $INRULE=1 ; } elsif ( /^}/ ) { $INRULE=0 ; } elsif ($INRULE == 1 and ($sharp,$tpath,$cond) = /^(\s*\#?\s*)(\/\S+)\b(\s+->\s+.+)$/) { $ret = ($sharp =~ s/\#//g) ; if ($tpath eq '/sbin/e2fsadm' ) { $cond =~ s/;\s+(tune2fs.*)$/; \#$1/ ; } if (! -s $tpath) { $_ = "$sharp#$tpath$cond" if ($ret == 0) ; } else { $_ = "$sharp$tpath$cond" ; } } print "$_\n" ; } close(POL) ; |
|
1 |
# perl twpolmake.pl twpol.txt > twpol.txt.new |
|
1 2 3 |
# twadmin -m P -c tw.cfg -p tw.pol -S site.key twpol.txt.new Please enter your site passphrase: <Site Key Passphrase> Wrote policy file: /etc/tripwire/tw.pol |
|
1 2 |
# tripwire -m i -s -c tw.cfg Please enter your local passphrase: <Lokal Key Passphrase> |
In our case, it stopped at a Snort-related file.
|
1 2 |
# chmod -R 5775 <Specify the absolute path to the file that causes the error> # chown -R snort:snort <Specify the absolute path to the file that causes the error> |
Paths and files that are expected to stop
/etc/snort/etc
/etc/snort/preproc_rules
/etc/snort/rules
/etc/snort/so_rules
/root/community-rules
After giving ownership and permissions to the above file, run the following again
|
1 2 |
# tripwire -m i -s -c tw.cfg Please enter your local passphrase: <Lokal Key Passphrase> |
When complete, the following will appear
|
1 2 3 4 5 6 7 8 |
Processing: /var/tmp --- Generating information for: /var/tmp Processing: /home --- Generating information for: /home Processing: /tmp --- Generating information for: /tmp Wrote database file: /var/lib/tripwire/Lepard.twd The database was successfully generated. |
2.4 Run a check
①Create test file
|
1 |
# echo test > /root/test.txt |
②Checking the operation of Tripwire
|
1 |
# tripwire -m c -s -c /etc/tripwire/tw.cfg |
If successful, the following message will appear
|
1 2 3 4 5 6 7 8 9 10 11 12 13 14 15 16 17 18 19 20 21 22 23 24 25 26 27 28 29 30 31 32 33 34 35 36 37 38 39 40 41 42 43 44 45 46 47 48 49 50 51 52 53 54 55 56 57 58 59 60 61 62 63 64 65 66 67 68 |
Open Source Tripwire(R) 2.4.3.7 Integrity Check Report Report generated by: root Report created on: Thu 16 Dec 2021 09:32:46 AM JST Database last updated on: Never =============================================================== Report Summary: =============================================================== Host name: Lepard Host IP address: 127.0.1.1 Host ID: None Policy file used: /etc/tripwire/tw.pol Configuration file used: /etc/tripwire/tw.cfg Database file used: /var/lib/tripwire/Lepard.twd Command line used: tripwire -m c -s -c /etc/tripwire/tw.cfg =============================================================== Rule Summary: ===============================================================------------------------------------------------------------------------------- Section: Unix File System ------------------------------------------------------------------------------- Rule Name Severity Level Added Removed Modified --------- -------------- ----- ------- -------- Other binaries 66 0 0 0 Tripwire Binaries 100 0 0 0 Other libraries 66 0 0 0 Root file-system executables 100 0 0 0 * Tripwire Data Files 100 1 0 0 System boot changes 100 0 0 0 Root file-system libraries 100 0 0 0 (/lib) Critical system boot files 100 0 0 0 Other configuration files 66 0 0 0 (/etc) Boot Scripts 100 0 0 0 Security Control 66 0 0 0 * Root config files 100 1 0 0 Devices & Kernel information 100 0 0 0 (/dev) Invariant Directories 66 0 0 0 Total objects scanned: 49813 Total violations found: 2 =============================================================== Object Summary: =============================================================== ------------------------------------------------------------------------------- # Section: Unix File System ------------------------------------------------------------------------------- ------------------------------------------------------------------------------- Rule Name: Tripwire Data Files (/var/lib/tripwire/Lepard.twd) Severity Level: 100 ------------------------------------------------------------------------------- Added: "/var/lib/tripwire/Lepard.twd" ------------------------------------------------------------------------------- Rule Name: Root config files (/root) Severity Level: 100 ------------------------------------------------------------------------------- Added: "/root/test.txt" =============================================================== Error Report: ===============================================================No Errors ------------------------------------------------------------------------------- *** End of report *** Open Source Tripwire 2.4 Portions copyright 2000-2018 Tripwire, Inc. Tripwire is a registered trademark of Tripwire, Inc. This software comes with ABSOLUTELY NO WARRANTY; for details use --version. This is free software which may be redistributed or modified only under certain conditions; see COPYING for details. All rights reserved. |
|
1 |
# rm -f /root/test.txt |
2.5 Tripwire auto-run
①Create an autorun script (tripwire.sh) and run it automatically
|
1 2 |
# cd /opt/script # vi tripwire.sh |
Contents of the auto-run script (tripwire.sh)
|
1 2 3 4 5 6 7 8 9 10 11 12 13 14 15 16 17 18 19 20 21 22 |
#!/bin/bash PATH=/usr/sbin:/usr/bin:/bin:/usr/local/tripwire/sbin # Passphrase settings LOCALPASS=xxxxxxxx # Local passphrase SITEPASS=xxxxxxxx # Site passphrase cd /etc/tripwire # Tripwire check run tripwire -m c -s -c tw.cfg|mail -s "Tripwire(R) Integrity Check Report in `hostname`" root # Policy file update twadmin -m p -c tw.cfg -p tw.pol -S site.key > twpol.txt perl twpolmake.pl twpol.txt > twpol.txt.new twadmin -m P -c tw.cfg -p tw.pol -S site.key -Q $SITEPASS twpol.txt.new > /dev/null rm -f twpol.txt* *.bak # Database modernisation rm -f /usr/local/tripwire/lib/tripwire/*.twd* tripwire -m i -s -c tw.cfg -P $LOCALPASS |
|
1 2 3 |
# chmod 700 tripwire.sh # crontab -e 0 5 * * * /opt/script/tripwire.sh |
Reference: Script for reporting results by email
|
1 2 3 4 5 6 7 8 9 10 11 12 13 14 15 16 17 18 19 20 21 22 23 24 25 |
#!/bin/bash PATH=/usr/sbin:/usr/bin:/bin:/usr/local/tripwire/sbin # Passphrase settings LOCALPASS=xxxxx # Local passphrase SITEPASS=xxxxx # Site passphrase #Specify email address for notification MAIL="<your mailaddress> " cd /etc/tripwire # Tripwire check run tripwire -m c -s -c tw.cfg|mail -s "Tripwire(R) Integrity Check Report in `hostname`" $MAIL # Policy file update twadmin -m p -c tw.cfg -p tw.pol -S site.key > twpol.txt perl twpolmake.pl twpol.txt > twpol.txt.new twadmin -m P -c tw.cfg -p tw.pol -S site.key -Q $SITEPASS twpol.txt.new > /dev/null rm -f twpol.txt* *.bak # Database modernization rm -f /usr/local/tripwire/lib/tripwire/*.twd* tripwire -m i -s -c tw.cfg -P $LOCALPASS |