MIRACLE ZBX, enterprise-oriented integrated system monitoring software based on the open source Zabbix, with enhancements and modifications provided by Cybertrust. It implements security enhancements that comply with some requirements of the National Institute of Standards and Technology (NIST) security guidelines "NIST SP800-171" and "NIST SP800-53", which are becoming an international standard for security standards.
SELinux must be set to permissive
|
1 2 3 4 5 6 7 |
# setenforce 0 && sed -i 's/^SELINUX=.*/SELINUX=permissive/g' /etc/selinux/config # cat /etc/selinux/config | grep SELINUX= # SELINUX= can take one of these three values: # NOTE: In earlier Fedora kernel builds, SELINUX=disabled would also #SELINUX=enforcing SELINUX=permissive |
1. Register dnf repository for MIRACLE ZBX 6.0
Install Repository
|
1 |
# dnf install https://ftp.miraclelinux.com/zbx/6.0/miracle-zbx-release-6.0-1.noarch.rpm |
2. Configure firewall for MIRACLE ZBX
The ports used by MIRACLE ZBX components are as follows
MIRACLE ZBX Web front-end : 80/tcp
MIRACLE ZBX Agent/Agent 2 : 10050/tcp
MIRACLE ZBX Server/Proxy : 10051/tcp
MIRACLE ZBX Java Gateway : 10052/tcp
MIRACLE ZBX Web Service : 10053/tcp
This time, only "MIRACLE ZBX Web Front End", "MIRACLE ZBX Agent2" and "MIRACLE ZBX Server" will be installed, so allow the following ports.
|
1 2 |
# firewall-cmd --add-port={80,10050,10051}/tcp --permanent # firewall-cmd --reload |
3. Installation of MIRACLE ZBX Server and Web Front End
①Install MIRACLE ZBX package for MariaDB/MySQL
|
1 |
# dnf install miracle-zbx-server-mysql miracle-zbx-sql-scripts |
②Create database and users for MIRACLE ZBX server
Create database schema for Zabbix server.
Login to the MySQL server as root account and create a MySQL database (e.g. zabbix), user (e.g. zabbix) and password (e.g. ?Wabcd123).
|
1 2 3 4 5 6 7 |
# mysql -u root -p Password: > create database zabbix character set utf8mb4 collate utf8mb4_bin; > create user zabbix@localhost identified by '?Wabcd123'; > grant all privileges on zabbix.* to zabbix@localhost; >FLUSH PRIVILEGES; >exit; |
③Import initial data from MIRACLE ZBX
Import the initial database schema and data from MIRACLE ZBX into the newly created database.
|
1 |
# zcat /usr/share/doc/miracle-zbx-sql-scripts/mysql/create.sql.gz | mysql zabbix -uzabbix -p |
④Edit MIRACLE ZBX server configuration file
Edit the MIRACLE ZBX server configuration file and update the database settings in order for the MIRACLE ZBX server to connect to the database
|
1 2 3 |
# vi /etc/zabbix/zabbix_server.conf Line 137 DBPassword=[password of user zabbix when creating database] |
⑤Start service zabbix-server
|
1 2 |
# systemctl enable --now zabbix-server # systemctl start zabbix-server |
⑥Install packages for web front-end and Apache
|
1 |
# dnf install miracle-zbx-web-mysql miracle-zbx-web-japanese miracle-zbx-apache-conf |
⑦Start httpd and php-fpm
|
1 2 |
# systemctl enable --now httpd php-fpm # systemctl restart --now httpd php-fpm |
4. Monitor the MIRACLE ZBX server itself
①Install MIRACLE ZBX Agent 2 package on this server to monitor the server itself
|
1 |
# dnf install miracle-zbx-agent2 |
②Edit configuration file /etc/zabbix/zabbix_agent2.conf
|
1 2 3 |
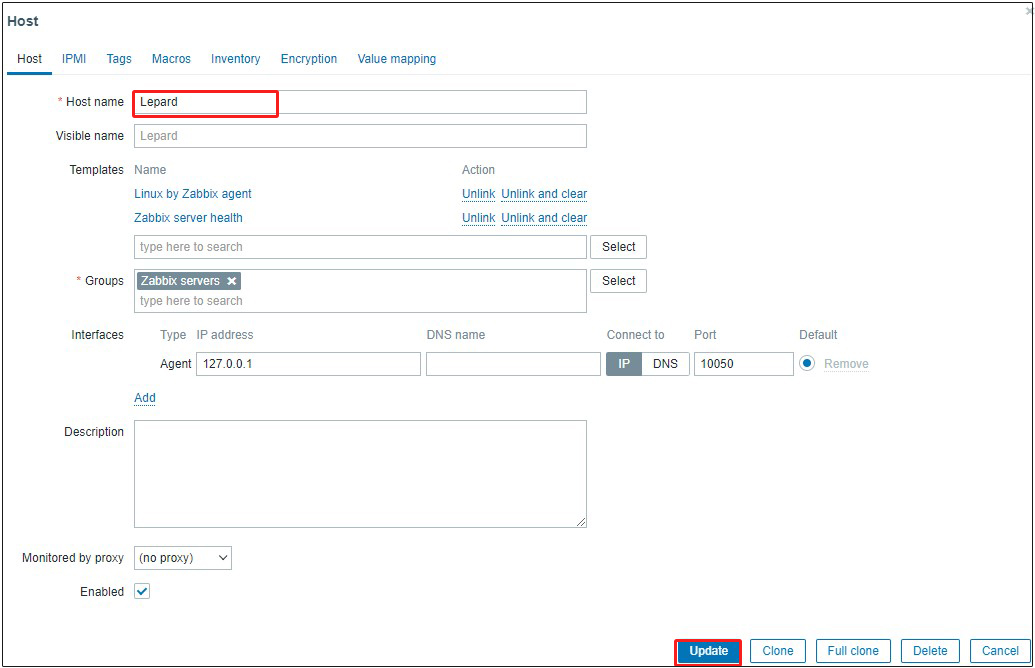
# vi /etc/zabbix/zabbix_agent2.conf # Line 148 Hostname=Lepard [Host name to be registered for the MIRACLE ZBX Web front end host] |
③Start zabbix-agent2
|
1 2 3 |
# systemctl enable --now zabbix-agent2 Created symlink /etc/systemd/system/multi-user.target.wants/zabbix-agent2.service → /usr/lib/systemd/system/zabbix-agent2.service. # systemctl start zabbix-agent2 |
5. Run the MIRACLE ZBX Web Installer
MIRACLE ZBX Web Installer can be accessed via "server IP/zabbix" or "domain/zabbix".
Open a web browser and enter "http: //[your-server-IP_Address]/zabbix".
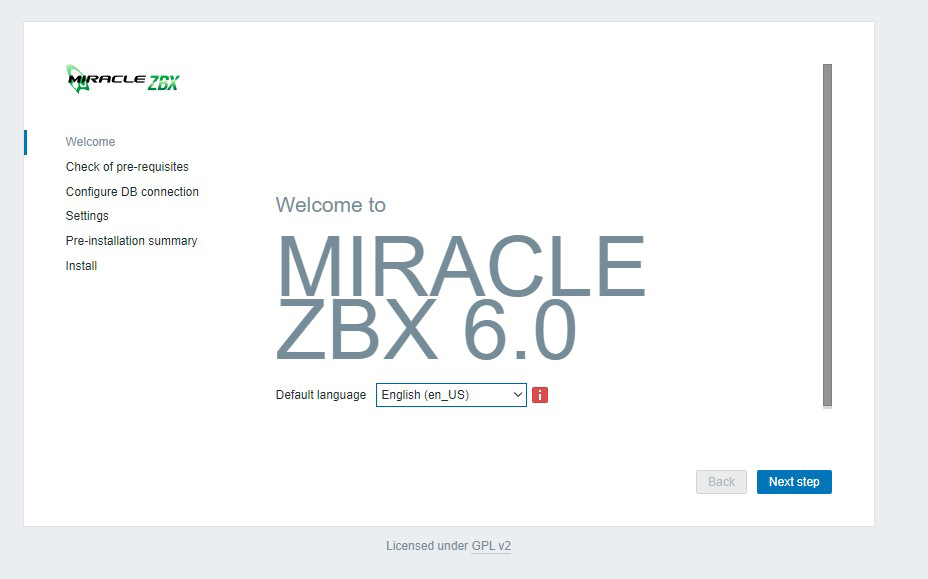
You will get the following screen. Click on [Next step].
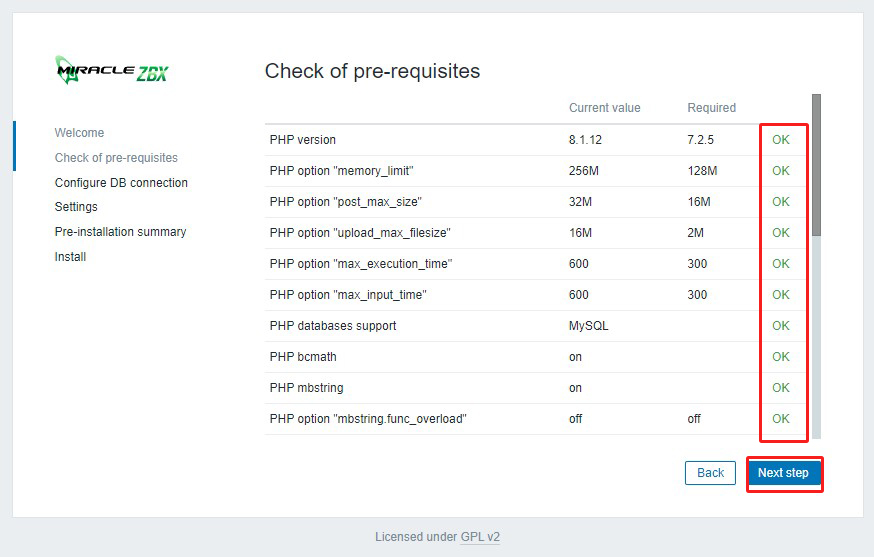
After confirming that all requirements are OK, click [ Next step]
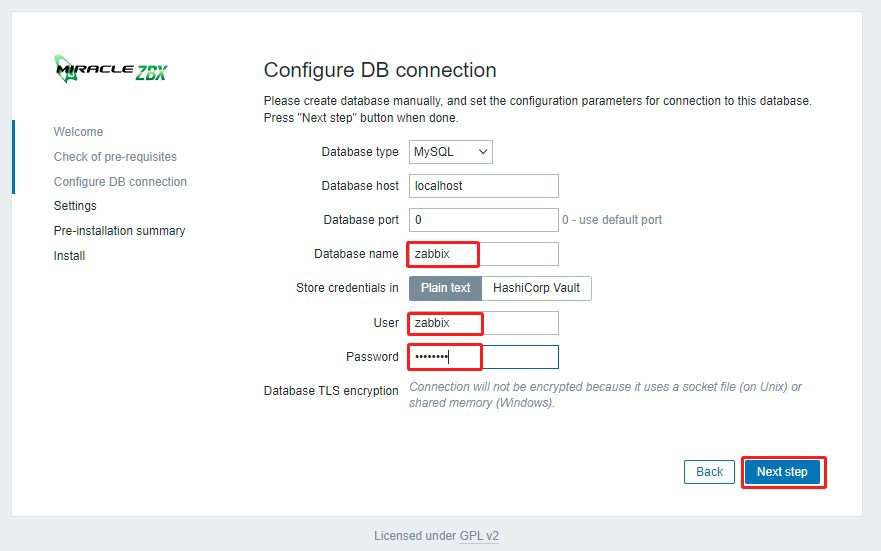
Enter the information you have set in the "Database name", "User", and "Password" fields, and click [ Next step ].
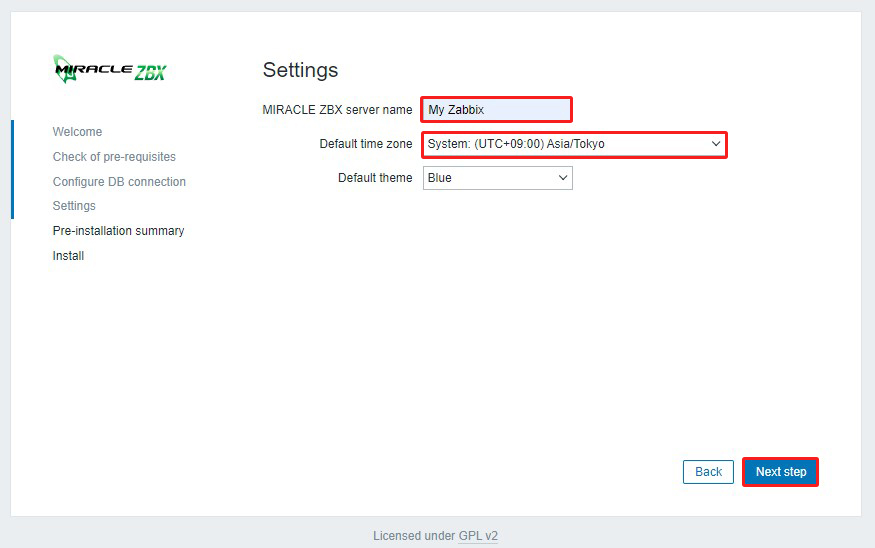
Enter any name for "Zabbix server names" and select Asia/Tokyo for time zone.
After confirming that you are in your own time zone, click [ Next step ].
Reconfirm settings If information is correct, click [Next step]

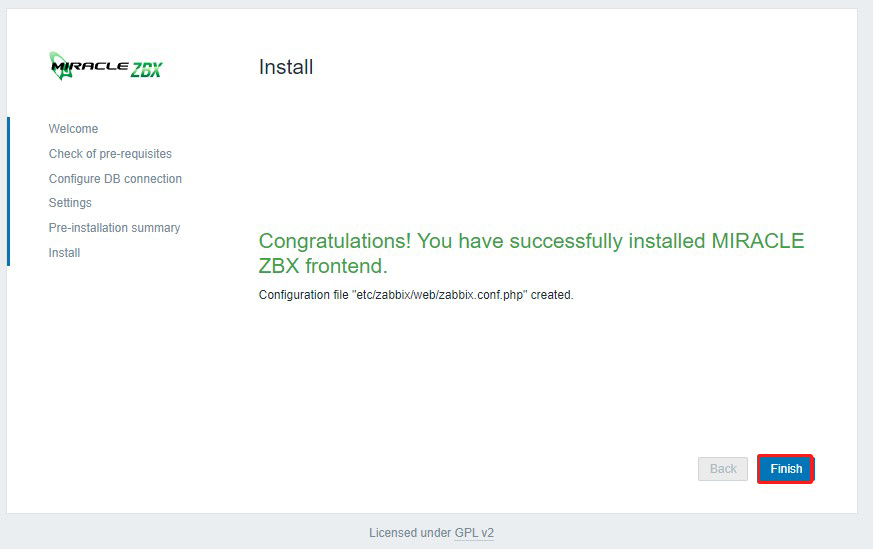
When the installation is successfully completed, the following page will appear. Click [Finish]
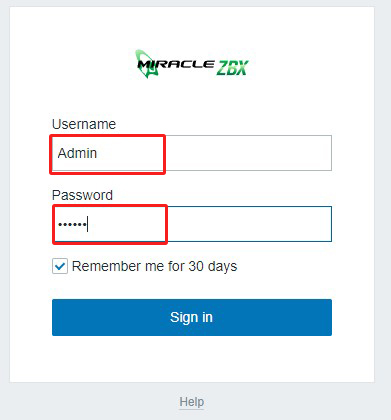
You will be redirected to MIRACLE ZBX login page
Sign in" using the following credentials
ユーザー名:Admin
パスワード:zabbix
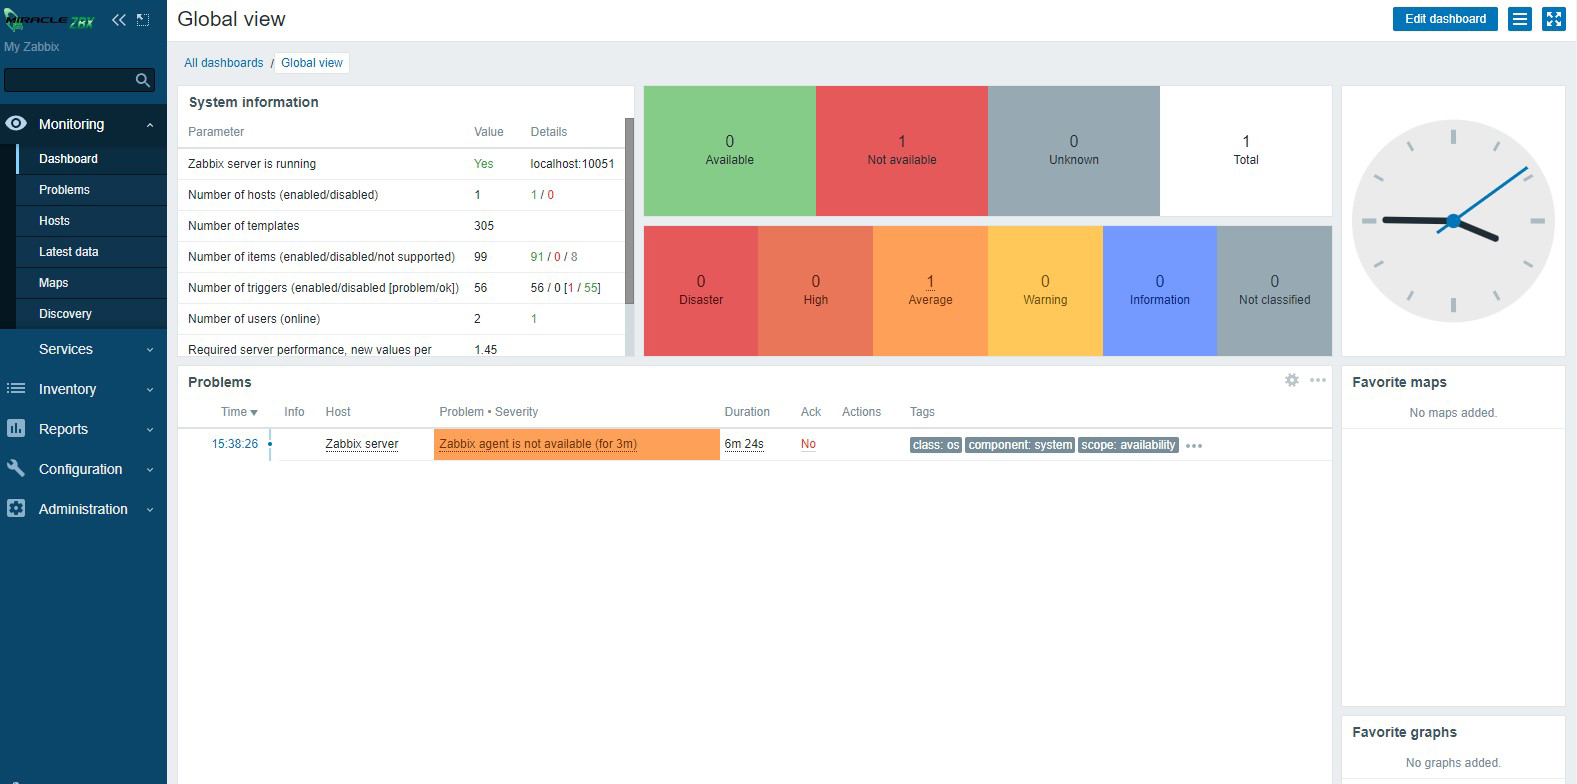
After successful login you will see the following screen (Zabbix Dashboard).
6. Various settings for MIRACLE ZBX
6.1 administrator password change, administrator email address settings
Change the default administrator password for security purposes
Also set up the administrator's email address
Once the above dashboard is displayed, continue
①Select "Administration" - "Users" in the left pane and click "Admin" in the right pane
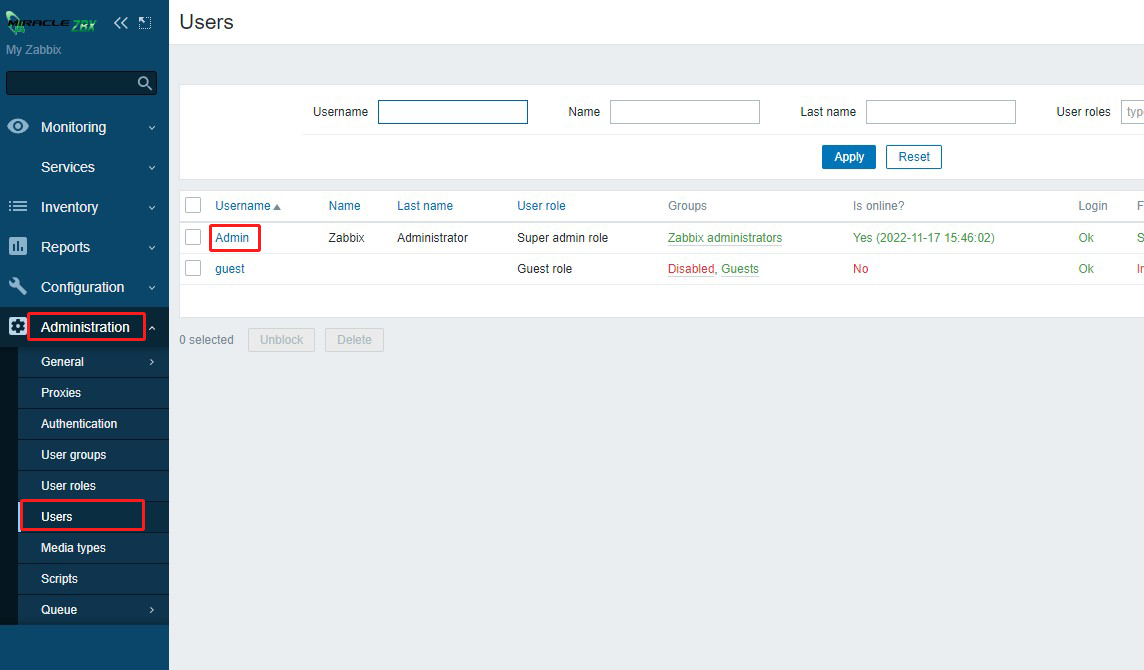
②Click [Change paddword]
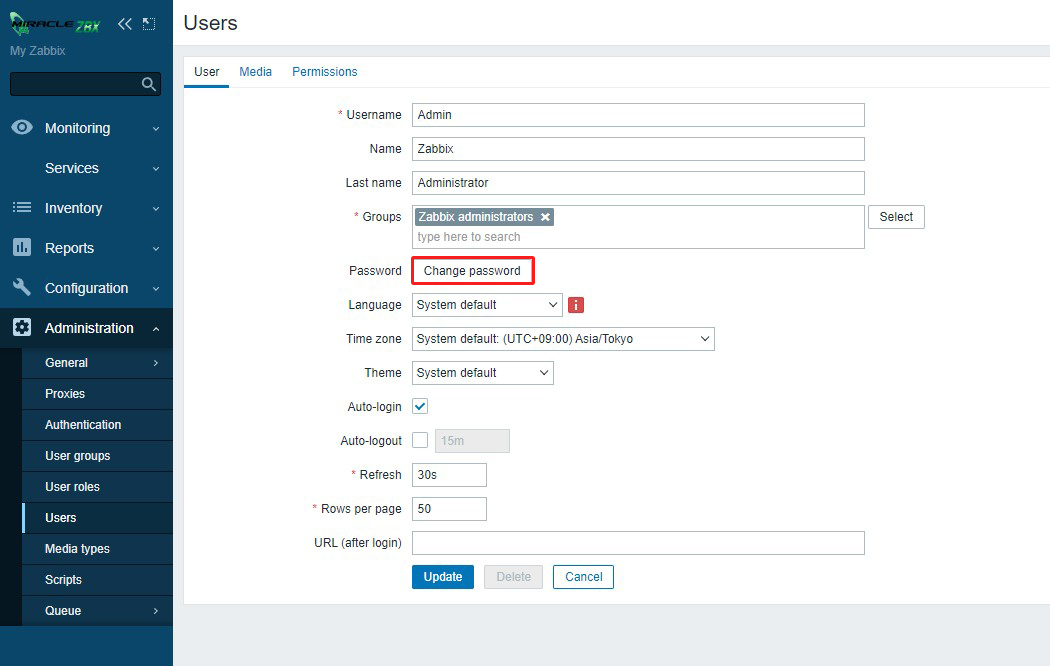
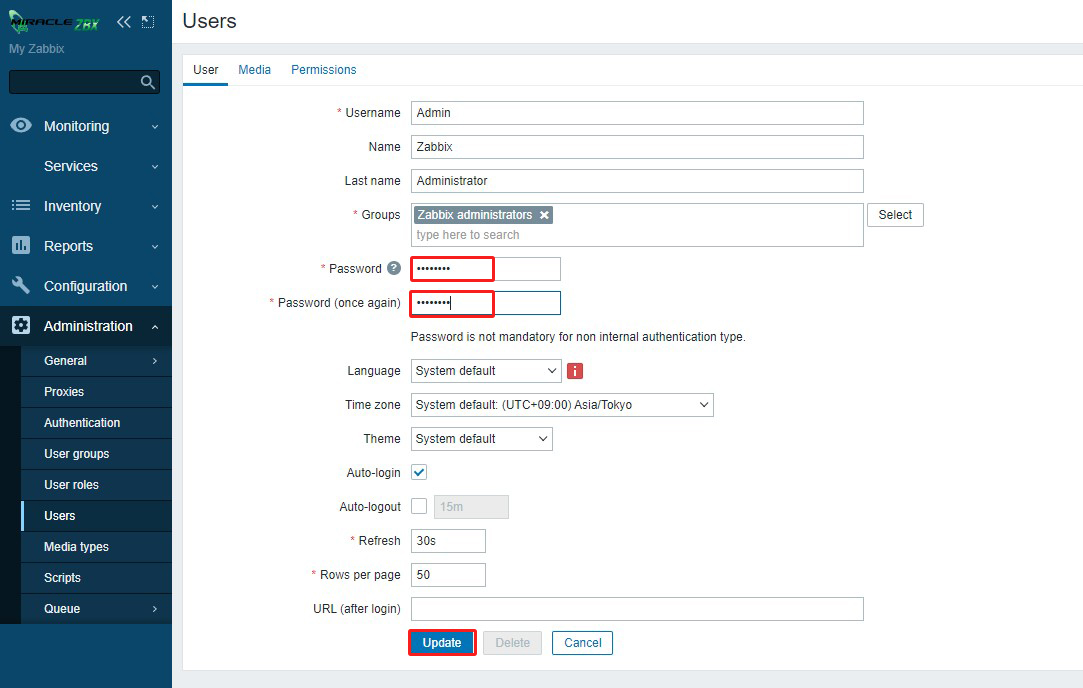
③Enter the password you wish to change and click [Update.]
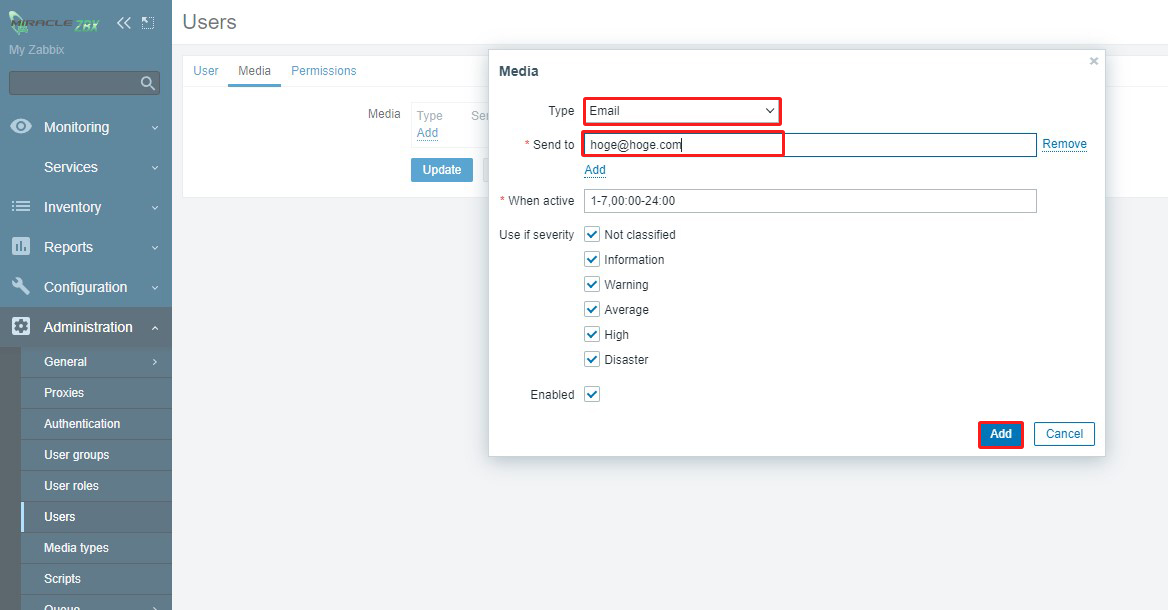
④Come back to the [Users] screen, go to the [Media] tab, and click the [Add] link
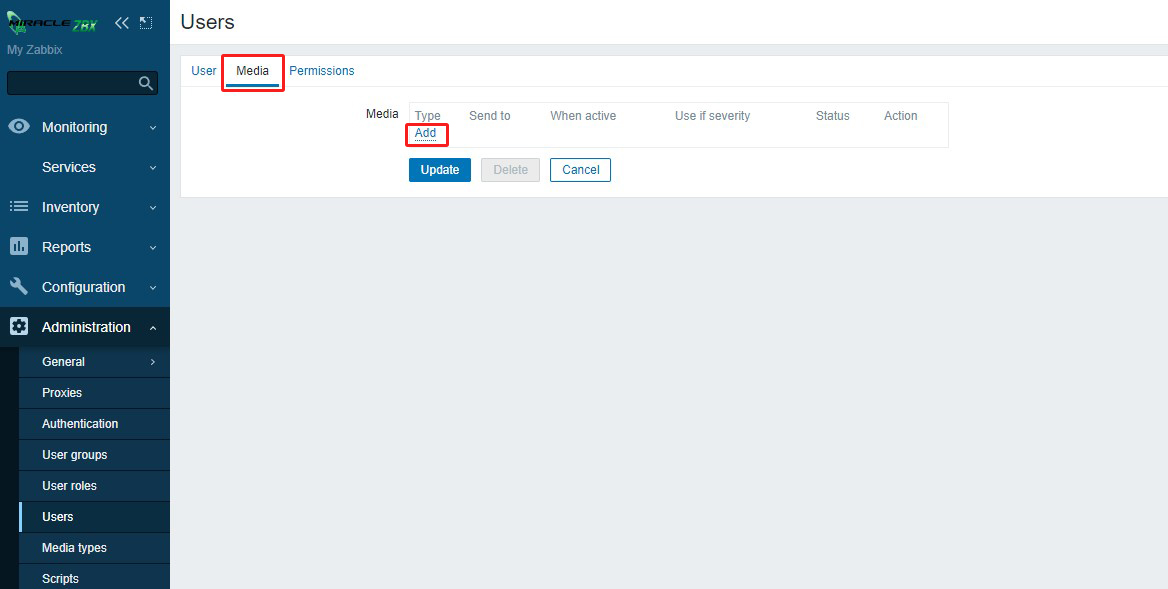
[Select "Email" in the "Type" field, enter the administrator's email address in the "Send to" field, and click the "Add" button.
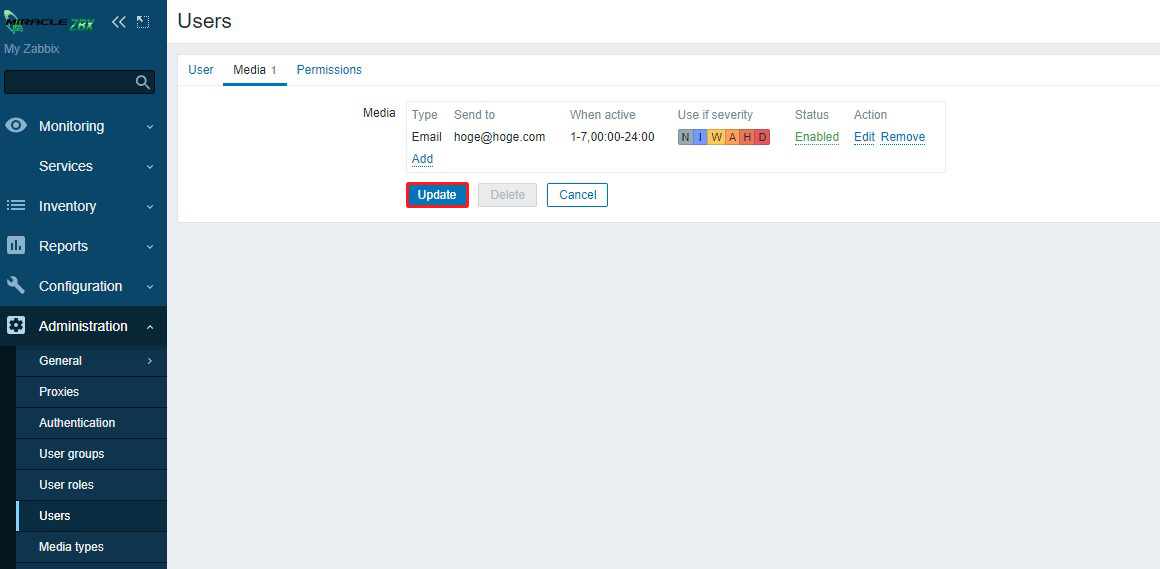
⑥Click the "Update" button to complete registration.
6.2 Monitoring Host Configuration
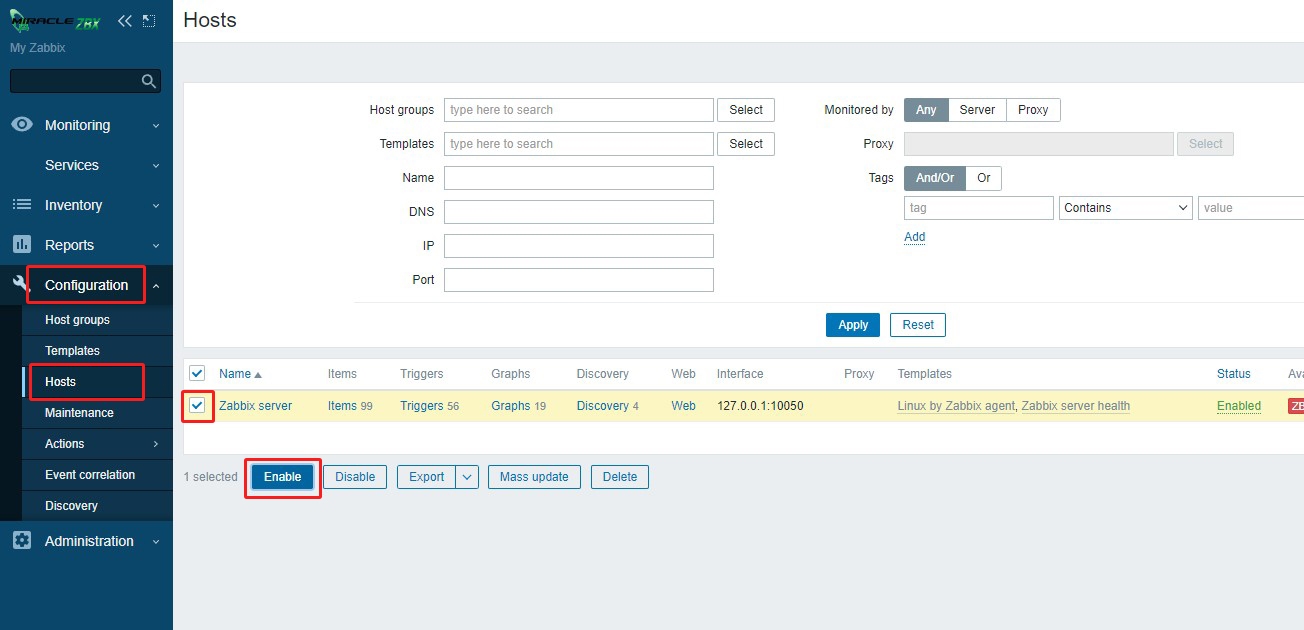
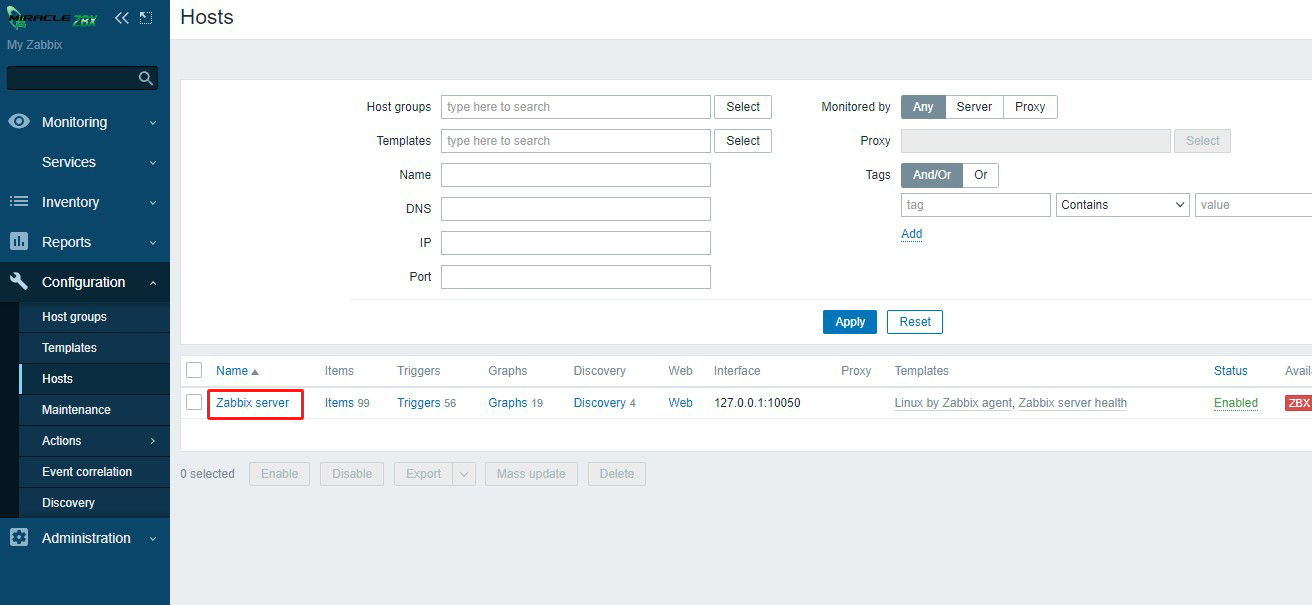
①Log in to the Zabbix administration site and select Configuration - Hosts in the left pane.
In the right pane you should see the local host with Zabbix Agent installed, check it and click the Enable button. (Currently you should see the zabbix server itself)
②Host name is registered with Zabbix server by default, but this should match [Hostname=***] set in /etc/zabbix_agentd.conf.
Click on "Zabbix server", make changes and click on "Update" button.
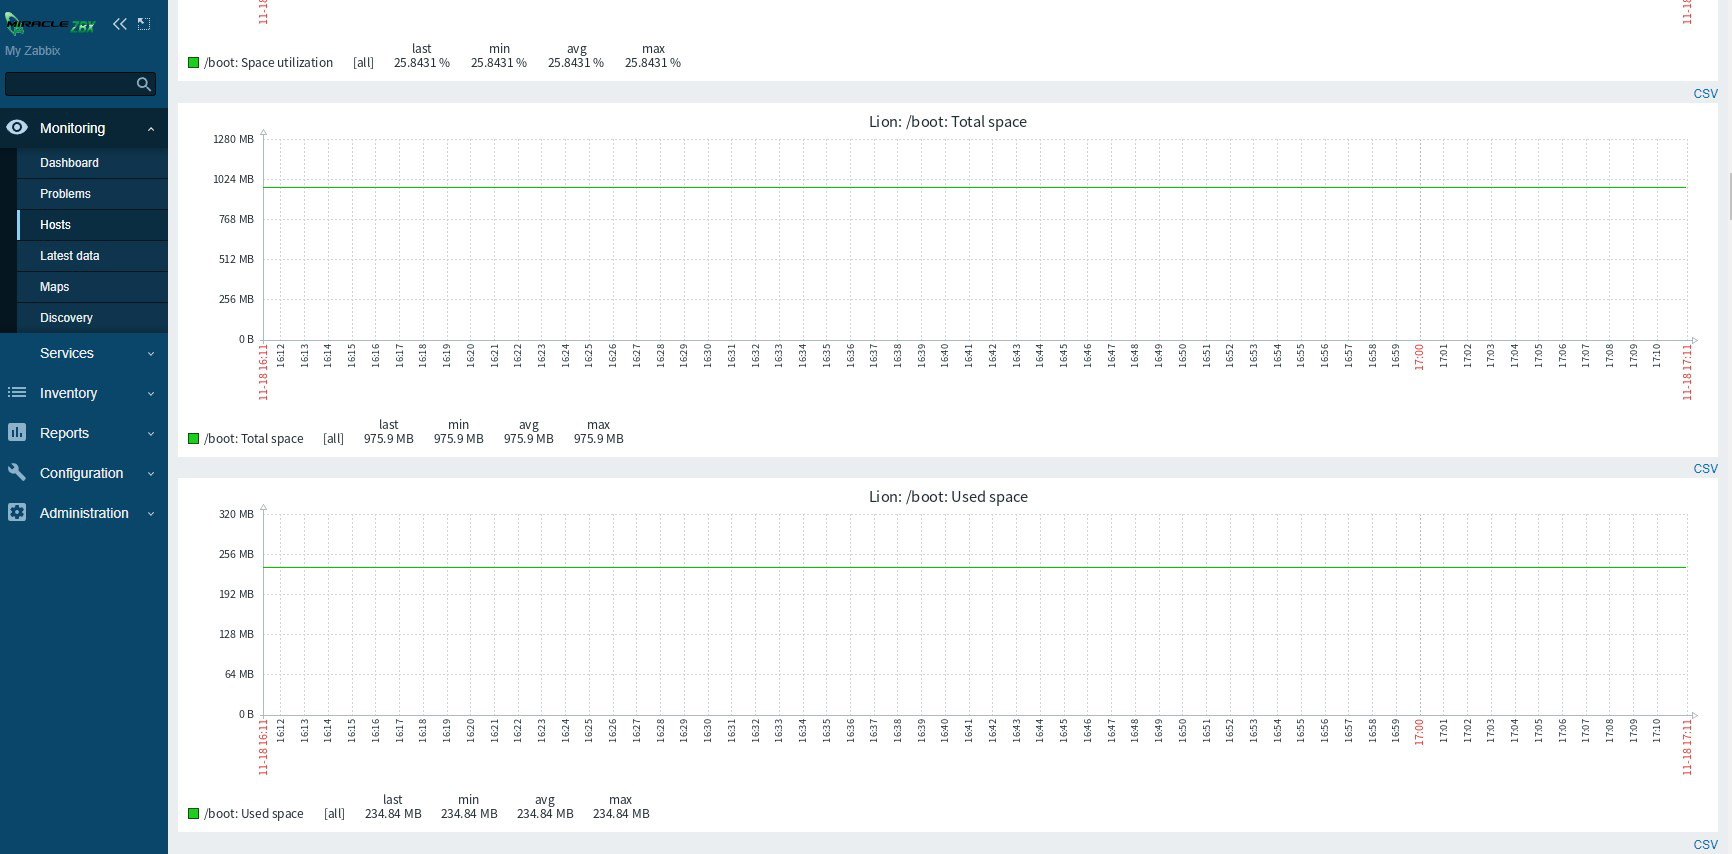
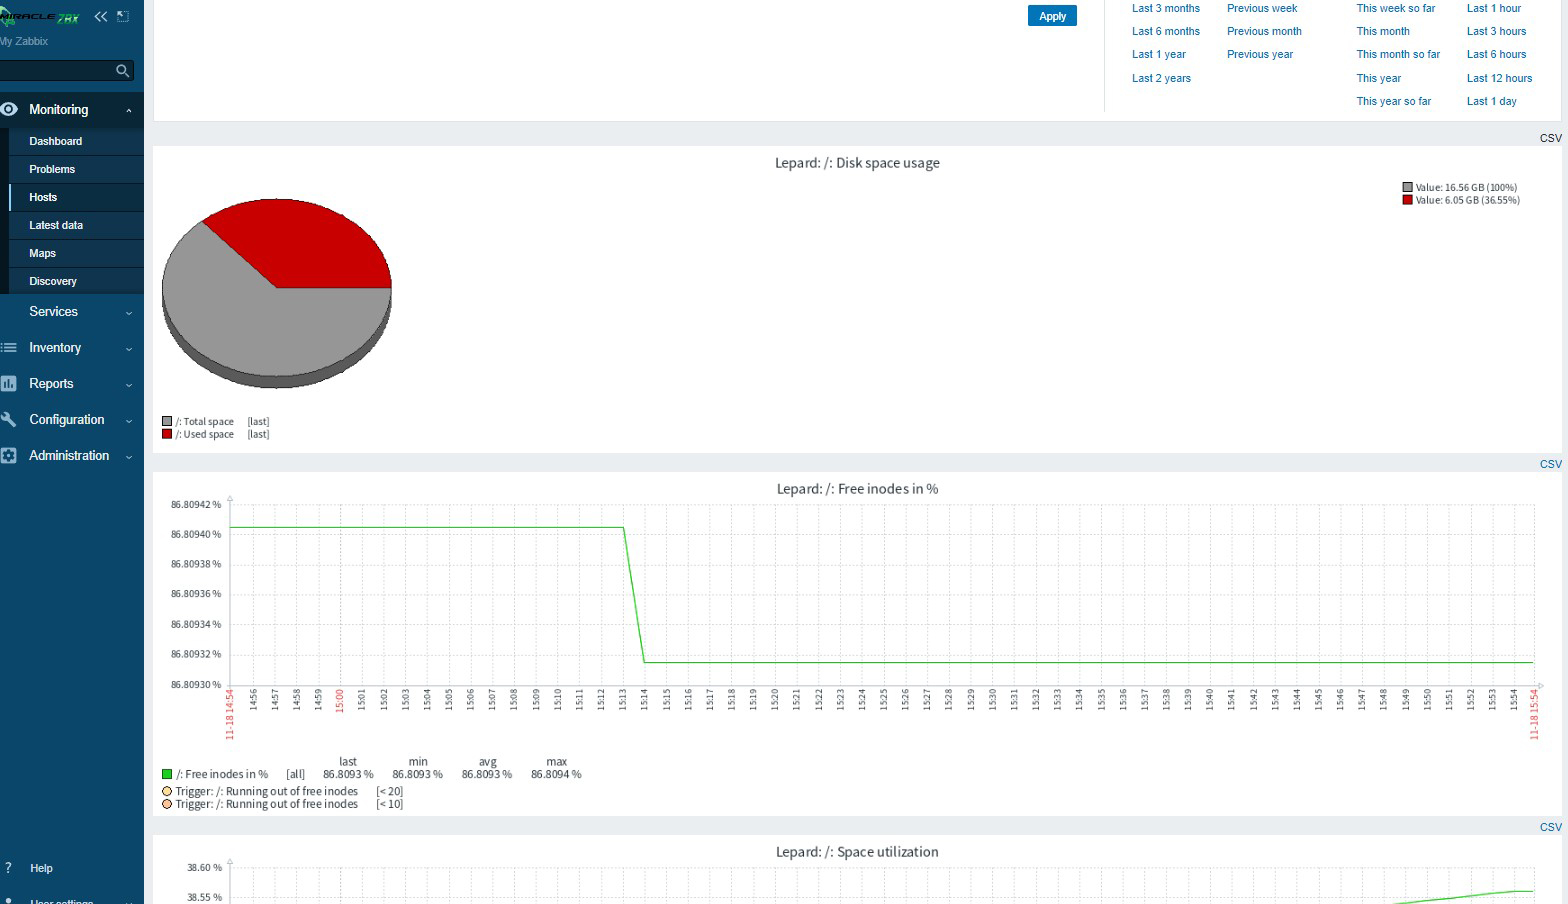
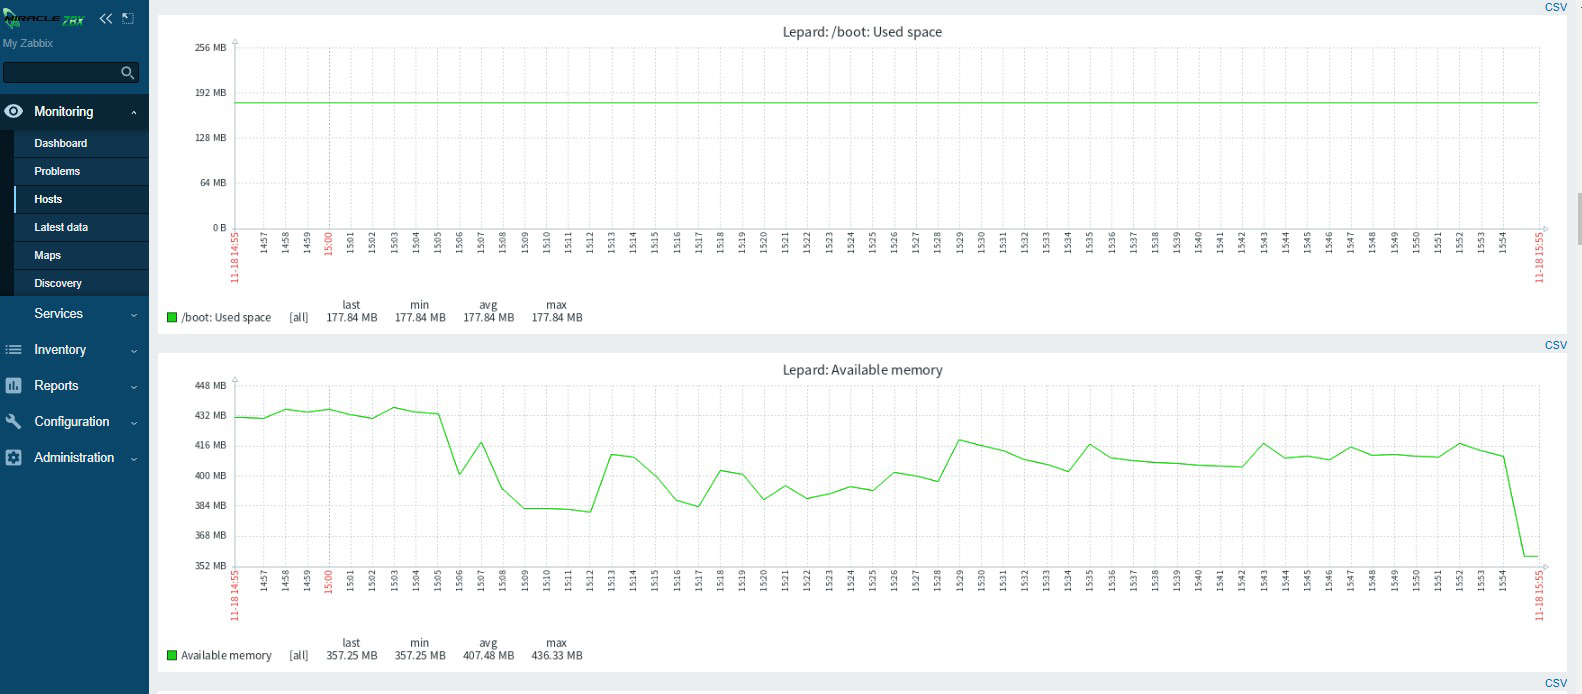
③After some time has passed, various data will be collected and the status of the server can be checked as shown below.
Left side Monitoring > Hosts Click
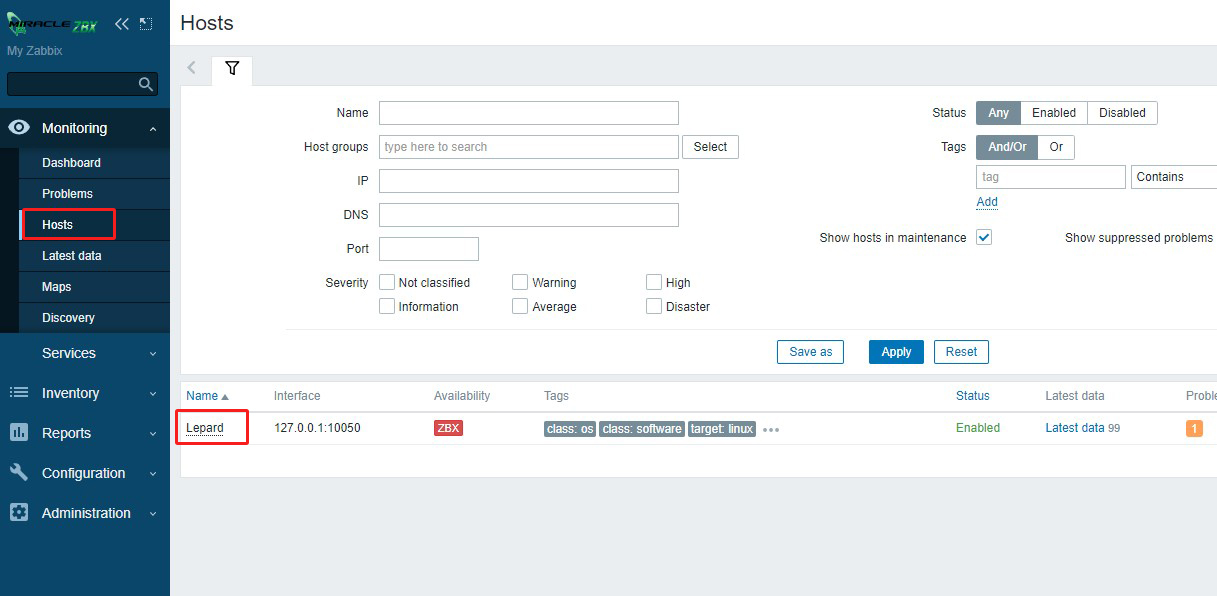
④Click on Lepard Select [Grahs]
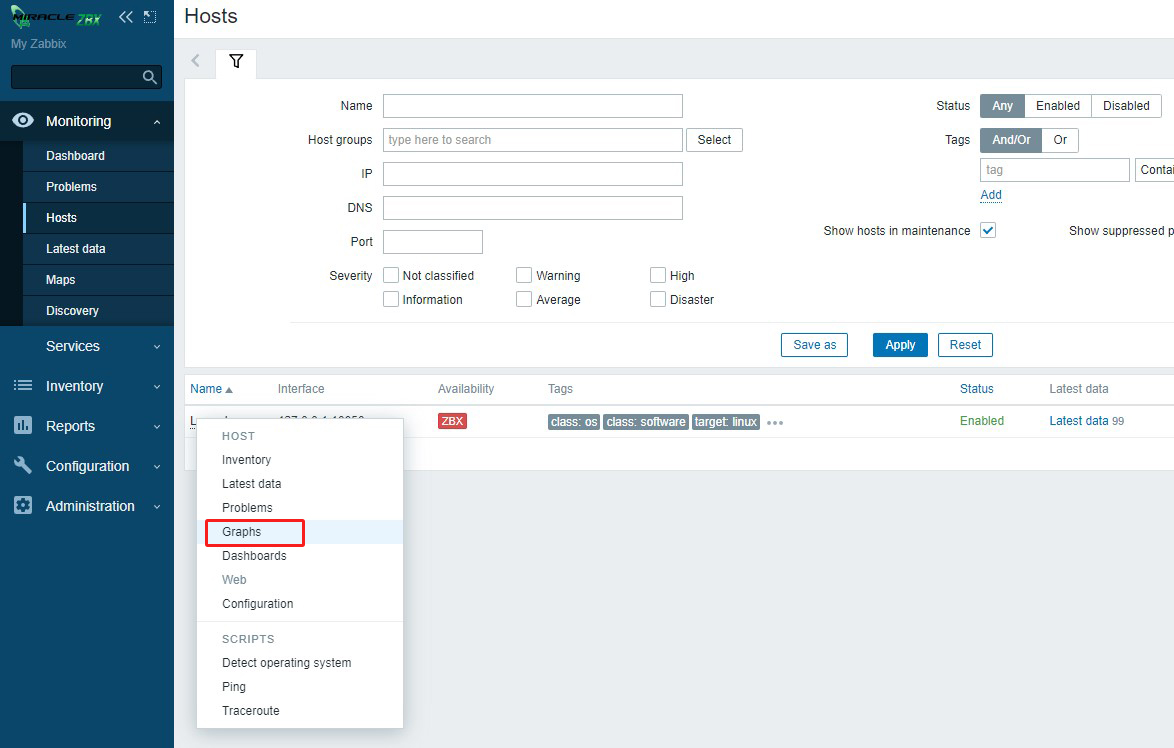
The following monitoring status screen will appear
7. MIRACLE ZBX 6: Add monitored hosts
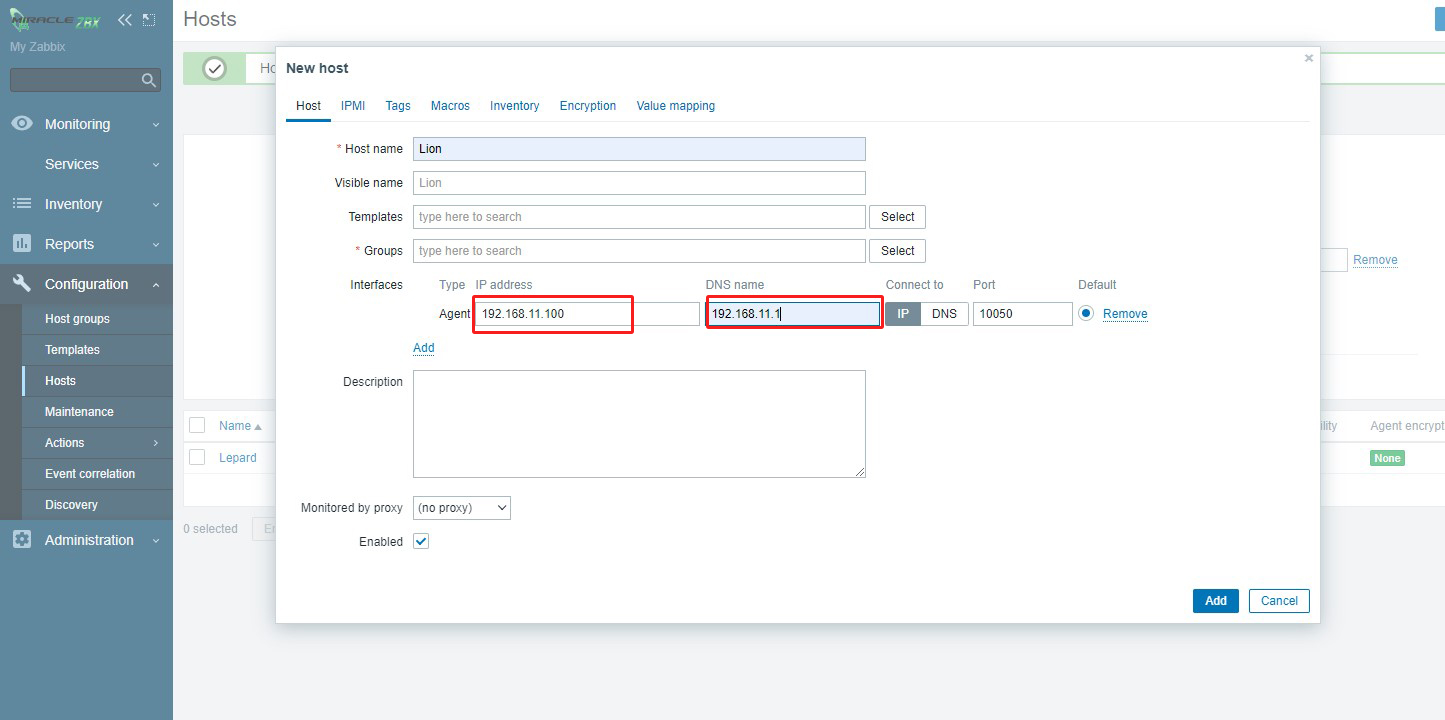
Add a host to be monitored. This time, the following servers will be added as targets.
Server OS : Miracle Linux 8.4
Server IP Address: 192.168.11.100
host name : Lion
7.1 Configuration of monitored servers
MIRACLE ZBX Agent 2 must be installed on the monitored server in the same manner as above, and the ports must be allowed by firewall.
Register dnf repository for MIRACLE ZBX 6.0.
|
1 |
# dnf install https://ftp.miraclelinux.com/zbx/6.0/miracle-zbx-release-6.0-1.noarch.rpm |
Firewall Settings
MIRACLE ZBX Agent 2 : 10050/tcp port allowed
|
1 2 |
# firewall-cmd --permanent --add-port=10050/tcp # firewall-cmd --reload |
Install MIRACLE ZBX Agent 2
|
1 |
# dnf install miracle-zbx-agent2 |
Edit configuration file /etc/zabbix/zabbix_agent2.conf
|
1 2 3 4 5 6 7 |
# vi /etc/zabbix/zabbix_agent2.conf Line 84 Server= 192.168.11.83 [IP address of the MIRACLE ZBX server] Line 137 ServerActive=192.168.11.83 [IP address of the MIRACLE ZBX server] Line 148 Hostname= Lion[Host name to be registered for the MIRACLE ZBX Web front end host] |
Start service zabbix-agent2.
|
1 |
# systemctl enable --now zabbix-agent2 |
7.2 Setting up MIRACLE ZBX
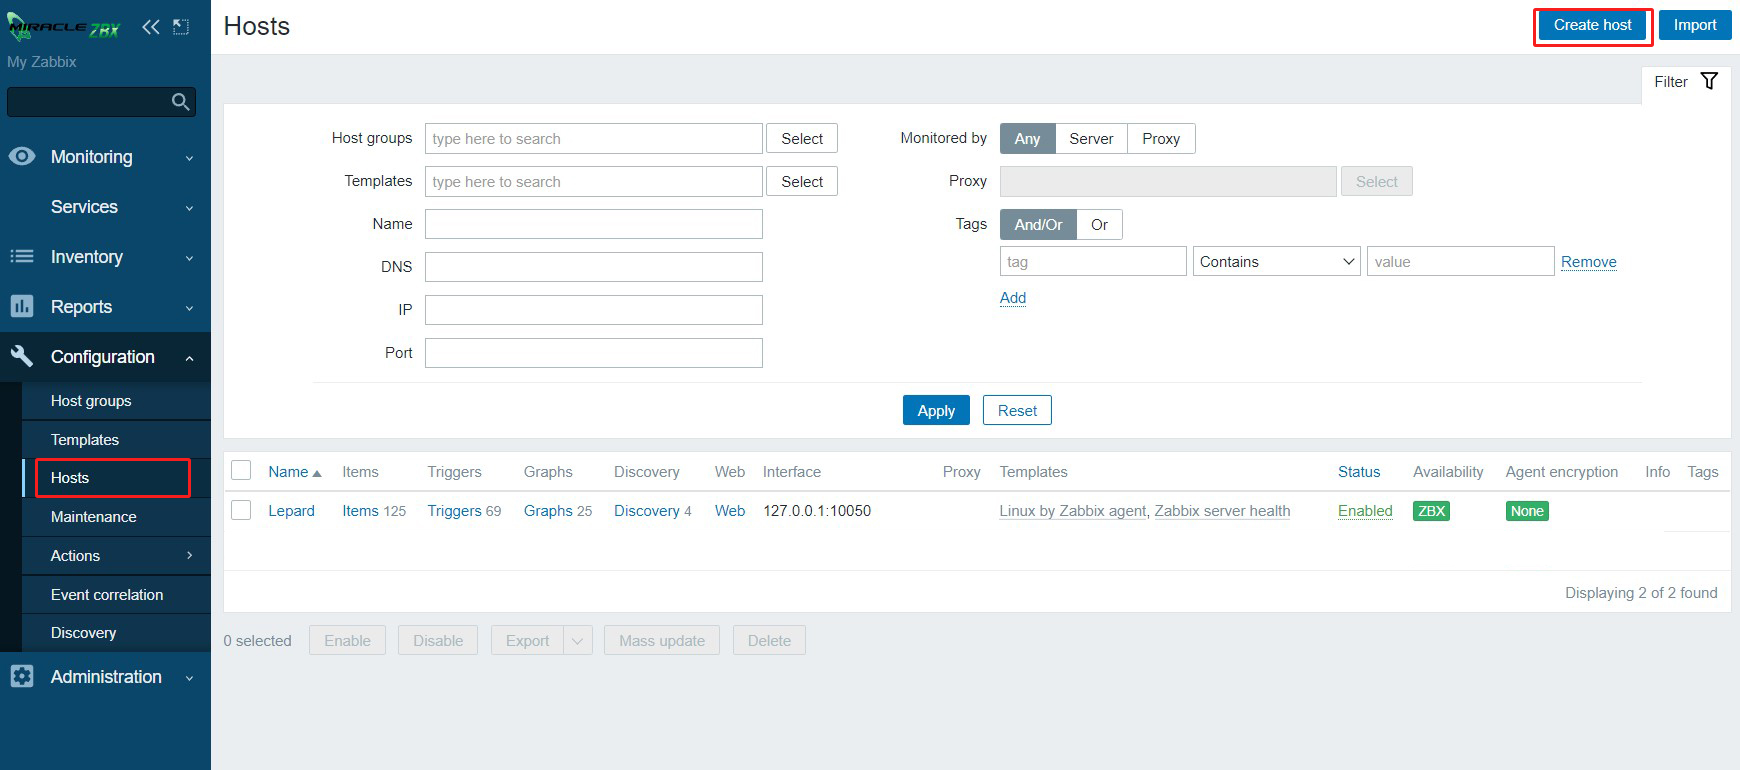
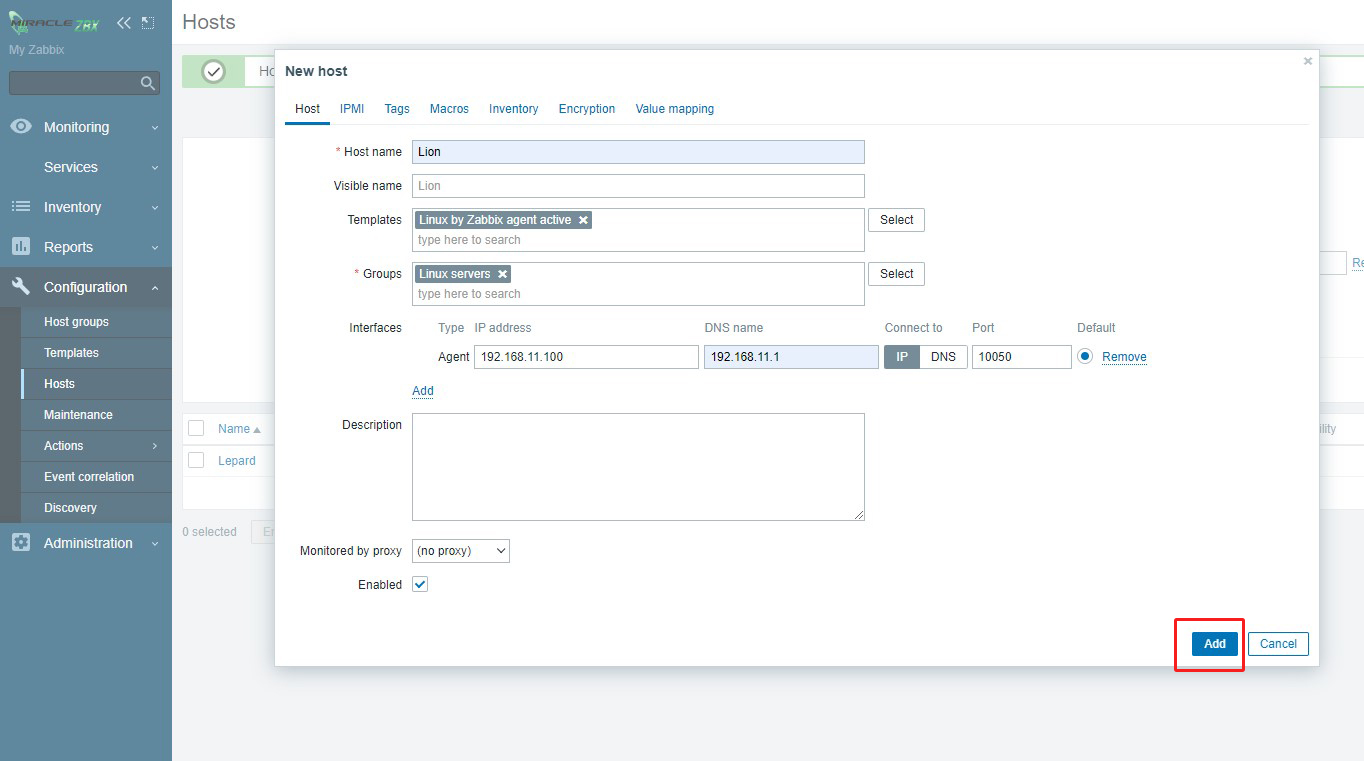
Log in to the MIRACLE ZBX management site, select [Configuration] - [Hosts] in the left pane, and click the [Create Host] button at the top of the right pane.
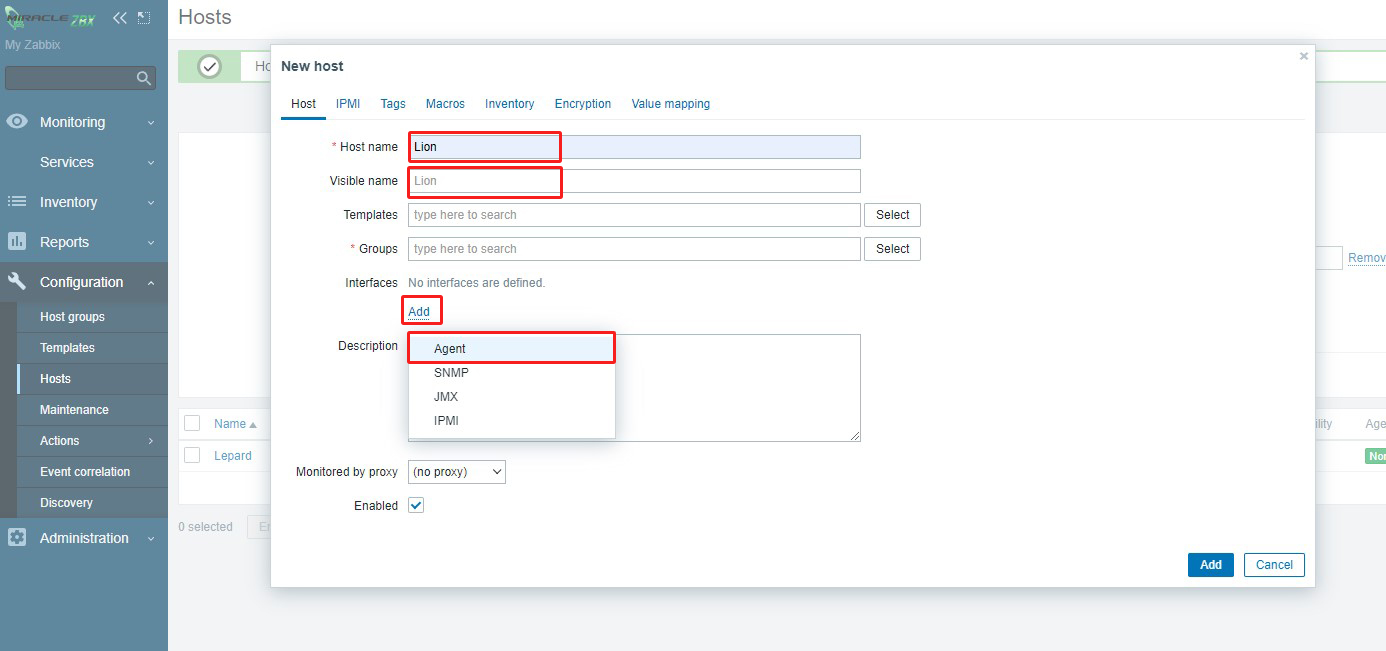
[Visible name] : Any name you wish to have displayed on the admin site
Under [Interfaces], click [Add] and select [Agent]
[DNS name] : IP address of DNS server
Click the [Select] button to the right of [Templates]
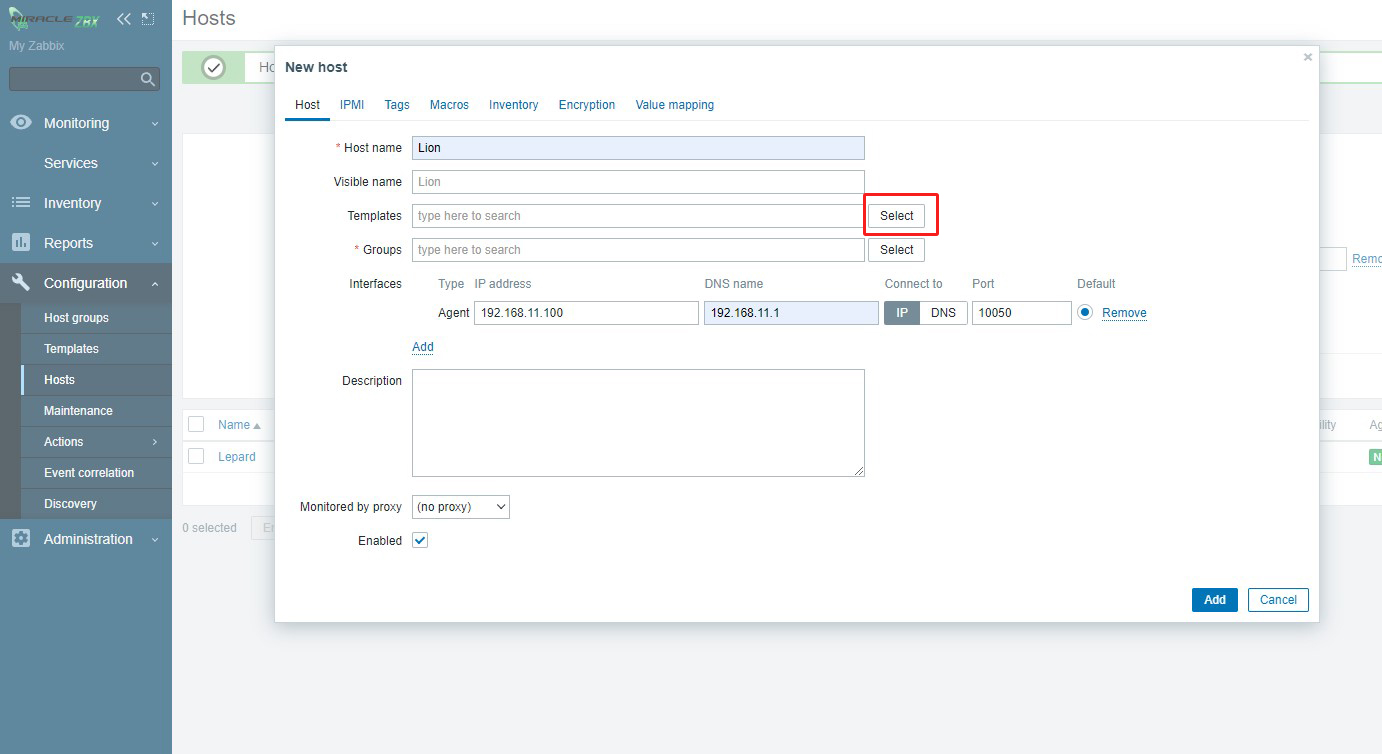
Click the [Select] button
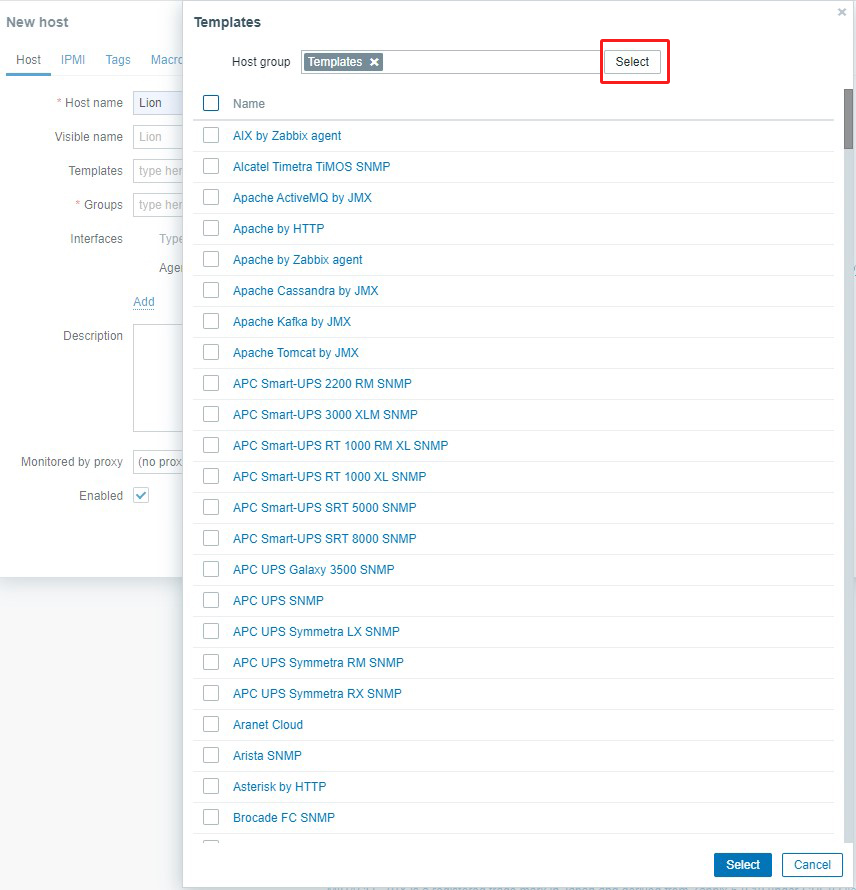
 [Linux by Zabbix agent active] select
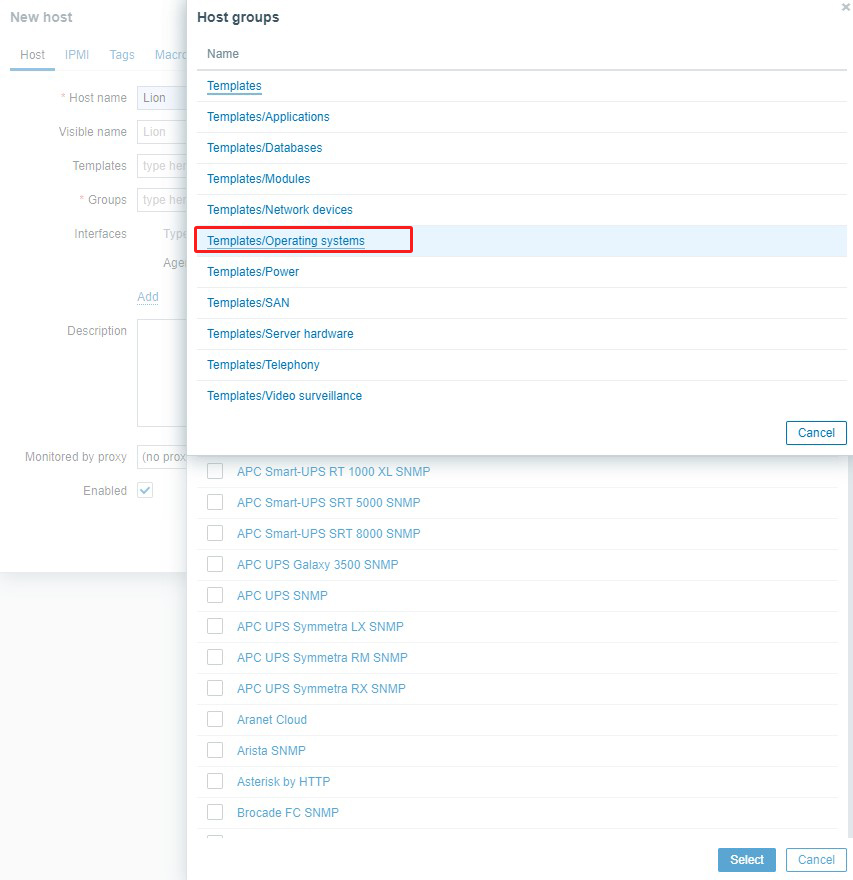
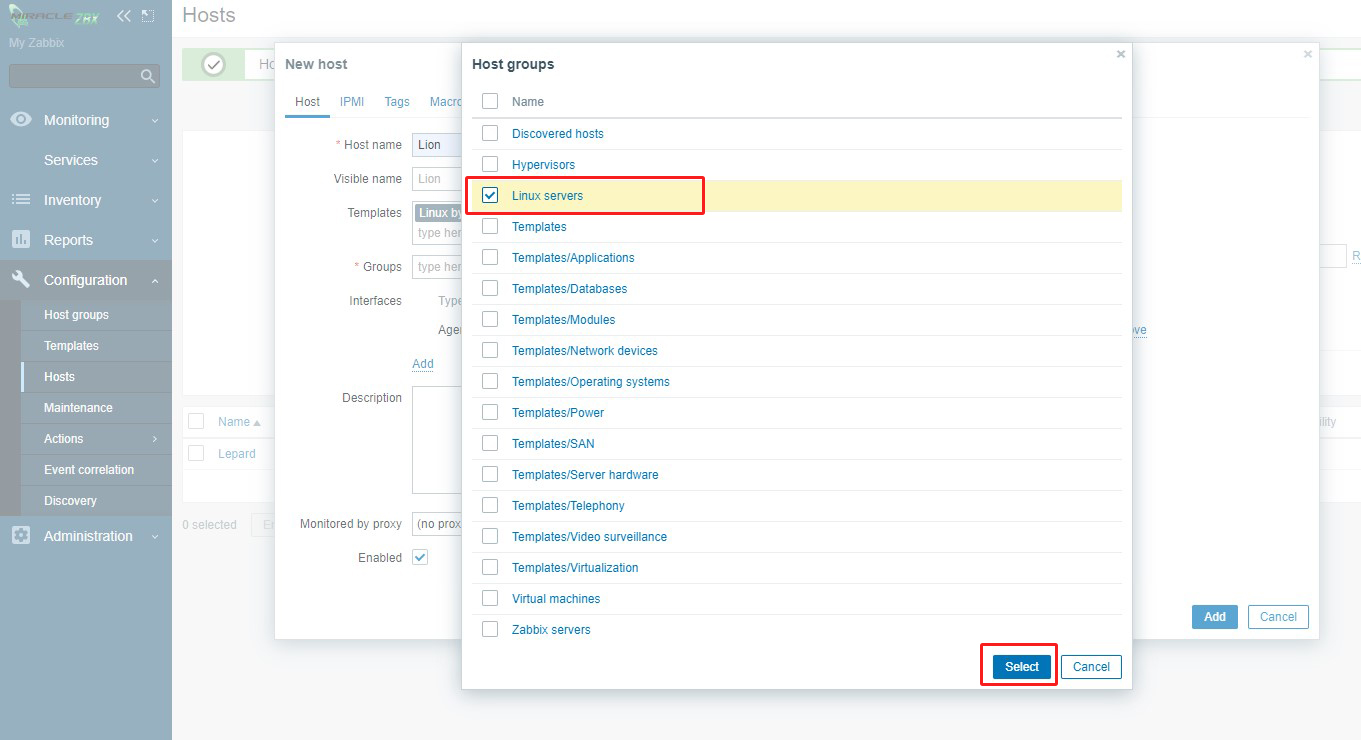
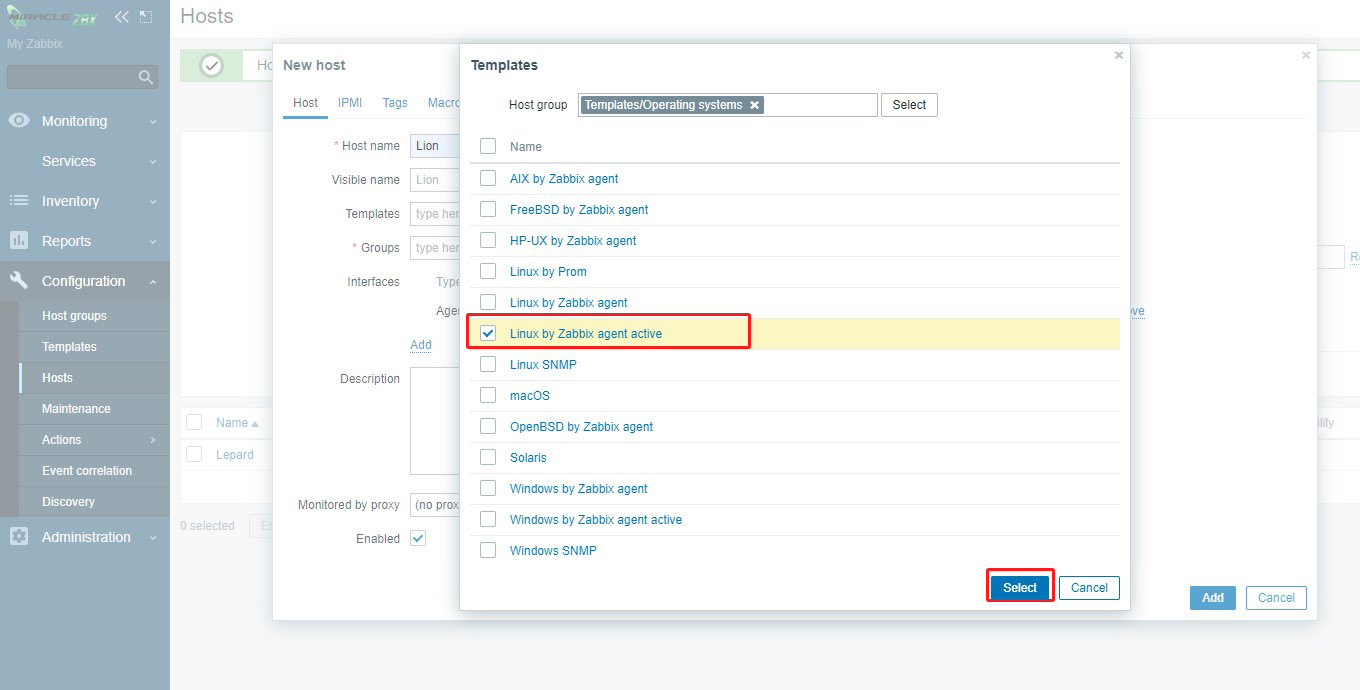 [Linux servers] select
After entering the required configuration items, click the [Add] button.
Monitored hosts have been added
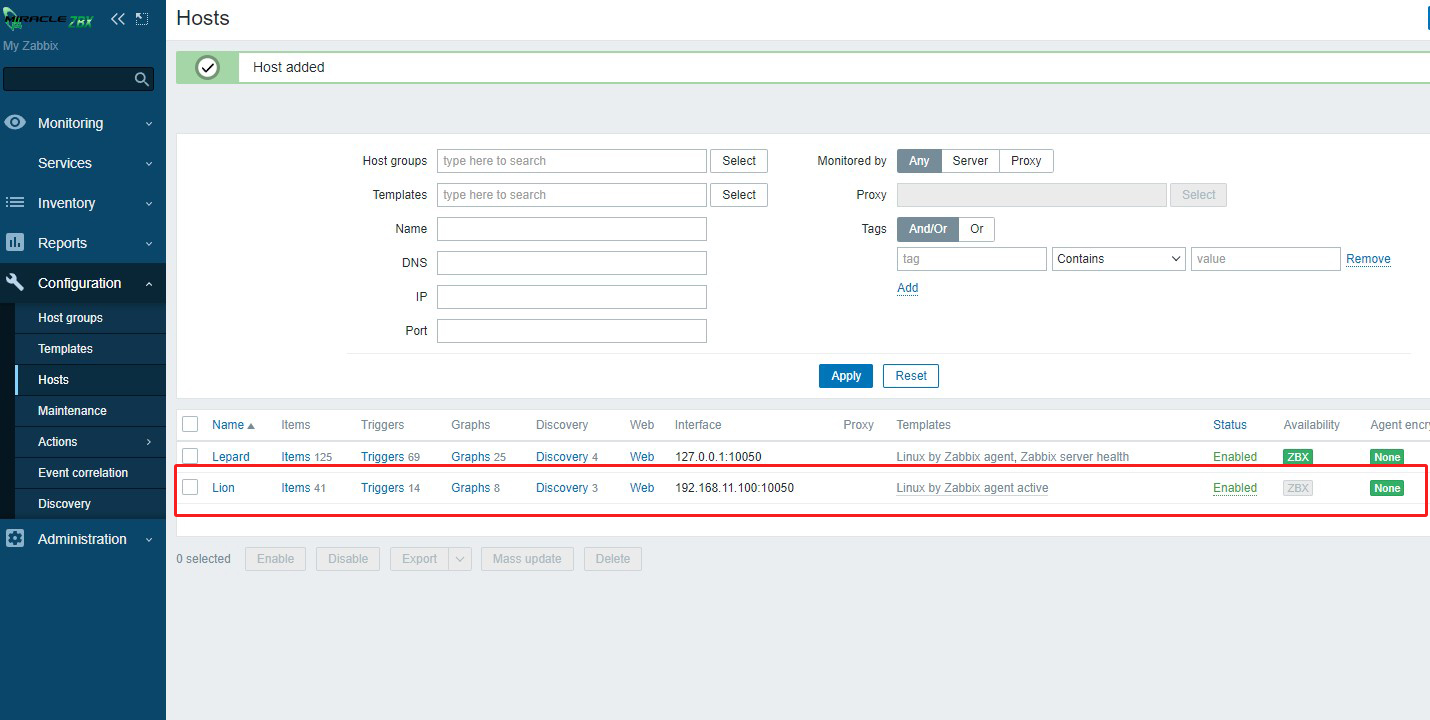
After a few moments, the data for the added target host will be displayed