Nagios Server installed
Nagios is an open source monitoring solution running on Linux.
Nagios is designed to periodically check critical network, application, or server parameters.
These parameters include microprocessor load, number of running processes, log files, disk and memory usage, as well as many other services such as SMTP (Simple Mail Transfer Protocol), HTTP (Hypertext Transfer Protocol), POP3 (Post Office Protocol 3), etc. can be checked.
These parameters require a microprocessor load, a database such as PHP or MySQL to run Nagois, and a web server such as Apache or Nginx. We will proceed under the assumption that all of these have already been configured
1. Install necessary packages
|
1 2 |
# apt update # apt install autoconf gcc libc6 make wget unzip libgd-dev |
2. Installing Nagios Core
①Download
|
1 |
# wget http://deb.debian.org/debian/pool/main/n/nagios4/nagios4_4.4.6.orig.tar.gz |
②Install
|
1 2 3 |
# tar zxvf nagios4_4.4.6.orig.tar.gz # cd nagios-4.4.6 # ./configure |
It appears as follows
|
1 2 3 4 5 6 7 8 9 10 11 12 13 14 15 16 17 18 19 20 21 22 23 24 25 26 27 28 29 30 31 32 33 34 35 36 37 38 39 |
checking build system type... x86_64-pc-linux-gnu checking host system type... x86_64-pc-linux-gnu checking for gcc... gcc checking whether the C compiler works... yes checking for C compiler default output file name... a.out checking for suffix of executables... checking whether we are cross compiling... no checking for suffix of object files... o checking whether we are using the GNU C compiler... yes ------omission----- *** Configuration summary for nagios 4.4.6 2020-04-28 ***: General Options: ------------------------- Nagios executable: nagios Nagios user/group: nagios,nagios Command user/group: nagios,nagios Event Broker: yes Install ${prefix}: /usr/local/nagios Install ${includedir}: /usr/local/nagios/include/nagios Lock file: /run/nagios.lock Check result directory: /usr/local/nagios/var/spool/checkresults Init directory: /lib/systemd/system Apache conf.d directory: /etc/apache2/sites-available Mail program: /usr/bin/mail Host OS: linux-gnu IOBroker Method: epoll Web Interface Options: ------------------------ HTML URL: http://localhost/nagios/ CGI URL: http://localhost/nagios/cgi-bin/ Traceroute (used by WAP): /usr/sbin/traceroute Review the options above for accuracy. If they look okay, type 'make all' to compile the main program and CGIs. |
compile
|
1 |
# make all |
It appears as follows
|
1 2 3 4 5 6 7 8 9 10 11 12 13 14 15 16 17 18 19 20 21 22 23 24 25 26 27 28 29 30 31 32 33 34 35 36 37 38 39 40 41 42 43 44 45 46 47 48 49 50 51 52 53 54 55 56 57 58 59 60 61 62 63 64 65 66 67 68 69 70 71 72 |
*** Compile finished *** If the main program and CGIs compiled without any errors, you can continue with testing or installing Nagios as follows (type 'make' without any arguments for a list of all possible options): make test - This runs the test suite make install - This installs the main program, CGIs, and HTML files make install-init - This installs the init script in /lib/systemd/system make install-daemoninit - This will initialize the init script in /lib/systemd/system make install-groups-users - This adds the users and groups if they do not exist make install-commandmode - This installs and configures permissions on the directory for holding the external command file make install-config - This installs *SAMPLE* config files in /usr/local/nagios/etc You'll have to modify these sample files before you can use Nagios. Read the HTML documentation for more info on doing this. Pay particular attention to the docs on object configuration files, as they determine what/how things get monitored! make install-webconf - This installs the Apache config file for the Nagios web interface make install-exfoliation - This installs the Exfoliation theme for the Nagios web interface make install-classicui - This installs the classic theme for the Nagios web interface *** Support Notes ******************************************* If you have questions about configuring or running Nagios, please make sure that you: - Look at the sample config files - Read the documentation on the Nagios Library at: https://library.nagios.com before you post a question to one of the mailing lists. Also make sure to include pertinent information that could help others help you. This might include: - What version of Nagios you are using - What version of the plugins you are using - Relevant snippets from your config files - Relevant error messages from the Nagios log file For more information on obtaining support for Nagios, visit: https://support.nagios.com ************************************************************* Enjoy. |
Create Nagios Users and Groups
|
1 2 3 |
# make install-groups-users groupadd -r nagios useradd -g nagios nagios |
Add Apache User to Nagios Group
|
1 |
# usermod -aG nagios www-data |
Install Nagios Core
|
1 |
# make install |
Install Nagios init script
|
1 2 3 |
# make install-init /usr/bin/install -c -m 755 -d -o root -g root /lib/systemd/system /usr/bin/install -c -m 755 -o root -g root startup/default-service /lib/systemd/system/nagios.service |
Install external command files and permissions
|
1 2 3 4 5 6 |
# make install-commandmode /usr/bin/install -c -m 775 -o nagios -g nagios -d /usr/local/nagios/var/rw chmod g+s /usr/local/nagios/var/rw *** External command directory configured *** |
Install Nagios Configuration Files
|
1 2 3 4 5 6 |
# make install-config *** Config files installed *** Remember, these are *SAMPLE* config files. You'll need to read the documentation for more information on how to actually define services, hosts, etc. to fit your particular needs. |
Install Apache configuration files for Nagios
|
1 2 3 4 5 6 7 |
# make install-webconf /usr/bin/install -c -m 644 sample-config/httpd.conf /etc/apache2/sites-available/nagios.conf if [ 1 -eq 1 ]; then \ ln -s /etc/apache2/sites-available/nagios.conf /etc/apache2/sites-enabled/nagios.conf; \ fi *** Nagios/Apache conf file installed *** |
3. Install Nagios Plugin
①Download the latest code from the Nagios Plugins page
|
1 |
# wget https://nagios-plugins.org/download/nagios-plugins-2.4.9.tar.gz |
②Install
|
1 2 3 4 5 |
# tar -xvf nagios-plugins-2.4.9.tar.gz # cd nagios-plugins-2.4.9 # ./configure --with-nagios-user=nagios --with-nagios-group=nagios # make # make install |
③Create necessary directories
|
1 2 |
# mkdir -p /usr/local/nagios/var/spool/checkresults # chown -R nagios:nagios /usr/local/nagios/var/spool/checkresults |
4. Creating a Nagios Web User
Create a user account to access the Nagios Web Dashboard. This user account is used for authentication.
The default name of the user is nagiosadmin, which is defined as the preferred user name in the /usr/local/nagios/etc/cgi.cfg file.
|
1 2 3 4 |
# htpasswd -c /usr/local/nagios/etc/htpasswd.users nagiosadmin New password: [password] Re-type new password: [again password] Adding password for user nagiosadmin |
Set ownership and permissions
|
1 2 |
# chown www-data:www-data /usr/local/nagios/etc/htpasswd.users # chmod 640 /usr/local/nagios/etc/htpasswd.users |
Restart Apache
|
1 |
# systemctl restart apache2 |
Allow HTTP service port in firewall
|
1 2 |
# ufw allow http # ufw reload |
Start and Enable Nagios Services
|
1 2 |
# systemctl enable nagios --now Created symlink /etc/systemd/system/multi-user.target.wants/nagios.service → /lib/systemd/system/nagios.service. |
Reboot system
|
1 |
# shutdown -r now |
Confirmation of service execution
|
1 2 3 4 5 6 7 8 9 10 11 12 13 14 15 16 17 18 19 20 21 22 23 24 25 26 27 |
# systemctl status nagios ● nagios.service - Nagios Core 4.4.6 Loaded: loaded (/lib/systemd/system/nagios.service; enabled; preset: enabled) Active: active (running) since Sat 2024-11-23 12:28:22 JST; 25s ago Docs: https://www.nagios.org/documentation Process: 839 ExecStartPre=/usr/local/nagios/bin/nagios -v /usr/local/nagios/etc/nagios.cfg (c> Process: 859 ExecStart=/usr/local/nagios/bin/nagios -d /usr/local/nagios/etc/nagios.cfg (code> Main PID: 865 (nagios) Tasks: 6 (limit: 2264) Memory: 7.8M CPU: 41ms CGroup: /system.slice/nagios.service ├─865 /usr/local/nagios/bin/nagios -d /usr/local/nagios/etc/nagios.cfg ├─874 /usr/local/nagios/bin/nagios --worker /usr/local/nagios/var/rw/nagios.qh ├─875 /usr/local/nagios/bin/nagios --worker /usr/local/nagios/var/rw/nagios.qh ├─876 /usr/local/nagios/bin/nagios --worker /usr/local/nagios/var/rw/nagios.qh ├─877 /usr/local/nagios/bin/nagios --worker /usr/local/nagios/var/rw/nagios.qh └─883 /usr/local/nagios/bin/nagios -d /usr/local/nagios/etc/nagios.cfg Nov 23 12:28:22 Lepard nagios[865]: qh: Socket '/usr/local/nagios/var/rw/nagios.qh' successfully > Nov 23 12:28:22 Lepard nagios[865]: qh: core query handler registered Nov 23 12:28:22 Lepard nagios[865]: qh: echo service query handler registered Nov 23 12:28:22 Lepard nagios[865]: qh: help for the query handler registered Nov 23 12:28:22 Lepard nagios[865]: wproc: Successfully registered manager as @wproc with query h> Nov 23 12:28:22 Lepard nagios[865]: wproc: Registry request: name=Core Worker 874;pid=874 Nov 23 12:28:22 Lepard nagios[865]: wproc: Registry request: name=Core Worker 875;pid=875 |
5. Access the Nagios Web Interface
Access http://[IP_Address]/nagios/ with any browser
Username : nagoisadmin
Password : Password specified when the user was created above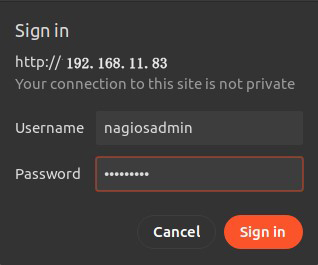
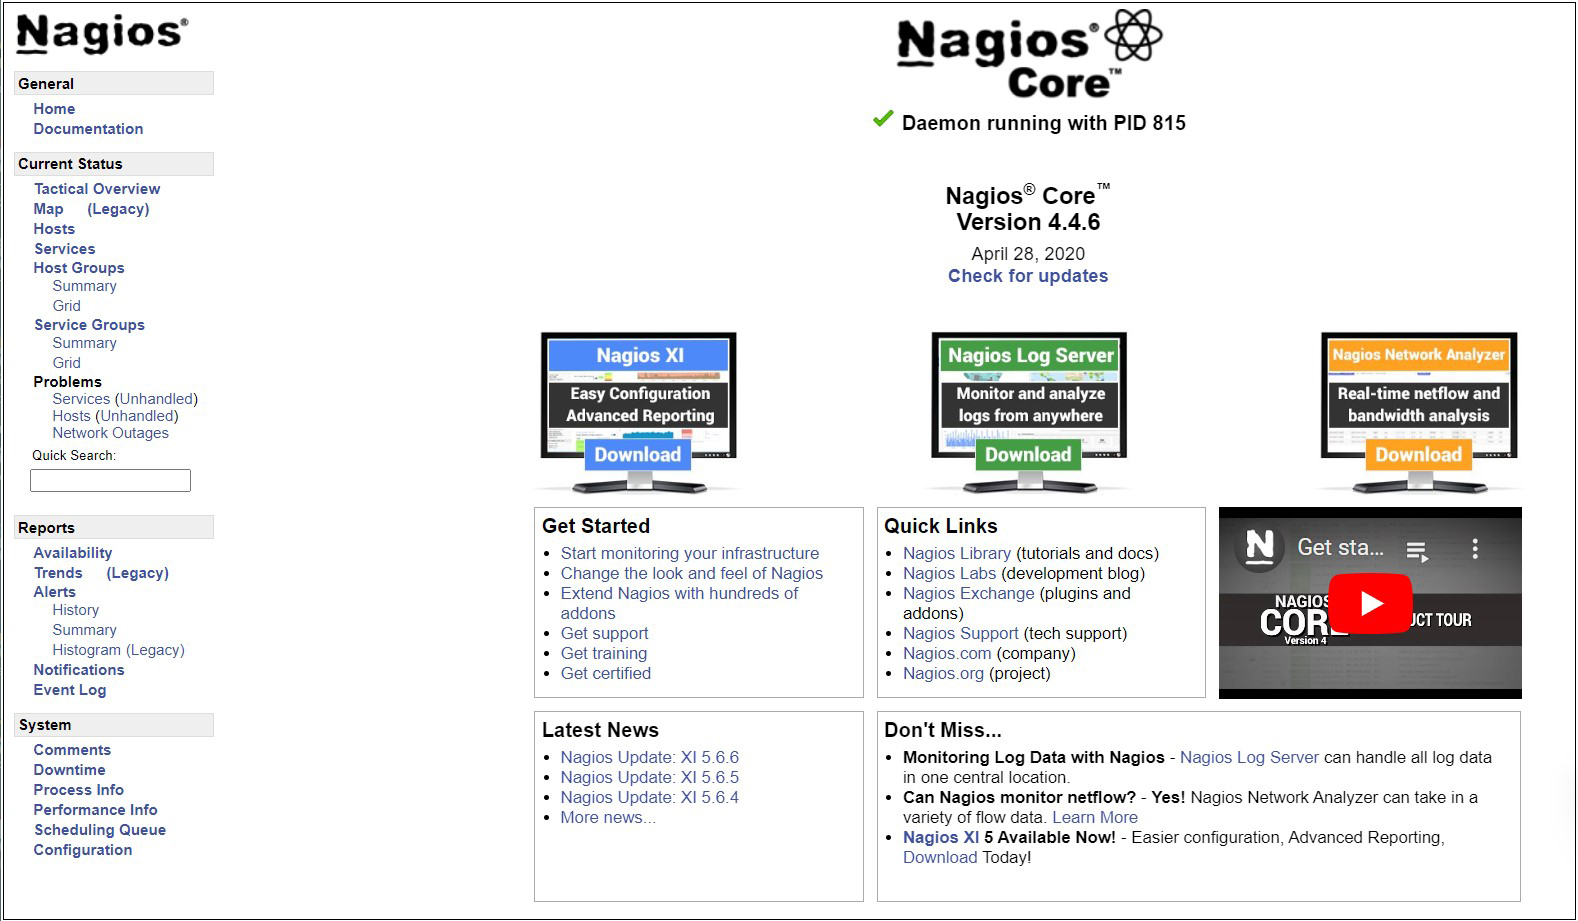
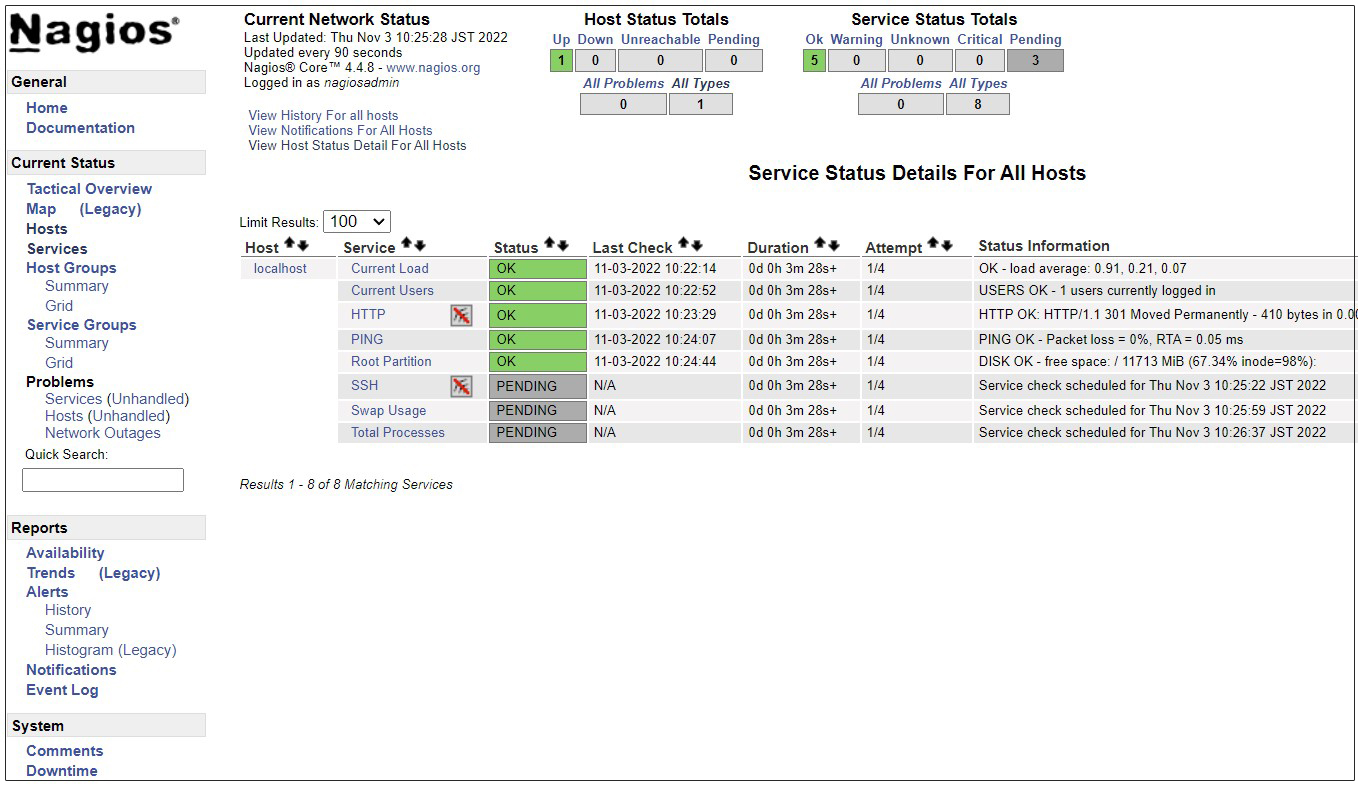
After successful login, the following dashboard will appear
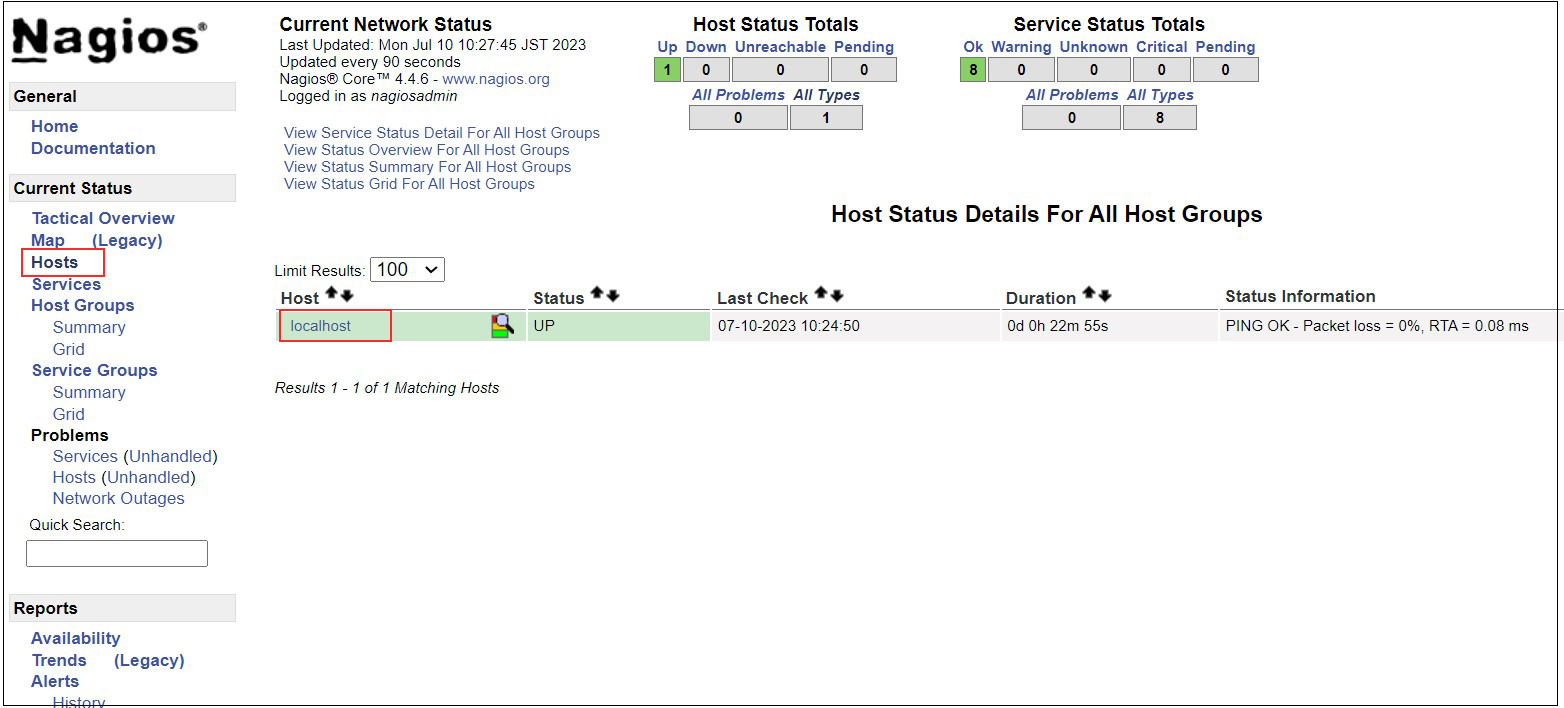
Show host availability
Click on [Hosts] in the left menu
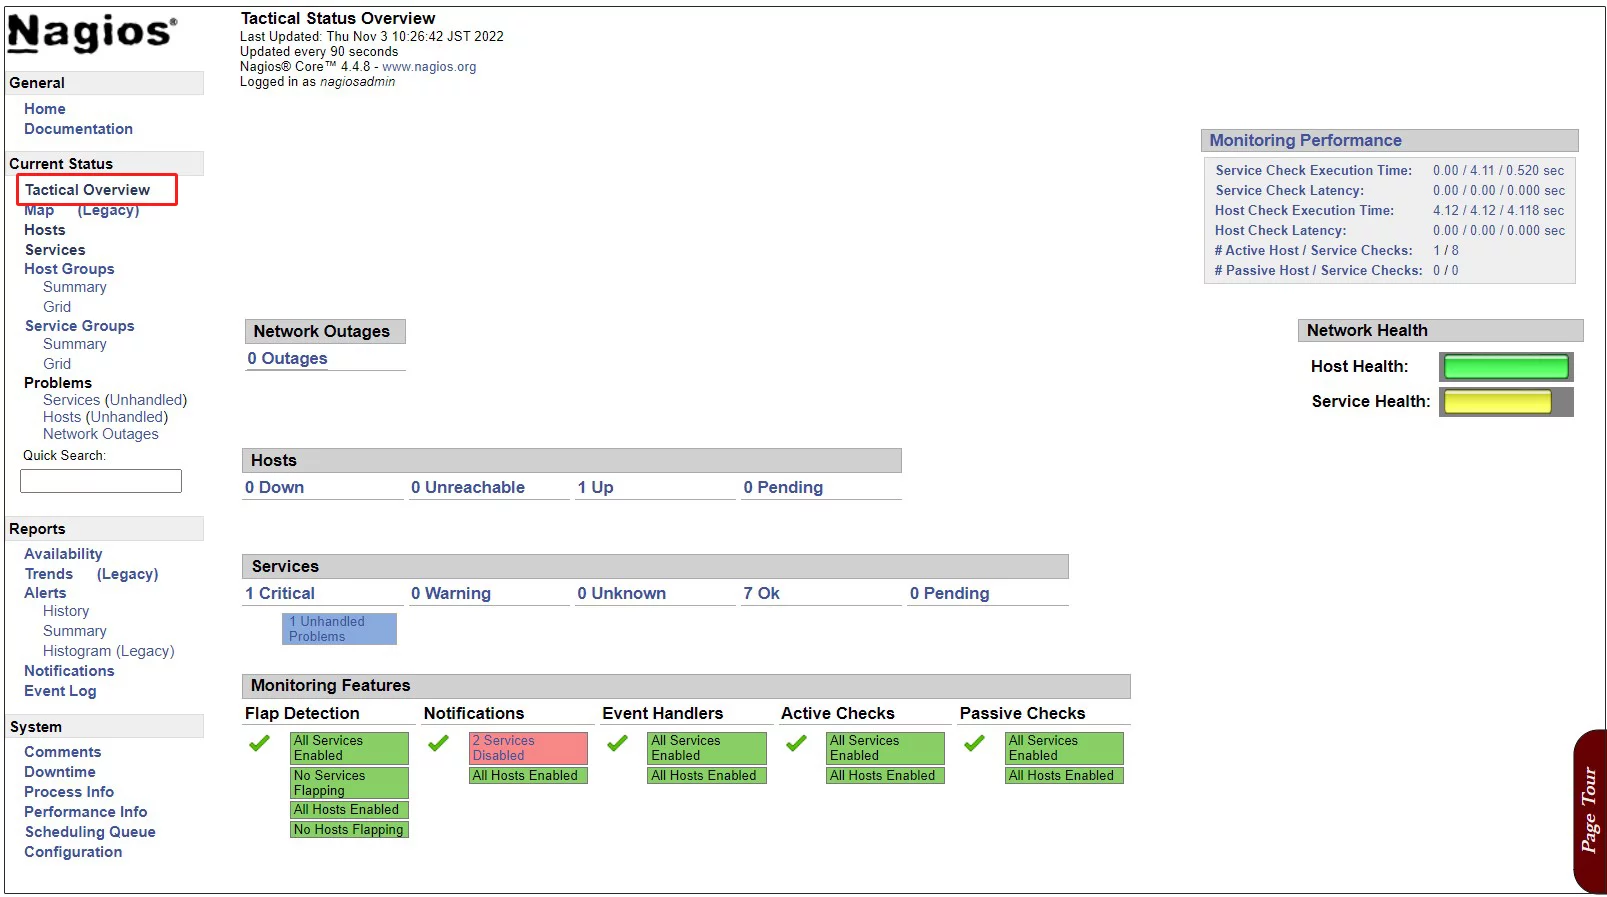
Click [Tactical Overview] on the left menu to view the monitoring data
Click [Current Status] [Services] on the left menu
6. Nagios Agent Configuration
To monitor the agent. Install the following
• Nagios plugins for data collection
• NRPE Agent to run plugins
6.1 Installing Nagios plugins
|
1 2 3 4 5 6 7 8 |
# wget https://github.com/nagios-plugins/nagios-plugins/archive/refs/heads/master.zip # unzip master.zip # cd nagios-plugins-master # ./tools/setup # ./configure # make # make install |
The Nagios plugin is located in the /usr/local/nagios/libexec/ directory.
List this directory to see all available plug-ins in the system.
|
1 |
# ls /usr/local/nagios/libexec/ |
The following nagios-plugins are available
|
1 2 3 4 5 6 7 8 9 10 11 12 13 14 15 16 |
check_apt check_ide_smart check_ntp_peer check_ssmtp check_breeze check_ifoperstatus check_ntp_time check_swap check_by_ssh check_ifstatus check_nwstat check_tcp check_clamd check_imap check_oracle check_time check_cluster check_ircd check_overcr check_udp check_dhcp check_jabber check_ping check_ups check_dig check_load check_pop check_uptime check_disk check_log check_procs check_users check_disk_smb check_mailq check_real check_wave check_dns check_mrtg check_rpc negate check_dummy check_mrtgtraf check_sensors remove_perfdata check_file_age check_nagios check_simap urlize check_flexlm check_nntp check_smtp utils.pm check_ftp check_nntps check_spop utils.sh check_http check_nt check_ssh check_icmp check_ntp check_ssl_validity |
Restart Nagios daemon to apply installed plugins
|
1 |
# systemctl restart nagios.service |
6.2 Installing Nagios NRPE Agent
NRPE agent available in default Debian repository
|
1 2 3 4 5 6 7 |
# apt-cache policy nagios-nrpe-server nagios-nrpe-server: Installed: (none) Candidate: 4.1.0-1+b1 Version table: 4.1.0-1+b1 500 500 http://deb.debian.org/debian bookworm/main amd64 Packages |
|
1 |
# apt install nagios-nrpe-server |
Version Check
|
1 2 3 |
# nrpe -V NRPE - Nagios Remote Plugin Executor Version: 4.1.0 |
Start and activate the service
|
1 2 3 4 |
# systemctl enable --now nagios-nrpe-server Synchronizing state of nagios-nrpe-server.service with SysV service script with /lib/systemd/systemd-sysv-install. Executing: /lib/systemd/systemd-sysv-install enable nagios-nrpe-server |
Check if the service is running
|
1 2 3 4 5 6 7 8 9 10 11 12 13 14 15 16 17 18 19 |
# systemctl status nagios-nrpe-server ● nagios-nrpe-server.service - Nagios Remote Plugin Executor Loaded: loaded (/lib/systemd/system/nagios-nrpe-server.service; enabled; preset: enabled) Active: active (running) since Sat 2024-11-23 12:37:25 JST; 40s ago Docs: http://www.nagios.org/documentation Main PID: 15698 (nrpe) Tasks: 1 (limit: 2264) Memory: 1.2M CPU: 14ms CGroup: /system.slice/nagios-nrpe-server.service └─15698 /usr/sbin/nrpe -c /etc/nagios/nrpe.cfg -f Nov 23 12:37:25 Lepard systemd[1]: Started nagios-nrpe-server.service - Nagios Remote Plugin Exec> Nov 23 12:37:25 Lepard nrpe[15698]: Starting up daemon Nov 23 12:37:25 Lepard nrpe[15698]: Server listening on 0.0.0.0 port 5666. Nov 23 12:37:25 Lepard nrpe[15698]: Server listening on :: port 5666. Nov 23 12:37:25 Lepard nrpe[15698]: Listening for connections on port 5666 Nov 23 12:37:25 Lepard nrpe[15698]: Allowing connections from: 127.0.0.1,::1 |
Allow services to pass through the firewall
NRPE uses TCP port 5666 by default.
|
1 2 |
# ufw allow 5666/tcp # ufw reload |
Check if port 5666/tcp is listening
|
1 2 3 4 |
# ss -altnp | grep 5666 LISTEN 0 5 0.0.0.0:5666 0.0.0.0:* users:(("nrpe",pid=18199,fd=4)) LISTEN 0 5 [::]:5666 [::]:* users:(("nrpe",pid=18199,fd=5)) |
7. Adding a monitored host
Add the following server to the host and configure it as a target for simple ping death/activity monitoring
OS : Ubuntu24.04
IP Address : 192.168.11.200
7.1 Configuration File Editing
|
1 2 3 |
# vi /usr/local/nagios/etc/nagios.cfg Line 51 cfg_dir=/usr/local/nagios/etc/servers Uncomment |
7.2 Directory Create
|
1 2 3 |
# mkdir /usr/local/nagios/etc/servers # chgrp nagios /usr/local/nagios/etc/servers # chmod 750 /usr/local/nagios/etc/servers |
7.3 Create new definition file
|
1 2 3 4 5 6 7 8 9 10 11 12 13 14 |
# vi /usr/local/nagios/etc/servers/korodes.cfg define host { use linux-server host_name korodes alias korodes address 192.168.11.200 } define service { use generic-service host_name korodes service_description PING check_command check_ping!100.0,20%!500.0,60% } |
7.4 Restart Nagios server
|
1 |
# systemctl restart nagios.service |
Log in to the Nagios server (http://[server IP address]/nagios) and look at Hosts, and the host is added.
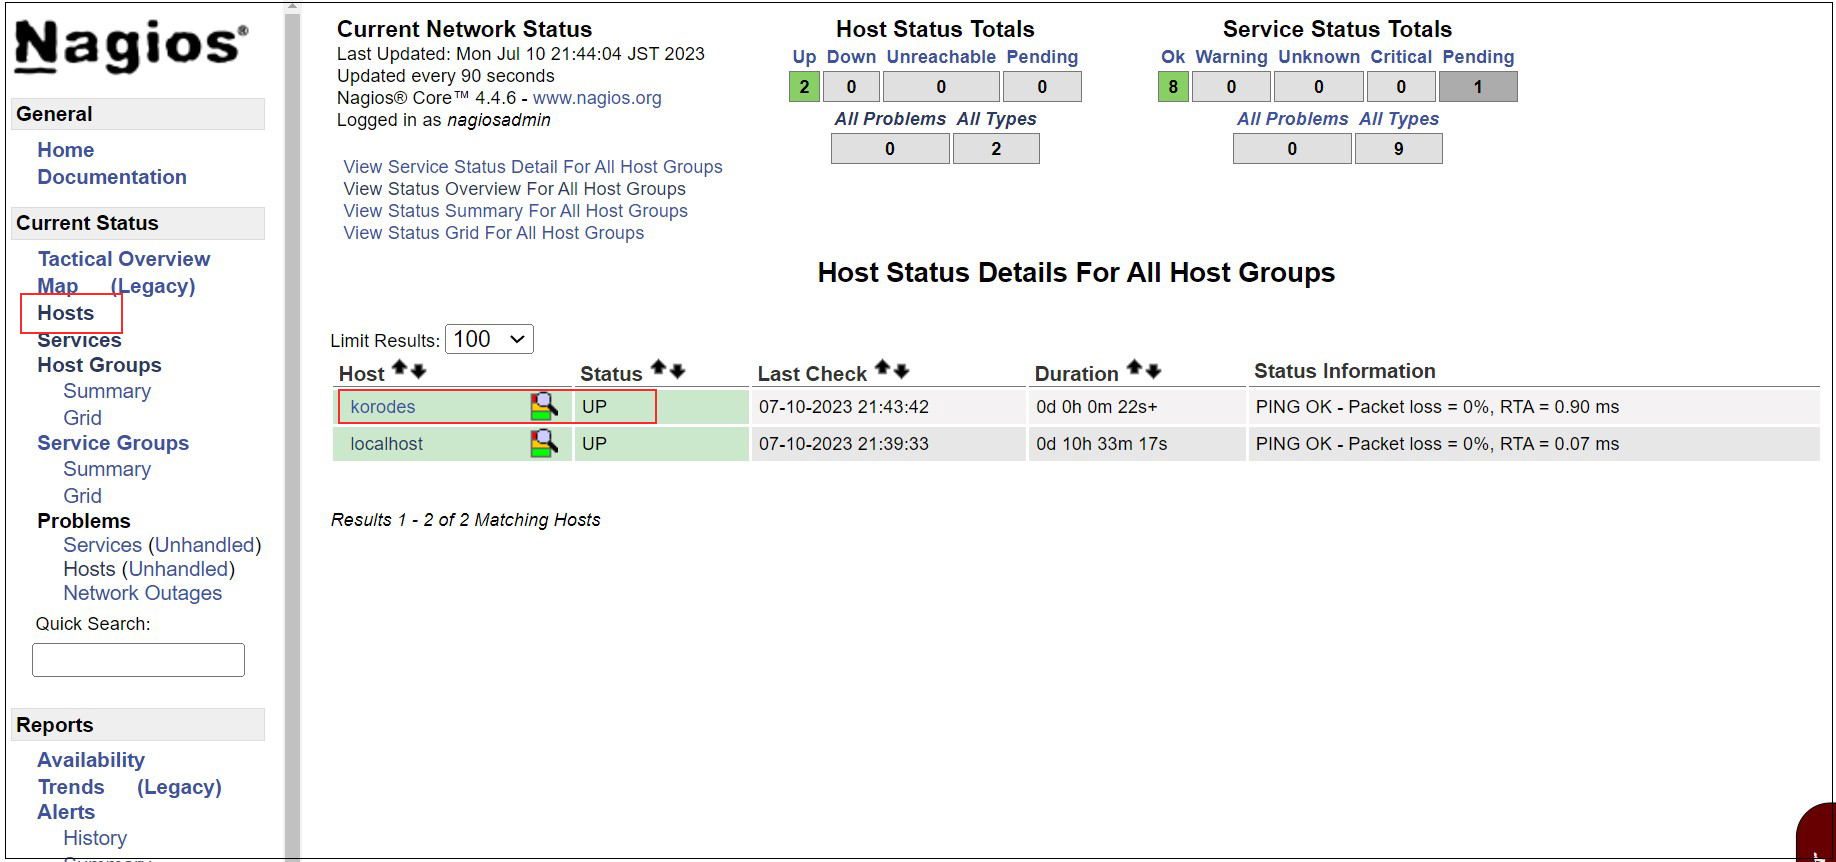
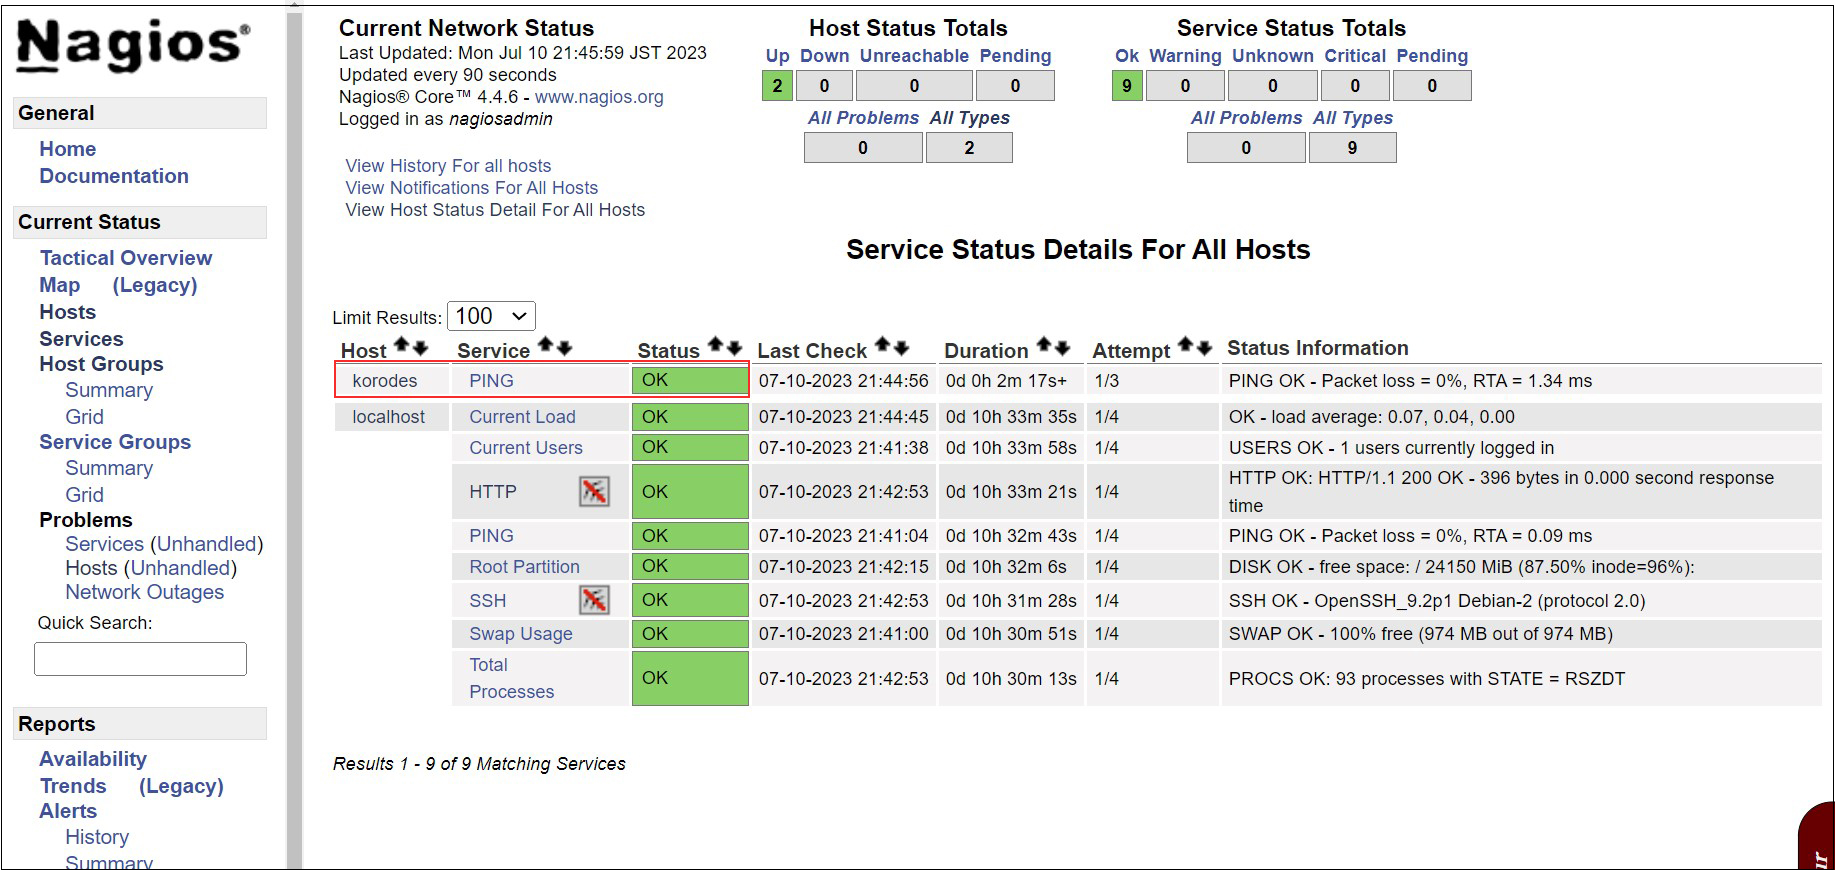
8. Adding Monitoring Services
Add monitoring services to the hosts added above.
OS : Ubuntu24.04
IPアドレス : 192.168.11.200
Services to be added
[check_users]
[check_load]
[check_disk]
[check_procs]
8.1 Configuration on the server to be monitored
8.1.1 Agent installed on monitored hosts
Install nrpe and typical service plugins from EPEL
|
1 |
# apt install nagios-nrpe-server |
8.1.2 Configuration File Editing
|
1 2 3 4 5 6 7 8 9 10 11 12 13 14 15 |
# vi /etc/nagios/nrpe.cfg # Line 106 : Add a host to allow connections (specify Nagios server) allowed_hosts=127.0.0.1,::1,192.168.11.83 # Line 122 : Allow command arguments dont_blame_nrpe=1 # Line 302 : Comment and add to line 303 command[check_users]=/usr/lib64/nagios/plugins/check_users -w 5 -c 10 command[check_load]=/usr/lib64/nagios/plugins/check_load -r -w .15,.10,.05 -c .30,.25,.20 #command[check_hda1]=/usr/lib64/nagios/plugins/check_disk -w 20% -c 10% -p /dev/hda1 command[check_disk]=/usr/lib/nagios/plugins/check_disk -w 20% -c 10% -p / command[check_zombie_procs]=/usr/lib64/nagios/plugins/check_procs -w 5 -c 10 -sZ command[check_total_procs]=/usr/lib64/nagios/plugins/check_procs -w 150 -c 200 |
8.1.3 nrpe server activation and startup
|
1 2 |
# systemctl enable --now nrpe # systemctl start nrpe |
8.1.4 Open NRPE ports 5666/tcp and 5666/udp on firewall
|
1 2 3 |
# firewall-cmd --add-port=5666/tcp --permanent # firewall-cmd --add-port=5666/udp --permanent # firewall-cmd --reload |
8.2 Nagios Server Side Configuration
8.2.1 nrpe plugin installation
|
1 |
# apt install nagios-nrpe-plugin |
8.2.2 Copy to nagios plugin directory
|
1 |
# cp /usr/lib/nagios/plugins/check_nrpe /usr/local/nagios/libexec/ |
8.2.3 commands.cfg edit
|
1 2 3 4 5 6 7 |
# vi /usr/local/nagios/etc/objects/commands.cfg # Add to the last line define command { command_name check_nrpe command_line $USER1$/check_nrpe -H $HOSTADDRESS$ -c $ARG1$ } |
8.2.4 Edit and add korodes.cfg created when you added the host earlier
|
1 2 3 4 5 6 7 8 9 10 11 12 13 14 15 16 17 18 19 20 21 22 23 24 25 26 27 28 29 30 |
# vi /usr/local/nagios/etc/servers/korodes.cfg # Add the following define service { use generic-service host_name korodes service_description Root Partition check_command check_nrpe_larg!check_disk\!20%\!10%\!/ } define service { use generic-service host_name korodes service_description Current Users check_command check_nrpe_larg!check_users\!20\!50 } define service { use generic-service host_name korodes service_description Total Processes check_command check_nrpe_larg!check_procs\!250\!400\!RSZDT } define service { use generic-service host_name korodes service_description Current Load check_command check_nrpe_larg!check_load\!5.0,4.0,3.0\!10.0,6.0,4.0 } |
8.2.5 Restart Nagios
|
1 |
# systemctl restart nagios.service |
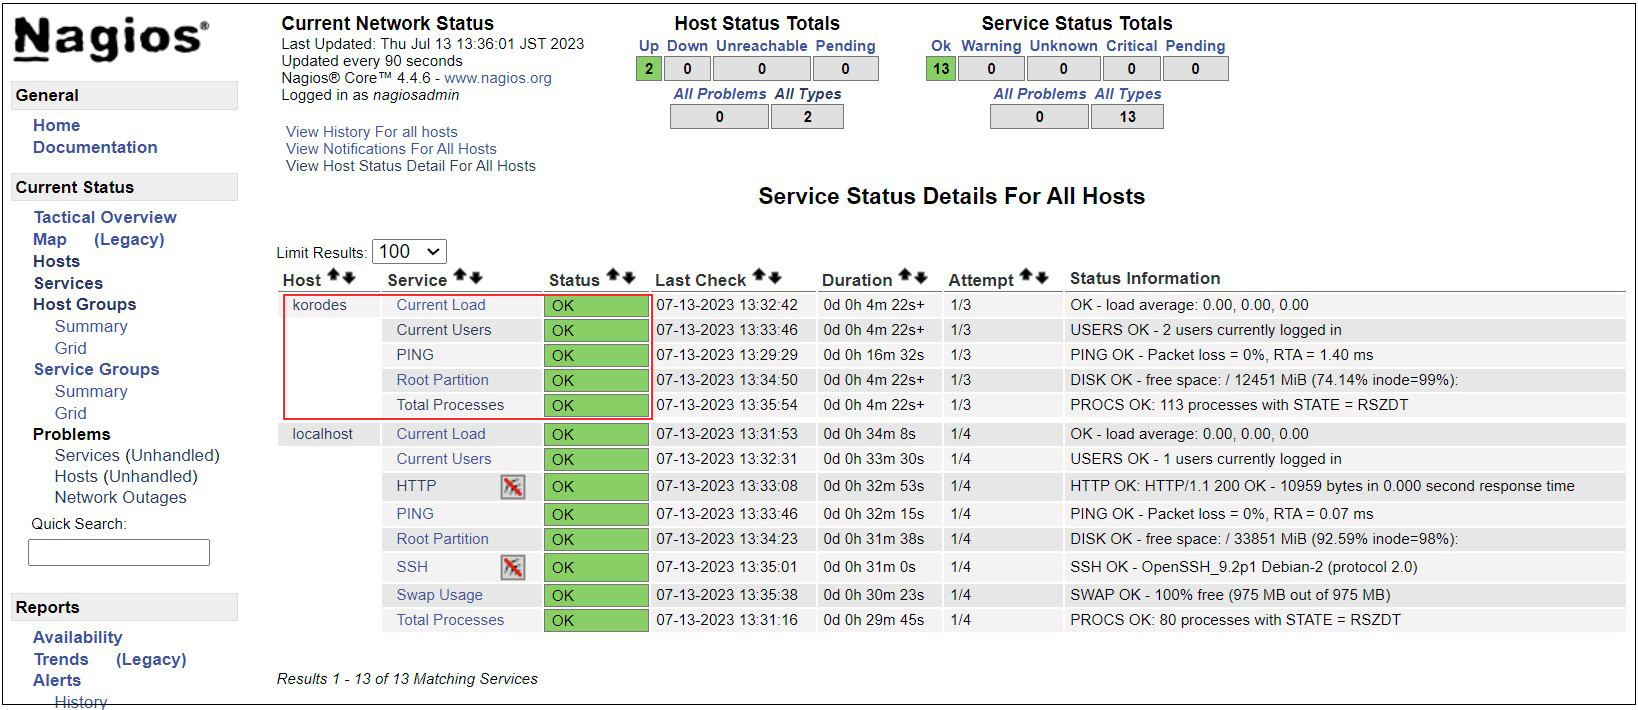
8.2.6 Access http://[Nagios Server IP Address]/nagios
Newly added monitoring services are added as shown in the figure below.
Tripwire Install
Implement a system to detect file tampering on Linux servers by crackers.
This time, Tripwire, a host-based IDS (IDS=Intrusion Detection System), will be installed as the file tampering detection system.
Tripwire creates a database of file status at the time of installation, and detects file additions/changes/deletions by comparing the database with the current status of the file.
1 Installation and Configuration
|
1 |
# apt install tripwire |
①Site Key Creation
Tripwire requires a site passphrase to secure the "tw.cfg" tripwire configuration file and the "tw.pol" tripwire policy file. The specified passphrase is used to encrypt both files. The site passphrase is also required for a single instance of tripwire.
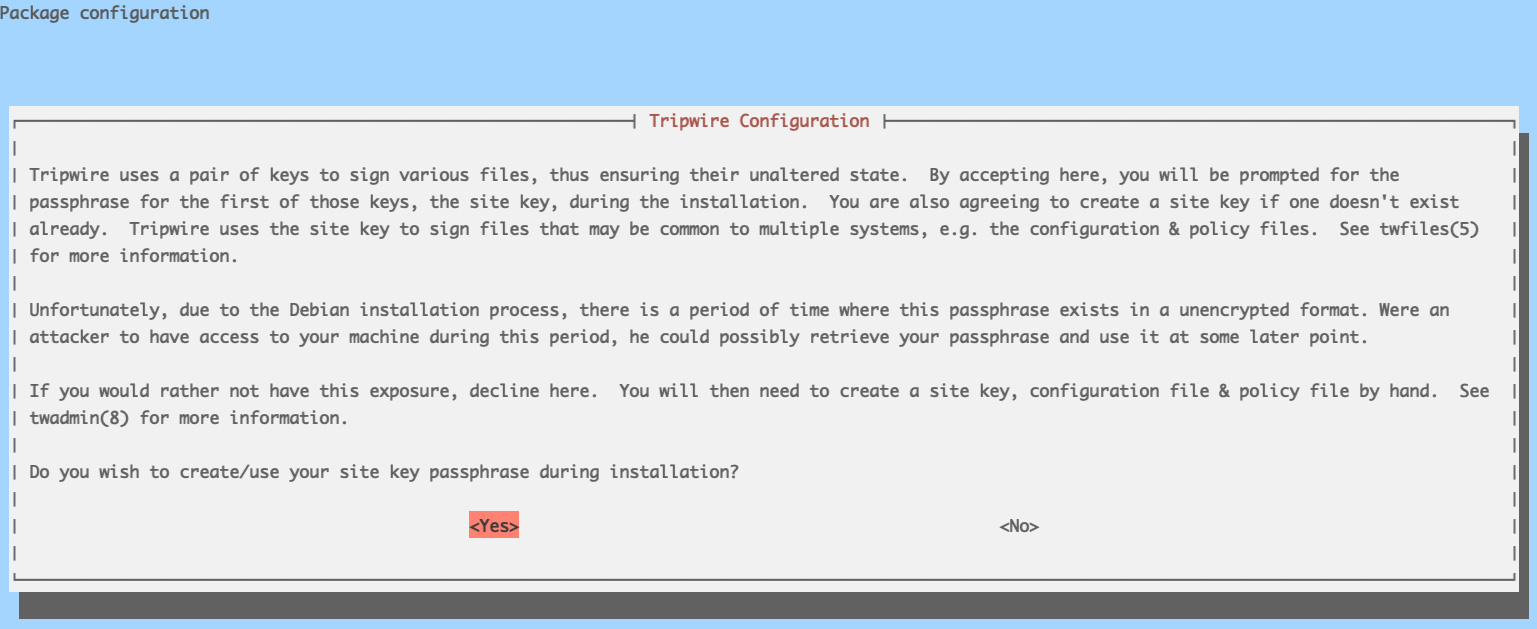

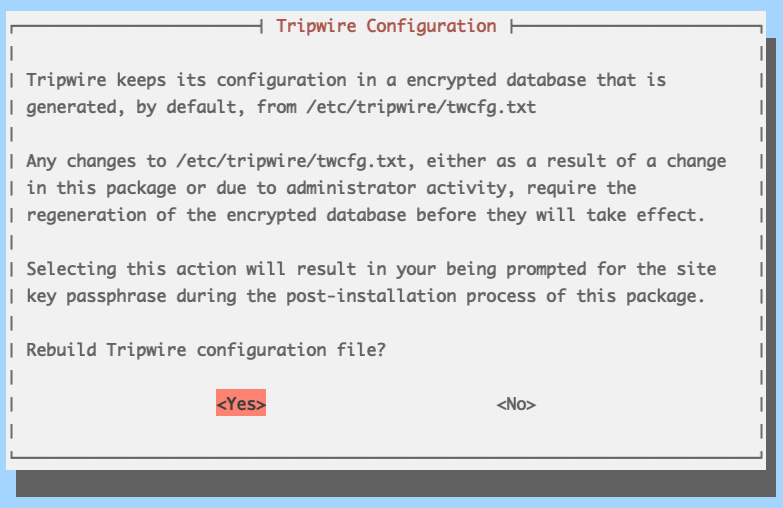
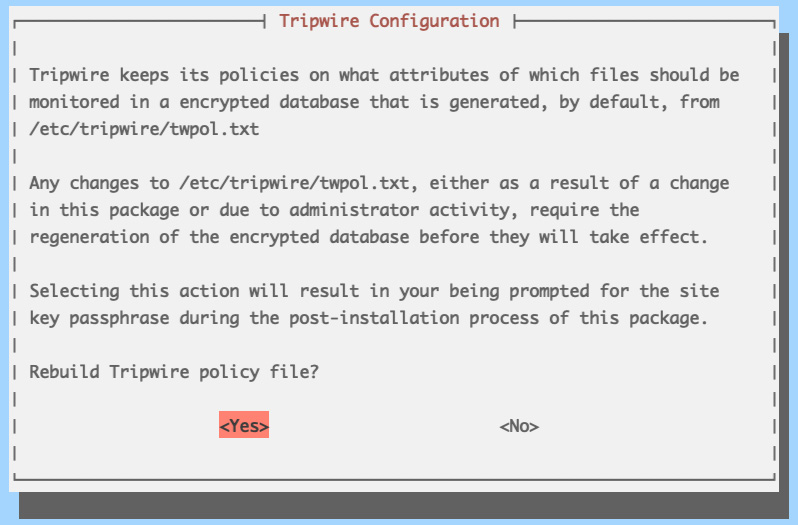
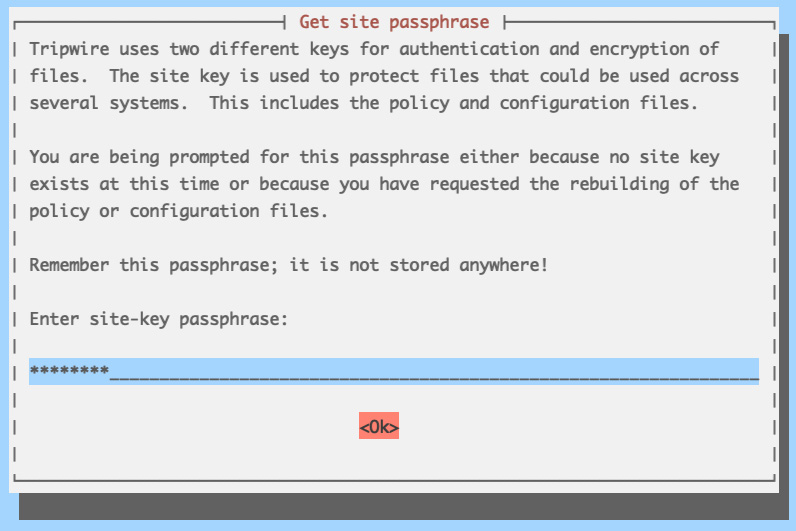
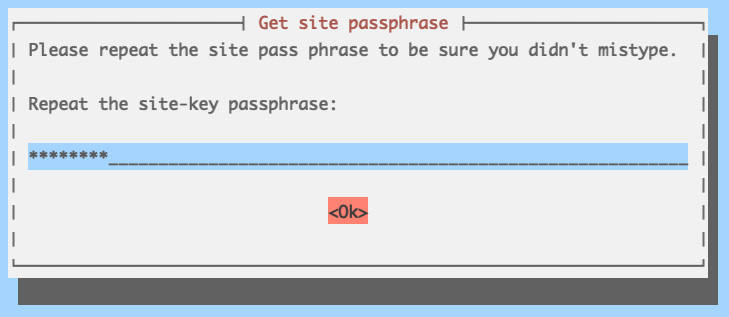
②local key Creation
A local passphrase is required to protect the tripwire database and report files; a local key used by tripwire to avoid unauthorized modification of the tripwire baseline database.
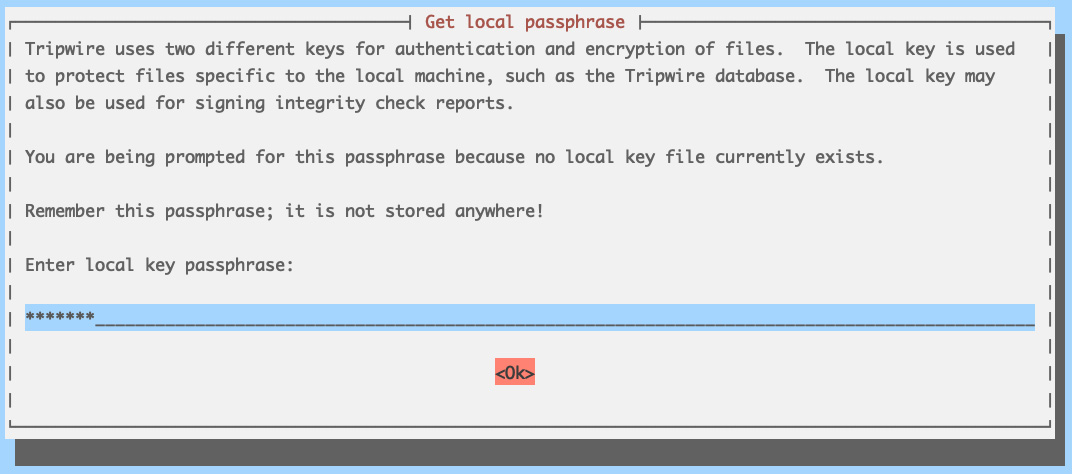
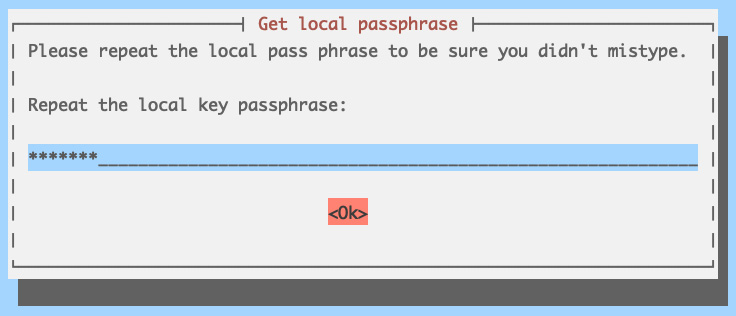
③Installation will proceed and complete.

2 Configuration File Settings
①Tripwire configuration file (twcfg.txt)
The tripwire configuration file (twcfg.txt) is detailed below. The paths to the encrypted policy file (tw.pol), site key (site.key), and local key (hostnamelocal.key), etc. are as follows
|
1 2 3 4 5 6 7 8 9 10 11 12 13 14 15 16 17 |
ROOT =/usr/sbin POLFILE =/etc/tripwire/tw.pol DBFILE =/var/lib/tripwire/$(HOSTNAME).twd REPORTFILE =/var/lib/tripwire/report/$(HOSTNAME)-$(DATE).twr SITEKEYFILE =/etc/tripwire/site.key LOCALKEYFILE =/etc/tripwire/$(HOSTNAME)-local.key EDITOR =/usr/bin/editor LATEPROMPTING =false LOOSEDIRECTORYCHECKING =false MAILNOVIOLATIONS =true EMAILREPORTLEVEL =3 REPORTLEVEL =3 SYSLOGREPORTING =true MAILMETHOD =SMTP SMTPHOST =localhost SMTPPORT =25 TEMPDIRECTORY =/tmp |
3 Initial setup including key creation, database creation, etc.
①Edit twcfg.txt
|
1 2 3 4 5 6 7 |
# cd /etc/tripwire # vi twcfg.txt # Line 9 : Changed to "true #LOOSEDIRECTORYCHECKING =false LOOSEDIRECTORYCHECKING =true # Line 12:Change as needed (maximum report level: 4) REPORTLEVEL =4 |
② configuration file generation
|
1 2 3 |
# twadmin -m F -c tw.cfg -S site.key twcfg.txt Please enter your site passphrase: <Site Key Passphrase> Wrote configuration file: /etc/tripwire/tw.cfg |
③ Optimize policies
Use the following policy optimization scripts to optimize your policy
|
1 |
# vi twpolmake.pl |
Policy Optimization Script Contents
|
1 2 3 4 5 6 7 8 9 10 11 12 13 14 15 16 17 18 19 20 21 22 23 24 25 26 27 28 29 30 31 32 33 34 35 36 |
#!/usr/bin/perl $POLFILE=$ARGV[0]; open(POL,"$POLFILE") or die "open error: $POLFILE" ; my($myhost,$thost) ; my($sharp,$tpath,$cond) ; my($INRULE) = 0 ; while (<POL>) { chomp; if (($thost) = /^HOSTNAME\s*=\s*(.*)\s*;/) { $myhost = `hostname` ; chomp($myhost) ; if ($thost ne $myhost) { $_="HOSTNAME=\"$myhost\";" ; } } elsif ( /^{/ ) { $INRULE=1 ; } elsif ( /^}/ ) { $INRULE=0 ; } elsif ($INRULE == 1 and ($sharp,$tpath,$cond) = /^(\s*\#?\s*)(\/\S+)\b(\s+->\s+.+)$/) { $ret = ($sharp =~ s/\#//g) ; if ($tpath eq '/sbin/e2fsadm' ) { $cond =~ s/;\s+(tune2fs.*)$/; \#$1/ ; } if (! -s $tpath) { $_ = "$sharp#$tpath$cond" if ($ret == 0) ; } else { $_ = "$sharp$tpath$cond" ; } } print "$_\n" ; } close(POL) ; |
|
1 |
# perl twpolmake.pl twpol.txt > twpol.txt.new |
|
1 2 3 |
# twadmin -m P -c tw.cfg -p tw.pol -S site.key twpol.txt.new Please enter your site passphrase: <Site Key Passphrase> Wrote policy file: /etc/tripwire/tw.pol |
Exclude the Tripwire database itself from the check
|
1 |
# echo ! "/var/lib/tripwire/`hostname`.twd ;" >> /etc/tripwire/twpol.txt.new |
④Database Creation
|
1 2 |
# tripwire -m i -s -c tw.cfg Please enter your local passphrase: <Local Key Passphrase> |
If it stops with an error on the way, reexecute with the "--verbose" option.
|
1 2 |
# tripwire -m i -c tw.cfg --verbose Please enter your local passphrase: <Local Key Passphrase> |
Display the progress, check the files and directories that stop with errors, set the owner and access rights, and execute the following again
|
1 2 |
# tripwire -m i -s -c tw.cfg Please enter your local passphrase: <Local Key Passphrase> |
In our case, the error occurred in the following file
Software interrupt forced exit /usr/lib/firmware/intel
Segmentation fault
I solved the problem by changing the ownership of /usr/lib/firmware/intel to root
|
1 |
# chown -R root:root /usr/lib/firmware/intel |
4 Perform checks
①Create test files
|
1 |
# echo test > /root/test.txt |
②Check Tripwire operation
|
1 |
# tripwire -m c -s -c /etc/tripwire/tw.cfg |
If successful, the following display appears
|
1 2 3 4 5 6 7 8 9 10 11 12 13 14 15 16 17 18 19 20 21 22 23 24 25 26 27 28 29 30 31 32 33 34 35 36 37 38 39 40 41 42 43 44 45 46 47 48 49 50 51 52 53 54 55 56 57 58 59 60 61 62 63 64 65 66 67 68 69 70 71 72 73 74 75 76 77 78 79 80 81 82 83 84 85 86 87 |
Open Source Tripwire(R) 2.4.3.7 Integrity Check Report Report generated by: root Report created on: Sun 24 Nov 2024 10:47:38 AM JST Database last updated on: Never =============================================================================== Report Summary: =============================================================================== Host name: Lepard Host IP address: Unknown IP Host ID: None Policy file used: /etc/tripwire/tw.pol Configuration file used: /etc/tripwire/tw.cfg Database file used: /var/lib/tripwire/Lepard.twd Command line used: tripwire -m c -s -c /etc/tripwire/tw.cfg =============================================================================== Rule Summary: =============================================================================== ------------------------------------------------------------------------------- Section: Unix File System ------------------------------------------------------------------------------- Rule Name Severity Level Added Removed Modified --------- -------------- ----- ------- -------- Other binaries 66 0 0 0 Tripwire Binaries 100 0 0 0 Other libraries 66 0 0 0 Root file-system executables 100 0 0 0 * Tripwire Data Files 100 1 0 0 System boot changes 100 0 0 0 Root file-system libraries 100 0 0 0 (/lib) Critical system boot files 100 0 0 0 Other configuration files 66 0 0 0 (/etc) Boot Scripts 100 0 0 0 Security Control 66 0 0 0 * Root config files 100 1 0 0 Devices & Kernel information 100 0 0 0 (/dev) Invariant Directories 66 0 0 0 Total objects scanned: 29235 Total violations found: 2 =============================================================================== Object Summary: =============================================================================== ------------------------------------------------------------------------------- # Section: Unix File System ------------------------------------------------------------------------------- ------------------------------------------------------------------------------- Rule Name: Tripwire Data Files (/var/lib/tripwire/Lepard.twd) Severity Level: 100 ------------------------------------------------------------------------------- Added: "/var/lib/tripwire/Lepard.twd" ------------------------------------------------------------------------------- Rule Name: Root config files (/root) Severity Level: 100 ------------------------------------------------------------------------------- Added: "/root/test.txt" =============================================================================== Error Report: =============================================================================== No Errors ------------------------------------------------------------------------------- *** End of report *** Open Source Tripwire 2.4 Portions copyright 2000-2018 Tripwire, Inc. Tripwire is a registered trademark of Tripwire, Inc. This software comes with ABSOLUTELY NO WARRANTY; for details use --version. This is free software which may be redistributed or modified only under certain conditions; see COPYING for details. All rights reserved |
Delete the test file.
|
1 |
# rm -f /root/test.txt |
5 Tripwire Autorun
①Create an auto-execution script (tripwire.sh) and have it run automatically
|
1 2 3 |
# mkdir /opt/script # cd /opt/script # vi tripwire.sh |
Contents of auto-execute script (tripwire.sh)
|
1 2 3 4 5 6 7 8 9 10 11 12 13 14 15 16 17 18 19 20 21 |
#!/bin/bash PATH=/usr/sbin:/usr/bin:/bin:/usr/local/tripwire/sbin #Passphrase setting LOCALPASS=xxxxxxxx # local key passphrase SITEPASS=xxxxxxxx # site key passphrase cd /etc/tripwire # Tripwire check run tripwire -m c -s -c tw.cfg|mail -s "Tripwire(R) Integrity Check Report in `hostname`" root # Policy File Update twadmin -m p -c tw.cfg -p tw.pol -S site.key > twpol.txt perl twpolmake.pl twpol.txt > twpol.txt.new twadmin -m P -c tw.cfg -p tw.pol -S site.key -Q $SITEPASS twpol.txt.new > /dev/null rm -f twpol.txt* *.bak # Database modernization rm -f /usr/local/tripwire/lib/tripwire/*.twd* tripwire -m i -s -c tw.cfg -P $LOCALPASS |
②Give execute permission and execute periodically by Cron.
|
1 2 3 |
# chmod 700 tripwire.sh # crontab -e 0 5 * * * /opt/script/tripwire.sh |
Reference: Script for reporting results by e-mail
|
1 2 3 4 5 6 7 8 9 10 11 12 13 14 15 16 17 18 19 20 21 22 23 24 25 |
#!/bin/bash PATH=/usr/sbin:/usr/bin:/bin:/usr/local/tripwire/sbin #Passphrase setting LOCALPASS=xxxxx # local key passphrase SITEPASS=xxxxx # site key passphrase #Email Address for Notification MAIL="<your mailaddress> " cd /etc/tripwire # Tripwire check run tripwire -m c -s -c tw.cfg|mail -s "Tripwire(R) Integrity Check Report in `hostname`" $MAIL # Policy File Update twadmin -m p -c tw.cfg -p tw.pol -S site.key > twpol.txt perl twpolmake.pl twpol.txt > twpol.txt.new twadmin -m P -c tw.cfg -p tw.pol -S site.key -Q $SITEPASS twpol.txt.new > /dev/null rm -f twpol.txt* *.bak # Database modernization rm -f /usr/local/tripwire/lib/tripwire/*.twd* tripwire -m i -s -c tw.cfg -P $LOCALPASS |
Execute the following and confirm that the results are delivered to the specified e-mail address
|
1 |
# /opt/script/tripwire.sh |

