What is Icinga2?
It is an open source software for system monitoring, derived and developed from a monitoring software called Nagios.
In this article, we will install the Icinga2 monitoring application on OracleLinux8.x with RHEL8.
The same can be done on Rocky Linux8.x and AlmaLinux8.x.
However, please note that some information related to PowerTools is different from the information on this page.
1.Prerequisite.
The requirement for installing Icinga2 is that you must have LAMP installed. PHP 7.3 or later version is also required.
In this case, it is assumed that the following have been built
MySQL Ver 8.0.32
PHP 7.4.33
Httpd Apache/2.4.37
SELINUX permissive
2. Install and configure PHP extensions
①Install required PHP extensions
Make the Remi repository available in advance.
|
1 |
# dnf install php-gd php-mbstring php-mysqlnd php-curl php-devel php-pear php-xml php-cli php-soap php-intl php-json php-ldap php-xmlrpc php-zip php-json php-common php-opcache php-gmp php-pgsql make -y |
➁The php-imagick extension is also required. However, this cannot be installed as in the case of the PHP extensions above, so install as follows
|
1 2 |
# dnf install -y ImageMagick ImageMagick-devel # pecl install imagick |
➂Add the following to the PHP.INI file
|
1 |
# echo "extension=imagick.so" > /etc/php.d/20-imagick.ini |
④Restart Apache for configuration to take effect
|
1 |
# systemctl restart httpd |
3. Icinga2 Install
①Add Icinga Repository
First, enable EPEL repository
|
1 |
# dnf -y install https://dl.fedoraproject.org/pub/epel/epel-release-latest-8.noarch.rpm |
Enable GPG signature key
|
1 |
# rpm --import https://packages.icinga.com/icinga.key |
Create a new repository file in the /etc/yum.repos.d directory
|
1 2 3 4 5 6 |
# vi /etc/yum.repos.d/icinga2.repo Describe the following [icinga2] name=Icinga 2 Repository for AlmaLinux8 RockyLinux8 Oracle8 baseurl=https://packages.icinga.com/epel/8/release enabled=1 |
Update the cache package.
|
1 |
# dnf makecache |
➁Install Icinga2 package and other relevant Icinga2 packages
|
1 2 3 4 5 6 7 8 9 10 11 12 13 14 15 16 17 18 19 20 21 22 23 24 25 26 27 28 29 30 31 32 33 34 35 36 37 38 39 40 41 42 43 44 45 46 47 48 49 50 51 52 53 54 55 56 57 58 59 60 61 62 63 64 65 66 67 68 69 70 71 72 73 74 75 76 77 78 79 80 81 82 83 84 |
# dnf install icinga2 icinga2-ido-mysql icinga2-selinux vim-icinga2 -y Last metadata expiration check: 0:00:48 ago on Wed 06 Sep 2023 12:57:49 PM JST. Dependencies resolved. ================================================================================ Package Arch Version Repository Size ================================================================================ Installing: icinga2 x86_64 2.13.2-1.el8.icinga icinga2 34 k icinga2-ido-mysql x86_64 2.13.2-1.el8.icinga icinga2 125 k icinga2-selinux x86_64 2.13.2-1.el8.icinga icinga2 64 k vim-icinga2 x86_64 2.13.2-1.el8.icinga icinga2 14 k Installing dependencies: boost-context x86_64 1.66.0-13.el8 ol8_appstream 15 k boost-coroutine x86_64 1.66.0-13.el8 ol8_appstream 32 k boost-program-options x86_64 1.66.0-13.el8 ol8_appstream 141 k icinga2-bin x86_64 2.13.2-1.el8.icinga icinga2 4.5 M icinga2-common x86_64 2.13.2-1.el8.icinga icinga2 162 k Transaction Summary ================================================================================ Install 9 Packages Total download size: 5.1 M Installed size: 25 M Downloading Packages: (1/9): icinga2-2.13.2-1.el8.icinga.x86_64.rpm 26 kB/s | 34 kB 00:01 (2/9): icinga2-common-2.13.2-1.el8.icinga.x86_6 88 kB/s | 162 kB 00:01 (3/9): icinga2-ido-mysql-2.13.2-1.el8.icinga.x8 136 kB/s | 125 kB 00:00 (4/9): icinga2-selinux-2.13.2-1.el8.icinga.x86_ 53 kB/s | 64 kB 00:01 (5/9): vim-icinga2-2.13.2-1.el8.icinga.x86_64.r 17 kB/s | 14 kB 00:00 (6/9): boost-context-1.66.0-13.el8.x86_64.rpm 290 kB/s | 15 kB 00:00 (7/9): boost-program-options-1.66.0-13.el8.x86_ 5.8 MB/s | 141 kB 00:00 (8/9): icinga2-bin-2.13.2-1.el8.icinga.x86_64.r 1.4 MB/s | 4.5 MB 00:03 (9/9): boost-coroutine-1.66.0-13.el8.x86_64.rpm 26 kB/s | 32 kB 00:01 -------------------------------------------------------------------------------- Total 1.2 MB/s | 5.1 MB 00:04 Running transaction check Transaction check succeeded. Running transaction test Transaction test succeeded. Running transaction Preparing : 1/1 Installing : boost-context-1.66.0-13.el8.x86_64 1/9 Running scriptlet: boost-context-1.66.0-13.el8.x86_64 1/9 Installing : boost-coroutine-1.66.0-13.el8.x86_64 2/9 Running scriptlet: boost-coroutine-1.66.0-13.el8.x86_64 2/9 Installing : boost-program-options-1.66.0-13.el8.x86_64 3/9 Running scriptlet: boost-program-options-1.66.0-13.el8.x86_64 3/9 Installing : icinga2-bin-2.13.2-1.el8.icinga.x86_64 4/9 Running scriptlet: icinga2-common-2.13.2-1.el8.icinga.x86_64 5/9 Installing : icinga2-common-2.13.2-1.el8.icinga.x86_64 5/9 Running scriptlet: icinga2-common-2.13.2-1.el8.icinga.x86_64 5/9 Running scriptlet: icinga2-2.13.2-1.el8.icinga.x86_64 6/9 Installing : icinga2-2.13.2-1.el8.icinga.x86_64 6/9 Running scriptlet: icinga2-2.13.2-1.el8.icinga.x86_64 6/9 Installing : icinga2-ido-mysql-2.13.2-1.el8.icinga.x86_64 7/9 Running scriptlet: icinga2-ido-mysql-2.13.2-1.el8.icinga.x86_64 7/9 Installing : icinga2-selinux-2.13.2-1.el8.icinga.x86_64 8/9 Running scriptlet: icinga2-selinux-2.13.2-1.el8.icinga.x86_64 8/9 Installing : vim-icinga2-2.13.2-1.el8.icinga.x86_64 9/9 Running scriptlet: vim-icinga2-2.13.2-1.el8.icinga.x86_64 9/9 Verifying : icinga2-2.13.2-1.el8.icinga.x86_64 1/9 Verifying : icinga2-bin-2.13.2-1.el8.icinga.x86_64 2/9 Verifying : icinga2-common-2.13.2-1.el8.icinga.x86_64 3/9 Verifying : icinga2-ido-mysql-2.13.2-1.el8.icinga.x86_64 4/9 Verifying : icinga2-selinux-2.13.2-1.el8.icinga.x86_64 5/9 Verifying : vim-icinga2-2.13.2-1.el8.icinga.x86_64 6/9 Verifying : boost-context-1.66.0-13.el8.x86_64 7/9 Verifying : boost-coroutine-1.66.0-13.el8.x86_64 8/9 Verifying : boost-program-options-1.66.0-13.el8.x86_64 9/9 Installed: boost-context-1.66.0-13.el8.x86_64 boost-coroutine-1.66.0-13.el8.x86_64 boost-program-options-1.66.0-13.el8.x86_64 icinga2-2.13.2-1.el8.icinga.x86_64 icinga2-bin-2.13.2-1.el8.icinga.x86_64 icinga2-common-2.13.2-1.el8.icinga.x86_64 icinga2-ido-mysql-2.13.2-1.el8.icinga.x86_64 icinga2-selinux-2.13.2-1.el8.icinga.x86_64 vim-icinga2-2.13.2-1.el8.icinga.x86_64 Complete! |
➂Install Nagios plugin used to monitor both physical and virtual hosts
|
1 |
# dnf install nagios-plugins-all -y |
④Enabling the ido-mysql module and other features of Icinga2
|
1 2 3 4 |
# icinga2 feature enable ido-mysql syslog command Enabling feature ido-mysql. Make sure to restart Icinga 2 for these changes to take effect. Enabling feature syslog. Make sure to restart Icinga 2 for these changes to take effect. Enabling feature command. Make sure to restart Icinga 2 for these changes to take effect. |
⑤Restart Icinga to apply changes
|
1 |
# systemctl restart icinga2 |
4. Create and configure database for Icinga-IDO MySQL module
①The Icinga-IDO MySQL function is a back-end function that collates and exports all configuration and status information to a database. Therefore, it is necessary to create a database for the Icinga2-ido-mysql function.
Create an Icinga2 database (in this case icinga2_db) and a database user (in this case icinga2_user, password:?Wabcd123) and grant the database user all permissions to the Icinga2 database.
|
1 2 3 4 5 6 7 |
# mysql -u root -p > CREATE DATABASE icinga2_db DEFAULT CHARACTER SET utf8 COLLATE utf8_unicode_ci; > CREATE USER 'icinga2_user'@'localhost' IDENTIFIED WITH mysql_native_password BY '?Wabcd123'; > GRANT ALL ON icinga2_db.* TO 'icinga2_user'@'localhost'; > FLUSH PRIVILEGES; > EXIT; |
➁Importing the database schema
|
1 |
# mysql -u root -p icinga2_db < /usr/share/icinga2-ido-mysql/schema/mysql.sql |
➂Edit ido-mysql configuration file
|
1 2 3 4 5 6 7 8 9 |
# vi /etc/icinga2/features-available/ido-mysql.conf Line 6-11 : Uncomment and specify database details. object IdoMysqlConnection "ido-mysql" { user = "icinga2_user" password = "?Wabcd123" host = "localhost" database = "icinga2_db" } |
④Start and activate Icinga2
|
1 2 3 |
# systemctl start icinga2 # systemctl enable icinga2 Created symlink /etc/systemd/system/multi-user.target.wants/icinga2.service → /usr/lib/systemd/system/icinga2.service. |
⑤Allow server monitoring (ICINGA2 protocol)
|
1 2 3 |
## 5665 port allowed # firewall-cmd --permanent --add-port=5665/tcp # firewall-cmd --reload |
⑥Status Check
|
1 2 3 4 5 6 7 8 9 10 11 12 13 14 |
# systemctl status icinga2 ● icinga2.service - Icinga host/service/network monitoring system Loaded: loaded (/usr/lib/systemd/system/icinga2.service; enabled; vendor > Active: active (running) since Wed 2023-09-06 14:54:15 JST; 29s ago Main PID: 67457 (icinga2) Status: "Startup finished." Tasks: 29 (limit: 22888) Memory: 15.7M CGroup: /system.slice/icinga2.service tq67457 /usr/lib64/icinga2/sbin/icinga2 --no-stack-rlimit daemon > tq67490 /usr/lib64/icinga2/sbin/icinga2 --no-stack-rlimit daemon > tq67499 /usr/lib64/icinga2/sbin/icinga2 --no-stack-rlimit daemon > tq67565 /usr/lib64/nagios/plugins/check_ping -6 -H ::1 -c 200,15%> mq67566 /usr/sbin/ping6 -n -U -w 10 -c 5 ::1 |
5. IcingaWeb2 Install
In Icingaweb2, Icingaweb2 implements a plugin for configuration called Director in the Icinga2 web interface, and Director can also be used to configure monitoring settings in the web interface
①PowerTools is required to install IcingaWeb2, but OracleLinux does not have the package, so install PowerTools equivalent (ol8_codeready_builder) with the following command
|
1 |
# dnf config-manager --set-enabled ol8_codeready_builder |
※Note: For AlmaLinux8.x and RockyLinux8.x, install PowerTools as follows
|
1 2 |
# dnf install 'dnf-command(config-manager)' # dnf config-manager --set-enabled powertools |
➁IcingaWeb2 CLI install
|
1 2 3 4 5 6 7 8 9 10 11 12 13 14 15 16 17 18 19 20 21 22 23 24 25 26 27 28 29 30 31 32 33 34 35 36 37 38 39 40 41 42 43 44 45 46 47 48 49 50 51 52 53 54 55 56 57 58 59 60 61 62 63 64 65 66 67 68 69 70 71 72 73 74 75 76 77 78 79 80 81 82 83 84 85 86 87 88 89 90 91 92 93 94 95 96 97 98 99 100 101 102 103 |
# dnf install icingaweb2 icingacli Oracle Linux 8 BaseOS Latest (x86_64) 29 kB/s | 3.6 kB 00:00 Oracle Linux 8 Application Stream (x86_64) 128 kB/s | 3.9 kB 00:00 Oracle Linux 8 CodeReady Builder (x86_64) - 125 kB/s | 3.3 kB 00:00 Dependencies resolved. ============================================================================= Package Arch Version Repo Size ============================================================================= Installing: icingacli noarch 2.9.5-1.el8.icinga icinga2 14 k icingaweb2 noarch 2.9.5-1.el8.icinga icinga2 6.0 M Installing dependencies: icinga-l10n noarch 1.1.0-1.el8.icinga icinga2 432 k icinga-php-common noarch 1.0.0-1.el8.icinga icinga2 6.6 k icinga-php-library noarch 0.7.0-1.el8.icinga icinga2 1.8 M icinga-php-thirdparty noarch 0.10.0-2.el8.icinga icinga2 538 k icingaweb2-common noarch 2.9.5-1.el8.icinga icinga2 171 k icingaweb2-vendor-HTMLPurifier noarch 1:2.9.5-1.el8.icinga icinga2 269 k icingaweb2-vendor-JShrink noarch 2.9.5-1.el8.icinga icinga2 15 k icingaweb2-vendor-Parsedown noarch 2.9.5-1.el8.icinga icinga2 18 k icingaweb2-vendor-dompdf noarch 2.9.5-1.el8.icinga icinga2 2.1 M icingaweb2-vendor-lessphp noarch 2.9.5-1.el8.icinga icinga2 91 k icingaweb2-vendor-zf1 noarch 2.9.5-1.el8.icinga icinga2 679 k php-Icinga noarch 2.9.5-1.el8.icinga icinga2 333 k Transaction Summary ============================================================================= Install 14 Packages Total download size: 12 M Installed size: 42 M Is this ok [y/N]: y Downloading Packages: (1/14): icinga-php-common-1.0.0-1.el8.icinga 6.3 kB/s | 6.6 kB 00:01 (2/14): icinga-l10n-1.1.0-1.el8.icinga.noarc 186 kB/s | 432 kB 00:02 (3/14): icinga-php-thirdparty-0.10.0-2.el8.i 348 kB/s | 538 kB 00:01 (4/14): icingacli-2.9.5-1.el8.icinga.noarch. 27 kB/s | 14 kB 00:00 (5/14): icinga-php-library-0.7.0-1.el8.icing 627 kB/s | 1.8 MB 00:02 (6/14): icingaweb2-common-2.9.5-1.el8.icinga 327 kB/s | 171 kB 00:00 (7/14): icingaweb2-vendor-HTMLPurifier-2.9.5 510 kB/s | 269 kB 00:00 (8/14): icingaweb2-vendor-JShrink-2.9.5-1.el 30 kB/s | 15 kB 00:00 (9/14): icingaweb2-2.9.5-1.el8.icinga.noarch 2.4 MB/s | 6.0 MB 00:02 (10/14): icingaweb2-vendor-Parsedown-2.9.5-1 11 kB/s | 18 kB 00:01 (11/14): icingaweb2-vendor-lessphp-2.9.5-1.e 175 kB/s | 91 kB 00:00 (12/14): icingaweb2-vendor-zf1-2.9.5-1.el8.i 1.2 MB/s | 679 kB 00:00 (13/14): icingaweb2-vendor-dompdf-2.9.5-1.el 1.1 MB/s | 2.1 MB 00:01 (14/14): php-Icinga-2.9.5-1.el8.icinga.noarc 639 kB/s | 333 kB 00:00 ----------------------------------------------------------------------------- Total 2.0 MB/s | 12 MB 00:06 Running transaction check Transaction check succeeded. Running transaction test Transaction test succeeded. Running transaction Preparing : 1/1 Running scriptlet: icingaweb2-common-2.9.5-1.el8.icinga.noarch 1/14 Installing : icingaweb2-common-2.9.5-1.el8.icinga.noarch 1/14 Installing : icinga-php-common-1.0.0-1.el8.icinga.noarch 2/14 Installing : icinga-php-library-0.7.0-1.el8.icinga.noarch 3/14 Installing : icinga-php-thirdparty-0.10.0-2.el8.icinga.noarc 4/14 Installing : icinga-l10n-1.1.0-1.el8.icinga.noarch 5/14 Installing : icingaweb2-vendor-HTMLPurifier-1:2.9.5-1.el8.ic 6/14 Installing : icingaweb2-vendor-JShrink-2.9.5-1.el8.icinga.no 7/14 Installing : icingaweb2-vendor-Parsedown-2.9.5-1.el8.icinga. 8/14 Installing : icingaweb2-vendor-dompdf-2.9.5-1.el8.icinga.noa 9/14 Installing : icingaweb2-vendor-lessphp-2.9.5-1.el8.icinga.no 10/14 Installing : icingaweb2-vendor-zf1-2.9.5-1.el8.icinga.noarch 11/14 Installing : php-Icinga-2.9.5-1.el8.icinga.noarch 12/14 Installing : icingacli-2.9.5-1.el8.icinga.noarch 13/14 Running scriptlet: icingaweb2-2.9.5-1.el8.icinga.noarch 14/14 Installing : icingaweb2-2.9.5-1.el8.icinga.noarch 14/14 Verifying : icinga-l10n-1.1.0-1.el8.icinga.noarch 1/14 Verifying : icinga-php-common-1.0.0-1.el8.icinga.noarch 2/14 Verifying : icinga-php-library-0.7.0-1.el8.icinga.noarch 3/14 Verifying : icinga-php-thirdparty-0.10.0-2.el8.icinga.noarc 4/14 Verifying : icingacli-2.9.5-1.el8.icinga.noarch 5/14 Verifying : icingaweb2-2.9.5-1.el8.icinga.noarch 6/14 Verifying : icingaweb2-common-2.9.5-1.el8.icinga.noarch 7/14 Verifying : icingaweb2-vendor-HTMLPurifier-1:2.9.5-1.el8.ic 8/14 Verifying : icingaweb2-vendor-JShrink-2.9.5-1.el8.icinga.no 9/14 Verifying : icingaweb2-vendor-Parsedown-2.9.5-1.el8.icinga. 10/14 Verifying : icingaweb2-vendor-dompdf-2.9.5-1.el8.icinga.noa 11/14 Verifying : icingaweb2-vendor-lessphp-2.9.5-1.el8.icinga.no 12/14 Verifying : icingaweb2-vendor-zf1-2.9.5-1.el8.icinga.noarch 13/14 Verifying : php-Icinga-2.9.5-1.el8.icinga.noarch 14/14 Installed: icinga-l10n-1.1.0-1.el8.icinga.noarch icinga-php-common-1.0.0-1.el8.icinga.noarch icinga-php-library-0.7.0-1.el8.icinga.noarch icinga-php-thirdparty-0.10.0-2.el8.icinga.noarch icingacli-2.9.5-1.el8.icinga.noarch icingaweb2-2.9.5-1.el8.icinga.noarch icingaweb2-common-2.9.5-1.el8.icinga.noarch icingaweb2-vendor-HTMLPurifier-1:2.9.5-1.el8.icinga.noarch icingaweb2-vendor-JShrink-2.9.5-1.el8.icinga.noarch icingaweb2-vendor-Parsedown-2.9.5-1.el8.icinga.noarch icingaweb2-vendor-dompdf-2.9.5-1.el8.icinga.noarch icingaweb2-vendor-lessphp-2.9.5-1.el8.icinga.noarch icingaweb2-vendor-zf1-2.9.5-1.el8.icinga.noarch php-Icinga-2.9.5-1.el8.icinga.noarch Complete! |
6.Creating a database for IcingaWeb2
Create an IcingaWeb2 database (in this case icingaweb2_db as an example) and a database user (in this case icingaweb2_user ,Password : ?Wefgh123) and grant all permissions to the database user for the Icinga Web2 database.
|
1 2 3 4 5 6 7 |
# mysql -u root -p > CREATE DATABASE icingaweb2_db DEFAULT CHARACTER SET utf8 COLLATE utf8_unicode_ci; > CREATE USER ' icingaweb2_user'@'localhost' IDENTIFIED WITH mysql_native_password BY '?Wefgh123'; > GRANT ALL ON icingaweb2_db.* TO 'icingaweb2_user'@'localhost'; > flush privileges; >exit |
Restart Apache Web Server
|
1 |
# systemctl restart httpd |
7. Icinga2 setup from browser
7.1 Generate Secret Token
Generate a secret token, a unique code used for authentication in the first step of setting up Icinga2
|
1 2 3 4 |
# systemctl restart icinga2 # icingacli setup token create he newly generated setup token is: 0752f78a9a8b12d6 |
Make a note of the above code If you lose your token, you can retrieve it by executing the following command
|
1 |
# icingacli setup token show |
7.2 Complete the installation from a web browser
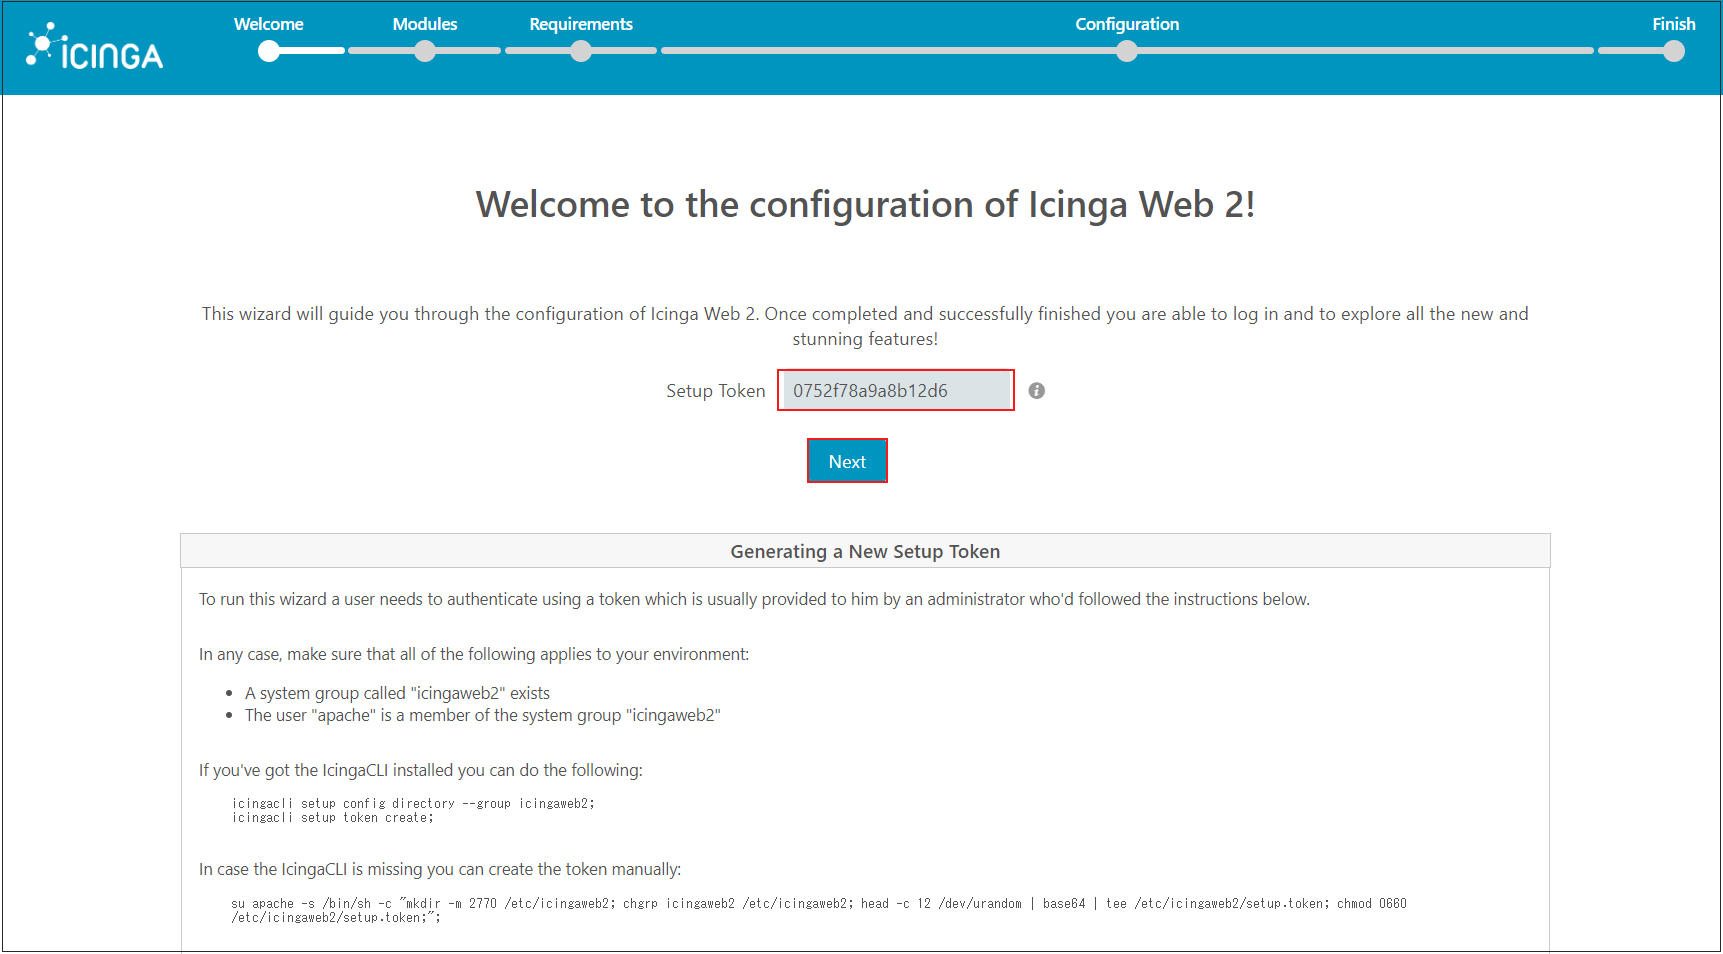
①Access "http://[server-ip]/icingaweb2/setup" from a web browser
Enter the secret token generated above into the Setup Token field and click "Next".
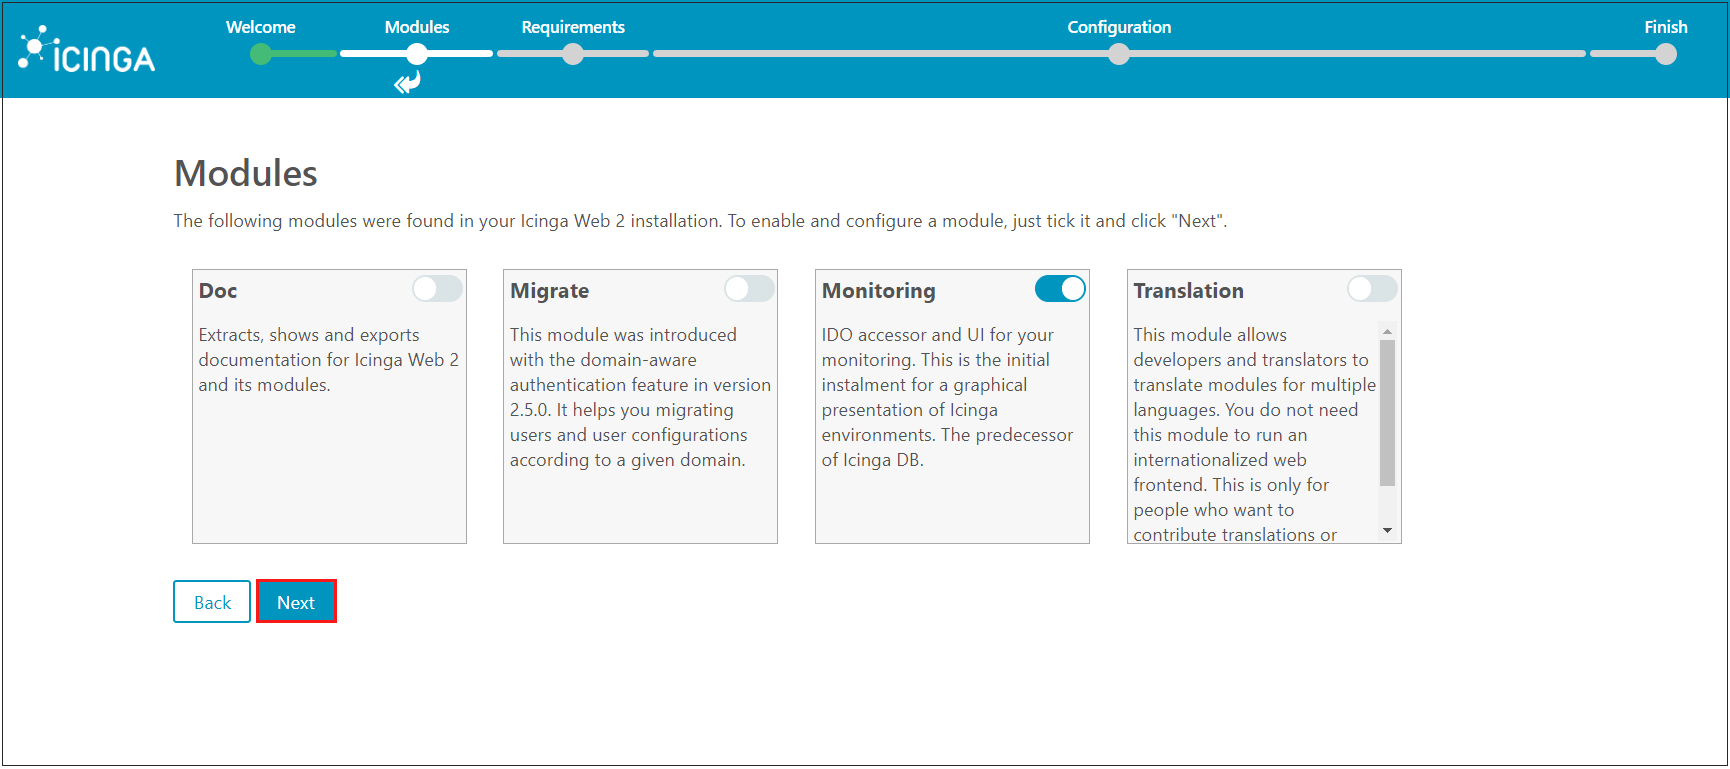
The Modules page will appear. It provides an overview of all modules that can be activated.
By default, the "Monitoring" module is enabled. Enable the module of your choice and click "Next"
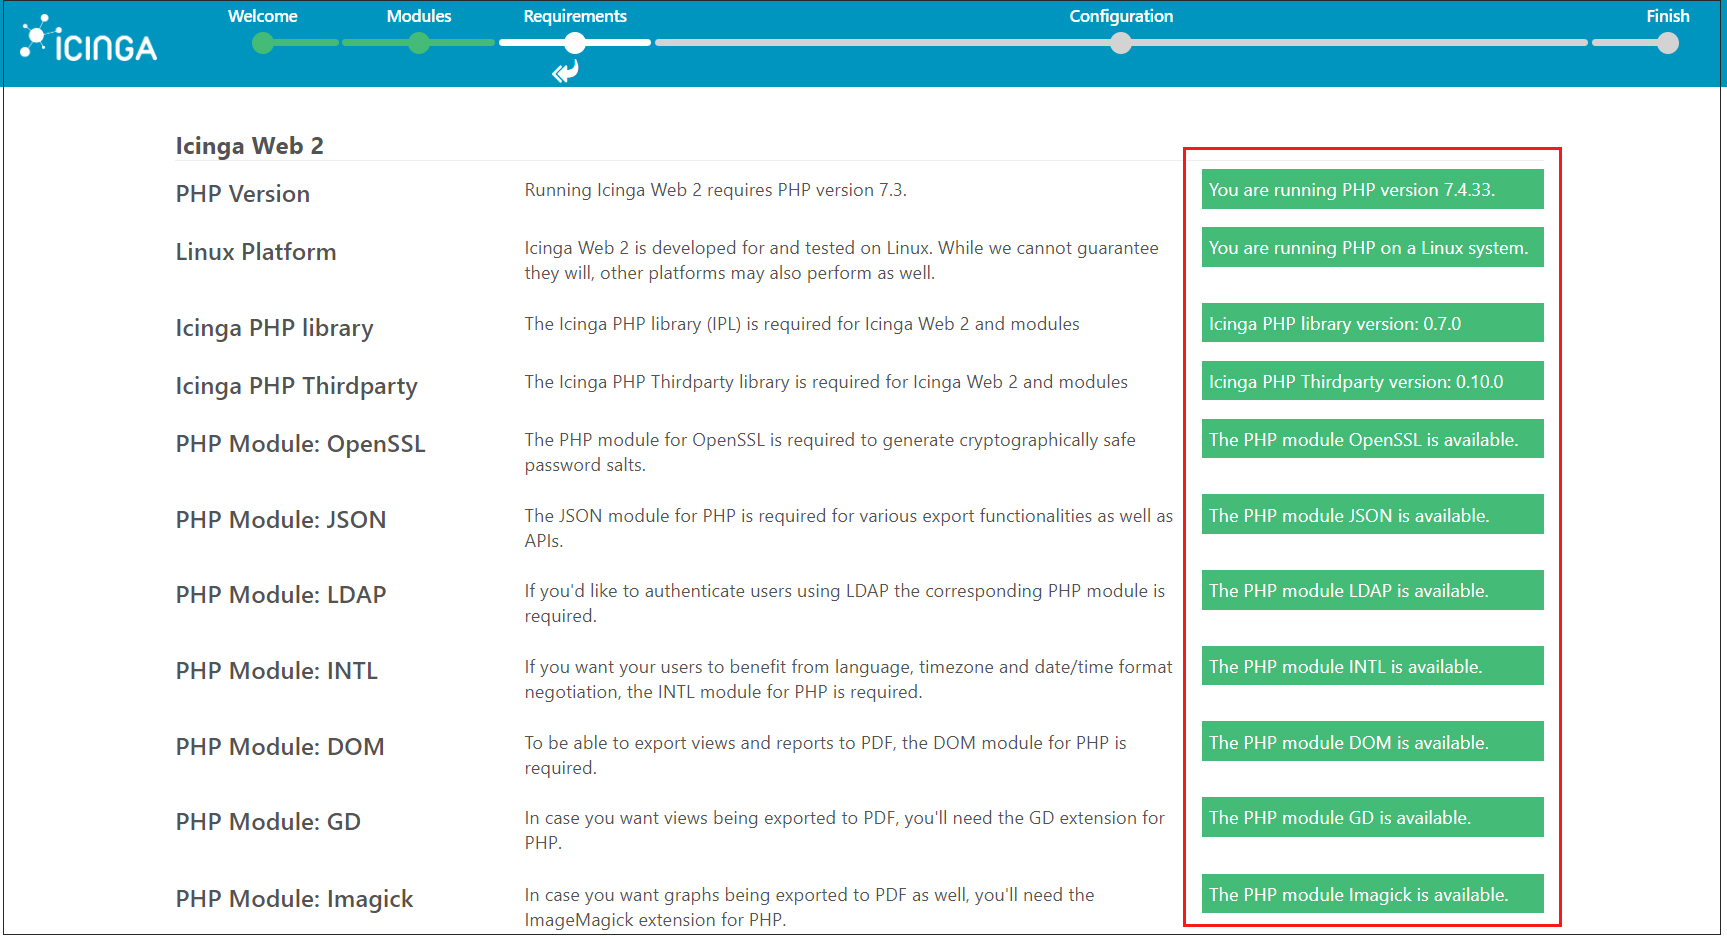
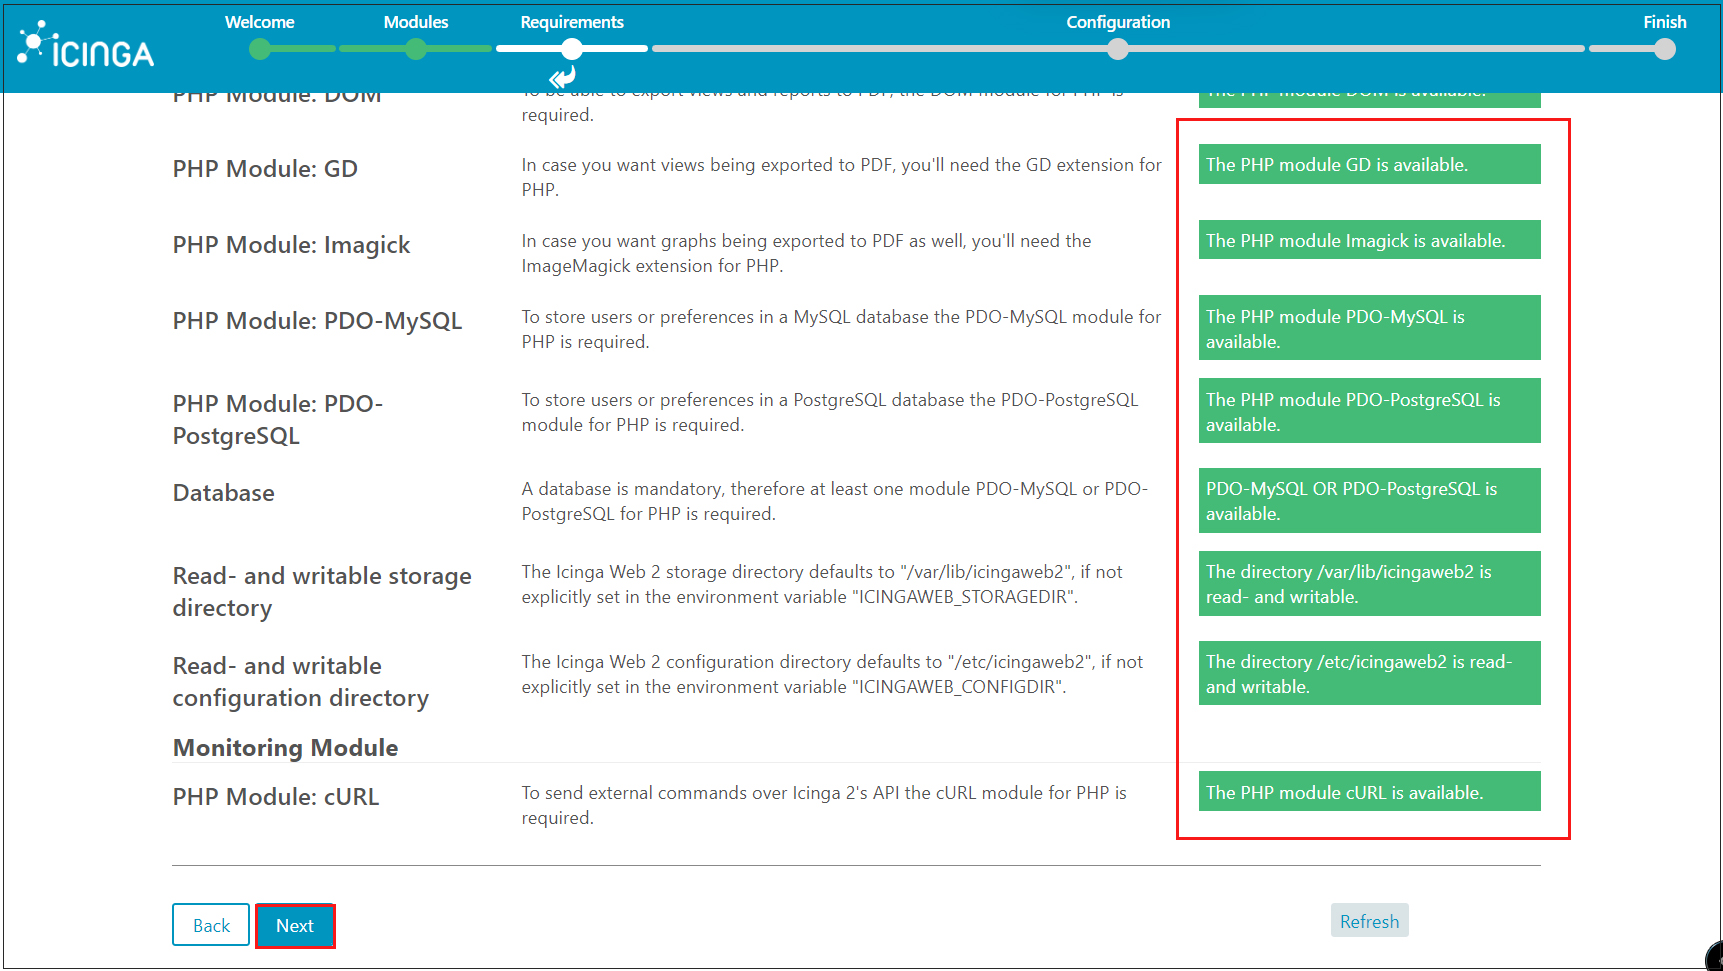
In this section, verify that all PHP prerequisites are met, including PHP modules, libraries, and directories. If all is in order, scroll down and click Next
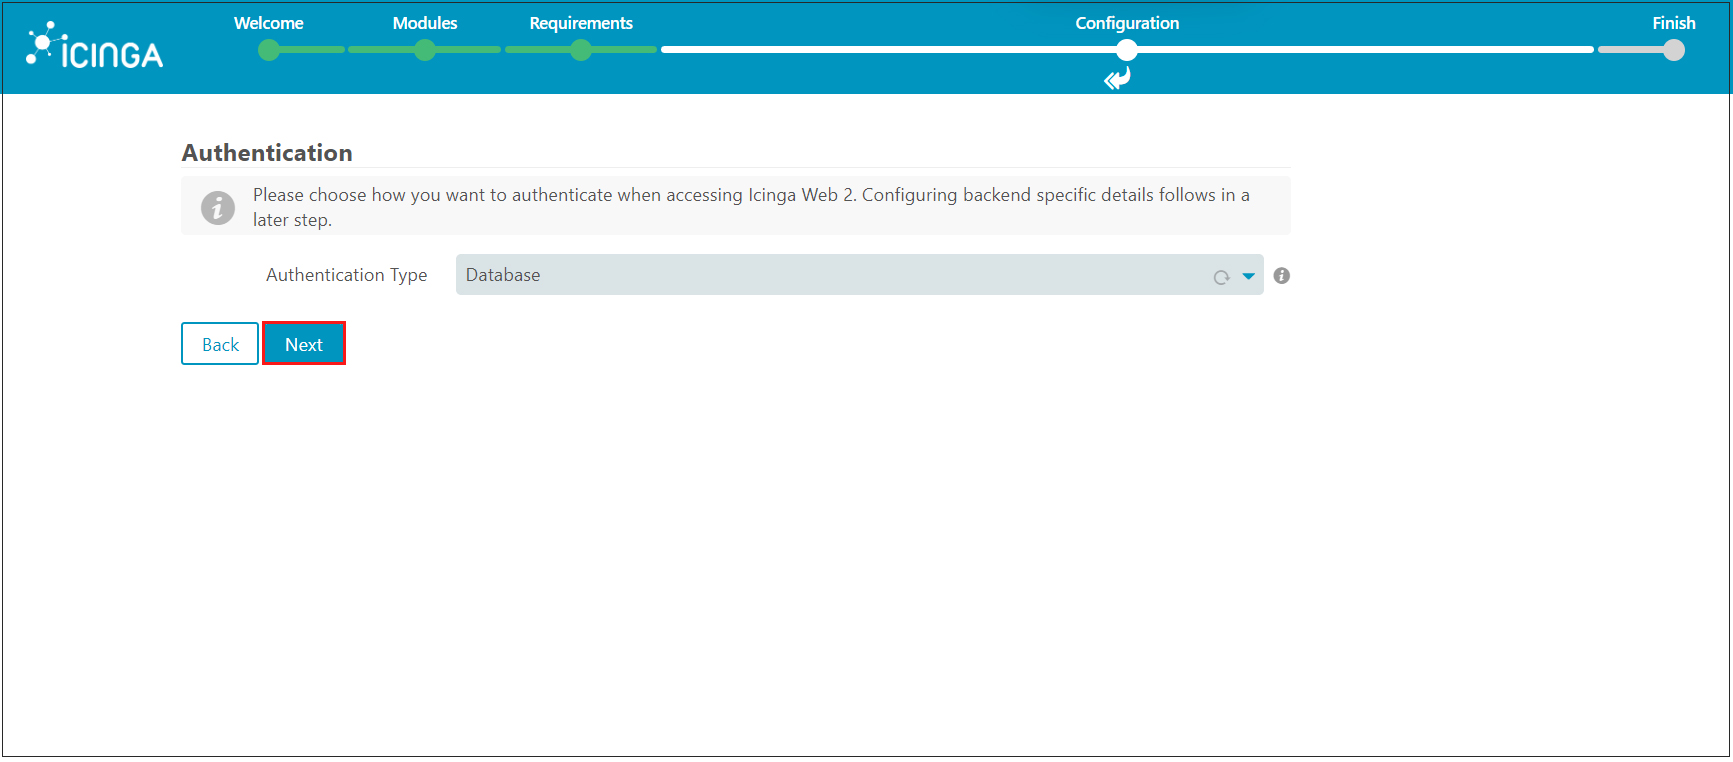
On the Authentication page, leave the defaults and click "Next"
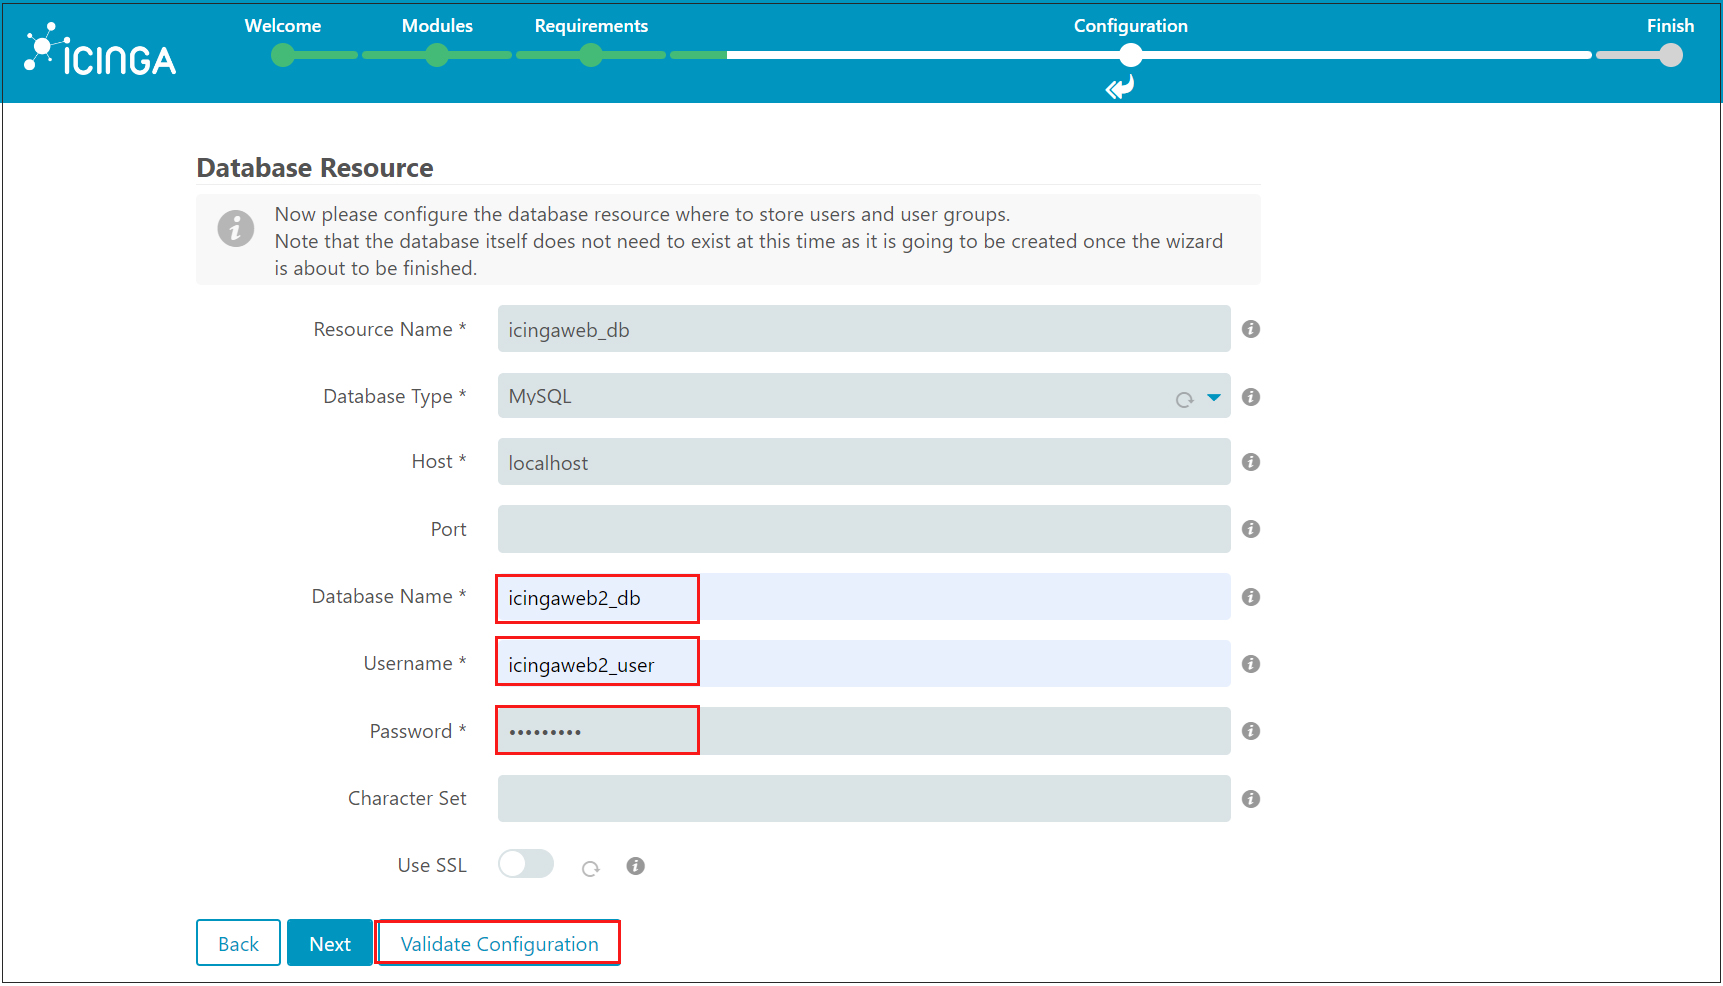
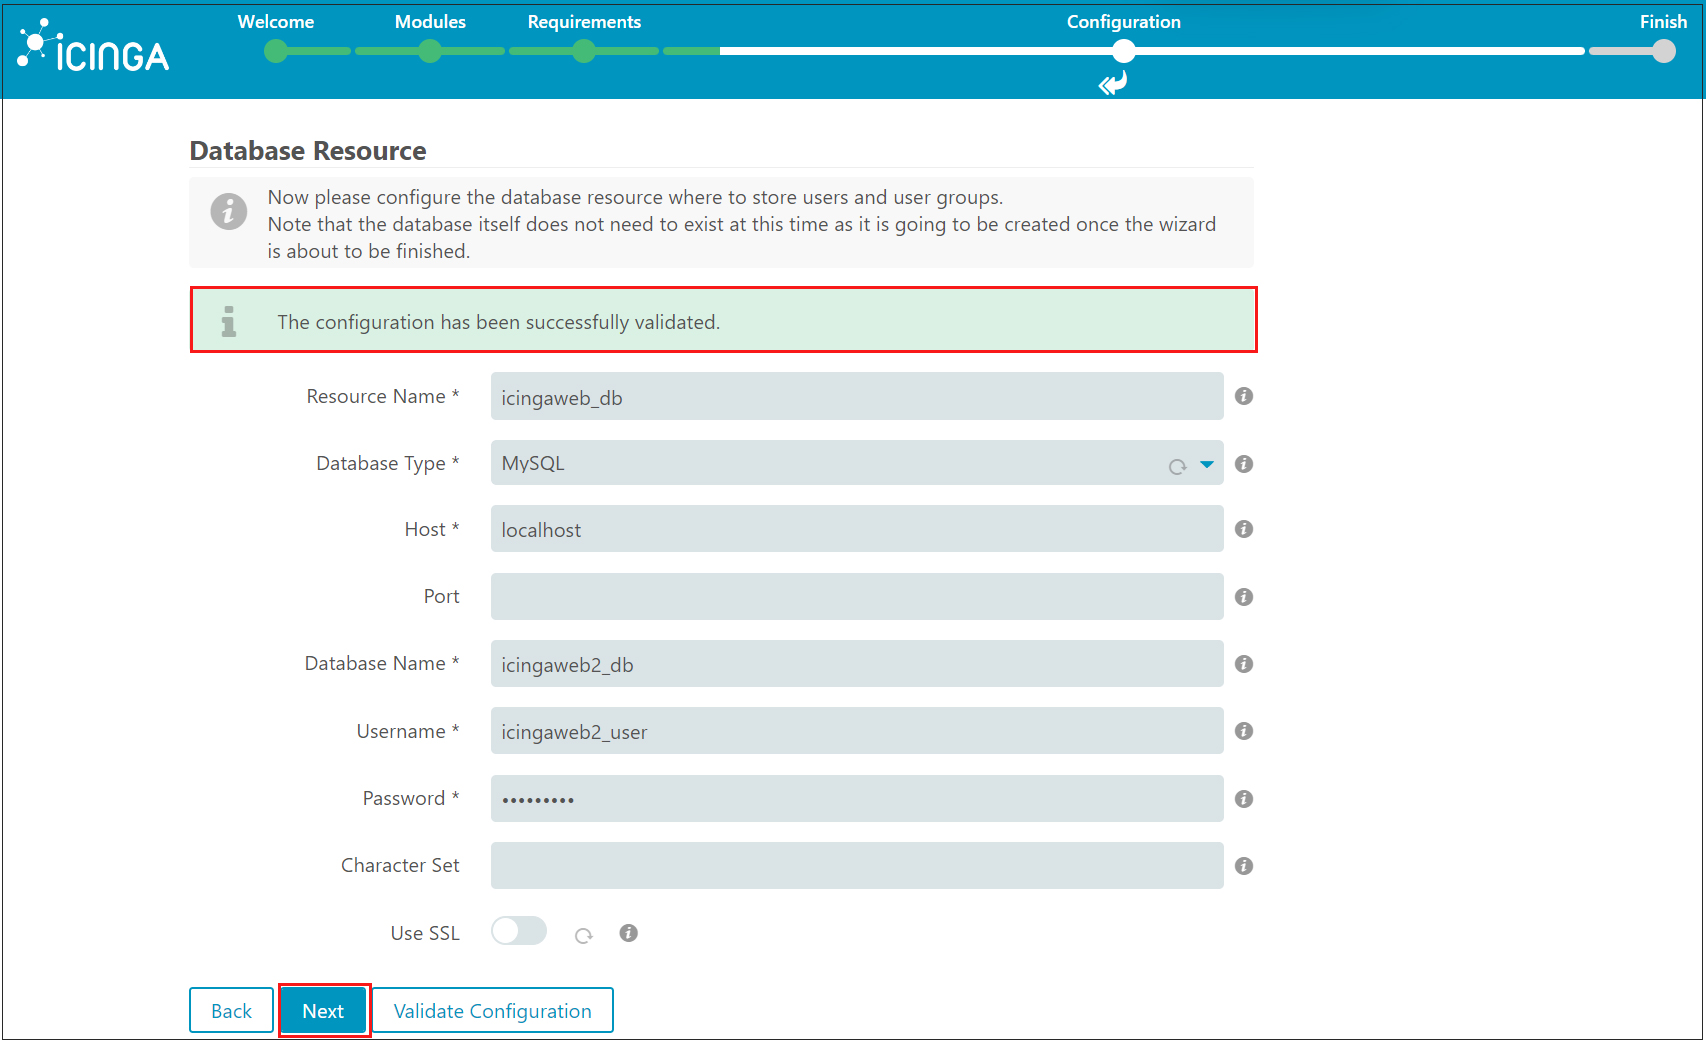
In [Database Resource], enter the IcingaWeb2 database information as specified in [6. Create IcingaWeb2 database].
To verify that the database details are correct, click Validate Configuration
If all is well, you will receive a notification that the configuration has been successfully verified as follows, click Next
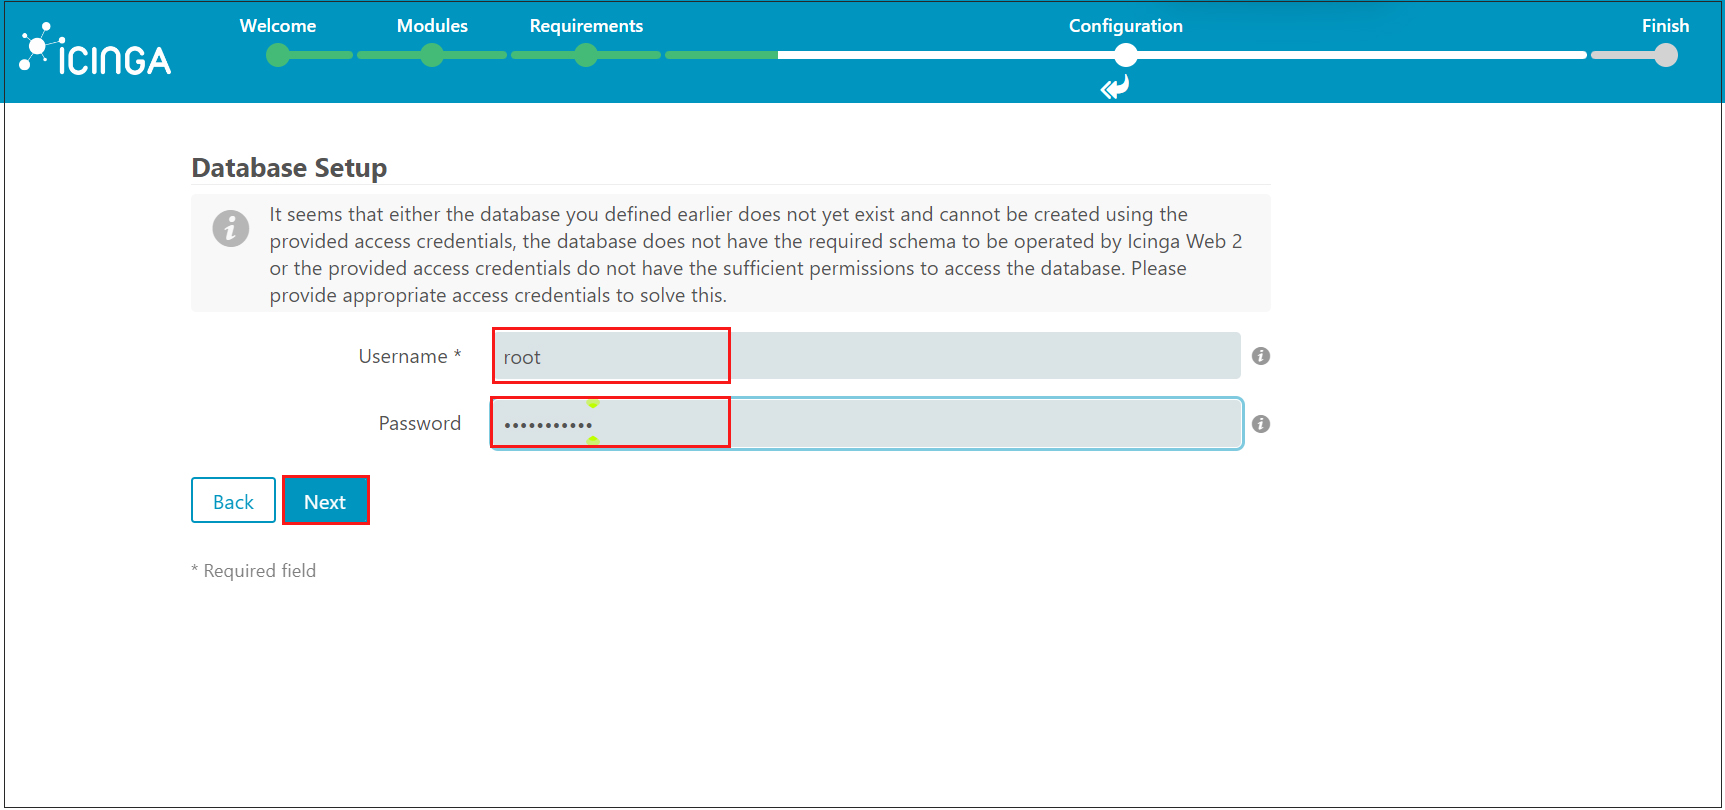
When the following [Database Setup] is displayed, enter the MySQL login credentials as follows and click [Next].
Username : root
Password : root Password
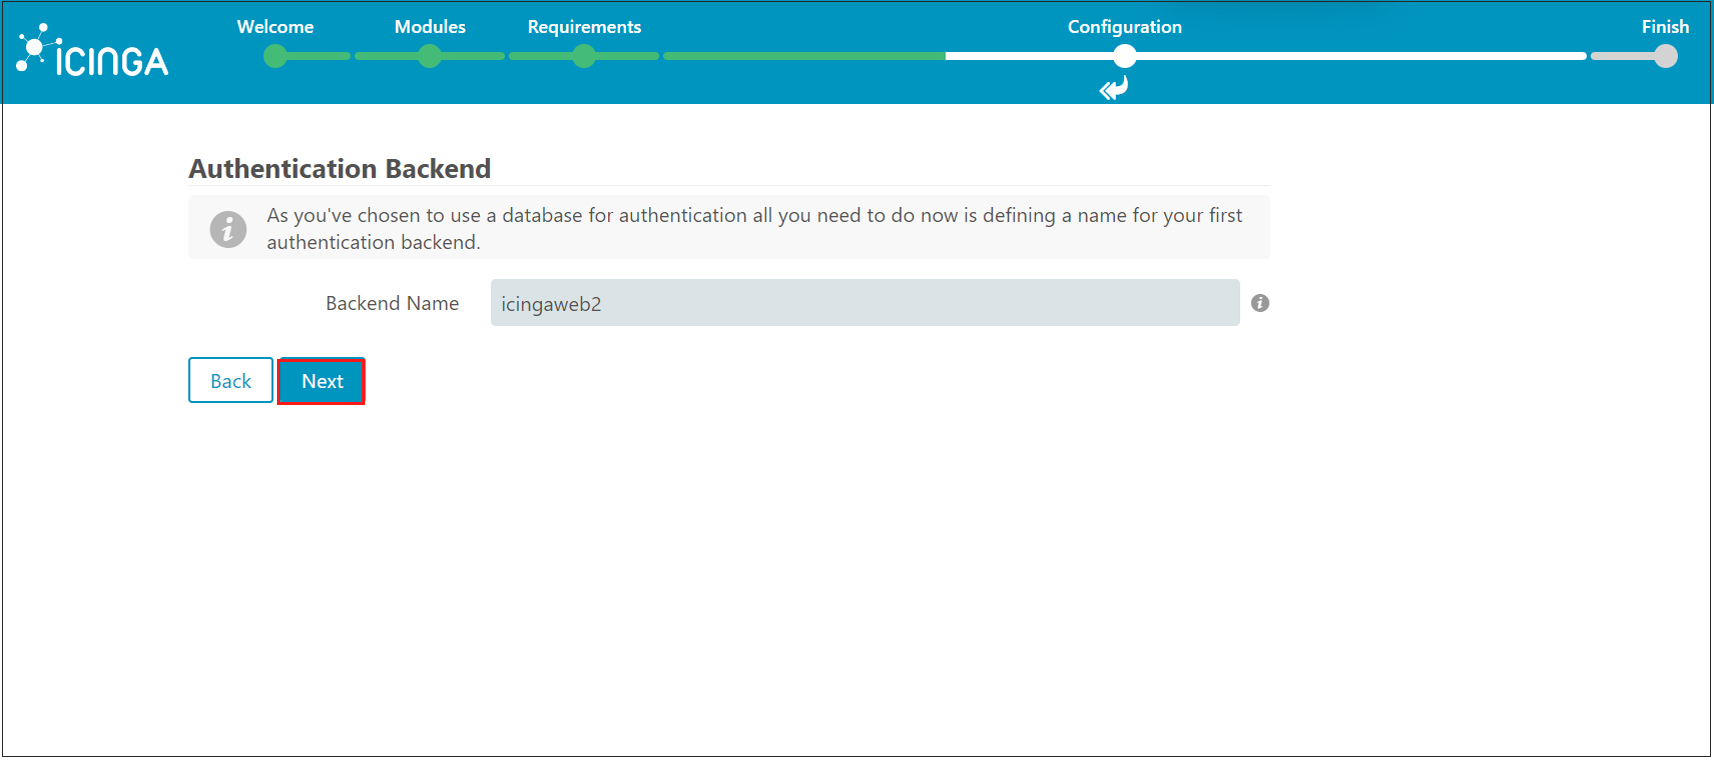
[Under "Authentication Backend," leave the defaults and click "Next."
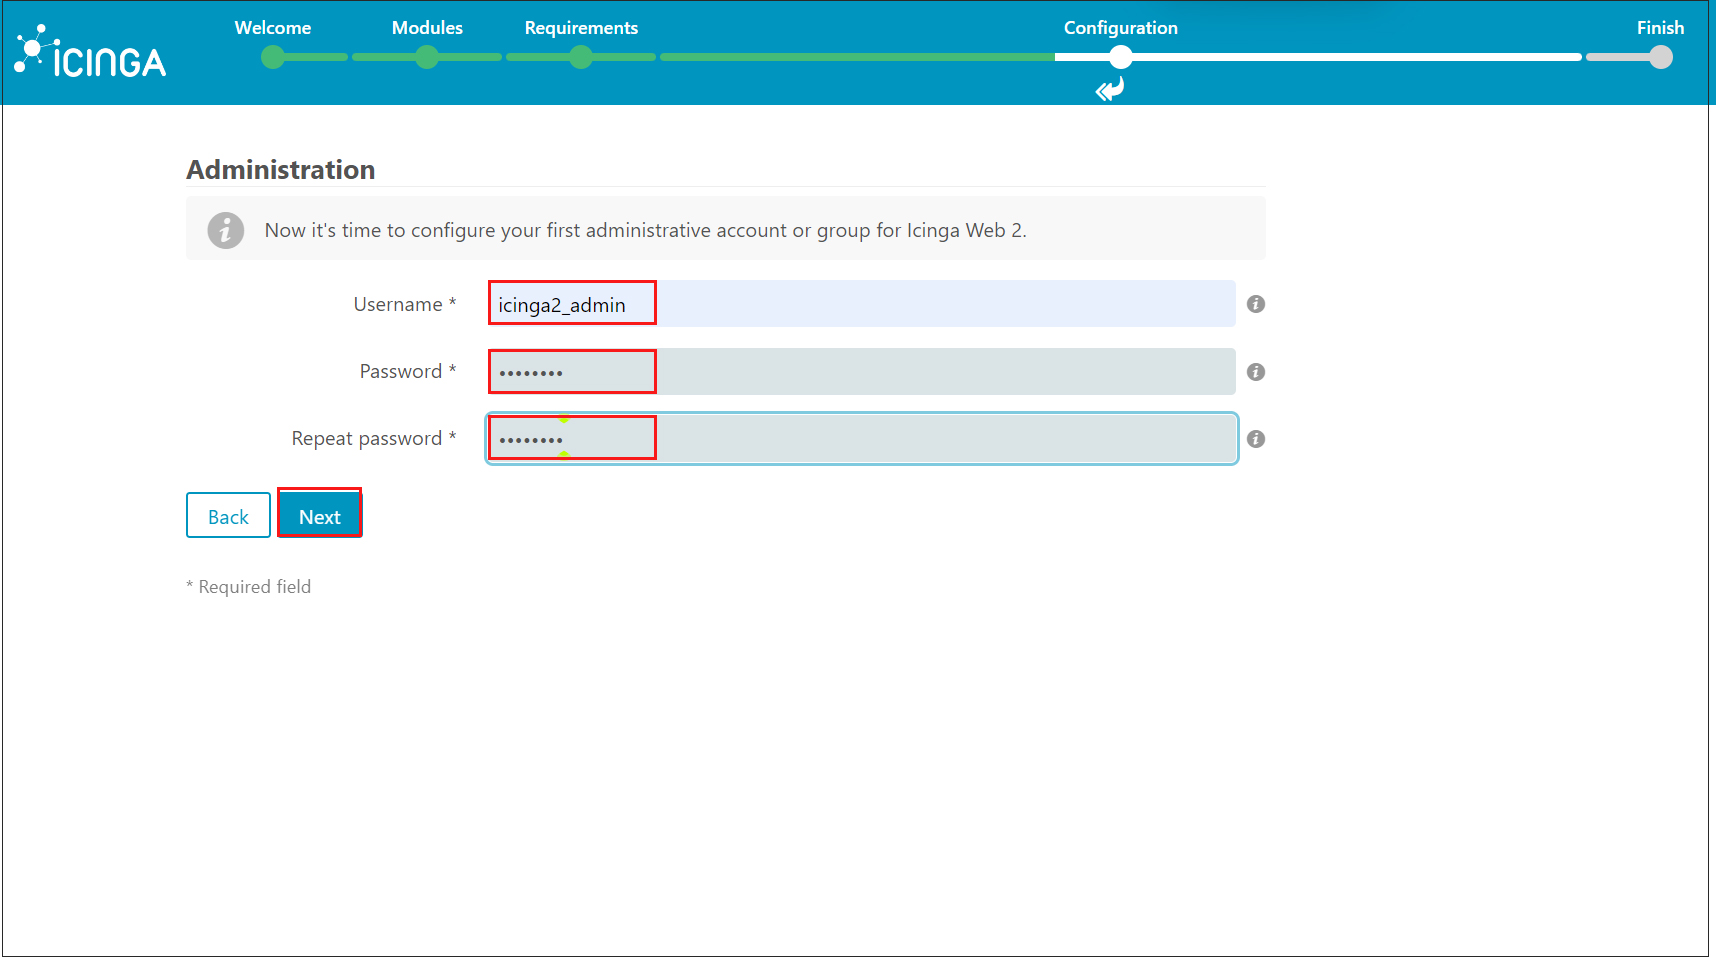
Create a new administrator user to access and login to the Icinga2 web interface
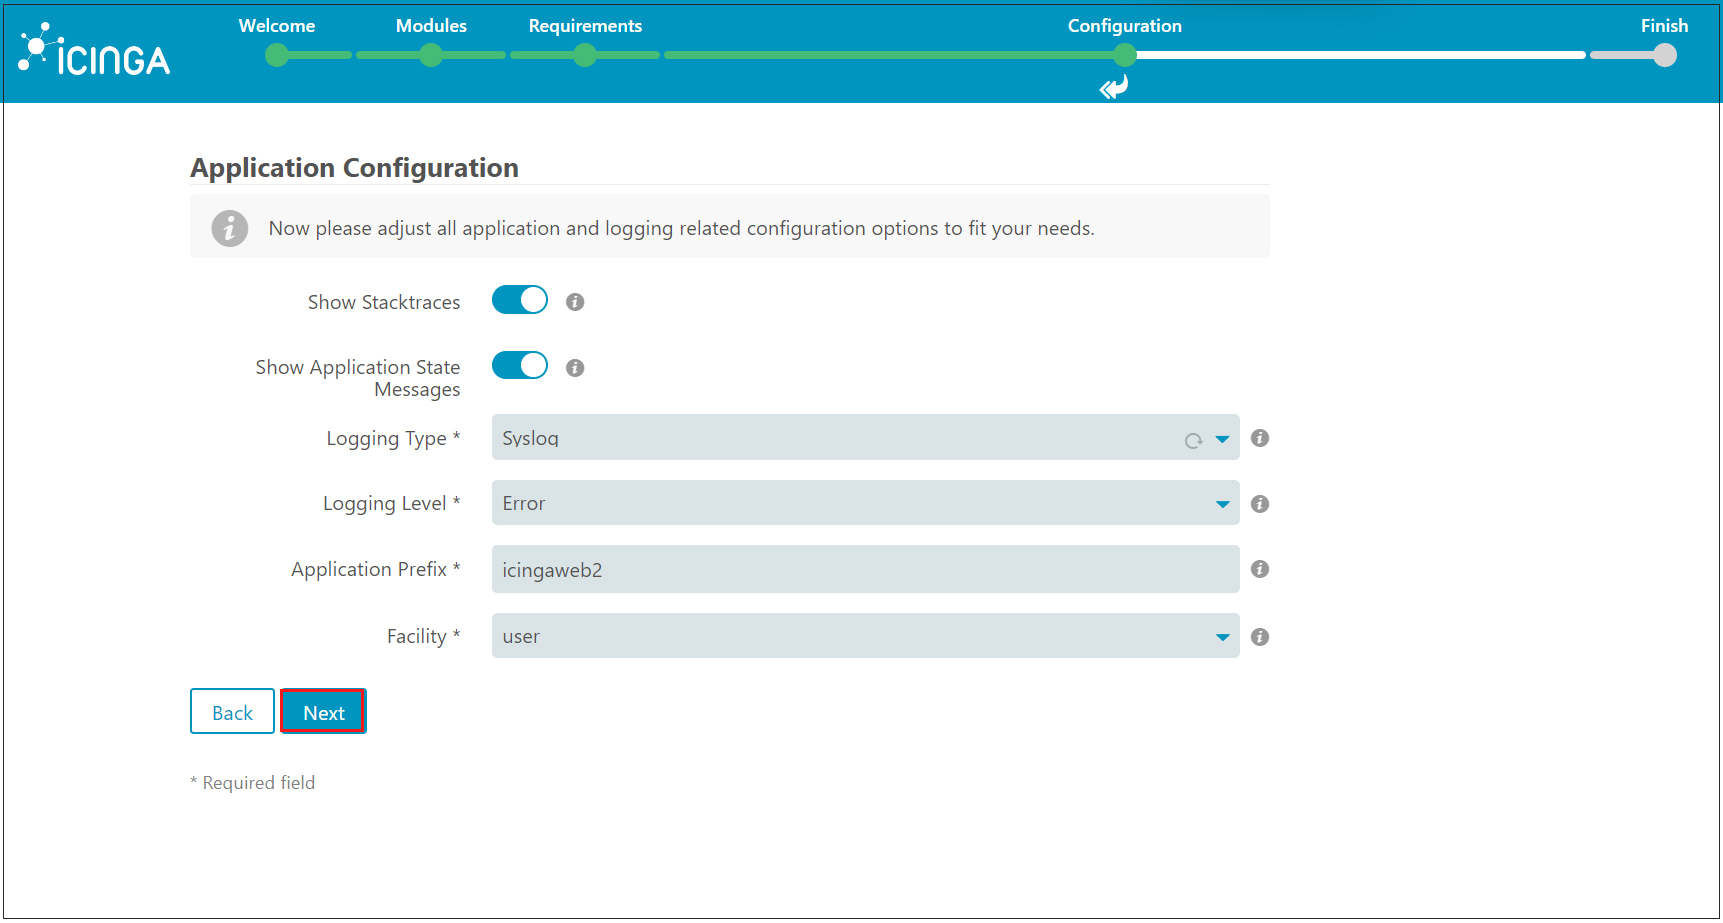
Under [Application Configuration] , leave the defaults and click Next.
Review all changes made so far. If all is well, click Next.

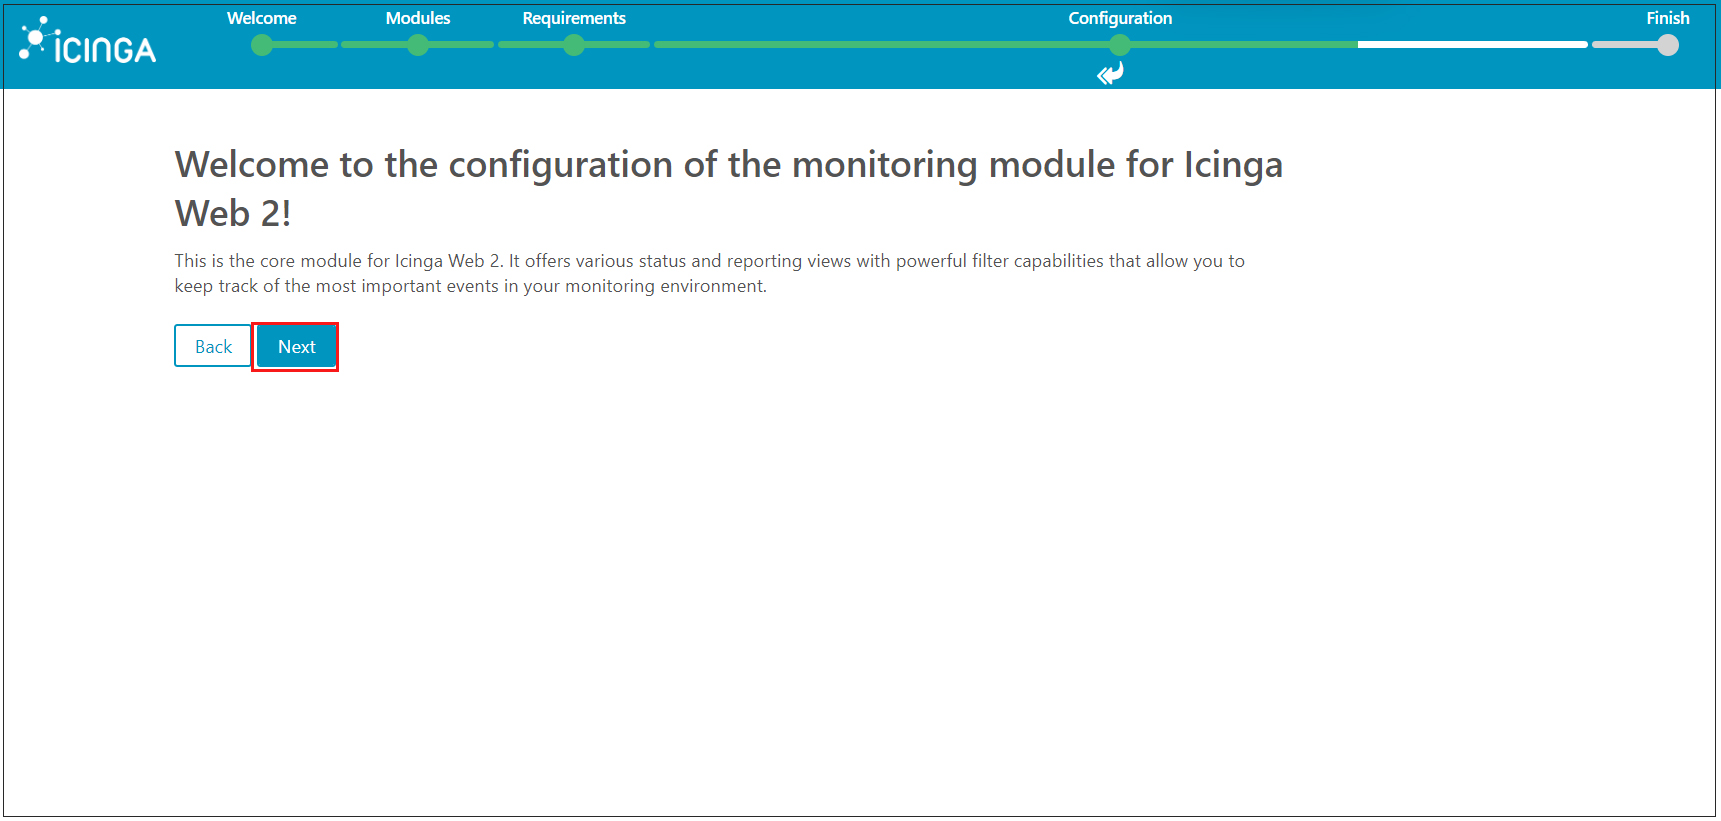
Here is the configuration of the monitoring module for IcingaWeb2 [Next] Click
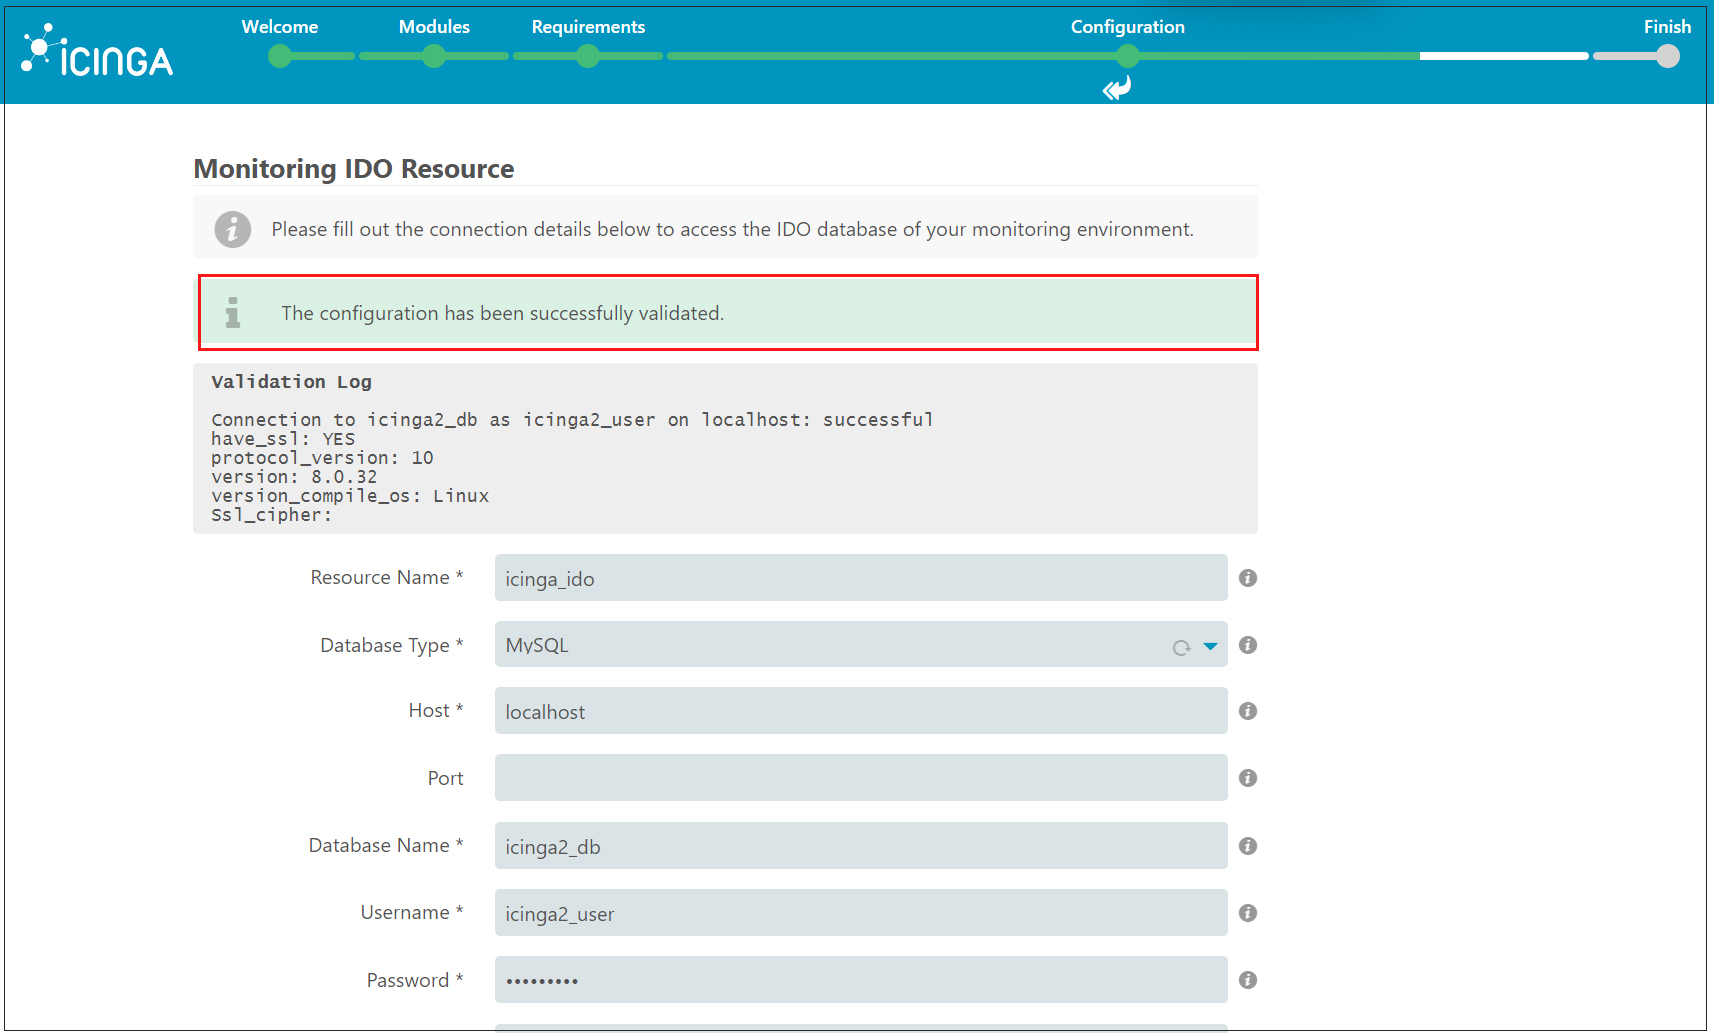
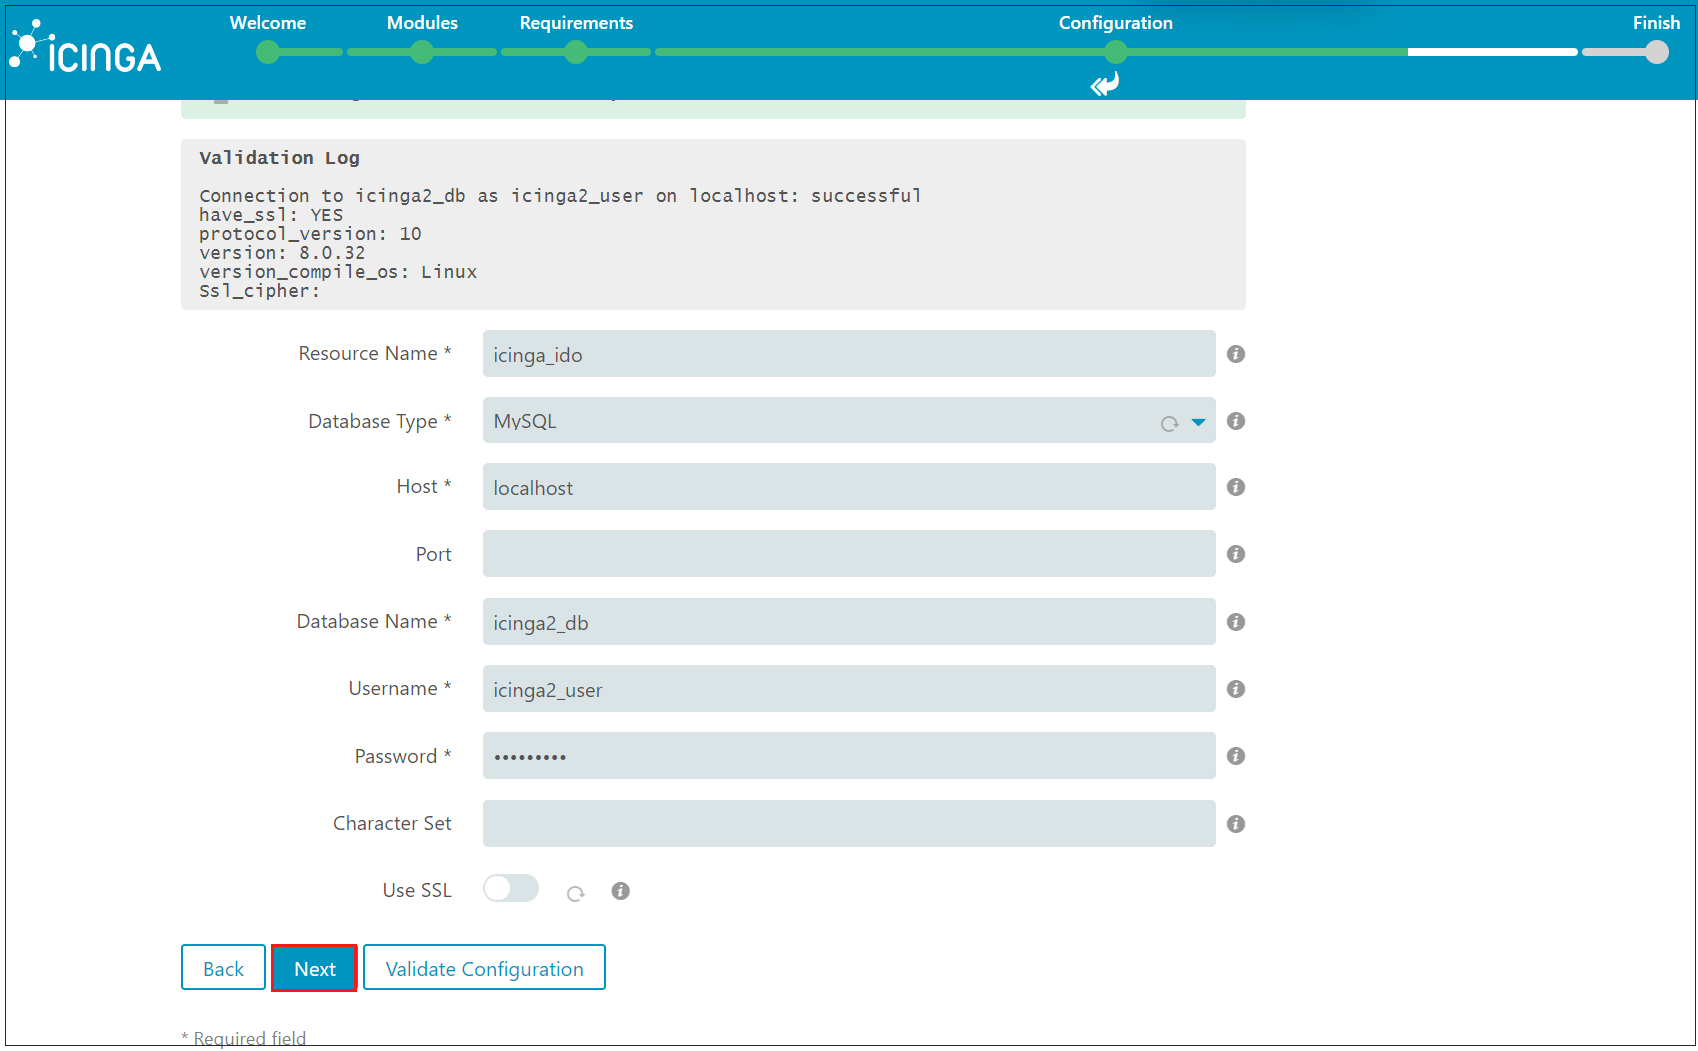
Here, enter the database information for the Icinga2-ido-mysql function specified in [4. Create database for Icinga-IDO MySQL module] in the form and click [Validate Configuration] to validate the configuration

Receive notification that the configuration has been successfully verified. Click "Next.
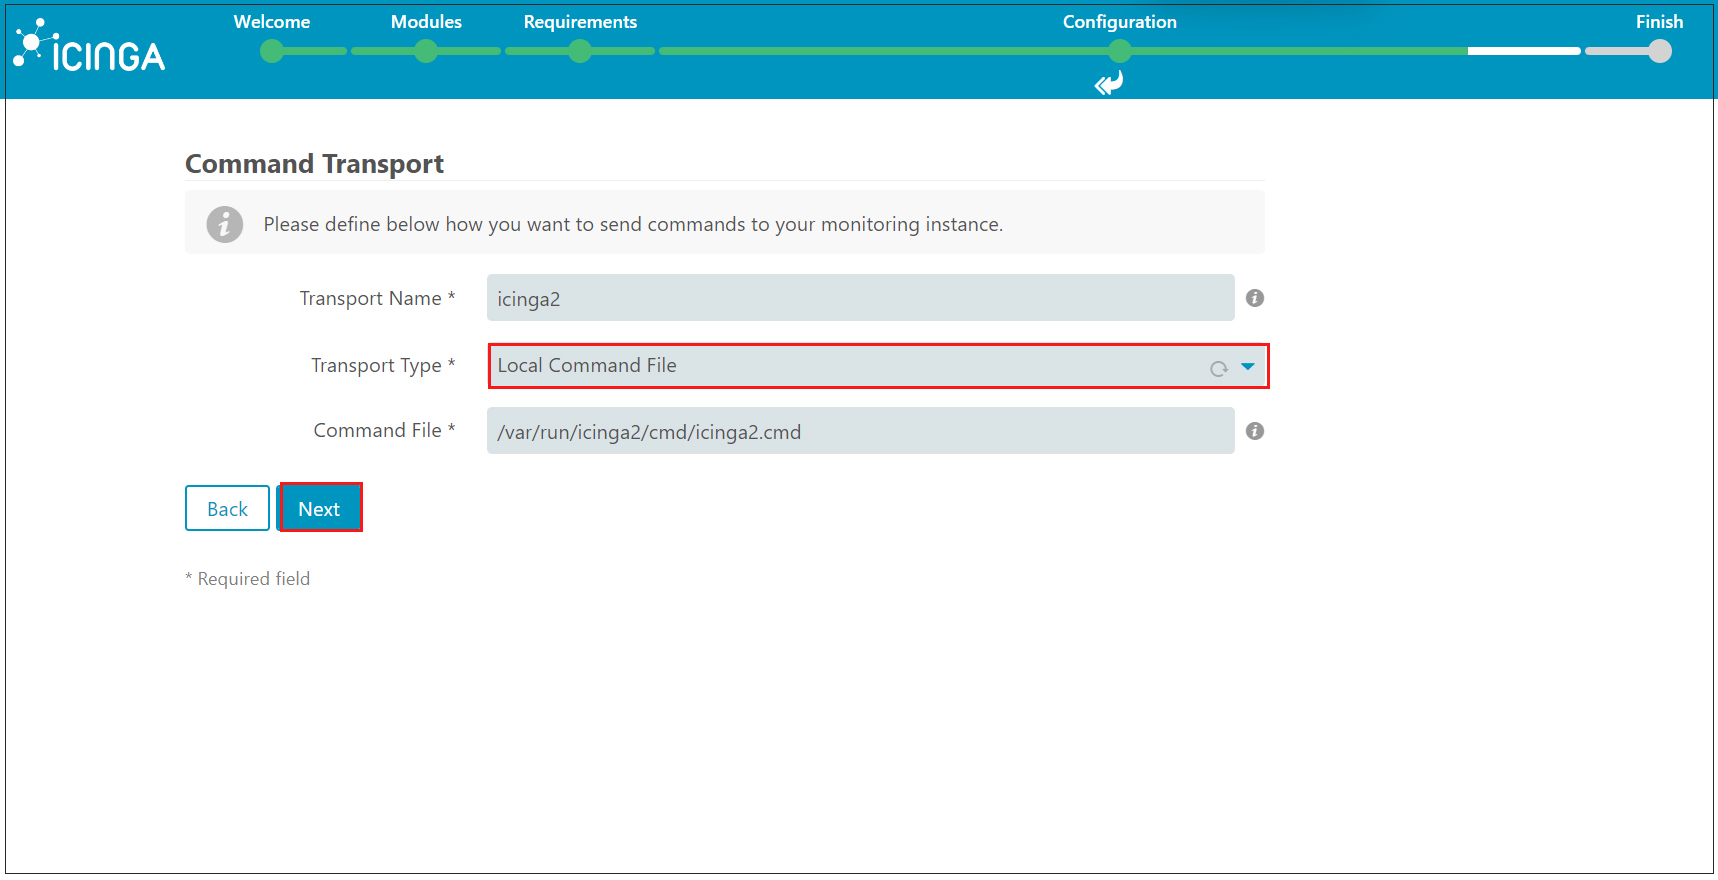
Under "Command Trnsport," select "Local Command File" as the Transport Type and click "Next.
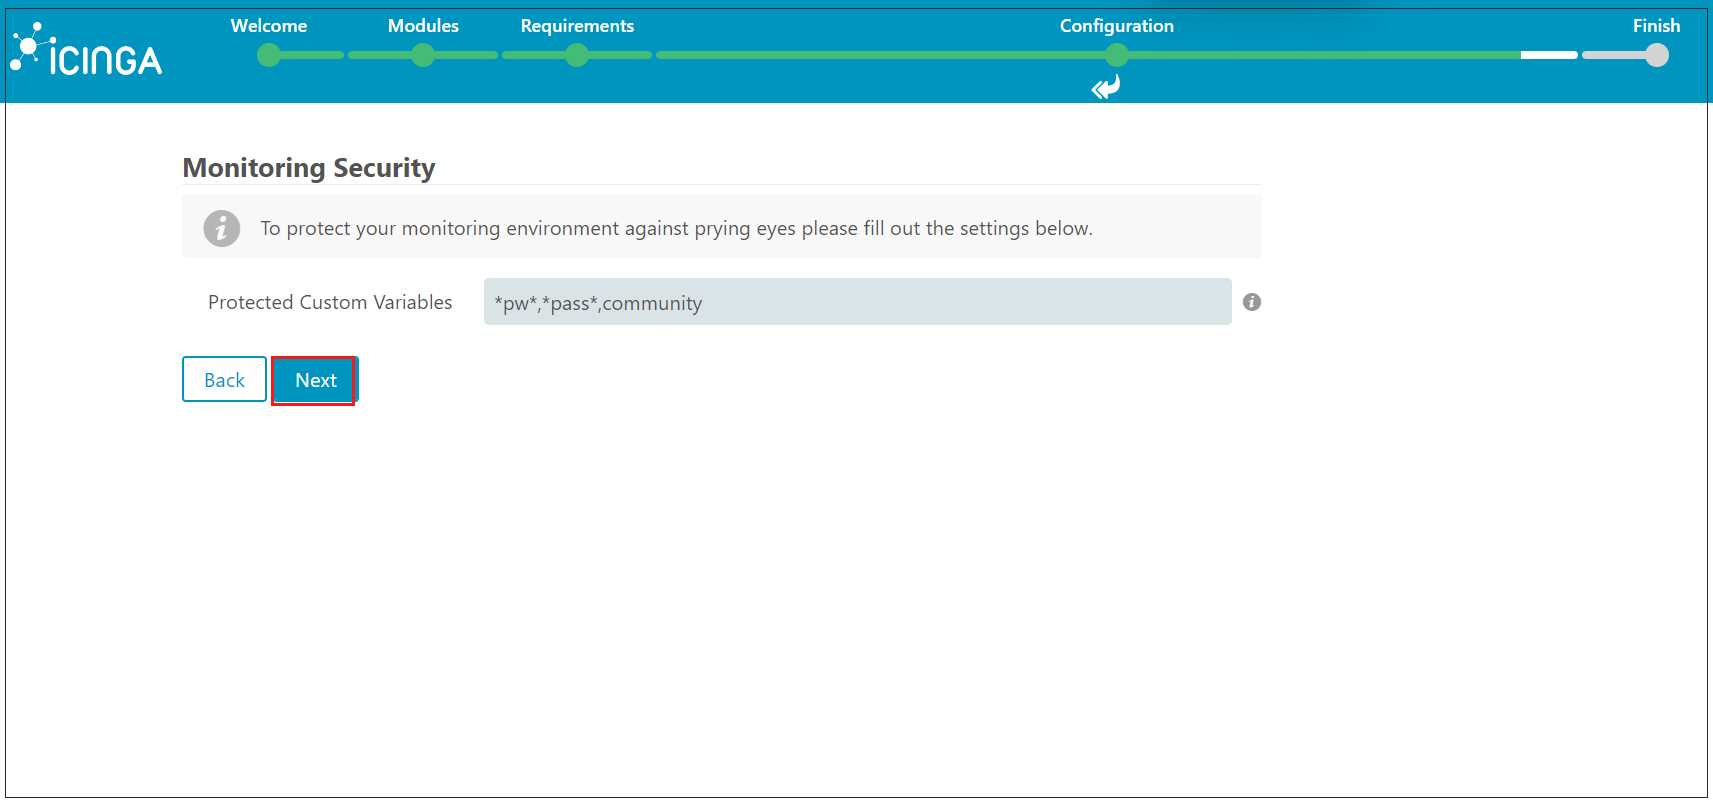
Leave [Monitoring Security] as the default and click [Next]
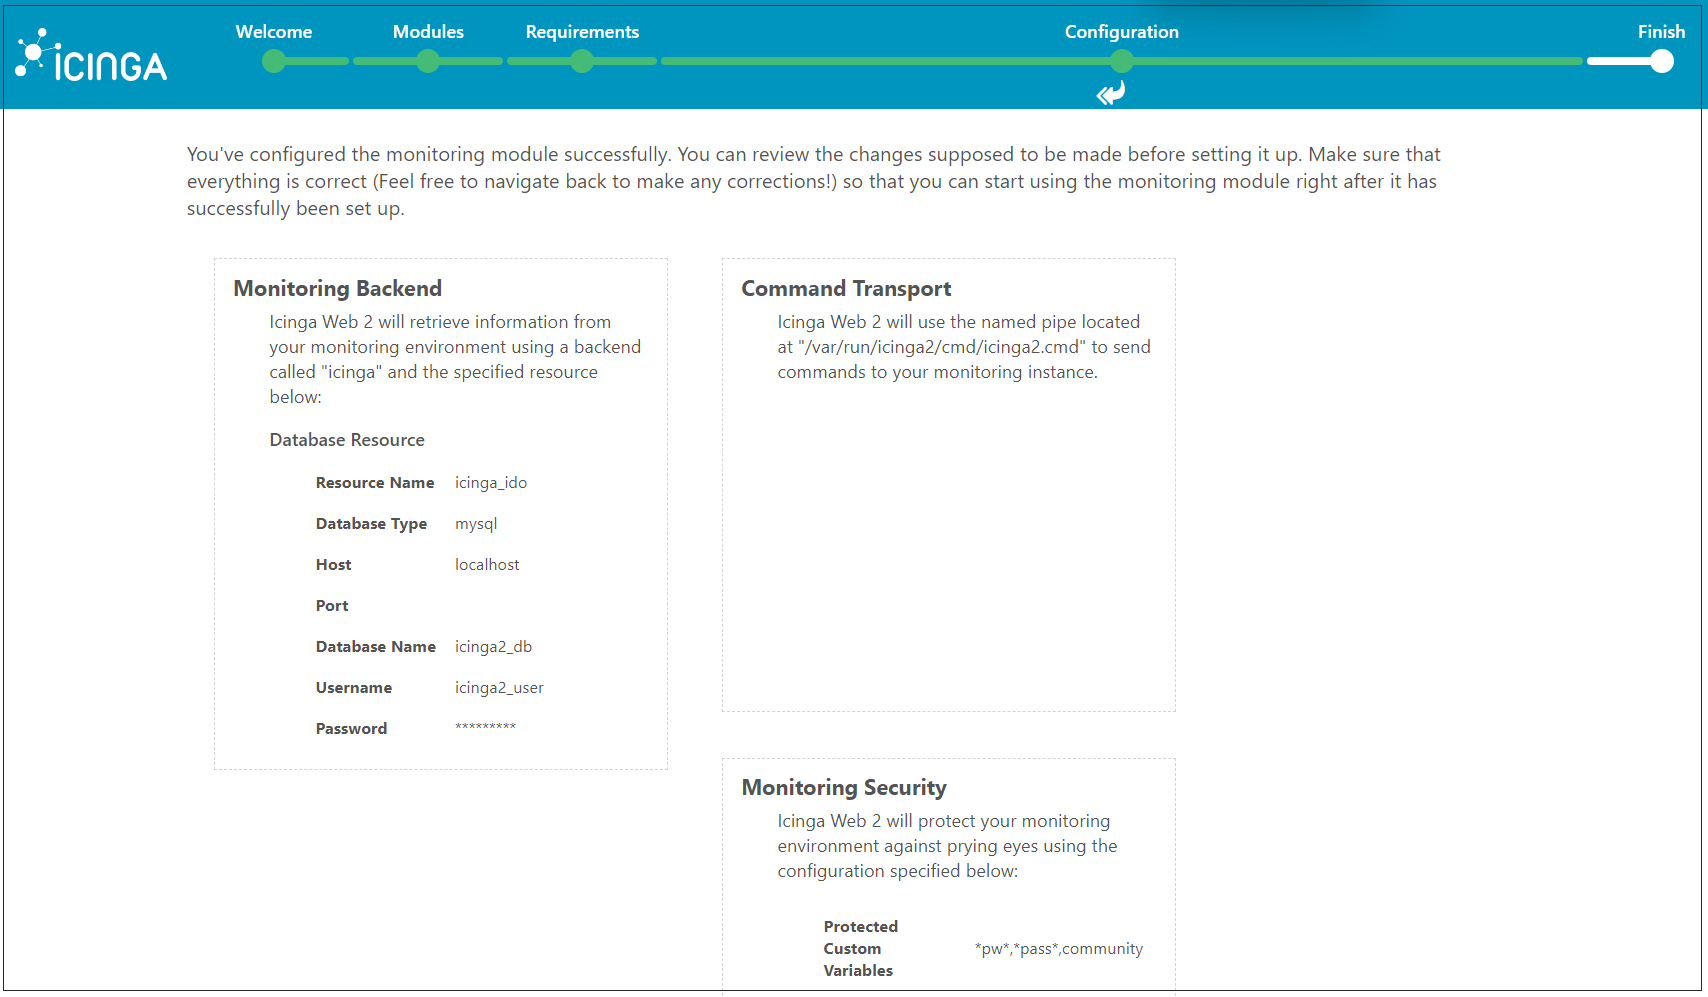
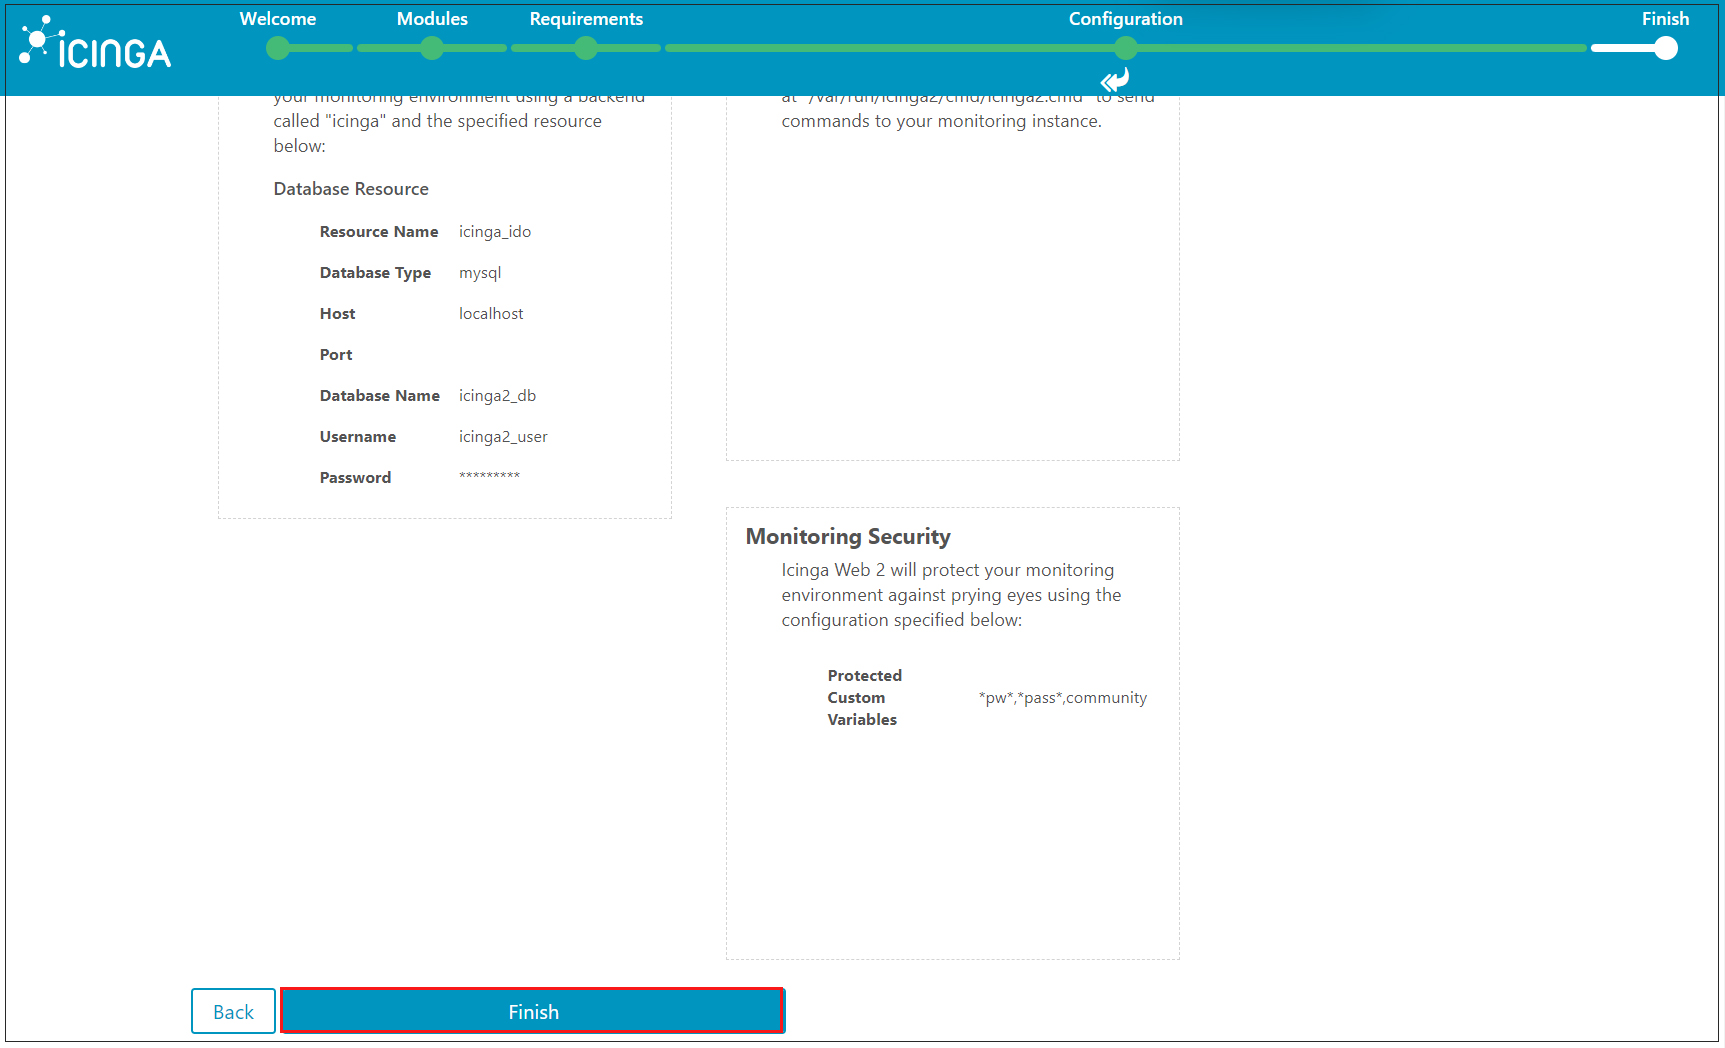
Check all configurations of the Icinga2 monitoring module again and if everything is ok, click "Finish"
You will receive a notification that Icinga Web 2 has been successfully set up. To login to the web interface, click on "Login to Icinga Web 2"

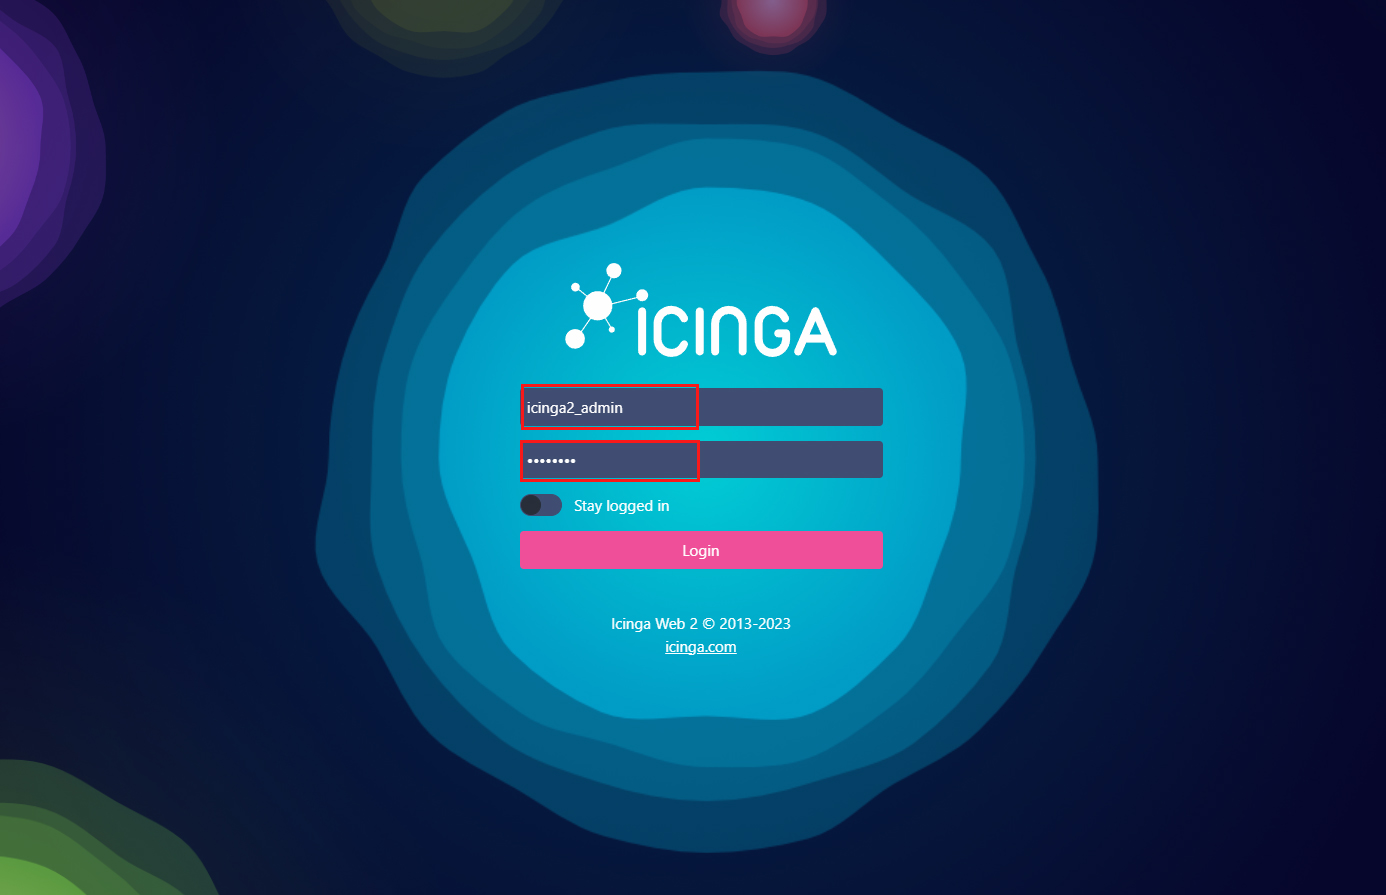
The Icinga Web 2 interface will open. Enter the administrator account name, password, and click "Login"
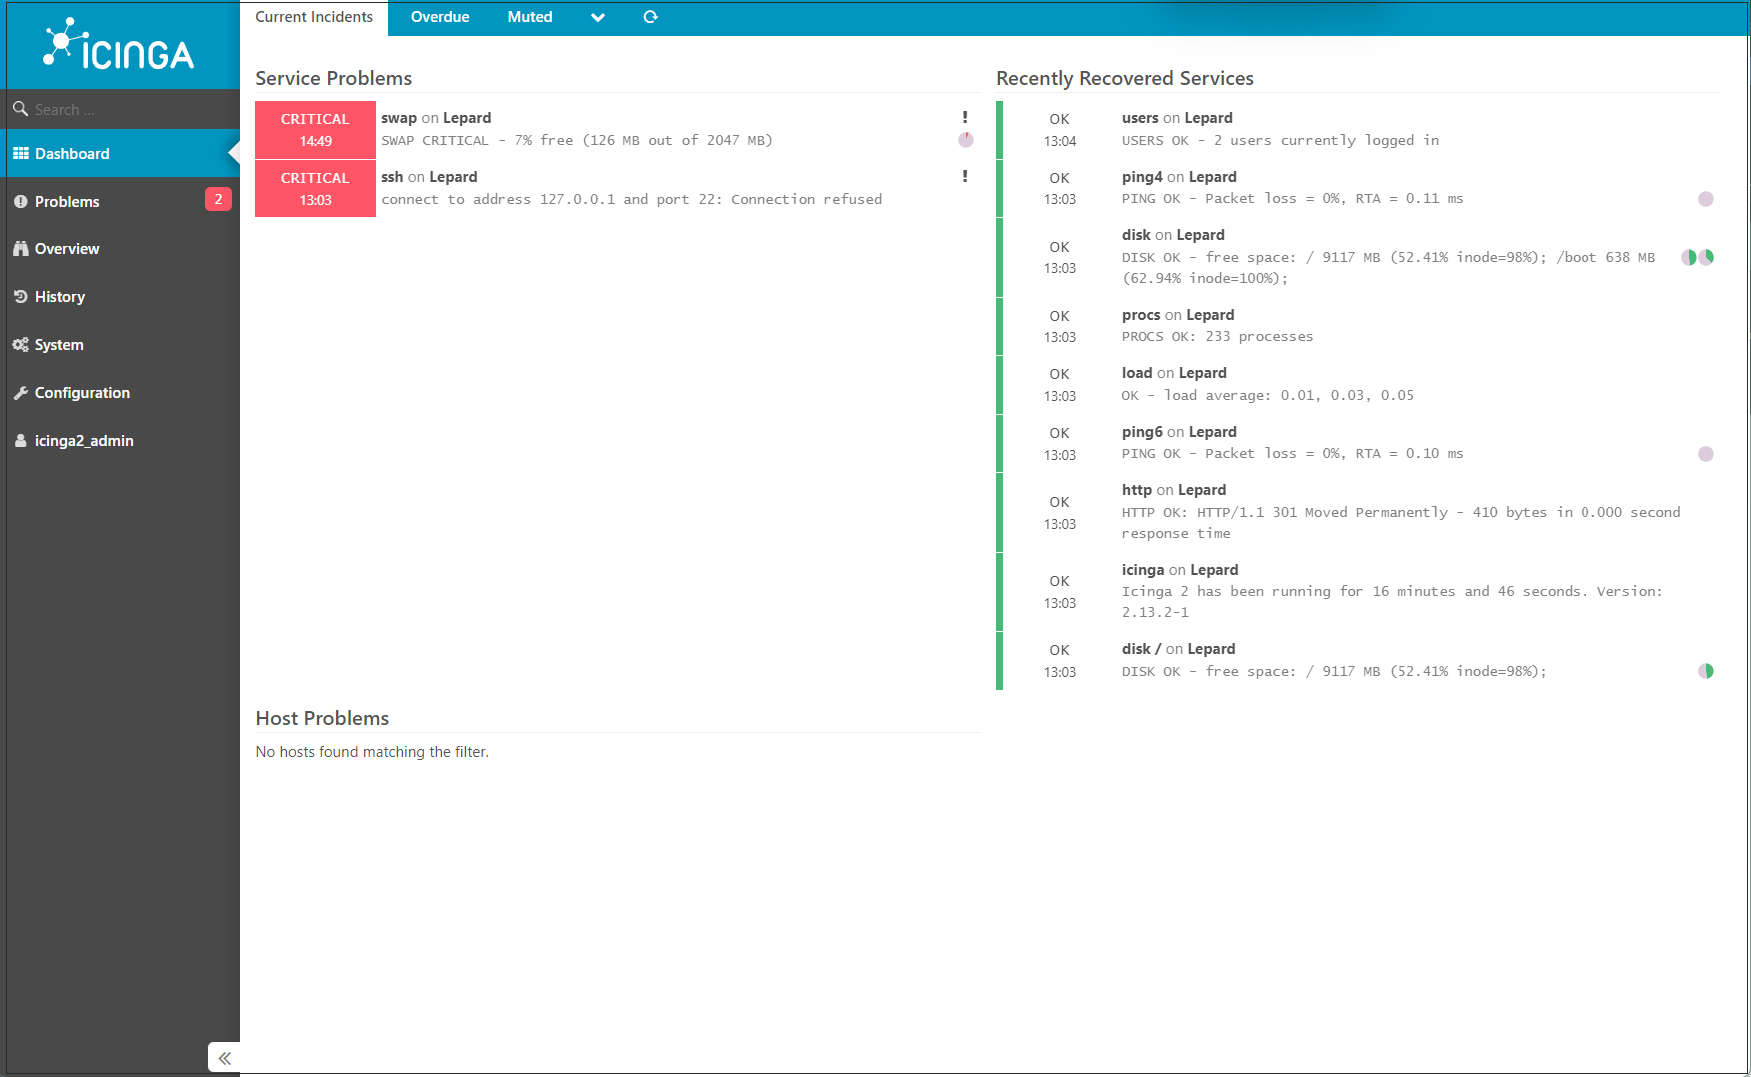
Icinga2 monitoring dashboard appears