

1. SSH service security settings
The SSH service allows root user login by default.
Since the root user already knows the username, if the password is known, he can log in to the server with administrator rights.
1.1 Creating a general user
If you have created a general user during the installation of Ubuntu 20, this step is not necessary.
If the only user created on the server is root, you will not be able to log in remotely via SSH, so if you have not created a user when you installed the OS, you will need to create one beforehand.
To create a user, use the "useradd" command.
The "-m" option is used to create a home directory and the "-p" option is used to specify a password.
For example, to set "ubuntuuser" as the user account name and "123456" as the password, you would run
|
1 |
# useradd -m -p 123456 ubuntuuser |
1.2 Changing the SSH service configuration file
Modify the configuration file to change the settings of the SSH service.
The configuration file for the SSH service is "/etc/ssh/sshd_config".
This time we will proceed by changing the default SSH port from 22 to 2244.
|
1 |
# vi /etc/ssh/sshd_config |
#line 16 : Add port 2244
# port 22
Port 2244
#line 35 : Change the parameter "PermitRootLogin prohibit-password".
The parameter "prohibit-password" means to disable password authentication for root.
# Authentication:
#LoginGraceTime 2m
#PermitRootLogin prohibit-password
↓ Remove comment out #.
PermitRootLogin prohibit-password
#StrictModes yes
#MaxAuthTries 6
#MaxSessions 10
Restart SSH service
|
1 |
# systemctl restart sshd |
If no error is printed, the restart is complete.
With an SSH client, make a remote connection to the server by root and check that the connection is rejected.

The server's authentication log "/var/log/auth.log" also shows that the connection was rejected as follows
|
1 2 3 4 |
# vi /var/log/auth.log Oct 31 17:32:51 ubuntu-10 sshd[1422]: pam_unix(sshd:auth): authentication failure; logname= uid=0 euid=0 tty=ssh ruser= rhost=192.168.241.10 user=root Oct 31 17:32:54 ubuntu-10 sshd[1422]: Failed password for root from 192.168.241.10 port 50730 ssh2 |
2. SSH connection with authentication using RSA public key cryptography
2.1 Creating a public/private key pair
Create a public/private key pair for the user who will connect to the Linux server using OpenSSH.
To create a key pair, use ssh-keygen.
This time we will create a key set using the RSA cipher, which is used with the SSH protocol Version 2.
The creation of a public/private key pair should be performed as a remote login user.
If you don't specify the destination and file name, id_rsa and id_rsa.pub will be created in /home/(user name)/.ssh/.
On the way, you also enter the password for the key.
|
1 |
# su - <user name> |
|
1 2 3 4 5 6 7 8 9 10 11 12 13 14 15 16 17 18 19 20 |
$ /usr/bin/ssh-keygen -t rsa Generating public/private rsa key pair. Enter file in which to save the key (/home/nuy/.ssh/id_rsa): /home/nuy/.ssh/id_rsa Enter passphrase (empty for no passphrase): xxxxxxx ←Any password Enter same passphrase again: xxxxxxx ←Re-enter password Your identification has been saved in /home/foo/.ssh/id_rsa. Your public key has been saved in /home/nuy/.ssh/id_rsa.pub. The key fingerprint is: 96:af:59:18:9c:a0:c2:da:86:7e:d7:24:05:d0:31:da foo@p183 The key's randomart image is: +--[ RSA 2048]-----------------------------------------+ | .oo. | | oo. | | . Eo | | . . + o | | o . . S | | + . . o + | |o o + . o | |.. . . . + | | .. . o | |
|
1 2 3 |
$ chmod 700 ~/.ssh $ cat ~/.ssh/id_rsa.pub >> ~/.ssh/authorized_keys $ chmod 600 ~/.ssh/authorized_keys |
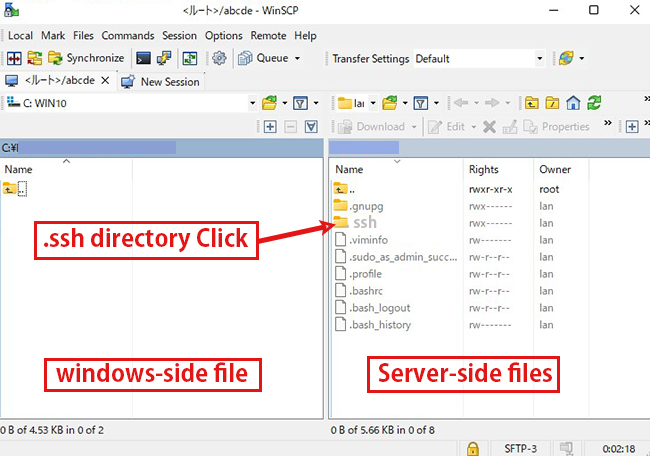
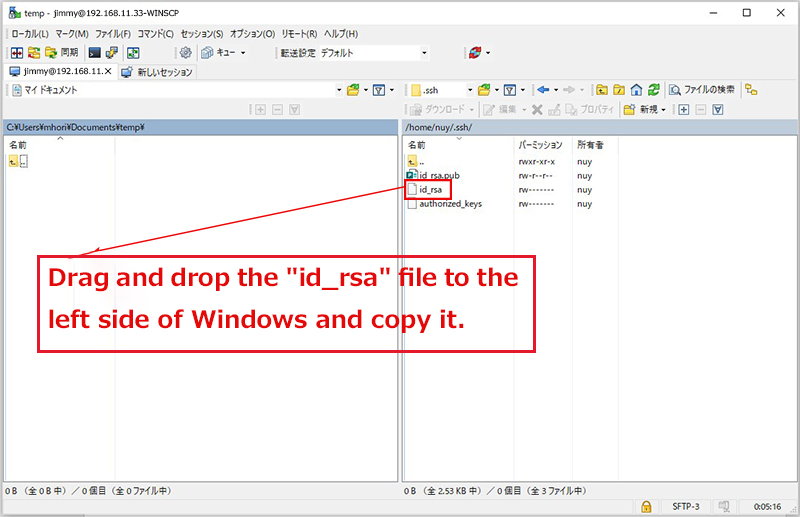
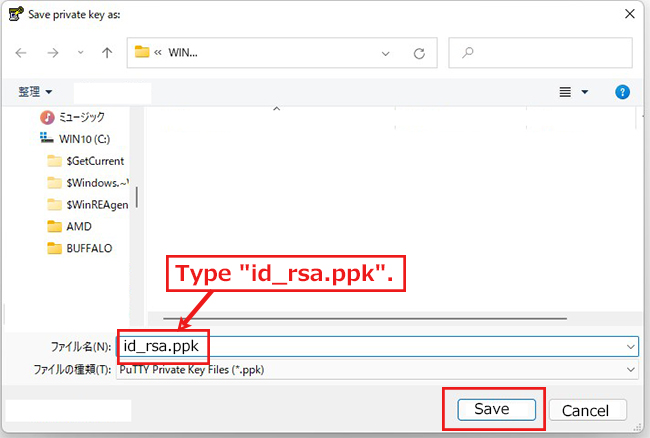
Using Winscp or similar, save your private key (~/.ssh/id_rsa) to a suitable location on Windows.
2.2 Editing the SSH configuration file
To disable password authentication, edit the SSH configuration file.
This time, instead of being a normal user, you can su - to become root.
|
1 2 |
$ su - Password: |
|
1 2 3 4 5 |
# vi /etc/ssh/sshd_config Per Line59 # PasswordAuthentication yes PasswordAuthentication no ← Change to no |
|
1 |
# systemctl restart sshd.service |
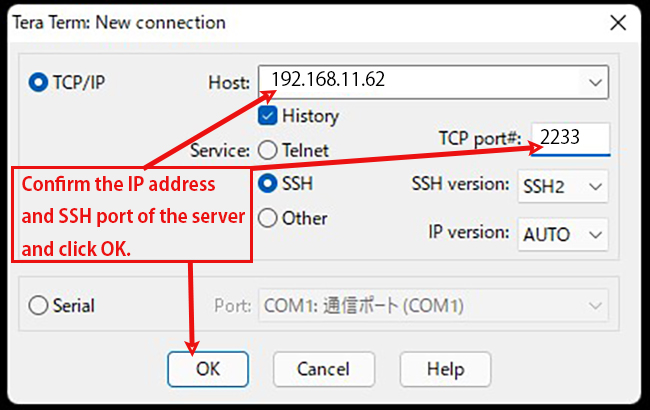
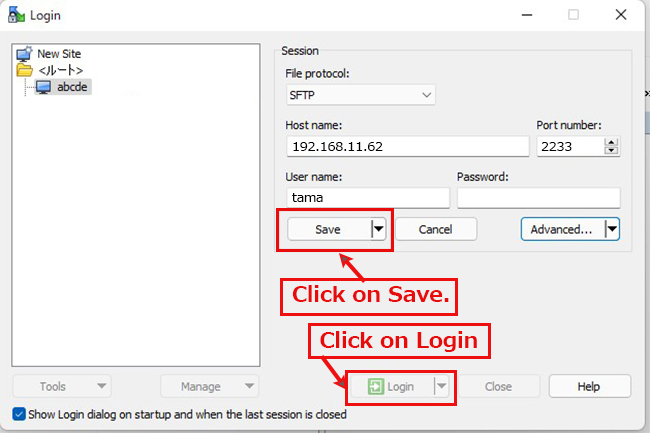
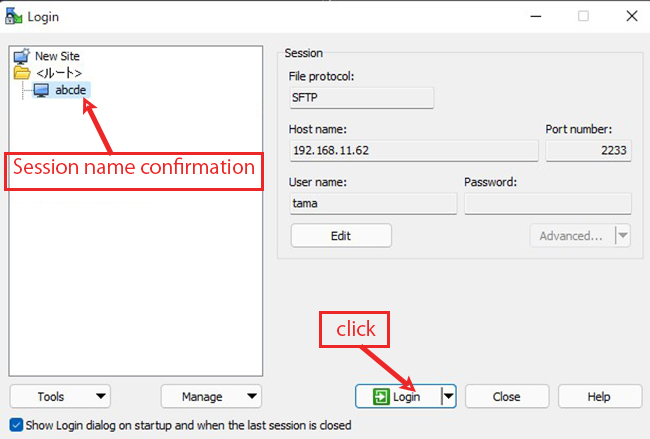
How to connect with Tera Term
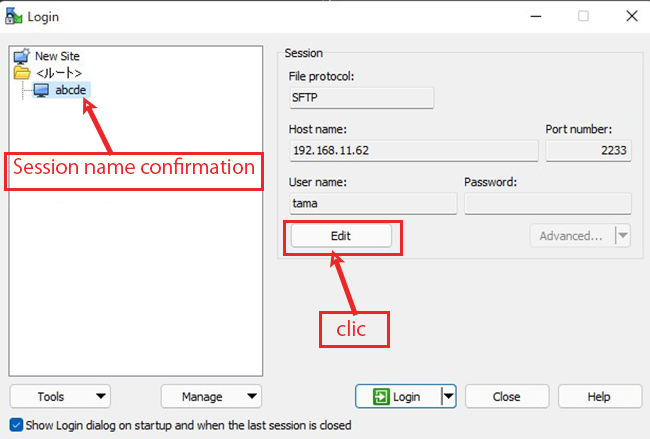
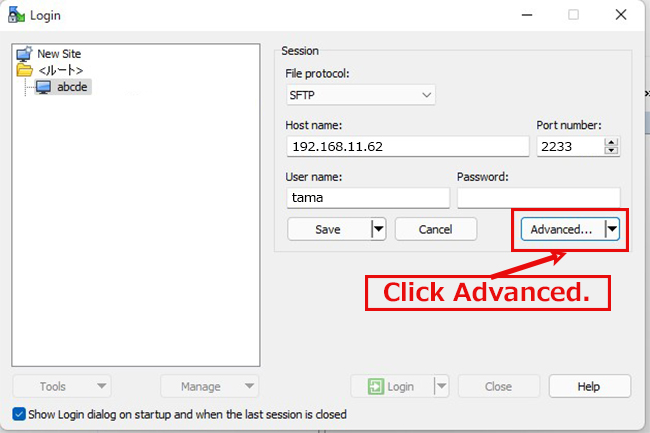
The host address (hostname), TCP port and user name should match your server.
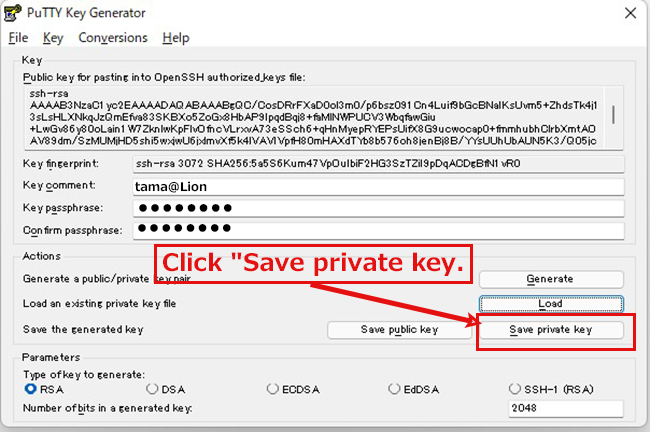
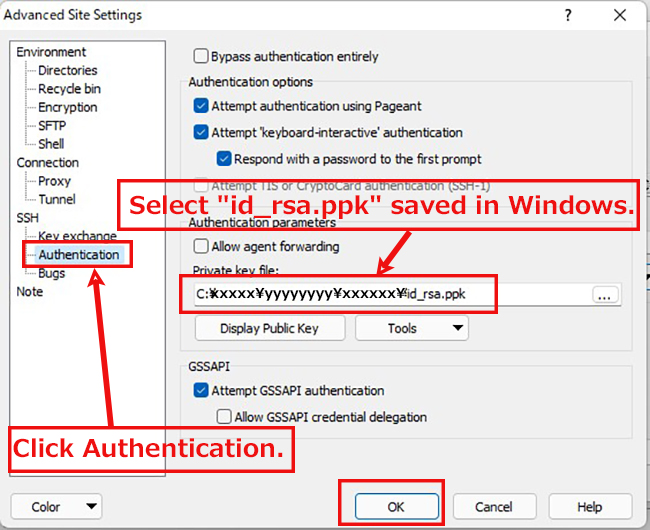
2.3 Creating a private key using PuTTYgen
The host address (hostname), TCP port and user name should match your server.
Start Winscp and launch puttygen.exe from Tools
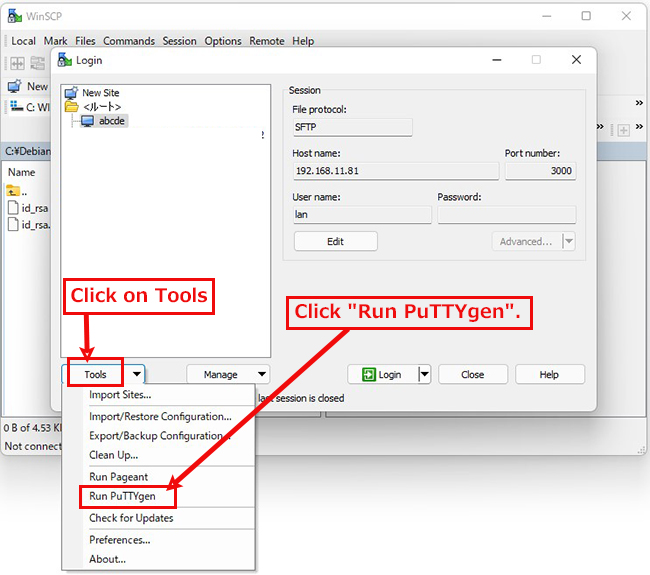
Click on Load
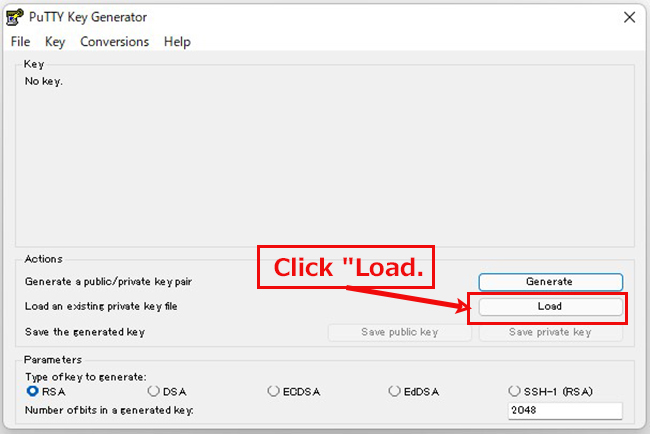
When the [ Open File Dialog ] opens, change the file type to [ All Files (*. Change the file type to [ All Files (*. *) ] and load the private key id_rsa transferred from the Linux server.

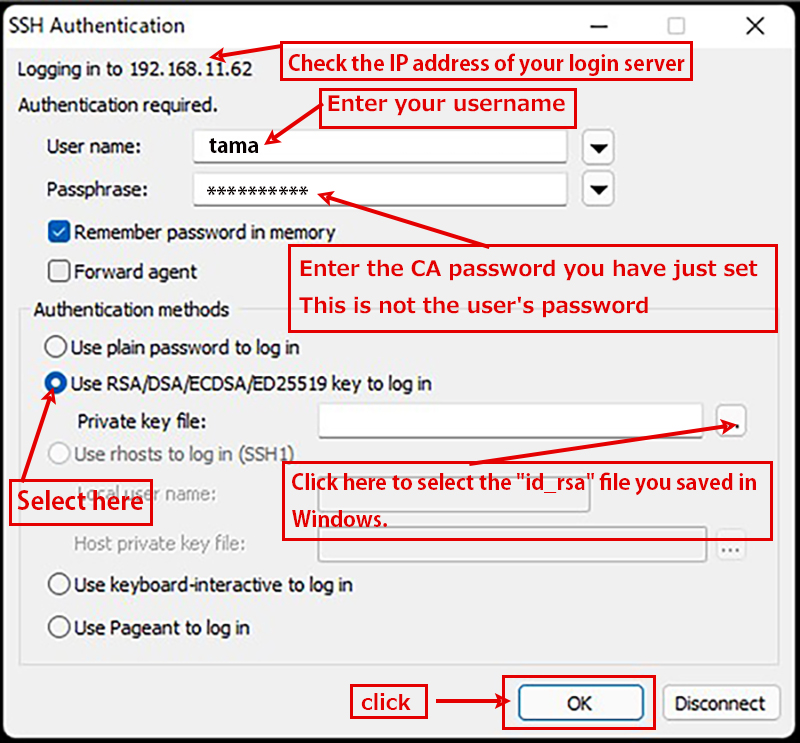
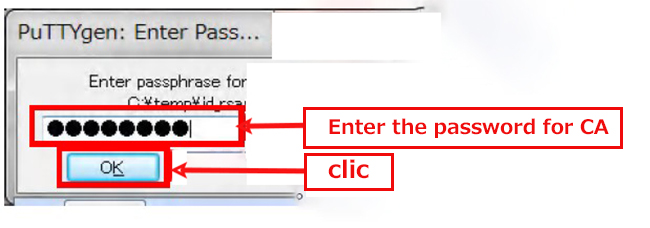
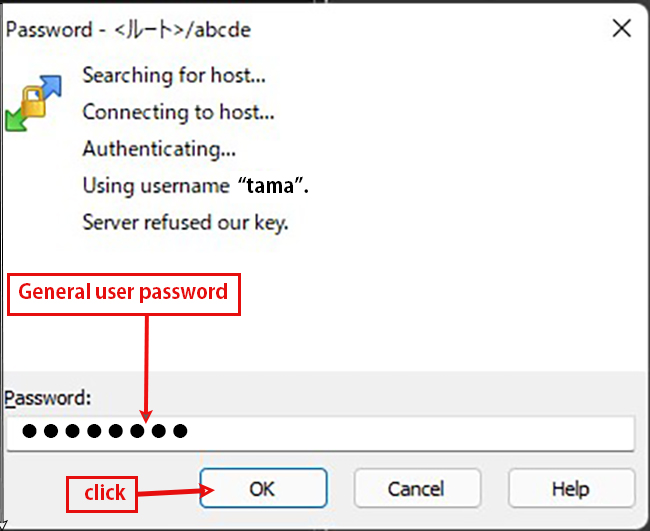
The CA password is the password set in "2.1 Creating a public/private key pair" above.
3. Firewall settings
Since Ubuntu often uses the "ufw" software to configure firewalls, we will use ufw to configure firewall settings.
ufw is installed when you install the operating system.
Minimum filter settings after installation
• All packets forwarded to the server are rejected
• All packets sent from the server to the outside are allowed
• The first port to allow is the port for SSH (2244)
• Limit packets coming into the server
3.1 Check your ufw package
Check which packages are installed with the "dpkg" command to display the packages
|
1 2 |
# dpkg -l | grep ufw ii ufw 0.36-6 all program for managing a Netfilter firewall |
The installed "ufw packages" are now displayed.
Run the command "systemctl status" to check the status of ufw
|
1 2 3 4 5 |
# systemctl status ufw ● ufw.service - Uncomplicated firewall Loaded: loaded (/lib/systemd/system/ufw.service; enabled; vendor preset: enabled) Active: inactive (dead) Docs: man:ufw(8) |
You can see that the ufw service is stopped by the message "Active: inactive (dead)".
3.2 Setting up basic firewall rules
If ufw is enabled, the default firewall rules will be applied.
Before enabling ufw, some basic rules should be set up, as enabling it at this point may prevent communication with the server.
3.2.1 Incoming packets Setting the default rule
The first step is to set up rules for incoming packets.
The general rule is to reject all incoming packets except for specific communications.
Execute "ufw default deny incoming" to essentially deny all incoming packets.
|
1 2 3 |
# ufw default deny incoming Default incoming policy changed to 'deny' (be sure to update your rules accordingly) |
3.2.2 Outgoing packets Setting the default rule
The general rule is to allow all outgoing packets.
Execute "ufw default allow outgoing" to basically allow outgoing packets.
|
1 2 3 |
# ufw default allow outgoing Default outgoing policy changed to 'allow' (be sure to update your rules accordingly) |
3.3 Enabling ufw
Enable ufw auto-start, but set up SSH connection permissions first, as this may prevent SSH remote connections.
The default SSH port is 22. Set permissions with the following command
|
1 2 |
# ufw allow ssh # ufw reload |
If you have configured your own port 2244 (e.g.)
|
1 2 |
# ufw allow 2244/tcp # ufw reload |
Execute the "ufw enable" command.
|
1 2 3 |
# ufw enable Command may disrupt existing ssh connections. Proceed with operation (y|n)? y Firewall is active and enabled on system startup |
You will receive a confirmation that the SSH connection will be closed when the command is executed.
The rule allows SSH, so you won't be disconnected. In this case, enter "y".
3.4 Check ufw settings
Verify the rules set in the firewall after they have been enabled. Execute the command "ufw status verbose".
|
1 2 3 4 5 6 7 |
# ufw status verbose Default: deny (incoming), allow (outgoing), disabled (routed) New profiles: skip To Action From -- ------ ---- 2244/tcp ALLOW IN Anywhere 2244/tcp (v6) ALLOW IN Anywhere (v6) |
3.5 Permission to restrict packets coming into the server
If you want to set ufw to "Allow communication coming to port number xxx", execute the following command.
# ufw allow [port number]
If you want to set "Do not allow communication coming to port number xxx", execute the following command
# ufw deny [port number]
3.5.1 Do not allow connections from IP addresses that access the site in succession
Using the SSH port 2244 that you have just configured as an example
The ssh connection is allowed to communicate to port 2244 for the change.
It will try to access port 2244 in succession by typing in the appropriate password and trying to find a coincidental match so that you can log in.
This is also known as a brute force attack.
The solution to this is to set the "Do not allow connections from IP addresses that access the site in succession" setting.
|
1 |
# ufw limit 2244 |
This will set the rule "Do not allow IP addresses that have been tried more than 6 times in 30 seconds".
Check your settings. Displayed as follows.
|
1 2 3 4 5 6 |
# ufw status Status: active To Action From -- ------ ---- 2244 LIMIT Anywhere 2244(v6) 1 LIMIT Anywhere (v6) |
3.5.2 Only allow ssh connections from specific networks
Even with the above settings, you are still opening up the ssh port to the outside internet, so even if you set a limit on the number of connections, it is still possible for someone to guess your password in some way and connect to you, or for a vulnerability attack to take place.
For this reason, you should only allow ssh connections to the network from inside, and disallow all ssh connections from outside.
As an example, there is a host in the local area network with an IP address of "192.168.11.10".
Allow ssh connections only from this host. Or to allow ssh connections only from this network (192.168.11.0/24), type the following command
Allow ssh connections from 192.168.11.0/24
|
1 |
# ufw allow from 192.168.11.0/24 to any port 2244 |
|
1 |
# ufw allow from 192.168.11.10 to any port 2244 |
Results when allowing ssh connections from 192.168.11.0/24
|
1 2 3 4 5 6 7 |
# ufw status Status: active To Action From -- ------ ---- 2244 LIMIT Anywhere 2244 ALLOW 192.168.11.0/24 2244 (v6) LIMIT Anywhere (v6) |
Results when allowing ssh connections from 192.168.11.0/24
|
1 2 3 4 5 6 7 |
# ufw status numbered Status: active To Action From -- ------ ---- [ 1] 2244 LIMIT IN Anywhere [ 2] 2244 ALLOW IN 192.168.11.0/24 [ 3] 2244 (v6) LIMIT IN Anywhere (v6) |
Results when allowing ssh connections from 192.168.11.0/24
|
1 2 3 4 5 |
# ufw delete 1 Deleting: limit 2244 Proceed with operation (y|n)? y Rule deleted |
3.5.3 Permission for web and other services
You can either allow connections by specifying a port number, or by specifying an application.
You can see the list of applications with the following command
|
1 |
# vi /etc/services |
|
1 2 3 |
# ufw allow http Rule added Rule added (v6) |
|
1 2 3 |
# ufw allow https Rule added Rule added (v6) |
3.5.4 Disable ipv6 ufw
|
1 2 3 |
# vi /etc/default/ufw IPV6=yes → IPV6=no rewrite |
|
1 |
# systemctl restart ufw |