1. Antivirus software Clamav installed
Install Clam AntiVirus, a free anti-virus software for Linux, as an anti-virus measure.
By installing this anti-virus software, you can not only scan the entire server for viruses, but also scan incoming and outgoing mail for viruses if you build and configure a mail server.
1.1 Install
|
1 |
# apt install clamav clamav-daemon |
The clamav-related configuration files are installed in the /etc/clamav/ folder.
1.2 Virus Definition Update
|
1 2 |
# systemctl stop clamav-freshclam # freshclam |
If the virus definitions can be updated with the above command, but the following error occurs, change the log settings and run the command again.
ERROR: /var/log/clamav/freshclam.log is locked by another process
ERROR: Problem with internal logger (UpdateLogFile = /var/log/clamav/freshclam.log).
ERROR: initialize: libfreshclam init failed.
ERROR: Initialization error!
If the above error occurs, delete the log file once and change the log rotate settings as follows.
|
1 2 3 |
# rm /var/log/clamav/freshclam.log # touch /var/log/clamav/freshclam.log # chown clamav:clamav /var/log/clamav/freshclam.log |
|
1 2 3 4 5 |
# freshclam Fri Jun 3 08:13:24 2022 -> ClamAV update process started at Fri Jun 3 08:13:24 2022 Fri Jun 3 08:13:24 2022 -> daily.cvd database is up-to-date (version: 26561, sigs: 1985547, f-level: 90, builder: raynman) Fri Jun 3 08:13:24 2022 -> main.cvd database is up-to-date (version: 62, sigs: 6647427, f-level: 90, builder: sigmgr) Fri Jun 3 08:13:24 2022 -> bytecode.cvd database is up-to-date (version: 333, sigs: 92, f-level: 63, builder: awillia2) |
|
1 |
# systemctl start clamav-freshclam |
Edit configuration file
|
1 2 3 4 |
# vi /etc/logrotate.d/clamav-freshclam create 640 clamav adm ↓ create 640 clamav clamav |
Automatic virus definition update confirmation
Ensure that the service is registered for automatic virus definition updates.
|
1 |
# service clamav-freshclam status |
It appears as follows
|
1 2 3 4 5 6 7 8 9 10 11 12 13 14 15 16 17 18 19 20 21 |
● clamav-freshclam.service - ClamAV virus database updater Loaded: loaded (/lib/systemd/system/clamav-freshclam.service; enabled; > Active: active (running) since Fri 2022-06-03 08:10:42 EDT; 4min 51s ago Docs: man:freshclam(1) man:freshclam.conf(5) https://docs.clamav.net/ Main PID: 1093 (freshclam) Tasks: 1 (limit: 2300) Memory: 230.6M CPU: 28.154s CGroup: /system.slice/clamav-freshclam.service mq1093 /usr/bin/freshclam -d --foreground=true Jun 03 08:11:00 debian freshclam[1093]: Fri Jun 3 08:11:00 2022 -> daily.cv> Jun 03 08:11:00 debian freshclam[1093]: Fri Jun 3 08:11:00 2022 -> main dat> Jun 03 08:11:05 debian freshclam[1093]: Fri Jun 3 08:11:05 2022 -> Testing > Jun 03 08:11:15 debian freshclam[1093]: Fri Jun 3 08:11:15 2022 -> Database> Jun 03 08:11:15 debian freshclam[1093]: Fri Jun 3 08:11:15 2022 -> main.cvd> Jun 03 08:11:15 debian freshclam[1093]: Fri Jun 3 08:11:15 2022 -> bytecode> Jun 03 08:11:15 debian freshclam[1093]: Fri Jun 3 08:11:15 2022 -> Testing > Jun 03 08:11:15 debian freshclam[1093]: Fri Jun 3 08:11:15 2022 -> Database> |
Logs are recorded in the file /var/log/clamav/freshclam.log.
1.3 Virus Check Confirmation
①Running manual virus checks
|
1 2 3 4 5 6 7 8 9 10 11 12 |
# clamscan --infected --remove --recursive /home ----------- SCAN SUMMARY ----------- Known viruses: 8617610 Engine version: 0.103.6 Scanned directories: 3 Scanned files: 7 Infected files: 0 Data scanned: 0.00 MB Data read: 0.00 MB (ratio 0.00:1) Time: 25.954 sec (0 m 25 s) Start Date: 2022:06:03 08:17:43 End Date: 2022:06:03 08:18:09 |
Infected files: 0, so no virus
②Virus detection by downloading test viruses
Download a harmless virus and test it for detection.
Log in as a general user and check
|
1 2 3 4 5 6 7 8 9 10 11 12 13 14 15 16 |
# su – <user name> $ wget http://www.eicar.org/download/eicar.com $ clamscan --infected --remove --recursive /home /home/<user name>/eicar.com: Win.Test.EICAR_HDB-1 FOUND /home/<user name>/eicar.com: Removed. ----------- SCAN SUMMARY ----------- Known viruses: 8617610 Engine version: 0.103.6 Scanned directories: 3 Scanned files: 8 Infected files: 1 Data scanned: 0.00 MB Data read: 0.00 MB (ratio 0.00:1) Time: 19.905 sec (0 m 19 s) Start Date: 2022:06:03 08:20:04 End Date: 2022:06:03 08:20:24 |
As you can see, the virus is notified with the message "FOUND" and "Infected files: 1". The "--remove" option was also added, so the test virus was removed.
1.4 Create a script file to do a full scan
①Create a script file storage directory (/opt/script) in advance.
|
1 2 3 |
$ su - Password: # mkdir /opt/script |
②Create script file
|
1 |
# vi /opt/script/clam-full.sh |
Contents of clam-full.sh (new)
|
1 2 3 4 5 6 7 8 9 10 11 12 13 14 15 16 17 18 19 |
#!/bin/sh echo ========================================= date hostname clamscan / \ --infected \ --recursive \ --log=/var/log/clamav/clamscan.log \ --move=/var/log/clamav/virus \ --exclude-dir=^/boot \ --exclude-dir=^/sys \ --exclude-dir=^/proc \ --exclude-dir=^/dev \ --exclude-dir=^/var/log/clamav/virus if [ $? = 0 ]; then echo “Virus not detected.” else echo “Virus detection!!” fi |
③execute authorization
|
1 |
# chmod +x /opt/script/clam-full.sh |
④Create a folder for virus quarantine
If not, a runtime error will occur because the above script specifies it as an excluded directory.
|
1 |
# mkdir /var/log/clamav/virus |
⑤Script Execution
|
1 |
# /opt/script/clam-full.sh |
Takes quite a long time to complete.
Logs are recorded in the /var/log/clamav/clamscan.log file.
⑤Scheduled virus scan execution with cron
|
1 2 |
# crontab -e 0 2 * * mon /opt/script/clam-full.sh >> /var/log/clamav/clamascan.log |
In the above example, it runs regularly every Monday at 2:00 AM.
2. Mail server installation
Postfix was developed as a Mail Transport Agent (MTA) to replace sendmail, and is a mail server that is highly compatible with sendmail, secure, easy to maintain, and fast.
In addition, since Postfix only functions as an SMTP server for sending mail, the POP server Dovecot for receiving mail will be installed separately in the latter half.
2.1 Postfix : Installation Configuration
①Install Postfix
Install Postfix and build an SMTP server; SMTP uses 25/TCP.
To prevent unauthorized mail relay, use the SASL function of Dovecot, described below, and configure Postfix so that authentication is also required for sending.
|
1 |
# apt -y install postfix sasl2-bin |
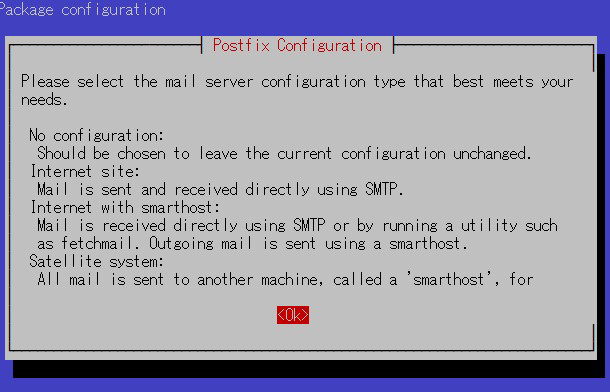
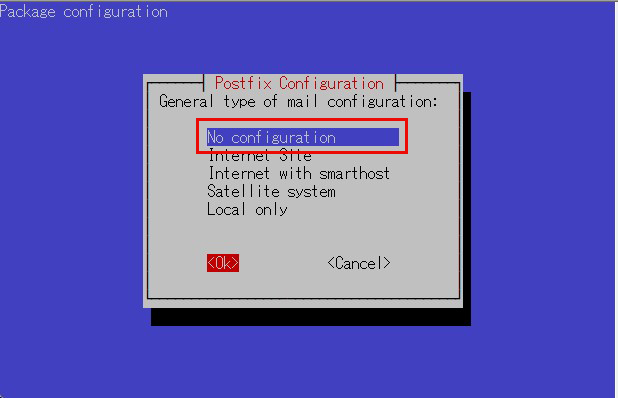
You will be asked to select general configuration settings, select "No configuration " to set them manually later
②Edit configuration file (main.cf)
|
1 2 |
# cp /usr/share/postfix/main.cf.dist /etc/postfix/main.cf # vi /etc/postfix/main.cf |
Editorial content
|
1 2 3 4 5 6 7 8 9 10 11 12 13 14 15 16 17 18 19 20 21 22 23 24 25 26 27 28 29 30 31 32 33 34 35 36 37 38 39 40 41 42 43 44 45 46 47 48 49 50 51 52 53 54 |
# Line 78:Uncomment mail_owner = postfix # Line 94:Uncomment and specify hostname myhostname = mail.<domain name> # Line 102:Uncomment and specify domain name mydomain = <domain name> # Line 123:Uncomment myorigin = $mydomain # Line 137:Uncomment inet_interfaces = all # Line 185:Uncomment mydestination = $myhostname, localhost.$mydomain, localhost, $mydomain # Line 228:Uncomment local_recipient_maps = unix:passwd.byname $alias_maps # Line 270:Uncomment mynetworks_style = subnet # Line 287:self-networking addition mynetworks = 127.0.0.0/8, 192.168.11.0/24 # Line 407:Uncomment alias_maps = hash:/etc/aliases # Line 418:Uncomment alias_database = hash:/etc/aliases # Line 440:Uncomment home_mailbox = Maildir/ # Line 576:Make it a comment and add below it #smtpd_banner = $myhostname ESMTP $mail_name (Ubuntu) smtpd_banner = $myhostname ESMTP # Line 650:add sendmail_path = /usr/sbin/postfix # Line 655:add newaliases_path = /usr/bin/newaliases # Line 660:add mailq_path = /usr/bin/mailq # Line 666:add setgid_group = postdrop # Line 670:comment #html_directory = # Line 674:comment #manpage_directory = # Line 679:comment #sample_directory = # Line 683:comment #readme_directory = # Added to the last line: Limit sent/received mail size to 10M message_size_limit = 10485760 # Limit mailbox size to 1G mailbox_size_limit = 1073741824 # SMTP-Auth setup smtpd_sasl_type = dovecot smtpd_sasl_path = private/auth smtpd_sasl_auth_enable = yes smtpd_sasl_security_options = noanonymous smtpd_sasl_local_domain = $myhostname smtpd_recipient_restrictions = permit_mynetworks, permit_auth_destination, permit_sasl_authenticated, reject |
③Edit configuration file (master.cf)
|
1 |
# vi /etc/postfix/master.cf |
Editorial content
|
1 2 3 4 5 6 7 8 9 10 |
smtp inet n - y - - smtpd #smtp inet n - y - 1 postscreen #smtpd pass - - y - - smtpd #dnsblog unix - - y - 0 dnsblog #tlsproxy unix - - y - 0 tlsproxy submission inet n - y - - smtpd # -o syslog_name=postfix/submission # -o smtpd_tls_security_level=encrypt -o smtpd_sasl_auth_enable=yes # -o smtpd_tls_auth_only=yes |
Reflect settings, reboot
|
1 2 |
# newaliases # systemctl restart postfix |
2.2 Dovecot : Installation Configuration
①Install Dovecot
Install Dovecot and build a POP/IMAP server, using 110/TCP for POP and 143/TCP for IMAP.
②Configure Dovecot to provide SASL functionality for Postfix
|
1 2 3 4 |
# apt -y install dovecot-core dovecot-pop3d dovecot-imapd # vi /etc/dovecot/dovecot.conf Line 30:Uncomment listen = *, :: |
|
1 2 3 4 5 |
# vi /etc/dovecot/conf.d/10-auth.conf Line 10:Uncomment and change (also allow plain text authentication) disable_plaintext_auth = no Line 100:add auth_mechanisms = plain login |
|
1 2 3 |
# vi /etc/dovecot/conf.d/10-mail.conf Line 30:Change to Maildir format mail_location = maildir:~/Maildir |
|
1 2 3 4 5 6 7 8 |
# vi /etc/dovecot/conf.d/10-master.conf Line 107-109:Uncommented and added # Postfix smtp-authi unix_listener /var/spool/postfix/private/auth { mode = 0666 user = postfix group = postfix } |
③Reflect settings, reboot
|
1 |
# systemctl restart dovecot |
2.3 Email User Account Registration
Register a user account for e-mail.
This setting is for when a user account on the OS is also used for e-mail.
If you want to use mail with a user account on the OS, no additional configuration is required, just register the OS user
①Mail client installed
|
1 |
# apt -y install mailutils |
②Mailboxes are set to refer to Maildir
|
1 |
# echo 'export MAIL=$HOME/Maildir/' >> /etc/profile.d/mail.sh |
2.4 Opening Ports
|
1 2 3 4 |
# ufw allow pop3 # ufw allow imap # ufw allow smtp # ufw reload |
2.5 operation check ①
①Send test mail to yourself [mail (user name)@(host name)].
user name : huong
|
1 2 3 4 5 |
# su - huong $ mail huong@localhost Cc: Subject: Test Mail This is the first mail. |
Ctrl + D key to exit the main text
Check incoming mail
|
1 2 3 4 5 6 7 8 9 10 11 12 13 14 15 16 |
$ mail "/home/huong/Maildir/": 1 message 1 new >N 1 huong Fri Jun 3 13:11 13/441 Test Mail ? 1 Return-Path: <huong@debian.korodes.com> X-Original-To: huong@localhost Delivered-To: huong@localhost Received: by mail.korodes.com (Postfix, from userid 1000) id 392CAA0038; Fri, 3 Jun 2022 09:11:54 -0400 (EDT) To: <huong@localhost> Subject: Test Mail X-Mailer: mail (GNU Mailutils 3.10) Message-Id: <20220603131154.392CAA0038@mail.korodes.com> Date: Fri, 3 Jun 2022 09:11:54 -0400 (EDT) From: huong <huong@debian.korodes.com> This is the first mail. |
2.6 operation check ②
Set up and confirm your account in Mozilla Thunderbird
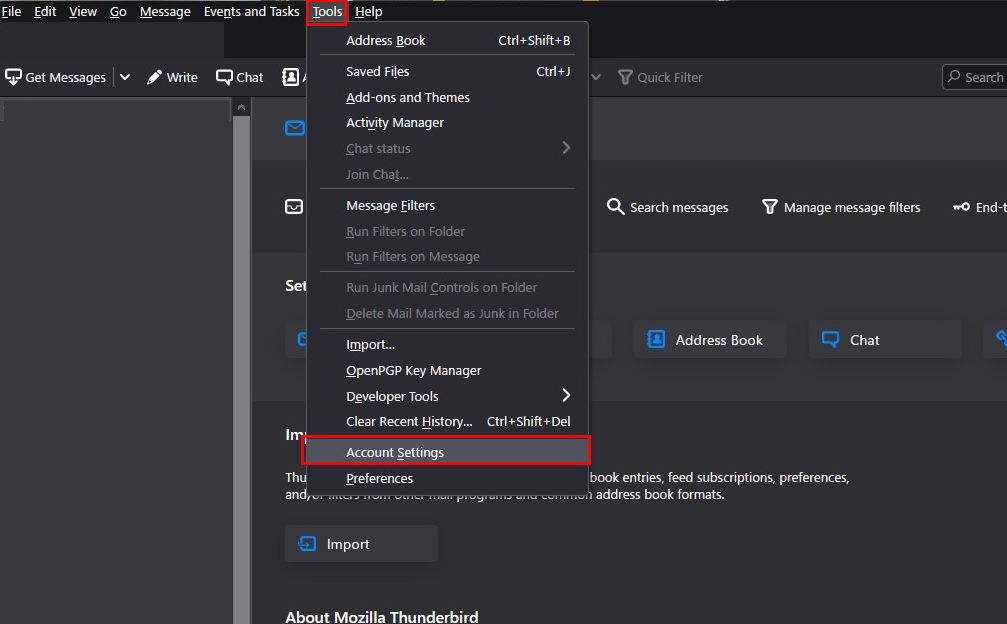
①Start Thunderbird, and click "Tools", "Account Settings".
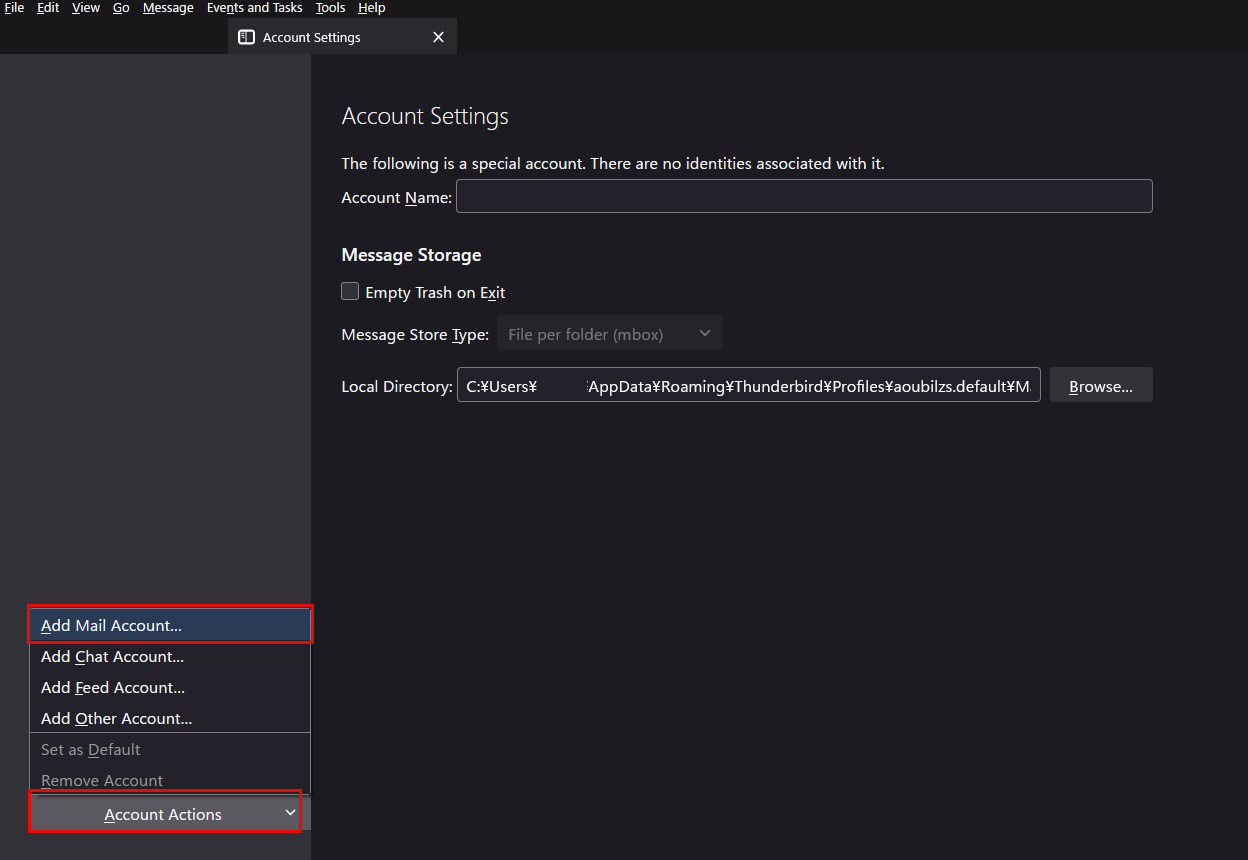
②「Account Actions」「Add Mail Account」
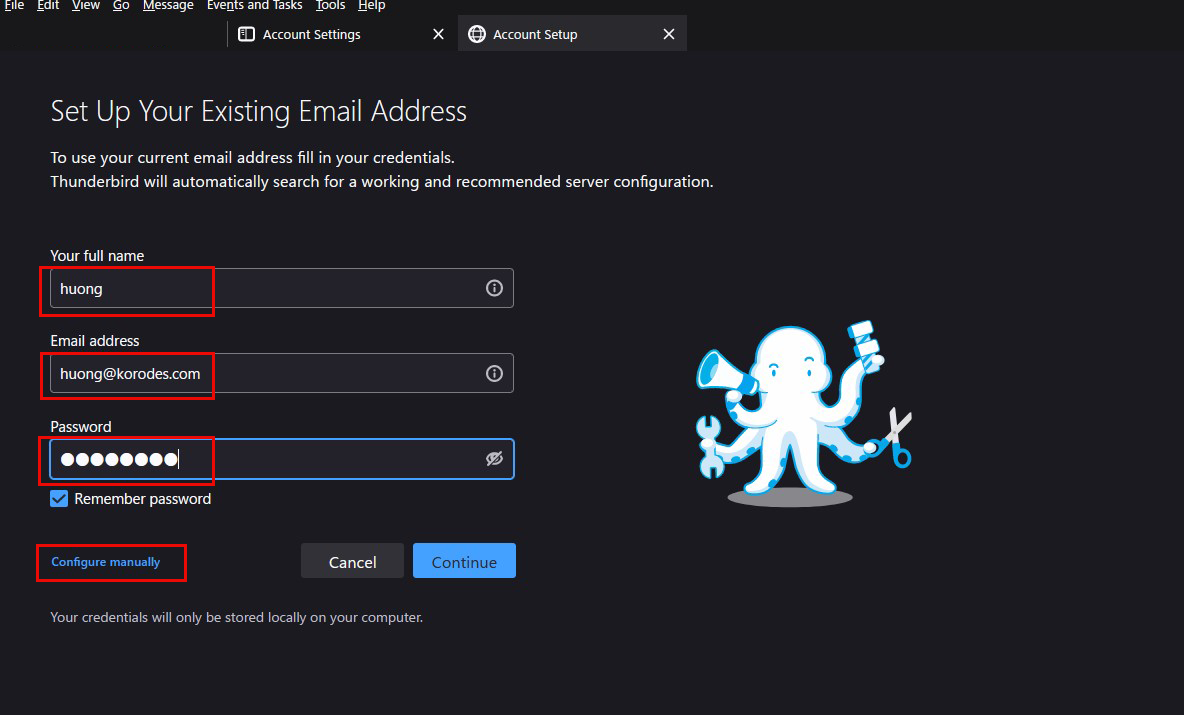
③Your full name" is an optional name
Email addtess" is "huong@korodes.com" added earlier
Password" is the password for user huong
Click on "Configure manually"
④Set "INCOMMING SERVER" and "OUTGOING SERVER" as shown below and click "Re-test".
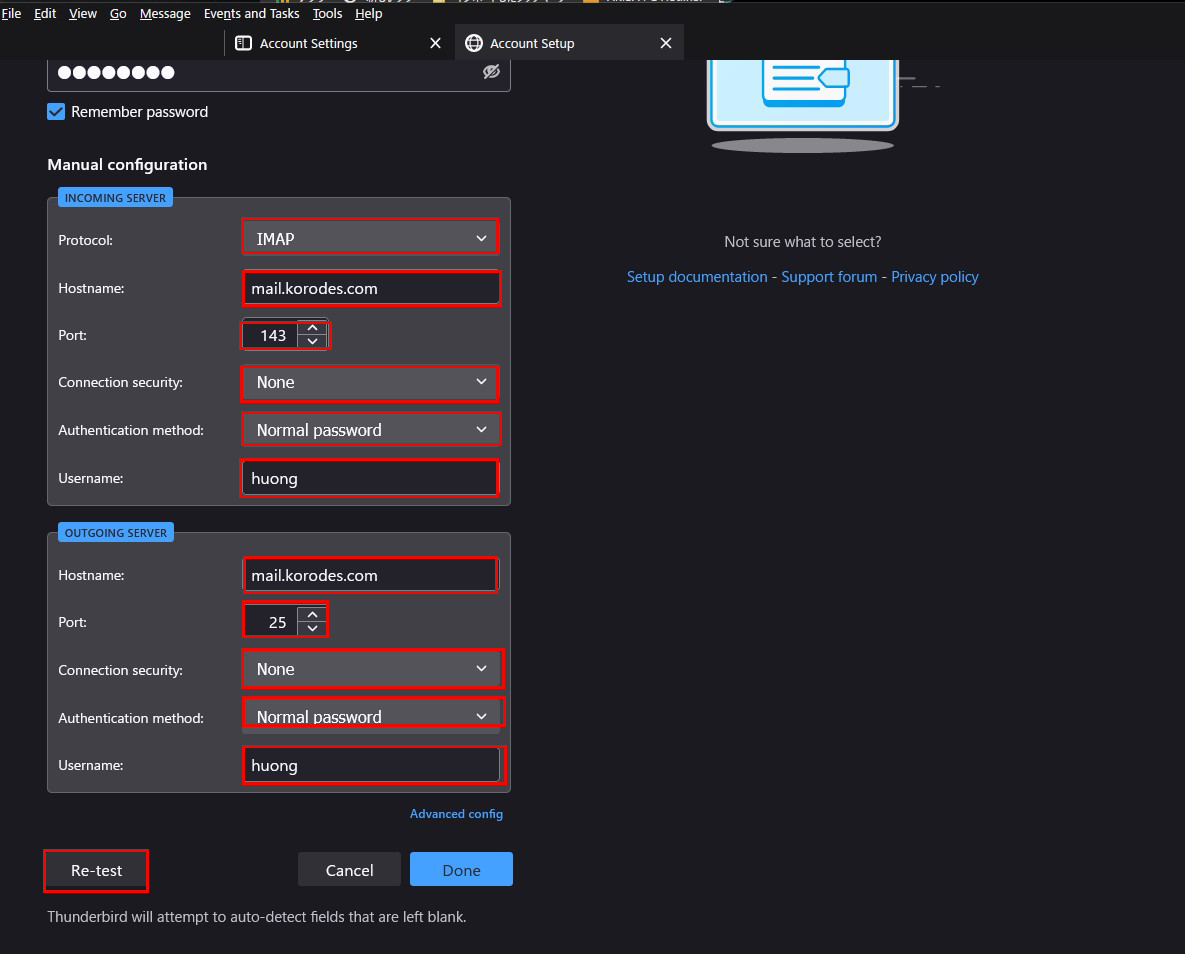
⑤The "Server Found" message appears.(The following settings were found by probinfg the given server)
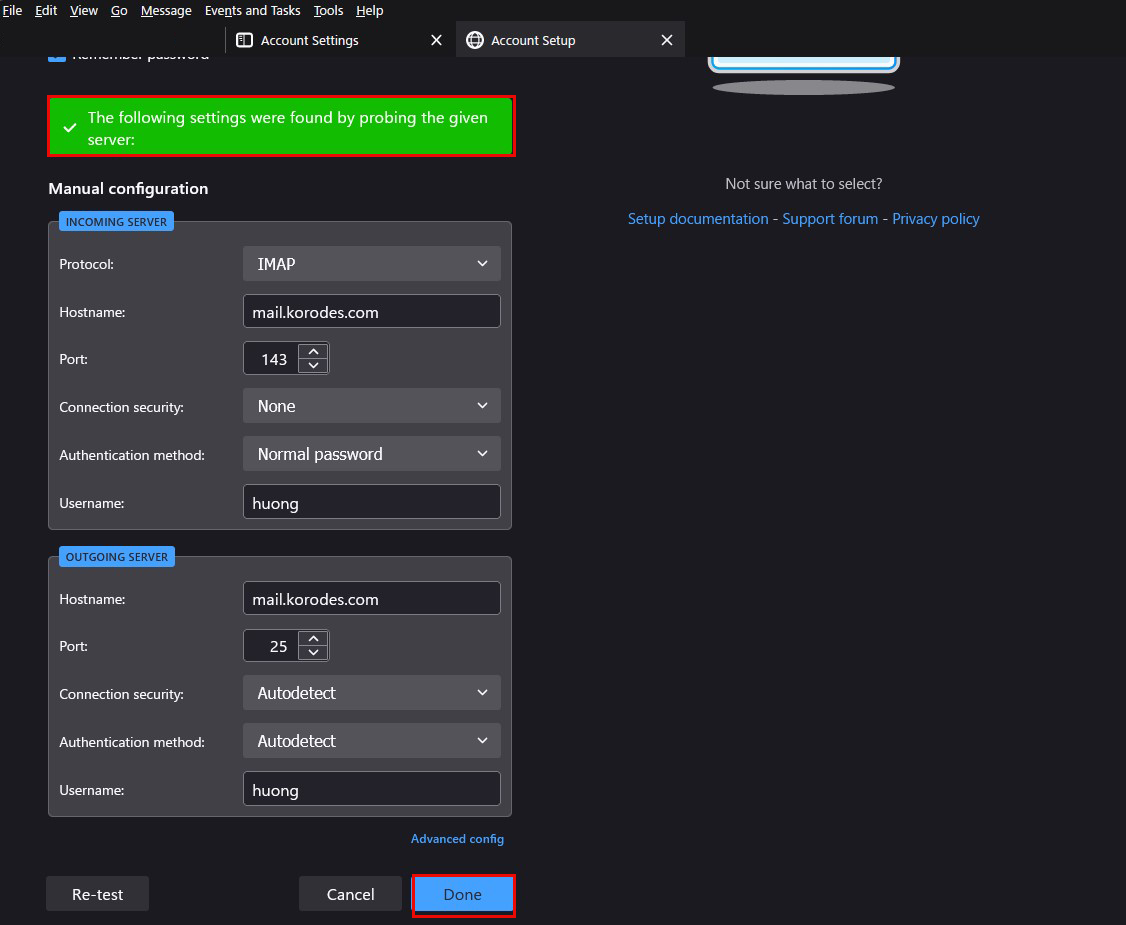
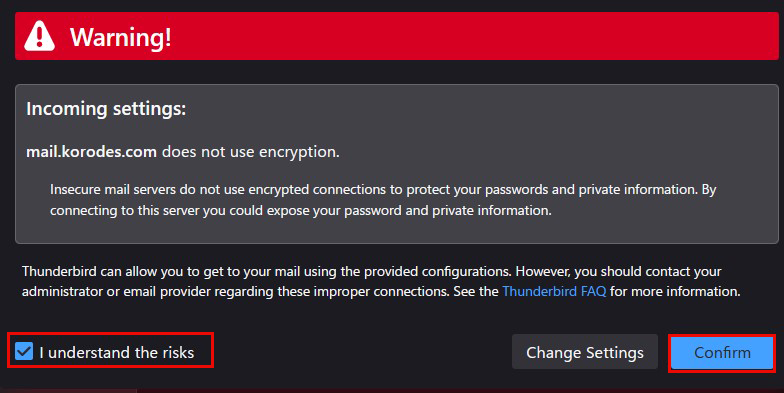
After clicking "Done," the following "Warning" appears, but there is no problem, so click "Confirm.
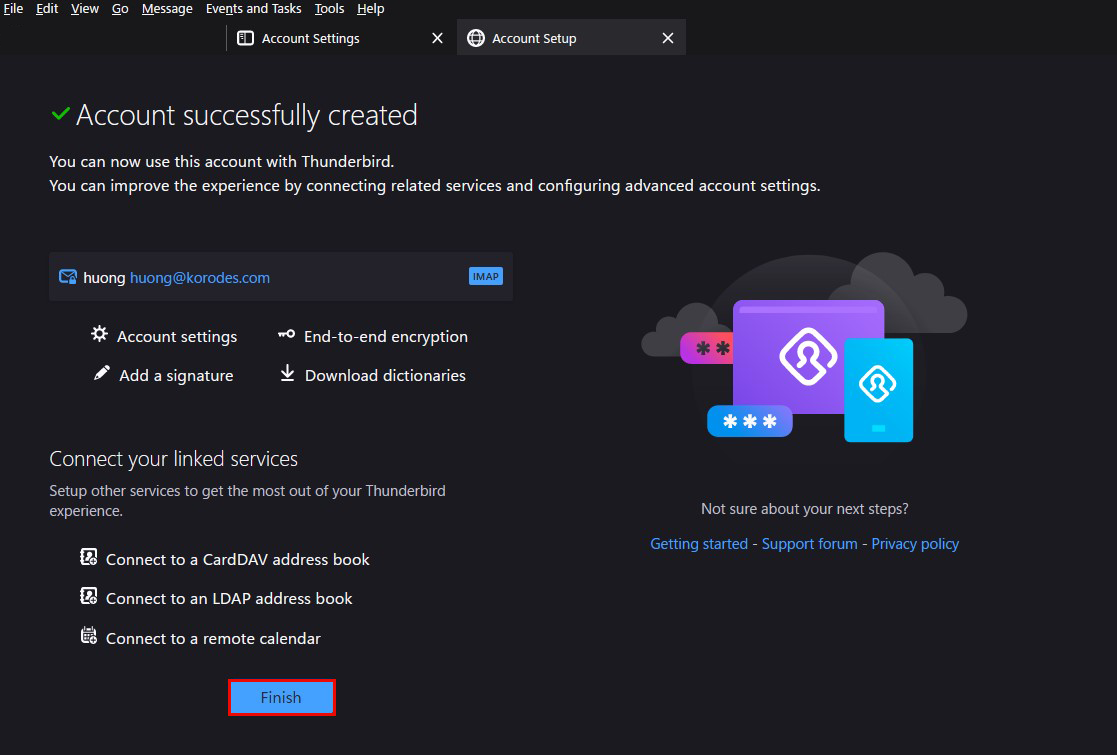
⑥Click "Finish" when "Account syccessfuly created" is displayed.
3 Applied ClamAV to mail server Postfix
①Install Amavisd and Clamav Daemon and start Clamav Daemon
|
1 |
# apt -y install clamav-daemon amavisd-new |
Set up Postfix and Clamav to work together to scan incoming and outgoing mail in real time.
If the server is not using a fully qualified domain name (FQDN) as the hostname, Amavis may fail to start. Also, since the OS hostname may change, set a valid hostname directly in the Amavis configuration file
|
1 2 3 4 5 6 7 8 9 10 |
# vi /etc/amavis/conf.d/05-node_id use strict; # $myhostname is used by amavisd-new for node identification, and it is # important to get it right (e.g. for ESMTP EHLO, loop detection, and so on) . chomp($myhostname = `hostname --fqdn`); # To manually set $myhostname, edit the following line with the correct Full y # Qualified Domain Name (FQDN) and remove the # at the beginning of the line . # $myhostname = "mail.<domain name>"; 1; # ensure a defined return |
②Virus Scan Enable
|
1 2 3 4 |
# vi /etc/amavis/conf.d/15-content_filter_mode Uncomment and enable virus scan @bypass_virus_checks_maps = ( \%bypass_virus_checks, \@bypass_virus_checks_acl, \$bypass_virus_checks_re); |
③Register your own domain name
|
1 |
# echo '<yourDomain>' > /etc/mailname |
④Edit configuration file (Main.cf)
|
1 2 3 |
# vi /etc/postfix/main.cf Add to last line content_filter=smtp-amavis:[127.0.0.1]:10024 |
⑤Edit configuration file (master.cf)
|
1 |
# vi /etc/postfix/master.cf |
Editorial content
|
1 2 3 4 5 6 7 8 9 10 11 12 13 14 15 16 17 18 19 |
# Add all the following lines to the last line smtp-amavis unix - - n - 2 smtp -o smtp_data_done_timeout=1200 -o smtp_send_xforward_command=yes -o disable_dns_lookups=yes 127.0.0.1:10025 inet n - n - - smtpd -o content_filter= -o local_recipient_maps= -o relay_recipient_maps= -o smtpd_restriction_classes= -o smtpd_client_restrictions= -o smtpd_helo_restrictions= -o smtpd_sender_restrictions= -o smtpd_recipient_restrictions=permit_mynetworks,reject -o mynetworks=127.0.0.0/8 -o strict_rfc821_envelopes=yes -o smtpd_error_sleep_time=0 -o smtpd_soft_error_limit=1001 -o smtpd_hard_error_limit=1000 |
⑥Settings reflect
|
1 2 3 |
# usermod -G clamav amavis # usermod -G amavis clamav # systemctl restart clamav-daemon amavis postfix |
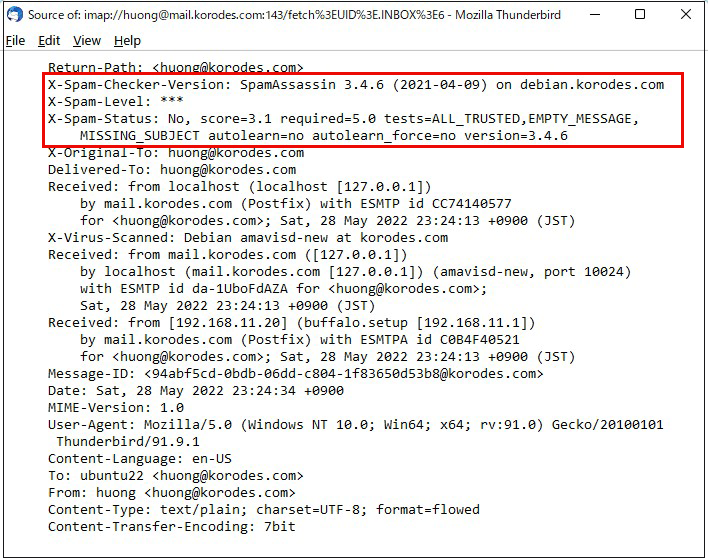
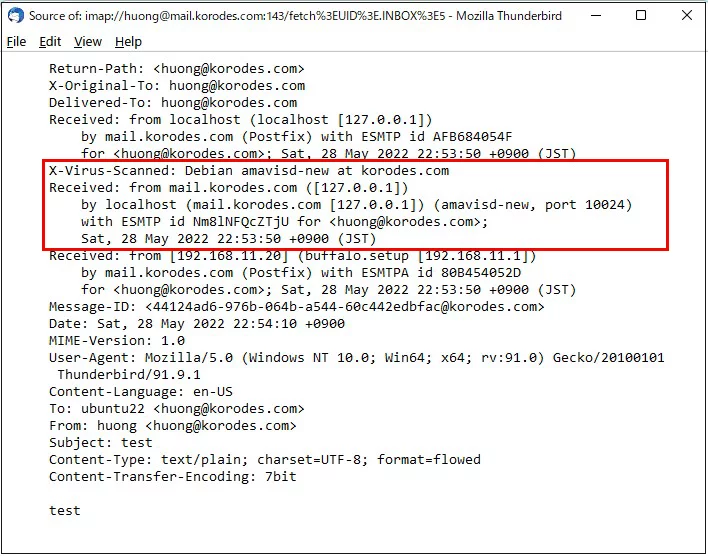
When you send an e-mail to yourself on Thuderbird, etc., it is successful if you see the following message in the header of the incoming e-mail.
4. Install spamassassin in Postfix to prevent spam
①Install
|
1 |
# apt install spamassassin |
②Preparation for SpamAssassin configuration
Create a directory ".Spam" in Maildir format for storing spam mails. First, log in as an ordinary user (e.g. huong)
|
1 2 3 4 5 |
# su - huong $ cd ~ $ cd Maildir $ /usr/bin/maildirmake.dovecot .Spam $ su – |
③Prepare Procmail
Check if Procmail is installed on the server machine.
If not, install it.
|
1 |
# apt install procmail |
Check the path to Procmail with the following command
|
1 2 |
# which procmail /usr/bin/procmail |
④Procmail Settings
The settings are applied to all users by putting them in "/etc/procmailrc", which is in charge of the entire mail filter.
The filter will be applied only to that user if it is written in "/home/username/.procmailrc", which is a mail filter file for each user.
This time, to apply to all users, we will describe it in "/etc/procmailrc".
|
1 |
# vi /etc/procmailrc |
procmailrc description (newly created)
|
1 2 3 4 5 6 7 8 9 10 11 12 13 14 15 16 17 |
# Set path PATH=/bin:/usr/bin:/usr/local/bin # Mailbox Settings MAILDIR=$HOME/Maildir DEFAULT=$MAILDIR/ # Specify where to output Procmail log files LOGFILE=$MAILDIR/procmaillog # Specify lock file path LOCKFILE=$HOME/.lockmail # If there is no "X-Spam-***" in the mail header, spamassassassin will be started. :0fw *!^X-Spam.* |spamassassin # If the mail header contains "X-Spam-Status: Yes", the mail will be stored in the ".Spam" directory. :0 * ^X-Spam-Status: Yes $MAILDIR/.Spam/ |
⑤Edit Postfix main.cf
|
1 2 3 |
# vi /etc/postfix/main.cf Add to the last line mailbox_command = /usr/bin/procmail |
⑥Reflecting settings, starting up and checking operation
|
1 2 |
# systemctl start spamassassin # systemctl restart postfix |
⑦Spam Email Learning
The following command will learn all the contents of all users' ".Spam" directories as spam mail
|
1 2 |
# /usr/bin/sa-learn --spam /home/*/Maildir/.Spam/cur Learned tokens from 0 message(s) (0 message(s) examined). <-- Learned 0 emails as spam mails |
⑧Normal mail Learning
|
1 2 |
# /usr/bin/sa-learn --ham /home/*/Maildir/cur Learned tokens from 4 message(s) (4 message(s) examined). <-- Learned 4 emails as normal emails |
⑨Create a script and register it with Cron
Name the file "spam-learns.sh" and place it under /opt/script/.
After saving the script, give it executable access as "chmod 750 spam-learns.sh".
|
1 |
# vi /opt/script/spam-learns.sh |
spam-learns.sh Contents
|
1 2 3 4 5 6 7 |
#! /bin/sh # Spam Email Learning /usr/bin/sa-learn --spam /home/*/Maildir/.Spam/cur # Learning normal mail /usr/bin/sa-learn --ham /home/*/Maildir/cur # If you want to force the deletion of the contents of the spam mail storage directory, add the following statement /bin/rm -f /home/*/Maildir/.Spam/cur |
|
1 |
# chmod 750 /opt/script/spam-learns.sh |
After spam-learns.sh is created, create a definition file directly under /lib/systemd/system. The name should end in .service, such as spam-learns.service.
Type is defined by simple
|
1 2 |
# cd /lib/systemd/system # vi spam-learns.service |
Contents of spam-learns.service
|
1 2 3 4 5 6 7 8 9 10 |
[Unit] Description=demo sample node.js program [Service] Type=simple ExecStart= /opt/script/spam-learns.sh Restart=always [Install] WantedBy=multi-user.target |
Register the learning script in Cron
|
1 2 |
# crontab -e 0 4 * * * /opt/script/spam-learns.sh |
Study scripts run daily at 4:00 a.m.
⑩Set to start automatically
|
1 |
# systemctl enable spam-learns |
⑪Send a blank email to yourself in Thunderbird, etc., and if you see the following message in the header of the received email, you have succeeded.