

1. WEB server installation
1. 1 Apache2 installation
① Install
|
1 |
# apt -y install apache2 |
② Edit configuration file
|
1 2 3 4 5 6 7 8 9 10 11 12 |
# vi /etc/apache2/conf-enabled/security.conf # Line 25: Change ServerTokens Prod # vi /etc/apache2/mods-enabled/dir.con # Line 2: Set the file name that can be accessed only by the directory name. DirectoryIndex index.html index.htm index.php # vi /etc/apache2/apache2.conf # Line 70: Server name added. ServerName <Domain Name> |
|
1 2 3 4 |
# vi /etc/apache2/sites-available/000-default.conf # Line 11: Change administrator address ServerAdmin <Email address> |
Restart
|
1 |
# systemctl restart apache2 |
1.2. Using Perl Scripts with Apache2
Enable CGI and configure it to use Perl scripts.
① Install Perl
|
1 |
# apt -y install perl |
② Enable the CGI module.
|
1 2 3 4 5 |
# a2enmod cgid Enabling module cgid. To activate the new configuration, you need to run: systemctl restart apache2 |
③ Test Script Creation
When the CGI module is enabled, the [/usr/lib/cgi-bin] directory will be allowed to execute CGI by default.
For example, by creating and deploying the script [/usr/lib/cgi-bin/index.cgi], you can access [http://(Apache2 server)/cgi-bin/index.cgi].
Note that this setting treats all files under [/usr/lib/cgi-bin] as CGI, so non-CGI files cannot be displayed.
# Test Script Creation
|
1 2 3 4 5 |
# cat > /usr/lib/cgi-bin/test_script <<'EOF' #!/usr/bin/perl print "Content-type: text/html\n\n"; print "Hello CGI\n"; EOF |
|
1 |
# chmod 705 /usr/lib/cgi-bin/test_script |
# operation check
|
1 2 |
# curl http://localhost/cgi-bin/test_script Hello CGI |
1.3 Using PHP Scripts with Apache2
① Install PHP
|
1 |
# apt -y install php php-cgi libapache2-mod-php php-common php-pear php-mbstring |
② Configuring Apache2
|
1 2 3 4 |
# a2enconf php7.2-cgi Enabling conf php7.2-cgi. To activate the new configuration, you need to run: systemctl reload apache2 |
|
1 2 3 4 5 6 |
# vi /etc/php/7.2/apache2/php.ini # Line 822.: upload_max_filesize = 2M upload_max_filesize = 200M # Line 936:Uncomment and set time zone date.timezone ="Asia/Tokyo |
|
1 |
# systemctl restart apache2 |
③ Create a test page to see how it works.
|
1 2 3 4 5 6 7 8 9 10 11 |
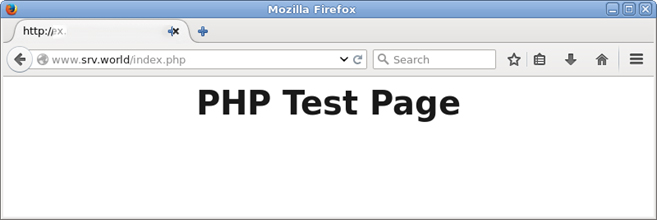
# vi /var/www/html/index.php <html> <body> <div style="width: 100%; font-size: 40px; font-weight: bold; text-align: center;"> <?php print "PHP Test Page"; ?> </div> </body> </html> |
http://[IP Address]/index.php
1.4 Virtual Host Configuration
① Preparing the configuration file
Copy the default configuration file and configure the virtual host settings(For example, let's say the file name is <vhost-sample.conf>.)
|
1 2 |
# cd /etc/apache2/sites-available/ # cp sites-available/000-default.conf vhost-sample.conf |
② Edit the configuration file
|
1 2 3 4 5 6 7 8 9 10 11 12 13 14 |
# vi vhost-sample.conf <VirtualHost *:80> ~Abbreviation~ ServerName <Domain Name> ServerAdmin <Email address> DocumentRoot /var/www/html/<Domain Name> ~Abbreviation~ ErrorLog ${APACHE_LOG_DIR}/<Domain Name>-error.log CustomLog ${APACHE_LOG_DIR}/<Domain Name>-access.log combined ~Abbreviation~ </VirtualHost> |
③ Activate the configuration file
Disable the default configuration file by putting a symbolic link to it
|
1 2 3 |
# cd /etc/apache2/sites-available/ # a2ensite vhost-sample.conf # a2dissite 000-default.conf ← Default disable |
④ Restarting Apache
|
1 |
# systemctl restart apache2 |
⑤ Edit the hosts file
|
1 2 3 |
# vi /etc/hosts 127.0.0.1 <Domain Name> |
2. Installed anti-virus software Clamaav
① Install
clamav related configuration files will be installed in /etc/clamav/ folder
|
1 |
# apt install clamav clamav-daemon |
② Update virus definitions
|
1 |
# freshclam |
If you get the following error, change the log settings and run again.
ERROR: /var/log/clamav/freshclam.log is locked by another process
ERROR: Problem with internal logger (UpdateLogFile = /var/log/clamav/freshclam.log).
Change the log settings as follows
|
1 2 3 |
# rm /var/log/clamav/freshclam.log # touch /var/log/clamav/freshclam.log # chown clamav:clamav /var/log/clamav/freshclam.log |
③ Edit configuration file
|
1 2 3 |
# vi /etc/logrotate.d/clamav-freshclam create 640 clamav adm → create 640 clamav clamav |
④ Automatic updating of virus definitions
Check if the service that automatically updates virus definitions is registered.
|
1 2 3 4 5 6 7 8 9 10 11 12 13 14 15 16 |
# service clamav-freshclam status ●clamav-freshclam.service - ClamAV virus database updater Loaded: loaded (/lib/systemd/system/clamav-freshclam.service; enabled; vendor preset: e Active: active (running) since Fri 2019-08-16 02:00:32 JST; 2 days ago Docs: man:freshclam(1) man:freshclam.conf(5) https://www.clamav.net/documents Main PID: 888 (freshclam) Tasks: 1 (limit: 4915) CGroup: /system.slice/clamav-freshclam.service └─888 /usr/bin/freshclam -d --foreground=true August 18 07:25:02 server freshclam[888]: Sun Aug 18 07:25:02 2019 -> daily.cld is up to d August 18 07:25:02 server freshclam[888]: Sun Aug 18 07:25:02 2019 -> bytecode.cld is up t August 18 08:25:02 server freshclam[888]: Sun Aug 18 08:25:02 2019 -> Received signal: wak August 18 08:25:02 server freshclam[888]: Sun Aug 18 08:25:02 2019 -> ClamAV update proces |
Logging will be done in /var/log/clamav/freshclam.log file
⑤ Run a virus check
|
1 |
# clamscan --infected --remove --recursive /home |
|
1 2 3 4 5 6 7 8 9 10 11 12 13 14 15 16 17 18 19 20 21 22 23 24 25 26 27 28 29 |
# vi /opt/script/clam-full.sh #!/bin/sh echo ========================================= date hostname clamscan / \ --infected \ --recursive \ --log=/var/log/clamav/clamscan.log \ --move=/var/log/clamav/virus \ --exclude-dir=^/boot \ --exclude-dir=^/sys \ --exclude-dir=^/proc \ --exclude-dir=^/dev \ --exclude-dir=^/var/log/clamav/virus # --infected Output results only for files that have been detected as infected # --recursive Checks recursively under the specified directory Compressed files should be decompressed and inspected. # --log=FILE logfile # --move=DIR Quarantine location for files detected as infected # --remove Delete the file that detected the infection. # --exclude=FILE exception file(Specify by pattern) # --exclude-dir=DIR inspection-excluded directory(Specify by pattern) if [ $? = 0 ]; then echo "virus undetected." else echo "virus detection!!" fi |
|
1 |
# chmod +x /opt/script/clam-full.sh |
|
1 |
# mkdir /var/log/clamav/virus |
|
1 |
# /opt/script/clam-full.sh |
|
1 2 3 |
# crontab -e # m h dom mon dow command 0 2 * * mon /opt/script/clam-full.sh >> /var/log/clamav/clamav_scan.log ← add |