Contents
1.Creating a Certificate for SSL
1.1 advance preparation
The RHEL8 series does not include CA, so use RHEL7 CA.
① Copy the CA to /etc/pki/tls/misc/ using WINSCP, etc.
➁Pass PATH to SSL commands
|
1 |
# export PATH=/etc/pki/tls/misc:$PATH |
➂Edit the openssl.cnf file
|
1 |
# cd /etc/pki/tls/ |
|
1 2 3 4 5 6 7 8 9 10 |
tls]# vi openssl.cnf ■1Add around line 197 # This is OK for an SSL server. # nsCertType = server nsCertType = server ■Add around line 265 # Some might want this also # nsCertType = sslCA, emailCA nsCertType = sslCA, emailCA |
④Go to the working directory for creating certificates, etc.
|
1 |
# cd /etc/pki/tls/certs |
①Create a private key for the CA (cakey.pem) and a certificate for the CA (cacert.pem)
|
1 2 3 4 5 6 7 8 9 10 11 12 13 14 15 16 17 18 19 20 21 22 23 24 25 26 27 28 29 30 31 32 33 34 35 36 37 38 39 40 41 42 43 44 45 46 47 48 49 50 51 52 53 54 55 56 57 |
certs]# CA -newca CA certificate filename (or enter to create) Type <Enter>. Making CA certificate ... Generating a 2048 bit RSA private key...............+++ .................................................................................................................+++ writing new private key to '/etc/pki/CA/private/./cakey.pem Enter PEM pass phrase: ←Enter any CA password. Verifying - Enter PEM pass phrase: ←Enter the same CA password again. ----- You are about to be asked to enter information that will be incorporated into your certificate request. What you are about to enter is what is called a Distinguished Name or a DN. There are quite a few fields but you can leave some blank For some fields there will be a default value, If you enter '.', the field will be left blank. ----- Country Name (2 letter code) [XX]:JP State or Province Name (full name) []:<Name of prefecture> Locality Name (eg, city) [Default City]:<City Name> Organization Name (eg, company) [Default Company Ltd]:<Organization name> Organizational Unit Name (eg, section) []:<組織内ユニット名> Common Name (eg, your name or your server's hostname) []:<Organization / Server Name> Email Address []:<Administrator email address> Please enter the following 'extra' attributes to be sent with your certificate request A challenge password []: <Enter> An optional company name []: <Enter> Using configuration from /etc/pki/tls/openssl.cnf Enter pass phrase for /etc/pki/CA/private/./cakey.pem: ←Enter the password for the CA that you set. Check that the request matches the signature Signature ok Certificate Details: Serial Number: c3:af:88:a0:37:c6:c9:6e Validity Not Before: Feb 20 04:47:20 2019 GMT Not After : Feb 19 04:47:20 2022 GMT Subject: countryName = JP stateOrProvinceName = <The name of the prefecture you set above will be displayed.> organizationName = <The name of the city you set above will be displayed.> organizationalUnitName = <The organization name you set above will be displayed.> commonName = <The organization/server name you set above will be displayed.> emailAddress = <The administrator email address you set above will be displayed.> X509v3 extensions: X509v3 Subject Key Identifier: 9F:64:6A:89:54:AF:A1:A3:08:D7:6B:B4:CB:3A:3E:DB:C9:0A:B8:70 X509v3 Authority Key Identifier: keyid:9F:64:6A:89:54:AF:A1:A3:08:D7:6B:B4:CB:3A:3E:DB:C9:0A:B8:70 X509v3 Basic Constraints: CA:TRUE Netscape Cert Type: SSL CA, S/MIME CA Certificate is to be certified until Feb 19 04:47:20 2022 GMT (1095 days) Write out database with 1 new entries Data Base Updated |
➁Create a ca.der file to import the CA certificate into your browser
|
1 |
certs]# openssl x509 -inform pem -in /etc/pki/CA/cacert.pem -outform der -out /etc/pki/CA/ca.der |
①Create a private key for the server (newkey.pem)
|
1 2 3 4 5 6 7 8 9 10 11 12 13 14 15 16 17 18 19 20 21 22 23 24 25 26 27 |
certs]# CA -newreq Generating a 2048 bit RSA private key .................................................+++ .......................+++ writing new private key to 'newkey.pem' Enter PEM pass phrase: ←Enter a password for an optional server certificate. Verifying - Enter PEM pass phrase: ←Enter the password for the optional server certificate again. ----- You are about to be asked to enter information that will be incorporated into your certificate request. What you are about to enter is what is called a Distinguished Name or a DN. There are quite a few fields but you can leave some blank For some fields there will be a default value, If you enter '.', the field will be left blank. ----- Country Name (2 letter code) [XX]:JP State or Province Name (full name) []:<Name of prefecture> Locality Name (eg, city) [Default City]:<City Name> Organization Name (eg, company) [Default Company Ltd]:<Organization name> Organizational Unit Name (eg, section) []:<Unit name in the organization> Common Name (eg, your name or your server's hostname) []:<Organization/Server Name> Email Address []:<Administrator email address> Please enter the following 'extra' attributes to be sent with your certificate request A challenge password []: <Enter> An optional company name []: <Enter> Request is in newreq.pem, private key is in newkey.pem |
② Remove the password for the server private key
If you leave this password set, you will be required to enter the password every time you start SSL, and you will not be able to start it, for example, during an automatic restart.
If you leave this password set, you will be required to enter the password every time you start SSL, and you will not be able to start it when you reboot automatically.
|
1 2 3 |
certs]# openssl rsa -in newkey.pem -out newkey.pem Enter pass phrase for newkey.pem: ←Enter the password for the server certificate. writing RSA key |
③ Create a certificate for the server (newcert.pem/server.crt)
|
1 2 3 4 5 6 7 8 9 10 11 12 13 14 15 16 17 18 19 20 21 22 23 24 25 26 27 28 29 30 31 32 33 34 35 36 37 38 39 40 41 42 43 44 45 46 47 48 49 50 |
certs]# CA -sign Using configuration from /etc/pki/tls/openssl.cnf Enter pass phrase for ./demoCA/private/cakey.pem: ←Enter the password for the CA that you set. Check that the request matches the signature Signature ok Certificate Details: Serial Number: c3:af:88:a0:37:c6:c9:6f Validity Not Before: Feb 20 04:51:26 2021 GMT Not After : Feb 20 04:51:26 20221 GMT Subject: countryName = xxxx stateOrProvinceName = xxxx localityName = xxxxx organizationName = xxxxx ・・・・・ 中略 ・・・・ DA:DD:DB:FF:DA:5B:28:8C:44:21:7E:DF:CC:C9:6C:31:03:23:BE:B6 X509v3 Authority Key Identifier: keyid:9F:64:6A:89:54:AF:A1:A3:08:D7:6B:B4:CB:3A:3E:DB:C9:0A:B8:70 Certificate is to be certified until Feb 20 04:51:26 2020 GMT (365 days) Sign the certificate? [y/n]:y ←「y」 Write out database with 1 new entries Data Base Updated ・・・・・ 中略 ・・・・ -----BEGIN CERTIFICATE----- MIIEHDCCAwSgAwIBAgIJAMOviKA3xslvMA0GCSqGSIb3DQEBCwUAMH4xCzAJBgNV BAYTAkpQMQ4wDAYDVQQIDAVUb2t5bzETMBEGA1UECgwKQ0FfUHJpdmF0ZTEOMAwG A1UECwwFQWRtaW4xEzARBgNVBAMMCkNBX1ByaXZhdGUxJTAjBgkqhkiG9w0BCQEW FnN0dWR5QGxpbnV4LXRvcGljcy5jb20wHhcNMTkwMjIwMDQ1MTI2WhcNMjAwMjIw MDQ1MTI2WjCBijELMAkGA1UEBhMCSlAxDjAMBgNVBAgMBVRva3lvMQ0wCwYDVQQH DARUYW1hMQ4wDAYDVQQKDAVUaWdlcjEOMAwGA1UECwwFQWRtaW4xFTATBgNVBAMM DDE5Mi4xNjguMC4zNjElMCMGCSqGSIb3DQEJARYWc3R1ZHlAbGludXgtdG9waWNz LmNvbTCCASIwDQYJKoZIhvcNAQEBBQADggEPADCCAQoCggEBAN/3xLxDDO9AdyCx q8MoiXAGU2JID6UXPUSwUvZURuNZsxoxOOJoGlgPr6H8fOKshNlfL50QMXDCRqYn P8ACUIoRbS4mrsGlriNDTVatai7CdhODz+NoYHMKDbbr42lHSM1ycm+JVZzsCcF3 M72WaoYZpNtB6oedg78NG/bwWz4fLhBm/YTaItfpYdNk0lPFuQQushzI8Z/ZmDGM 5iNd86WNtsDvtmZQEM01aA6uvBUVaT8bBn8y8efwvFqX+WRbO1DoygJOKJ89npXX uRUMQVNDsW5jrSTLi4qQgGKmc23o/q2P46q9TZ9Bbp9xyc/5EOq1NUv5AE5lFoLV /AmkFKcCAwEAAaOBjzCBjDAJBgNVHRMEAjAAMBEGCWCGSAGG+EIBAQQEAwIGQDAs BglghkgBhvhCAQ0EHxYdT3BlblNTTCBHZW5lcmF0ZWQgQ2VydGlmaWNhdGUwHQYD VR0OBBYEFNrd2//aWyiMRCF+38zJbDEDI762MB8GA1UdIwQYMBaAFJ9kaolUr6Gj CNdrtMs6PtvJCrhwMA0GCSqGSIb3DQEBCwUAA4IBAQCK0Xvx2ppyKxVv1FswuTXC Vy/WLeAVVdLR4LFzQ41g2CsISRU6pkvnqCKJQsNsejlfh9oeMMpvBTqJMdSAe9mV CX0X4xtmGqKFzTsS3Xd2E8QvX8MJrATPvLzKl9wAOP45RpKStDgvt9e85mpFtOdU GfriZBlAxU2MnAbhLpTInefKneZh+v+KwgBoRL3NPZHVL/JGV4L0vnrG2r6SnNuS nBHZnkW4A6T3T/28f/ogbjq+kmvXjoakZw7axTGO53TariaRO6eVusNe+i66Ectj 2SFTGsOd6sHJW5KPWuqFamncAjFqxo67KNIMWzgmUDqQTwji+bql+lKNUakZJf9u -----END CERTIFICATE----- Signed certificate is in newcert.pem |
④ Create a server certificate (server.crt)
|
1 |
certs]# openssl x509 -in newcert.pem -out server.crt |
2.SSH public key cryptography setting
① Create a key pair with RSA
Become an ordinary user (jimmy in the example) and create a key pair with RSA
|
1 2 3 4 5 6 7 8 9 10 11 12 13 14 15 16 17 18 19 20 21 22 23 |
certs]# su - jimmy ~]$ ssh-keygen -t rsa Generating public/private rsa key pair. Enter file in which to save the key (/home/tama/.ssh/id_rsa): <Enter> Created directory '/home/pakira/.ssh'. Enter passphrase (empty for no passphrase): ←Enter the password for the CA Enter same passphrase again: ← same password Your identification has been saved in /home/pakira/.ssh/id_rsa. Your public key has been saved in /home/pakira/.ssh/id_rsa.pub The key fingerprint is: SHA256:/C+8j0Ykpbqq80ABB/kkbwB8L76MUxmrkBvAsT6OVwg pakira@Tiger The key's randomart image is: +---[RSA 2048]----+ |*o. | |+=.. . | |.*= . o | |Eo++ . .o . | |o+o.= .So | |++.=. . .. | |+oB.. . o. | |o=o+ . +o | | .o+o. .o+o | +----[SHA256]-----+ |
|
1 2 |
~]$ mv ~/.ssh/id_rsa.pub ~/.ssh/authorized_keys ~]$ chmod 600 ~/.ssh/authorized_keys |
➁Private Key Login Settings
|
1 |
~]$ su - |
|
1 2 3 4 5 6 7 |
# vi /etc/ssh/sshd_config ■Remove the "#" at the beginning of the line per line 49 Before change) #PubkeyAuthentication yes After change) PubkeyAuthentication yes |
③ Restart SSH
|
1 |
# systemctl restart sshd.service |
④Copy the private key to the client PC (using WinSCP)
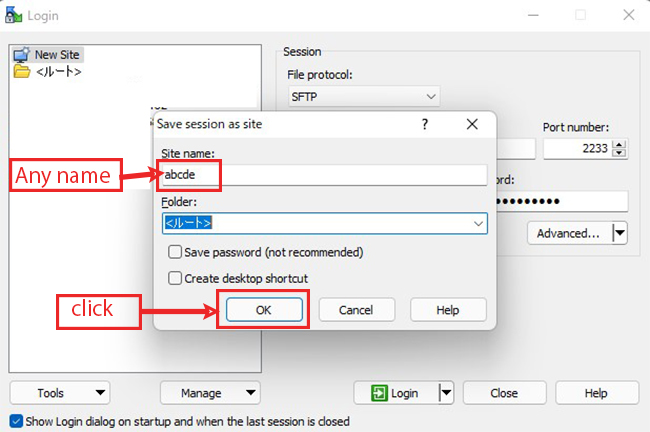
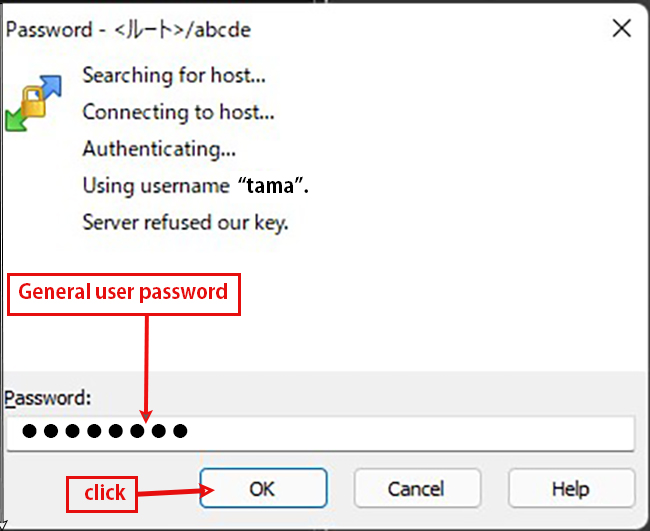
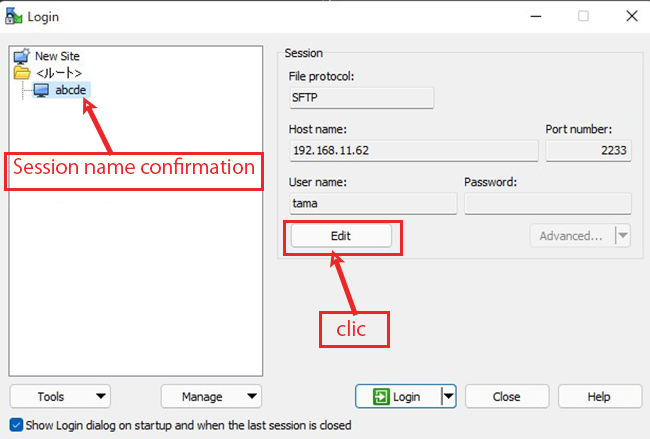
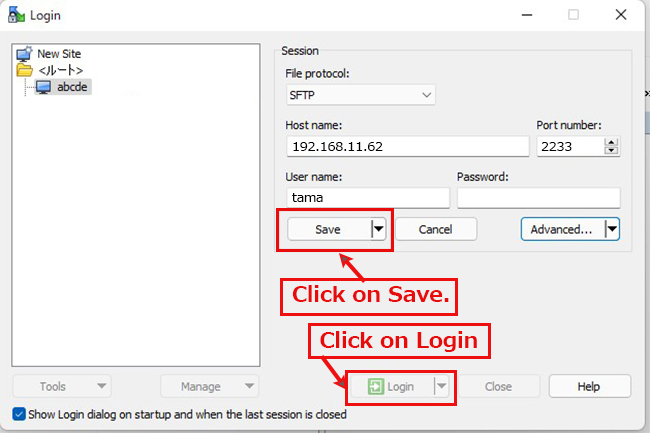
Start WinSCP and configure it to connect to the server (IP:192.168.11.62, SSH port 2233 user;tama).
(where to get it ; https://winscp.net/eng/download.php)
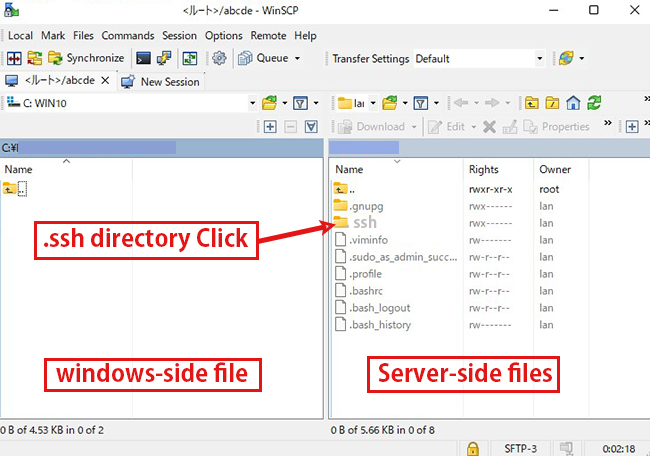
Drag and drop the "id_rsa file" in the .ssh directory into Windows on the left side to save it.
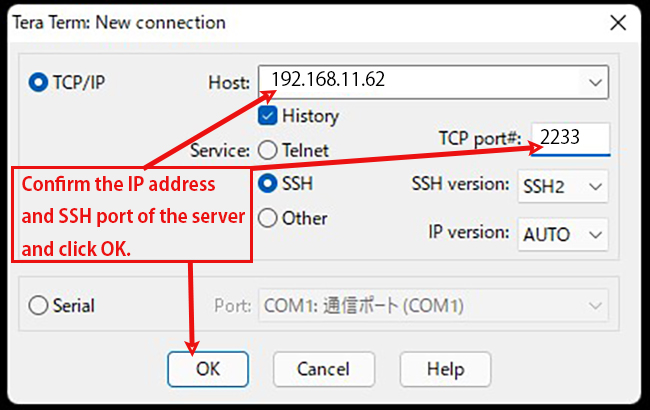
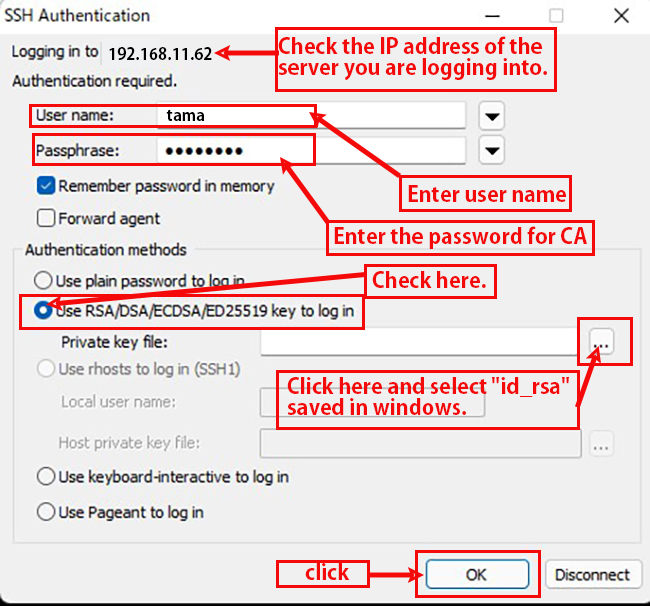
Start Tera Term anew.
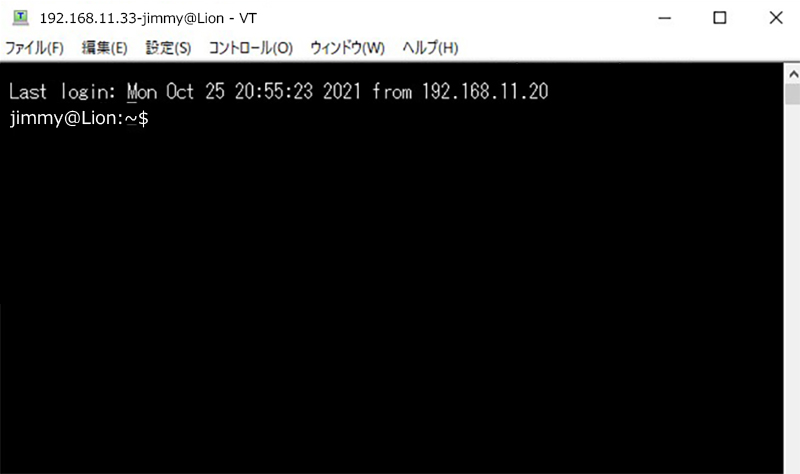
If the connection is successful, it will look like this
⑤ Change to login only with the private key.
| [root@Lepard ~]# vi /etc/ssh/sshd_config ■Per line 69 Add "PasswordAuthentication no" under "#PasswordAuthentication yes". #PasswordAuthentication yes PasswordAuthentication noRestart SSH [root@Lepard ~]# systemctl restart sshd.service |
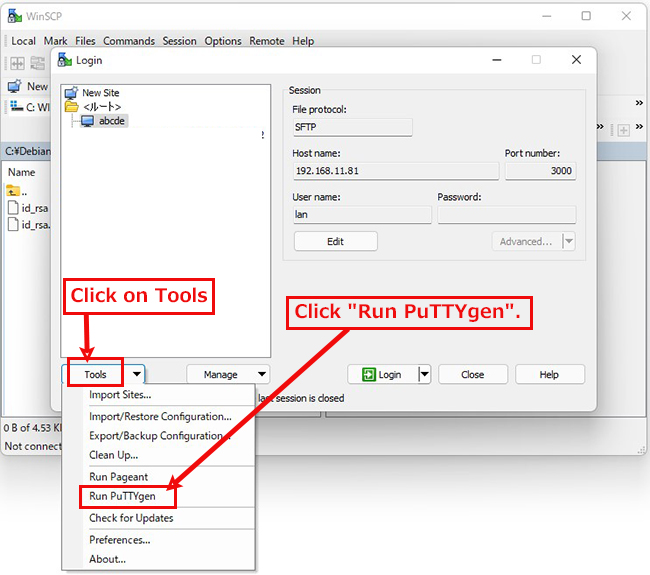
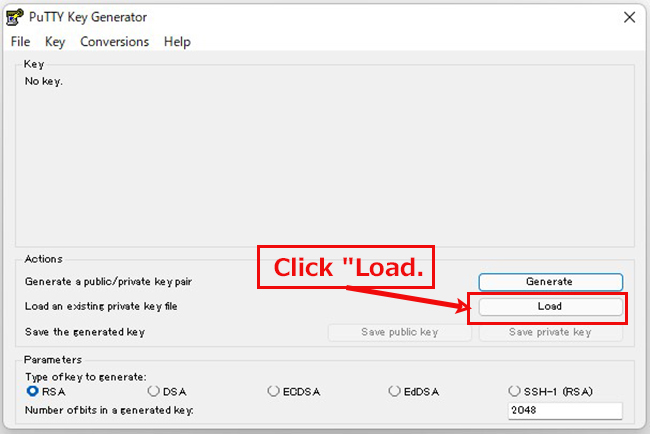
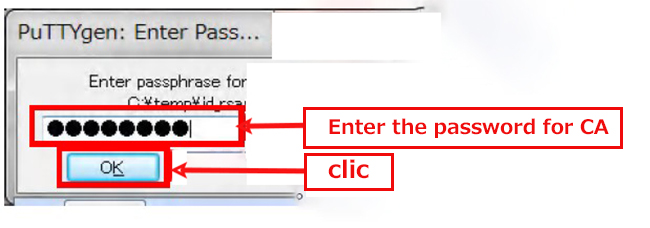
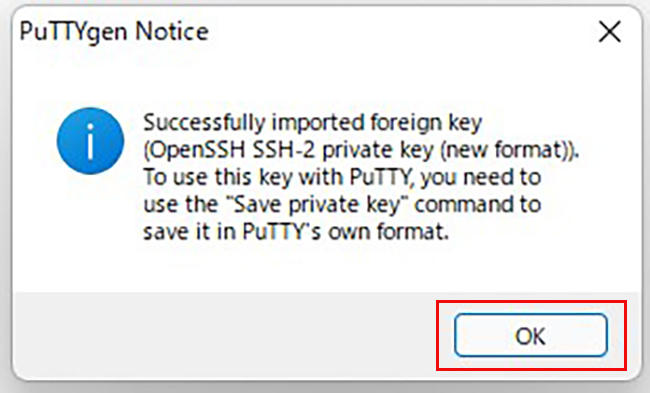
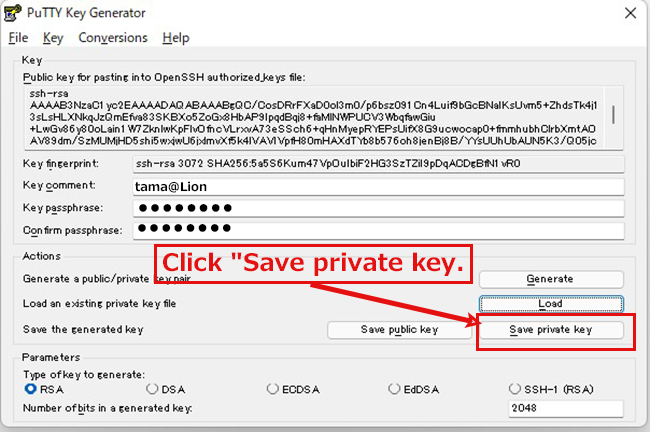
⑥Change WinSCP settings (using PuTTYgen, which is included with WinSCP)
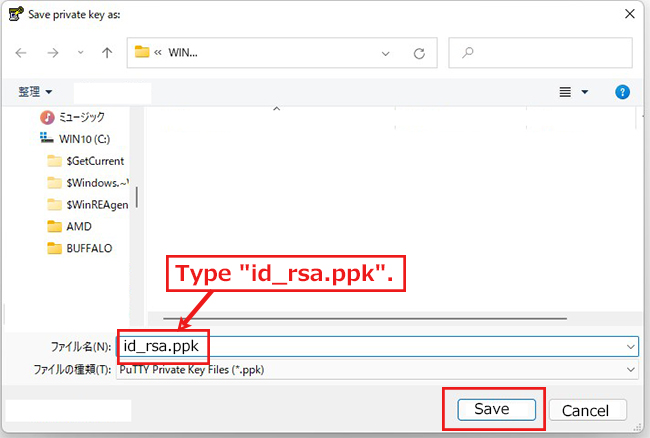
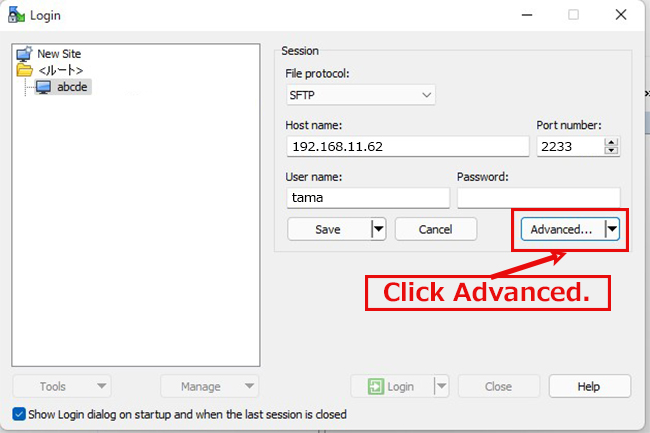
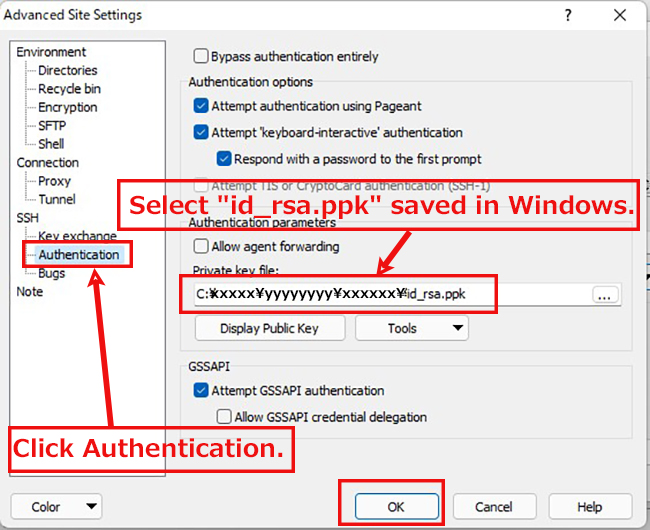
Launch WinSCP and click "Tools".

