Suricata Host IDS/IPS + Elastic Stackでログの可視化とモニタリング(RockyLinux/AlmaLinux)

Contents
このページの目的
SuricataをIDSとIPSとして利用し、Elastic StackをSuricataのログの可視化とモニタリングに利用します
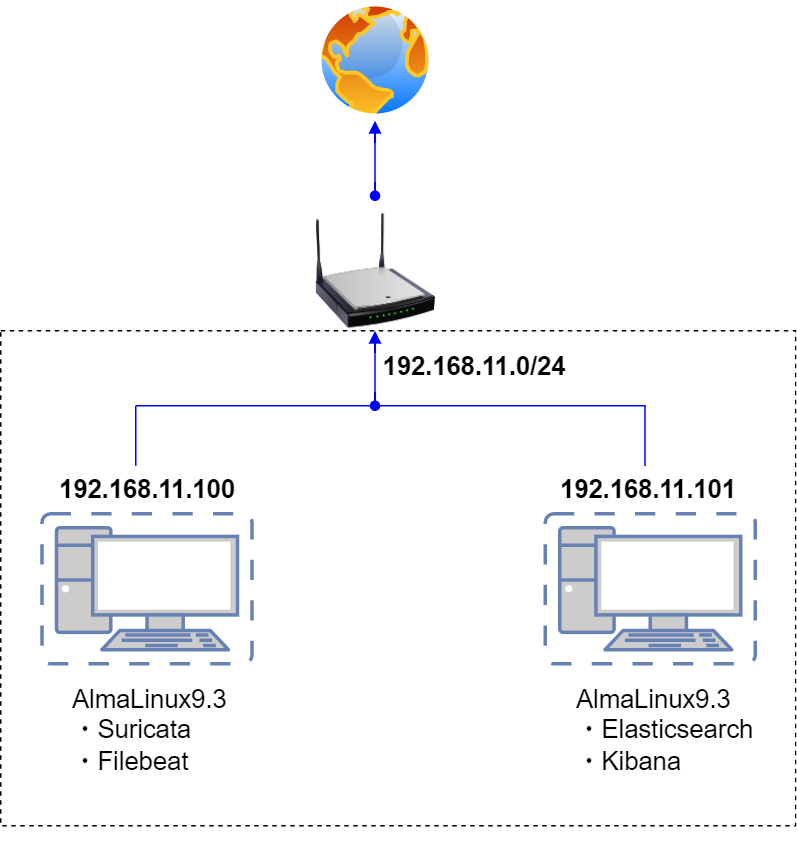
構築するイメージは下図の通りで2台のAlmaLinux9.3サーバーを用意し、
・1台目のサーバーにSuricata、Filebeatをインストールする
・2台目のサーバーに、Kibana、Elasticsearchをインストールする
それぞれの役割は
Suricata Host IDS/IPS
ホスト侵入検知・防御システムでデフォルトでパッシブIDSとしてインストールされ、単に不審なトラフィックをスキャンし、ホスト上でアラートを生成します。今回はSURICATAをIPSとしても動作するように設定し、定義されたルールに一致する悪意のあるネットワークトラフィックのパケットをドロップして完全にブロックします
Filebeat
ログデータを転送し、一元管理するための軽量なシッパーです
Elasticsearch
あらゆる種類のデータを対象とした検索・分析エンジン
Kibana
Elasticsearch にインデックスされたデータの検索とデータ可視化機能を提供します
SURICATAインストールと設定
本作業は1台目のAlmaLinuxサーバーで行う
1. SURICATAインストール
1.1 Open Information Security Foundation(OSIF)のリポジトリを追加
|
1 2 |
# dnf install epel-release dnf-plugins-core # dnf copr enable @oisf/suricata-7.0 |
1.2 SURICATAをインストール
|
1 |
# dnf install suricata |
バージョンの確認
|
1 2 |
# suricata -V This is Suricata version 7.0.2 RELEASE |
1.3 システム起動時にsuricata.serviceが起動するようにする
|
1 2 |
# systemctl enable suricata.service Created symlink /etc/systemd/system/multi-user.target.wants/suricata.service → /usr/lib/systemd/system/suricata.service. |
1.4 SURICATAを停止する
設定ファイルを編集してテストしたときに、SURICATAが再び起動したときに変更が検証されて読み込まれるようになる
|
1 |
# systemctl stop suricata.service |
2. SURICATAの設定
①SURICATAは、IDSモードでのみ有効であり、悪意のあるネットワークトラフィックをドロップあるいはブロックはしません、アラートとログを提供するだけです。SURICATAをIPSとして設定し、悪意のあるネットワークパケットをドロップするようにする
➁JSON出力にコミュニティIDを含めるようにSURICATAを設定する
2.1 デフォルトのネットワーク・インターフェイスを確認
|
1 2 3 |
# ip --brief add lo UNKNOWN 127.0.0.1/8 ::1/128 ens160 UP 192.168.11.100/24 |
デフォルトのネットワーク・インターフェイス名は"ens160"である
2.2 Suricataの設定ファイル編集
|
1 2 3 4 |
# vi /etc/sysconfig/suricata # 8行目 :インターフェイスを指定 # Add options to be passed to the daemon OPTIONS="-i ens160 --user suricata " |
|
1 2 3 4 5 6 7 8 9 10 11 12 13 14 15 16 17 18 19 20 21 |
# vi /etc/suricata/suricata.yaml # 18行目 : varsセクションで、ネットワークを定義する HOME_NET: "[192.168.11.0/24]" EXTRNAL_NET: "!$HOME_NET" 137行目 community-id: falseこの行をcommunity-id:trueに変更する community-id: true # Seed value for the ID output. Valid values are 0-65535. community-id-seed: 0 616行目 af-packetセクションのインターフェース名を設定 af-packet: - interface: ens160 SURICATAのサービスを再起動することなく、ルールの追加、削除、編集ができるようにする。 最終行に次を追加 detect-engine: - rule-reload: true |
2.3 プロセスを再起動せずにルールセットを再読み込みするようSuricataプロセスに通知し、以Suricataサービスを再起動する
|
1 2 3 |
# kill -usr2 $(pidof suricata) kill: usage: kill [-s sigspec | -n signum | -sigspec] pid | jobspec ... or kill -l [sigspec] # service suricata restart |
2.4 Suricataルールの更新
|
1 2 3 4 5 6 7 8 9 10 11 12 13 14 15 16 17 18 19 20 21 22 |
# suricata-update 13/1/2024 -- 09:30:12 - <Info> -- Using data-directory /var/lib/suricata. 13/1/2024 -- 09:30:12 - <Info> -- Using Suricata configuration /etc/suricata/suricata.yaml 13/1/2024 -- 09:30:12 - <Info> -- Using /usr/share/suricata/rules for Suricata provided rules. 13/1/2024 -- 09:30:12 - <Info> -- Found Suricata version 7.0.2 at /usr/sbin/suricata. 13/1/2024 -- 09:30:12 - <Info> -- Loading /etc/suricata/suricata.yaml 13/1/2024 -- 09:30:12 - <Info> -- Disabling rules for protocol pgsql 13/1/2024 -- 09:30:12 - <Info> -- Disabling rules for protocol modbus 13/1/2024 -- 09:30:12 - <Info> -- Disabling rules for protocol dnp3 13/1/2024 -- 09:30:12 - <Info> -- Disabling rules for protocol enip 13/1/2024 -- 09:30:12 - <Info> -- No sources configured, will use Emerging Threats Open 13/1/2024 -- 09:30:12 - <Info> -- Fetching https://rules.emergingthreats.net/open/suricata-7.0.2/emerging.rules.tar.gz. ............................................................................ 13/1/2024 -- 09:30:16 - <Info> -- Enabled 133 rules for flowbit dependencies. 13/1/2024 -- 09:30:16 - <Info> -- Creating directory /var/lib/suricata/rules. 13/1/2024 -- 09:30:16 - <Info> -- Backing up current rules. 13/1/2024 -- 09:30:16 - <Info> -- Writing rules to /var/lib/suricata/rules/suricata.rules: total: 46733; enabled: 36126; added: 46733; removed 0; modified: 0 13/1/2024 -- 09:30:16 - <Info> -- Writing /var/lib/suricata/rules/classification.config 13/1/2024 -- 09:30:16 - <Info> -- Testing with suricata -T. 13/1/2024 -- 09:30:41 - <Info> -- Done. |
出力の最後に、読み込まれたルールの数が表示される
利用可能 enabled: 46733; 追加 added: 36236;
SURICATAのすべてのルールセット・プロバイダーを更新
no-check-certificateは、認証局の検証を無視する。
|
1 2 3 4 5 6 7 8 9 |
# suricata-update --no-check-certificate update-sources 13/1/2024 -- 09:32:24 - <Info> -- Using data-directory /var/lib/suricata. 13/1/2024 -- 09:32:24 - <Info> -- Using Suricata configuration /etc/suricata/suricata.yaml 13/1/2024 -- 09:32:24 - <Info> -- Using /usr/share/suricata/rules for Suricata provided rules. 13/1/2024 -- 09:32:24 - <Info> -- Found Suricata version 7.0.2 at /usr/sbin/suricata. 13/1/2024 -- 09:32:24 - <Info> -- Downloading https://www.openinfosecfoundation.org/rules/index.yaml 13/1/2024 -- 09:32:25 - <Info> -- Adding all sources 13/1/2024 -- 09:32:25 - <Info> -- Saved /var/lib/suricata/update/cache/index.yaml |
SURICATAのすべてのルールセット・プロバイダーをリストアップ
|
1 2 3 4 5 6 7 8 9 10 11 12 13 14 15 16 17 18 19 20 21 22 23 24 25 26 27 28 29 30 31 32 33 34 35 36 37 38 39 40 41 42 43 44 45 46 47 48 49 50 51 52 53 54 55 56 57 58 59 60 61 62 63 |
# suricata-update list-sources 13/1/2024 -- 09:33:14 - <Info> -- Using data-directory /var/lib/suricata. 13/1/2024 -- 09:33:14 - <Info> -- Using Suricata configuration /etc/suricata/suricata.yaml 13/1/2024 -- 09:33:14 - <Info> -- Using /usr/share/suricata/rules for Suricata provided rules. 13/1/2024 -- 09:33:14 - <Info> -- Found Suricata version 7.0.2 at /usr/sbin/suricata. Name: et/open Vendor: Proofpoint Summary: Emerging Threats Open Ruleset License: MIT Name: et/pro Vendor: Proofpoint Summary: Emerging Threats Pro Ruleset License: Commercial Replaces: et/open Parameters: secret-code Subscription: https://www.proofpoint.com/us/threat-insight/et-pro-ruleset Name: oisf/trafficid Vendor: OISF Summary: Suricata Traffic ID ruleset License: MIT Name: scwx/enhanced Vendor: Secureworks Summary: Secureworks suricata-enhanced ruleset License: Commercial Parameters: secret-code Subscription: https://www.secureworks.com/contact/ (Please reference CTU Countermeasures) Name: scwx/malware Vendor: Secureworks Summary: Secureworks suricata-malware ruleset License: Commercial Parameters: secret-code Subscription: https://www.secureworks.com/contact/ (Please reference CTU Countermeasures) Name: scwx/security Vendor: Secureworks Summary: Secureworks suricata-security ruleset License: Commercial Parameters: secret-code Subscription: https://www.secureworks.com/contact/ (Please reference CTU Countermeasures) Name: sslbl/ssl-fp-blacklist Vendor: Abuse.ch Summary: Abuse.ch SSL Blacklist License: Non-Commercial Name: sslbl/ja3-fingerprints Vendor: Abuse.ch Summary: Abuse.ch Suricata JA3 Fingerprint Ruleset License: Non-Commercial Name: etnetera/aggressive Vendor: Etnetera a.s. Summary: Etnetera aggressive IP blacklist License: MIT Name: tgreen/hunting Vendor: tgreen Summary: Threat hunting rules License: GPLv3 Name: malsilo/win-malware Vendor: malsilo Summary: Commodity malware rules License: MIT Name: stamus/lateral Vendor: Stamus Networks Summary: Lateral movement rules License: GPL-3.0-only |
License: Commercial のルールは有償です。tgreen/huntingルールをフェッチする
|
1 |
# suricata-update enable-source tgreen/hunting |
suricata-updateコマンドを再度実行してtgreen/huntingルールセットをロードし、killコマンドを実行して再起動せずにルールを更新する
|
1 2 3 4 5 6 7 8 9 10 11 12 13 14 15 |
# suricata-update 13/1/2024 -- 09:34:57 - <Info> -- Ignoring file rules/emerging-deleted.rules 13/1/2024 -- 09:34:59 - <Info> -- Loaded 47008 rules. 13/1/2024 -- 09:34:59 - <Info> -- Disabled 14 rules. 13/1/2024 -- 09:34:59 - <Info> -- Enabled 0 rules. 13/1/2024 -- 09:34:59 - <Info> -- Modified 0 rules. 13/1/2024 -- 09:34:59 - <Info> -- Dropped 0 rules. 13/1/2024 -- 09:34:59 - <Info> -- Enabled 133 rules for flowbit dependencies. 13/1/2024 -- 09:34:59 - <Info> -- Backing up current rules. 13/1/2024 -- 09:35:01 - <Info> -- Writing rules to /var/lib/suricata/rules/suricata.rules: total: 47008; enabled: 36369; added: 275; removed 0; modified: 0 13/1/2024 -- 09:35:01 - <Info> -- Writing /var/lib/suricata/rules/classification.config 13/1/2024 -- 09:35:01 - <Info> -- Testing with suricata -T. 13/1/2024 -- 09:35:25 - <Info> -- Done. # kill -usr2 $(pidof suricata) |
2.5 Suricataテスト
|
1 2 3 4 5 6 7 8 9 10 11 12 13 14 |
# suricata -T -c /etc/suricata/suricata.yaml -v Notice: suricata: This is Suricata version 7.0.2 RELEASE running in SYSTEM mode Info: cpu: CPUs/cores online: 2 Info: suricata: Running suricata under test mode Info: suricata: Setting engine mode to IDS mode by default Info: exception-policy: master exception-policy set to: auto Info: logopenfile: fast output device (regular) initialized: fast.log Info: logopenfile: eve-log output device (regular) initialized: eve.json Info: logopenfile: stats output device (regular) initialized: stats.log Info: detect: 1 rule files processed. 36369 rules successfully loaded, 0 rules failed Info: threshold-config: Threshold config parsed: 0 rule(s) found Info: detect: 36372 signatures processed. 1232 are IP-only rules, 5022 are inspecting packet payload, 29905 inspect application layer, 108 are decoder event only Notice: suricata: Configuration provided was successfully loaded. Exiting. |
2.6 SURICATAサービスを起動し、ステータス確認
|
1 |
# systemctl start suricata.service |
|
1 2 3 4 5 6 7 8 9 10 11 12 13 14 15 16 17 |
# systemctl status suricata.service ● suricata.service - Suricata Intrusion Detection Service Loaded: loaded (/usr/lib/systemd/system/suricata.service; enabled; preset: disabled) Active: active (running) since Sat 2024-01-13 10:00:51 JST; 8s ago Docs: man:suricata(1) Process: 46675 ExecStartPre=/bin/rm -f /var/run/suricata.pid (code=exited, status=0/SUCCESS) Main PID: 46676 (Suricata-Main) Tasks: 1 (limit: 22874) Memory: 157.3M CPU: 7.343s CGroup: /system.slice/suricata.service mq46676 /sbin/suricata -c /etc/suricata/suricata.yaml --pidfile /var/run/suricata.pid -i ens160 --user suricata Jan 13 10:00:51 Lepard systemd[1]: Starting Suricata Intrusion Detection Service... Jan 13 10:00:51 Lepard systemd[1]: Started Suricata Intrusion Detection Service. Jan 13 10:00:51 Lepard suricata[46676]: i: suricata: This is Suricata version 7.0.2 RELEASE running in SYSTEM mode |
tailコマンドを使い、SURICATAのログから、起動が終了したことを示す特定のメッセージを探すことができる
|
1 2 3 4 5 6 7 |
# tail -f /var/log/suricata/suricata.log [47667 - Suricata-Main] 2024-01-13 10:32:27 Info: threshold-config: Threshold config parsed: 0 rule(s) found [47667 - Suricata-Main] 2024-01-13 10:32:27 Info: detect: 36372 signatures processed. 1232 are IP-only rules, 5022 are inspecting packet payload, 29905 inspect application layer, 108 are decoder event only [47667 - Suricata-Main] 2024-01-13 10:32:39 Info: runmodes: ens160: creating 2 threads [47667 - Suricata-Main] 2024-01-13 10:32:39 Info: unix-manager: unix socket '/var/run/suricata/suricata-command.socket' [47667 - Suricata-Main] 2024-01-13 10:32:39 Notice: threads: Threads created -> W: 2 FM: 1 FR: 1 Engine started. |
2.7 SuricataがIDSモード動作確認テスト
TestMyNIDSのウェブサイトを使う
|
1 2 |
# curl http://testmynids.org/uid/index.html uid=0(root) gid=0(root) groups=0(root) |
2100498ルール識別子を使用して、grepコマンドを使用してそれに一致するエントリを検索
|
1 2 3 |
# grep 2100498 /var/log/suricata/fast.log 01/13/2024-10:36:00.911180 [**] [1:2100498:7] GPL ATTACK_RESPONSE id check returned root [**] [Classification: Potentially Bad Traffic] [Priority: 2] {TCP} 18.65.159.104:80 -> 192.168.11.100:51174 |
GPL ATTACK_RESPONSEアラートをログに記録されています
JSON形式でイベントを記録するとより読みやすい形式でログを提供します。この形式でログを表示するために、jqユーティリティをインストールする
|
1 |
# dnf install jq |
検索対象の2100498の値と一致するsignature_idキーを持つalertオブジェクトを表示します
|
1 2 3 4 5 6 7 8 9 10 11 12 13 14 15 16 17 18 19 20 21 22 23 24 25 26 27 28 29 30 31 |
# jq 'select(.alert .signature_id==2100498)' /var/log/suricata/eve.json { "timestamp": "2024-01-13T10:36:00.911180+0900", "flow_id": 2013526128312502, "in_iface": "ens160", "event_type": "alert", "src_ip": "18.65.159.104", "src_port": 80, "dest_ip": "192.168.11.100", "dest_port": 51174, "proto": "TCP", "pkt_src": "wire/pcap", "community_id": "1:I6MDvLy90BiFgFMr0+lulTL+ibs=", "alert": { "action": "allowed", "gid": 1, "signature_id": 2100498, "rev": 7, "signature": "GPL ATTACK_RESPONSE id check returned root", "category": "Potentially Bad Traffic", "severity": 2, "metadata": { "created_at": [ "2010_09_23" ], "updated_at": [ "2019_07_26" ] } ……………………………………………………….. |
2.8 SuricataをIPSに設定する
悪意のあるネットワーク・トラフィックをドロップするようにSuricataをIPSモードで起動するように設定する
非SSHポートへのSSHトラフィックをスキャンする以下のカスタム署名を作成し、/var/lib/suricata/rules/local.rulesというファイルにインクルードする
|
1 2 |
# vi /var/lib/suricata/rules/local.rules alert ssh any any -> 192.168.11.100 !22 (msg:"SSH TRAFFIC on non-SSH port"; flow:to_client, not_established; classtype: misc-attack; target: dest_ip; sid:1000000;) |
/etc/suricata/suricata.yaml設定ファイルを編集し、local.rulesをインクルードする
|
1 2 3 4 5 |
# vi /etc/suricata/suricata.yaml 2149行目に追加 rule-files: - suricata.rules - local.rules |
SURICATAの設定を検証
|
1 2 3 4 |
# suricata -T -c /etc/suricata/suricata.yaml -v Info: detect: 36373 signatures processed. 1232 are IP-only rules, 5022 are inspecting packet payload, 29906 inspect application layer, 108 are decoder event only Notice: suricata: Configuration provided was successfully loaded. Exiting. |
SURICATAの/etc/sysconfig/suricata設定ファイルを編集する
|
1 2 3 4 5 6 7 8 |
# vi /etc/sysconfig/suricata OPTIONS="-i ens160 --user suricata "行を見つけ、行頭に#を追加してコメントアウトする。 次に、OPTIONS="-q 0 -vvv --user suricata "行を追加し、SURICATAにIPSモードで実行するように指示する . . . # OPTIONS="-i ens160 --user suricata" OPTIONS="-q 0 -vvv --user suricata" . . . |
Suricataを再起動
|
1 |
# systemctl restart suricata.service |
ステータス確認
|
1 2 3 4 5 6 7 8 9 10 11 12 13 14 15 16 17 18 19 20 21 22 23 24 |
# systemctl status suricata.service ● suricata.service - Suricata Intrusion Detection Service Loaded: loaded (/usr/lib/systemd/system/suricata.service; enabled; preset: disabled) Active: active (running) since Sat 2024-01-13 10:48:30 JST; 8s ago Docs: man:suricata(1) Process: 47855 ExecStartPre=/bin/rm -f /var/run/suricata.pid (code=exited, status=0/SUCCESS) Main PID: 47856 (Suricata-Main) Tasks: 1 (limit: 22874) Memory: 188.7M CPU: 8.423s CGroup: /system.slice/suricata.service mq47856 /sbin/suricata -c /etc/suricata/suricata.yaml --pidfile /var/run/suricata.pid -q 0 -vvv --user suricata Jan 13 10:48:30 Lepard suricata[47856]: [47856] Config: runmodes: enabling 'eve-log' module 'flow' Jan 13 10:48:30 Lepard suricata[47856]: [47856] Info: logopenfile: stats output device (regular) initialized: stats.log Jan 13 10:48:30 Lepard suricata[47856]: [47856] Config: landlock: Landlock is not enabled in configuration Jan 13 10:48:30 Lepard suricata[47856]: [47856] Config: suricata: Delayed detect disabled Jan 13 10:48:30 Lepard suricata[47856]: [47856] Config: detect: pattern matchers: MPM: hs, SPM: hs Jan 13 10:48:30 Lepard suricata[47856]: [47856] Config: detect: grouping: tcp-whitelist (default) 53, 80, 139, 443, 445, 1433, 3306, 3389, 6> Jan 13 10:48:30 Lepard suricata[47856]: [47856] Config: detect: grouping: udp-whitelist (default) 53, 135, 5060 Jan 13 10:48:30 Lepard suricata[47856]: [47856] Config: detect: prefilter engines: MPM Jan 13 10:48:30 Lepard suricata[47856]: [47856] Config: reputation: IP reputation disabled Jan 13 10:48:30 Lepard suricata[47856]: [47856] Config: detect: Loading rule file: /var/lib/suricata/rules/suricata.rules |
2.9 入ってくるネットワーク・トラフィックをSuricataのNFQUEUEに向ける
Firewalld がインストールされ、有効になっているのでSuricataに必要なルールをFirewalldに追加する
|
1 2 3 4 5 6 7 8 9 10 11 12 13 14 15 16 17 18 19 20 21 |
# firewall-cmd --permanent --direct --add-rule ipv4 filter INPUT 0 -p tcp --dport 22 -j NFQUEUE --queue-bypass # firewall-cmd --permanent --direct --add-rule ipv4 filter OUTPUT 0 -p tcp --sport 22 -j NFQUEUE --queue-bypass IPv6用の同じルールを追加する: # firewall-cmd --permanent --direct --add-rule ipv6 filter INPUT 0 -p tcp --dport 22 -j NFQUEUE --queue-bypass # firewall-cmd --permanent --direct --add-rule ipv6 filter OUTPUT 0 -p tcp --sport 22 -j NFQUEUE --queue-bypas FORWARDルールを追加して、サーバーが他のシステムのゲートウェイとして動作している場合、そのトラフィックもすべてSURICATAに行って処理されるようにします。 # firewall-cmd --permanent --direct --add-rule ipv4 filter FORWARD 0 -j NFQUEUE # firewall-cmd --permanent --direct --add-rule ipv6 filter FORWARD 0 -j NFQUEUE 最後の2つのINPUTとOUTPUTルールは、SSHトラフィックでない残りのトラフィックをすべてSuricataに送って処理させる。 # firewall-cmd --permanent --direct --add-rule ipv4 filter INPUT 1 -j NFQUEUE # firewall-cmd --permanent --direct --add-rule ipv4 filter OUTPUT 1 -j NFQUEUE IPv6も同様にする # firewall-cmd --permanent --direct --add-rule ipv6 filter INPUT 1 -j NFQUEUE # firewall-cmd --permanent --direct --add-rule ipv6 filter OUTPUT 1 -j NFQUEUE Firewalldをリロード # firewall-cmd --reload |
2.10 SURICATA がトラフィックを正しくドロップしていることを確認
シグネチャのデフォルトアクションをalertやlogからactive dropping trafficに切り替える
/var/lib/suricata/rules/local.rulesファイルを開き、ファイル内の各行の先頭にあるアラートアクションをdropに変更する
|
1 2 |
# vi /var/lib/suricata/rules/local.rules drop ssh any any -> 203.0.113.5 !22 (msg:"SSH TRAFFIC on non-SSH port"; classtype: misc-attack; target: dest_ip; sid:1000000;) |
/var/lib/suricata/rules/suricata.rulesにsid:2100498に該当するものがあれば コメントアウトし、/var/lib/suricata/rules/local.rulesファイルにルールを追加
|
1 2 3 4 |
# vi /var/lib/suricata/rules/local.rules drop ssh any any -> 203.0.113.5 !22 (msg:"SSH TRAFFIC on non-SSH port"; classtype: misc-attack; target: dest_ip; sid:1000000;) drop ip any any -> any any (msg:"GPL ATTACK_RESPONSE id check returned root"; content:"uid=0|28|root|29|"; classtype:bad-unknown; sid:2100498; rev:7; metadata:created_at 2010_09_23, updated_at 2010_09_23;) |
シグネチャを再読み込み
|
1 |
# kill -usr2 $(pidof suricata) |
Suricataのルールを再読み込み
|
1 |
# kill -usr2 $(pidof suricata) |
curlを使ってこのルールをテスト
|
1 2 |
# curl --max-time 5 http://testmynids.org/uid/index.html curl: (28) Operation timed out after 5001 milliseconds with 0 out of 39 bytes received |
jqを使ってeve.logファイルを調べる
|
1 2 3 4 5 6 7 8 9 10 11 12 13 14 15 16 17 18 19 20 21 22 23 24 25 26 27 28 29 30 |
# jq 'select(.alert .signature_id==2100498)' /var/log/suricata/eve.json { "timestamp": "2024-01-13T10:58:20.474191+0900", "flow_id": 1359478570762159, "event_type": "alert", "src_ip": "18.65.159.60", "src_port": 80, "dest_ip": "192.168.11.100", "dest_port": 41314, "proto": "TCP", "pkt_src": "wire/pcap", "community_id": "1:aAuHLSLn0C12JaTBYPRPpi38q/U=", "alert": { "action": "blocked", "gid": 1, "signature_id": 2100498, "rev": 7, "signature": "GPL ATTACK_RESPONSE id check returned root", "category": "Potentially Bad Traffic", "severity": 2, "metadata": { "created_at": [ "2010_09_23" ], "updated_at": [ "2019_07_26" ] } }, |
"action": "blocked",になっている
ホストへのICMPリクエストをすべてドロップするルールを作成し、pingリクエストを実行し、パケットがドロップされることを確認する
ルールを作成
|
1 2 |
# vi /var/lib/suricata/rules/local.rules drop ICMP any any -> any any (msg: “Blocked ICMP Request” ; sid:1000001; rev:1;) |
Suricataのルールを再読み込み
|
1 |
# kill -usr2 $(pidof suricata) |
Windowsマシンから、Suricataホストにpingリクエストを実行する
|
1 |
# ping 192.168.1.100 |
SuricataはIPSとして動作し、すべてのpingリクエストをドロップするはずです
ログを確認すると下記のようにDropされている
|
1 2 3 |
# tail /var/log/suricata/fast.log 01/13/2024-11:30:19.085663 [Drop] [**] [1:1000001:1] Blocked ICMP Request [**] [Classification: (null)] [Priority: 3] {ICMP} 192.168.11.22:8 -> 192.168.11.100:0 |
ELK StackとSURICATAの統合
Elastic Stackをインストール&設定して、SURICATAのログをより効率的に可視化&検索できるようにする
本セクションは基本的には2台目のAlmaLinuxサーバーで行います
1. Elasticsearchのインストール
1.1 公開署名キーをダウンロードしてインストール
|
1 |
# rpm --import https://artifacts.elastic.co/GPG-KEY-elasticsearch |
1.2 リポジトリ定義を/etc/yum/yum.repos.d ディレクトリに作成
|
1 2 3 4 5 6 7 8 9 10 11 |
# vi /etc/yum.repos.d/elasticsearch.repo 下記内容記述 [elasticsearch] name=Elasticsearch repository for 7.x packages baseurl=https://artifacts.elastic.co/packages/7.x/yum gpgcheck=1 gpgkey=https://artifacts.elastic.co/GPG-KEY-elasticsearch enabled=0 autorefresh=1 type=rpm-md |
1.3 ElasticsearchとKibanaをインストール
|
1 |
# dnf install --enablerepo=elasticsearch elasticsearch kibana |
2. Elasticsearch 設定
Elasticsearchはデフォルトでローカル接続のみを受け付けるように設定されています。また、認証が有効になっていないため、Filebeatなどのツールはログを送信できません。今回は、Elasticsearchのネットワーク設定を行い、Elasticsearchに組み込まれているxpackセキュリティモジュールを有効にします。
2.1 Elasticsearchネットワークの設定
ElasticsearchとSURICATAのサーバは別々なので、Elasticsearchがプライベートネットワークインターフェースで接続をリッスンするように設定する必要がある
|
1 2 3 4 5 6 7 8 9 10 11 12 |
# vi /etc/elasticsearch/elasticsearch.yml 57行目追加 #network.host: 192.168.0.1 network.bind_host: ["127.0.0.1", "192.168.11.101"] 62行目コメント解除 http.port: 9200 ファイルの最後に追加する discovery.type: single-node xpack.security.enabled: true |
ファイルを保存する
2.2 ファイアウォールルールを追加
|
1 2 3 4 |
# firewall-cmd --permanent --zone=internal --change-interface=ens160 # firewall-cmd --permanent --zone=internal --add-service=elasticsearch # firewall-cmd --permanent --zone=internal --add-service=kibana # systemctl reload firewalld.service |
2.3 Elasticsearch デーモンを起動し、xpack セキュリティモジュールで使用するパスワードを設定
|
1 |
# systemctl start elasticsearch.service |
ユーティリティを再度実行することはできませんので、これらのパスワードを安全な場所に記録しておいてください。kibana_systemユーザのパスワードはKibana ネットワークの設定で、elasticユーザのパスワードはFilebeatを設定するステップで使用します
3. Kibana の設定
3.1 xpackセキュリティモジュールの設定
Kibana の xpack セキュリティ機能を有効にして、Kibana が Elasticsearch にデータを保存するために使用するいくつかの暗号化キーを作成する。
暗号化キーは、/usr/share/kibana/bin ディレクトリに含まれる kibana-encryption-keys ユーティリティを使用して作成する。
作成した3つのキーを安全な場所に保存しておく
|
1 2 3 4 5 |
# cd /usr/share/kibana/bin/ # ./kibana-encryption-keys generate -q --force xpack.encryptedSavedObjects.encryptionKey: 223e4b8eb75b1838ec47e2b1a7ad1e12 xpack.reporting.encryptionKey: 2470abdda89497fdd027e789b9036f16 xpack.security.encryptionKey: 5271d47560f0c57cdb554db8b1fca3d8 |
これらのキーをKibanaの/etc/kibana/kibana.yml設定ファイルに追加する
|
1 2 3 4 5 6 7 8 9 |
# vi /etc/kibana/kibana.yml 最終行に記述 # Specifies locale to be used for all localizable strings, dates and number formats. # Supported languages are the following: English - en , by default , Chinese - zh-CN . #i18n.locale: "en" xpack.encryptedSavedObjects.encryptionKey: 223e4b8eb75b1838ec47e2b1a7ad1e12 xpack.reporting.encryptionKey: 2470abdda89497fdd027e789b9036f16 xpack.security.encryptionKey: 5271d47560f0c57cdb554db8b1fca3d8 |
3.2 Kibana ネットワークの設定
|
1 2 3 4 5 |
# vi /etc/kibana/kibana.yml 7行目サーバーのプライベートIPアドレス(192.168.11.101)を追加 #server.host: "localhost" server.host: "192.168.11.101" |
3.3 Kibana が Elasticsearch の認証に使用するユーザー名とパスワードを設定
Kibanaのキーストアに値を保存する
Kibanaのユーザー名を設定
|
1 2 3 |
# cd /usr/share/kibana/bin # ./kibana-keystore add elasticsearch.username Enter value for elasticsearch.username: ************* ←kibana_systemと入力する。入力した各文字は * アスタリスク文字で表示される |
パスワードを保存
|
1 2 |
# ./kibana-keystore add elasticsearch.password Enter value for elasticsearch.password: ******************** ←前述で作成したkibana_systemのパスワード |
3.4 Kibanaの起動
|
1 |
# systemctl start kibana.service |
ステータス確認
|
1 2 3 4 5 6 7 8 9 10 11 12 13 14 15 |
# systemctl status kibana.service ● kibana.service - Kibana Loaded: loaded (/etc/systemd/system/kibana.service; disabled; preset: disabled) Active: active (running) since Sat 2024-01-13 16:23:54 JST; 2min 22s ago Docs: https://www.elastic.co Main PID: 7366 (node) Tasks: 11 (limit: 22874) Memory: 572.6M CPU: 12.733s CGroup: /system.slice/kibana.service mq7366 /usr/share/kibana/bin/../node/bin/node /usr/share/kibana/bin/../src/cli/dist --logging.dest=/var/log/kibana/kibana.log --pid.file=/run/kibana/kibana.pid "--deprecatio> Jan 13 16:23:54 Panser systemd[1]: Started Kibana. Jan 13 16:23:54 Panser kibana[7366]: Kibana is currently running with legacy OpenSSL providers enabled! For details and instructions on how to disable see https://www.elastic.co/guide/en> |
4. Kibanaのウェブページ起動確認
ウェブ・ブラウザにアクセスし、Kibanaが正しく起動していることを確認する。"http://192.168.1.101:5601"と入力してKibanaにアクセスしてみる。ただし、5601ポートを開放しておく
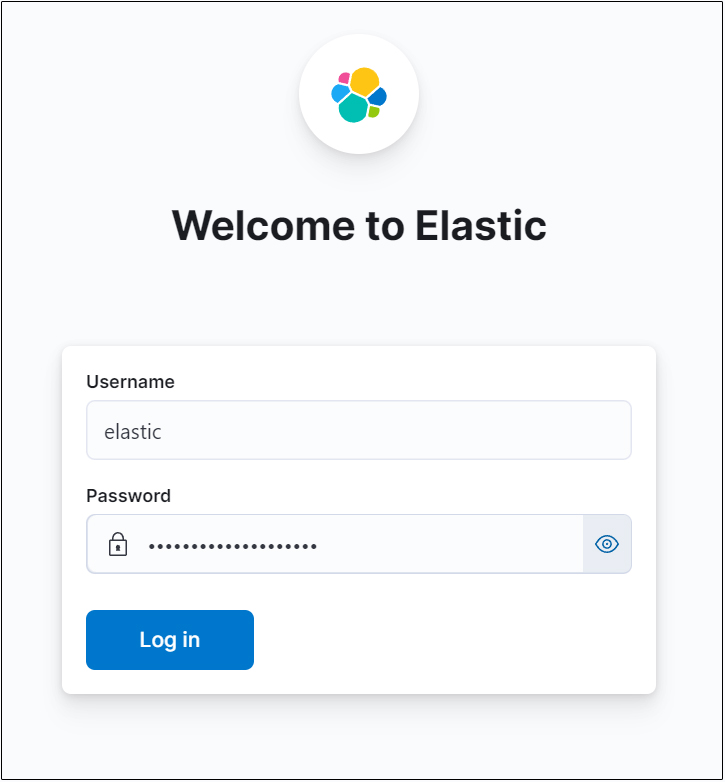
Usernameはelastic、Passwordはelastic用に作成したものでログイン

"Add integrations"選択しEnter
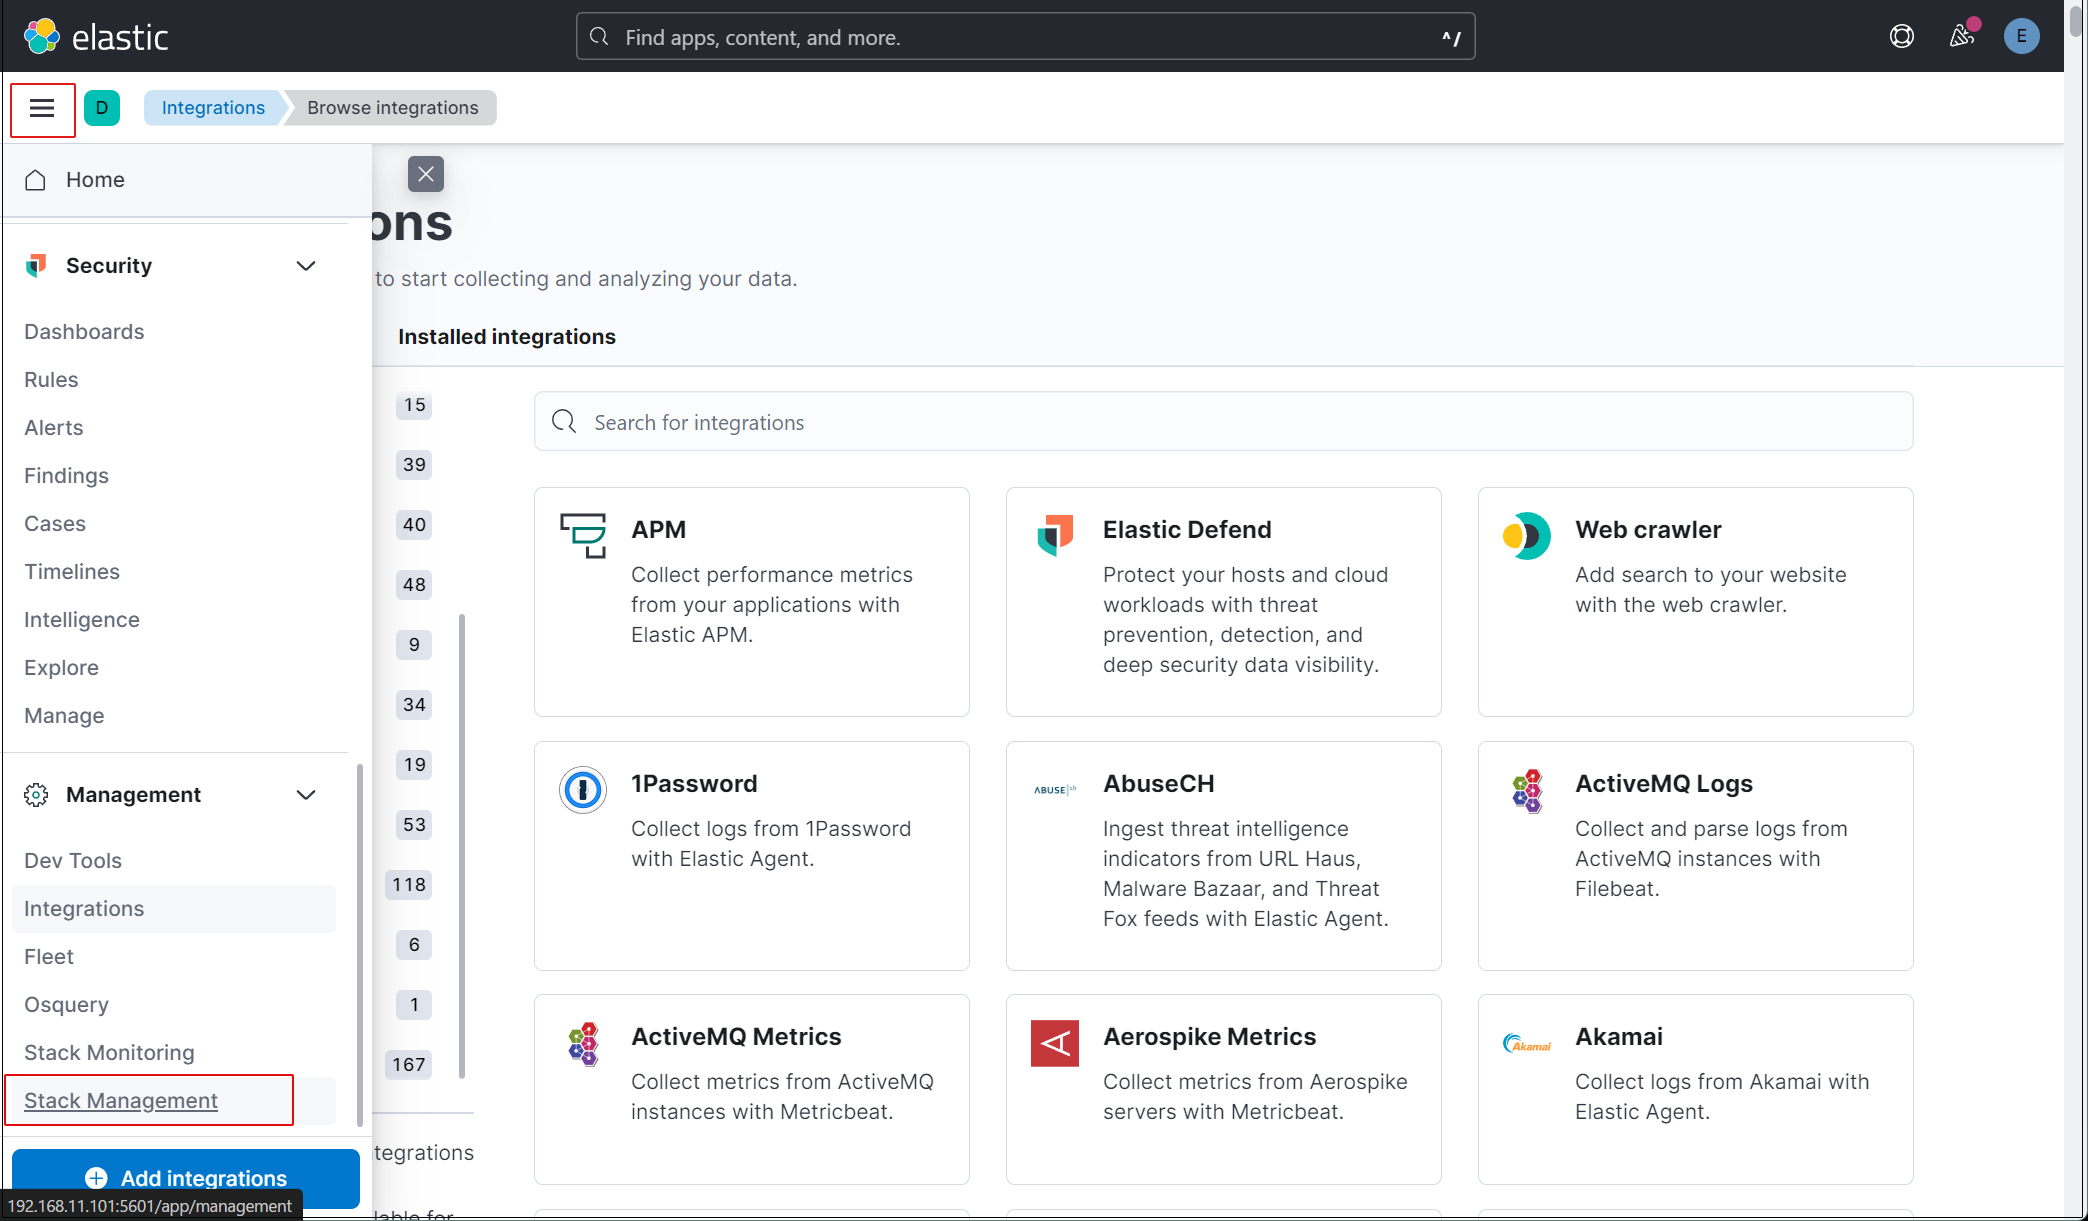
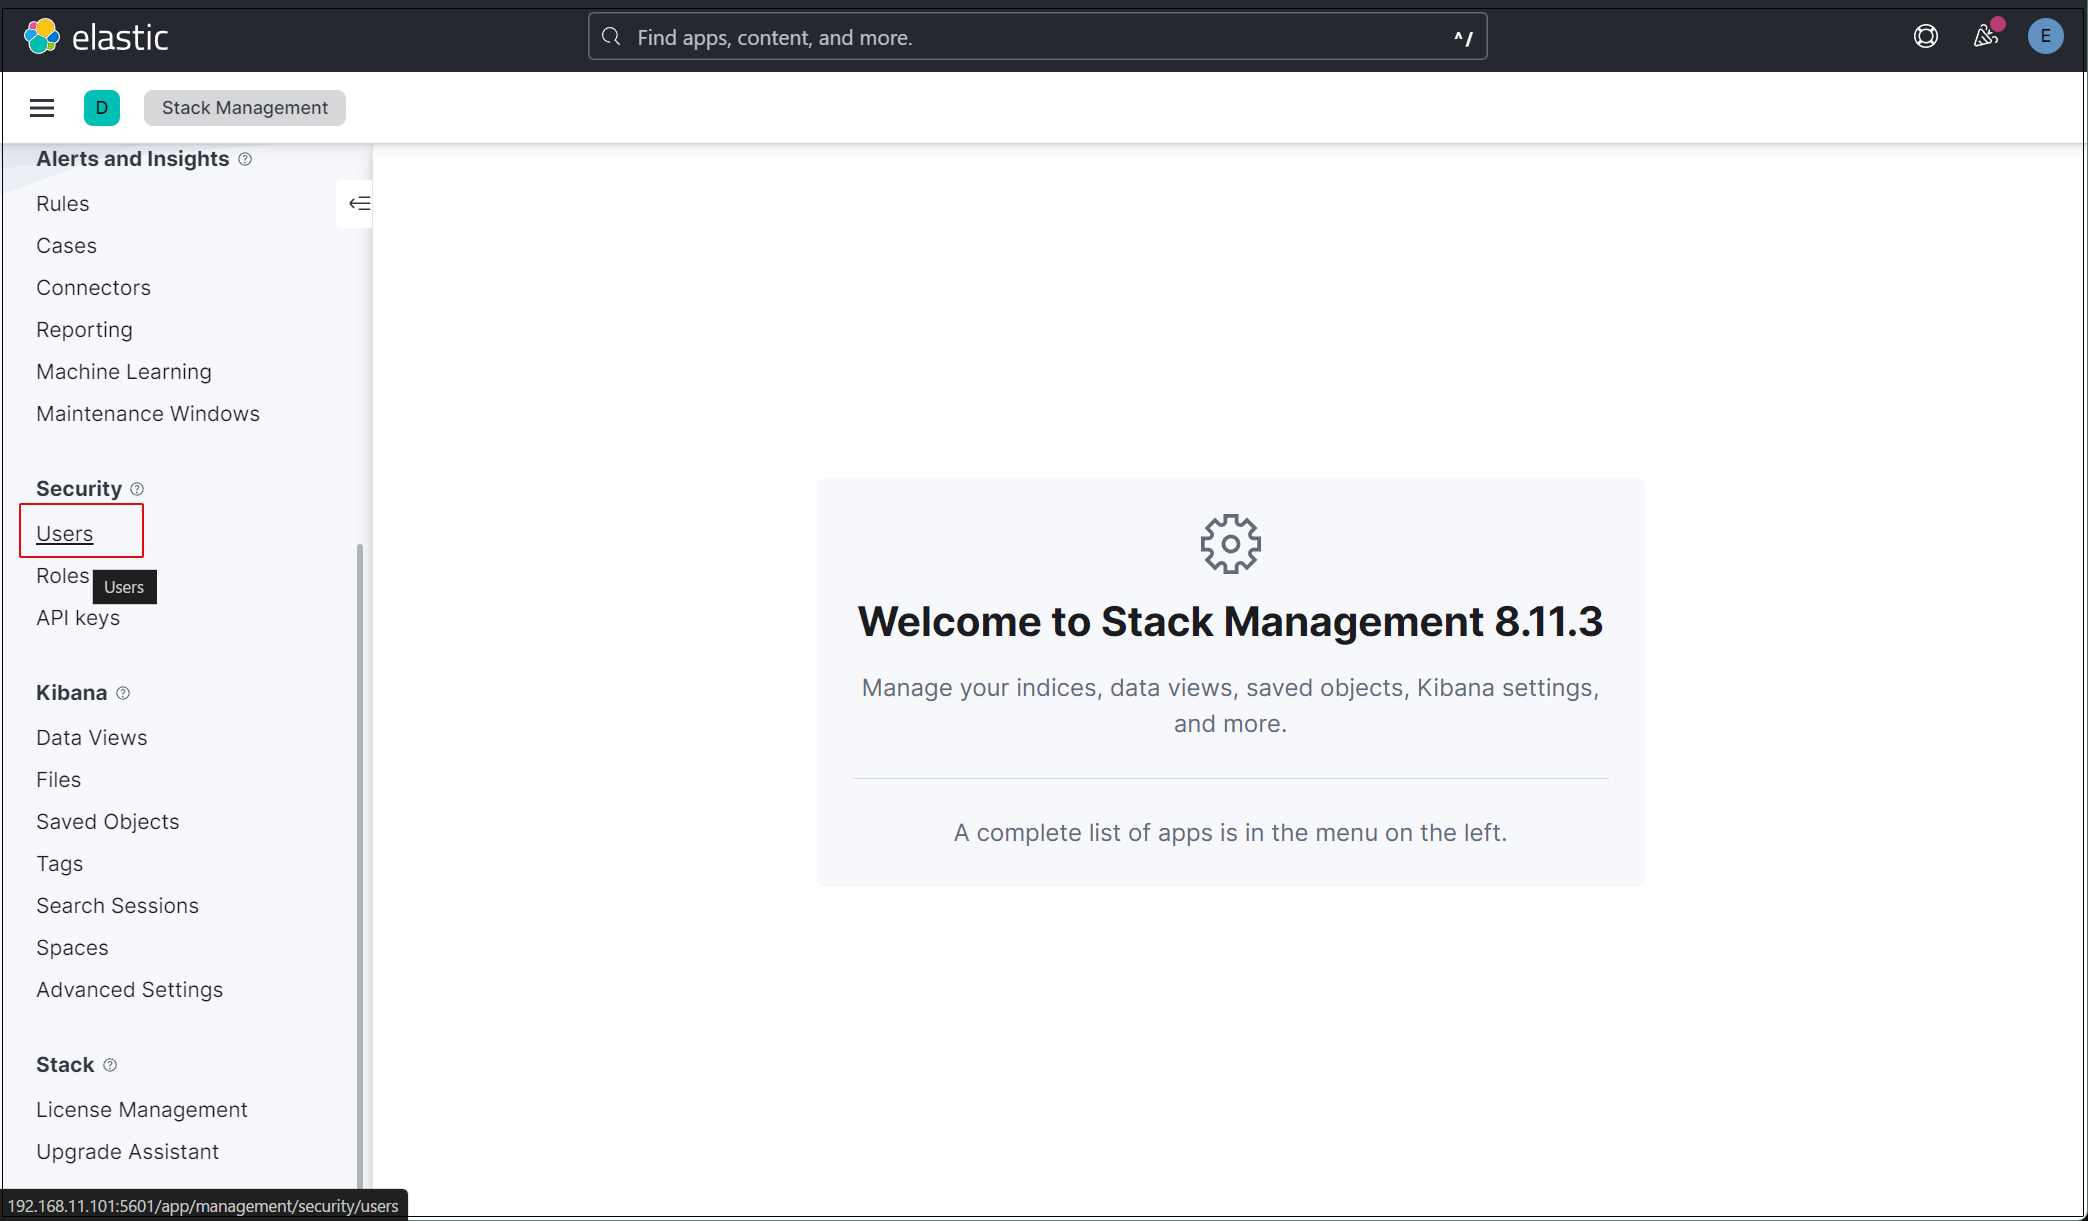
elasticスーパーユーザーアカウントを使う必要がないように、新しいユーザーアカウントを作成します。
メインメニューを開き、Stack Management > Users
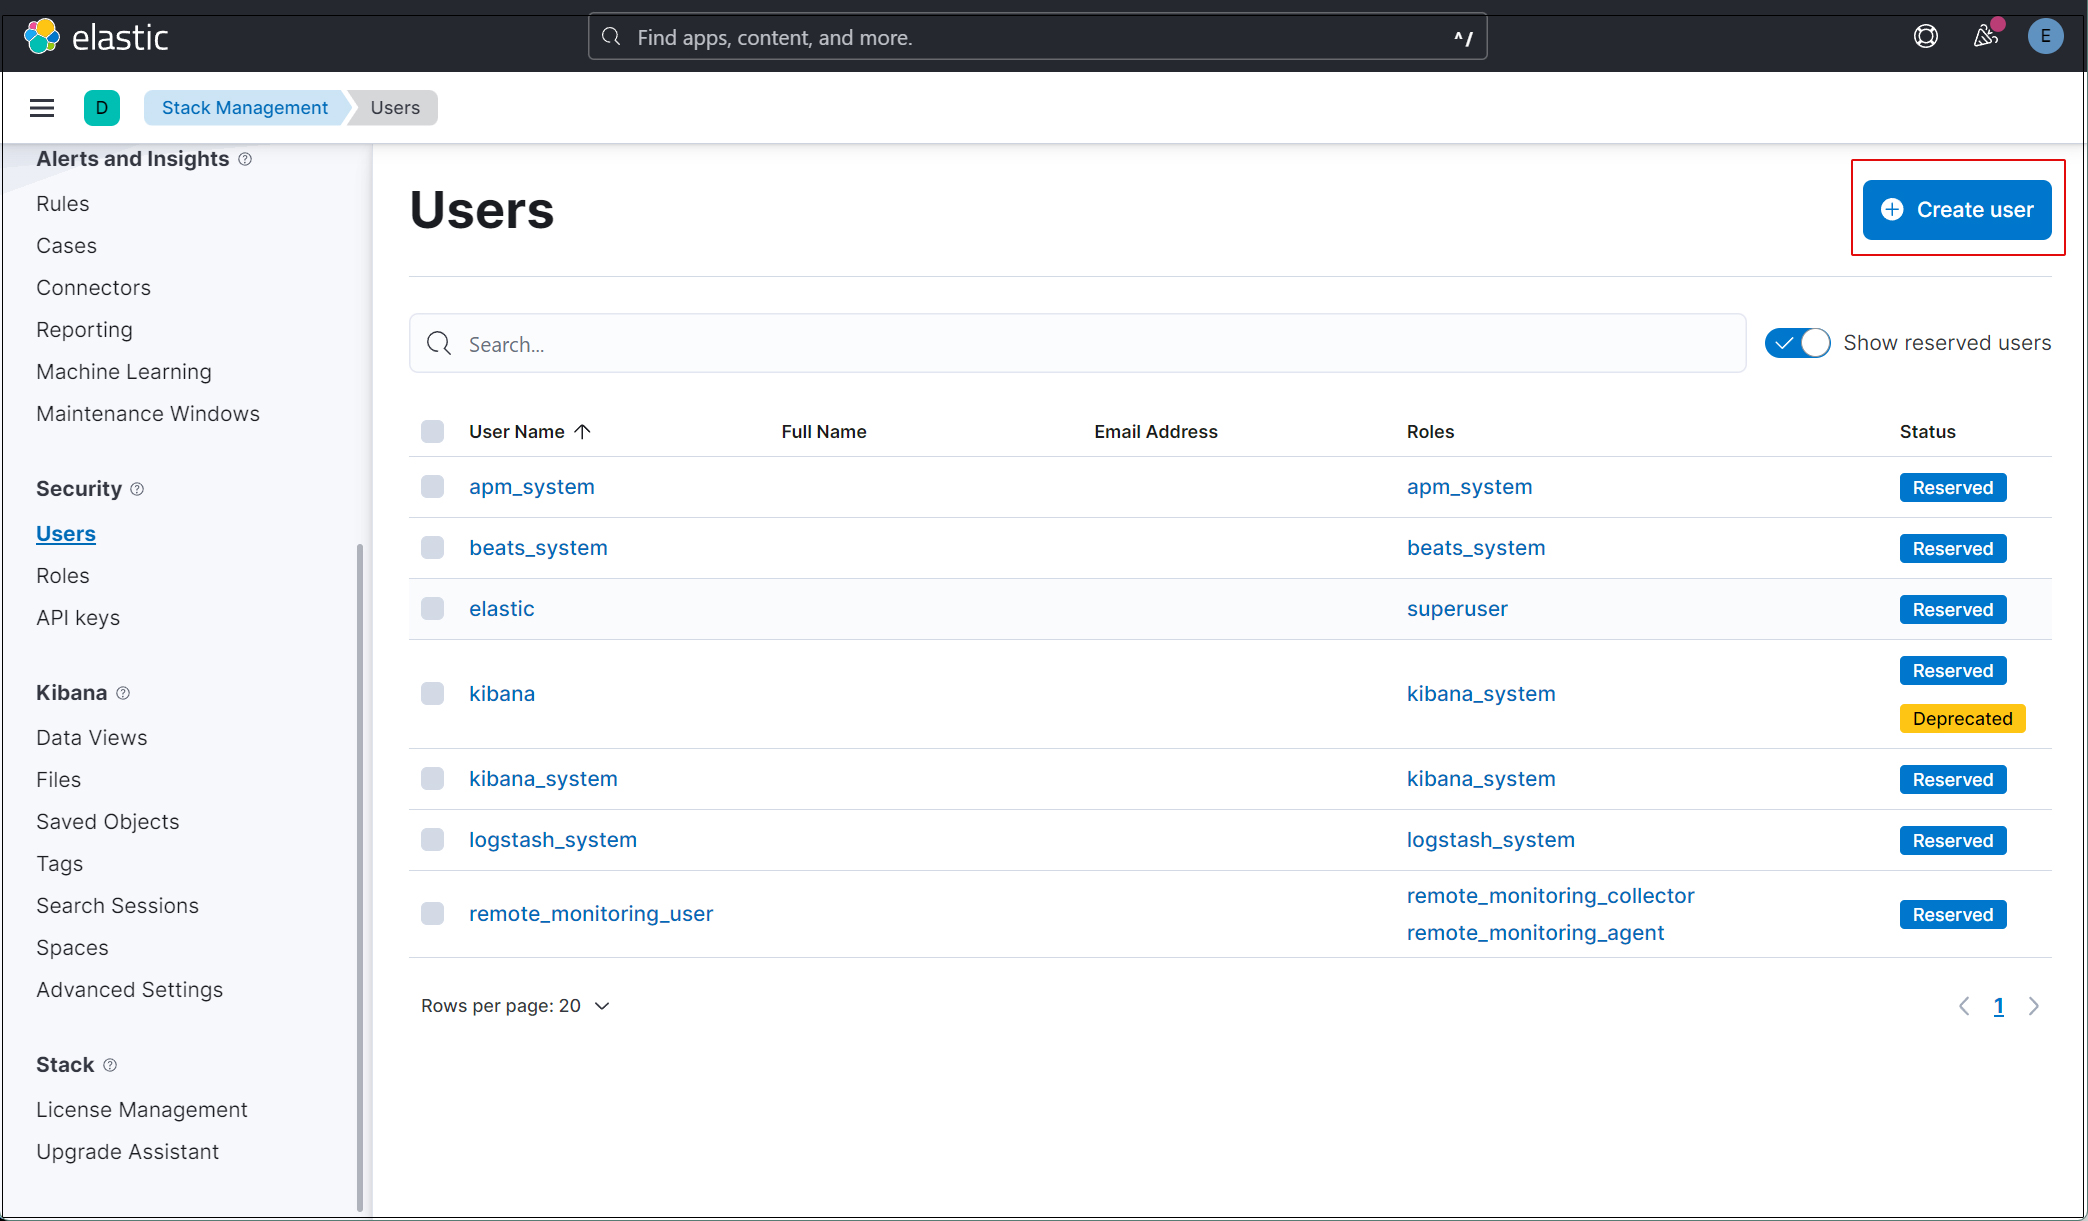
右上の"Create user"ボタンをクリック
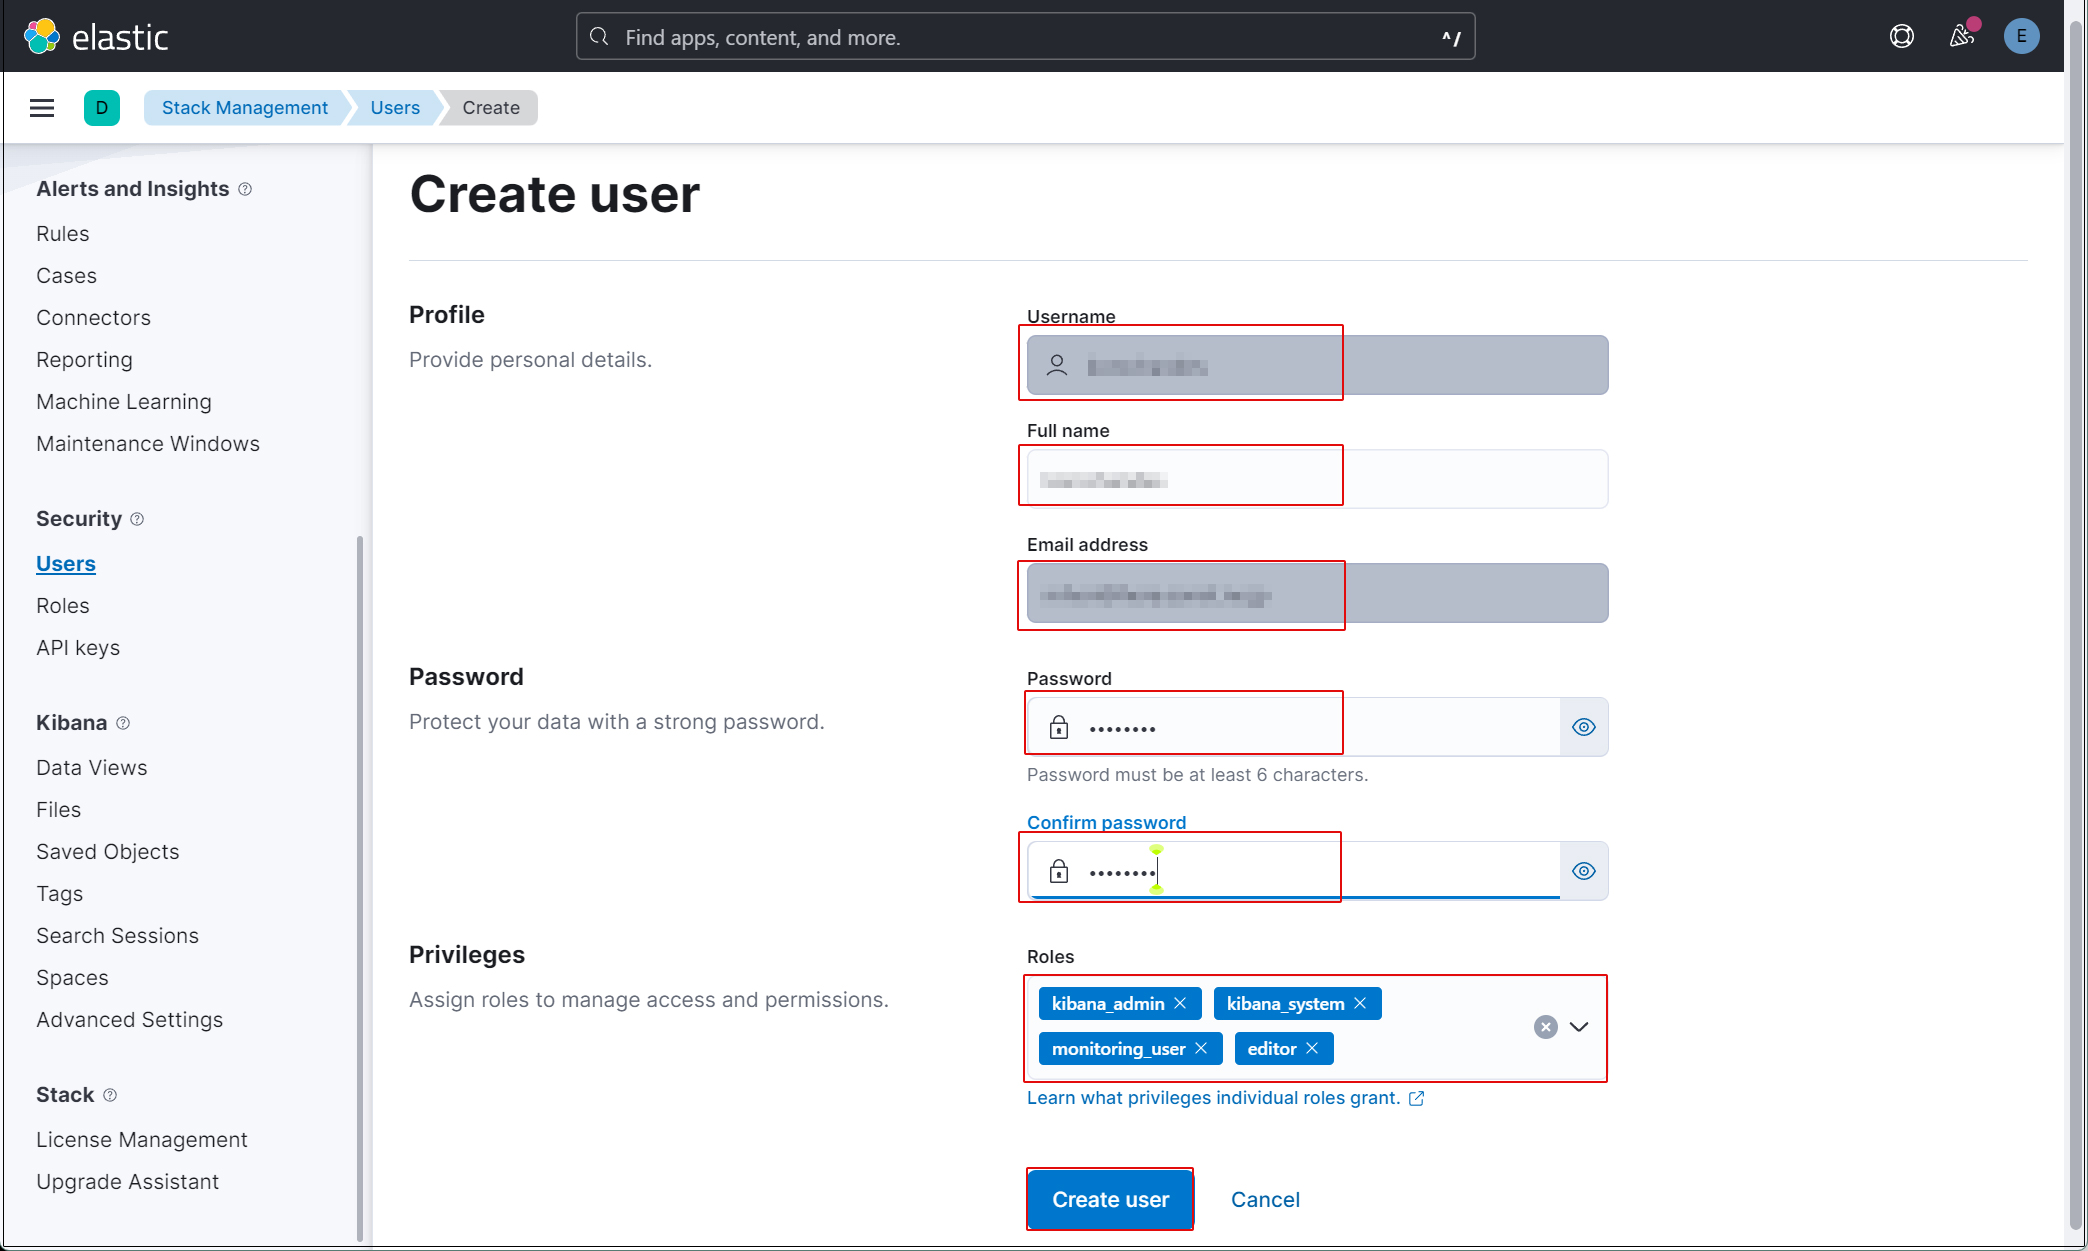
新規ユーザー情報を入力し、Privilegesでkibana_admin、kibana_system、monitoring_user、editorのロールを割り当てる
現在のプロファイルからログアウトし、新しく作成したユーザーアカウントでログインできることを確認する。現在、SURICATAのホストでFilebeatとAuditbeatを設定していないため、Kibanaで表示できるデータがありません。
SURICATAサーバにFilebeatをインストール
本作業はSuricataをインストールした1台目のAlmaLinuxサーバーで作業する
1. Filebeat インストール
1.1 Elastic GPGキーをダウンロード
|
1 |
# rpm --import https://artifacts.elastic.co/GPG-KEY-elasticsearch |
1.2 /etc/yum/yum.repos.dディレクトリにelasticsearch.repoファイルを以下の内容で、作成
|
1 2 3 4 5 6 7 8 9 10 11 |
# vi /etc/yum.repos.d/elasticsearch.repo 以下内容を記述 [elasticsearch] name=Elasticsearch repository for 7.x packages baseurl=https://artifacts.elastic.co/packages/7.x/yum gpgcheck=1 gpgkey=https://artifacts.elastic.co/GPG-KEY-elasticsearch enabled=0 autorefresh=1 type=rpm-md |
1.3 Filebeatをインストール
|
1 2 3 |
# dnf install --enablerepo=elasticsearch filebeat Installed: filebeat-7.17.16-1.x86_64 |
1.4 FilebeatをElasticsearchとKibanaに接続するように設定
|
1 2 3 |
# vi /etc/filebeat/filebeat.yml 110行目コメントアウトされた#host: "localhost:5601"行の後に、KibanaインスタンスのプライベートIPアドレスとポートを指す行を追加する host: "192.168.11.101:5601" |
|
1 2 3 4 5 6 7 8 |
# vi /etc/filebeat/filebeat.yml 137行目 Elastic Stack のipアドレスとelasticsearchのポート番号を入力 hosts: ["https://192.168.11.101:9200"] 144,145行目コメント解除し、[username]はデフォルトのままにし、[password]は[elastic]ユーザーのパスワードを入力する username: "elastic" password: “fDD6nabgiJRJTivgHFP1" |
Filebeatsの組み込みSuricataモジュールを有効にする
|
1 |
# filebeat modules enable suricata |
1.5 初期環境をセットアップ
|
1 2 3 4 5 6 7 8 9 10 11 12 |
# filebeat setup -e Overwriting ILM policy is disabled. Set `setup.ilm.overwrite: true` for enabling. Index setup finished. Loading dashboards (Kibana must be running and reachable) Loaded dashboards Setting up ML using setup --machine-learning is going to be removed in 8.0.0. Please use the ML app instead. See more: https://www.elastic.co/guide/en/machine-learning/current/index.html It is not possble to load ML jobs into an Elasticsearch 8.0.0 or newer using the Beat. Loaded machine learning job configurations Loaded Ingest pipelines |
1.6 Filebeatサービスを開始
|
1 |
# systemctl start filebeat.service |
1.7 Kibana ダッシュボードへのアクセス
KibanaはElasticsearchサーバーのプライベートIPアドレスからのみ利用できるように設定されているため、Kibanaに接続するにはSSHトンネルを使用する必要がある
SSHでKibanaに接続する
SSHには、ローカル・ポート上のネットワーク・トラフィックをサーバー上のリモートIPアドレスとポートに転送するオプション -L を使用して、ブラウザから Kibana インスタンスにトラフィックを転送します。
Linux、MavOS、Windowsでは、内蔵の SSH クライアントを使用してトンネルを作成できます。Kibanaに接続するたびにこのコマンドを使用します。この接続はいつでも閉じることができ、トンネルを再確立するために再度SSHコマンドを実行する
ローカルのPCのターミナルで以下のコマンドを実行し、KibanaへのSSHトンネルを作成する
192.168.11.101はElasticsearch serverのIPアドレス
lanはElasticsearch serverへログインするユーザー名
SSHトンネルを閉じたい場合は、CTRL+C
|
1 |
# ssh -L 5601:192.168.11.101:5601 lan@192.168.11.101 -N |
以上で4. Kibanaのウェブページ起動確認で記載通りKibanaに接続できる
2. Kibanaで確認
作成したユーザーでKibanaにログインし直します。http://192.168.1.101:5601にアクセスします。
一番上の検索フィールドに「Suricata Events Overview」と入力し、Events Overviewをクリック
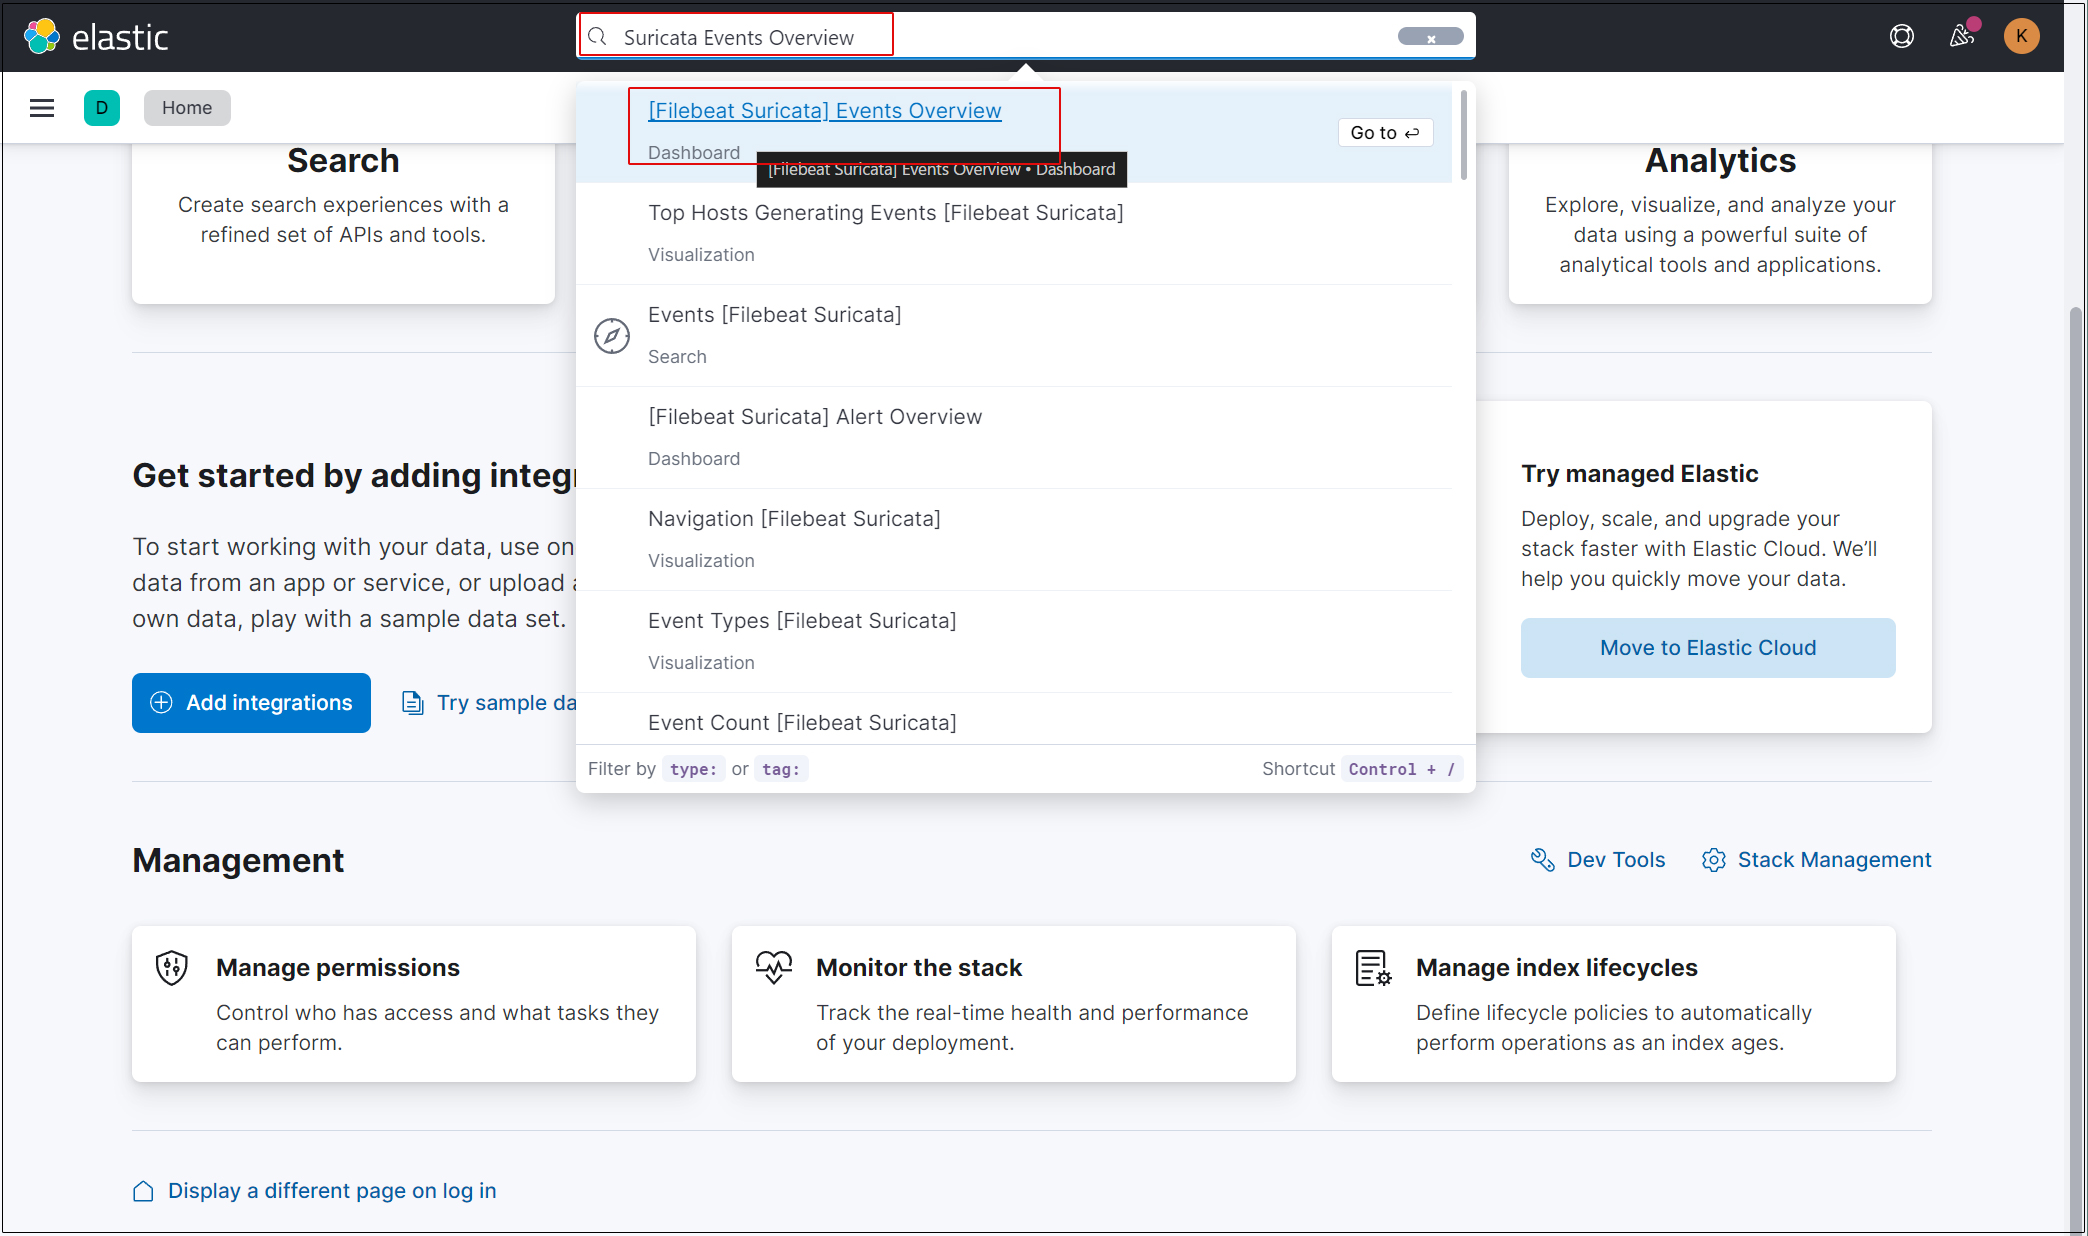
過去 15 分間のすべての Suricata イベントが表示されます
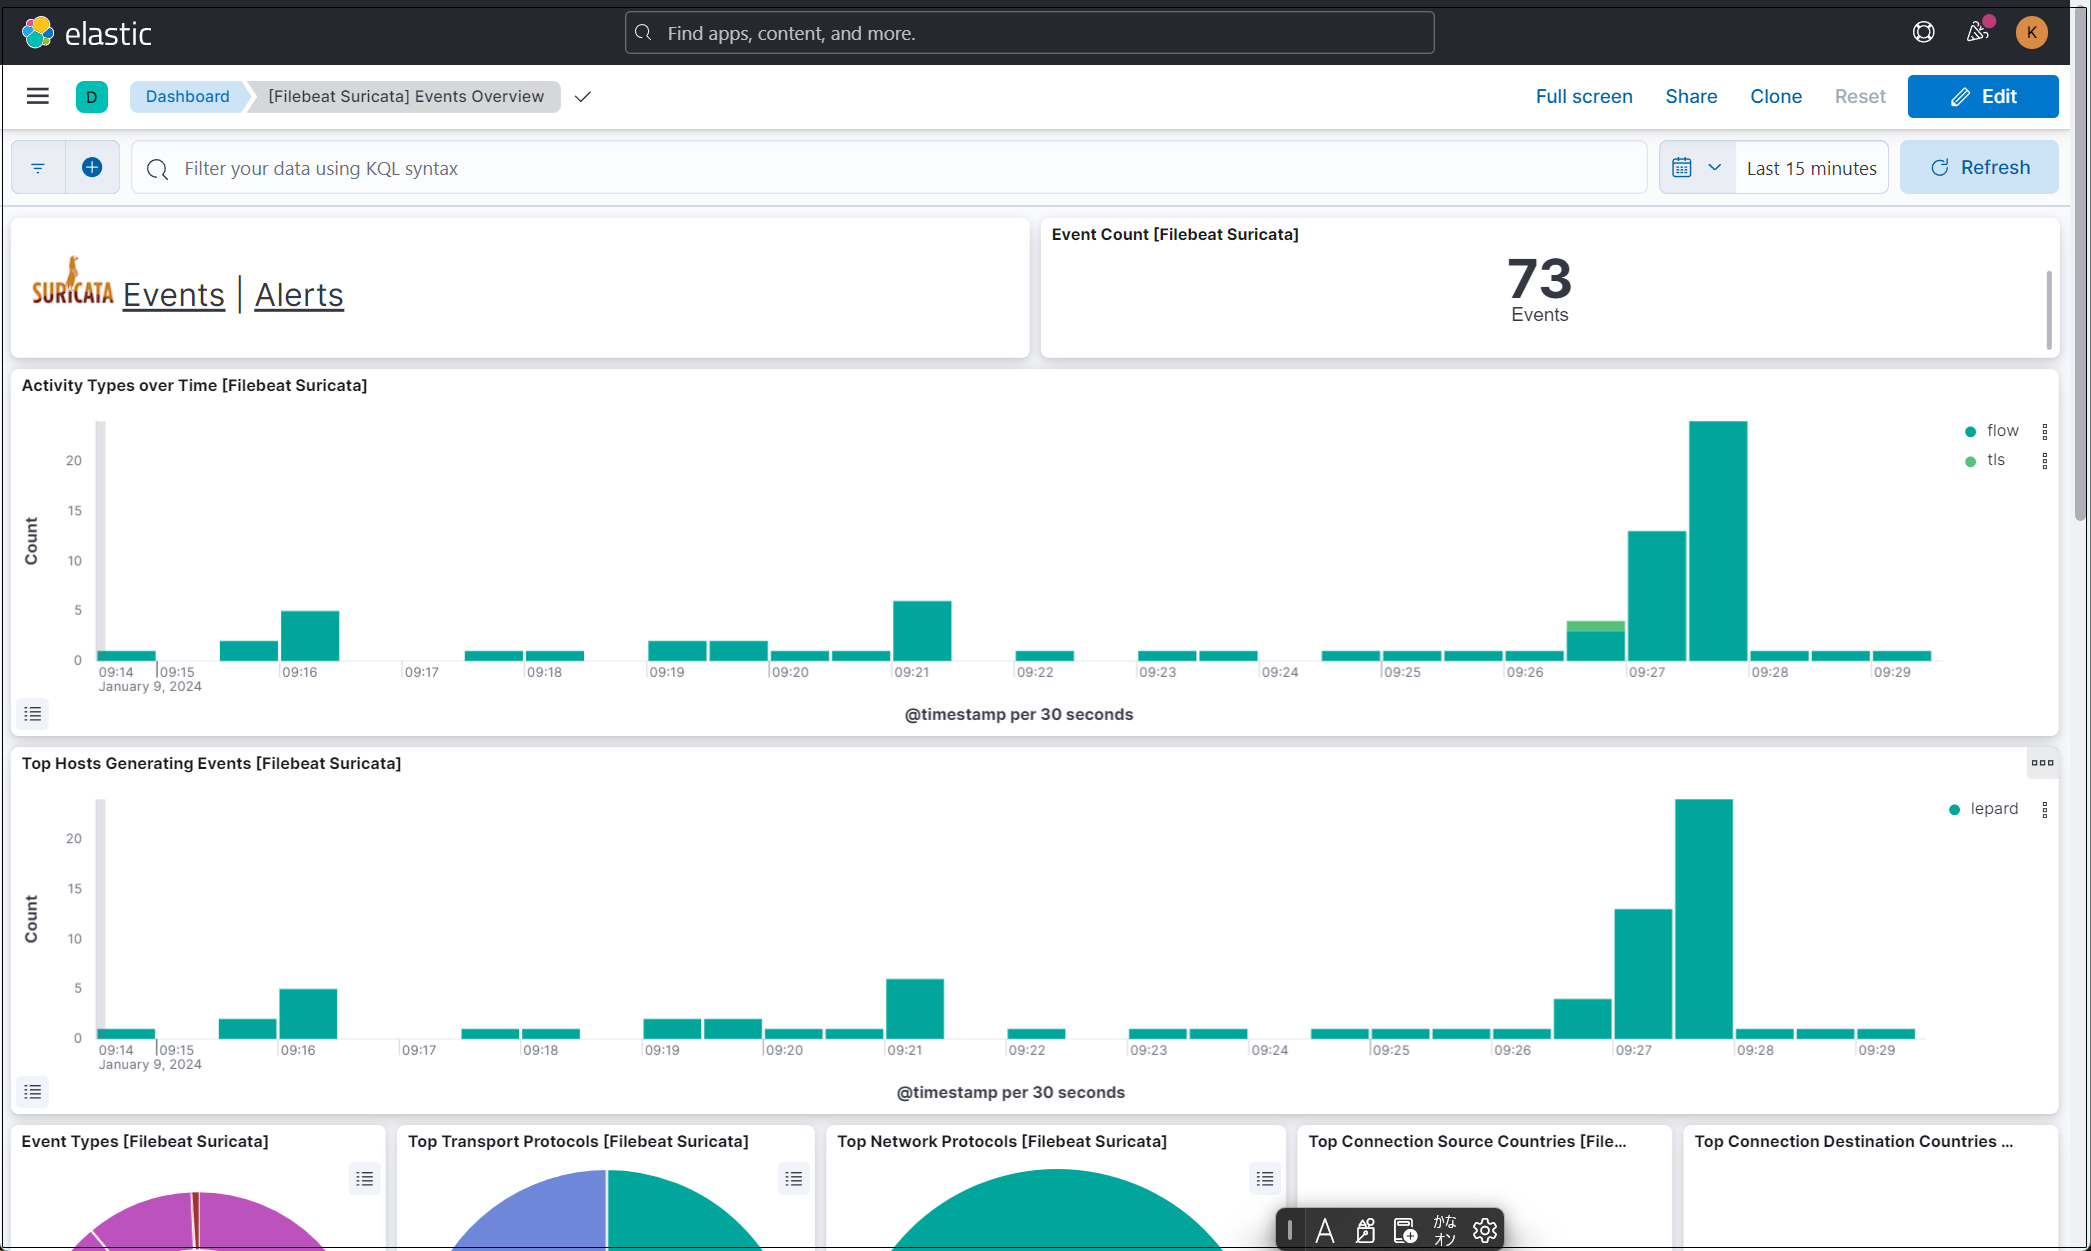
悪質なトラフィックのアラートを表示するにはSuricataロゴの横にあるAlertsテキストをクリック
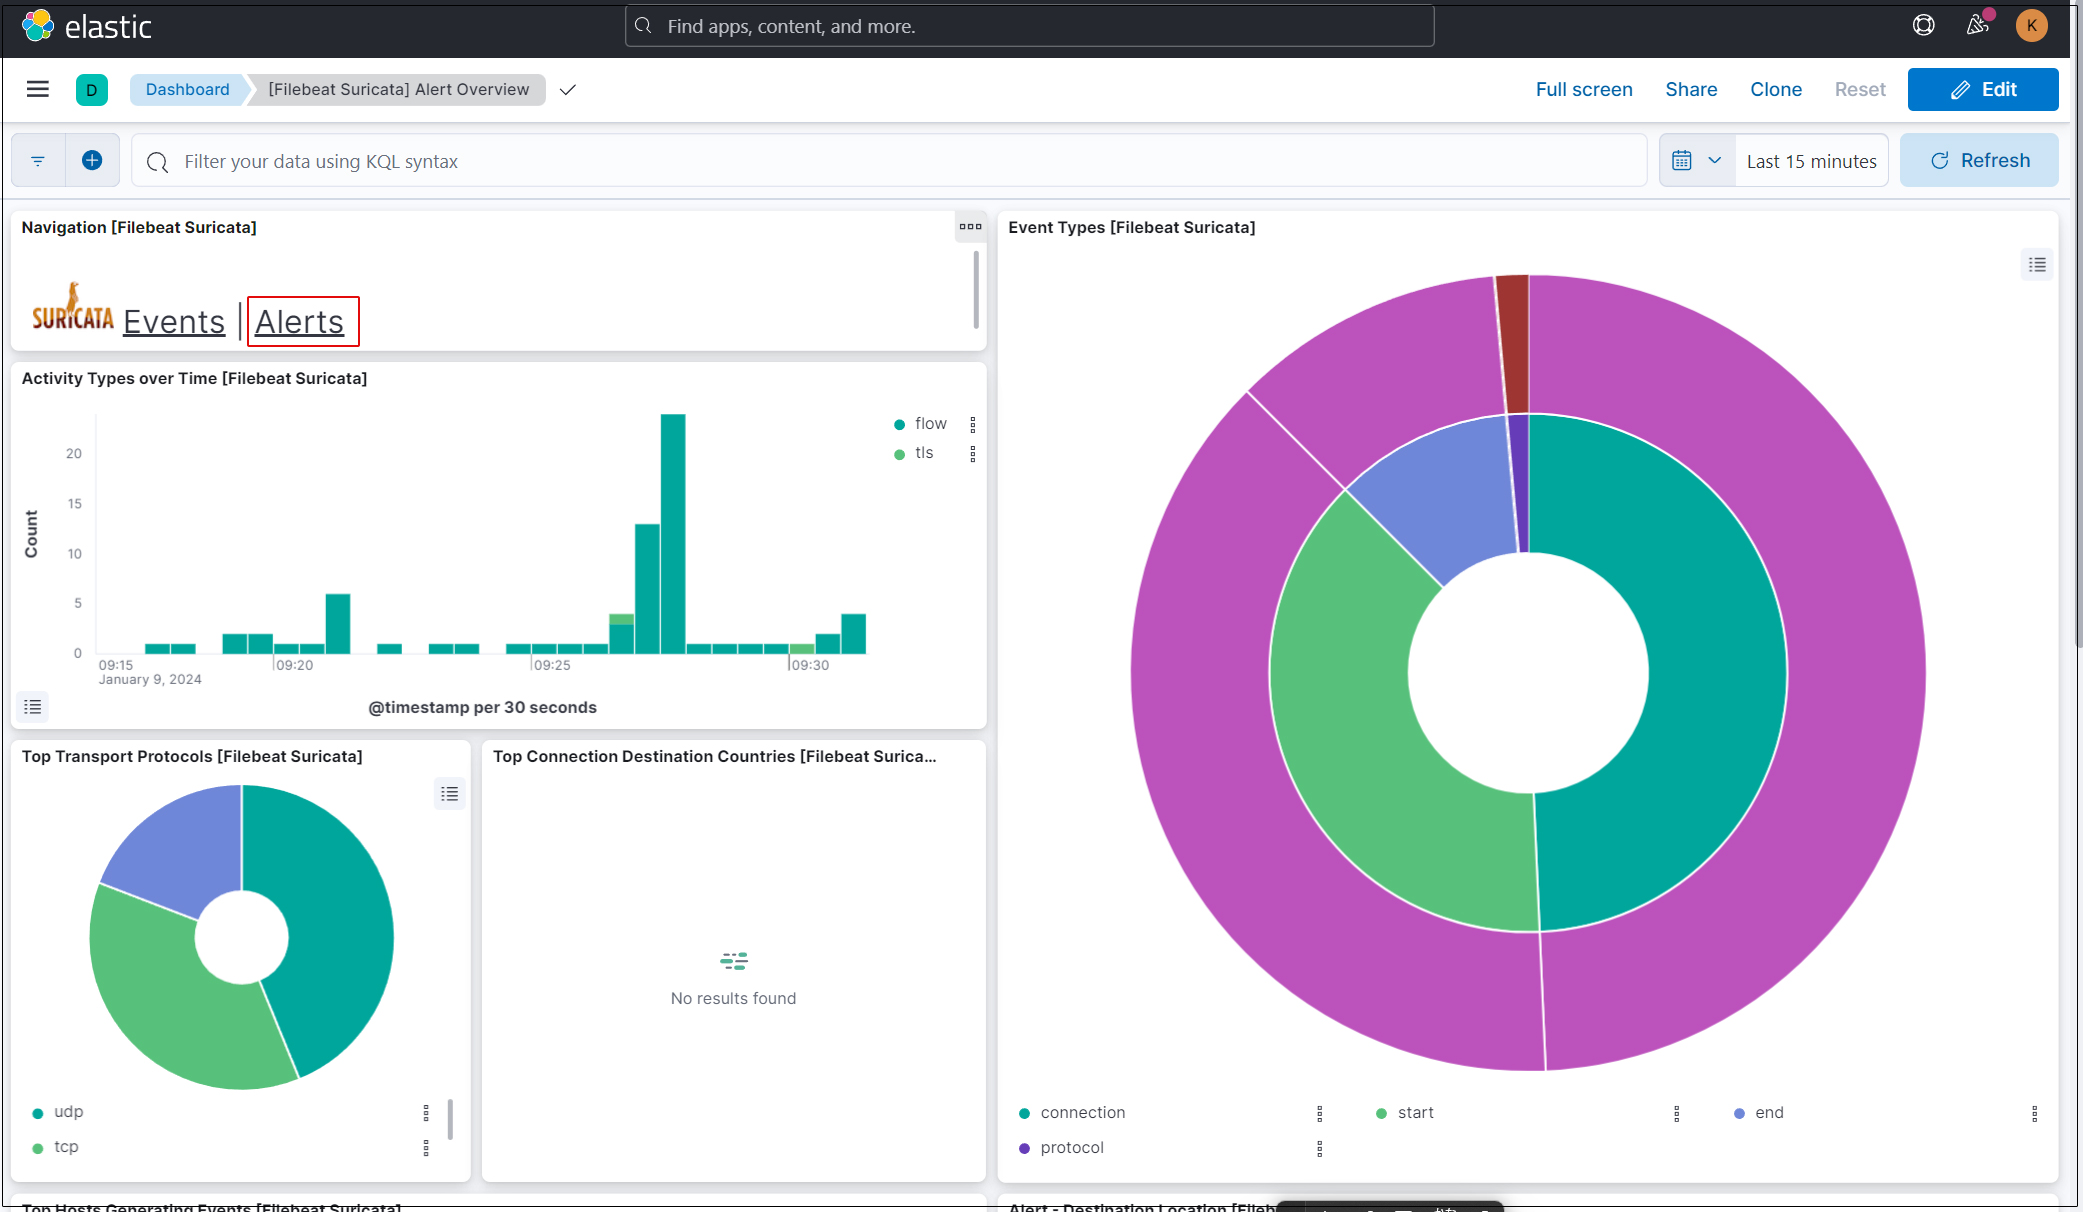
Kibana には、ログを視覚化するためのさまざまな機能とツールがありますのでいろいろと試してください。
