Contents
clamav ( アンチウィルスソフト )のインストール
1.Clam AntiVirusインストール
|
1 |
# dnf -y install clamav clamd clamav-update |
2.Clam AntiVirus設定ファイル編集
|
1 2 3 4 5 6 7 8 9 10 11 12 13 14 15 16 |
# vi /etc/clamd.d/scan.conf ●14行目 # Default: disabled LogFile /var/log/clamd.scan ← コメント解除 ●77行目 # Default: disabled PidFile /run/clamd.scan/clamd.pid ← コメント解除 ●96行目 # Path to a local socket file the daemon will listen on. # Default: disabled (must be specified by a user) LocalSocket /run/clamd.scan/clamd.sock ← コメント解除 ●219行目 # Run as another user (clamd must be started by root for this option to work) # Default: don't drop privileges #User clamscan ← 行頭に#を追加してコメントアウト(root権限で動作するようにする) |
3.ウイルス定義ファイル更新設定
|
1 2 3 4 5 6 7 8 9 10 11 |
# vi /etc/freshclam.conf ← ウイルス定義ファイル更新設定ファイル編集 ●75行目 「DatabaseMirror database.clamav.net」の行頭に「#」を挿入し、 「DatabaseMirror db.jp.clamav.net」を追加 #DatabaseMirror database.clamav.net DatabaseMirror db.jp.clamav.net ●151 行目あたり 「NotifyClamd /etc/clamd.d/scan.conf」を追加 #NotifyClamd /path/to/clamd.conf NotifyClamd /etc/clamd.d/scan.conf |
4.ウイルス定義ファイル最新化
|
1 2 3 4 5 6 7 8 9 10 11 12 13 14 15 16 17 18 |
# freshclam ← ウイルス定義ファイル最新化 ClamAV update process started at Mon Oct 17 16:28:12 2022 daily database available for download (remote version: 26691) Time: 0.9s, ETA: 0.0s [========================>] 57.27MiB/57.27MiB Testing database: '/var/lib/clamav/tmp.86f3a197d8/clamav-f8e5e9a4e35a43ccb613b710389fd3c0.tmp-daily.cvd' ... Database test passed. daily.cvd updated (version: 26691, sigs: 2008286, f-level: 90, builder: raynman) main database available for download (remote version: 62) Time: 2.0s, ETA: 0.0s [========================>] 162.58MiB/162.58MiB Testing database: '/var/lib/clamav/tmp.86f3a197d8/clamav-89bbce01172ebe46ef30173e4764af5c.tmp-main.cvd' ... Database test passed. main.cvd updated (version: 62, sigs: 6647427, f-level: 90, builder: sigmgr) bytecode database available for download (remote version: 333) Time: 0.1s, ETA: 0.0s [========================>] 286.79KiB/286.79KiB Testing database: '/var/lib/clamav/tmp.86f3a197d8/clamav-5ff8858020e095447d90edaeafa70cd8.tmp-bytecode.cvd' ... Database test passed. bytecode.cvd updated (version: 333, sigs: 92, f-level: 63, builder: awillia2) |
|
1 2 3 4 5 6 7 8 9 10 11 12 13 14 15 16 17 18 19 20 21 22 23 24 25 26 27 28 29 30 31 32 |
# systemctl start clamd@scan ← clamd起動 # systemctl enable clamd@scan ← clamd自動起動設定 Created symlink /etc/systemd/system/multi-user.target.wants/clamd@scan.service → /usr/lib/systemd/system/clamd@.service. # systemctl is-enabled clamd@scan enabled # systemctl status clamd@scan ← 動作確認 ● clamd@scan.service - clamd scanner (scan) daemon Loaded: loaded (/usr/lib/systemd/system/clamd@.service; enabled; vendor preset: d> Active: active (running) since Mon 2022-10-17 16:30:49 JST; 44s ago Docs: man:clamd(8) man:clamd.conf(5) https://www.clamav.net/documents/ Main PID: 1433 (clamd) Tasks: 2 (limit: 2274) Memory: 1.2G CPU: 13.851s CGroup: /system.slice/system-clamd.slice/clamd@scan.service mq 1433 /usr/sbin/clamd -c /etc/clamd.d/scan.conf Oct 17 16:30:49 Lepard clamd[1433]: ELF support enabled. Oct 17 16:30:49 Lepard clamd[1433]: Mail files support enabled. Oct 17 16:30:49 Lepard clamd[1433]: OLE2 support enabled. Oct 17 16:30:49 Lepard clamd[1433]: PDF support enabled. Oct 17 16:30:49 Lepard clamd[1433]: SWF support enabled. Oct 17 16:30:49 Lepard clamd[1433]: HTML support enabled. Oct 17 16:30:49 Lepard clamd[1433]: XMLDOCS support enabled. Oct 17 16:30:49 Lepard clamd[1433]: HWP3 support enabled. Oct 17 16:30:49 Lepard clamd[1433]: Self checking every 600 seconds. Oct 17 16:30:49 Lepard systemd[1]: Started clamd@scan.service - clamd scanner (scan) d> |
6.ウィスルスキャンを実施
■テスト用ウィルスをダウンロードして、ウィスルスキャンを実施
■テスト用ウィルスをダウンロードして、ウィスルスキャンを実施
|
1 2 3 4 5 6 7 8 9 10 11 12 13 14 15 16 |
# wget http://www.eicar.org/download/eicar.com # clamscan --infected --remove --recursive /root/eicar.com: Win.Test.EICAR_HDB-1 FOUND /root/eicar.com: Removed. ----------- SCAN SUMMARY ----------- Known viruses: 8640327 Engine version: 0.103.7 Scanned directories: 1 Scanned files: 10 Infected files: 1 Data scanned: 0.02 MB Data read: 0.01 MB (ratio 2.00:1) Time: 18.415 sec (0 m 18 s) Start Date: 2022:10:17 16:32:48 End Date: 2022:10:17 16:33:06 |
7.ウィルススキャン自動実行スクリプトの導入
|
1 2 |
# mkdir -p /var/www/system # cd /var/www/system |
|
1 2 3 4 5 6 7 8 9 10 11 12 13 14 15 16 17 18 19 20 21 |
# vi /var/www/system/clamscan.sh #!/bin/bash PATH=/usr/bin:/bin # excludeopt setup excludelist=/var/www/system/clamscan.exclude if [ -s $excludelist ]; then for i in `cat $excludelist` do if [ $(echo "$i"|grep \/$) ]; then i=`echo $i|sed -e 's/^\([^ ]*\)\/$/\1/p' -e d` excludeopt="${excludeopt} --exclude-dir=$i" else excludeopt="${excludeopt} --exclude=$i" fi done fi # signature update freshclam # virus scan clamscan --recursive --remove ${excludeopt} / |
|
1 2 3 4 |
# chmod 700 clamscan.sh # echo "/sys/" >> /var/www/system/clamscan.exclude # echo "/proc/" >> /var/www/system/clamscan.exclude sys ディレクトリ、proc ディレクトリは対象外にする |
9.ウィルススキャンの定期実行
|
1 2 3 4 5 6 7 8 9 |
# crontab -e no crontab for root - using an empty one cronをインストールする場合 # dnf install cronie cronie-anacron 再度 # crontab -e 0 1 * * * /var/www/system/clamscan.sh > /dev/null 2>&1 |
メールサーバー インストール
1. Postfixのインストール
1.1 インストール
Postfix をインストールして SMTP サーバーを構築します
|
1 |
# dnf -y install postfix |
Postfix がインストールされているか確認
|
1 2 |
# rpm -qa | grep postfix postfix-3.6.4-1.fc35.x86_64 |
1.2 Postfix をサービスへ登録
|
1 2 |
# systemctl enable postfix.service Created symlink /etc/systemd/system/multi-user.target.wants/postfix.service → /usr/lib/systemd/system/postfix.service. |
|
1 2 |
# systemctl is-enabled postfix.service enabled |
1.3 postfix の設定ファイル、main.cf とmaster.cf ファイルをバックアップ
|
1 2 |
# cp -p /etc/postfix/main.cf `date '+/etc/postfix/main.cf.%Y%m%d'` # cp -p /etc/postfix/master.cf `date '+/etc/postfix/master.cf.%Y%m%d'` |
1.4 postfix の設定ファイル編集
メール不正中継防止のため、Dovecot の SASL 機能を利用して、送信にも認証を要求するように Postfix を設定します
メール不正中継防止のため、Dovecot の SASL 機能を利用して、送信にも認証を要求するように Postfix を設定します
|
1 2 3 4 5 6 7 8 9 10 11 12 13 14 15 16 17 18 19 20 21 22 23 24 25 26 27 28 29 30 31 32 33 34 35 36 37 38 39 40 41 42 43 44 45 46 |
# vi /etc/postfix/main.cf ●96 行目あたりに追加 #myhostname = virtual.domain.tld myhostname = mail.<ドメイン> ●103 行目あたりに自ドメイン名を追加 #mydomain = domain.tld mydomain = <ドメイン> ●118 行目あたりコメントアウト削除 myorigin = $mydomain ●135 行目あたり変更 inet_interfaces = all ●138 行目あたり変更 inet_protocols = ipv4 ●183 行目あたりに追加 183 行目あたりをコメントアウトし、184 行目に追加します。 #mydestination = $myhostname, localhost.$mydomain, localhost mydestination = $myhostname, localhost.$mydomain, localhost, $mydomain ●287 行目あたりに追加 #mynetworks = 168.100.189.0/28, 127.0.0.0/8 #mynetworks = $config_directory/mynetworks #mynetworks = hash:/etc/postfix/network_table mynetworks = 192.168.11.0/24, 127.0.0.0/8 ←192.168.11.0/24は各自環境に合わす ●440 行目あたりコメント削除 メールの格納形式の設定をします。 #home_mailbox = Mailbox home_mailbox = Maildir/ ●447 行目あたりに追加 #mail_spool_directory = /var/mail mail_spool_directory = /var/spool/mail ●593 行目あたりに追加 #smtpd_banner = $myhostname ESMTP $mail_name #smtpd_banner = $myhostname ESMTP $mail_name ($mail_version) smtpd_banner = $myhostname ESMTP unknown ●以下の内容を最終行に追加 # 送受信メールサイズを 10M に制限 message_size_limit = 10485760 # メールボックスサイズを 1G に制限 mailbox_size_limit = 1073741824 # SMTP-Auth 設定 smtpd_sasl_type = dovecot smtpd_sasl_path = private/auth smtpd_sasl_auth_enable = yes smtpd_sasl_security_options = noanonymous smtpd_sasl_local_domain = $mydomain smtpd_recipient_restrictions = permit_mynetworks, permit_auth_destination, permit_sasl_authenticated, reject |
SMTP ポート(25 番ポート) の解放
|
1 2 3 4 |
# firewall-cmd --add-service=smtp --permanent success # firewall-cmd --reload success |
1.5 Postfix を起動
|
1 |
# systemctl enable --now postfix |
2.Dovecotインストール
2.1 dovecotインストール
|
1 |
# dnf -y install dovecot |
2.2 dovecot.conf ファイルを編集
|
1 2 3 4 5 6 7 8 |
# cp -p /etc/dovecot/dovecot.conf `date '+ /etc/dovecot/dovecot.conf.%Y%m%d'` # vi /etc/dovecot/dovecot.conf ●25 行目あたりに追加 # protocols = imap pop3 lmtp protocols = imap pop3 ●30行目 : コメント解除 # IPv4 のみリスンする場合は [::] を削除 listen = * |
2.3 10-auth.conf ファイルを編集
|
1 2 3 4 5 6 |
# vi /etc/dovecot/conf.d/10-auth.conf ●10行目 : コメント解除し変更 プレーンテキスト認証も許可する場合 disable_plaintext_auth = no ●100行目 : 追記 auth_mechanisms = plain login |
2.3 10-mail.conf ファイルを編集
|
1 2 3 |
# vi /etc/dovecot/conf.d/10-mail.conf ●31行目 : 追記 mail_location = maildir:~/Maildir |
2.4 10-master.conf ファイルを編集
|
1 2 3 4 5 6 7 8 |
# vi /etc/dovecot/conf.d/10-master.conf ●107-109行目 : コメント解除して追記 # Postfix smtp-auth unix_listener /var/spool/postfix/private/auth { mode = 0666 user = postfix group = postfix } |
2.5 10-ssl.conf ファイルを編集
|
1 2 3 4 |
# vi /etc/dovecot/conf.d/10-ssl.conf ●8 行目あたり 「ssl = required」を「ssl = yes」に変更 ssl = yes |
2.6 dovecot をサービスに登録し、起動する
|
1 2 |
# systemctl enable dovecot.service Created symlink /etc/systemd/system/multi-user.target.wants/dovecot.service → /usr/lib/systemd/system/dovecot.service. |
|
1 2 |
# systemctl is-enabled dovecot.service Enabled |
|
1 |
# systemctl start dovecot.service |
2.7 firewalldでPOP/IMAP サービスの許可ポート開放を行う
POP は [110/TCP], IMAP は [143/TCP]
|
1 2 3 |
# firewall-cmd --permanent --add-service=pop3 # firewall-cmd --permanent --add-service=imap # firewall-cmd --reload |
3.メールユーザー作成と動作確認
3.1 ユーザーアカウント作成
メールクライアントインストール
|
1 |
# dnf -y install mailx |
メールボックスは Maildir を参照するよう設定
|
1 |
# echo 'export MAIL=$HOME/Maildir' >> /etc/profile.d/mail.sh |
ユーザー [linux] を追加
|
1 2 3 4 5 6 |
# useradd linux # passwd linux ユーザー linux のパスワードを変更。 新しい パスワード: 新しい パスワードを再入力してください: passwd: すべての認証トークンが正しく更新できました。 |
3.2 動作確認
①メールユーザーでログインして、テストメールを送る
①メールユーザーでログインして、テストメールを送る
|
1 2 3 4 5 6 |
# su - linux $ mail linux@localhost Subject: Test Mail mail test . ← 本文終了するには「.」を入力 EOT |
|
1 2 3 4 5 6 7 8 9 10 11 12 13 14 15 16 17 18 |
$ mail Heirloom Mail version 12.5 7/5/10. Type ? for help. "/home/linux/Maildir": 1 message 1 new >N 1 linux@korodes.com Wed May 11 13:05 17/506 "Test Mail" & 1 Message 1: From linux@korodes.com Wed May 11 13:05:10 2022 Return-Path: <linux@korodes.com> X-Original-To: linux@localhost Delivered-To: linux@localhost Date: Wed, 11 May 2022 13:05:10 +0900 To: linux@localhost Subject: test User-Agent: Heirloom mailx 12.5 7/5/10 Content-Type: text/plain; charset=us-ascii From: linux@korodes.com Status: Rmail test& q Held 1 message in /home/linux/Maildir |
3.3 動作確認 ②
Mozilla Thunderbirdにアカウントを設定し、確認します
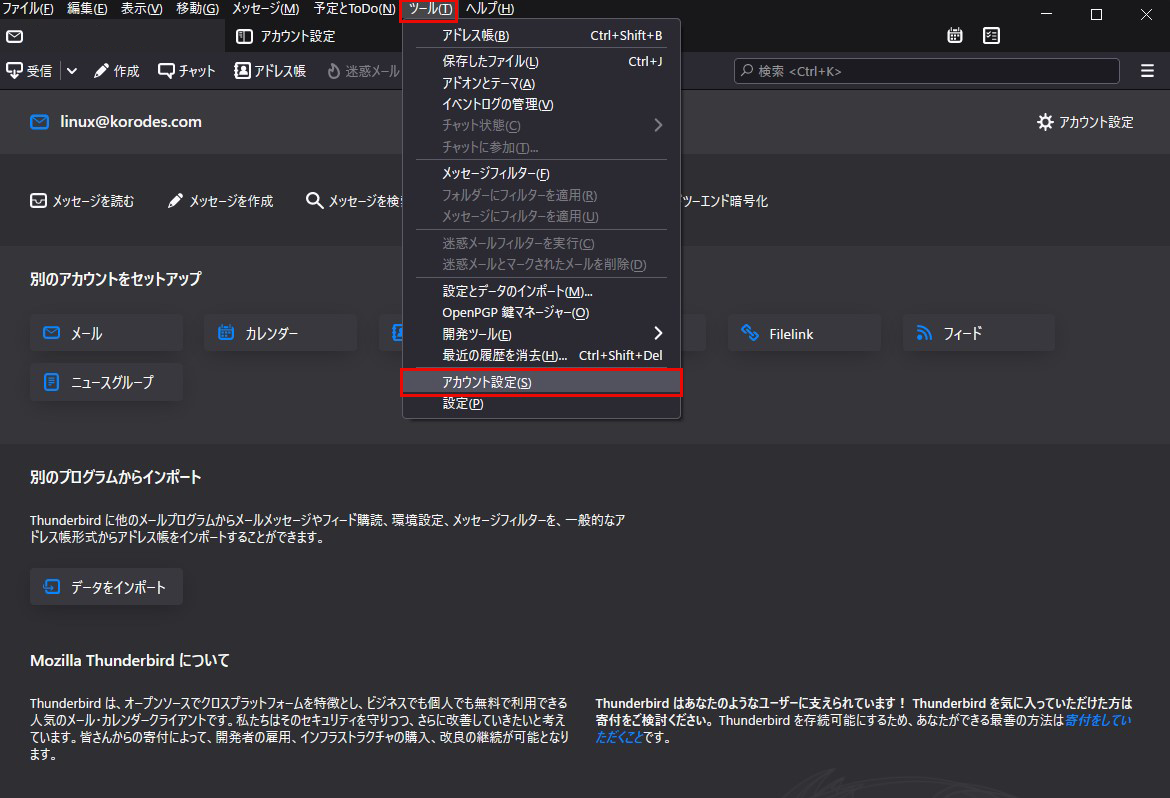
①Thunderbirdを起動し、「ツール」「アカウント設定」
Mozilla Thunderbirdにアカウントを設定し、確認します
①Thunderbirdを起動し、「ツール」「アカウント設定」
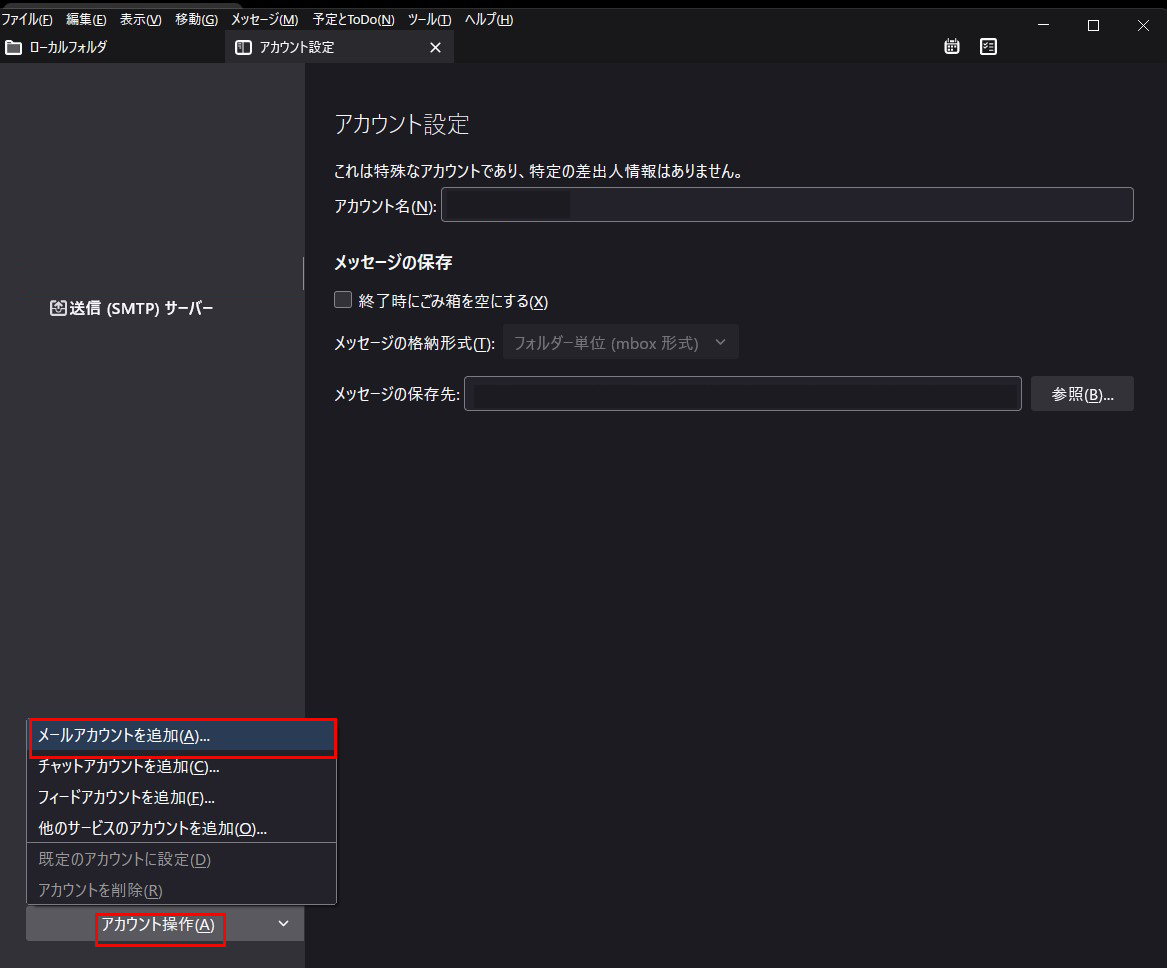
②「アカウント操作」「メールアカウント追加」
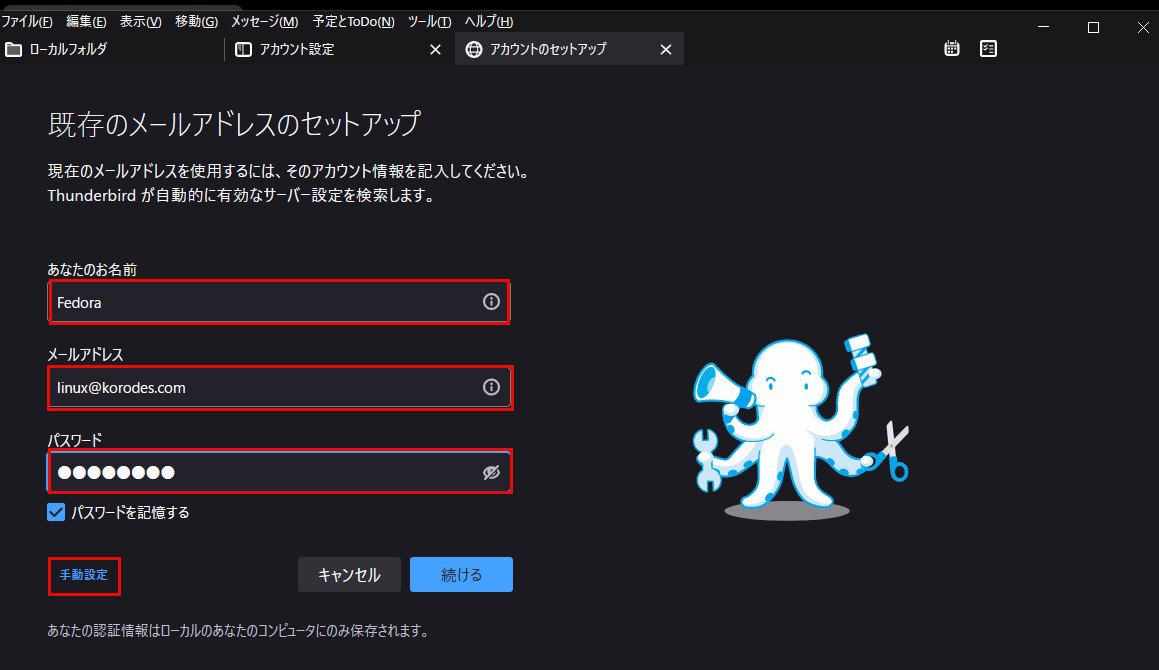
③「あなたのお名前」は任意の名称
「メールアドレス」は先ほど追加した「linux@korodes.com」
「パスワード」はlinux@korodes.comのパスワード
をそれぞれ入力し、「手動設定」クリック
「メールアドレス」は先ほど追加した「linux@korodes.com」
「パスワード」はlinux@korodes.comのパスワード
をそれぞれ入力し、「手動設定」クリック
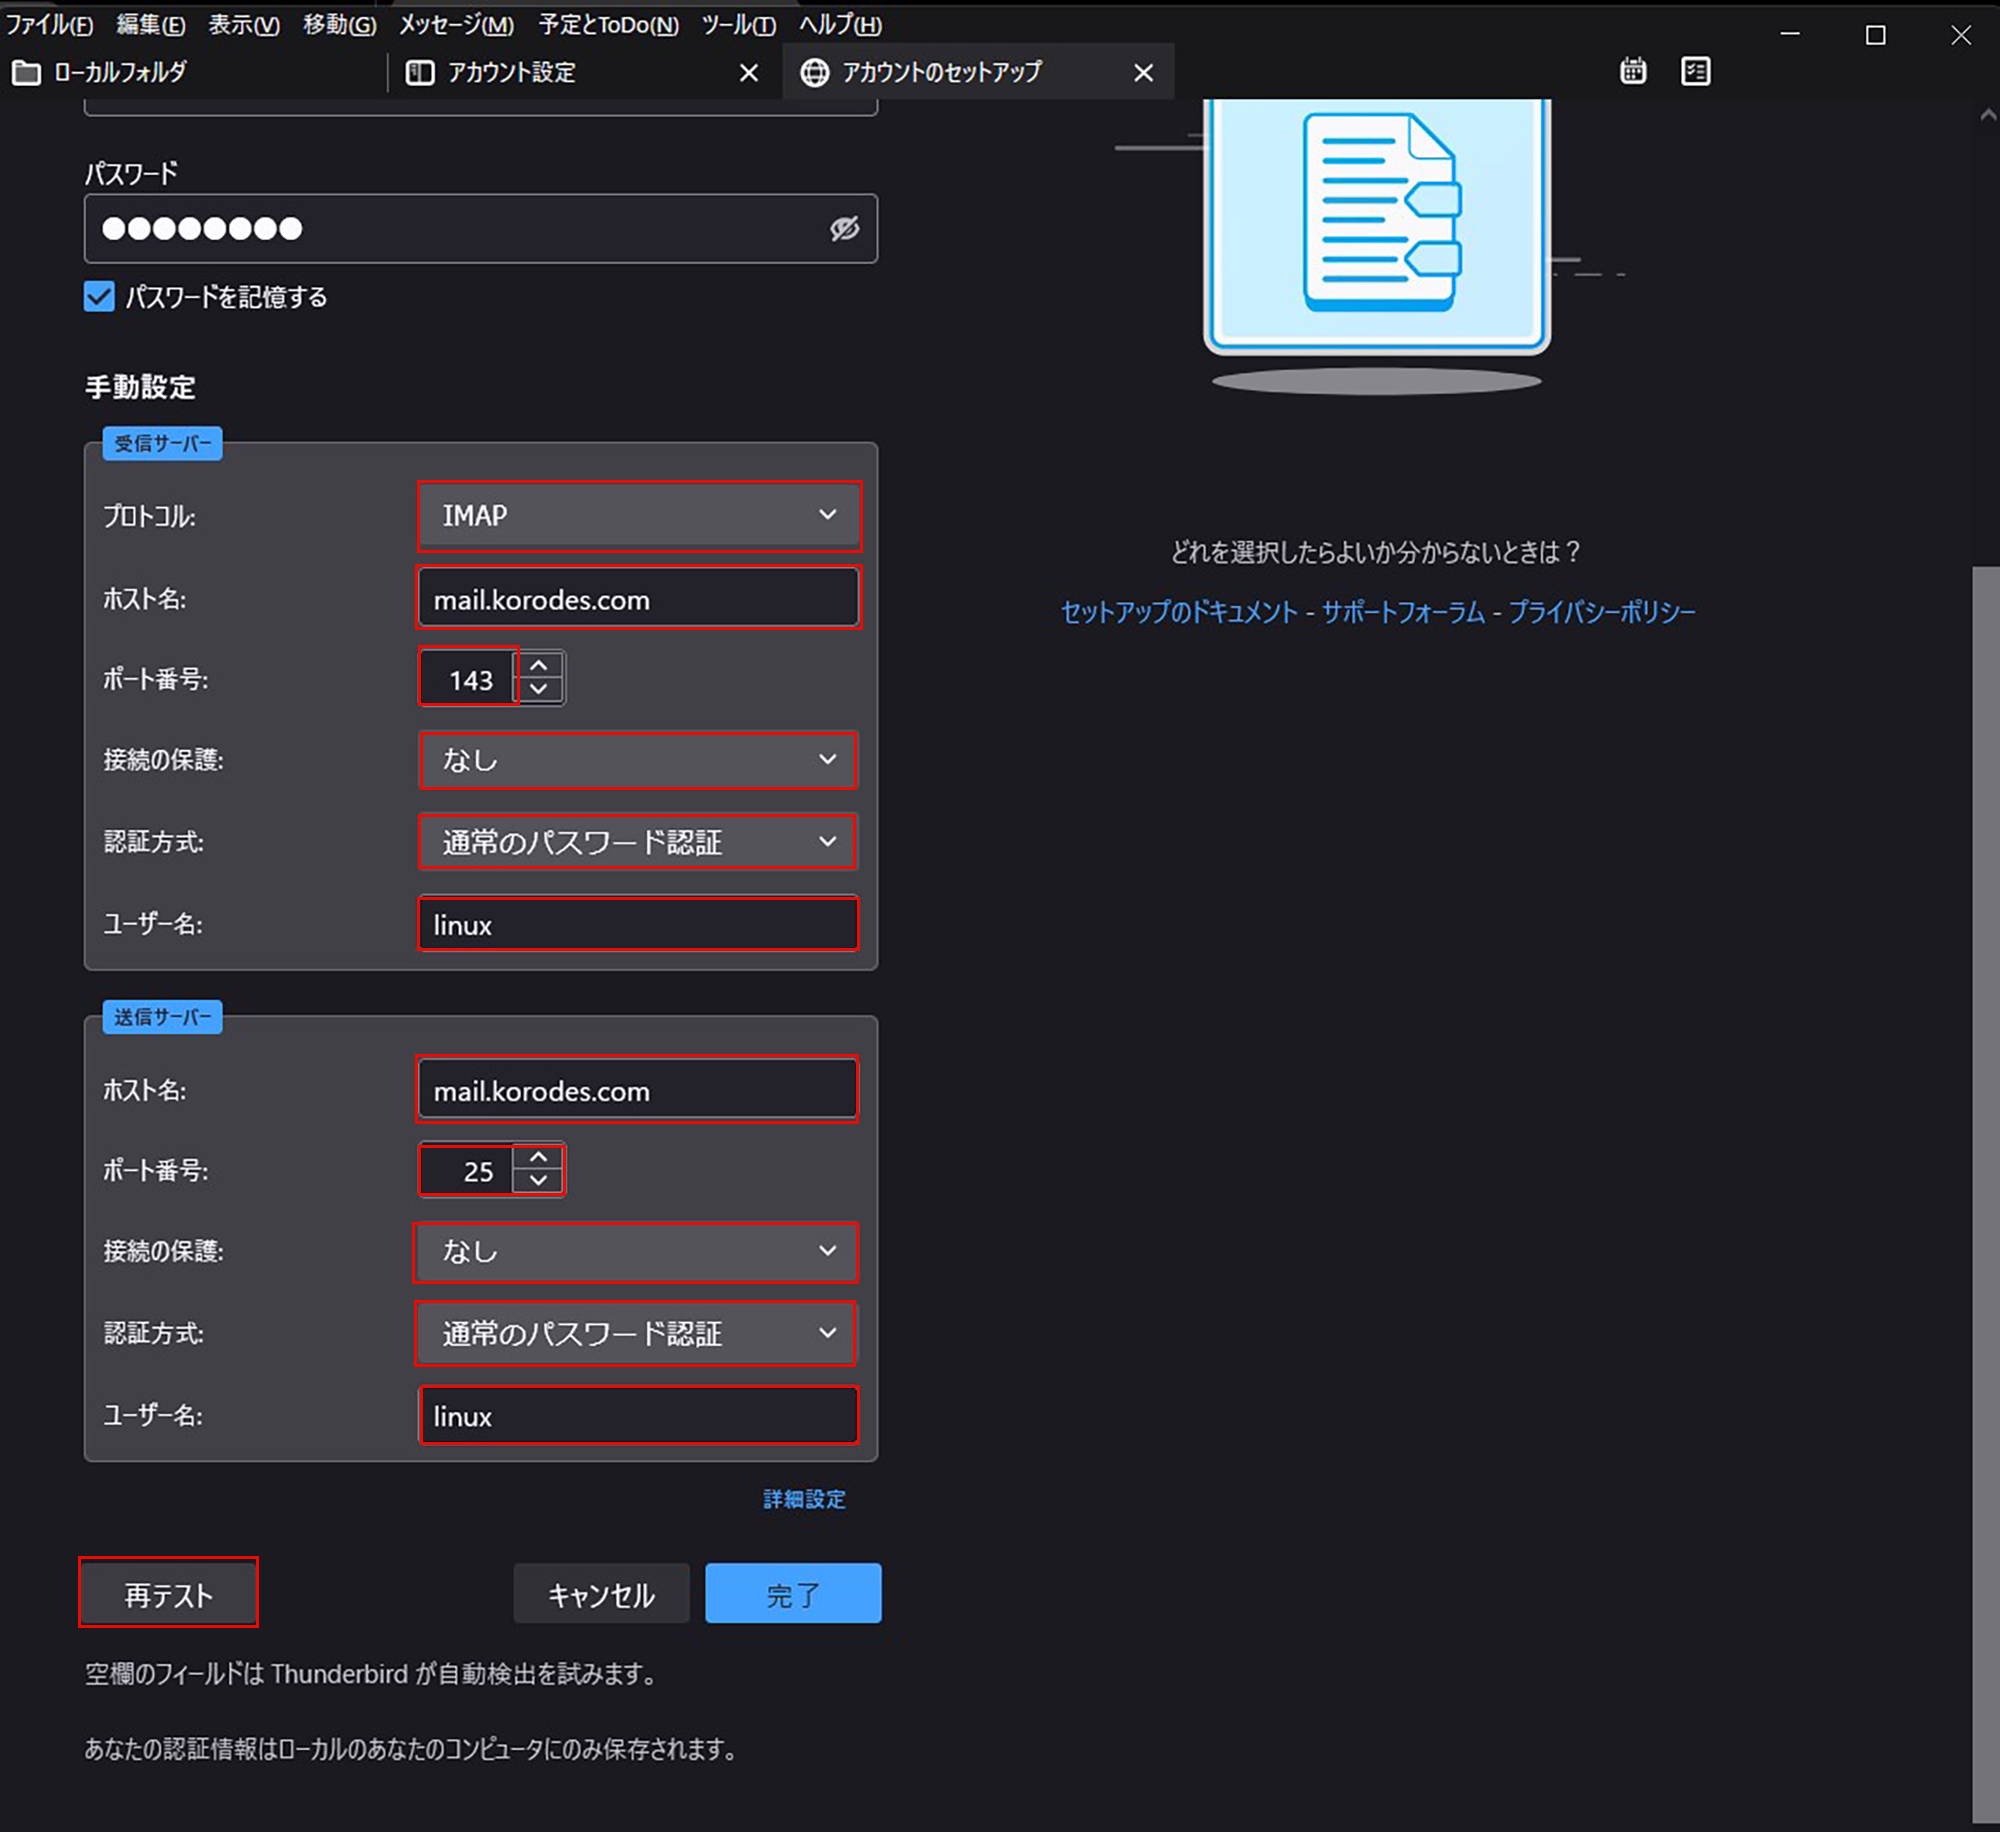
④「受信サーバー」「送信サーバー」を下図のように設定し、「再テスト」クリック
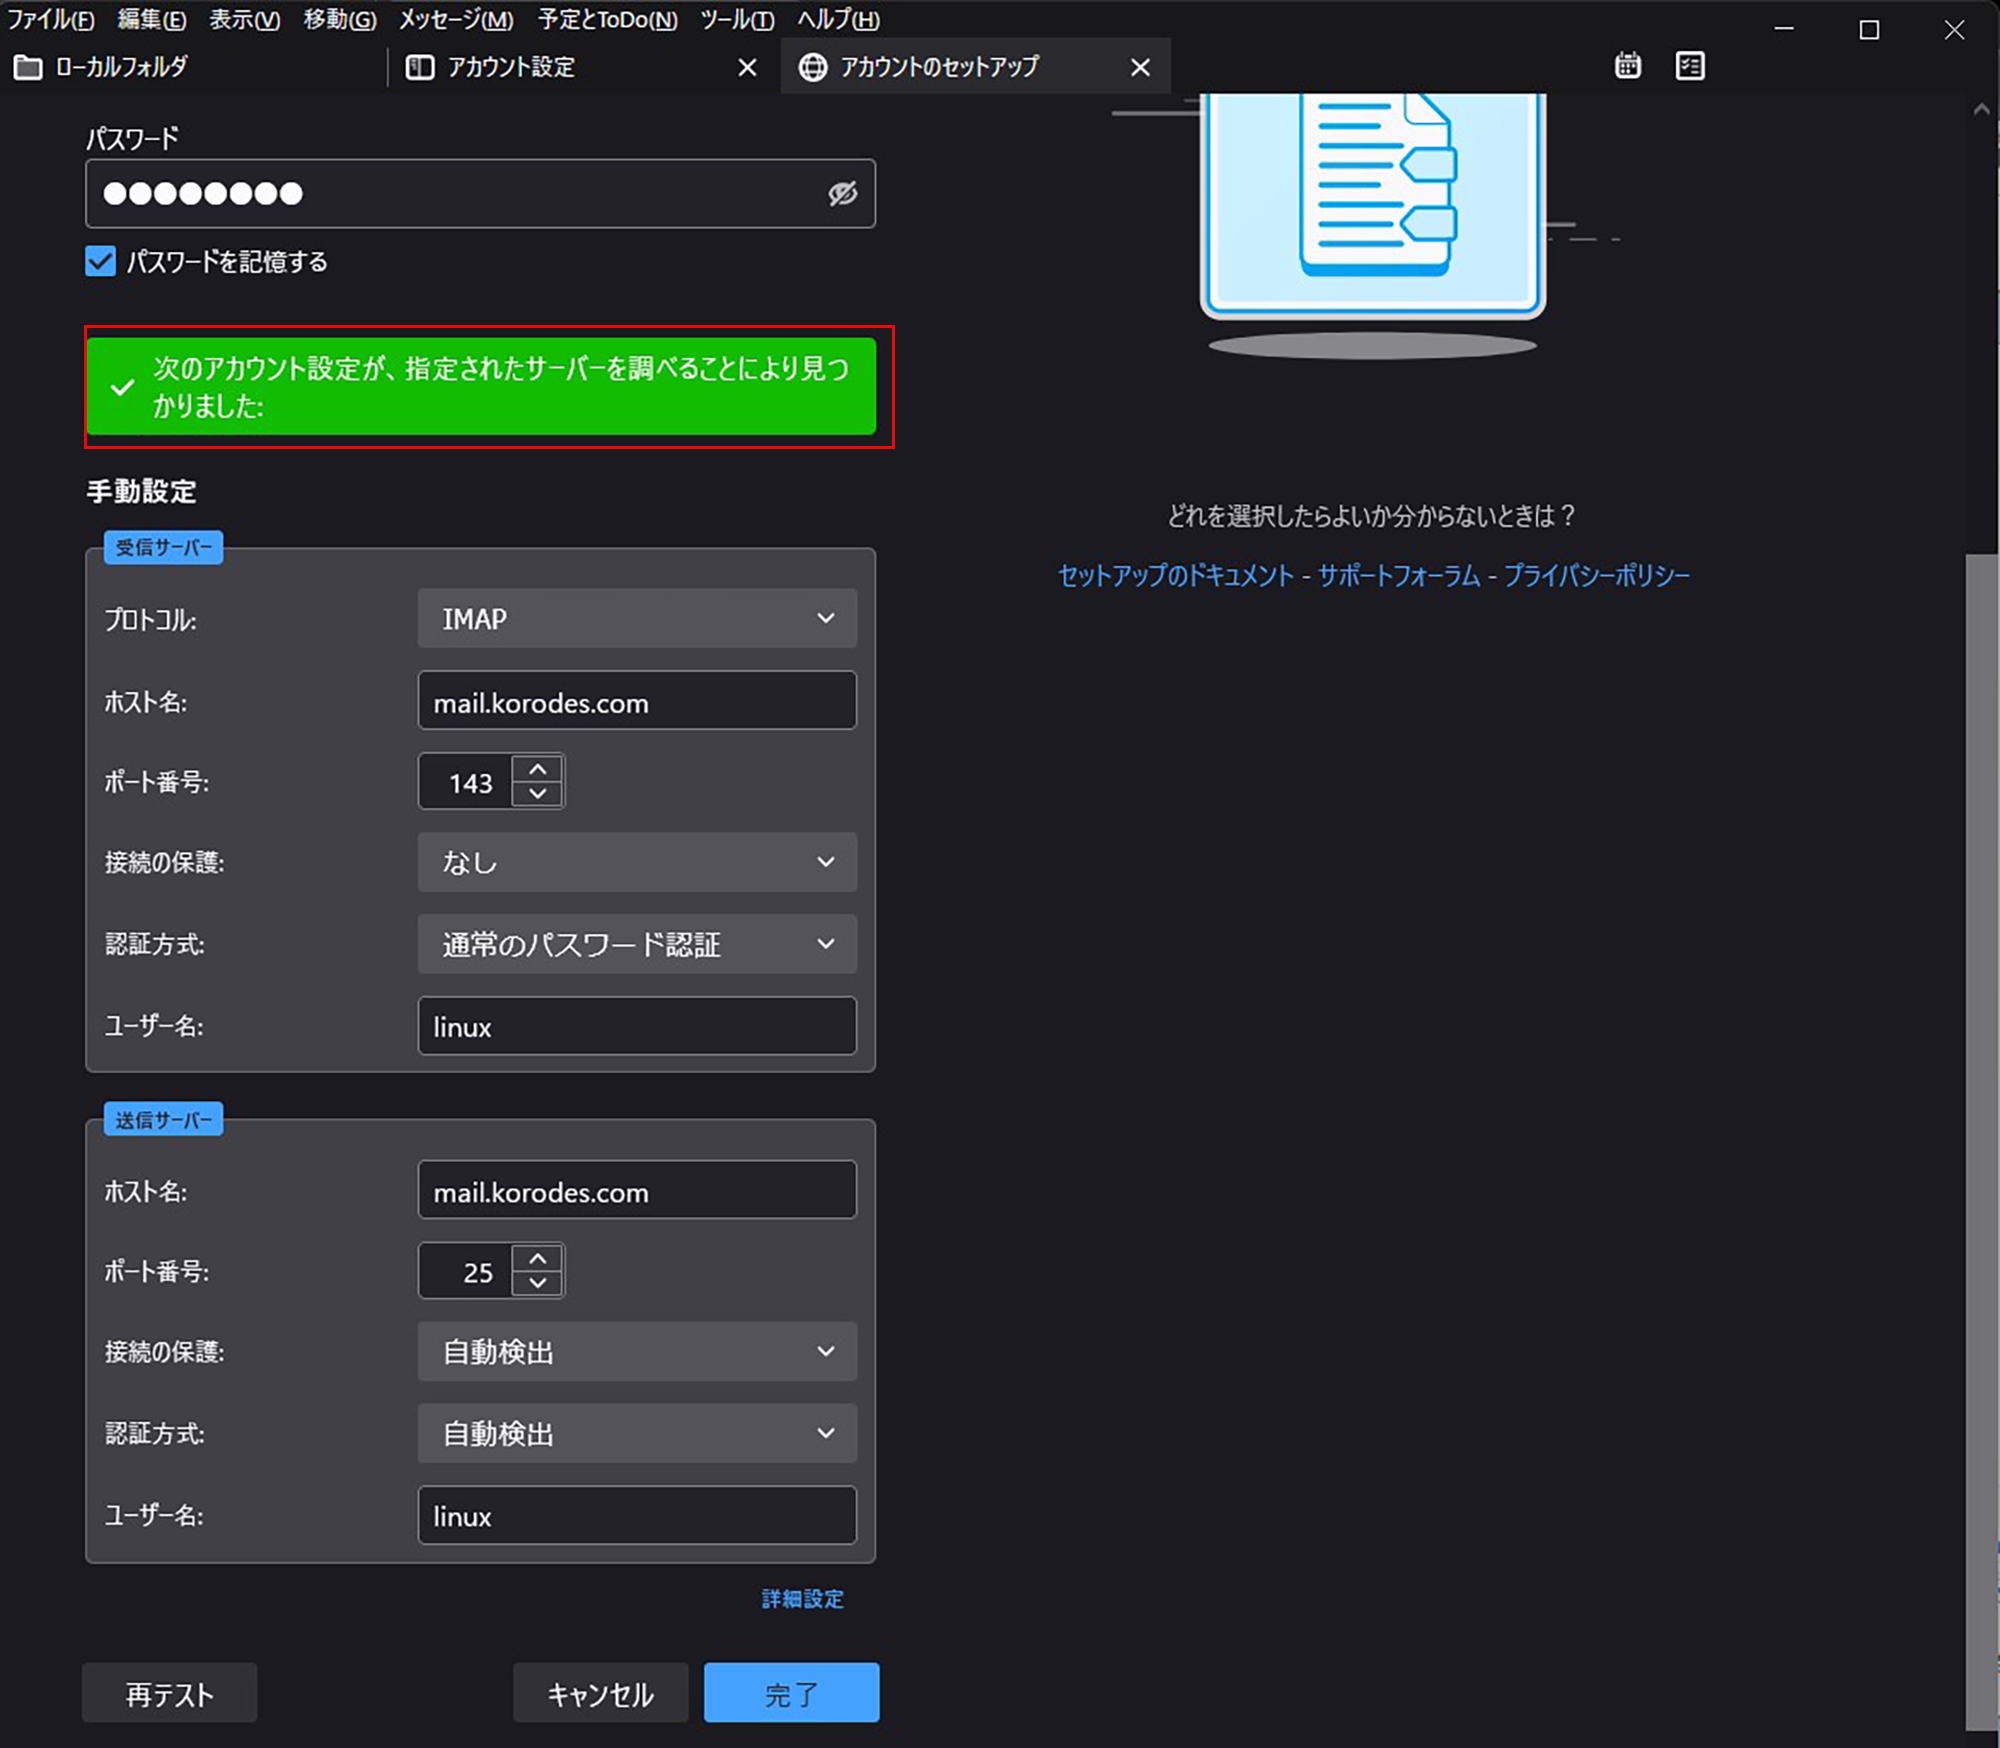
⑤「サーバーがみつかりました」が表示される、
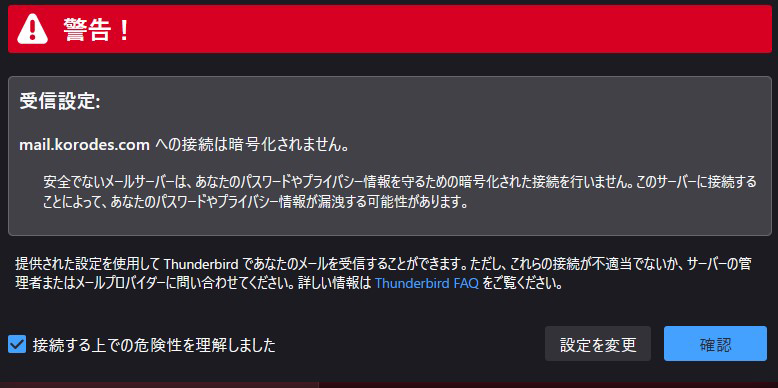
「完了」をクリックすると、下図の「警告」が表示されるが問題は無いので「確認」をクリック
⑥「完了」クリック
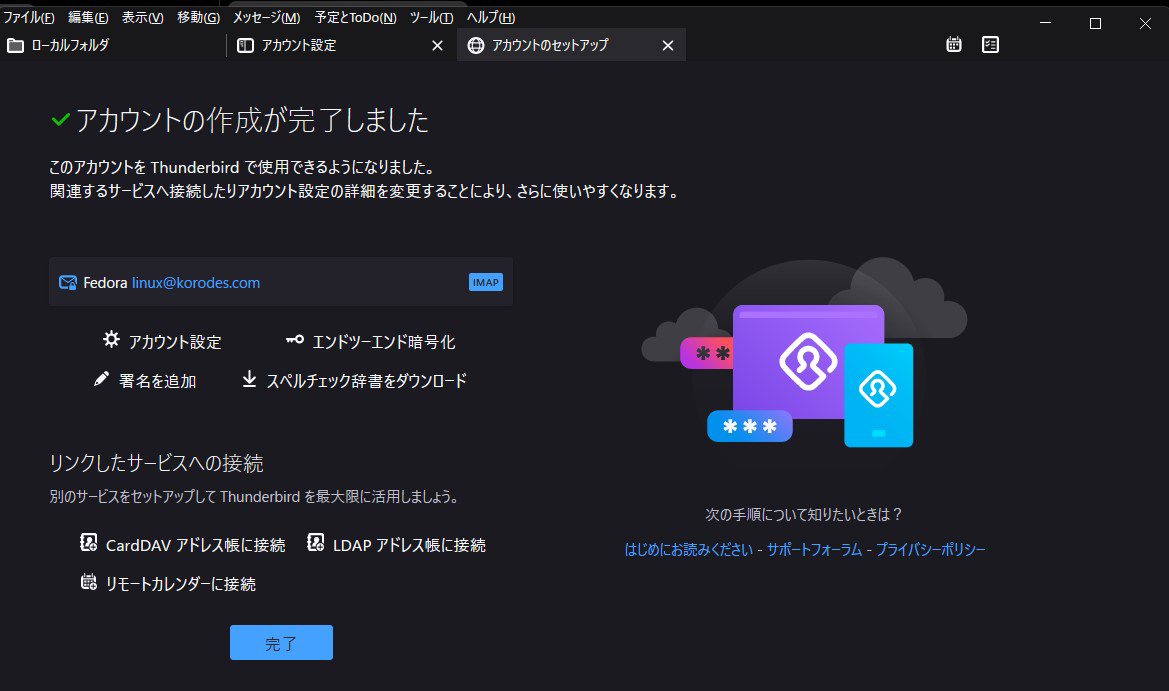
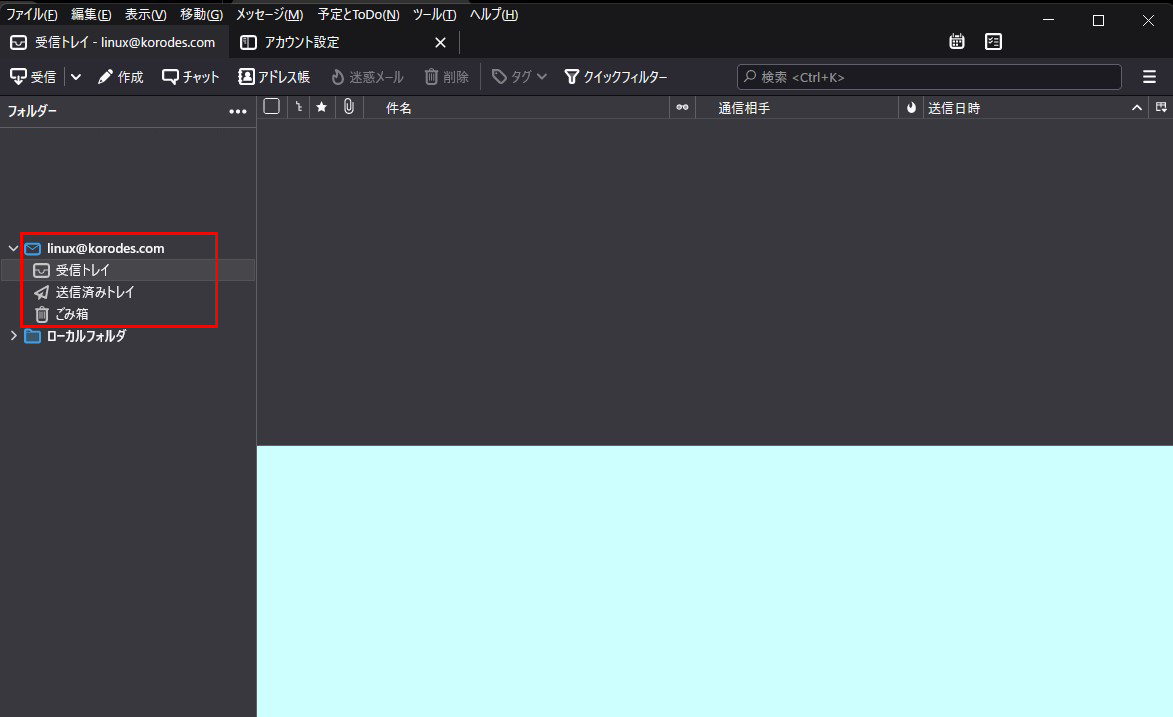
⑦linux@korodes.comアカウントが作成されました
Mail サーバー : Postfix + Clamav + Amavisd+SpamAssassin
1.メールのリアルタイムスキャン
①Amavisd および Clamav Server をインストール
|
1 |
# dnf -y install amavisd-new clamd perl-Digest-SHA1 perl-IO-stringy |
➁設定ファイル編集
|
1 2 3 4 5 6 7 |
# vi /etc/clamd.d/scan.conf ●77行目:変更 PidFile /var/run/clamd.scan/clamd.pid ●81行目:コメント解除 TemporaryDirectory /var/tmp ●96行目:変更 LocalSocket /var/run/clamd.scan/clamd.sock |
|
1 2 3 |
# touch /var/log/clamd.scan # chown clamscan. /var/log/clamd.scan # systemctl enable clamd@scan |
➂Amavisd を設定して起動
|
1 2 3 4 5 6 7 8 9 10 11 |
# vi /etc/amavisd/amavisd.conf ●13 行目あたり行頭の#削除 @bypass_spam_checks_maps = (1); # controls running of anti-spam code ● 23行目:自ドメイン名に変更 $mydomain = 'ドメイン名'; ●28 行目あたりコメントアウト #$QUARANTINEDIR = undef; # -Q ●125 行目あたりコメントアウト # $virus_admin = undef; # notifications recip ●158行目:コメント解除して自ホスト名に変更 $myhostname = 'mail.ドメイン名'; |
|
1 2 |
# systemctl enable amavisd Created symlink /etc/systemd/system/multi-user.target.wants/amavisd.service → /usr/lib/systemd/system/amavisd.service. |
|
1 2 3 |
# vi /etc/postfix/main.cf # 最終行に追記 content_filter=smtp-amavis:[127.0.0.1]:10024 |
|
1 2 3 4 5 6 7 8 9 10 11 12 13 14 15 16 17 18 19 20 |
# vi /etc/postfix/master.cf # 最終行に追記 smtp-amavis unix - - n - 2 smtp -o smtp_data_done_timeout=1200 -o smtp_send_xforward_command=yes -o disable_dns_lookups=yes 127.0.0.1:10025 inet n - n - - smtpd -o content_filter= -o local_recipient_maps= -o relay_recipient_maps= -o smtpd_restriction_classes= -o smtpd_client_restrictions= -o smtpd_helo_restrictions= -o smtpd_sender_restrictions= -o smtpd_recipient_restrictions=permit_mynetworks,reject -o mynetworks=127.0.0.0/8 -o strict_rfc821_envelopes=yes -o smtpd_error_sleep_time=0 -o smtpd_soft_error_limit=1001 -o smtpd_hard_error_limit=1000 |
|
1 |
# systemctl restart postfix |
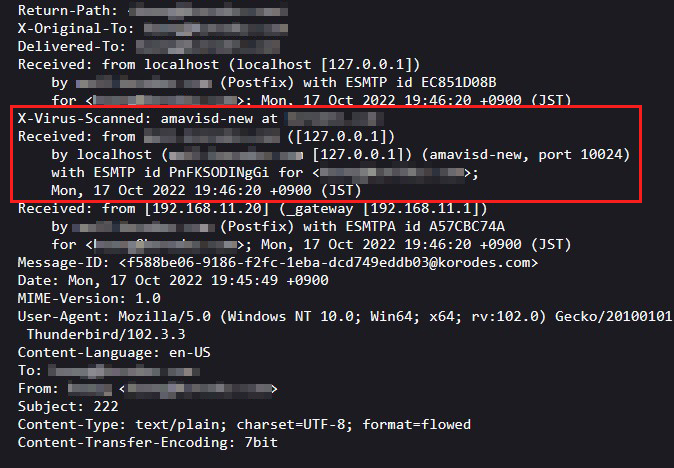
⑤Thunderbirdで自分宛にテストメールを送付し、受信メールのヘッダー表示部分に下記のように
「X-Virus-Scanned: amavisd-new at 」が表示される
「X-Virus-Scanned: amavisd-new at 」が表示される
2.メールのスパム対策
①スパム対策としてSpamAssassin を導入
|
1 2 3 4 |
# dnf -y install spamassassin spamass-milter-postfix # systemctl start spamassassin # systemctl enable spamassassin Created symlink /etc/systemd/system/multi-user.target.wants/spamassassin.service → /usr/lib/systemd/system/spamassassin.service. |
②SpamAssassin の設定
|
1 2 3 |
# vi /etc/mail/spamassassin/v310.pre ●24 行目あたり行頭の#を削除 loadplugin Mail::SpamAssassin::Plugin::DCC |
③SpamAssassin 設定ファイル最新化スクリプト
|
1 2 3 4 5 6 7 8 9 10 11 12 13 14 15 16 17 18 19 20 21 22 23 24 25 26 27 |
# cd /var/www/system # vi /var/www/system/spamassassin-update.sh #!/bin/bash cd /etc/mail/spamassassin wget -q https://github.com/kittyfreak/spamassassin_user_prefs/archive/refs/heads/main.zip [ $? -ne 0 ] && exit unzip main.zip >/dev/null 2>&1 [ $? -ne 0 ] && exit rm -f main.zip mv spamassassin_user_prefs-main/user_prefs . rm -rf spamassassin_user_prefs-main diff user_prefs user_prefs.org > /dev/null 2>&1 if [ $? -ne 0 ]; then cp user_prefs local.cf echo "report_safe 0" >> local.cf echo "rewrite_header Subject ***SPAM***" >> local.cf # SpamAssassin再起動 if [ -f /etc/rc.d/init.d/spamassassin ]; then /etc/rc.d/init.d/spamassassin restart > /dev/null else systemctl restart spamassassin > /dev/null fi fi cp user_prefs user_prefs.org |
|
1 2 |
# chmod 700 /var/www/system/spamassassin-update.sh # /var/www/system/spamassassin-update.sh |
/etc/mail/spamassassin ディレクトリにSpamAssassin 設定ファイルが当日日付で
作成されていることを確認
作成されていることを確認
|
1 2 3 4 5 6 7 8 9 10 11 12 13 14 15 16 17 18 19 |
# ls -l /etc/mail/spamassassin total 1612 drwxr-xr-x 2 root root 40 Oct 17 19:20 channel.d -rw-r--r-- 1 root root 1194 Jan 22 2022 init.pre -rw-r--r-- 1 root root 499337 Oct 17 20:09 local.cf drwx------ 2 root root 6 Jan 22 2022 sa-update-keys -rw-r--r-- 1 root root 62 Jan 22 2022 spamassassin-default.rc -rwxr-xr-x 1 root root 39 Jan 22 2022 spamassassin-helper.sh -rw-r--r-- 1 root root 55 Jan 22 2022 spamassassin-spamc.rc -rw-r--r-- 1 root root 499289 Dec 29 2021 user_prefs -rw-r--r-- 1 root root 499289 Oct 17 20:09 user_prefs.org -rw-r--r-- 1 root root 2523 Oct 17 20:07 v310.pre -rw-r--r-- 1 root root 1194 Jan 22 2022 v312.pre -rw-r--r-- 1 root root 2416 Jan 22 2022 v320.pre -rw-r--r-- 1 root root 1237 Jan 22 2022 v330.pre -rw-r--r-- 1 root root 1020 Jan 22 2022 v340.pre -rw-r--r-- 1 root root 1309 Jan 22 2022 v341.pre -rw-r--r-- 1 root root 1469 Jan 22 2022 v342.pre -rw-r--r-- 1 root root 1264 Jan 22 2022 v343.pre |
SpamAssassin 設定ファイルを最新化するスクリプトが毎日自動実行されるようcron に設定
|
1 2 |
# crontab -e 0 2 * * * /var/www/system/spamassassin-update.sh > /dev/null 2>&1 |
④Postfix にSpamAssassin を組み込む
|
1 2 3 4 5 6 7 8 9 10 11 12 13 14 15 16 17 18 19 20 21 22 23 24 25 26 27 28 29 30 |
# vi /etc/postfix/master.cf ●12行目あたり 11 行目の行頭に「#」を追加し12 行目にSpamAssassin 設定を追加 # smtp inet n - n - - smtpd smtp inet n - n - - smtpd -o content_filter=spamassassin ●最終行へ追加 smtp-amavis unix - - n - 2 smtp -o smtp_data_done_timeout=1200 -o smtp_send_xforward_command=yes -o disable_dns_lookups=yes 127.0.0.1:10025 inet n - n - - smtpd -o content_filter= -o local_recipient_maps= -o relay_recipient_maps= -o smtpd_restriction_classes= -o smtpd_client_restrictions= -o smtpd_helo_restrictions= -o smtpd_sender_restrictions= -o smtpd_recipient_restrictions=permit_mynetworks,reject -o mynetworks=127.0.0.0/8 -o strict_rfc821_envelopes=yes -o smtpd_error_sleep_time=0 -o smtpd_soft_error_limit=1001 -o smtpd_hard_error_limit=1000 spamassassin unix - n n - - pipe user=nobody argv=/usr/bin/spamc -e /usr/sbin/sendmail.postfix -oi -f ${sender} ${recipient} |
|
1 |
# systemctl restart postfix |
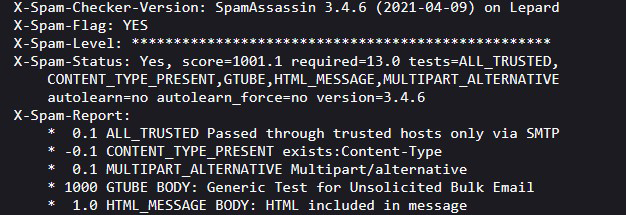
⑥Thunderbirdで自分宛に本文に下記記入してメールを送ると、ヘッダーに次のように表示される。
XJS*C4JDBQADN1.NSBN3*2IDNEN*GTUBE-STANDARD-ANTI-UBE-TEST-EMAIL*C.34X