

1. ClamAV (antivirus software) implementation
1.1 Install ClamAV
# zypper -n install clamav
1.2 Definition File Update
①Virus Definition File Update Settings
# vi /etc/freshclam.conf

Line 88 : Comment out and add below
#DatabaseMirror database.clamav.net
DatabaseMirror db.jp.clamav.net
②Virus definition file update
# freshclam

ClamAV update process started at Sun Nov 15 16:54:54 2026
daily database available for download (remote version: 28184)
Time:    0.3s, ETA:    0.0s [========================>]   22.36MiB/22.36MiB
Time:    0.3s, ETA:    0.0s [========================>]    8.87KiB/8.87KiB
Testing database: '/var/lib/clamav/tmp.e7dcfef5fc/daily.cvd' ...
Database test passed.
daily.cvd updated (version: 28184, sigs: 355871, f-level: 90, builder: svc.clamav-publisher)
main database available for download (remote version: 63)
Time:    1.1s, ETA:    0.0s [========================>]   84.95MiB/84.95MiB
Time:    0.3s, ETA:    0.0s [========================>]    8.87KiB/8.87KiB
Testing database: '/var/lib/clamav/tmp.e7dcfef5fc/main.cvd' ...
Database test passed.
main.cvd updated (version: 63, sigs: 3287027, f-level: 90, builder: tomjudge)
bytecode database available for download (remote version: 339)
Time:    0.3s, ETA:    0.0s [========================>]  275.10KiB/275.10KiB
Time:    0.3s, ETA:    0.0s [========================>]    8.87KiB/8.87KiB
Testing database: '/var/lib/clamav/tmp.e7dcfef5fc/bytecode.cvd' ...
Database test passed.
bytecode.cvd updated (version: 339, sigs: 80, f-level: 90, builder: nrandolp)
WARNING: Clamd was NOT notified: Can't connect to clamd through /run/clamav/clamd.sock: No such file or directory
Finally, the message "WARNING: Clamd was NOT notified: Can't connect to clamd through /run/clamav/clamd-socket: No such file or directory" appears, but this is not a problem.
1.3 Functionality Verification
Download and scan the test virus
# wget https://secure.eicar.org/eicar.com.txt
# clamscan --infected --remove --recursive

/root/eicar.com.txt: Eicar-Test-Signature FOUND
/root/eicar.com.txt: Removed.

----------- SCAN SUMMARY -----------
Known viruses: 3628275
Engine version: 1.5.4
Scanned directories: 6
Scanned files: 6
Infected files: 1
Data scanned: 27.49 KiB
Data read: 14.42 KiB (ratio 1.91:1)
Time: 8.417 sec (0 m 8 s)
Start Date: 2026:11:15 16:57:02
End Date:   2026:11:15 16:57:11
/root/eicar.com.txt: Eicar-Test-Signature FOUND
/root/eicar.com.txt: Removed.
It says "We have detected and removed viruses."
1.4 Implementation of an Automatic Virus Scan Script
①Creating the Script Storage Directory
# mkdir -p /srv/www/system
②Automatic Script Creation
# cd /srv/www/system
Create clamscan.sh in /srv/www/system with the following content:
# vi clamscan.sh

Fill in the following
#!/bin/bash
PATH=/usr/bin:/bin
# excludeopt setup
excludelist=/srv/www/system/clamscan.exclude
if [ -s $excludelist ]; then
for i in `cat $excludelist`
do
if [ $(echo "$i"|grep \/$) ]; then
i=`echo $i|sed -e 's/^\([^ ]*\)\/$/\1/p' -e d`
excludeopt="${excludeopt} --exclude-dir=$i"
else
excludeopt="${excludeopt} --exclude=$i"
fi
done
fi
# signature update
freshclam
# virus scan
clamscan --recursive --remove ${excludeopt} /
Grant execution permissions to the script
# chmod 700 clamscan.sh
The sys directory and proc directory cannot be scanned per specification, so exclude them.
Also, openSUSE creates a large number of snapshots, so exclude it.
# echo "/sys/" >> /srv/www/system/clamscan.exclude
# echo "/proc/" >> /srv/www/system/clamscan.exclude
# echo "/.snapshots/" >> /srv/www/system/clamscan.exclude
Scheduling Regular Virus Scans
Install cronie
# zypper -n install cronie
# crontab -e
0 1 * * * /srv/www/system/clamscan.sh > /dev/null 2>&
Run "/srv/www/system/clamscan.sh" to scan the entire system.
# /srv/www/system/clamscan.sh

----------- SCAN SUMMARY -----------
Known viruses: 3628275
Engine version: 1.5.4
Scanned directories: 8555
Scanned files: 56710
Infected files: 0
Data scanned: 7.35 GiB
Data read: 3.28 GiB (ratio 2.24:1)
Time: 685.360 sec (11 m 25 s)
Start Date: 2026:11:15 17:03:06
End Date:   2026:11:15 17:14:31
2. Mail Server Installation
2.1 Postfix Installation
①Install Postfix to build an SMTP server.
# zypper -n install postfix
②Postfix Configuration
To prevent unauthorized mail relaying, configure Postfix to require authentication for outgoing mail using the SASL feature of Dovecot, described later.
# vi /etc/postfix/main.cf

Line 100:Hostname specification
myhostname = mail.[domain]  ←Self-hosted name


Line 107:Domain name designation
mydomain = [domain]  ←Custom domain name

Line 122:Uncomment
myorigin = $mydomain

Per Line 136:Uncomment
inet_interfaces = all

Line 184:Uncomment
mydestination = $myhostname, localhost.$mydomain, localhost, $mydomain

Line 289:Uncomment and append your own network
mynetworks = 127.0.0.0/8, 192.168.11.0/24  ←Self-network

Line 443:Uncomment and use Maildir format
home_mailbox = Maildir/

Around line 694: Change
inet_protocols = all

Add to last line
# Limit mailbox size as needed (example below is 1G)
mailbox_size_limit = 1073741824
# Limit the size of sent and received emails as needed (example below: 10MB)
message_size_limit = 10485760
smtpd_recipient_restrictions = permit_mynetworks,permit_sasl_authenticated,reject_unauth_destination
smtpd_sasl_auth_enable = yes
smtpd_sasl_type = dovecot
smtpd_sasl_path = private/auth
smtpd_sasl_security_options = noanonymous
smtpd_sasl_local_domain = $myhostname
Enabling and launching the postfix service
# systemctl start postfix
# systemctl enable postfix
③If Firewalld is enabled, you must allow the SMTP service. SMTP uses port 25/TCP.
# firewall-cmd --add-service=smtp --permanent
# firewall-cmd --reload
2.2 Dovecot Installation
The version of Dovecot being installed this time is 2.4.1, and the configuration has changed significantly from 2.3.x.
①Install
# zypper -n install dovecot
➁Dovecot Configuration
Configure Dovecot to enable SASL functionality for Postfix.
# vi /etc/dovecot/dovecot.conf

Line 21-24 : Changes and Additions
protocols {
  imap = yes
  #  lmtp = yes
  pop3 = yes
 }

Line 34: Comment it out and add below it
#protocols = imap pop3 lmtp
protocols = imap pop3

Add around line 40
listen = *

Per Line 42-48 : Change namespace inbox as follows:
namespace inbox {
  inbox = yes
  separator = /
  mail_driver = maildir
  mail_path = ~/Maildir
  #  mail_inbox_path = ~/Maildir/.INBOX
 }

Add to the last line
service auth {
  # Postfix smtp-auth
  unix_listener /var/spool/postfix/private/auth {
     mode = 0666
     user = postfix
     group = postfix
   }
}
ssl = no
➂Dovecot Startup and Automatic Execution
# systemctl start dovecot
# systemctl enable dovecot
④If Firewalld is enabled, you must allow POP/IMAP services.
POP uses port 110/TCP, and IMAP uses port 143/TCP.
# firewall-cmd --add-service={pop3,imap} --permanent
# firewall-cmd --reload
2.3 User Account Registration
This time, we will register the OS user "huong".
① Install the email client
# zypper -n install mailx
②The mailbox is configured to reference Maildir.
# echo 'export MAIL=$HOME/Maildir' >> /etc/profile.d/mail.sh
※If a Maildir directory has not been created in the home directory of the existing user (huong), create it manually as follows:
# mkdir -p /home/huong/Maildir/{new,cur,tmp}
# chown -R huong:huong /home/huong/Maildir/
# chmod 700 /home/huong/Maildir
# chmod 700 /home/huong/Maildir/{new,cur,tmp}
2.4 Operation Verification
Configure your account in the free email client Thunderbird and verify it works.
However, depending on your provider, the outgoing server may use port 587, so make sure to open port 587 in your firewall settings.
# firewall-cmd --add-port=587/tcp --permanent
# firewall-cmd --reload
Set up and verify your account in Mozilla Thunderbird (for OS user huong as an email user)
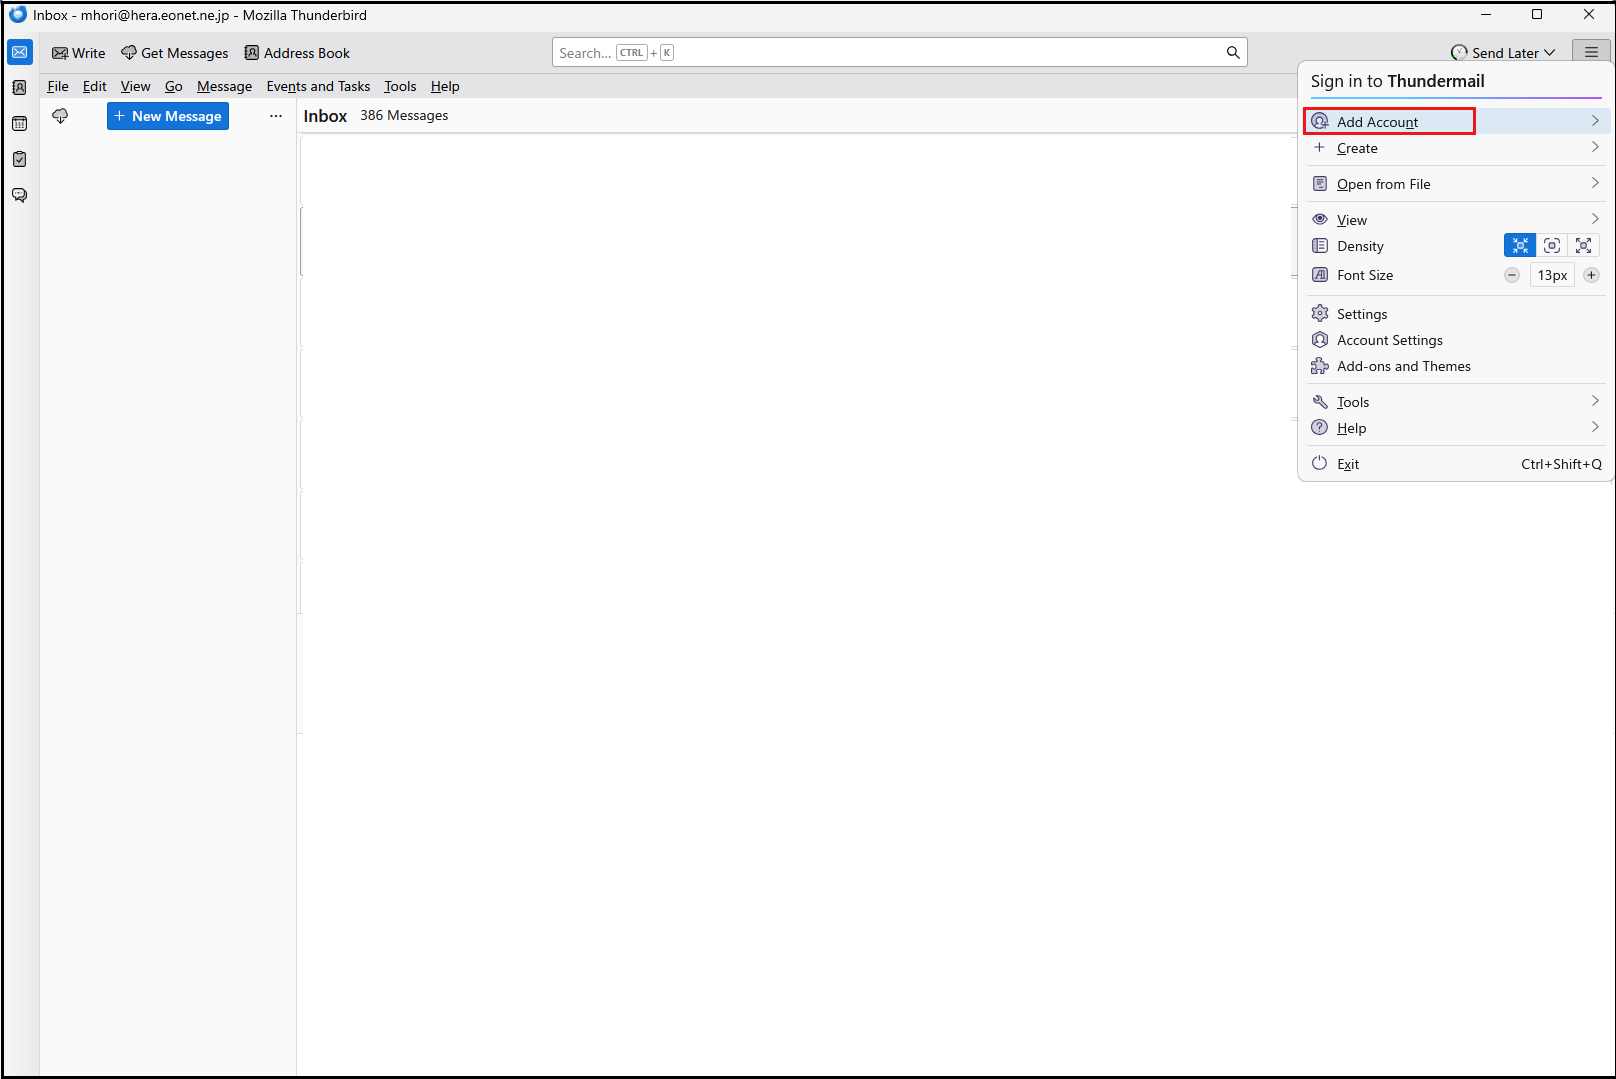
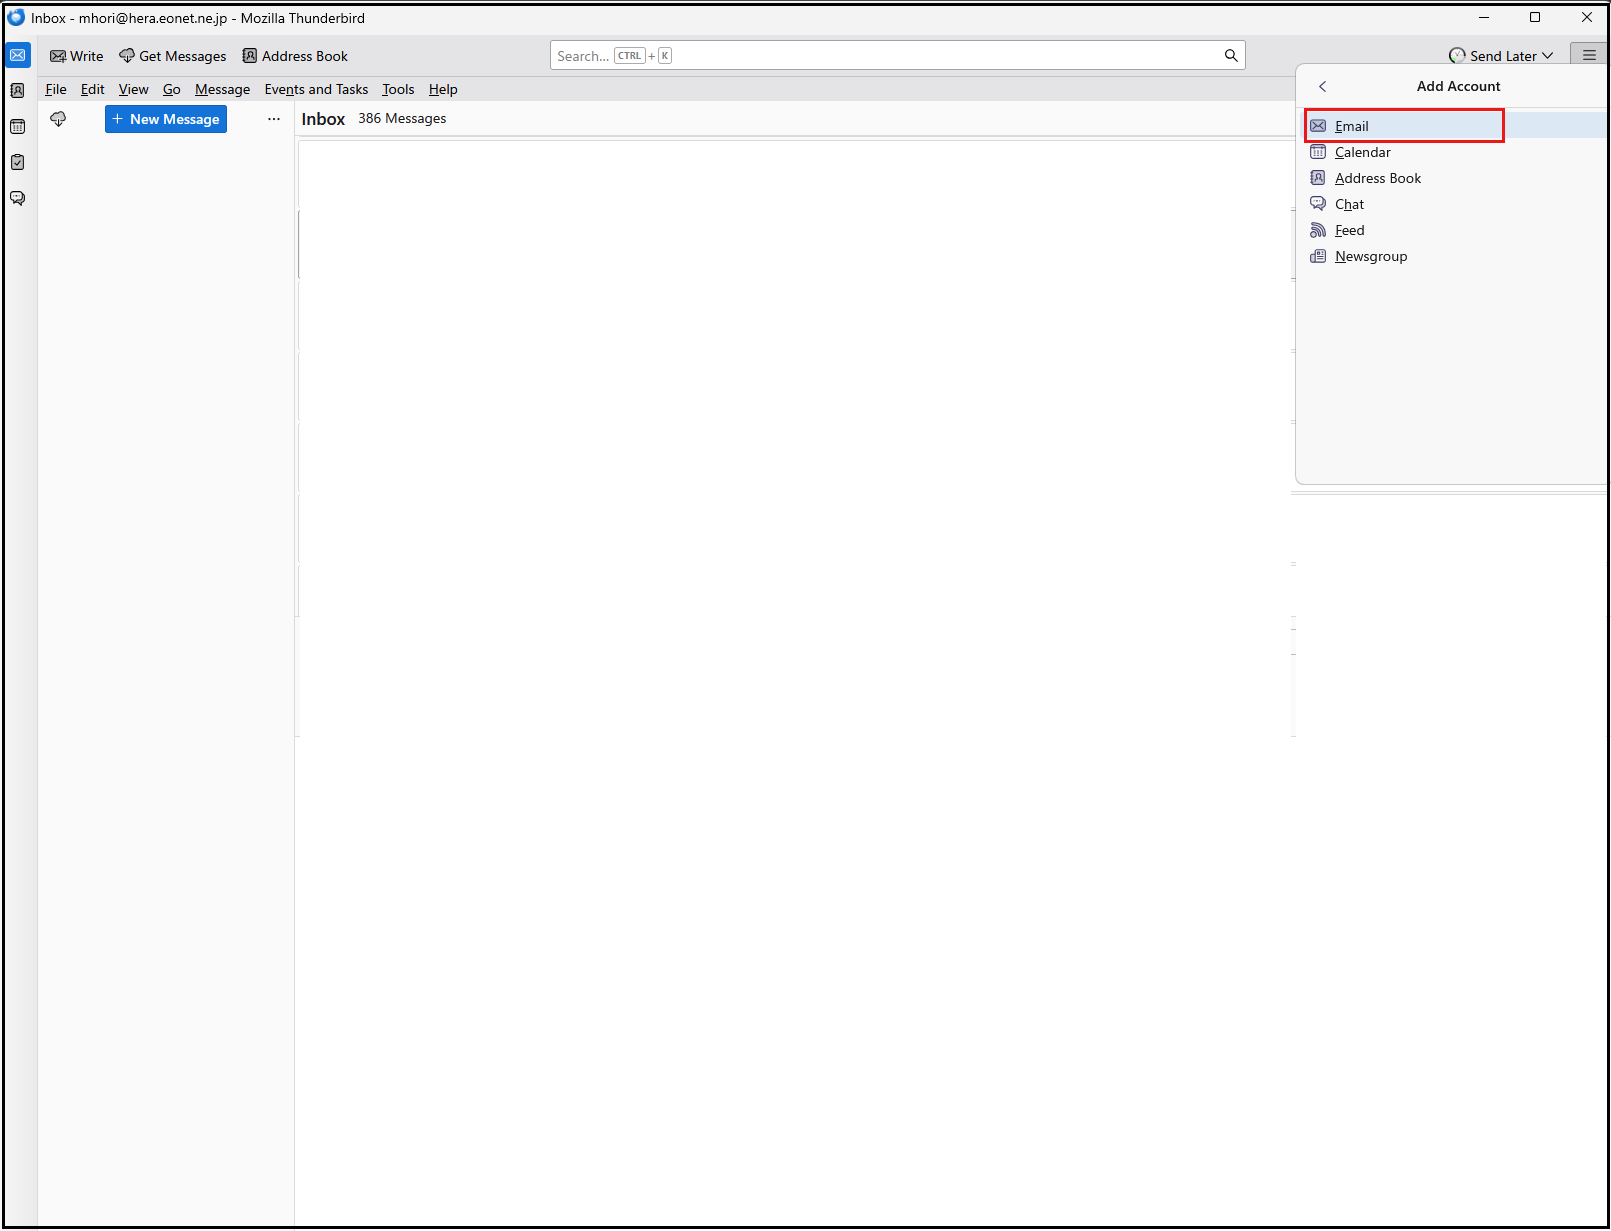
Launch Thunderbird, click [Add Account] > [Email] in the [three-bar] menu at the top right
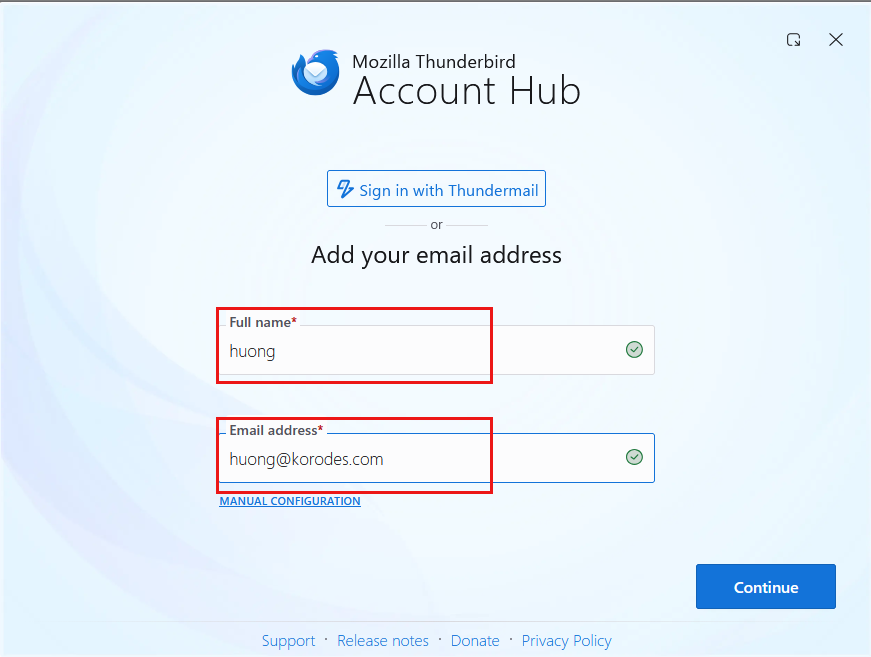
Full name: Any name
Email address: huong@[domain name]
Enter each field and click "Continue".
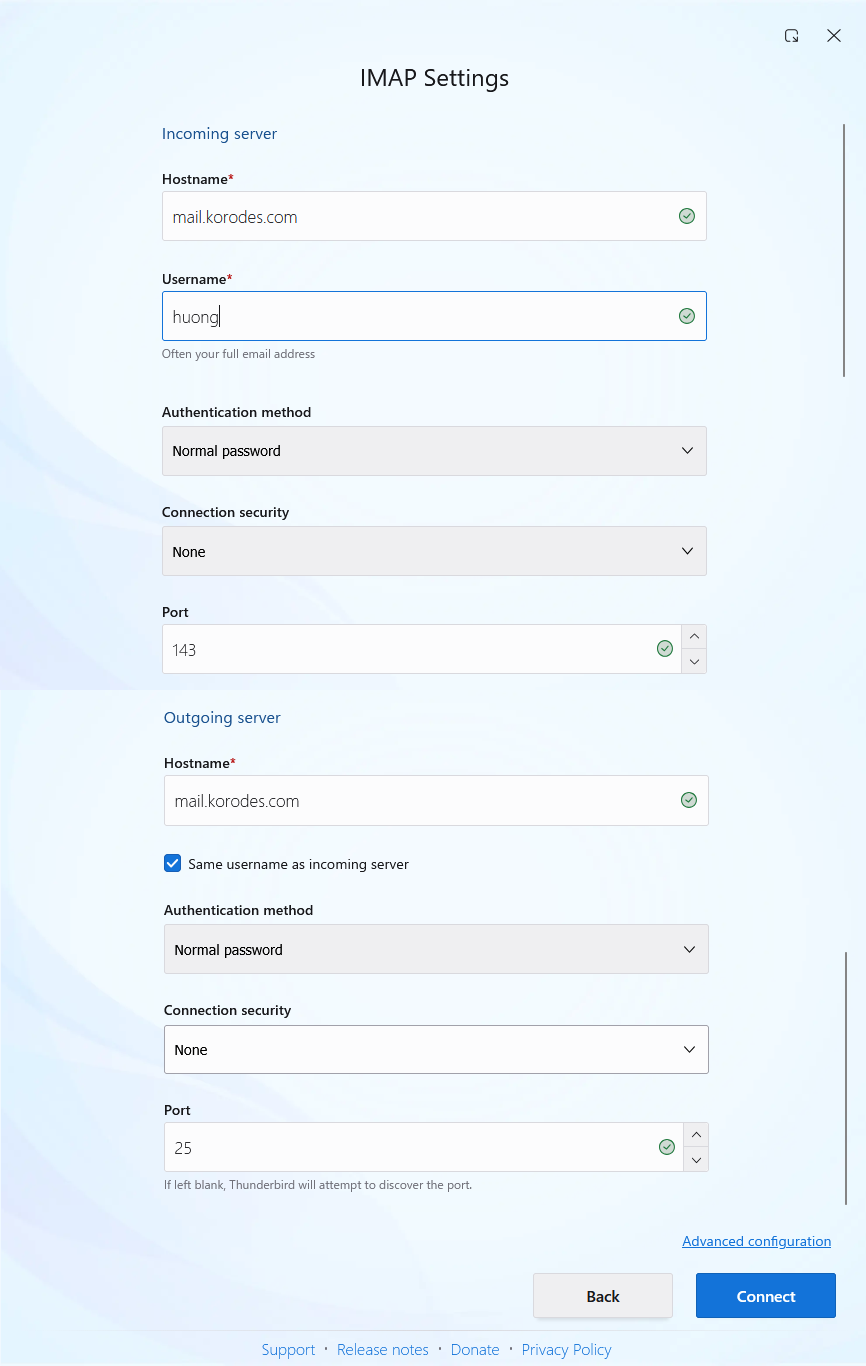
Click [EDIT CONFIGURATION]
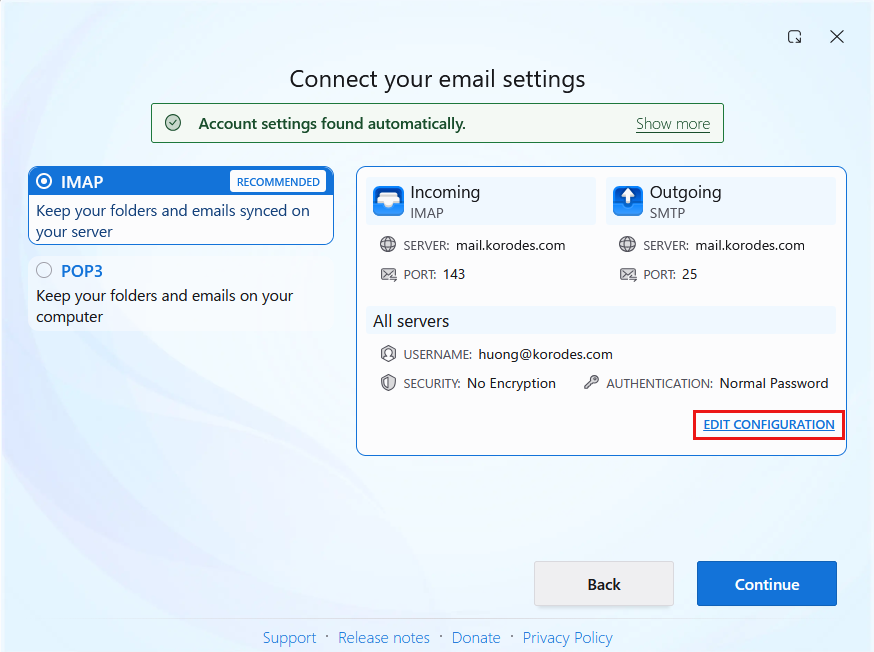
Setting up receiving and sending servers
Set it as shown below and click [Connect]
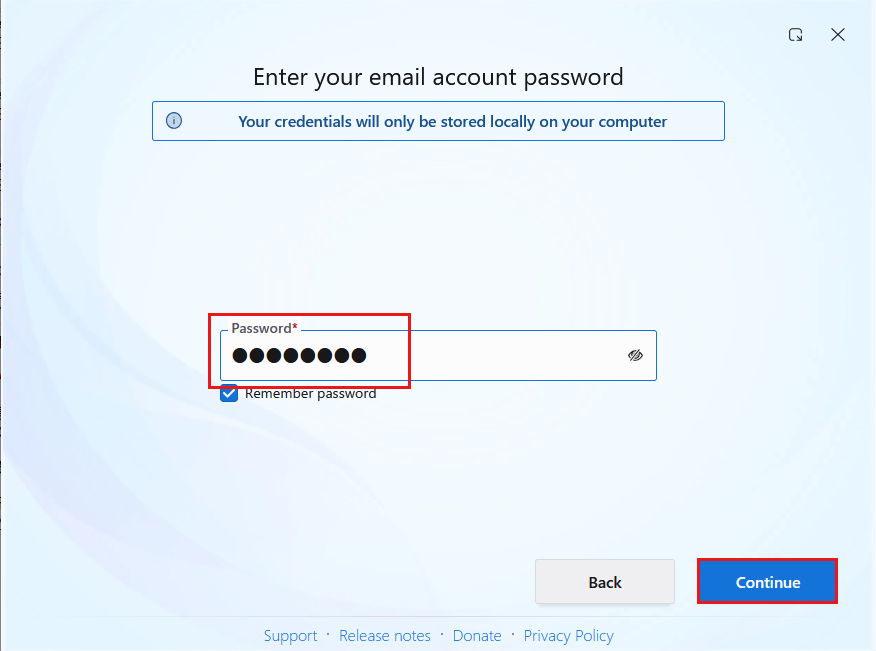
Enter password
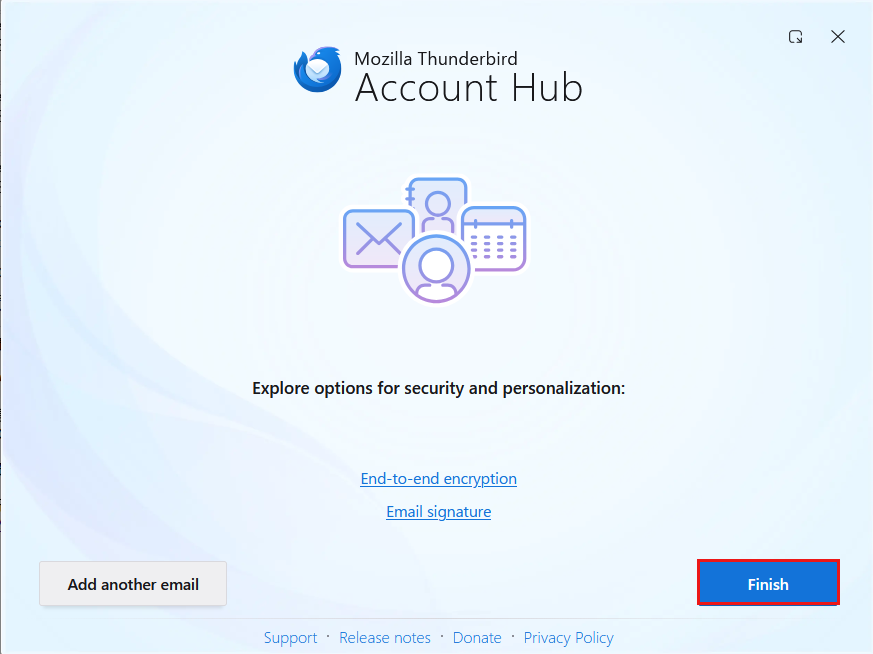
Your email account has been successfully created. Click [Finish].
3. Mail Server : Postfix + Clamav + clamav-milter+SpamAssassin
3.1 Real-time email scanning
①clamav-milter Installation
Perform virus checks on emails at the mail server side using Clam AntiVirus.
Integration between the mail server and Clam AntiVirus is achieved using clamav-milter.
# zypper -n install clamav-milter
➁clclamav-milter configuration
Editing the clamav-milter configuration file
Regarding the UNIX socket permissions for clamav-milter, most sources recommend setting them to "660". However, in my environment, this caused it to fail to start. Although it poses a security risk, I set them to "666".
# vi /etc/clamav-milter.conf

Line 26: Change
MilterSocketMode 666  ← Specify the access permissions for the UNIX socket of clamav-milter

Around line 166: Add
# Action to be performed on infected messages
# Default: Quarantine
#OnInfected Quarantine
OnInfected Blackhole ← Delete virus-infected emails

Around line 188: Add
# Note that while "Replace" can potentially break DKIM signatures, "Add" may
# confuse procmail and similar filters.
# Default: no
#AddHeader Replace
AddHeader Yes ← Output a message in the email header indicating that a virus check has been performed.
➂clamav-milter startup and automatic startup configuration
# systemctl start clamav-milter
# systemctl enable clamav-milter
④Postfix and ClamAV-Milter Integration Configuration
Editing the Postfix Configuration File
# vi /etc/postfix/main.cf

Add the following to the last line
milter_default_action = accept
smtpd_milters = unix:/run/clamav/clamav-milter.sock
non_smtpd_milters = unix:/run/clamav/clamav-milter.sock
⑤Add the postfix user to the clamilt group
For some reason, the clamilt group user wasn't created during installation, so I'll create it now.
# groupadd clamilt
# useradd -g clamilt clamilt
Add the postfix user to the clamilt group
# usermod -G clamilt -a postfix
⑥Postfix Configuration Update
# systemctl restart postfix
⑦Check with Thunderbird
Send an empty email to yourself in Thunderbird. In the header display section of the received email, the following should appear:
X-Virus-Scanned: clamav-milter 1.5.4 at lepard
X-Virus-Status: Clean
X-Mozilla-Status: 0001
X-Mozilla-Status2: 00000000
Return-Path: xxxxx@xxxxxxx.com
X-Original-To: xxxxx@xxxxxxx.com
Delivered-To: xxxxx@xxxxxxx.com
Received: from [192.168.11.36] (buffalo.setup [192.168.11.1])
by mail.xxxxxxx.com (Postfix) with ESMTPA id C7D7C42A9
for xxxxx@xxxxxxx.com; Mon, 16 Nov 2026 14:03:08 +0900 (JST)
Message-ID: fa526717-a3c5-4615-abbc-ae915dc8f6c3@xxxxxxx.com
Date: Mon, 16 Nov 2026 14:03:07 +0900
MIME-Version: 1.0
User-Agent: Mozilla Thunderbird
From: xxxxx xxxxx@xxxxxxx.com
Content-Language: en-US
To: xxxxx xxxxx@xxxxxxx.com
Content-Type: text/plain; charset=UTF-8; format=flowed
Content-Transfer-Encoding: 7bit
X-Virus-Scanned: clamav-milter 1.5.4 at Lepard
X-Virus-Status: Clean
Send yourself an email with the body text "X5O!P%@AP[4\PZX54(P^)7CC)7}$EICAR-STANDARD-ANTIVIRUS-TEST-FILE!$H+H*" and verify that the email is discarded and does not arrive.
3.2 Email Spam Prevention
3.2.1 SpamAssassin・spamass-milter・postfix Settings
①SpamAssassin・spamass-milter install
# zypper -n install spamassassin
# zypper install https://download.opensuse.org/repositories/server:/mail/16.1/x86_64/spamass-milter-0.4.0-lp161.14.1.x86_64.rpm
➁SpamAssassin startup
# systemctl start spamd
➂SpamAssassin Configuration
# vi /etc/mail/spamassassin/v310.pre

Remove the # at the beginning of line 24.
loadplugin Mail::SpamAssassin::Plugin::DCC
④SpamAssassin Configuration File Update Script
Create script under /etc/cron.daily
# vi /etc/cron.daily/spamassassin-update.sh

Fill in the following
#!/bin/bash

# Download the latest version of the SpamAssassin configuration file
cd /etc/mail/spamassassin

wget -q https://github.com/kittyfreak/spamassassin_user_prefs/archive/refs/heads/main.zip
[ $? -ne 0 ] && exit

unzip main.zip >/dev/null 2>&1
[ $? -ne 0 ] && exit
rm -f main.zip

mv spamassassin_user_prefs-main/user_prefs .
rm -rf spamassassin_user_prefs-main

# Restart SpamAssassin only when updating configuration files
diff user_prefs user_prefs.org > /dev/null 2>&1
if [ $? -ne 0 ]; then
    cp user_prefs local.cf

    # Change spam detection score※The default value is high and you will receive a lot of spam emails
    sed -i 's/required_score .*/required_score 8.0/g' local.cf

    # Set spam emails to no longer be attached
    echo "report_safe 0" >> local.cf

    # Configure to add "***SPAM***" to the subject line of emails identified as spam Only when the incoming mail server is not IMAP
    lsof -i:143,993 >/dev/null 2>&1
    [ $? -ne 0 ] && echo "rewrite_header Subject ***SPAM***" >> local.cf

    # Restart SpamAssassin
    systemctl restart spamd > /dev/null
fi
cp user_prefs user_prefs.org
Grant the spamassassin-update script execution permissions and run it.
Install "unzip" beforehand
# chmod +x /etc/cron.daily/spamassassin-update.sh
# /etc/cron.daily/spamassassin-update.sh
Verify that the SpamAssassin configuration file (local.cf) has been created with the current date in the /etc/mail/spamassassin directory.
# ls -l /etc/mail/spamassassin
total 1520
-rw-r--r-- 1 root root   1649 Apr 10  2024 init.pre
-rw-r--r-- 1 root root 500601 Nov 16 14:16 local.cf
-rw-r--r-- 1 root root 500588 Apr 30  2023 user_prefs
-rw-r--r-- 1 root root 500588 Nov 16 14:16 user_prefs.org
-rw-r--r-- 1 root root   2262 Nov 16 14:14 v310.pre
-rw-r--r-- 1 root root   1168 Apr 10  2024 v312.pre
-rw-r--r-- 1 root root   2416 Apr 10  2024 v320.pre
-rw-r--r-- 1 root root   1237 Apr 10  2024 v330.pre
-rw-r--r-- 1 root root   1020 Apr 10  2024 v340.pre
-rw-r--r-- 1 root root   1315 Apr 10  2024 v341.pre
-rw-r--r-- 1 root root   1519 Apr 10  2024 v342.pre
-rw-r--r-- 1 root root   1266 Apr 10  2024 v343.pre
-rw-r--r-- 1 root root   1482 Apr 10  2024 v400.pre
-rw-r--r-- 1 root root   1118 Apr 10  2024 v401.pre
⑤SpamAssassin Milter Startup and Automatic Startup Configuration
# systemctl start spamass-milter
# systemctl enable spamass-milter
⑥Postfix and SpamAssassin Milter Integration Configuration
"unix:/run/spamass-milter/socket" append
# vi /etc/postfix/main.cf

Last place
milter_default_action = accept
smtpd_milters = unix:/var/run/clamav-milter/clamav-milter.socket,unix:/run/spamass-milter/socket
non_smtpd_milters = unix:/var/run/clamav-milter/clamav-milter.socket,unix:/run/spamass-milter/socket
⑧Restart postfix
# systemctl restart postfix
⑨Procmail Configuration
Procmail Install
# zypper -n install procmail
Creating a Procmail Configuration File
# vi /etc/procmailrc

SHELL=/bin/bash
PATH=/usr/bin:/bin
DROPPRIVS=yes
MAILDIR=$HOME/Maildir
SPAM=$MAILDIR/.Spam/
DEFAULT=$MAILDIR/
# Log output destination
LOGFILE=$HOME/.procmail.log
# Detailed Log Output
VERBOSE=ON

# If the mail header does not contain an "X-Spam-***" entry, SpamAssassin will be launched.
:0fw
*!^X-Spam.*
|spamassassin

# If the email header contains "X-Spam-Status: Yes", store the email in the ".Spam" directory.
:0
* ^X-Spam-Status: Yes
$SPAM
Creating the Procmail Log Rotation Configuration File
# vi /etc/logrotate.d/procmail

Fill in the following
/home/*/.procmail.log {
    missingok
    nocreate
    notifempty
}
⑩Postfix and Procmail Integration Configuration
# vi /etc/postfix/main.cf

Per Line 473 : Addition
#mailbox_command = /some/where/procmail
#mailbox_command = /some/where/procmail -a "$EXTENSION"
mailbox_command = /usr/bin/procmail
Postfix Configuration Update
# systemctl restart postfix
3.2.2 Spam Email Filtering Settings
Emails marked as spam by SpamAssassin in their headers should be delivered to the spam-specific mailbox, while other emails should be delivered to the regular mailbox.
①Creating a Dedicated Spam Mailbox
For existing users, add a dedicated spam mailbox to their mailbox.
For new users, automatically create a dedicated spam mailbox when adding the user.
Create a script for creating dedicated spam mailboxes.
# vi spamfolder-create

Fill in the following
#!/bin/bash

for user in `ls /home`
do
    id -u $user > /dev/null 2>&1
    if [ $? -eq 0 ] && [ ! -d /home/$user/Maildir/.Spam/new ]; then
        mkdir -p /home/$user/Maildir/.Spam/new
        mkdir -p /home/$user/Maildir/.Spam/cur
        mkdir -p /home/$user/Maildir/.Spam/tmp
        chmod -R 700 /home/$user/Maildir/.Spam
        chown -R $user:$user /home/$user/Maildir/.Spam
        echo $user
    fi
done
Execute the spam-dedicated mailbox creation script
# bash spamfolder-create
clamilt
huong
New User Countermeasures
Automatically create a dedicated spam mailbox when adding new users
# mkdir -p /etc/skel/Maildir/.Spam/{new,cur,tmp}
# chmod -R 700 /etc/skel/Maildir/.Spam
➁Spam Email Filtering
Emails flagged as spam by SpamAssassin are delivered to a dedicated spam mailbox.
# vi /etc/procmailrc

Add the following to the end
# Emails flagged as spam by SpamAssassin are delivered to the spam-specific mailbox.
:0
*^X-Spam-Flag: YES
$HOME/Maildir/.Spam/
➂SpamAssassin Milter Verification
When sending an empty email to yourself, the following message is appended to the header of the received email:
X-Spam-Status: No, score=2.2 required=8.0 tests=ALL_TRUSTED,
CONTENT_TYPE_PRESENT,EMPTY_MESSAGE autolearn=no autolearn_force=no
version=4.0.1
X-Spam-Level: **
X-Spam-Checker-Version: SpamAssassin 4.0.1 (2024-03-26) on Lepard
X-Mozilla-Status: 0001
X-Mozilla-Status2: 00000000
Return-Path: xxxxx@xxxxxxx.com
X-Original-To: xxxxx@xxxxxxx.com
Delivered-To: xxxxx@xxxxxxx.com
Received: from [192.168.11.36] (buffalo.setup [192.168.11.1])
by mail.xxxxxxx.com (Postfix) with ESMTPA id 348584558
for xxxxx@xxxxxxx.com; Mon, 16 Nov 2026 14:33:37 +0900 (JST)
Message-ID: 44e6ec7b-8d60-4277-967c-629cf5a53dc1@korodes.com
Date: Mon, 16 Nov 2026 14:33:36 +0900
MIME-Version: 1.0
User-Agent: Mozilla Thunderbird
From: xxxxx xxxxx@xxxxxxx.com
Content-Language: en-US
To: xxxxx xxxxx@xxxxxxx.com
Content-Type: text/plain; charset=UTF-8; format=flowed
Content-Transfer-Encoding: 7bit
X-Virus-Scanned: clamav-milter 1.5.4 at Lepard
X-Virus-Status: Clean
X-Spam-Status: No, score=2.2 required=8.0 tests=ALL_TRUSTED,
CONTENT_TYPE_PRESENT,EMPTY_MESSAGE autolearn=no autolearn_force=no
version=4.0.1
X-Spam-Level: **
X-Spam-Checker-Version: SpamAssassin 4.0.1 (2024-03-26) on Lepard
④Spam Check Verification
Confirm that an email with the body text "XJSC4JDBQADN1.NSBN32IDNENGTUBE-STANDARD-ANTI-UBE-TEST-EMAILC.34X" sent to yourself is not delivered and is instead routed to the Spam folder.
The email header displays as follows:
X-Spam-Flag: YES
X-Spam-Status: Yes, score=1003.3 required=8.0 tests=ALL_TRUSTED,
CONTENT_TYPE_PRESENT,GTUBE,HTML_MESSAGE,MPART_ALT_DIFF,
MULTIPART_ALTERNATIVE autolearn=no autolearn_force=no version=4.0.1
X-Spam-Report:
* 0.1 ALL_TRUSTED Passed through trusted hosts only via SMTP
* 0.1 MULTIPART_ALTERNATIVE Multipart/alternative
* -0.1 CONTENT_TYPE_PRESENT exists:Content-Type
* 1000 GTUBE BODY: Generic Test for Unsolicited Bulk Email
* 1.0 HTML_MESSAGE BODY: HTML included in message
* 2.2 MPART_ALT_DIFF BODY: HTML and text parts are different
X-Spam-Level: **************************************************
X-Spam-Checker-Version: SpamAssassin 4.0.1 (2024-03-26) on Lepard