

Prerequisites
1.Suricata
Suricata IDS/IPS is an open-source intrusion detection system (IDS) that monitors network traffic and detects suspicious activity. Since it operates on a signature-based mechanism, it can detect predefined malicious traffic. Another key feature of Suricata is its ability to not only detect but also prevent such threats.
2.Elasticsearch,Kibana,Filebeat
Install and configure the Elasticsearch to enable visualization and search of SURICATA logs using Kibana and Filebeat
In this session, we will install Suricata IDS and ElasticStack on the following serve
・First server Suricata & Filebeat : ArchLinux IP address(192.168.11.83)
・Second server Elasticsearch & kibana : ArchLinux IP address(192.168.11.85)
This time, we will run it as the root user
Server 1: Suricata Installation
1.Installing and Configuring Suricata
①Suricata Install
# su - huong
$ yay -S suricata-nfqueue

Version Check
# suricata -V
This is Suricata version 8.0.5 RELEASE
➁Checking and Loading Required Kernel Modules
To use NFQUEUE, the kernel must support nfnetlink_queue.
Module Verification:
# lsmod | grep nfnetlink_queue
If nothing appears above, load the module
# modprobe nfnetlink_queue
Confirm again
# lsmod | grep nfnetlink_queue
nfnetlink_queue        36864  0
Keep this setting active even after a restart
# echo "nfnetlink_queue" | tee /etc/modules-load.d/nfqueue.conf
➂Determine the interfaces and IP addresses that Suricata uses to inspect network packets
# ip --brief add
lo               UNKNOWN        127.0.0.1/8 ::1/128
ens33            UP             192.168.11.83/24 fe80::20c:29ff:fe76:c730/64
④Edit the configuration file
# vim /etc/suricata/suricata.yaml

Line 18 : Comment it out and add the following below it (in the `vars` section, where you define the network)
#HOME_NET: "[192.168.0.0/16,10.0.0.0/8,172.16.0.0/12]"
HOME_NET: "[192.168.11.0/24]"

Per Line158 : Change
community-id: false → community-id: true

Per Line 661 : Set the interface name in the af-packet section
af-packet:
    - interface: ens33
Set directory ownership and execution permissions
# chown -R root:root /tmp
# chmod 775 /tmp
⑤Starting Suricata
# systemctl daemon-reload
# systemctl start suricata
# systemctl enable suricata
Created symlink /etc/systemd/system/multiuser.target.wants/suricata.service → /usr/lib/systemd/system/suricata.service.
⑥Verifying that Suricata is running
# systemctl status suricata

● suricata.service - Suricata IDS/IPS daemon
     Loaded: loaded (/usr/lib/systemd/system/suricata.service; enabled; preset: disabled)
     Active: active (running) since Fri 2026-09-25 09:11:36 JST; 36s ago
 Invocation: da54dc8b4bfd4cbd98cc8dc6982d534f
   Main PID: 30302 (Suricata-Main)
      Tasks: 10 (limit: 4599)
     Memory: 52.8M (peak: 53.1M)
        CPU: 268ms
     CGroup: /system.slice/suricata.service
             mq30302 /usr/bin/suricata -c /etc/suricata/suricata.yaml --pidfile /run/suricata/suricata.pid -q 0

Sep 25 09:11:36 lepard systemd[1]: Started Suricata IDS/IPS daemon.
Sep 25 09:11:36 lepard suricata[30302]: Info: conf-yaml-loader: Including configuration file local.yaml.
Sep 25 09:11:36 lepard suricata[30302]: i: suricata: This is Suricata version 8.0.5 RELEASE running in SYSTEM mode
Sep 25 09:11:36 lepard suricata[30302]: W: detect: No rule files match the pattern /var/lib/suricata/rules/suricata.rules
Sep 25 09:11:36 lepard suricata[30302]: W: detect: 2 rule files specified, but no rules were loaded!
Sep 25 09:11:36 lepard suricata[30302]: i: threads: Threads created -> RX: 1 W: 2 TX: 1 FM: 1 FR: 1   Engine started.
Check the log
# tail /var/log/suricata/suricata.log
To view the statistics, check the stats.log file (updated every 8 seconds by default)
# tail -f /var/log/suricata/stats.log
EVE JSON, which provides more advanced output, can be generated using the following command
# tail -f /var/log/suricata/eve.json
suricata rulesを取得
# suricata-update
2.Configuring Suricata Rules
①Get Suricata rules
# suricata-update
➁Displaying the rule sets included in Suricata
# ls -al /var/lib/suricata/rules/
total 8
drwxr-x--- 2 suricata suricata 4096 Sep 25 09:05 .
drwxr-x--- 5 suricata suricata 4096 Sep 25 09:11 ..
-rw-r----- 1 suricata suricata    0 Sep 25 09:05  suricata.rules
②List of indexes for sources that provide rule sets
# suricata-update list-sources

Name: abuse.ch/feodotracker
  Vendor: Abuse.ch
  Summary: Abuse.ch Feodo Tracker Botnet C2 IP ruleset
  License: CC0-1.0
Name: abuse.ch/sslbl-blacklist
  Vendor: Abuse.ch
  Summary: Abuse.ch SSL Blacklist
  License: CC0-1.0
  Replaces: sslbl/ssl-fp-blacklist
Name: abuse.ch/sslbl-c2
  Vendor: Abuse.ch
  Summary: Abuse.ch Suricata Botnet C2 IP Ruleset
  License: CC0-1.0
Name: abuse.ch/sslbl-ja3
  Vendor: Abuse.ch
  Summary: Abuse.ch Suricata JA3 Fingerprint Ruleset
  License: CC0-1.0
  Replaces: sslbl/ja3-fingerprints
Name: abuse.ch/urlhaus
  Vendor: abuse.ch
  Summary: Abuse.ch URLhaus Suricata Rules
  License: CC0-1.0
Name: aleksibovellan/nmap
  Vendor: aleksibovellan
  Summary: Suricata IDS/IPS Detection Rules Against NMAP Scans
  License: MIT
Name: et/open
  Vendor: Proofpoint
  Summary: Emerging Threats Open Ruleset
  License: MIT
Name: et/pro
  Vendor: Proofpoint
  Summary: Emerging Threats Pro Ruleset
  License: Commercial
  Replaces: et/open
  Parameters: secret-code
  Subscription: https://www.proofpoint.com/us/threat-insight/et-pro-ruleset
Name: etnetera/aggressive
  Vendor: Etnetera a.s.
  Summary: Etnetera aggressive IP blacklist
  License: MIT
Name: oisf/trafficid
  Vendor: OISF
  Summary: Suricata Traffic ID ruleset
  License: MIT
Name: pawpatrules
  Vendor: pawpatrules
  Summary: PAW Patrules is a collection of rules for IDPS / NSM Suricata engine
  License: CC-BY-SA-4.0
Name: ptrules/open
  Vendor: Positive Technologies
  Summary: Positive Technologies Open Ruleset
  License: Custom
Name: scwx/enhanced
  Vendor: Secureworks
  Summary: Secureworks suricata-enhanced ruleset
  License: Commercial
  Parameters: secret-code
  Subscription: https://www.secureworks.com/contact/ (Please reference CTU Countermeasures)
Name: scwx/malware
  Vendor: Secureworks
  Summary: Secureworks suricata-malware ruleset
  License: Commercial
  Parameters: secret-code
  Subscription: https://www.secureworks.com/contact/ (Please reference CTU Countermeasures)
Name: scwx/security
  Vendor: Secureworks
  Summary: Secureworks suricata-security ruleset
  License: Commercial
  Parameters: secret-code
  Subscription: https://www.secureworks.com/contact/ (Please reference CTU Countermeasures)
Name: stamus/lateral
  Vendor: Stamus Networks
  Summary: Lateral movement rules
  License: GPL-3.0-only
Name: stamus/nrd-14-open
  Vendor: Stamus Networks
  Summary: Newly Registered Domains Open only - 14 day list, complete
  License: Commercial
  Parameters: secret-code
  Subscription: https://www.stamus-networks.com/stamus-labs/subscribe-to-threat-intel-feed
Name: stamus/nrd-30-open
  Vendor: Stamus Networks
  Summary: Newly Registered Domains Open only - 30 day list, complete
  License: Commercial
  Parameters: secret-code
  Subscription: https://www.stamus-networks.com/stamus-labs/subscribe-to-threat-intel-feed
Name: stamus/nrd-entropy-14-open
  Vendor: Stamus Networks
  Summary: Newly Registered Domains Open only - 14 day list, high entropy
  License: Commercial
  Parameters: secret-code
  Subscription: https://www.stamus-networks.com/stamus-labs/subscribe-to-threat-intel-feed
Name: stamus/nrd-entropy-30-open
  Vendor: Stamus Networks
  Summary: Newly Registered Domains Open only - 30 day list, high entropy
  License: Commercial
  Parameters: secret-code
  Subscription: https://www.stamus-networks.com/stamus-labs/subscribe-to-threat-intel-feed
Name: stamus/nrd-phishing-14-open
  Vendor: Stamus Networks
  Summary: Newly Registered Domains Open only - 14 day list, phishing
  License: Commercial
  Parameters: secret-code
  Subscription: https://www.stamus-networks.com/stamus-labs/subscribe-to-threat-intel-feed
Name: stamus/nrd-phishing-30-open
  Vendor: Stamus Networks
  Summary: Newly Registered Domains Open only - 30 day list, phishing
  License: Commercial
  Parameters: secret-code
  Subscription: https://www.stamus-networks.com/stamus-labs/subscribe-to-threat-intel-feed
Name: tgreen/hunting
  Vendor: tgreen
  Summary: Threat hunting rules
  License: GPLv3
③Enable the source (if enabling tgreen/hunting)
# suricata-update enable-source tgreen/hunting

25/9/2026 -- 09:19:18 - <Info> -- Using data-directory /var/lib/suricata.
25/9/2026 -- 09:19:18 - <Info> -- Using Suricata configuration /etc/suricata/suricata.yaml
25/9/2026 -- 09:19:18 - <Info> -- Using /usr/share/suricata/rules for Suricata provided rules.
25/9/2026 -- 09:19:18 - <Info> -- Found Suricata version 8.0.5 at /usr/bin/suricata.
25/9/2026 -- 09:19:18 - <Warning> -- Source index does not exist, will use bundled one.
25/9/2026 -- 09:19:18 - <Warning> -- Please run suricata-update update-sources.
25/9/2026 -- 09:19:18 - <Info> -- Creating directory /var/lib/suricata/update/sources
25/9/2026 -- 09:19:18 - <Info> -- Enabling default source et/open
25/9/2026 -- 09:19:18 - <Info> -- Source tgreen/hunting enabled
Run the update
# suricata-update update-sources
Suricata service restart
# systemctl restart suricata
3. Configuring Suricata as an IPS
①Return to nfqueue mode
# vim /usr/lib/systemd/system/suricata.service

Line 12 : Uncomment
ExecStart=/usr/bin/suricata -c /etc/suricata/suricata.yaml --pidfile /run/suricata/suricata.pid -q 0

Line 13 : Comments
#ExecStart=/usr/bin/suricata -c /etc/suricata/suricata.yaml --pidfile /run/suricata/suricata.pid -i ens33 --user suricata
Verifying SURICATA Settings
# suricata -T -c /etc/suricata/suricata.yaml -v
--------------------------------------------------------------------------------------------------
Info: detect: 53245 signatures processed. 1231 are IP-only rules, 4652 are inspecting packet payload, 47126 inspect application layer, 110 are decoder event only
Notice: suricata: Configuration provided was successfully loaded. Exiting.
Suricata service restart
# systemctl daemon-reload
# systemctl restart suricata
Redirect incoming network traffic to Suricata's NFQUEUE
Since Firewalld is installed and enabled, add the rules required by Suricata to Firewalld (assuming the SSH port is 22)
# vim /etc/ufw/before.rules

Per Line 18 : Add
# Don't delete these required lines, otherwise there will be errors
*filter
:ufw-before-input - [0:0]
:ufw-before-output - [0:0]
:ufw-before-forward - [0:0]
:ufw-not-local - [0:0]
# End required lines

## Start Suricata NFQUEUE rules
-I INPUT 1 -p tcp --dport 22 -j NFQUEUE --queue-bypass
-I OUTPUT 1 -p tcp --sport 22 -j NFQUEUE --queue-bypass
-I FORWARD -j NFQUEUE
-I INPUT 2 -j NFQUEUE
-I OUTPUT 2 -j NFQUEUE
## End Suricata NFQUEUE rules
Similarly, edit /etc/ufw/before6.rules
# vim /etc/ufw/before6.rules
Apply Firewall Rules
# ufw reload
Verify that SURICATA is dropping traffic correctly
Change the default action for signatures from "alert" or "log" to "active dropping traffic"
Open the /var/lib/suricata/rules/suricata.rules file and comment out any entries matching "sid:2100498"
# vim /var/lib/suricata/rules/suricata.rules
#alert ip any any -> any any (msg:"GPL ATTACK_RESPONSE id check returned root"; content:"uid=0|28|root|29|"; classtype:bad-unknown; sid:2100498; rev:7; metadata:created_at 2010_09_23, confidence Medium, signature_severity Informational, updated_at 2019_07_26;)
Create the file /var/lib/suricata/rules/local.rules and write the rule with the SID 2100498.
# vim /var/lib/suricata/rules/local.rules

drop ip any any -> any any (msg:"GPL ATTACK_RESPONSE id check returned root"; content:"uid=0|28|root|29|"; classtype:bad-unknown; sid:2100498; rev:7; metadata:created_at 2010_09_23, confidence Medium, signature_severity Informational, updated_at 2019_07_26;)
Edit the SURICATA configuration file to define the path for custom rules
# vim /etc/suricata/suricata.yaml

Line 2327 : Add
rule-files:
  - suricata.rules
  - local.rules
Suricata service restart
# systemctl restart suricata
Test this rule using curl
# curl --max-time 5 http://testmynids.org/uid/index.html
curl: (6) Could not resolve host: testmynids.org
At this stage of the process, the message "Host not found" appears as shown above, so I downloaded the script from GitHub and ran it as described below.
# curl -sSL https://raw.githubusercontent.com/3CORESec/testmynids.org/master/tmNIDS -o /tmp/tmNIDS && chmod +x /tmp/tmNIDS && /tmp/tmNIDS
Examining the eve.log file using jq
Install jq
# pacman -S jq
# jq 'select(.alert .signature_id==2100498)' /var/log/suricata/eve.json
{
  "timestamp": "2026-09-25T10:08:54.302742+0900",
  "flow_id": 1409022830884306,
  "event_type": "alert",
  "src_ip": "217.160.0.187",
  "src_port": 80,
  "dest_ip": "192.168.11.83",
  "dest_port": 46282,
  "proto": "TCP",
  "ip_v": 4,
  "pkt_src": "wire/pcap",
  "community_id": "1:fDwcunrjTZ1tMh4aUPKQxx0W3bs=",
  "alert": {
    "action": "blocked",
    "gid": 1,
    "signature_id": 2100498,
    "rev": 7,
    "signature": "GPL ATTACK_RESPONSE id check returned root",
    "category": "Potentially Bad Traffic",
    "severity": 2,
    "metadata": {
      "confidence": [
        "Medium"
      ],
      "created_at": [
        "2010_09_23"
      ],
      "signature_severity": [
        "Informational"
      ],
      "updated_at": [
        "2019_07_26"
      ]
    }
  },
"action" is set to "blocked"
Elasticsearch
Install and configure the Elastic Stack to visualize and search SURICATA logs more efficiently
This section will primarily be performed on the second ArchLinux server (IP 192.168.11.85).
1. Installing Elasticsearch
In this guide, we will download the archive for Elasticsearch 8.x from the official website and install it. Since Elasticsearch 8.x includes a Java Runtime Environment (JVM), you do not need to install Java on your system beforehand.
1.1 Download the Archive
# wget https://artifacts.elastic.co/downloads/elasticsearch/elasticsearch-8.19.22-linux-x86_64.tar.gz
1.2 Extracting and Placing the Archive
Place it in the /opt directory
# tar -xzf elasticsearch-8.19.22-linux-x86_64.tar.gz
# mv elasticsearch-8.19.22 /opt/elasticsearch
2. Creating Dedicated Users and Setting Permissions
For security reasons, Elasticsearch does not allow startup as the root user. Create a dedicated user and group, and change the directory ownership.
Creating Dedicated Groups and Users
# groupadd elasticsearch
# useradd -r -g elasticsearch -d /opt/elasticsearch -s /sbin/nologin elasticsearch

Change of Ownership
# chown -R elasticsearch:elasticsearch /opt/elasticsearch
3. Initial Setup and First Launch
Security features are automatically enabled in Elasticsearch 8 when it is started for the first time. At this point, the initial password and token for the elastic user will be displayed on the console screen, so be sure to make a note of them.
Switch to the dedicated user you created and run the startup script.
# sudo -u elasticsearch /opt/elasticsearch/bin/elasticsearch
The following information will appear on the console screen, so be sure to write it down.
・Password for the elastic user: (Administrator's Initial Password)
・HTTP CA certificate SHA-256 fingerprint: (Certificate Fingerprint)
・Configure Kibana to use this cluster: (Token for Kibana Integration)
Elasticsearch security features have been automatically configured!
Authentication is enabled and cluster connections are encrypted.
ℹ️ Password for the elastic user (reset with bin/elasticsearch-reset-password -u elastic):
kYaEN_HCJnTiq*hb1_o-
ℹ️ HTTP CA certificate SHA-256 fingerprint:
9adec632194076852b831ad4d251e806c4bec21ecd81d1b85af4ee25d6122682
ℹ️ Configure Kibana to use this cluster:
~ Run Kibana and click the configuration link in the terminal when Kibana starts.
~ Copy the following enrollment token and paste it into Kibana in your browser (valid for the next 30 minutes):
eyJ2ZXIiOiI4LjE0LjAiLCJhZHIiOlsiMTkyLjE2OC4xMS44NTo5MjAwIl0sImZnciI6IjlhZGVjNjMyMTk0MDc2ODUyYjgzMWFkNGQyNTFlODA2YzRiZWMyMWVjZDgxZDFiODVhZjRlZTI1ZDYxMjI2ODIiLCJrZXkiOiJBZlh0N3FBQjQzb05YYVZLXzdBMjpXOElxMUFsVWlpT1pDQlZNZk5yVWFnIn0=
ℹ️ Configure other nodes to join this cluster:
~ On this node:
⁃ Create an enrollment token with bin/elasticsearch-create-enrollment-token -s node.
⁃ Uncomment the transport.host setting at the end of config/elasticsearch.yml.
⁃ Restart Elasticsearch.
~ On other nodes:
⁃ Start Elasticsearch with bin/elasticsearch --enrollment-token <token>, using the enrollment token that you generated.
4. Elasticsearch configuration
Since the Elasticsearch and SURICATA servers are separate, you need to configure Elasticsearch to listen for connections on a private network interface.
# vim /opt/elasticsearch/config/elasticsearch.yml

Line 17 : Uncomment
cluster.name: my-application

Line 23 : Uncomment
node.name: node-1

Line 57 : Adding a Local Address to the Elasticsearch Server: When Allowing External Access (Set "Allow All" to 0.0.0.0)
#network.host: 192.168.0.1
network.host: 192.168.11.85

Line 62 : Uncomment
http.port: 9200
5. Create a systemd service file
# vim  /etc/systemd/system/elasticsearch.service

Describe the following
[Unit]
Description=Elasticsearch
Documentation=https://elastic.co
Wants=network-online.target
After=network-online.target

[Service]
Type=simple
RuntimeDirectory=elasticsearch
PrivateTmp=true
Environment=ES_HOME=/opt/elasticsearch
Environment=ES_PATH_CONF=/opt/elasticsearch/config
ExecStart=/opt/elasticsearch/bin/elasticsearch
User=elasticsearch
Group=elasticsearch
LimitNOFILE=65535
LimitNPROC=4096
LimitMEMLOCK=infinity
LimitFSIZE=infinity
TimeoutStopSec=20

[Install]
WantedBy=multi-user.target
# systemctl daemon-reload
# systemctl enable elasticsearch.service
# systemctl start elasticsearch.service
6. Functionality Verification
Enter your password, and if you receive JSON similar to the following, the installation was successful.
# curl --cacert /opt/elasticsearch/config/certs/http_ca.crt -u elastic https://192.168.11.85:9200

Enter host password for user 'elastic':
{
  "name" : "node-1",
  "cluster_name" : "my-application",
  "cluster_uuid" : "HDvKpWVFSyqCCUbiWME0NQ",
  "version" : {
    "number" : "8.19.22",
    "build_flavor" : "default",
    "build_type" : "tar",
    "build_hash" : "3b2a41103de35e0af4064d647974032fcc1bcde9",
    "build_date" : "2026-09-18T10:10:07.018982263Z",
    "build_snapshot" : false,
    "lucene_version" : "9.12.2",
    "minimum_wire_compatibility_version" : "7.17.0",
    "minimum_index_compatibility_version" : "7.0.0"
  },
  "tagline" : "You Know, for Search"
}
※Reference: Resetting Your Elasticsearch Password
Since the automatically generated Elastic user password is too complex, you can reset it using the /usr/share/elasticsearch/bin/elasticsearch-reset-password command.
To reset the password, run the command
# /opt/elasticsearch/bin/elasticsearch-reset-password -u elastic -i

This tool will reset the password of the [elastic] user.
You will be prompted to enter the password.
Please confirm that you would like to continue [y/N]y


Enter password for [elastic]:
Re-enter password for [elastic]:
Password for the [elastic] user successfully reset.
3. Kibana
This section will be performed on a second ArchLinux server.
Verification of Prerequisites
- Elasticsearch 8 (the same version) must be installed and running beforehand.
- If you want to allow access from an external source (such as a browser), you must open TCP port 5601 on the server beforehand.
3.1 Installing Kibana
Download the archive and extract it to the /opt directory
# cd /opt
# wget https://artifacts.elastic.co/downloads/kibana/kibana-8.19.22-linux-x86_64.tar.gz
# tar -xzf kibana-8.19.22-linux-x86_64.tar.gz
# mv kibana-8.19.22 kibana
# rm kibana-8.19.22-linux-x86_64.tar.gz
3.2 Creating an Executive User and Setting Permissions
# useradd -r -s /bin/false kibana
# chown -R kibana:kibana /opt/kibana
3.3 Initial Setup and Integration with Elasticsearch
Starting with Kibana 8, the easiest way to configure encrypted communication (TLS/SSL) and authentication with Elasticsearch is to use the enrollment token generated when Kibana is first launched.
① Issuing a Token in Elasticsearch
When you installed Elasticsearch, a token for Kibana was issued. However, since it expires after 30 minutes, use the following command to reissue it if it has expired.
# /opt/elasticsearch/bin/elasticsearch-create-enrollment-token -s kibana
eyJ2ZXIiOiI4LjE0LjAiLCJhZHIiOlsiMTkyLjE2OC4xMS44NTo5MjAwIl0sImZnciI6Ijc2NjllYzAwY2RhY2JiZDk4NGZkYWI3ZWFkZDg3YjNiZDQ2OWUzMjM2NGUyOTJmMzhjMDk0ZjI1OTBmMTAyZmQiLCJrZXkiOiIzZUtkNWFBQlBrMFNUX2RFeGd0dDpGenlmSUw4YUc3Q0MyOXdXSEVBbGRBIn0=
➁Editing Kibana Configuration Files
# vim /opt/kibana/config/kibana.yml

Line 6 : Uncomment
server.port: 5601

Line 12 : Add
server.host: "192.168.11.85"
3.4 Creating a Kibana Service Using systemd
# vim  /etc/systemd/system/kibana.service

Describe the following
[Unit]
Description=Kibana
After=network.target

[Service]
Type=simple
User=kibana
Group=kibana
WorkingDirectory=/opt/kibana
ExecStart=/opt/kibana/bin/kibana --config /opt/kibana/config/kibana.yml
Restart=always
StandardOutput=journal
StandardError=journal
ProtectSystem=full

[Install]
WantedBy=multi-user.target
# systemctl daemon-reload
# systemctl enable kibana.service
# systemctl start kibana.service
3.5 Log in to the Kibana dashboard
Access Kibana and configure it
Launch Kibana as the "kibana" user, and use the address displayed in the console: http://192.168.11.85:5601/code=xxxxxxx
# sudo -u kibana /opt/kibana/bin/kibana
If you paste the Enrollment Token into the browser's setup screen and are prompted to generate and enter a verification code, follow the instructions and use the command below to generate the verification code.
# cd /opt/kibana/bin
# ./kibana-verification-code
Your verification code is:  xxx xxx
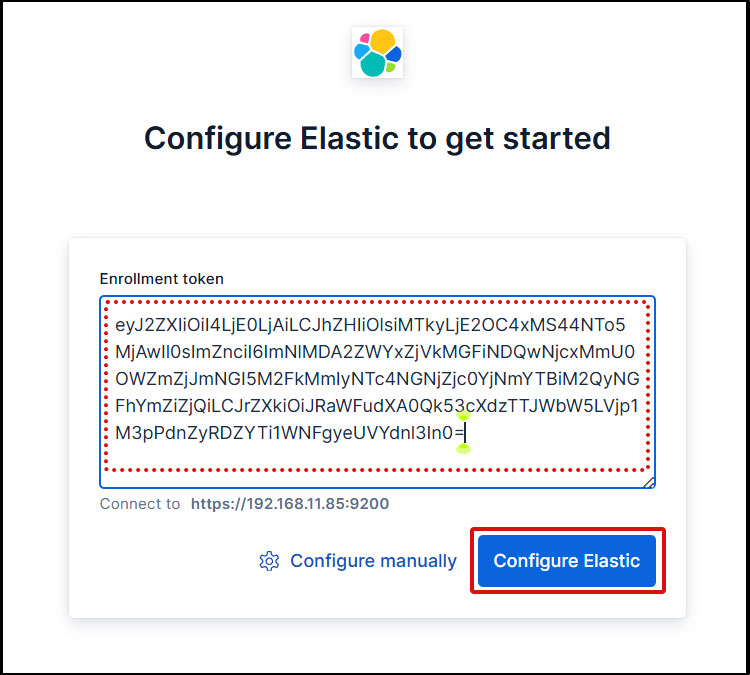
When you paste the token, Kibana automatically connects to Elasticsearch.
Click "Configure Elastic." The settings are saved, and Elasticsearch is configured and restarted.
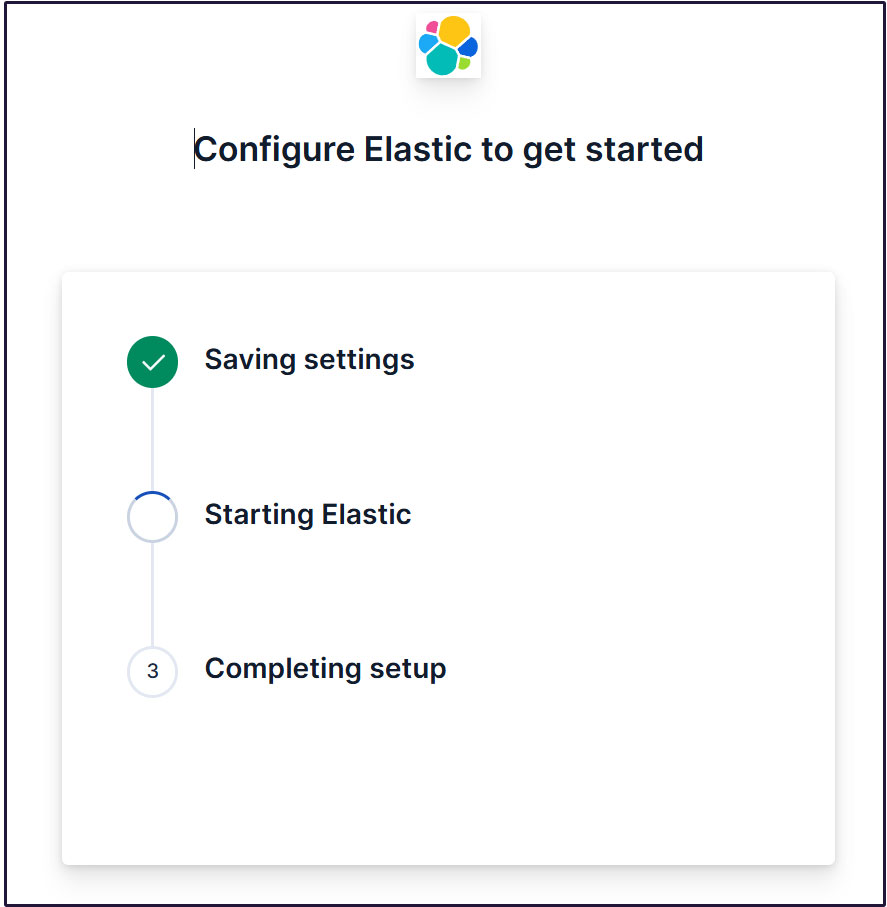
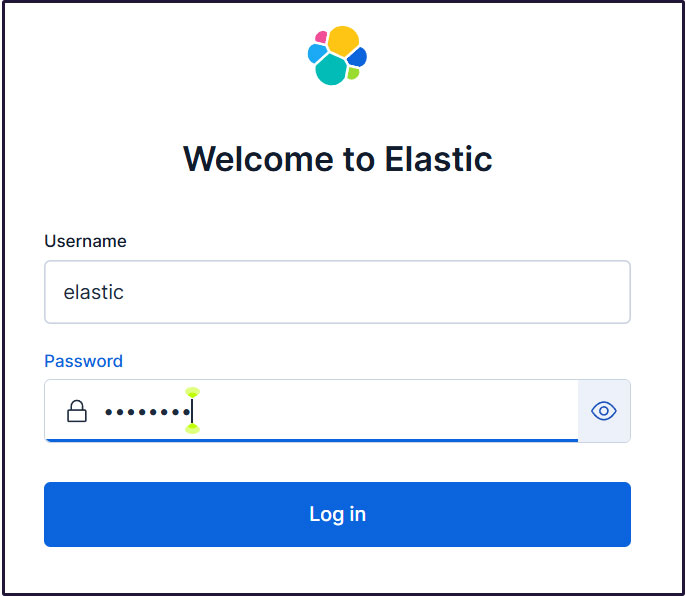
You will be redirected to the login page. Log in using the generated Elastic user credentials.
Username : elastic
Password : A password that has been regenerated for ease of understanding
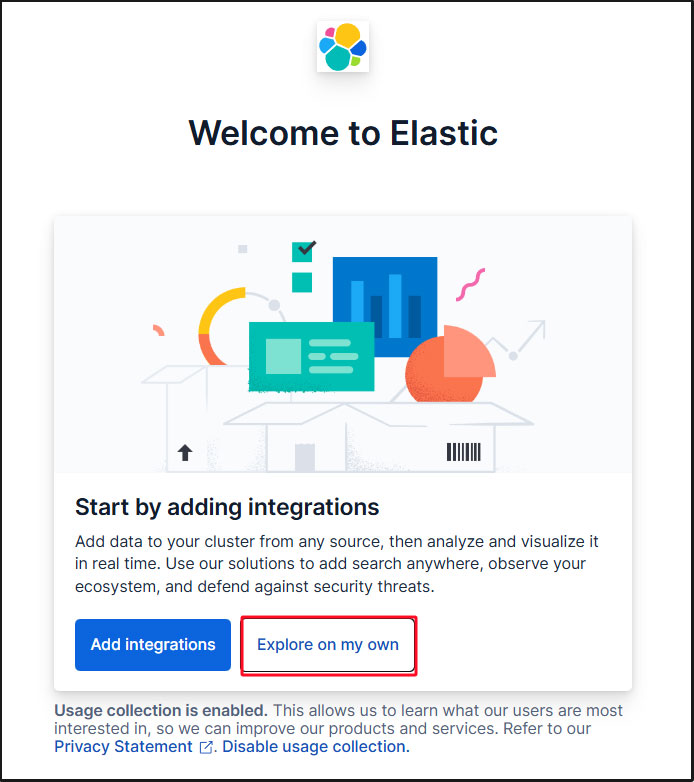
On the welcome page, click “Explore on my own” to go to the Kibana 8.x dashboard.
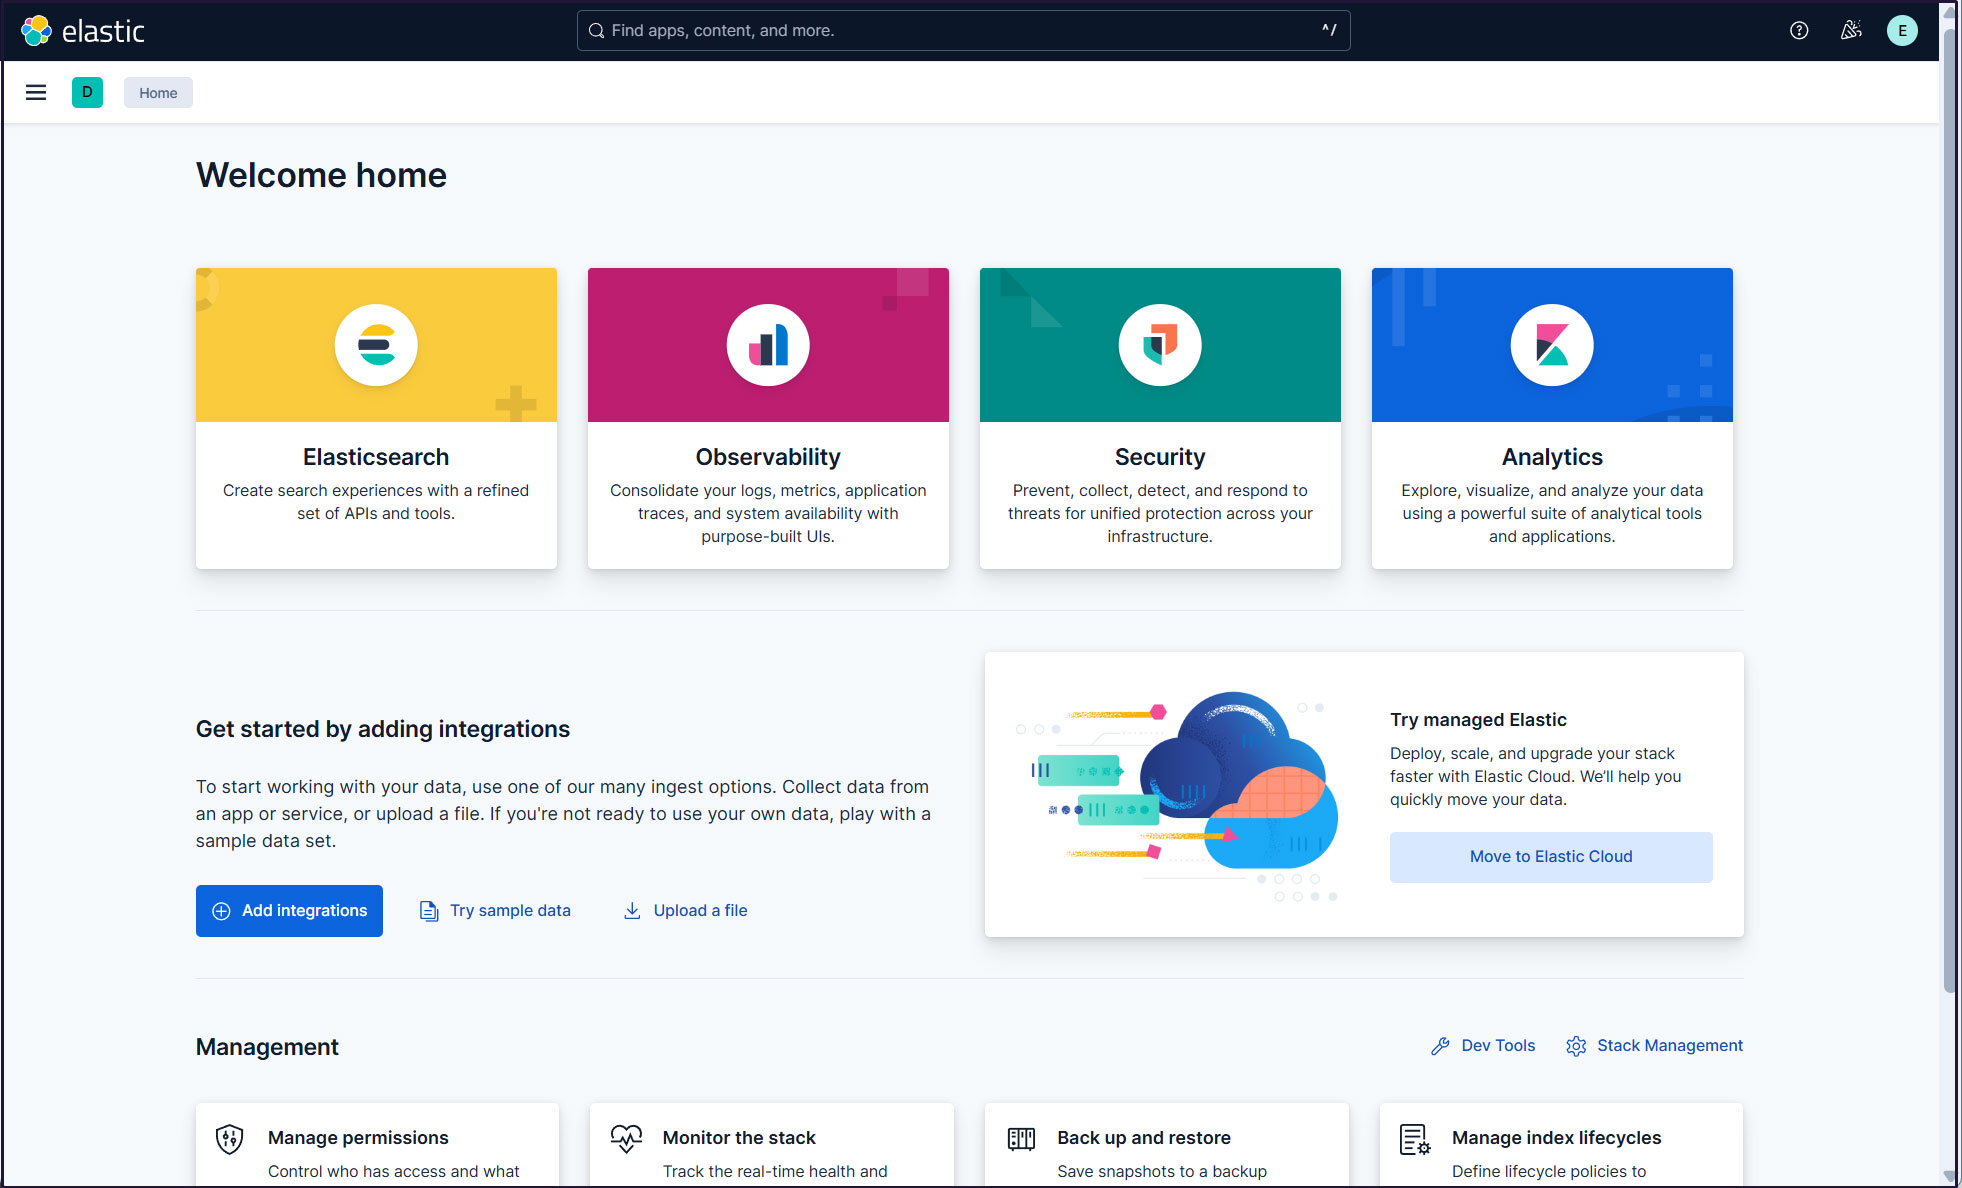
Create a new user account so that you don't need to use the Elastic superuser account.
Open the main menu and、Stack Management >Security> Users
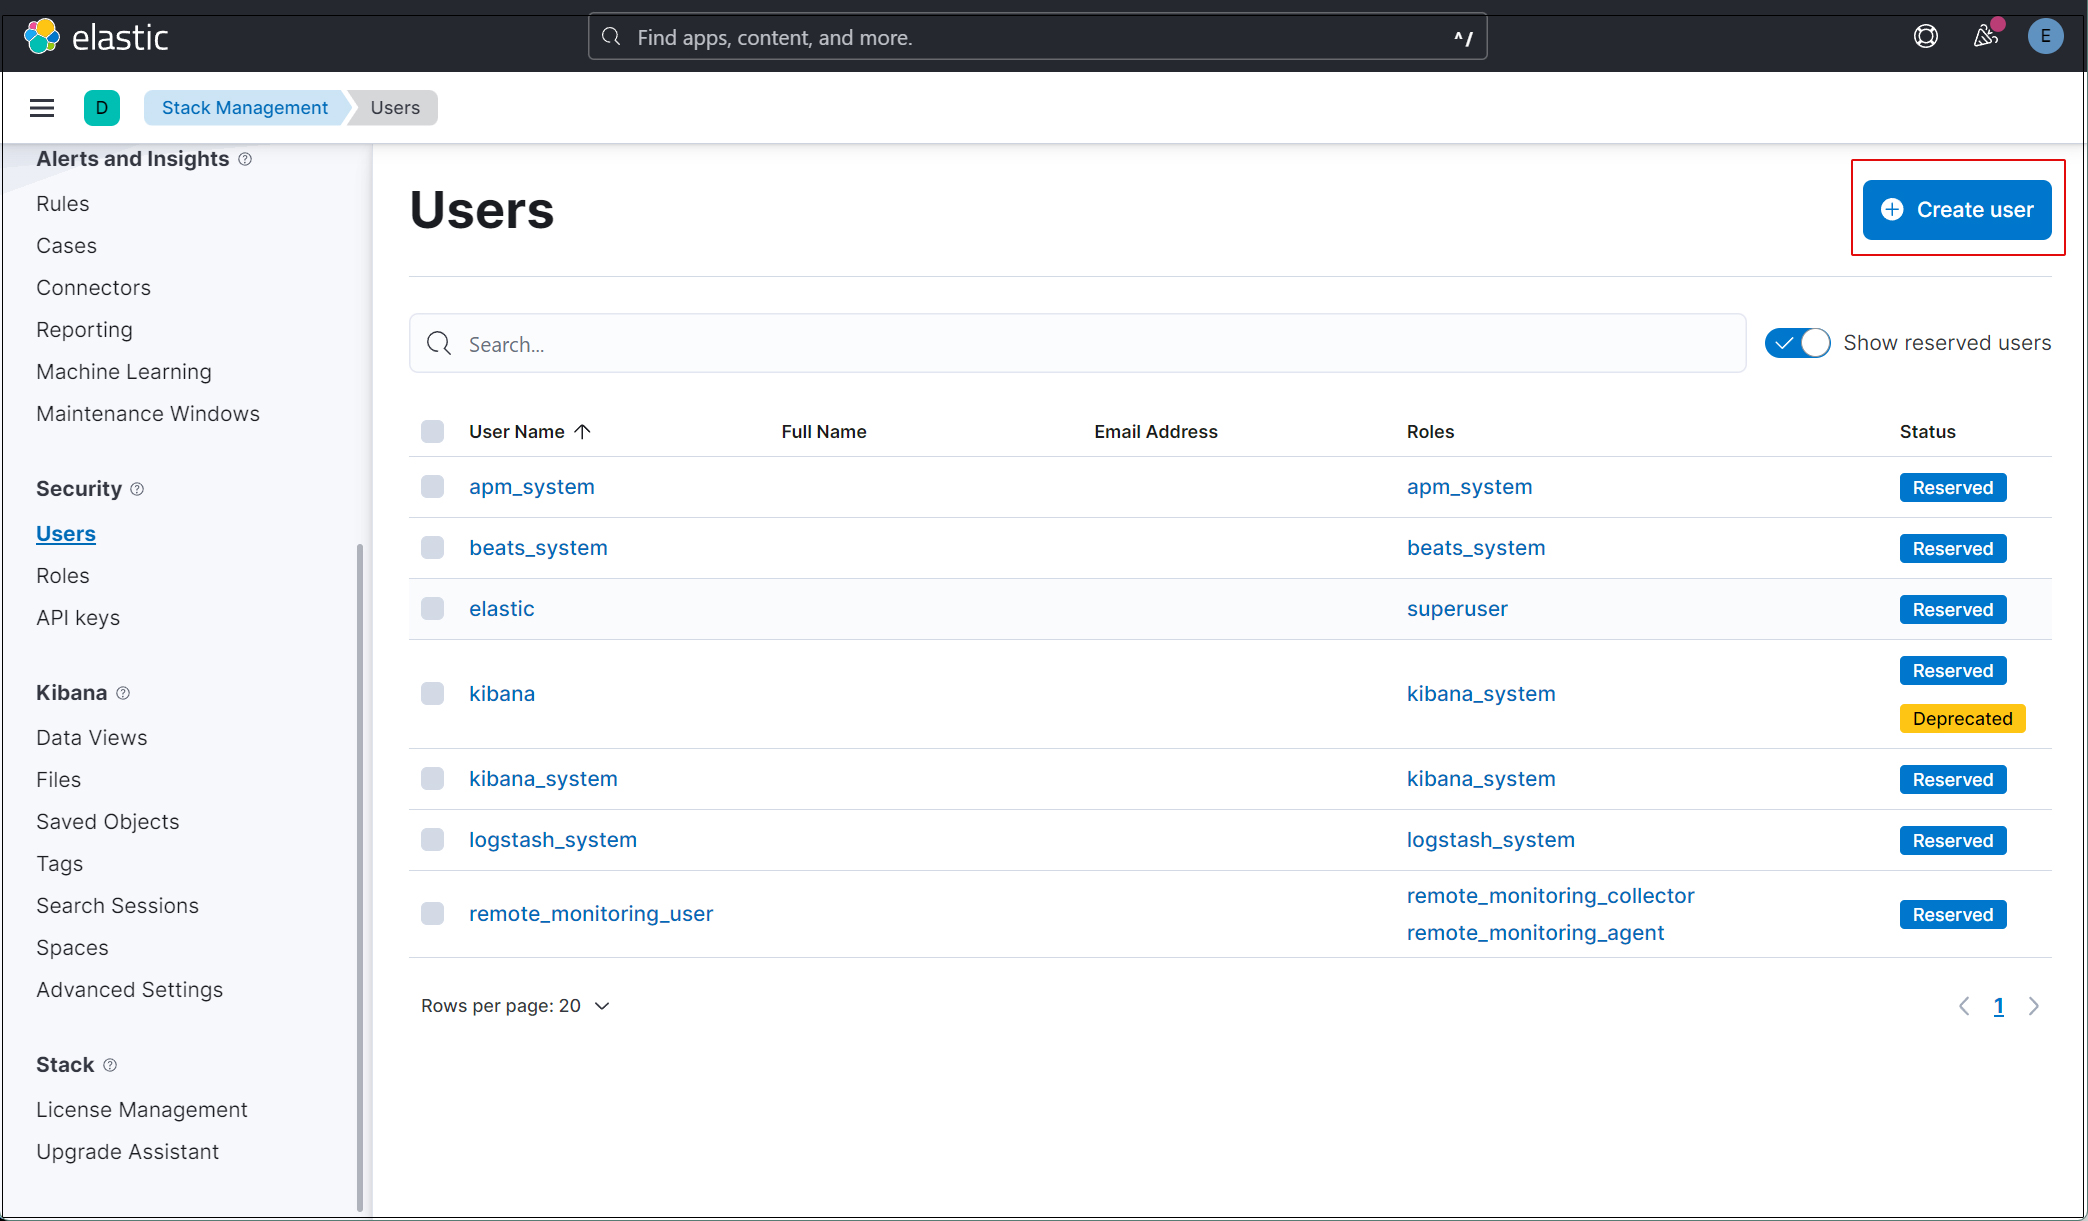
Click the "Create user" button in the upper-right corner
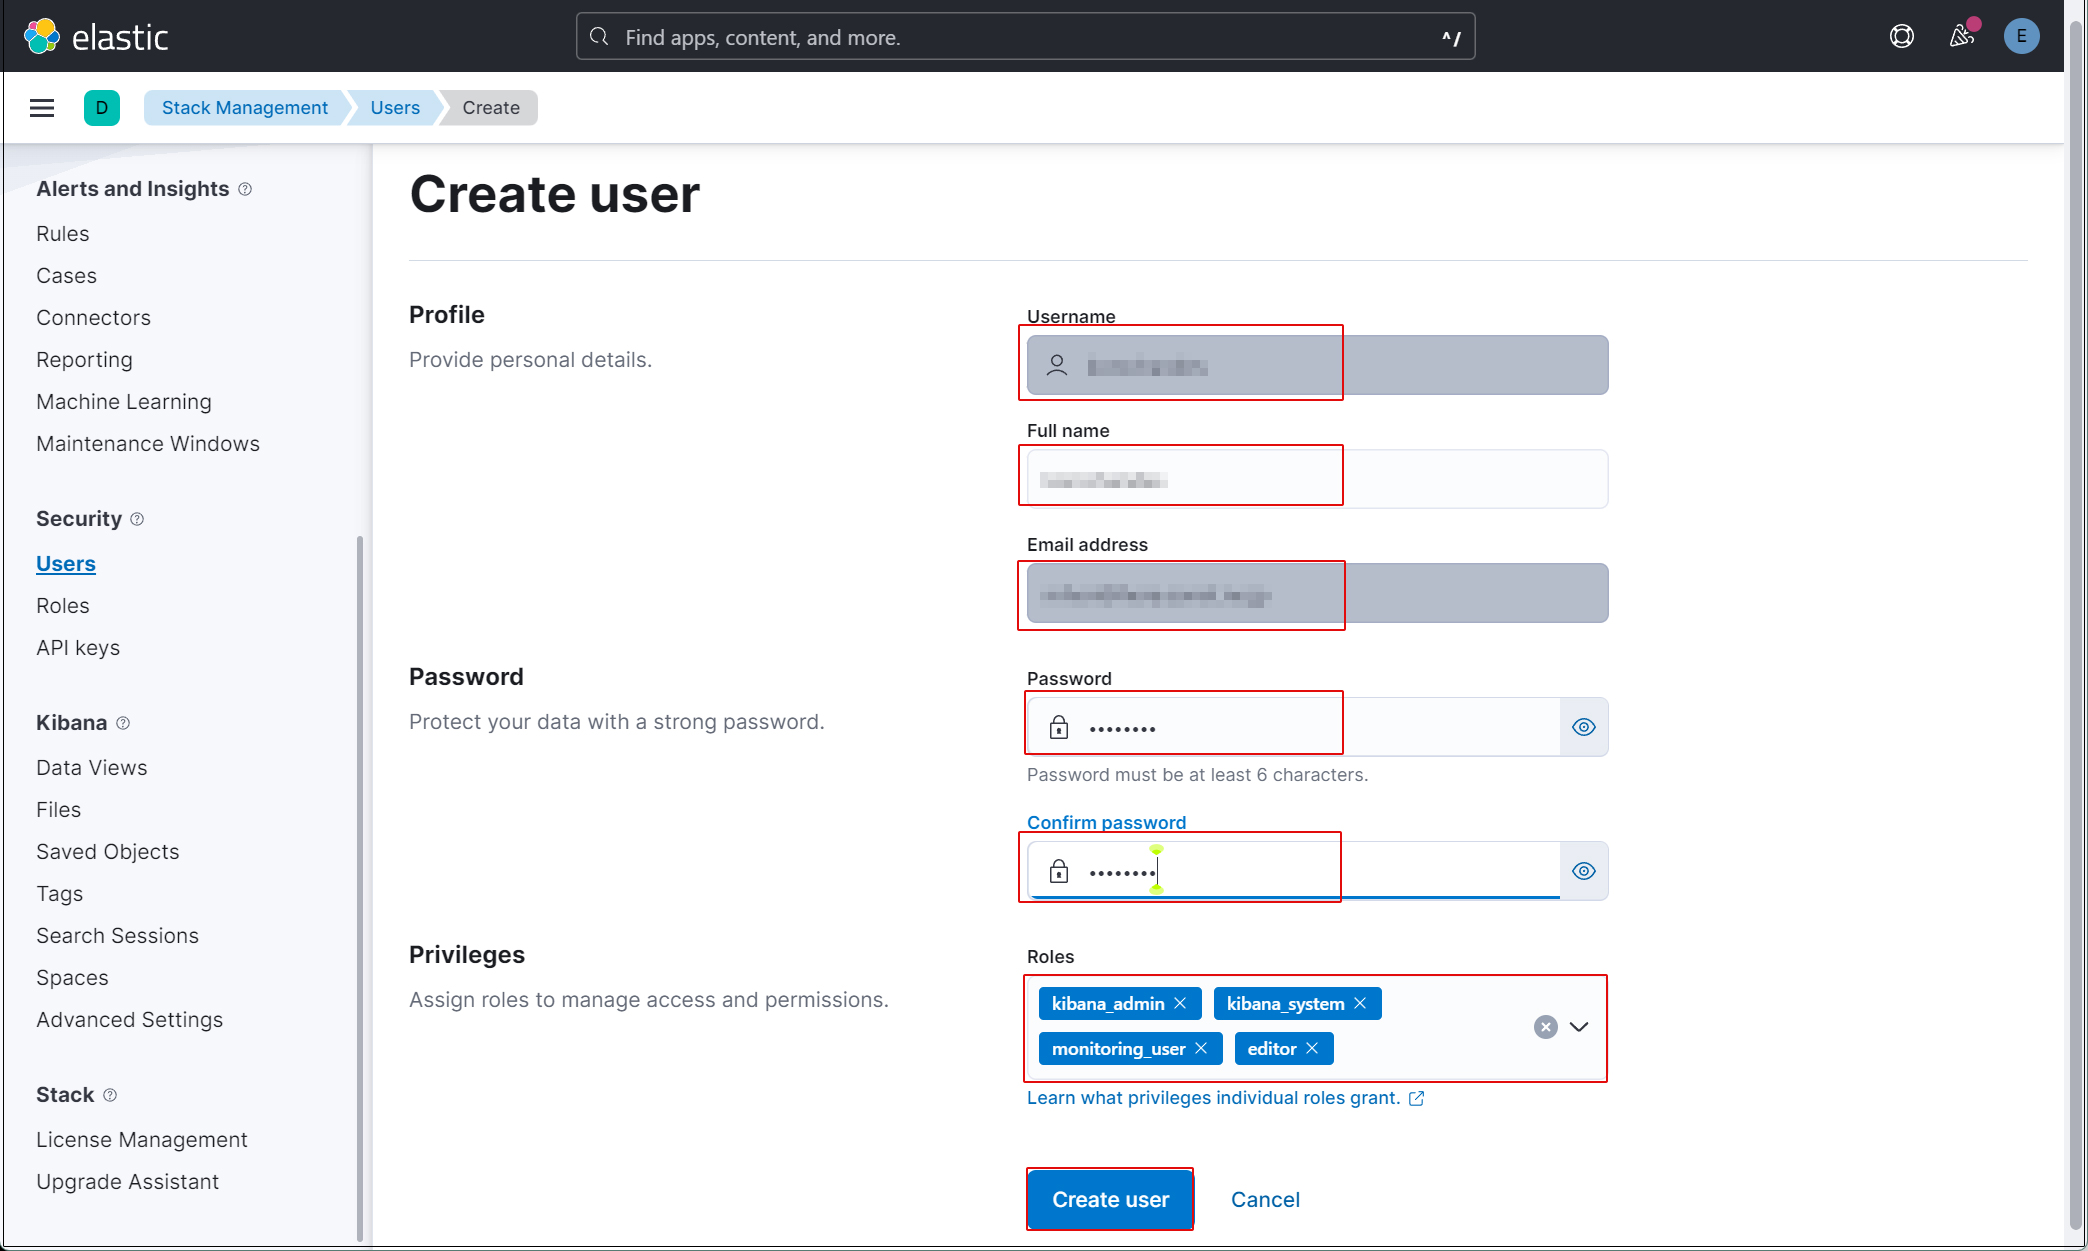
Enter the new user's information and assign the kibana_admin, kibana_system, monitoring_user, and editor roles under "Privileges."
Finally, click [Create user].
Log out of your current profile and verify that you can log in with the newly created user account. Since Filebeat and Auditbeat are not currently configured on the SURICATA host, there is no data available to view in Kibana.
Install Filebeat on the SURICATA server
1.Download, Extract, and Deploy the Archive
# wget https://artifacts.elastic.co/downloads/beats/filebeat/filebeat-8.19.22-linux-x86_64.tar.gz
# tar -xvf filebeat-8.19.22-linux-x86_64.tar.gz
# mv filebeat-8.19.22-linux-x86_64 /opt/filebeat
2. Elasticsearch CA Certificate
Download the Elasticsearch CA certificate and save it to a directory of your choice (in this example, we'll save it to /opt/filebeat/).
*Make sure to open port 9200 on Server 2 (the server running Elasticsearch).
# scp root@192.168.11.85:/opt/elasticsearch/config/certs/http_ca.crt /opt/filebeat/
3. Symbolic Link (Add "bin" to PATH)
# ln -s /opt/filebeat/filebeat /usr/local/bin/filebeat
4. Verifying the Version and Checking Settings
# filebeat version
filebeat version 8.19.22 (amd64), libbeat 8.19.22 [ada3d02e16d0e102f3a8a6df851b8b382145e02d built 2026-09-18 06:58:39 +0000 UTC] (FIPS-distribution: false)

# filebeat test config -c /opt/filebeat/filebeat.yml
Config OK
5. FConfigure Filebeat to connect to Elasticsearch and Kibana
# vim /opt/filebeat/filebeat.yml

Line 28
filebeat.inputs:
 enabled: true

Add a line below the commented-out line #host: "localhost:5601" on line 141 that specifies the private IP address and port of the Kibana instance.
host: "http://192.168.11.85:5601"

Line 168 : comment
#hosts: ["localhost:9200"]

Line 169 : Enter the IP address of the Elastic Stack and the port number for Elasticsearch
hosts: ["https://192.168.11.85:9200"]

Line 176 : Uncomments
protocol: "https"

Line 177 : Specifying an Elasticsearch CA Certificate
ssl.certificate_authorities: ["/opt/filebeat/elastic-ca.crt"]

Line 180,181 : Uncheck the comment box, leave [username] as the default, and enter the password for the [elastic] user in the [password] field.
username: "elastic"
password: “xxxxxxxxx"
6. Configuration File Test
# filebeat test config -c /opt/filebeat/filebeat.yml
Config OK
7. Enable Filebeats' built-in Suricata module
#  filebeat modules enable suricata -c /opt/filebeat/filebeat.yml
Module suricata is already enabled
The command above will rename /opt/filebeat/modules.d/suricata.yml.disabled to /opt/filebeat/modules.d/suricata.yml, but since the contents remain unchanged, edit it as follows:
# vim /opt/filebeat/modules.d/suricata.yml

# Module: suricata
# Docs: https://www.elastic.co/guide/en/beats/filebeat/main/filebeat-module-suricata.html

- module: suricata
  # All logs
  eve:
    enabled: true
    var.paths: ["/var/log/suricata/eve.json"]

    # Set custom paths for the log files. If left empty,
    # Filebeat will choose the paths depending on your OS.
    #var.paths:
8. Set up the initial environment
Pipeline for the Suricata service
Load the SIEM dashboard into Elasticsearch
# /opt/filebeat/filebeat setup -e -c /opt/filebeat/filebeat.yml

{"log.level":"info","@timestamp":"2026-09-30T15:59:47.996+0900","log.logger":"modules","log.origin":{"function":"github.com/elastic/beats/v7/filebeat/fileset.LoadPipeline","file.name":"fileset/pipelines.go","file.line":135},"message":"Elasticsearch pipeline loaded.","service.name":"filebeat","pipeline":"filebeat-8.19.22-suricata-eve-pipeline","ecs.version":"1.6.0"}
{"log.level":"info","@timestamp":"2026-09-30T15:59:47.999+0900","log.logger":"modules","log.origin":{"function":"github.com/elastic/beats/v7/filebeat/fileset.LoadPipeline","file.name":"fileset/pipelines.go","file.line":135},"message":"Elasticsearch pipeline loaded.","service.name":"filebeat","pipeline":"filebeat-8.19.22-suricata-eve-dns","ecs.version":"1.6.0"}
{"log.level":"info","@timestamp":"2026-09-30T15:59:48.002+0900","log.logger":"modules","log.origin":{"function":"github.com/elastic/beats/v7/filebeat/fileset.LoadPipeline","file.name":"fileset/pipelines.go","file.line":135},"message":"Elasticsearch pipeline loaded.","service.name":"filebeat","pipeline":"filebeat-8.19.22-suricata-eve-dns-answer-v1","ecs.version":"1.6.0"}
{"log.level":"info","@timestamp":"2026-09-30T15:59:48.005+0900","log.logger":"modules","log.origin":{"function":"github.com/elastic/beats/v7/filebeat/fileset.LoadPipeline","file.name":"fileset/pipelines.go","file.line":135},"message":"Elasticsearch pipeline loaded.","service.name":"filebeat","pipeline":"filebeat-8.19.22-suricata-eve-dns-answer-v2","ecs.version":"1.6.0"}
{"log.level":"info","@timestamp":"2026-09-30T15:59:48.007+0900","log.logger":"modules","log.origin":{"function":"github.com/elastic/beats/v7/filebeat/fileset.LoadPipeline","file.name":"fileset/pipelines.go","file.line":135},"message":"Elasticsearch pipeline loaded.","service.name":"filebeat","pipeline":"filebeat-8.19.22-suricata-eve-tls","ecs.version":"1.6.0"}
{"log.level":"info","@timestamp":"2026-09-30T15:59:48.011+0900","log.logger":"modules","log.origin":{"function":"github.com/elastic/beats/v7/filebeat/fileset.LoadPipeline","file.name":"fileset/pipelines.go","file.line":135},"message":"Elasticsearch pipeline loaded.","service.name":"filebeat","pipeline":"filebeat-8.19.22-suricata-eve-http","ecs.version":"1.6.0"}
For further information, please refer to the page below
