

1. Antivirus software Clamav installed
Install Clam AntiVirus, a free anti-virus software for Linux, as an anti-virus measure.
By installing this anti-virus software, you can not only scan the entire server for viruses, but also scan incoming and outgoing mail for viruses if you build and configure a mail server.
1.1 Install
# apt -y install clamav clamav-daemon
The clamav-related configuration files are installed in the /etc/clamav/ folder.
1.2 Virus Definition Update
# sed -i -e "s/^NotifyClamd/#NotifyClamd/g" /etc/clamav/freshclam.conf
# systemctl stop clamav-freshclam

# freshclam
Wed Sep 16 16:49:15 2026 -> ClamAV update process started at Wed Sep 16 16:49:15 2026
WARNING: Wed Sep 16 16:49:15 2026 -> Your ClamAV installation is OUTDATED!
WARNING: Wed Sep 16 16:49:15 2026 -> Local version: 1.4.3 Recommended version: 1.4.6
Wed Sep 16 16:49:15 2026 -> DON'T PANIC! Read https://docs.clamav.net/manual/Installing.html
Wed Sep 16 16:49:15 2026 -> daily.cvd database is up-to-date (version: 28125, sigs: 355664, f-level: 90, builder: svc.clamav-publisher)
Wed Sep 16 16:49:15 2026 -> main.cvd database is up-to-date (version: 63, sigs: 3287027, f-level: 90, builder: tomjudge)
Wed Sep 16 16:49:15 2026 -> bytecode.cvd database is up-to-date (version: 339, sigs: 80, f-level: 90, builder: nrandolp)

# systemctl start clamav-freshclam
Edit configuration file
# vi /etc/logrotate.d/clamav-freshclam
Line 7 : change
create 640 clamav adm
↓
create 640 clamav clamav
Automatic virus definition update confirmation
Ensure that the service is registered for automatic virus definition updates.
# service clamav-freshclam status

It appears as follows
● clamav-freshclam.service - ClamAV virus database updater
     Loaded: loaded (/usr/lib/systemd/system/clamav-freshclam.service; disabled; preset: enabled)
     Active: active (running) since Wed 2026-09-16 16:49:25 JST; 1min 30s ago
 Invocation: 18ce759bc13a4438b033c7c12d010c77
       Docs: man:freshclam(1)
             man:freshclam.conf(5)
             https://docs.clamav.net/
   Main PID: 18913 (freshclam)
      Tasks: 1 (limit: 4553)
     Memory: 3.1M (peak: 3.3M)
        CPU: 14ms
     CGroup: /system.slice/clamav-freshclam.service
             └─18913 /usr/bin/freshclam -d --foreground=true

Sep 16 16:49:25 Lepard systemd[1]: Started clamav-freshclam.service - ClamAV virus database updater.
Sep 16 16:49:25 Lepard freshclam[18913]: Wed Sep 16 16:49:25 2026 -> ClamAV update process started at Wed Sep 16 16:49:25 2026
Sep 16 16:49:25 Lepard freshclam[18913]: WARNING: Wed Sep 16 16:49:25 2026 -> Your ClamAV installation is OUTDATED!
Sep 16 16:49:25 Lepard freshclam[18913]: WARNING: Wed Sep 16 16:49:25 2026 -> Local version: 1.4.3 Recommended version: 1.4.6
Sep 16 16:49:25 Lepard freshclam[18913]: Wed Sep 16 16:49:25 2026 -> DON'T PANIC! Read https://docs.clamav.net/manual/Installing.html
Sep 16 16:49:25 Lepard freshclam[18913]: Wed Sep 16 16:49:25 2026 -> daily.cvd database is up-to-date (version: 28125, sigs: 355664, f-level: 90, builder: svc.clamav>
Sep 16 16:49:25 Lepard freshclam[18913]: Wed Sep 16 16:49:25 2026 -> main.cvd database is up-to-date (version: 63, sigs: 3287027, f-level: 90, builder: tomjudge)
Sep 16 16:49:25 Lepard freshclam[18913]: Wed Sep 16 16:49:25 2026 -> bytecode.cvd database is up-to-date (version: 339, sigs: 80, f-level: 90, builder: nrandolp)
Logs are recorded in the file /var/log/clamav/freshclam.log.
1.3 Virus Check Confirmation
Download a harmless virus to detect viruses
# wget https://secure.eicar.org/eicar.com.txt

# clamscan --infected --remove --recursive
/root/eicar.com.txt: Eicar-Test-Signature FOUND
/root/eicar.com.txt: Removed.

----------- SCAN SUMMARY -----------
Known viruses: 3628069
Engine version: 1.4.3
Scanned directories: 2
Scanned files: 8
Infected files: 1
Data scanned: 0.02 MB
Data read: 0.01 MB (ratio 2.00:1)
Time: 10.465 sec (0 m 10 s)
Start Date: 2026:09:16 16:52:08
End Date:   2026:09:16 16:52:19
As you can see, it notifies me of the virus by displaying “FOUND” and “Removed.” and “Infected files: 1”. The “--remove” option was added, so the test virus was removed.
1.4 Create a script file to do a full scan
①Create a script file storage directory (/opt/script) in advance.
# mkdir /opt/script
②Create script file
# vi /opt/script/clam-full.sh

Contents of clam-full.sh (new)
#!/bin/sh

echo =========================================
date
hostname
clamscan / \
--infected \
--recursive \
--log=/var/log/clamav/clamscan.log \
--move=/var/log/clamav/virus \
--exclude-dir=^/boot \
--exclude-dir=^/sys \
--exclude-dir=^/proc \
--exclude-dir=^/dev \
--exclude-dir=^/var/log/clamav/virus
if [ $? = 0 ]; then
echo “virus undetected.”
else
echo “virus detection!!”
fi
③execute authorization
# chmod +x /opt/script/clam-full.sh
④Create a folder for virus quarantine
If not, a runtime error will occur because the above script specifies it as an excluded directory.
# mkdir /var/log/clamav/virus
⑤Script Execution
# /opt/script/clam-full.sh

=========================================
Wed Sep 16 04:53:56 PM JST 2026
Lepard

----------- SCAN SUMMARY -----------
Known viruses: 3628069
Engine version: 1.4.3
Scanned directories: 4346
Scanned files: 35521
Infected files: 0
Data scanned: 2801.45 MB
Data read: 1303.86 MB (ratio 2.15:1)
Time: 396.864 sec (6 m 36 s)
Start Date: 2026:09:16 16:53:56
End Date:   2026:09:16 17:00:33
“virus undetected.”
akes quite a long time to complete.
Logs are recorded in the /var/log/clamav/clamscan.log file.
⑤Scheduled virus scan execution with cron
# crontab -e
0 2 * * mon /opt/script/clam-full.sh >> /var/log/clamav/clamascan.log
In the above example, it runs regularly every Monday at 2:00 AM.
2. Mail server installation
2.1 Postfix : Installation Configuration
Install Postfix and build an SMTP server; SMTP uses 25/TCP.
To prevent unauthorized mail relay, use the SASL function of Dovecot, described below, and configure Postfix so that authentication is also required for sending.
①Install Postfix
# apt -y install postfix sasl2-bin
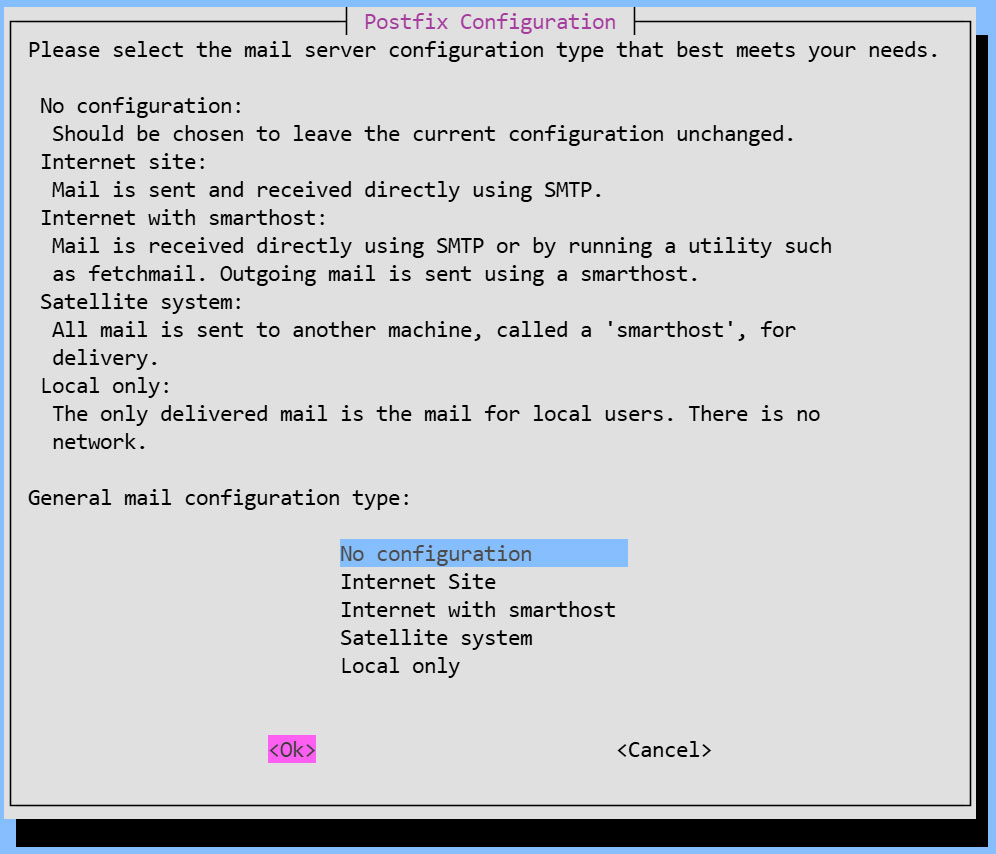
You will be asked to select general configuration settings, select "No configuration " to set them manually later
②Edit configuration file (main.cf)
# cp /usr/share/postfix/main.cf.dist /etc/postfix/main.cf
# vi /etc/postfix/main.cf

Line 82:Uncomment
mail_owner = postfix

Line 108:Add Host Name
myhostname = mail.<domain name>

Line 115:Add a Domain Name
mydomain = <domain name>

Line 133 : Comments
#myorigin = /etc/mailname

Line 135:Uncomment
myorigin = $mydomain

Line 149:Uncomment
inet_interfaces = all

Line 197:Uncomment
mydestination = $myhostname, localhost.$mydomain, localhost, $mydomain

Line 240:Uncomment
local_recipient_maps = unix:passwd.byname $alias_maps

Line 285:Uncomment
mynetworks_style = subnet

Line 299:Uncomment and change to your own network
mynetworks = 192.168.11.0/24, 127.0.0.0/8

Line 423:Uncomment
alias_maps = hash:/etc/aliases

Line 434:Uncomment
alias_database = hash:/etc/aliases

Line 456:Uncomment
home_mailbox = Maildir/

Line 592:comment and add a note below it
#smtpd_banner = $myhostname ESMTP $mail_name (Debian)
smtpd_banner = $myhostname ESMTP

Line 666:Add
sendmail_path = /usr/sbin/postfix

Line 670:Uncomment
newaliases_path = /usr/bin/newaliases

Line 675:Uncomment
mailq_path = /usr/bin/mailq

Line 681:Uncomment
setgid_group = postdrop

Append to the last line
Disable the SMTP VRFY command
disable_vrfy_command = yes
Request the HELO command from the client
smtpd_helo_required = yes
Limit the size of sent and received emails to 10 MB
message_size_limit = 10485760
Limit mailbox size to 1 GB
mailbox_size_limit = 1073741824
SMTP Authentication Settings
smtpd_sasl_type = dovecot
smtpd_sasl_path = private/auth
smtpd_sasl_auth_enable = yes
smtpd_sasl_security_options = noanonymous
smtpd_sasl_local_domain = $myhostname
smtpd_recipient_restrictions = permit_mynetworks, permit_auth_destination, permit_sasl_authenticated, reject
③Edit configuration file (master.cf)
# vi /etc/postfix/master.cf

Line 19,23 : Uncomment
submission inet n - y - - smtpd
# -o syslog_name=postfix/submission
# -o smtpd_tls_security_level=encrypt
 -o smtpd_sasl_auth_enable=yes
# -o smtpd_tls_auth_only=yes
Reflect settings, restart
In Debian 12.x, /etc/aliases was created, but not in Debian 13.x, so I created it manually.
# vi /etc/aliases

Describe the following
postmaster:    root
huong:         huong
# newaliases
# systemctl restart postfix
2.2 Dovecot : Installation Configuration
①Install Dovecot
Install Dovecot to set up a POP/IMAP server. POP uses port 110/TCP, and IMAP uses port 143/TCP.
# apt -y install dovecot-core dovecot-pop3d dovecot-imapd
②Configure Dovecot to provide SASL functionality for Postfix
# vi /etc/dovecot/dovecot.conf

Line 24 : Add
protocols = imap pop3
Line 31:Uncomment
listen = *, ::
# vi /etc/dovecot/conf.d/10-auth.conf

Line 10: Uncomment
auth_allow_cleartext = yes

Line 93: Uncomment
auth_mechanisms = plain login
# vi /etc/dovecot/conf.d/10-mail.conf

Line 26-27 : Uncomment
mail_driver = maildir
mail_path = ~/Maildir

Line 36-39 : Comment
#mail_driver = mbox
#mail_home = /home/%{user|username}
#mail_path = %{home}/mail
#mail_inbox_path = /var/mail/%{user}
# vi /etc/dovecot/conf.d/10-master.conf
Line 110-112:Uncomment and Add
# Postfix smtp-authi
unix_listener /var/spool/postfix/private/auth {
 mode = 0666
 user = postfix
 group = postfix
}
③Reflect settings, reboot
# systemctl restart dovecot
2.3 Email User Account Registration
Register a user account for e-mail.
This setting is for when a user account on the OS is also used for e-mail.
If you want to use mail with a user account on the OS, no additional configuration is required, just register the OS user
①Mail client installed
# apt -y install mailutils
②Mailboxes are set to refer to Maildir
# echo 'export MAIL=$HOME/Maildir/' >> /etc/profile.d/mail.sh
2.4 Opening Ports
# ufw allow pop3
# ufw allow imap
# ufw allow smtp
# ufw reload
2.5 operation check ①
①Send test mail to yourself [mail (user name)@(host name)].
user name : huong
# su - huong
$ mail huong@localhost
Cc:
(Subject)
Subject: Test Mail
(Main Text)
This is the first mail.
Ctrl + D key to exit the main text
Check incoming mail
$ mail
"/home/huong/Maildir/": 1 message 1 new
>N   1 huong              Wed Sep 16 23:52  13/427   Test Mail
? 1
Return-Path: <huong@Lepard>
X-Original-To: huong@localhost
Delivered-To: huong@localhost
Received: by mail.korodes.com (Postfix, from userid 1000)
        id E1F1F80C1D; Thu, 17 Sep 2026 08:52:24 +0900 (JST)
To: <huong@localhost>
Subject: Test Mail
User-Agent: mail (GNU Mailutils 3.19)
Date: Thu, 17 Sep 2026 08:52:24 +0900
Message-Id: <20260916235224.E1F1F80C1D@mail.korodes.com>
From: huong <huong@Lepard>

This is the first mail.
? q
Saved 1 message in /home/huong/mbox
Held 0 messages in /home/huong/Maildir/
2.6 operation check ②
Set up and confirm your account in Mozilla Thunderbird (for OS user huong as mail user)
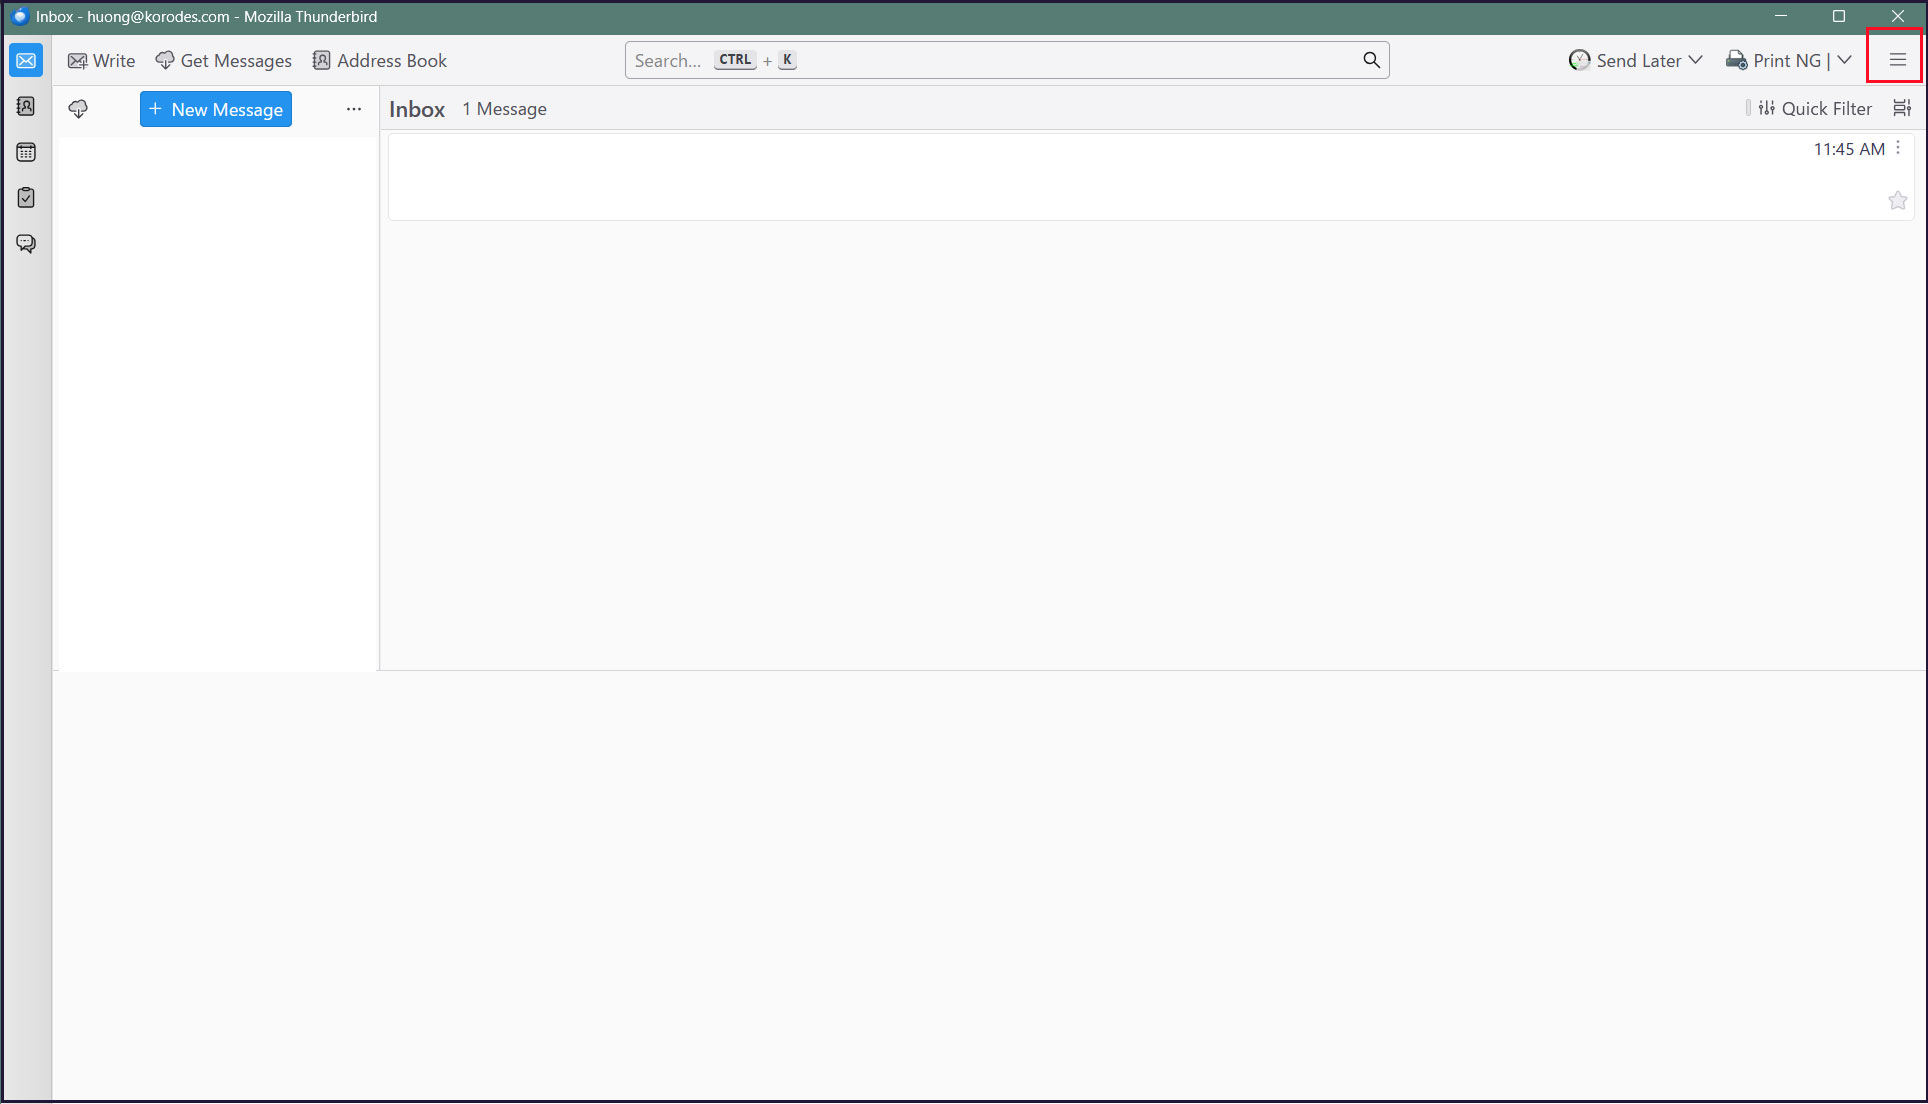
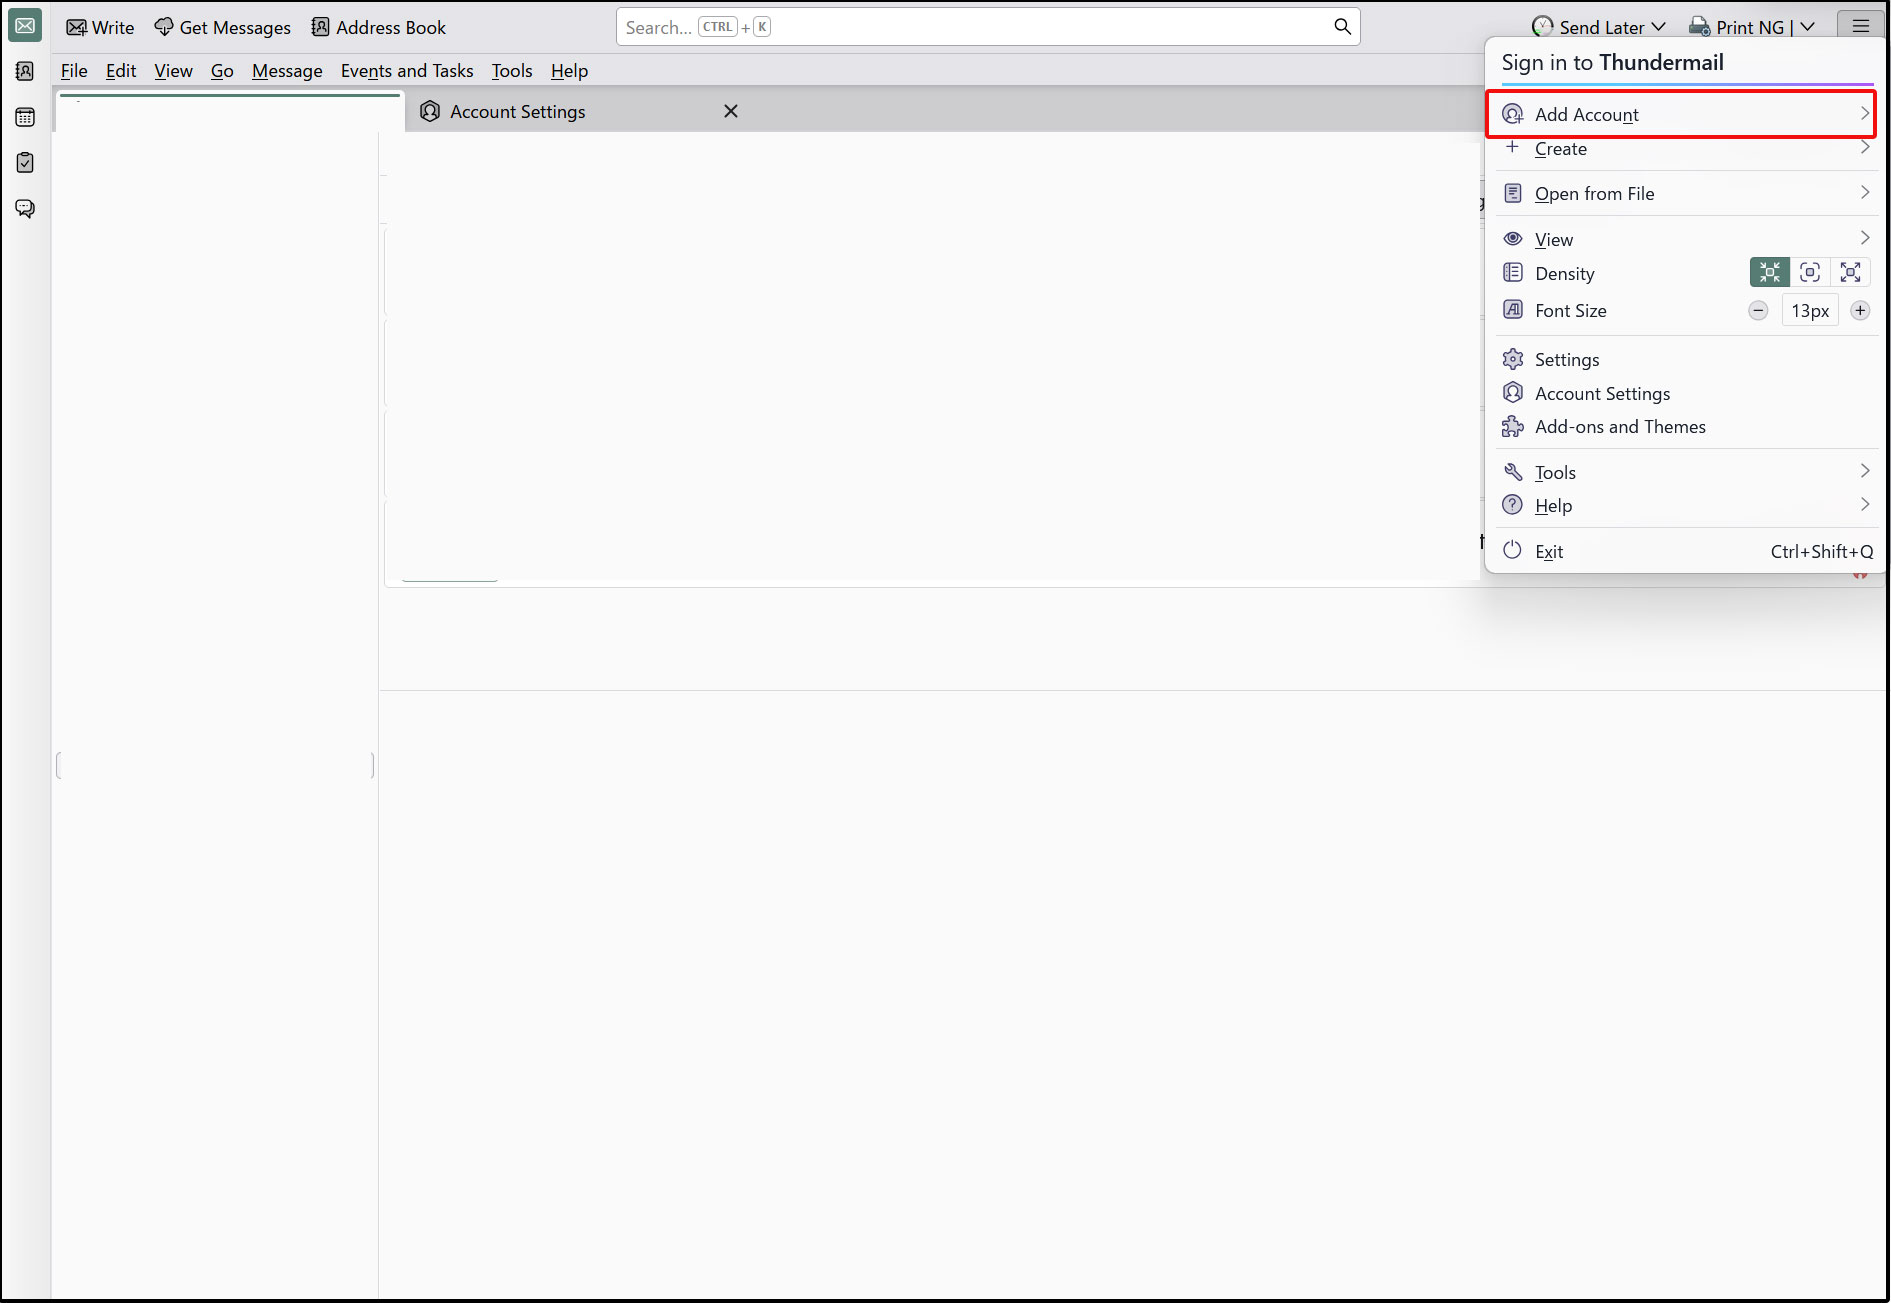
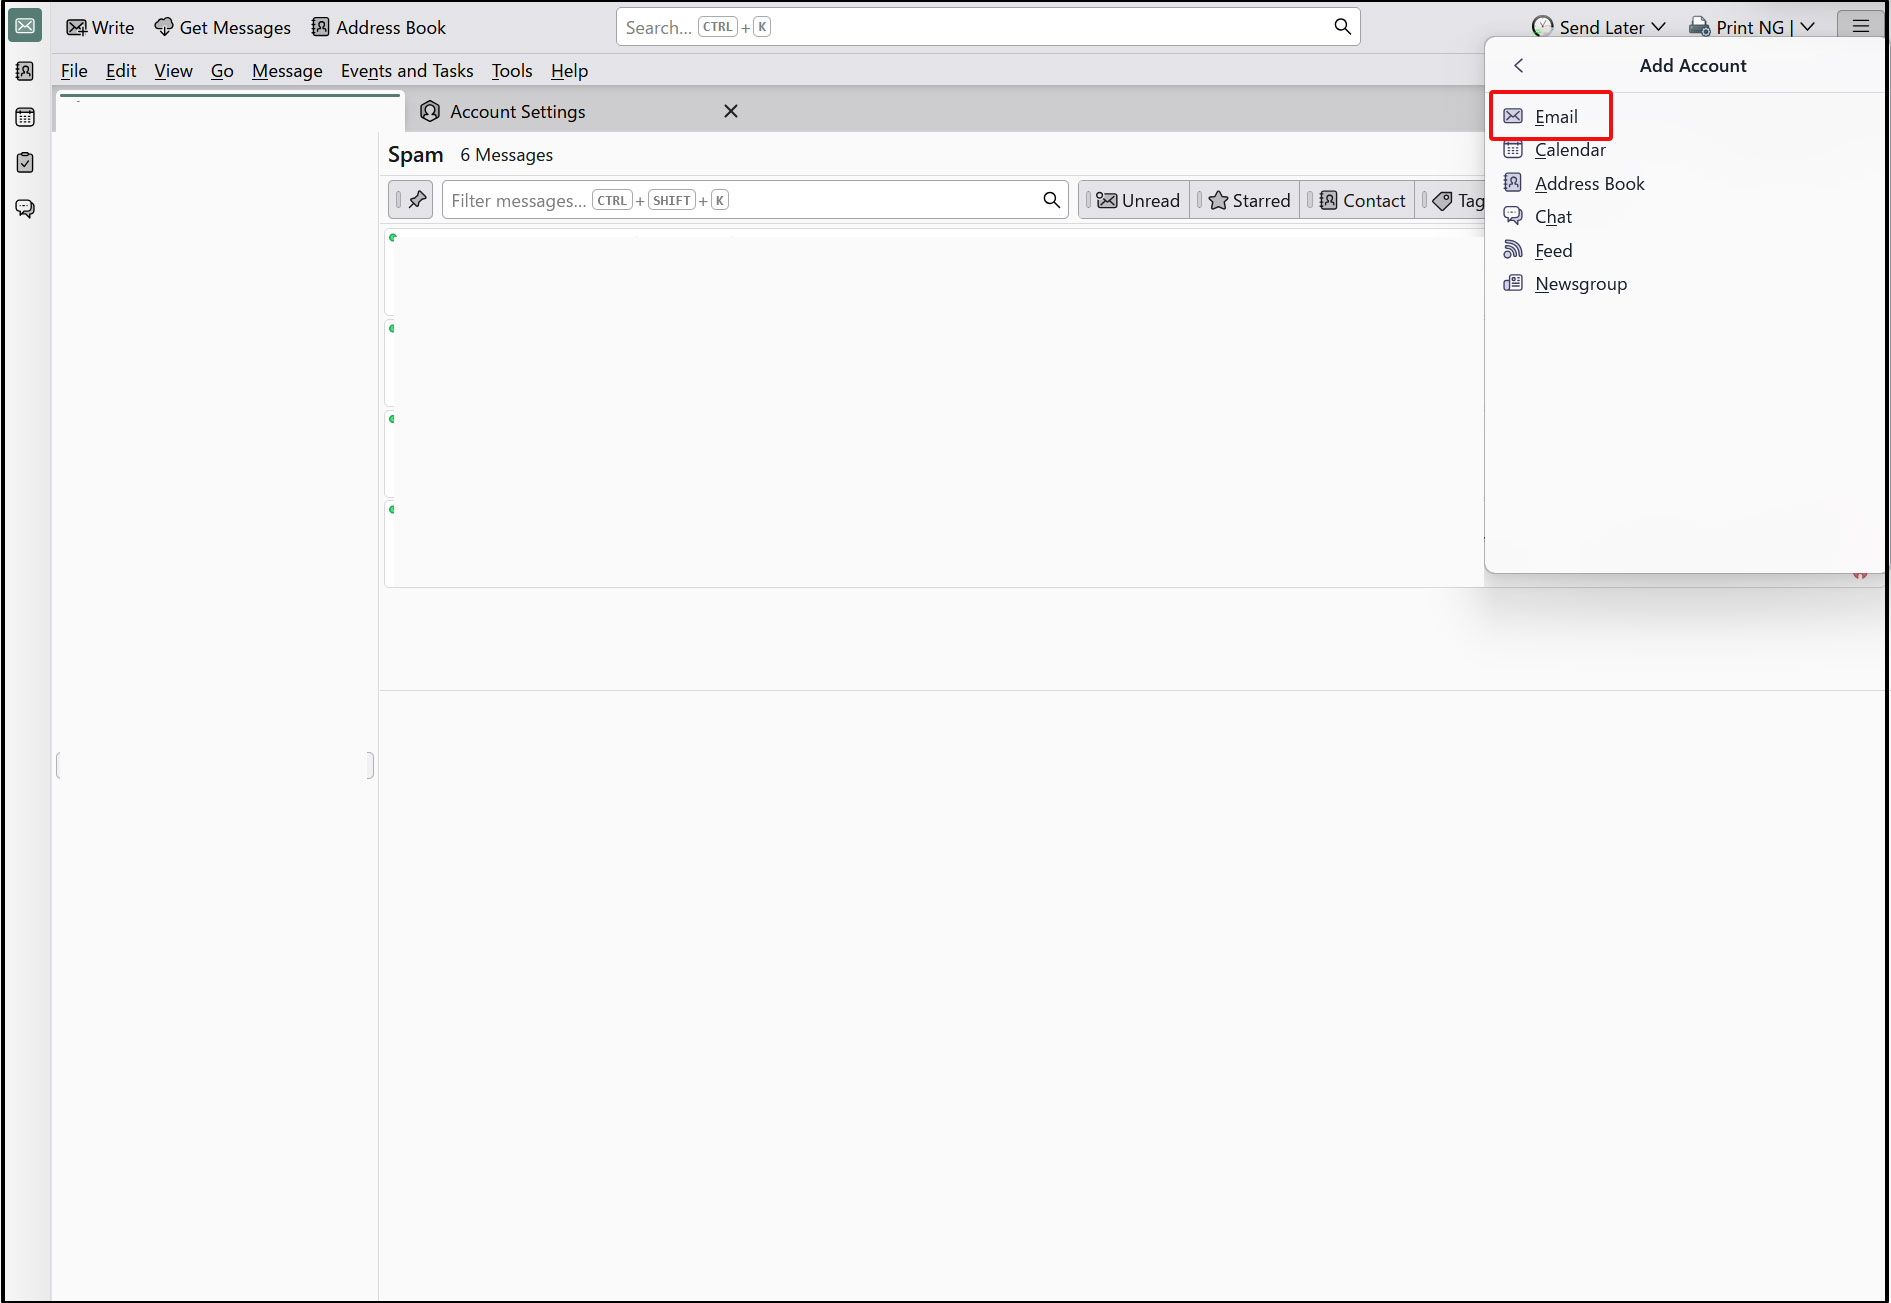
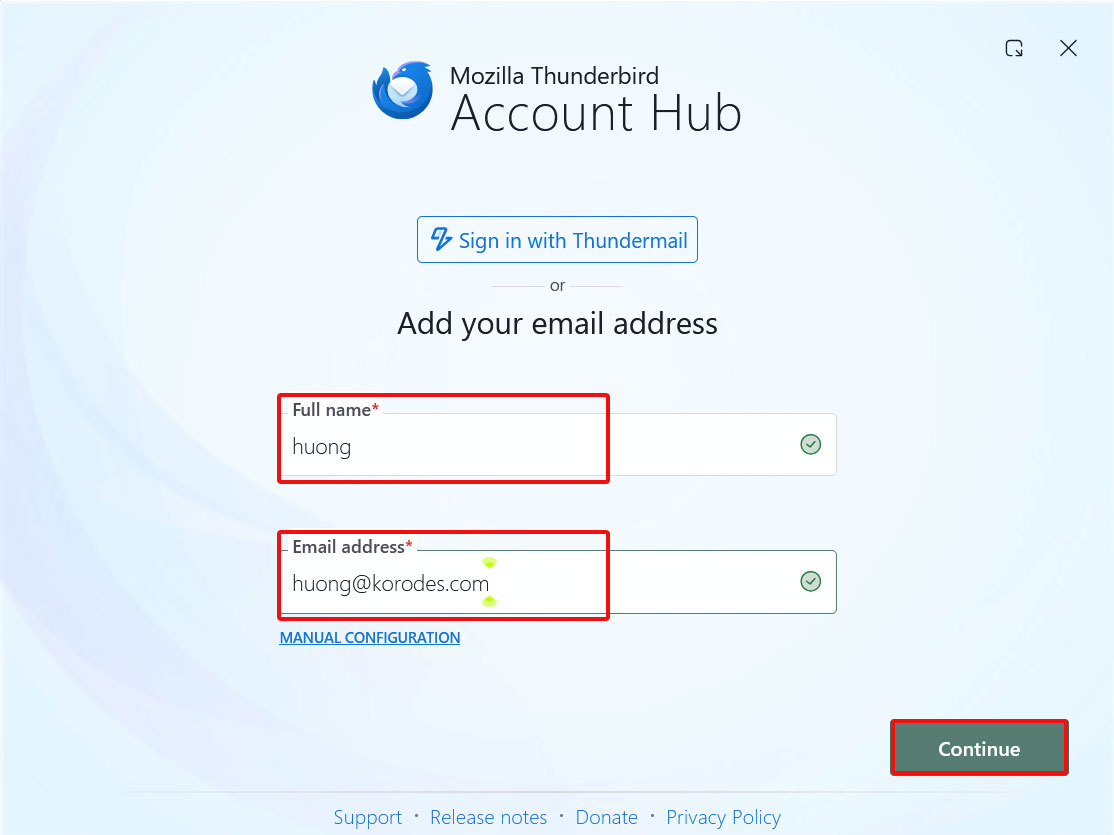
Start Thunderbird and click [New Account][Email] in the [Three] button-menu in the upper right corner.
Full name : any name
Email address : huong@<domain-name>
Enter the information and click "Continue".
Click on [EDIT CONFIGURATION]
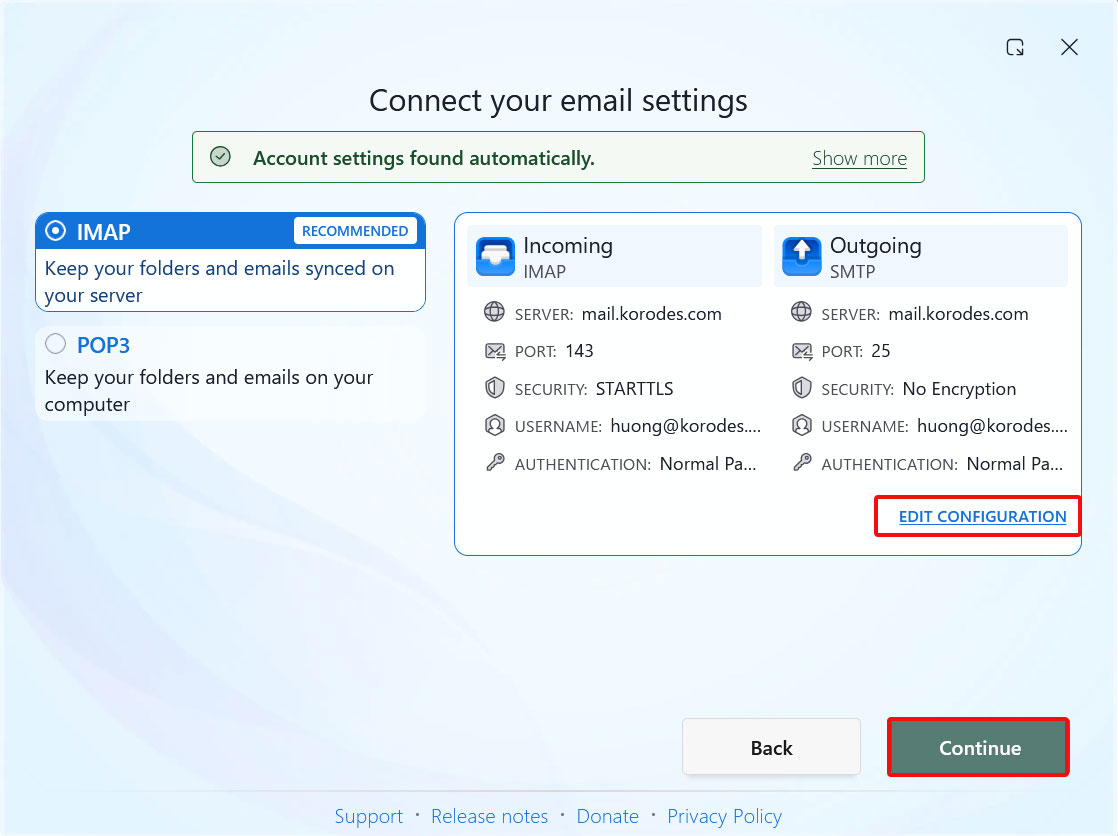
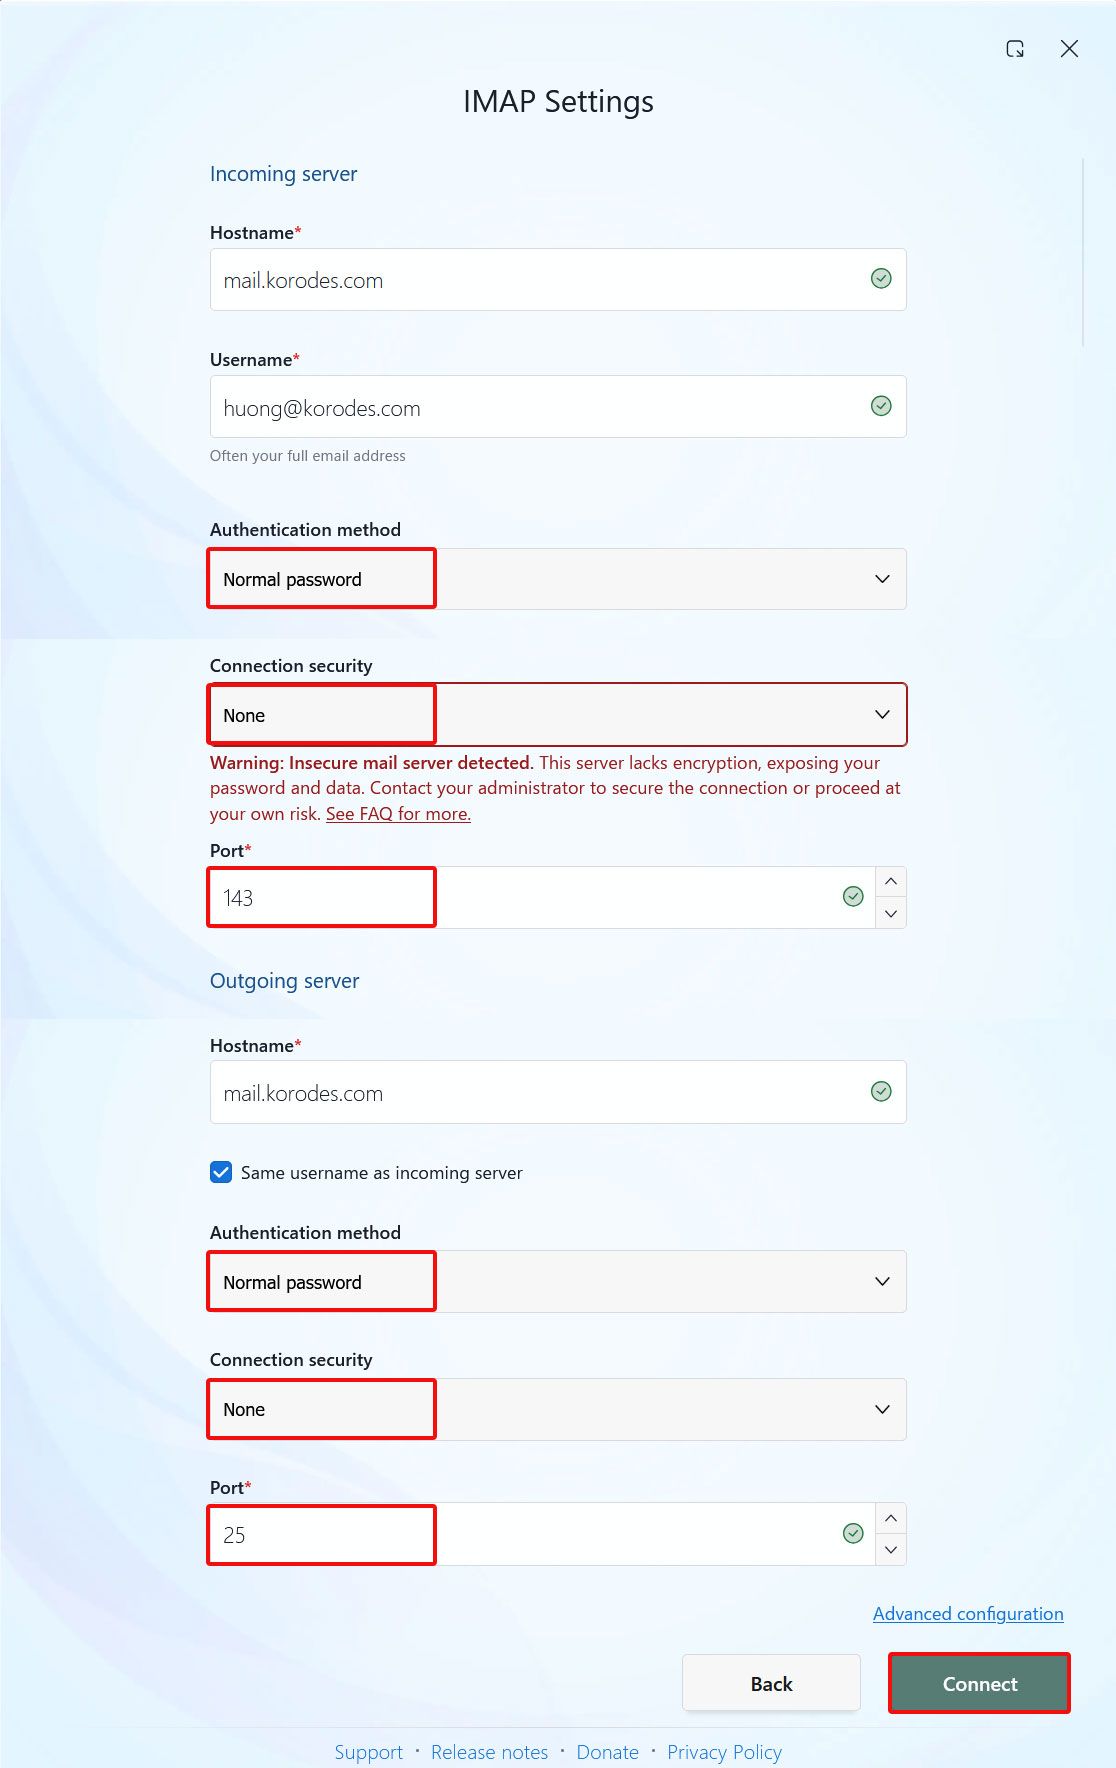
Incoming and Outgoing Server Settings Scroll down to continue
Incoming Server
[Authentication method] : Nomal pasword
[Connection security] : を[None]
[Port] : 143
Outgoing Server
[Authentication] : Nomal pasword
[Connection security] : [None]
[Port] : 25
Click [Continue]
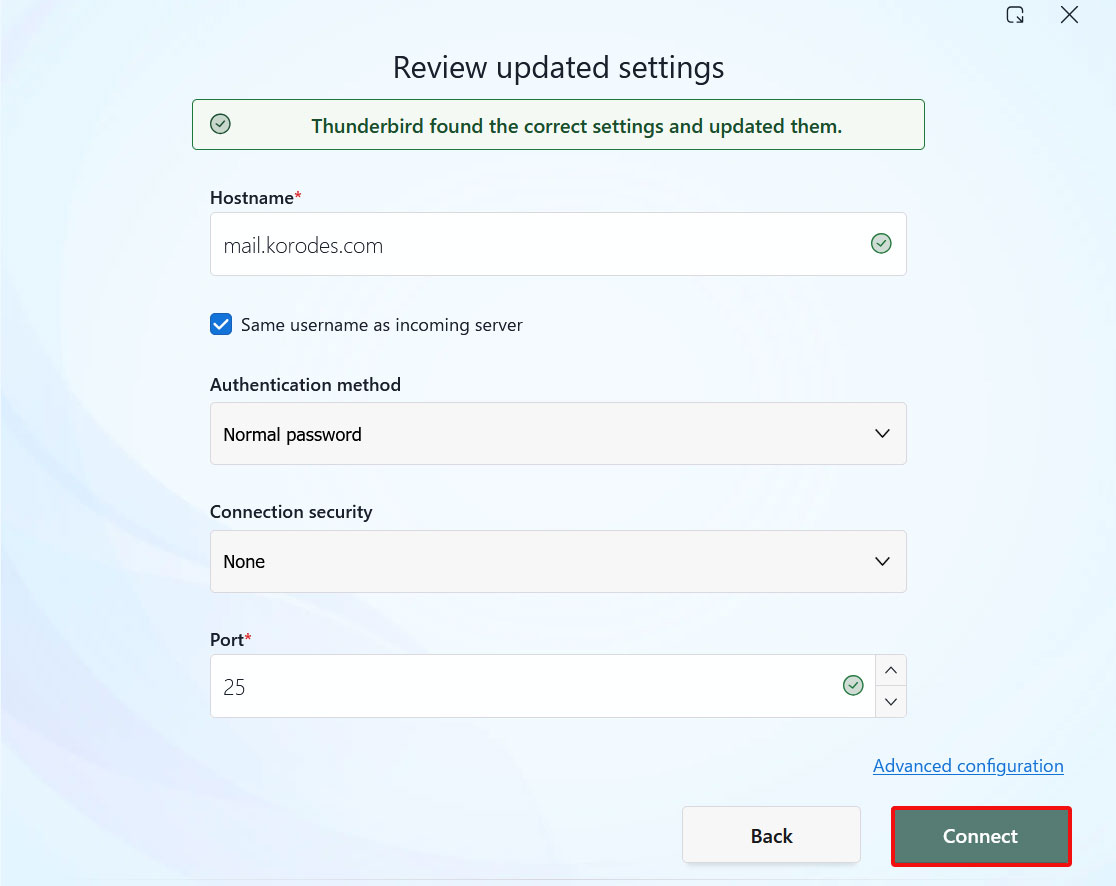
Click [Connect]
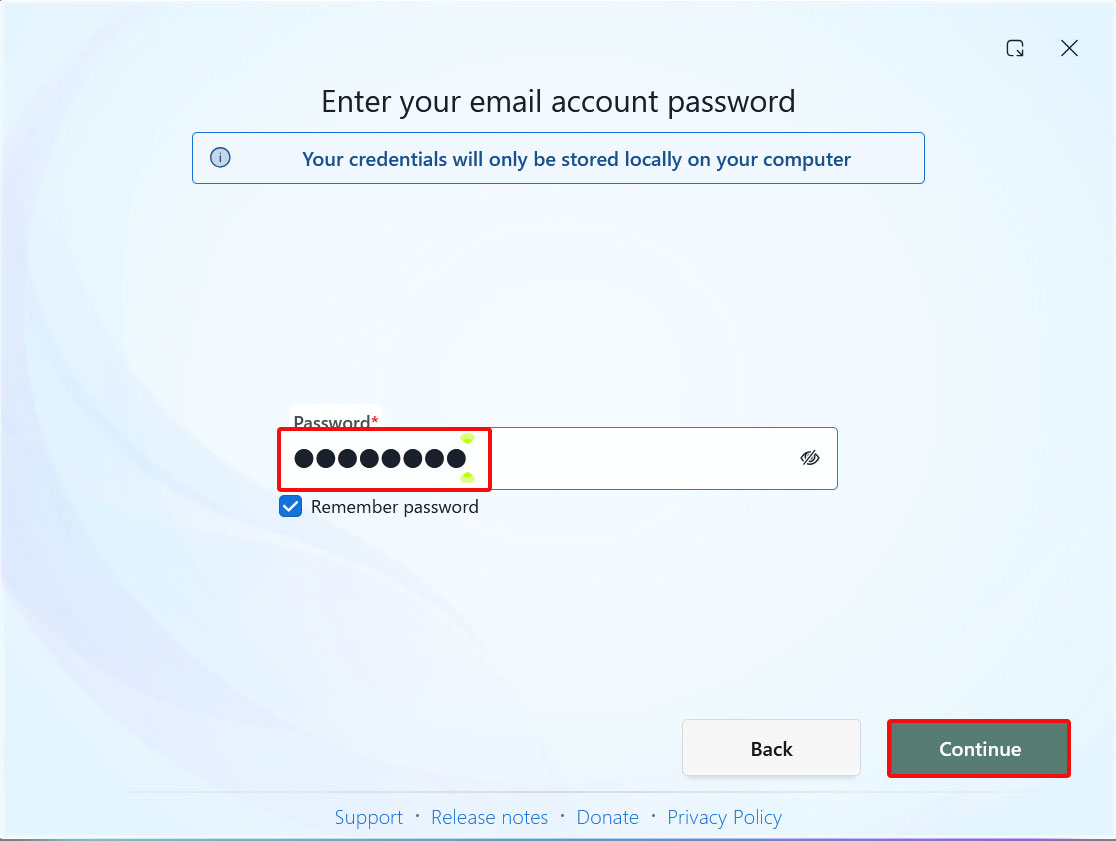
Enter the [user's password] in the "Password" field and click "Continue"
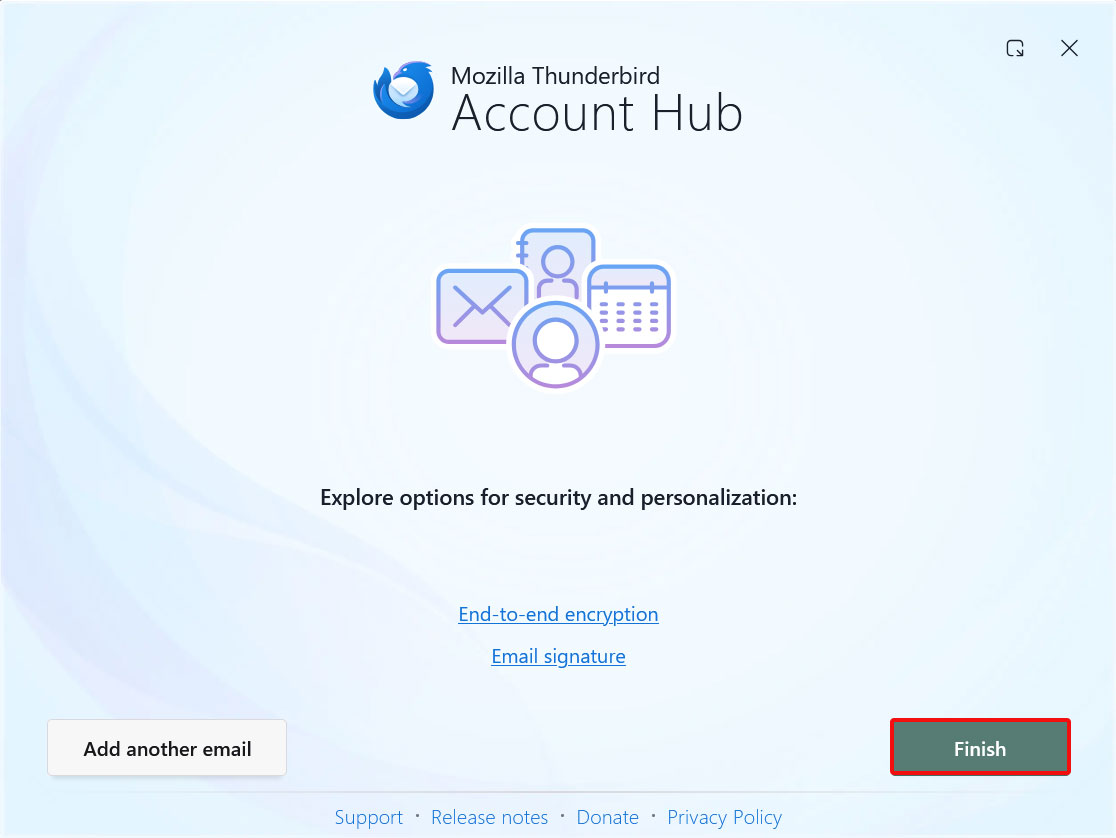
Click "Finish" when the email account has been successfully created.
3 Applied ClamAV to mail server Postfix
Set up Postfix and Clamav to work together to scan incoming and outgoing mail in real time.
①Install Amavisd and Clamav Daemon and start Clamav Daemon
# apt -y install clamav-daemon amavisd-new
If the server is not using a fully qualified domain name (FQDN) as the hostname, Amavis may fail to start. Also, since the OS hostname may change, set a valid hostname directly in the Amavis configuration file
# vi /etc/amavis/conf.d/05-node_id

Add to line 12
use strict;
# $myhostname is used by amavisd-new for node identification, and it is
# important to get it right (e.g. for ESMTP EHLO, loop detection, and so on) .

chomp($myhostname = `hostname --fqdn`);

# To manually set $myhostname, edit the following line with the correct Full y
# Qualified Domain Name (FQDN) and remove the # at the beginning of the line .
#
#$myhostname = "mail.example.com";
$myhostname = "mail.<domain>";
1; # ensure a defined return
②Virus Scan Enable
# vi /etc/amavis/conf.d/15-content_filter_mode

Line 13-14 : Uncomment and enable virus scan
@bypass_virus_checks_maps = (
\%bypass_virus_checks, \@bypass_virus_checks_acl, \$bypass_virus_checks_re);
③Register your own domain name
# echo '<yourDomain>' > /etc/mailname
④Edit configuration file (Main.cf)
# vi /etc/postfix/main.cf

Add to last line
content_filter=smtp-amavis:[127.0.0.1]:10024
⑤Edit configuration file (master.cf)
# vi /etc/postfix/master.cf

# Append all lines below to the last line
smtp-amavis unix - - n - 2 smtp
    -o smtp_data_done_timeout=1200
    -o smtp_send_xforward_command=yes
    -o disable_dns_lookups=yes
127.0.0.1:10025 inet n - n - - smtpd
    -o content_filter=
    -o local_recipient_maps=
    -o relay_recipient_maps=
    -o smtpd_restriction_classes=
    -o smtpd_client_restrictions=
    -o smtpd_helo_restrictions=
    -o smtpd_sender_restrictions=
    -o smtpd_recipient_restrictions=permit_mynetworks,reject
    -o mynetworks=127.0.0.0/8
    -o strict_rfc821_envelopes=yes
    -o smtpd_error_sleep_time=0
    -o smtpd_soft_error_limit=1001
    -o smtpd_hard_error_limit=1000
⑥Settings reflect
# usermod -G clamav amavis
# usermod -G amavis clamav
# systemctl restart clamav-daemon amavis postfix
If you send a blank email to yourself using Thunderbird or a similar program, you’ll know it worked if you see a message like the following in the header of the received email.
X-Mozilla-Status: 0001
X-Mozilla-Status2: 00000000
Return-Path: xxxxx@xxxxxxx.com
X-Original-To: xxxxx@xxxxxxx.com
Delivered-To: xxxxx@xxxxxxx.com
Received: from localhost (localhost [127.0.0.1])
by mail.xxxxxxx.com (Postfix) with ESMTP id CDF7E20C62
for xxxxx@xxxxxxx.com; Thu, 17 Sep 2026 10:23:29 +0900 (JST)
X-Virus-Scanned: Debian amavis at xxxxxxx.com
Received: from mail.xxxxxxx.com ([127.0.0.1])
by localhost (mail.xxxxxxx.com [127.0.0.1]) (amavis, port 10024) with ESMTP
id 2zNL_6R4AnYu for xxxxx@xxxxxxx.com;
Thu, 17 Sep 2026 10:23:29 +0900 (JST)
Received: from [192.168.11.14] (buffalo.setup [192.168.11.1])
by mail.xxxxxxx.com (Postfix) with ESMTPA id AC16420C23
for xxxxx@xxxxxxx.com; Thu, 17 Sep 2026 10:23:29 +0900 (JST)
Message-ID: 20246f45-6112-4cce-8a04-9556df952d2c@xxxxxxx.com
Date: Thu, 17 Sep 2026 10:23:30 +0900
MIME-Version: 1.0
User-Agent: Mozilla Thunderbird
From: xxxxx xxxxx@xxxxxxx.com
Content-Language: en-US
To: xxxxx xxxxx@xxxxxxx.com
Content-Type: text/plain; charset=UTF-8; format=flowed
Content-Transfer-Encoding: 7bit
4 Apply spam checks to the mail server
4.1 Spam checking using spamassassin and procmail
①spamassassin and procmail installation
# apt -y install procmail spamassassin
➁Configure procmail
If you want to apply the settings to all users
Create /etc/procmailrc
To configure for each individual, create a ~/.procmailrc in each user's home directory.
Create /etc/procmailrc this time
# vi /etc/procmailrc

Enter the following content (the contents of procmailrc)
SHELL=/bin/bash
PATH=/usr/bin:/bin:/usr/local/bin
DROPPRIVS=yes
MAILDIR=$HOME/Maildir
DEFAULT=$MAILDIR/
SPAM=$MAILDIR/.Spam/
LOGFILE=$HOME/.procmail.log #Log output destination
VERBOSE=ON # Detailed log output

## If there is no "X-Spam-***" in the mail header, spamassassassin will be started.
:0fw
*!^X-Spam.*
|spamassassin

## If there is an "X-Spam-Status: Yes" in the mail header, the mail is stored in the ".
:0
* ^X-Spam-Status: Yes
$SPAM
➂Create a .Spam directory in each user's ~/Maildir directory
# su - <user>
$ mkdir Maildir/.Spam
④Edit postfix configuration file
Do it as root user
# vi /etc/postfix/main.cf

Per Line 485 : Uncomment
mailbox_command = /usr/bin/procmail -a "$EXTENSION"
⑤Restart postfix and spamassassin
# systemctl restart postfix spamd

# systemctl enable spamassassin-maintenance.timer
Created symlink '/etc/systemd/system/timers.target.wants/spamassassin-maintenance.timer' → '/usr/lib/systemd/system/spamassassin-maintenance.timer'.
⑥Confirmed by Thudrtbird
Send a blank email to yourself; if the header displays as shown below, everything is working properly.
X-Mozilla-Status: 0001
X-Mozilla-Status2: 00000000
Return-Path: xxxxx@xxxxxxx.com
X-Spam-Checker-Version: SpamAssassin 4.0.1 (2024-03-25) on Lepard
X-Spam-Level: ***
X-Spam-Status: No, score=3.1 required=5.0 tests=ALL_TRUSTED,EMPTY_MESSAGE,
MISSING_SUBJECT autolearn=no autolearn_force=no version=4.0.1
--------------------------------------------------------------------------------------------
⑦Spam check confirmation
Send yourself an email with the body of the email "XJSC4JDBQADN1.NSBN32IDNENGTUBE-STANDARD-ANTI-UBE-TEST-EMAILC.34X" and make sure the email is not delivered and is sorted into the Spam folder
The header states
Received: from localhost by Lepard
with SpamAssassin (version 4.0.1);
Thu, 17 Sep 2026 10:33:14 +0900
From: xxxxx xxxxx@xxxxxxx.com
To: xxxxx xxxxx@xxxxxxx.com
Subject: Spam Test
Date: Thu, 17 Sep 2026 10:33:14 +0900
Message-Id: 1a794804-f627-4221-ad30-f30053146841@xxxxxxx.com
X-Spam-Checker-Version: SpamAssassin 4.0.1 (2024-03-25) on Lepard
X-Spam-Flag: YES
X-Spam-Level:**********************************************
X-Spam-Status: Yes, score=999.7 required=5.0 tests=ALL_TRUSTED,GTUBE,
HTML_MESSAGE,MPART_ALT_DIFF autolearn=no autolearn_force=no
version=4.0.1
MIME-Version: 1.0
Content-Type: multipart/mixed; boundary="----------=_6A61614B.7AED63B6"
This is a multi-part message in MIME format.
4.2 Spam Email Learning
SpamAssassin's email learning functionality improves the accuracy of its judgments
①Learns all contents of ".Spam" directory as spam mail
# /usr/bin/sa-learn --spam /home/*/Maildir/.Spam/cur
Learned tokens from 0 message(s) (0 message(s) examined)
➁Learning of non-spam mail (normal mail)
# /usr/bin/sa-learn --ham /home/*/Maildir/cur
Learned tokens from 7 message(s) (7 message(s) examined)
➂Creating scripts for automatic learning
# vi /opt/script/spam-learns.sh

Describe the following
#! /bin/sh
#Spam Email Learning
/usr/bin/sa-learn --spam /home/*/Maildir/.Spam/cur
#Learning normal mail
/usr/bin/sa-learn --ham /home/*/Maildir/cur

#If you want to force the deletion of the contents of the spam mail storage directory, add the following statement
/bin/rm -f /home/*/Maildir/.Spam/cur
# chmod 750 /opt/script/spam-learns.sh
④SpamAssassin automatically starts at system startup
# systemctl enable spamd
Synchronizing state of spamd.service with SysV service script with /usr/lib/systemd/systemd-sysv-install.
Executing: /usr/lib/systemd/systemd-sysv-install enable spamd