

1. Vim Install
Install Vim, which you are familiar with as an editor, as follows
# pkg install -y vim
Edit the ".shrc" to make Vim available as the standard editor, and log in again to reflect the change.
FreeBSD14 has sh as default shell.
# vim ~/.shrc
Add the following content
alias vi='vim'

Configuration Reflection
# shutdown -r now
Create a new ".vimrc" to set up the environment for using Vim, and fill in the following information
# vi ~/.vimrc

Add the following content
set nocompatible
set encoding=utf-8
set nobackup
set tabstop=4
set clipboard=unnamed
set number
syntax on
highlight Comment ctermfg=LightCyan
set wrap
set backspace=indent,eol,start
set autoindent
2.Use of locate database
On FreeBSD, I get the following error when using updatedb
# /usr/libexec/locate.updatedb
>>> WARNING
>>> Executing updatedb as root.  This WILL reveal all filenames
>>> on your machine to all login users, which is a security risk.
The error message is
I am running updatedb as root user.
This would allow all logged in users to see all file names. This is a security risk.
On FreeBSD, scripts under PERIODIC are run by cron, so use the update script for the locate database that cron will run
# /etc/periodic/weekly/310.locate

Rebuilding locate database:
3. SSH Connection Security Measures
3.1 SSH port changed, root user login disabled
# vi /etc/ssh/sshd_config

Line 16 : Change Port
Port 2244
Line 35 : Disable comments and prevent login as root user
PermitRootLogin no
Reflection of settings
# service sshd restart
Performing sanity check on sshd configuration.
Stopping sshd.
Waiting for PIDS: 795.
Performing sanity check on sshd configuration.
Starting sshd.
3.2 Use public key authentication method
① Creating public and private key pairs --- logging in as a general user to create them
If you do not specify the destination and file name, id_ed25519 and id_eed25519.pub will be created in /home/(user name)/.ssh/.
On the way, enter the password for the key.。
# su - huong
$ ssh-keygen -t ed25519
Generating public/private ed25519 key pair.
Enter file in which to save the key (/home/huong/.ssh/id_ed25519):
Enter passphrase (empty for no passphrase): [Password]
Enter same passphrase again: [Password]
Your identification has been saved in /home/huong/.ssh/id_ed25519
Your public key has been saved in /home/huong/.ssh/id_ed25519.pub
The key fingerprint is:
SHA256:xboQ1lwuaVzf2FXCOtK2tD6Pie9c2mbG1GHvODpZ3y4 huong@Lepard
The key's randomart image is:
+--[ED25519 256]--+
|          o  .. +|
|       + * . +.o |
|      o B +.o.o  |
|     . o +. *  o |
|      . S  + +..o|
|       . .  o o o|
|        .  . =.+.|
|           o=*E +|
|          .oOOo+.|
+----[SHA256]-----+
$ cat ~/.ssh/id_ed25519.pub >> ~/.ssh/authorized_keys
$ chmod 600 ~/.ssh/authorized_keys
$ chmod 700 ~/.ssh/
➁Save the private key you created (id_ed25519) to a location of your choice on Windows using WinSCP.
Start Winscp
Host name : Server IP address
Port number : SSH Port
User name : Server login user
Password : The same user's password
「Save」
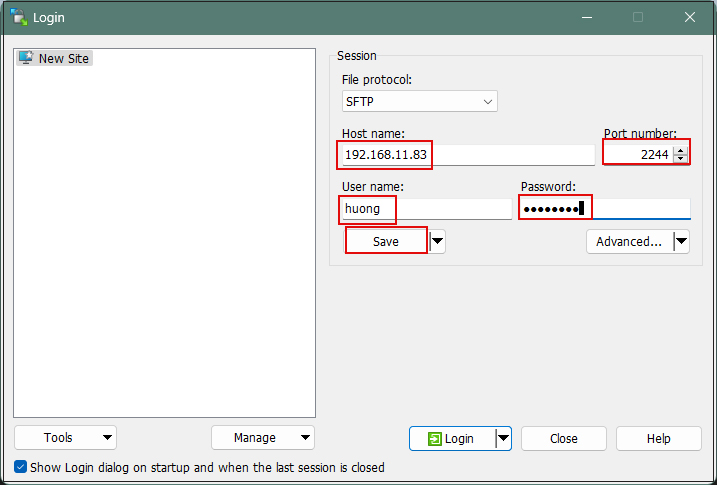
Site name : Any name
Click "OK"
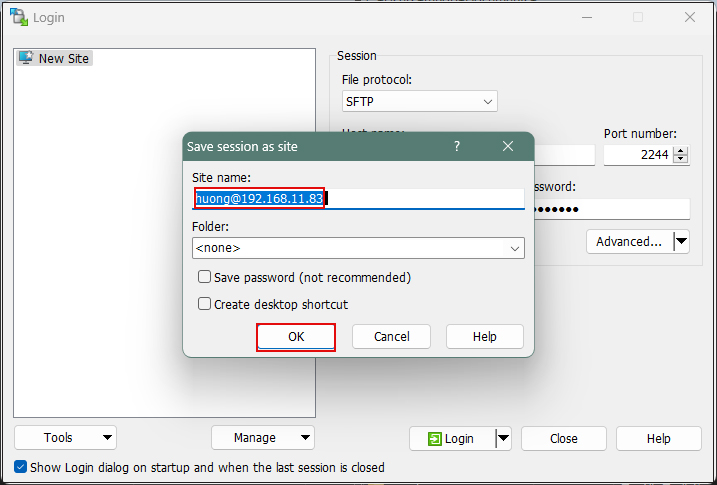
After verifying the server, click "Login"
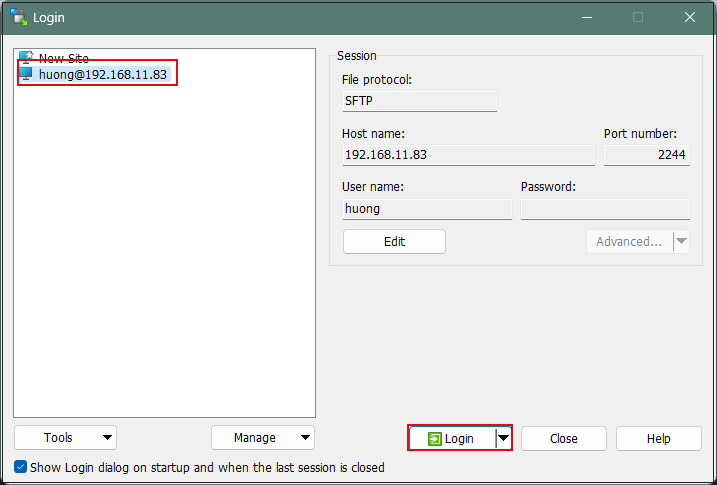
If the screen below appears, click "Update"
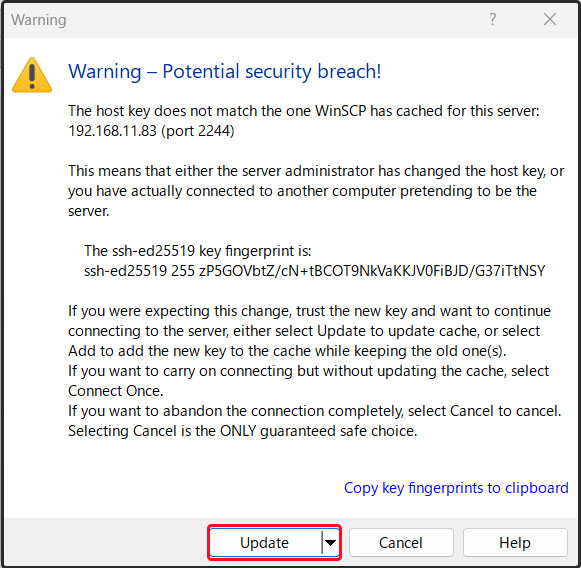
In the "Password" field, enter the user's password
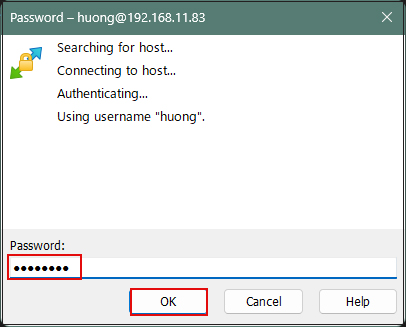
Once connected, the left pane shows the server side, and the right pane shows the PC (Windows) side.
Save the "id_ed25519" file located in the .ssh directory to a suitable location on the Windows side (in the right pane).
➂Edit the SSH configuration file
# vi /etc/ssh/sshd_config

Line 40 : Uncomment
PubkeyAuthentication yes

Line 61 : Change
PasswordAuthentication no

Line 68 : Change
KbdInteractiveAuthentication no
# service sshd restart
④Connecting via TeraTerm
User name : Login username
Password :The password specified when creating the public/private key pair
Check the "Use RSA/DSA…" box, and in the "Private key file" field, specify the "id_ed25519" file you saved to Windows earlier.
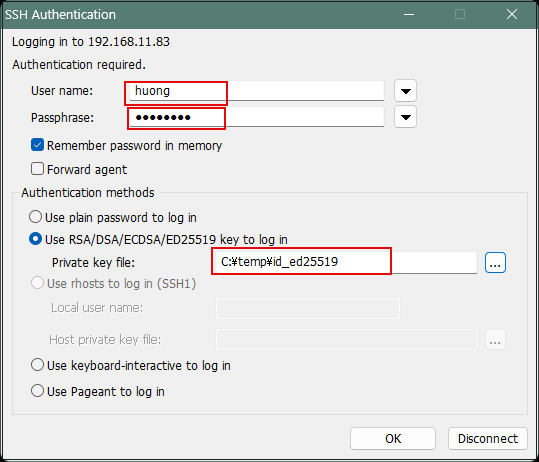
SSH connections using public-key authentication can be established in the same way as on other Linux systems; please refer to the following instructions.

4. Firewall Settings
FreeBSD has the following firewalls
・pf
・ipfw
・ipf
In this case, we will use ipfw to configure the firewall
4.1 Check if ipfw works
# ipfw list
...
As long as something other than "Command not found" is displayed, it's fine.
4.2 Add configuration to /etc/rc.conf to use ipfw
Better to use the sysrc command than to edit the /etc/rc.conf file with a vim editor
# sysrc firewall_enable="YES"   ←Enabled at server startup
firewall_enable: NO -> YES

# sysrc firewall_logdeny="YES"  ←Log output to /var/log/security on denial
firewall_logdeny: NO -> YES

# sysrc firewall_script="/usr/local/etc/ipfw.rules"   ←Specify additional configuration scripts
firewall_script: /etc/rc.firewall -> /usr/local/etc/ipfw.rules
4.3 Create additional configuration script (/usr/local/etc/ipfw.rules)
# vi /usr/local/etc/ipfw.rules
Additional configuration script content ----- for now open the following service ports
ftp (20,21), ssh (22), smtp (25), dns (53) , http (80), ntp(123) , https(443) pop3(110), imap(143), mail-over(587) , Modified SSH(2244)
#! /bin/sh
#

IPF="ipfw -q add"
ipfw -q -f flush

#loopback
$IPF 10 allow all from any to any via lo0
$IPF 20 deny all from any to 127.0.0.0/8
$IPF 30 deny all from 127.0.0.0/8 to any
$IPF 40 deny tcp from any to any frag

# statefull
$IPF 50 check-state
$IPF 60 allow tcp from any to any established
$IPF 70 allow all from any to any out keep-state
$IPF 80 allow icmp from any to any

$IPF 90 allow tcp from any to any 20 in
$IPF 100 allow tcp from any to any 20 out
$IPF 110 allow tcp from any to any 21 in
$IPF 120 allow tcp from any to any 21 out
$IPF 130 allow tcp from any to any 22 in
$IPF 140 allow tcp from any to any 22 out
$IPF 150 allow tcp from any to any 25 in
$IPF 160 allow tcp from any to any 25 out
$IPF 170 allow udp from any to any 53 in
$IPF 175 allow tcp from any to any 53 in
$IPF 180 allow udp from any to any 53 out
$IPF 185 allow tcp from any to any 53 out
$IPF 190 allow tcp from any to any 80 in
$IPF 200 allow tcp from any to any 80 out
$IPF 210 allow tcp from any to any 110 in
$IPF 220 allow tcp from any to any 110 out
$IPF 230 allow tcp from any to any 123 in
$IPF 240 allow tcp from any to any 123 out
$IPF 250 allow tcp from any to any 143 in
$IPF 260 allow tcp from any to any 143 out
$IPF 270 allow tcp from any to any 443 in
$IPF 280 allow tcp from any to any 443 out
$IPF 290 allow tcp from any to any 587 in
$IPF 300 allow tcp from any to any 587 out
$IPF 310 allow tcp from any to any 2244 in
$IPF 320 allow tcp from any to any 2244 out

 # deny and log everything
$IPF 500 deny log all from any to any
System Reboot
# shutdown -r now
Show ipfw list
# ipfw list

00010 allow ip from any to any via lo0
00020 deny ip from any to 127.0.0.0/8
00030 deny ip from 127.0.0.0/8 to any
00040 deny tcp from any to any frag offset
00050 check-state :default
00060 allow tcp from any to any established
00070 allow ip from any to any out keep-state :default
00080 allow icmp from any to any
00090 allow tcp from any to any 20 in
00100 allow tcp from any to any 20 out
00110 allow tcp from any to any 21 in
00120 allow tcp from any to any 21 out
00130 allow tcp from any to any 22 in
00140 allow tcp from any to any 22 out
00150 allow tcp from any to any 25 in
00160 allow tcp from any to any 25 out
00170 allow udp from any to any 53 in
00175 allow tcp from any to any 53 in
00180 allow udp from any to any 53 out
00185 allow tcp from any to any 53 out
00190 allow tcp from any to any 80 in
00200 allow tcp from any to any 80 out
00210 allow tcp from any to any 110 in
00220 allow tcp from any to any 110 out
00230 allow tcp from any to any 123 in
00240 allow tcp from any to any 123 out
00250 allow tcp from any to any 143 in
00260 allow tcp from any to any 143 out
00270 allow tcp from any to any 443 in
00280 allow tcp from any to any 443 out
00290 allow tcp from any to any 587 in
00300 allow tcp from any to any 587 out
00310 allow tcp from any to any 2244 in
00320 allow tcp from any to any 2244 out
00500 deny log ip from any to any
65535 deny ip from any to any
5. NTP Server Settings
5.1 Rewrite the referenced NTP server in /etc/ntp.conf. Add an appropriate server in Japan.
# vi /etc/ntp.conf

Line 32-33 : Post it as a comment, and add a note below it
#pool 0.freebsd.pool.ntp.org iburst
#pool 2.freebsd.pool.ntp.org iburst
pool ntp.nict.jp iburst  ←Add
5.2 Added to /etc/rc.conf to automatically start ntp at startup
# vi /etc/rc.conf

Add the following
ntpd_enable="YES"
ntpd_sync_on_start="YES"
5.3 Correct time
If the time is too far off, the NTP daemon will stop working, so use the ntpdate command to correct the time before starting the NTP daemon.
# ntpdate ntp.nict.jp
14 Sep 19:50:48 ntpdate[932]: step time server 61.205.120.130 offset -32400.002263 sec

# /etc/rc.d/ntpd start
Starting ntpd.
5.4 Time synchronization confirmation
# ntpq -p

     remote           refid      st t when poll reach   delay   offset  jitter
==============================================================================
 ntp.nict.jp     .POOL.          16 p    -   64    0    0.000   +0.000   0.000
-ntp-k1.nict.jp  .NICT.           1 u   16   64    1    6.118   -0.808   1.362
+ntp-a3.nict.go. .NICT.           1 u   15   64    1   13.972   +0.326   0.557
-ntp-a2.nict.go. .NICT.           1 u   14   64    1   10.502   -0.559   1.184
*ntp-b2.nict.go. .NICT.           1 u   13   64    1   13.728   +0.587   1.030
+ntp-b3.nict.go. .NICT.           1 u   12   64    1   13.409   +0.883   0.901
+Servers that pass the connection test and can be referenced at any time
– Servers off the reference list in clustering checks
* Servers declared to be in reference synchronization