

OSインストール後の各種設定
一般ユーザの追加
rootは特権ユーザで、普段からrootでログインしてはいけません。
rootとは別に、自分のアカウントを作成する必要があります。下記コマンドでログインユーザーを作成する
# useradd huong
# passwd huong
New password:
Retype new password:
passwd: password updated successfully
ユーザのホームディレクトリ作成
# mkdir -pv /home/huong
# chown -R huong:huong /home/huong
sudoコマンドの利用設定
作成した一般ユーザにsudoの権限を付与するためには、rootで「visudo」というコマンドを使い、「sudoers」というファイルを編集します。
今回は「wheelグループに所属するユーザが使える。sudoの際は、パスワードを要求されない。」を利用する
# visudo

125行目コメント解除
## Uncomment to allow members of group wheel to execute any command
%wheel ALL=(ALL) ALL  ←wheelグループに所属するユーザが使える。sudoの際に、自分のログインパスワードが要求される。

128行目コメント解除
## Same thing without a password
%wheel ALL=(ALL) NOPASSWD: ALL ←wheelグループに所属するユーザが使える。sudoの際は、パスワードを要求されない。

131行目コメント解除
## Uncomment to allow members of group sudo to execute any command
%sudo ALL=(ALL) ALL ←アカウント登録しているユーザは、誰でもsudoを使える。
wheelグループへの登録
作成したユーザーhuongをwheelグルーブに登録する
現在のhuongが所属するグループを表示してみる
# groups huong
huong : huong
まだhuongグループにしか所属していません。
sudoが使えるようにwheelグループへと追加します。
usermod -G {所属させるグループ} {ユーザ名}の書式で入力します。
# usermod -aG wheel huong
所属グループを確認
# groups huong
huong : huong wheel
日本語化
もし、日本語環境で使用する場合(今回は使用しません)
「root」ユーザ権限で行う
# vi /etc/profile.d/lang.sh

14行目 : コメントアウトし、下に追加
# UTF-8 locales will include "UTF-8" in the output.
# export LANG=en_US.UTF-8
export LANG=ja_JP.UTF-8
システム再起動
# reboot
時刻を同期
ntpdを設定するためntp.confの編集
# vi /etc/ntp.conf

24行目あたりに追加
# NTP server (list one or more) to synchronize with:
#server 0.pool.ntp.org iburst
#server 1.pool.ntp.org iburst
#server 2.pool.ntp.org iburst
#server 3.pool.ntp.org iburst
server time.cloudflare.com iburst
server ntp.nict.jp iburst
server ntp.jst.mfeed.ad.jp
/etc/rc.d/rc.ntpdに実行権限を付与して起動します。
# chmod +x /etc/rc.d/rc.ntpd
# /etc/rc.d/rc.ntpd start
Starting NTP daemon:  /usr/sbin/ntpd -g -p /run/ntpd.pid -u ntp:ntp
時刻の確認
# date
Thu Oct  1 16:15:10 JST 2026
パッケージ管理
Slackwareはパッケージ管理プログラム「slackpkg」を利用する
1.リポジトリの設定確認
# slackpkg info slackpkg

This appears to be the first time you have run slackpkg.
Before you install|upgrade|reinstall anything, you need to uncomment
ONE mirror in /etc/slackpkg/mirrors and run:

        # slackpkg update

You can see more information about slackpkg functions in slackpkg manpage.
リポジトリの設定がされていないので、リポジトリの設定とアップデートが必要
リポジトリの設定
# vi /etc/slackpkg/mirrors

Slackware64-currentセクションの中
277-280行目 の日本のミラーサイトのうちどれか一つコメントを外す

# JAPAN (JP)
 ftp://ftp.nara.wide.ad.jp/pub/Linux/slackware/slackware64-current/
# http://ftp.nara.wide.ad.jp/pub/Linux/slackware/slackware64-current/
# ftp://riksun.riken.go.jp/Linux/slackware/slackware64-current/
# http://riksun.riken.go.jp/Linux/slackware/slackware64-current/
指定したミラーサーバーに到達できない場合違うサーバーを選択する
パッケージリストの更新
# slackpkg update
# slackpkg upgrade-all
2.新しいパッケージのインストール
新しい追加のパッケージがある場合には、以下のように表示されます。
全部インストールするので、このままENTER
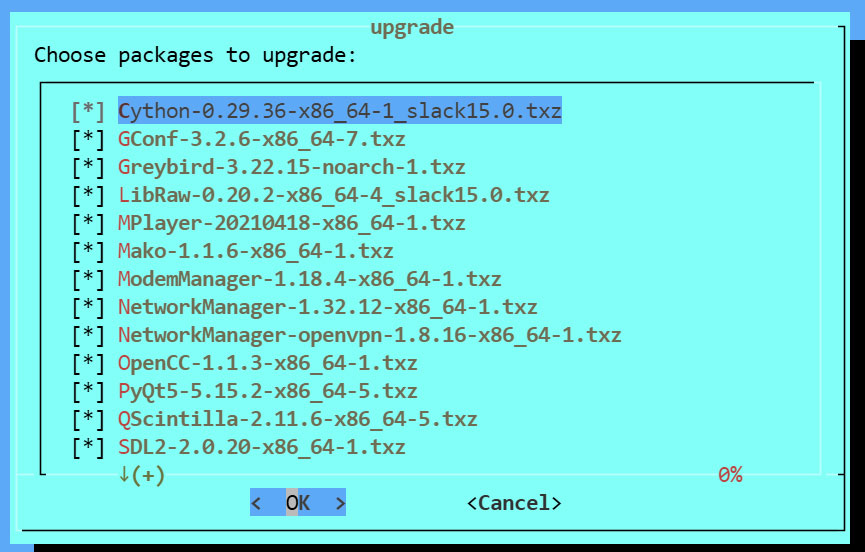
カーネルのアップグレードがある場合には、以下のように表示されるので、必ずENTERキーを押す
Your kernel image was updated, and lilo does not appear to be used on
your system.  You may need to adjust your boot manager (like GRUB) to
boot the appropriate kernel (after generating an initrd if required).
Press the "Enter" key to continue...
コマンド入力に戻り、必ず次の措置を行う。
# cp /boot/vmlinuz /boot/efi/EFI/Slackware/vmlinuz
パッケージの更新によって設定ファイルも更新される場合があります。
その場合には、以下のような表示が最後に出ますので必ず"O"を入力する
What do you want (K/O/R/P)?

        (K)eep the old files and consider .new files later

        (O)verwrite all old files with the new ones. The
           old files will be stored with the suffix .orig

        (R)emove all .new files

        (P)rompt K, O, R selection for every single file
O  ←oを入力
カーネルをアップデートしたときは必ずシステムを再起動する
Vimの環境設定
以下の2つのファイルを作ります。
# touch /etc/skel/.bash_profile
# touch /etc/skel/.bashrc
「/etc/skel/.bash_profile」は、下記のように記述
# vi /etc/skel/.bash_profile

下記を記述
#!/usr/bin/bash
source ~/.bashrc
「/etc/skel/.bashrc」は、下記のように記述
# vi /etc/skel/.bashrc
PATH="$PATH":/sbin
bind '"\e[A": history-search-backward'
bind '"\e[B": history-search-forward'
alias ci='ci -l'
alias ls='ls -a --color'
alias vi='vim'
alias view='vim -R'
「/sbin」にパスが通っていない場合は下記を実行
# cp /etc/skel/.bash_profile ~/.
# cp /etc/skel/.bashrc ~/.
.vimrcを作成する
# vi /etc/skel/.vimrc
set number
set mouse-=a
set autoindent
syntax on
highlight Comment ctermfg=LightCyan
set wrap
augroup vimrcEx
au BufRead * if line("'\"") > 0 && line("'\"") <= line("$") |
\ exe "normal g`\"" | endif
augroup END
下記を実行
# cp /etc/skel/.vimrc ~/.
SSHリモート接続
デフォルトの設定を変更してssh接続のセキュリティを高める設定を行います。
1. SSHサービスの設定ファイル変更
SSHサービスの設定を変更するために設定ファイルを変更します。
SSHサービスの設定ファイルは"/etc/ssh/sshd_config"になります。
# /etc/rc.d/rc.sshd stop

# vi /etc/ssh/sshd_config

13行目 : コメント解除し、今回は「Port 2244」に変更して進めていきます
Port 2244

15行目 : コメント解除
ListenAddress 0.0.0.0

32行目 : コメント解除
PermitRootLogin prohibit-password
SSH の再起動
# /etc/rc.d/rc.sshd start
ファイアウォールの導入と設定方法
Linuxカーネル標準のiptablesを使用します。
デフォルトでファイアウォールは有効になっていません。/etc/rc.d/rc.firewallを作成・編集して実行権限を与えることで、ファイアウォールを設定できます。
# vi /etc/rc.d/rc.firewall
基本的なスクリプト
#!/bin/sh
# /etc/rc.d/rc.firewall - Basic iptables firewall
#ルールの初期化
iptables -F
iptables -X
#デフォルトポリシー(すべて拒否)
iptables -t filter -P INPUT DROP
iptables -t filter -P FORWARD DROP
iptables -t filter -P OUTPUT ACCEPT
#ローカルホストの通信を許可
iptables -A INPUT -i lo -j ACCEPT
iptables -A INPUT -s 192.168.11.0/24 -d 0/0 -p tcp -j ACCEPT
iptables -A INPUT -s 192.168.11.0/24 -d 0/0 -p udp -j ACCEPT
#すでに確立された通信を許可
iptables -A INPUT -m conntrack --ctstate ESTABLISHED,RELATED -j ACCEPT
#SSH (ポート 22) を許可
iptables -A INPUT -s 0/0 -p tcp --dport 22 -j ACCEPT
#独自にSSH (ポート 2244) を設定している場合
iptables -A INPUT -s 0/0 -p tcp --dport 2244 -j ACCEPT
#ICMP(Ping)を許可
iptables -A INPUT -p icmp -j ACCEPT
作成したスクリプトに実行権限を与える
# chmod +x /etc/rc.d/rc.firewall
システム起動時にこのスクリプトが自動的に読み込まれるように、/etc/rc.d/rc.localに追記する
# echo "/etc/rc.d/rc.firewall" >> /etc/rc.d/rc.local
ファイアウォールを有効にする
# /etc/rc.d/rc.firewall