1.SSL証明書を取得する ( Let's Encrypt )
1.1 事前準備
1.パッケージ管理システムSnappyインストール
Let’s EncryptのSSL証明書発行ツール「certbot」は「snap」を利用したインストールが推奨されていますので、まずSnapdをインストールします。(dnfまたはyumでの従来の方法でもインストールできます)

# dnf -y install snapd
メインのスナップ通信ソケットを管理するsystemdユニットを有効化する
# systemctl enable --now snapd.socket
クラシックスナップのサポートを有効にする
# ln -s /var/lib/snapd/snap /snap
バージョン確認
# snap --version
snap          2.76-0.el10_3
snapd         2.76-0.el10_3
series        16
ol            10.2
kernel        6.12.0-204.92.4.3.el10uek.x86_64
architecture  amd64
ログアウトして再度ログインするか、システムを再起動して、snapのパスが正しく更新されていることを確認
2.certbot パッケージインストール
# snap install --classic certbot
certbot 5.7.0 from Certbot Project (certbot-eff✓) installed
/snap/bin/certbotへのシンボリックリンクを作成
# ln -s /snap/bin/certbot /usr/bin/certbot
確認する
# ls -la /usr/bin/certbot
lrwxrwxrwx 1 root root 17 Nov 30 12:29 /usr/bin/certbot -> /snap/bin/certbot

# ls -la /snap/bin/certbot
lrwxrwxrwx 1 root root 13 Nov 30 12:29 /snap/bin/certbot -> /usr/bin/snap
1.2 証明書の取得
# certbot certonly --webroot -w /var/www/html/[FQDN] -d [FQDN]
初回のみメールアドレスの登録と利用条件への同意が必要
受信可能なメールアドレスを指定
Saving debug log to /var/log/letsencrypt/letsencrypt.log
Enter email address or hit Enter to skip.
 (Enter 'c' to cancel): [mail address]

- - - - - - - - - - - - - - - - - - - - - - - - - - - - - - - - - - - - - - - -
Please read the Terms of Service at:
https://letsencrypt.org/documents/LE-SA-v1.8-July-06-2026.pdf
You must agree in order to register with the ACME server. Do you agree?
- - - - - - - - - - - - - - - - - - - - - - - - - - - - - - - - - - - - - - - -
(Y)es/(N)o: y

- - - - - - - - - - - - - - - - - - - - - - - - - - - - - - - - - - - - - - - -
Would you be willing, once your first certificate is successfully issued, to
share your email address with the Electronic Frontier Foundation, a founding
partner of the Let's Encrypt project and the non-profit organization that
develops Certbot? We'd like to send you email about our work encrypting the web,
EFF news, campaigns, and ways to support digital freedom.
- - - - - - - - - - - - - - - - - - - - - - - - - - - - - - - - - - - - - - - -
(Y)es/(N)o: y
Account registered.
Requesting a certificate for [FQDN]

Successfully received certificate.
Certificate is saved at: /etc/letsencrypt/live/[FQDN]/fullchain.pem
Key is saved at:         /etc/letsencrypt/live/[FQDN]/privkey.pem
This certificate expires on 2026-10-15.
These files will be updated when the certificate renews.
Certbot has set up a scheduled task to automatically renew this certificate in the background.

- - - - - - - - - - - - - - - - - - - - - - - - - - - - - - - - - - - - - - - -
If you like Certbot, please consider supporting our work by:
 * Donating to ISRG / Let's Encrypt:   https://letsencrypt.org/donate
 * Donating to EFF:                    https://eff.org/donate-le
- - - - - - - - - - - - - - - - - - - - - - - - - - - - - - - - - - - - - - - -
「Successfully received certificate.」と表示されれば成功
メッセージ中に記載の通り [/etc/letsencrypt/live/[FQDN]/] 配下に次の証明書が取得されている
cert.pem ⇒ SSLサーバー証明書(公開鍵含む)
chain.pem ⇒ 中間証明書
fullchain.pem ⇒ cert.pem と chain.pem が結合されたファイル
privkey.pem ⇒ 公開鍵に対する秘密鍵
※Webサーバーが稼働していない場合のLet's Encrypt証明書の取得
インターネット側から当作業を実施するサーバーの 80 ポート宛てにアクセス可能であることは前提となります
[--standalone] 指定で 簡易 Webサーバー機能を使用
# certbot certonly --standalone -d [FQDN]
取得済みの証明書を更新する
# 有効期限が 30日未満の証明書を全て更新
# 有効期限の残り日数に関わらず更新したい場合は [--force-renewal] を合わせて指定
# certbot [--force-renewal] renew
1.2 証明書を自動更新 (Let's Encrypt)
①登録前のテスト
まず以下の--dry-runオプションを使って自動更新をテストしてみる。このオプションでは、証明書は更新されずに動作確認のみ実施されるため、証明書の取得回数制限に引っかかる心配もない
# certbot renew --dry-run
Saving debug log to /var/log/letsencrypt/letsencrypt.log

- - - - - - - - - - - - - - - - - - - - - - - - - - - - - - - - - - - - - - - -
Processing /etc/letsencrypt/renewal/[FQDN].conf
- - - - - - - - - - - - - - - - - - - - - - - - - - - - - - - - - - - - - - - -
Account registered.
Simulating renewal of an existing certificate for [FQDN]

- - - - - - - - - - - - - - - - - - - - - - - - - - - - - - - - - - - - - - - -
Congratulations, all simulated renewals succeeded:
  /etc/letsencrypt/live/[FQDN]/fullchain.pem (success)
- - - - - - - - - - - - - - - - - - - - - - - - - - - - - - - - - - - - - - - -
②Snap版certbotをインストールすると、証明書自動更新機能も合わせてインストールされます
# systemctl list-timers | less
NEXT                            LEFT LAST                           PASSED UNIT                         ACTIVATES
Fri 2026-07-17 16:40:00 JST 3min 54s Fri 2026-07-17 16:30:02 JST  6min ago sysstat-collect.timer        sysstat-collect.service
Fri 2026-07-17 16:50:00 JST    13min Fri 2026-07-17 16:20:00 JST 16min ago pmlogger_check.timer         pmlogger_check.service
Fri 2026-07-17 16:50:10 JST    14min Fri 2026-07-17 16:20:11 JST 15min ago pmlogger_farm_check.timer    pmlogger_farm_check.service
Fri 2026-07-17 16:58:00 JST    21min Fri 2026-07-17 16:28:02 JST  8min ago pmie_check.timer             pmie_check.service
Fri 2026-07-17 16:58:10 JST    22min Fri 2026-07-17 16:28:12 JST  7min ago pmie_farm_check.timer        pmie_farm_check.service
Fri 2026-07-17 17:14:39 JST    38min Fri 2026-07-17 16:06:18 JST 29min ago dnf-makecache.timer          dnf-makecache.service
Fri 2026-07-17 17:18:51 JST    42min Fri 2026-07-17 16:20:07 JST 15min ago fwupd-refresh.timer          fwupd-refresh.service
Fri 2026-07-17 21:38:00 JST  5h 1min -                                   - snap.certbot.renew.timer     snap.certbot.renew.service
Sat 2026-07-18 00:00:00 JST       7h -                                   - sa-update.timer              sa-update.service
Sat 2026-07-18 00:00:00 JST       7h -                                   - sysstat-rotate.timer         sysstat-rotate.service
Sat 2026-07-18 00:00:00 JST       7h Fri 2026-07-17 08:39:26 JST    7h ago unbound-anchor.timer         unbound-anchor.service
Sat 2026-07-18 00:00:29 JST       7h Fri 2026-07-17 09:27:16 JST    7h ago logrotate.timer              logrotate.service
Sat 2026-07-18 00:07:00 JST       7h -                                   - sysstat-summary.timer        sysstat-summary.service
Sat 2026-07-18 00:08:00 JST       7h Fri 2026-07-17 08:39:38 JST    7h ago pmie_daily.timer             pmie_daily.service
Sat 2026-07-18 00:10:00 JST       7h Fri 2026-07-17 08:39:39 JST    7h ago pmlogger_daily.timer         pmlogger_daily.service
Sat 2026-07-18 00:26:39 JST       7h Fri 2026-07-17 09:07:06 JST    7h ago plocate-updatedb.timer       plocate-updatedb.service
Sat 2026-07-18 08:54:26 JST      16h Fri 2026-07-17 08:54:26 JST    7h ago systemd-tmpfiles-clean.timer systemd-tmpfiles-clean.service
Sun 2026-07-19 01:00:00 JST 1 day 8h Thu 2026-07-16 10:29:45 JST         - raid-check.timer             raid-check.service
Mon 2026-07-20 00:03:49 JST   2 days Thu 2026-07-16 10:29:45 JST         - fstrim.timer                 fstrim.service
snap.certbot.renew.timer が登録されています
snap.certbot.renew.timer のユニットファイルを確認
# vi /etc/systemd/system/snap.certbot.renew.timer
[Unit]
# Auto-generated, DO NOT EDIT
Description=Timer renew for snap application certbot.renew
Requires=var-lib-snapd-snap-certbot-5758.mount
After=var-lib-snapd-snap-certbot-5758.mount
X-Snappy=yes

[Timer]
Unit=snap.certbot.renew.service
OnCalendar=*-*-* 10:31
OnCalendar=*-*-* 21:38

[Install]
WantedBy=timers.target
上記設定によるとOnCalenderパラメータで指定されている毎日10時31分と21時38分に更新を試みます(ただし、更新ごとにランダムに設定時刻が変更します)
snap.certbot.renew.serviceのユニットファイルを確認
# vi /etc/systemd/system/snap.certbot.renew.service
[Unit]
# Auto-generated, DO NOT EDIT
Description=Service for snap application certbot.renew
Requires=var-lib-snapd-snap-certbot-5758.mount
Wants=network.target
After=var-lib-snapd-snap-certbot-5758.mount network.target snapd.apparmor.service
X-Snappy=yes

[Service]
EnvironmentFile=-/etc/environment
ExecStart=/usr/bin/snap run --timer="00:00~24:00/2" certbot.renew
SyslogIdentifier=certbot.renew
Restart=no
WorkingDirectory=/var/snap/certbot/5758
TimeoutStopSec=30s
Type=oneshot
ただし、証明書を使用するWebサーバーの再起動は行われませんので、更新後に自動的に実行されるスクリプトを設定します
# vi /etc/letsencrypt/renewal-hooks/post/web_restart.sh

下記内容を記述
#!/bin/bash
systemctl reload httpd
# chmod 755 /etc/letsencrypt/renewal-hooks/post/web_restart.sh
2. Apache のhttps 化
下記をインストールしておく
# dnf -y install mod_ssl
2.1 ssl.conf ファイルの編集
# vi /etc/httpd/conf.d/ssl.conf

43 行目 コメント解除して変更
DocumentRoot "/var/www/html/[FQDN]"

44 行目 コメント解除して変更
ServerName [FQDN]:443

85行目 コメントにしてその下に追加
# SSLCertificateFile /etc/pki/tls/certs/localhost.crt
SSLCertificateFile /etc/letsencrypt/live/[FQDN]/cert.pem

93行目 コメントにしてその下に追加
# SSLCertificateKeyFile /etc/pki/tls/private/localhost.key
SSLCertificateKeyFile /etc/letsencrypt/live/[FQDN]/privkey.pem

103行目 追加
SSLCertificateChainFile /etc/letsencrypt/live/[FQDN]/chain.pem
Apache を再起動
# systemctl restart httpd
Firewallでhttpsを許可する
# firewall-cmd --add-service=https --permanent
# firewall-cmd --reload
2.2 HTTP 通信を HTTPS へリダイレクト
バーチャルホスト設定ファイルに追記する
#  vi /etc/httpd/conf.d/vhost.conf

<VirtualHost *:80>
RewriteEngine On ←追加
RewriteCond %{HTTPS} off ←追加
RewriteRule ^(.*)$ https://%{HTTP_HOST}%{REQUEST_URI} [R=301,L] ←追加

DocumentRoot /var/www/html/[FQDN]
ServerName [FQDN]
ServerAdmin [email address]
ErrorLog logs/[FQDN].error_log
CustomLog logs/[FQDN].access_log combined
</VirtualHost>

<Directory "/var/www/html/[FQDN]">
Options FollowSymLinks
AllowOverride All
</Directory>
Apache を再起動
# systemctl restart httpd
3. Mail サーバーにSSL/TLS(Let's Encrypt) の設定
3.1 メールサーバー用証明書の取得
メールサーバー用の証明書を取得するが上記と同様の方法では取得できないので一度web サーバーを止めてから行う
# systemctl stop httpd.service
# certbot certonly --standalone -d mail.[domain name]
Saving debug log to /var/log/letsencrypt/letsencrypt.log
Requesting a certificate for mail.korodes.com

Successfully received certificate.
Certificate is saved at: /etc/letsencrypt/live/mail.[Domain]/fullchain.pem
Key is saved at:         /etc/letsencrypt/live/mail.[Domain]/privkey.pem
This certificate expires on 2026-10-15.
These files will be updated when the certificate renews.
Certbot has set up a scheduled task to automatically renew this certificate in the background.

- - - - - - - - - - - - - - - - - - - - - - - - - - - - - - - - - - - - - - - -
If you like Certbot, please consider supporting our work by:
 * Donating to ISRG / Let's Encrypt:   https://letsencrypt.org/donate
 * Donating to EFF:                    https://eff.org/donate-le
- - - - - - - - - - - - - - - - - - - - - - - - - - - - - - - - - - - - - - - -
# systemctl start httpd
3.2 Postfixの設定
# vi /etc/postfix/main.cf

718, 724行目 あたり: コメント化
#smtpd_tls_cert_file = /etc/pki/tls/certs/postfix.pem
#smtpd_tls_key_file = /etc/pki/tls/private/postfix.key

最終行に追記
smtpd_use_tls = yes
smtp_tls_mandatory_protocols = !SSLv2, !SSLv3
smtpd_tls_mandatory_protocols = !SSLv2, !SSLv3
smtpd_tls_cert_file = /etc/letsencrypt/live/mail.[Domain]/fullchain.pem
smtpd_tls_key_file = /etc/letsencrypt/live/mail.[Domain]/privkey.pem
smtpd_tls_session_cache_database = btree:${data_directory}/smtpd_scache
# vi /etc/postfix/master.cf

19-22行目 : コメント解除
submission inet n       -       n       -       -       smtpd
    -o syslog_name=postfix/submission
    -o smtpd_tls_security_level=encrypt
    -o smtpd_sasl_auth_enable=yes

38-41行目 : コメント解除
submissions     inet  n       -       n       -       -       smtpd
    -o syslog_name=postfix/smtps
    -o smtpd_tls_wrappermode=yes
    -o smtpd_sasl_auth_enable=yes
3.3 Dovecotの設定
# vi /etc/dovecot/conf.d/10-ssl.conf

9行目:確認
ssl = yes

14,15行目:コメントにして下に証明書/鍵ファイル指定追加
#ssl_cert = </etc/pki/dovecot/certs/dovecot.pem
#ssl_key = </etc/pki/dovecot/private/dovecot.pem
ssl_cert = </etc/letsencrypt/live/mail.[Domain]/fullchain.pem
ssl_key = </etc/letsencrypt/live/mail.[Domain]/privkey.pem
firewallでPort 587を許可して、postfix dovecot再起動
# firewall-cmd --add-port=587/tcp --permanent
# firewall-cmd --reload
# systemctl restart postfix dovecot
3.4 Thunderbirdの設定
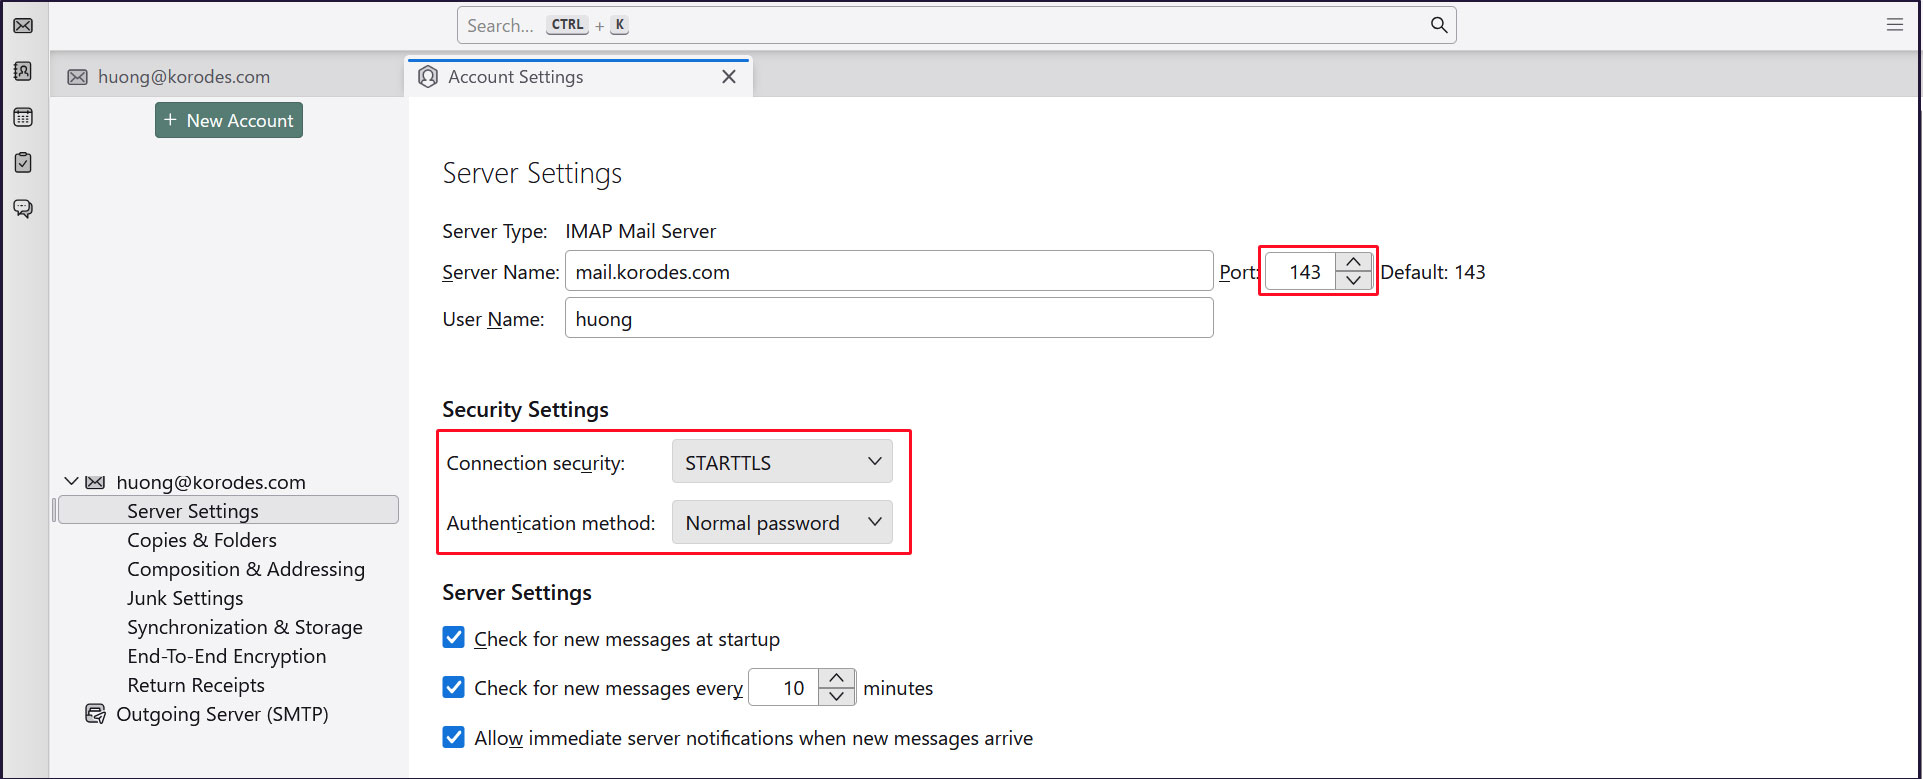
受信サーバー
Port : 143
Connection security : STARTTLS
Authentication method : Normal password
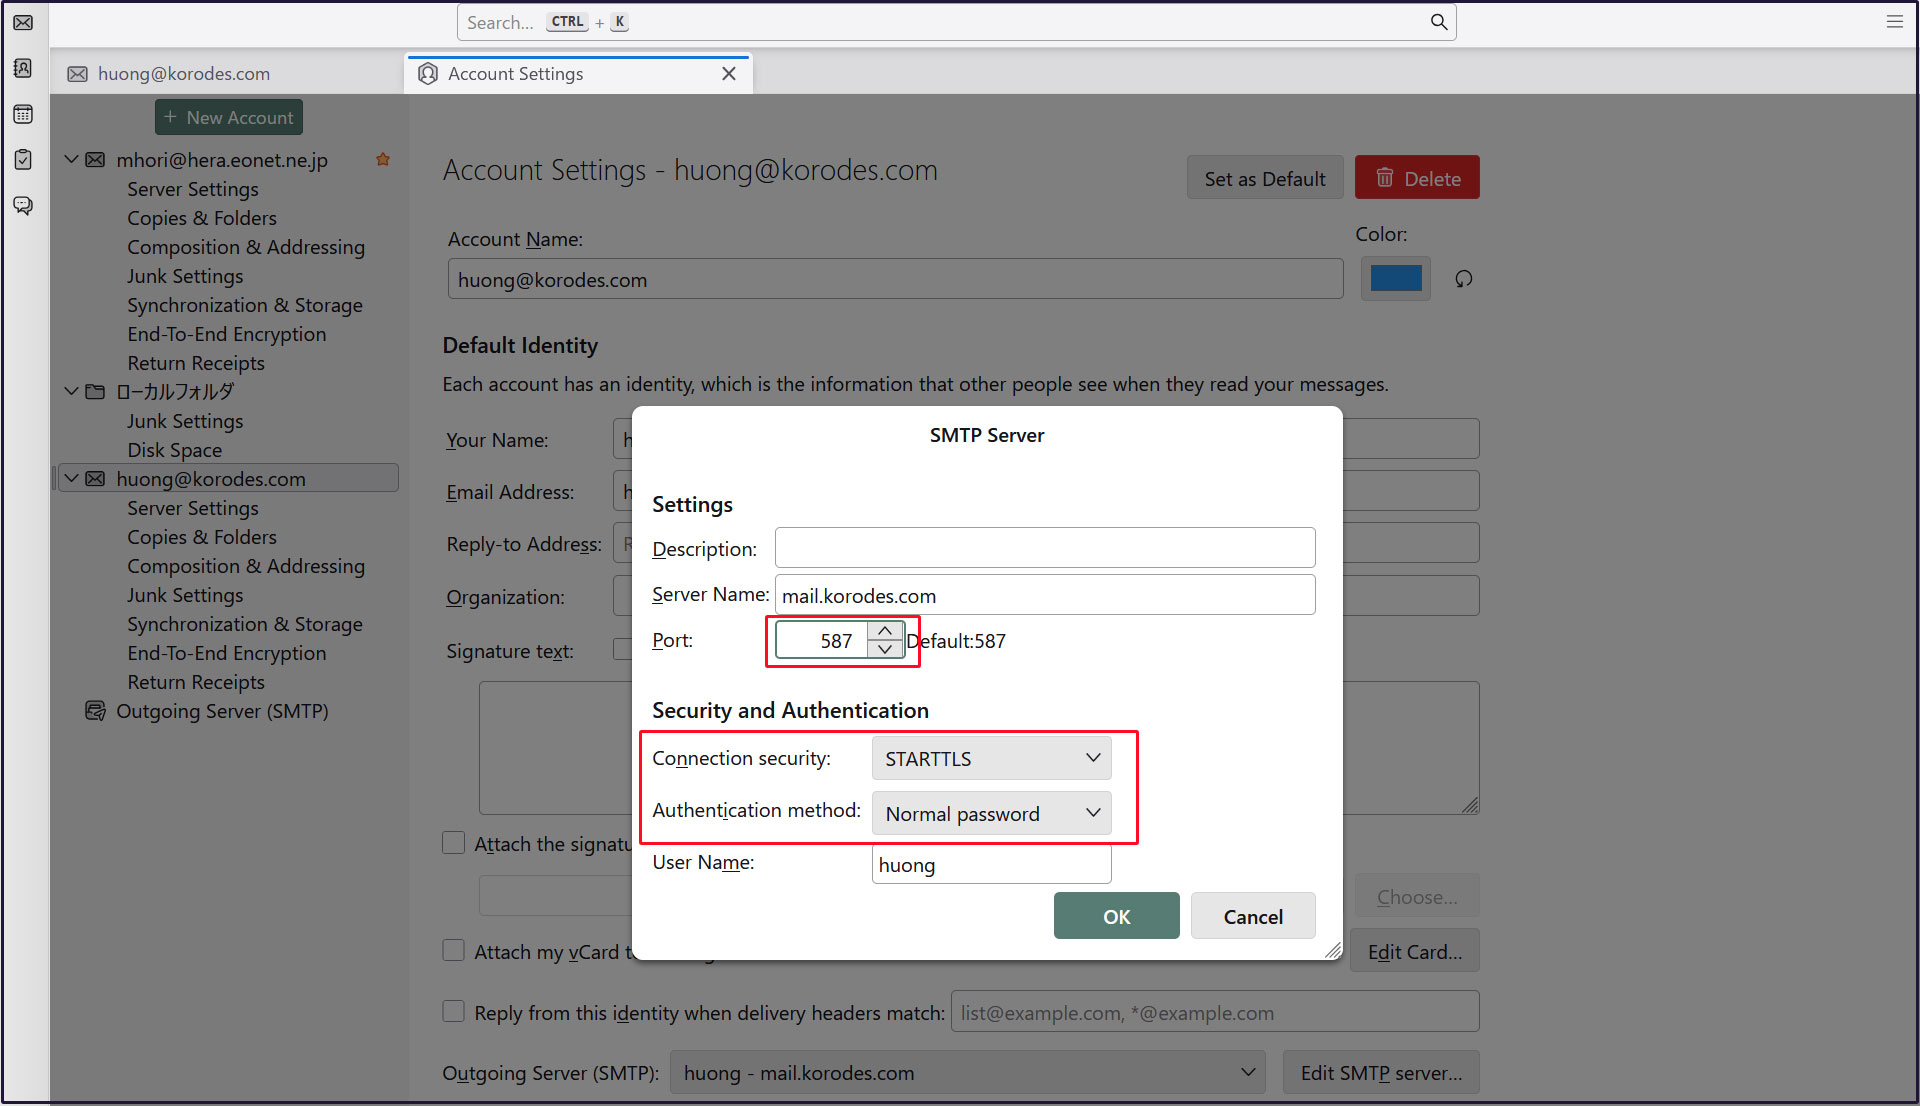
送信サーバー
Port : 587
Connection security : STARTTLS
Authentication method : Normal password