

公開鍵暗号方式を用いた認証によるSSH接続
公開鍵、秘密鍵ペアの作成
OpenSSH 使って Linux サーバに接続するユーザの公開鍵と秘密鍵のペアを作成します。
鍵ペアの作成は ssh-keygen をを使います。
公開鍵と秘密鍵のペアの作成はリモートログインするユーザ権限で実行します。
作成先・ファイル名を指定しなければ、 /home/(ユーザ名)/.ssh/ に id_ed25519, id_ed25519.pub が作成される。 途中、鍵用のパスワードも入力する。
# su - huong
[huong@Lepard~]$ ssh-keygen -t ed25519
Generating public/private ed25519 key pair.
Enter file in which to save the key (/home/huong/.ssh/id_ed25519):
Created directory '/home/huong/.ssh'.
Enter passphrase for "/home/huong/.ssh/id_ed25519" (empty for no passphrase):
Enter same passphrase again:
Your identification has been saved in /home/huong/.ssh/id_ed25519
Your public key has been saved in /home/huong/.ssh/id_ed25519.pub
The key fingerprint is:
SHA256:OvKH+r2OkMT84qp+zZuoxblgVGJZGceXpC+WBnpiktY huong@Lepard
The key's randomart image is:
+--[ED25519 256]--+
|   o+....        |
|  o....o         |
| + o ..          |
|..=o. o          |
|o* E+= .S        |
|= +.+o..         |
| o +B +.         |
|. oooBo+.        |
|o+++o==o+.       |
+----[SHA256]-----+
$ cat ~/.ssh/id_ed25519.pub >> ~/.ssh/authorized_keys
$ chmod 600 ~/.ssh/authorized_keys
$ chmod 700 ~/.ssh/
作成した秘密鍵id_ed25519 をwinSCPでWindowsの[c:\USERS\ユーザー\.ssh\]配下に保存する
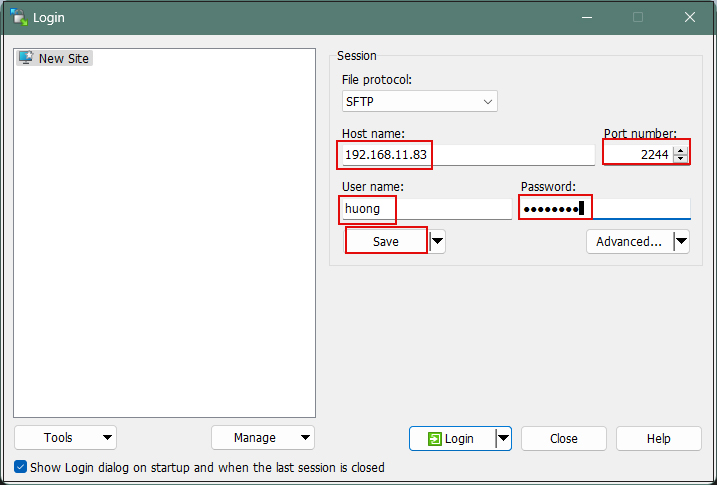
Winscpを起動する
Host name : サーバーのIPアドレス
Port number : SSHポート
User name : サーバーのログインユーザー
Password : 同上ユーザーのパスワード
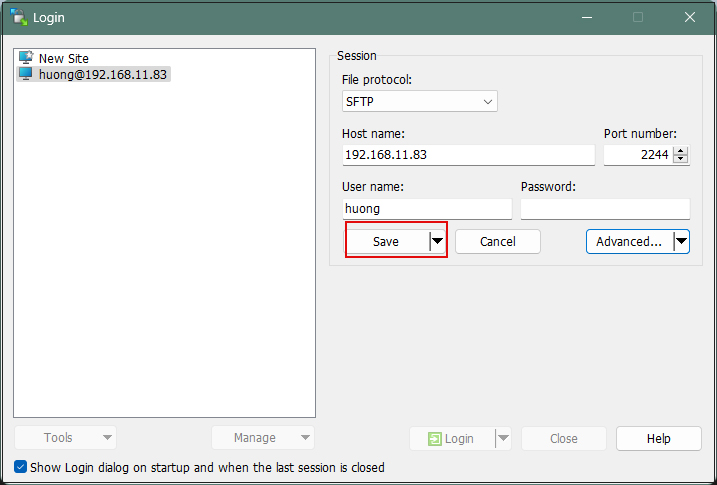
を入力し、「Save」
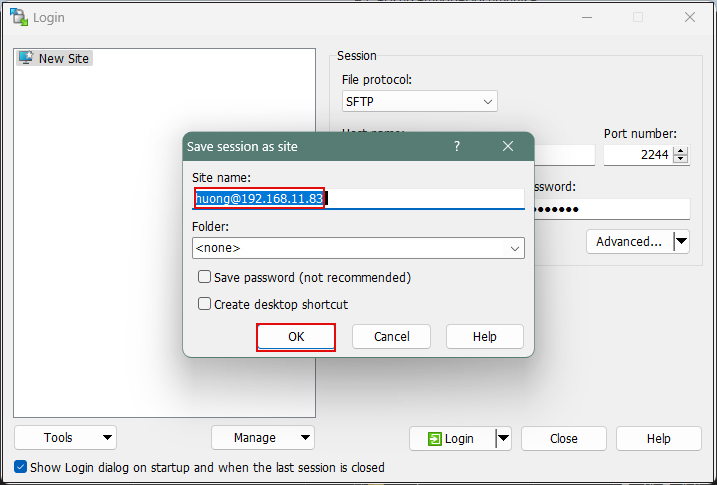
Site name : 任意の名前
「OK」クリック
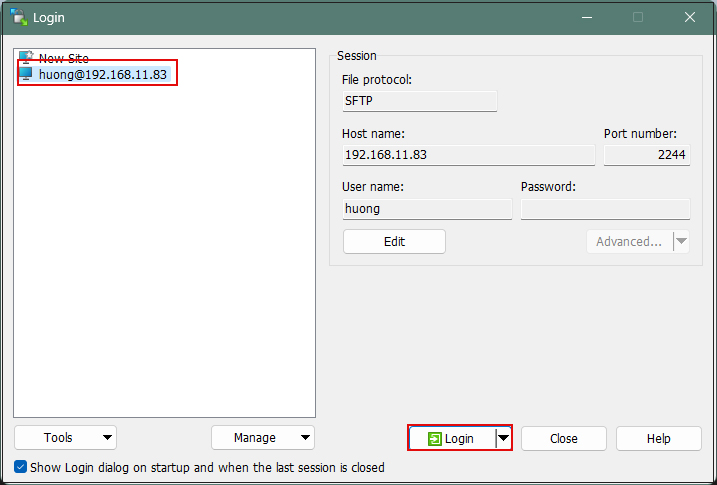
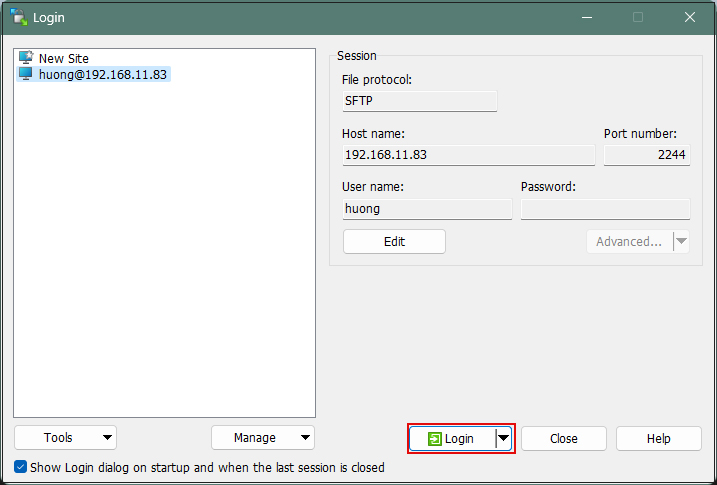
該当サーバーを確認後、「Login」クリック
下記画面が出れば「Update」クリック
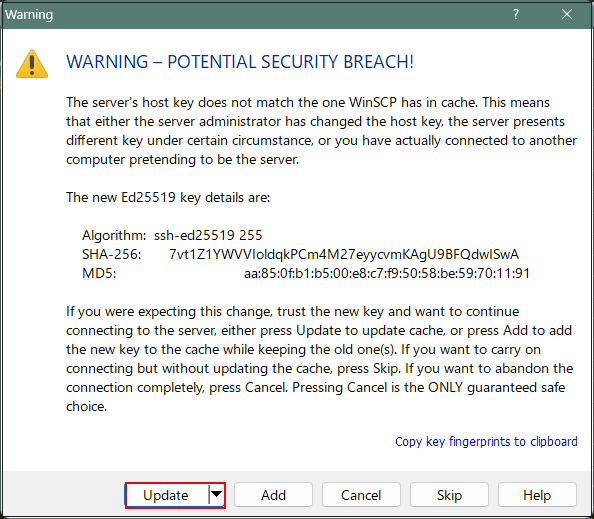
Passwordの欄にはログインユーザーのパスワード
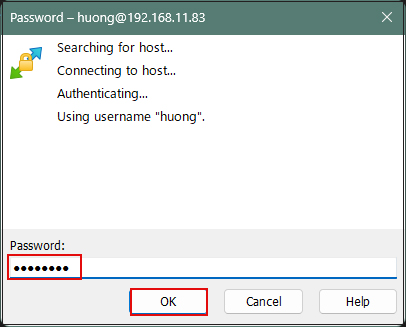
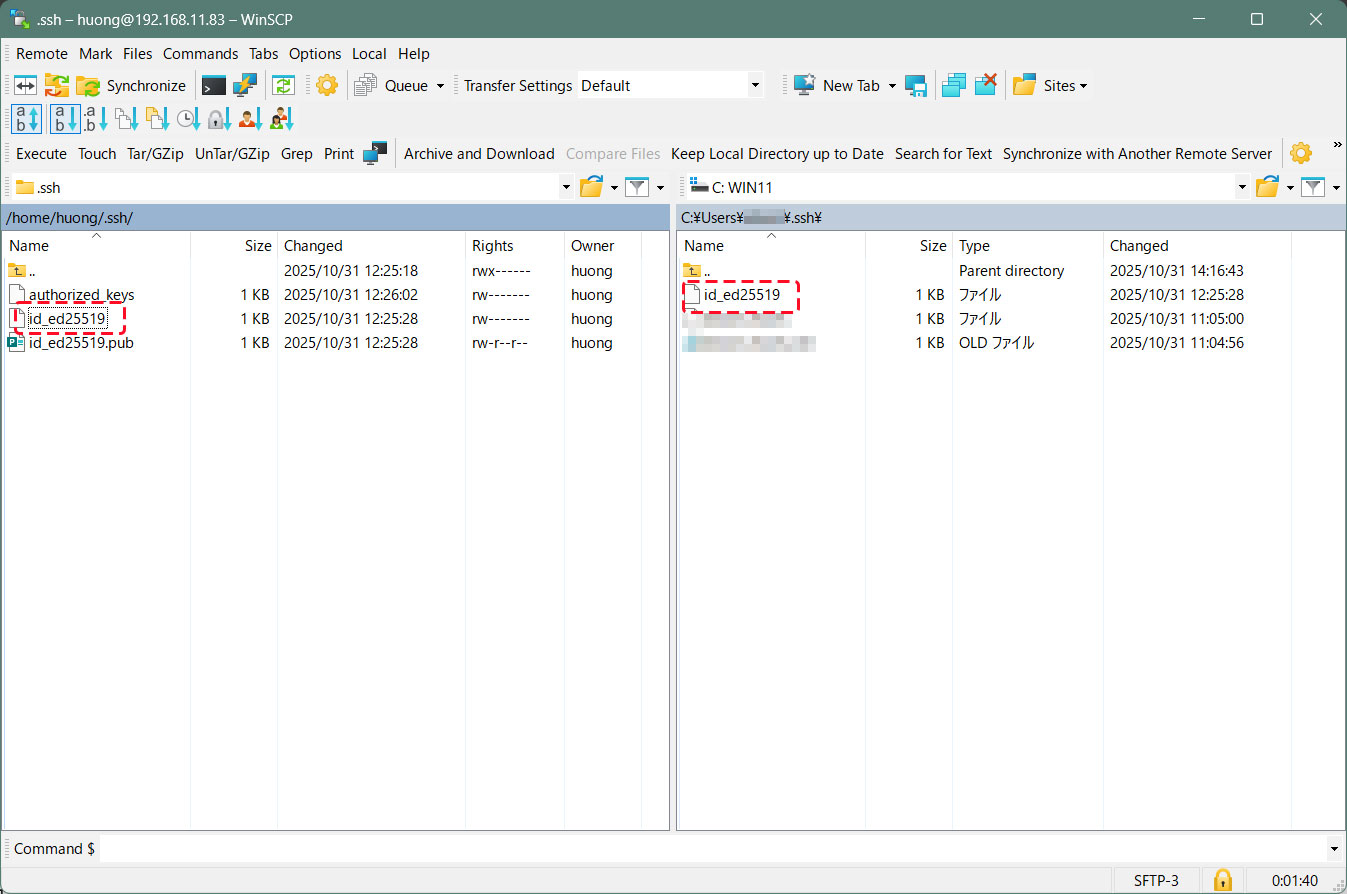
接続されると、左欄サーバー側、右欄PC(Windows)側になる。
.sshディレクトリーにある"id_ed25519"ファイルを右欄Windowsの[c:\USERS\ユーザー\.ssh\]配下にコピーする
SSH 設定ファイルの編集
パスワード認証をできないようにするため、 SSH 設定ファイルを編集する。
今度は一般ユーザではなく、 su - で rootになり行う。
$ su -
Password:
# vi /etc/ssh/sshd_config
# 65行目 : パスワード認証不可に変更
PasswordAuthentication no

# systemctl restart sshd
Tabby Terminalで接続する方法
オプション[-i c:\USERS\xxxxx\.ssh\id_ed25519]でkeyを指定する
C:\Users\xxxxx>ssh huong@192.168.11.83 -p 2244 -i c:\USERS\xxxxx\.ssh\id_ed25519
Enter passphrase for key 'c:\USERS\xxxxx\.ssh\id_ed25519': [公開鍵の作成時作成したパスワード]
Activate the web console with: systemctl enable --now cockpit.socket
Last login: Wed Jul 1 10:01:28 2026
huong@Lepard:~$
PuTTYgen を使った秘密鍵の作成
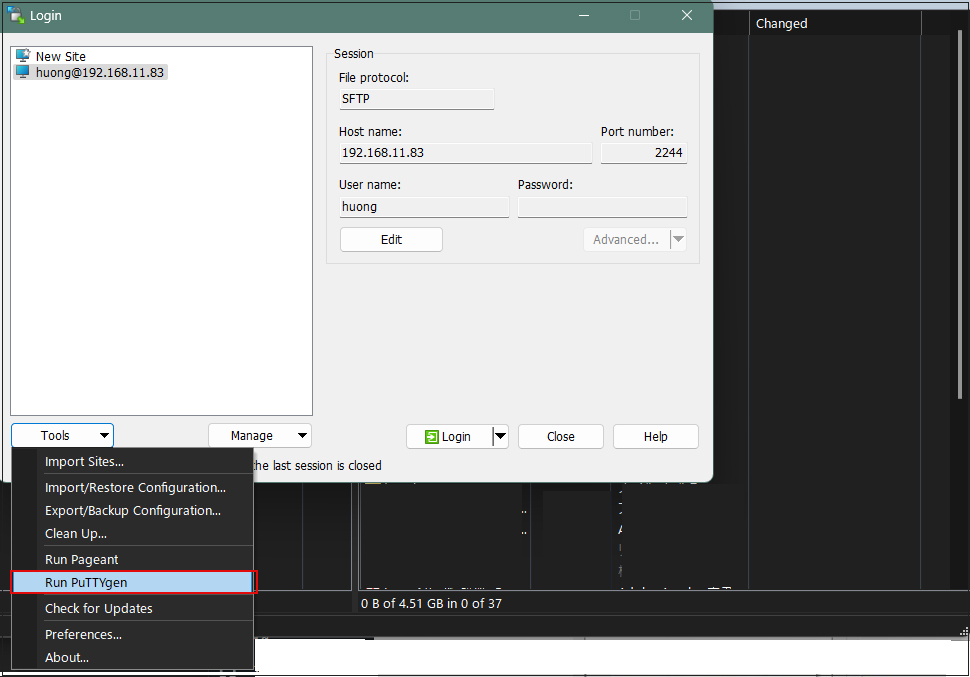
Winscpを起動し「Tools」から[Run Puttygen] を起動する
該当サーバーを選択
Loadをクリック
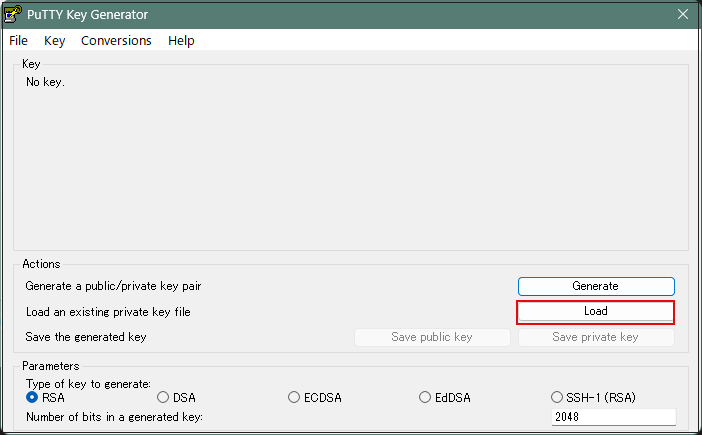
[ ファイルを開くダイアログ ] が開くのでファイルの種類を [ All Files (*.*) ] に変更して Linux サーバから転送した秘密鍵 id_ed25519 を読み込みます。
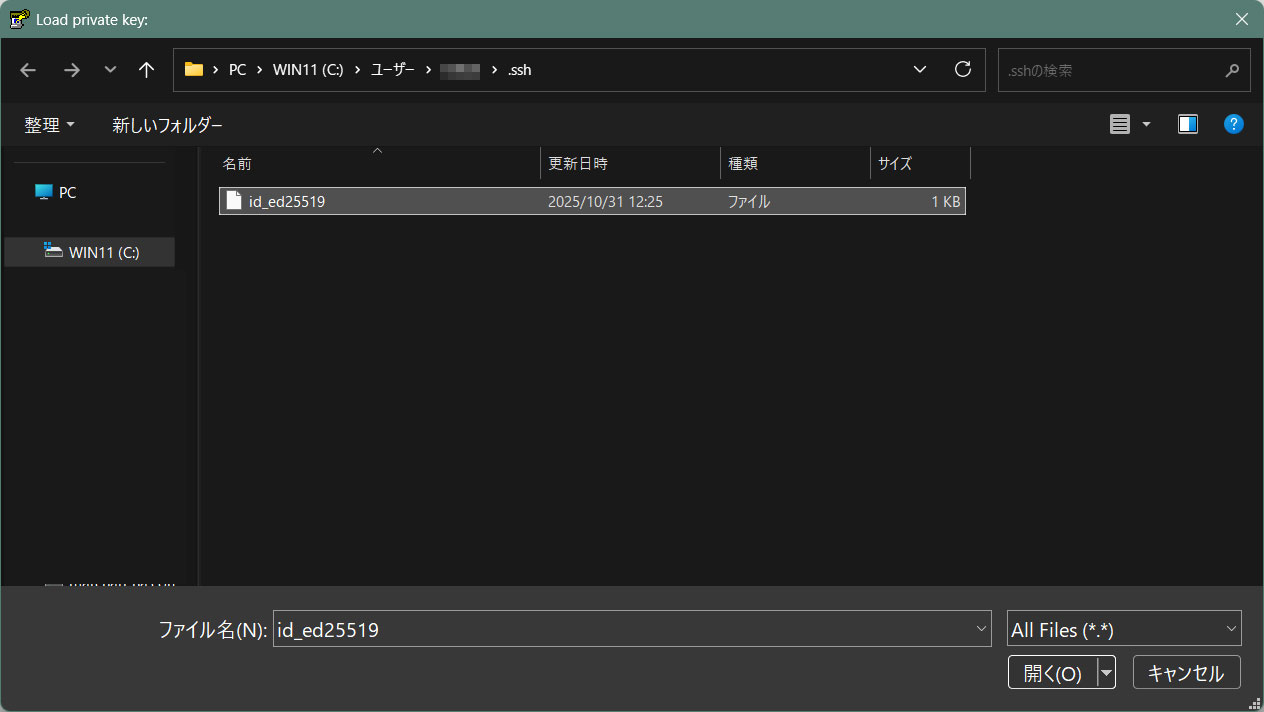
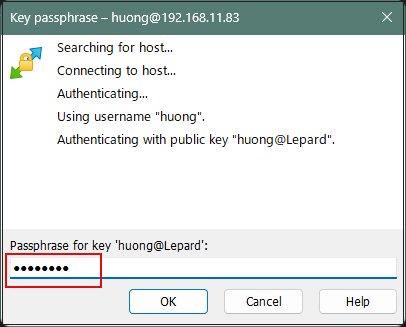
パスワードは上記「公開鍵、秘密鍵ペアの作成」で設定したパスワード
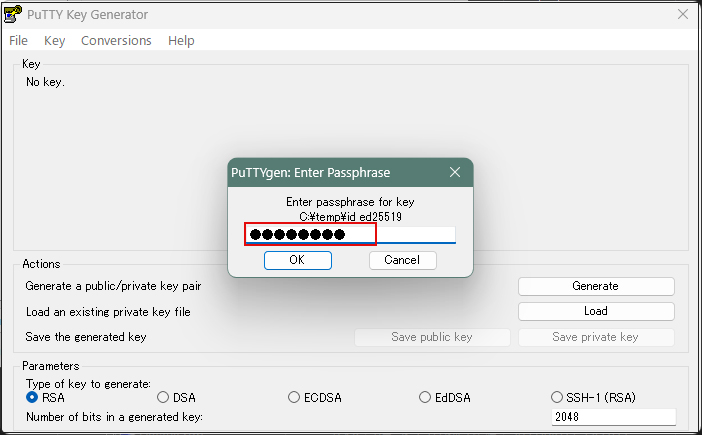
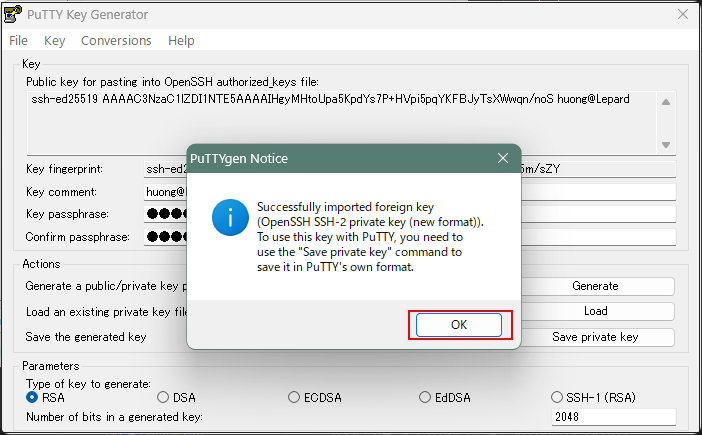
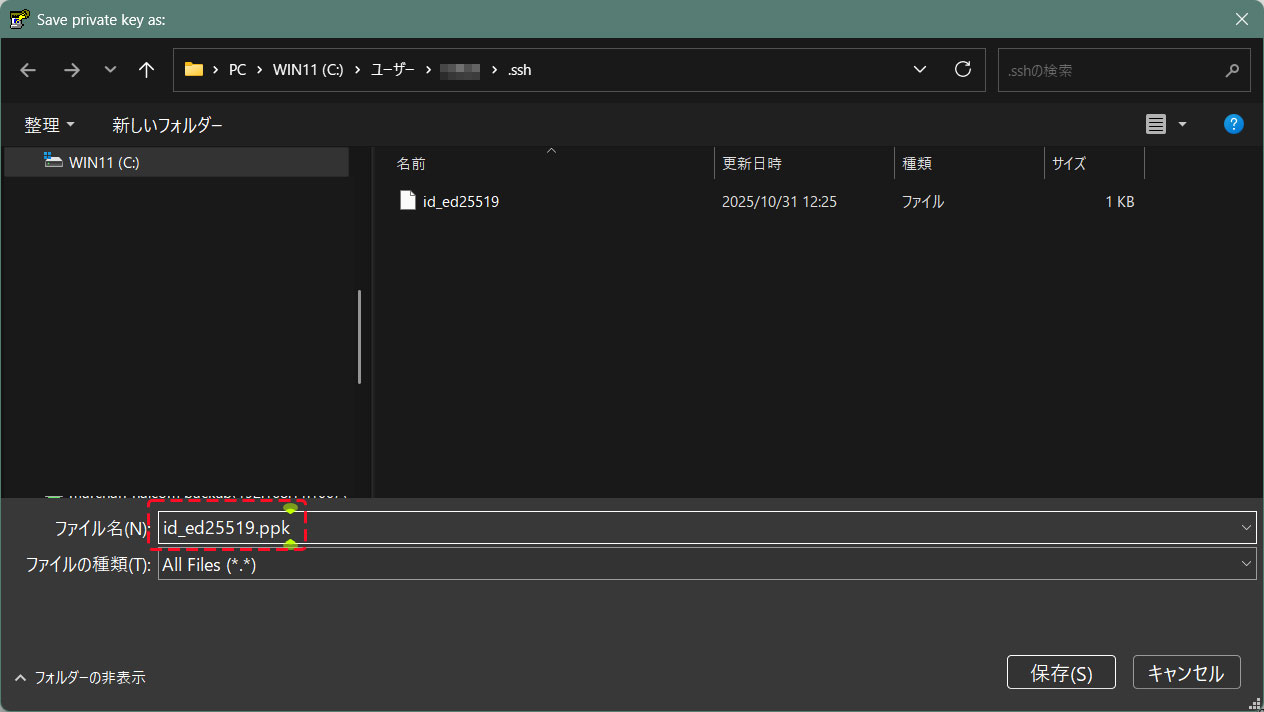
「Save private key」をクリック
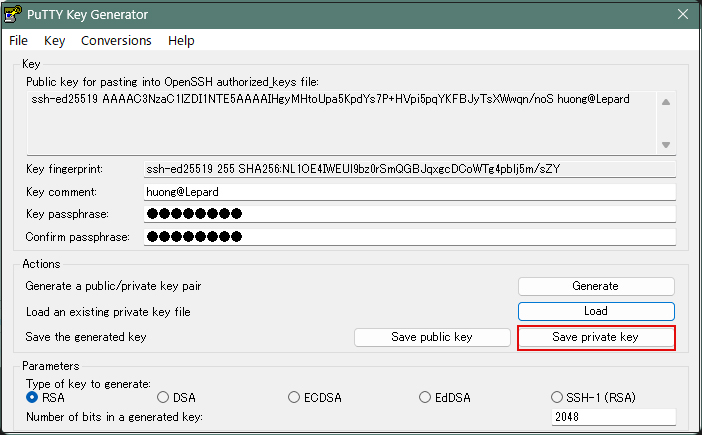
Windows側に先ほど保存した「id_ed25519」と同じところに拡張子「.ppk」として「id_ed25519.ppk」の名称で保存
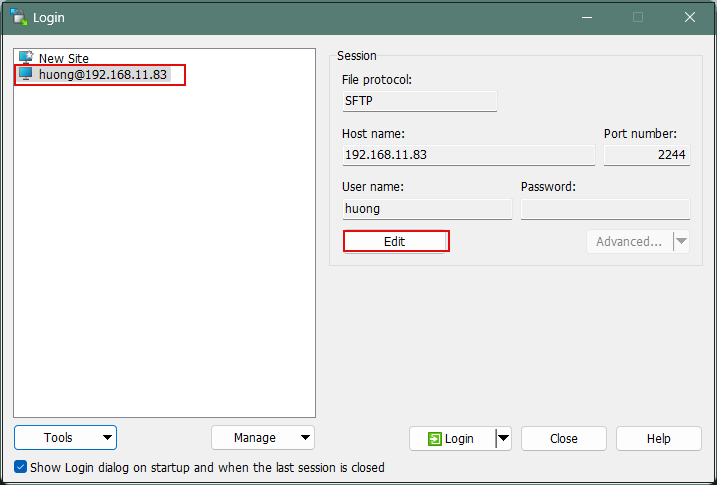
該当サーバーを選択し、「Edit」クリック
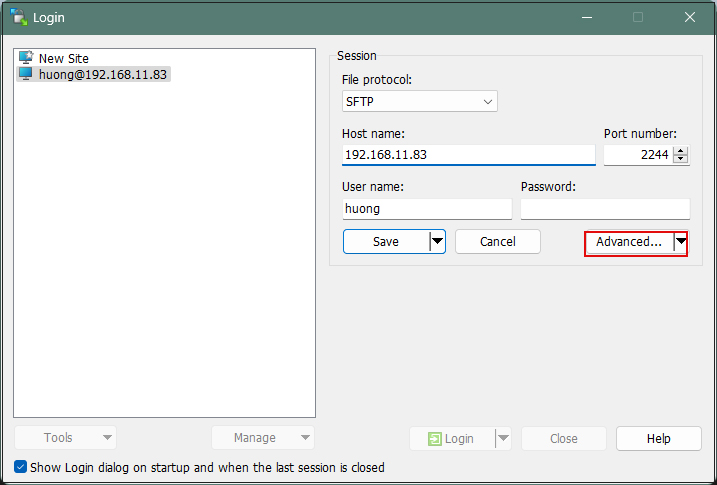
「Advanced」をクリック
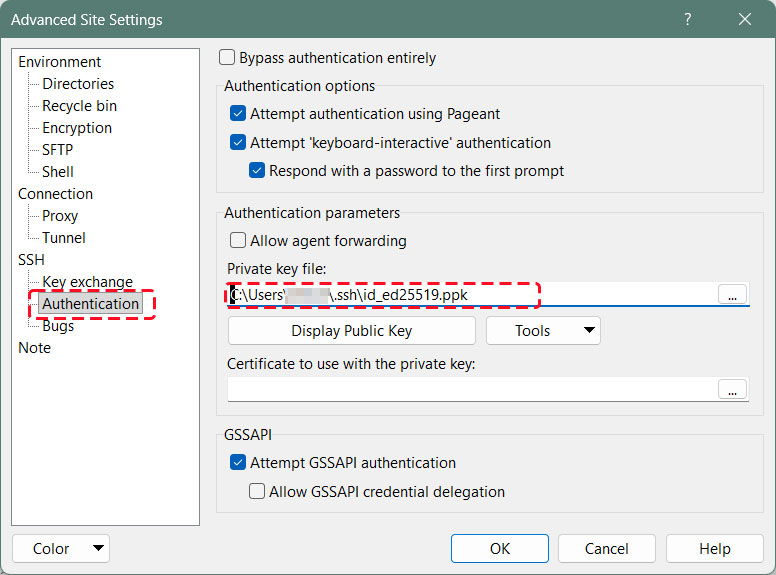
「Authentication」メニューを開き、「Private key file」に先ほどWindowsに保存した「id_ed25519.ppk」を指定する
「Save」をクリック
「Login」をクリック
パスワードは上記「公開鍵、秘密鍵ペアの作成」で設定したパスワード
Tabby Terminalで接続する場合は以下のように
C:\Users\xxxxx>ssh huong@192.168.11.83 -p 2244 -i c:\USERS\xxxxx\.ssh\id_ed25519.ppk
Enter passphrase for key 'c:\USERS\xxxxx\.ssh\id_ed25519.ppk': ←公開鍵作成の時に指定したパスワード
Activate the web console with: systemctl enable --now cockpit.socket
もし、下記のようなエラーが出た場合は秘密鍵をOpenSSH形式に変換する
C:\Users\xxxxx>ssh huong@192.168.11.83 -p 2244 -i c:\USERS\xxxxx\.ssh\id_ed25519.ppk
Load key "c:\USERS\xxxxx\.ssh\id_ed25519.ppk": invalid format
huong@192.168.11.83: Permission denied (publickey,gssapi-keyex,gssapi-with-mic).
[WinSCP]を起動し、該当サーバーを選択後、[Run PuTTygen]を起動し、[Conversions]タブの[Import key]で秘密キーをインポートする
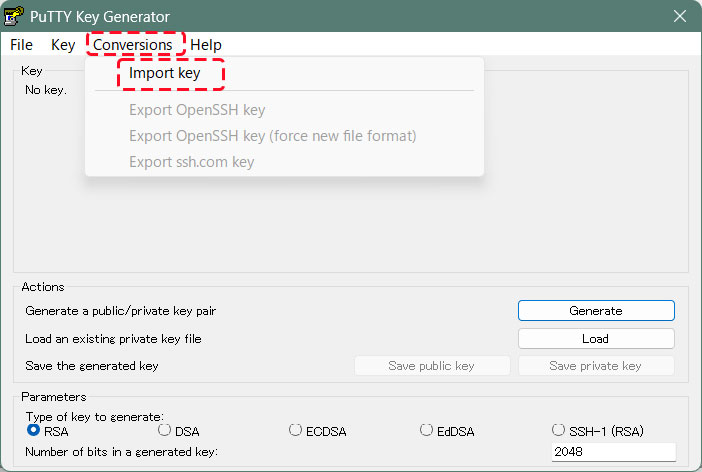
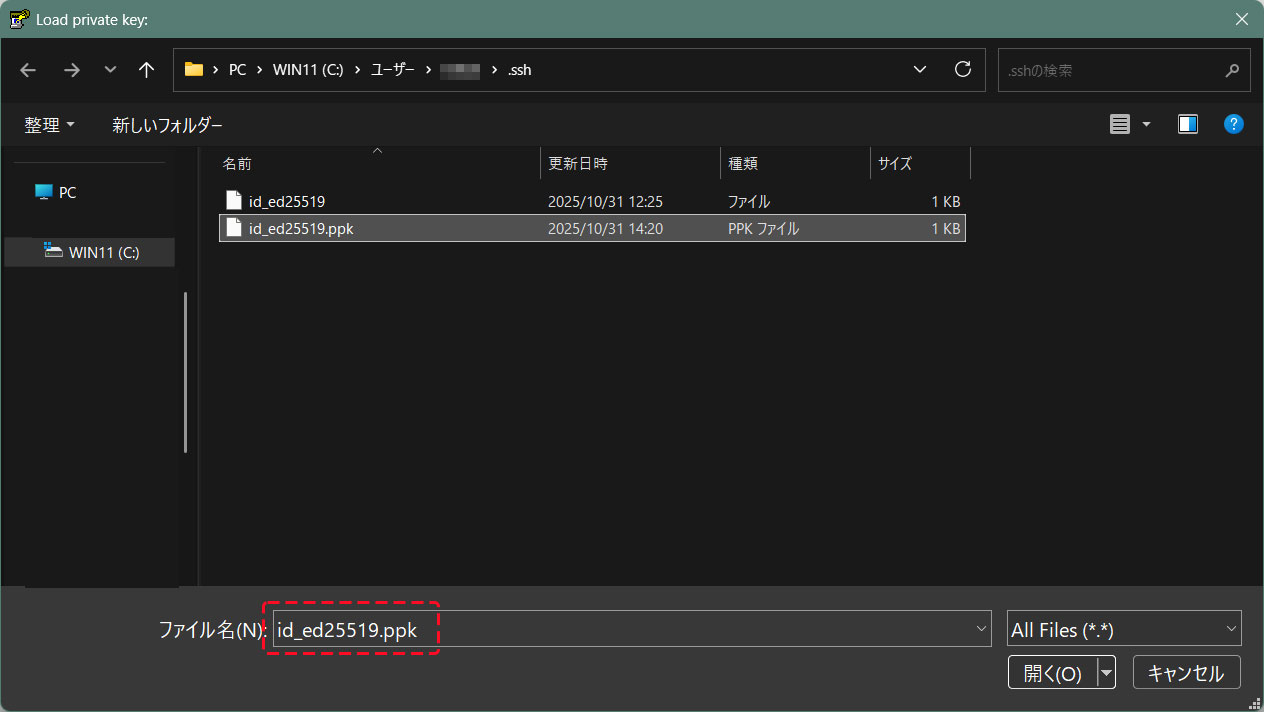
インポートした秘密キーをOpenSSH形式に変換して、別名で保存する
公開鍵作成の時に指定したパスワード
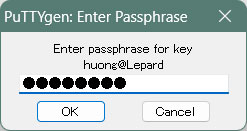
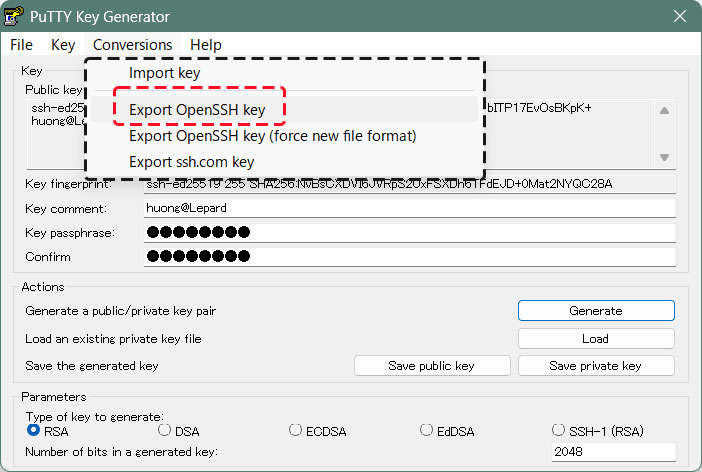
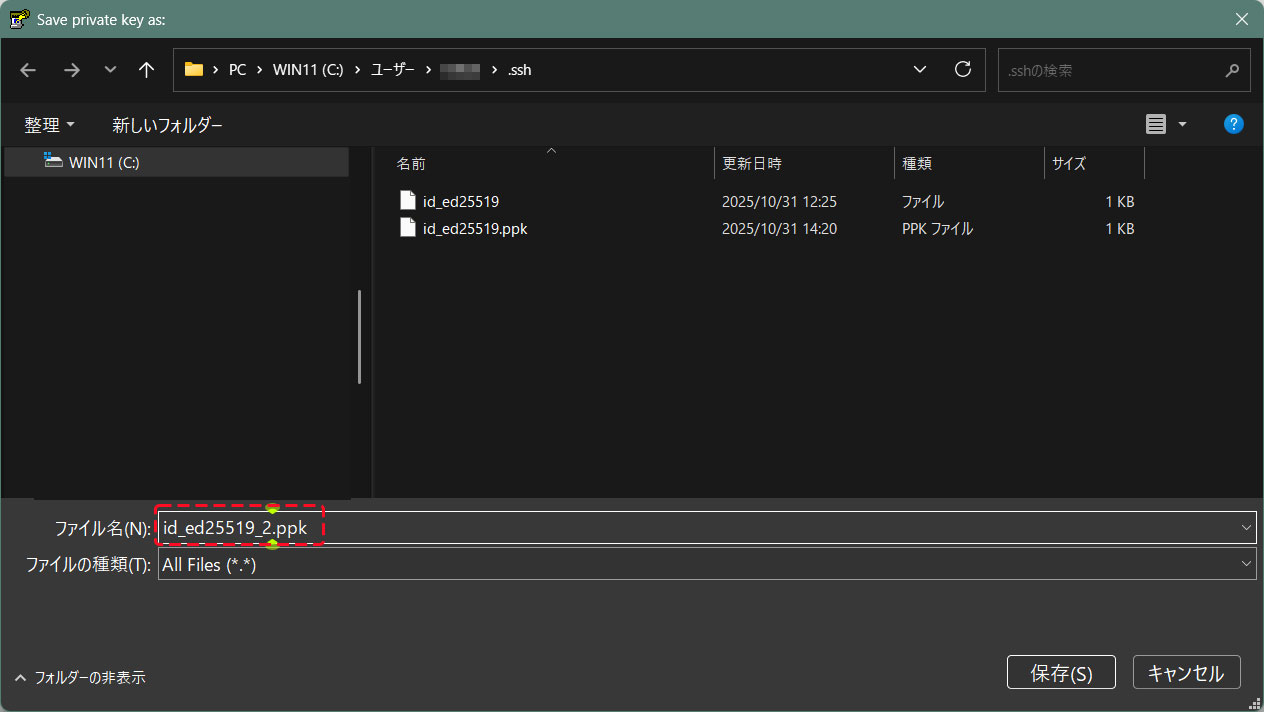
openssh形式に変更した[id_ed25519_2.ppk]を利用し、下記の通り接続できる
C:\Users\xxxxx>ssh huong@192.168.11.83 -p 2244 -i c:\USERS\xxxxx\.ssh\id_ed25519_2.ppk
Enter passphrase for key 'c:\USERS\xxxxx\.ssh\id_ed25519_2.ppk': ←公開鍵作成の時に指定したパスワード
Activate the web console with: systemctl enable --now cockpit.socket
Last login: Wed Jul 1 10:06:20 2026 from 192.168.11.14