1. 証明書を取得する (Let's Encrypt)
1.1 事前準備
1.mod_sslを有効にする
# a2enmod ssl
2.パッケージ管理システムSnappyインストール
Let’s EncryptのSSL証明書発行ツール「certbot」は「snap」を利用したインストールが推奨されていますので、まずSnapdをインストールします。

# apt -y install snapd
snapdのバージョンを最新にする
# snap install core
core 16-2.61.4-20260225 from Canonical✓ installed

# snap refresh core
snap "core" has no updates available
バージョン確認
# snap --version
snap    2.68.3-3+deb13u1+b6
snapd   2.68.3-3+deb13u1+b6
series  16
debian  13
kernel  6.12.88+deb13-amd64
1.2.certbot パッケージインストール
# snap install --classic certbot
certbot 5.6.0 from Certbot Project (certbot-eff✓) installed
/snap/bin/certbotへのシンボリックリンクを作成
# ln -s /snap/bin/certbot /usr/bin/certbot
確認する
# ls -la /usr/bin/certbot
lrwxrwxrwx 1 root root 17 May 20 10:34 /usr/bin/certbot -> /snap/bin/certbot

# ls -la /snap/bin/certbot
lrwxrwxrwx 1 root root 13 May 20 10:33 /snap/bin/certbot -> /usr/bin/snap
1.3 Let's Encrypt証明書の取得
Apache httpd や Nginx などの Webサーバーが稼働していることが前提となります。
作業を実施するサーバーで Webサーバーが稼働していない場合は 下記の「Webサーバーが稼働していない場合のLet's Encrypt証明書の取得」の手順を実行。
また、インターネット側から、作業を実施するサーバー (証明書を取得したい FQDN のサーバー) の 80 ポート宛てにアクセス可能であることも前提です。
# certbot certonly --webroot -w /var/www/html/[FQDN] -d [FQDN]
# 初回のみメールアドレスの登録と利用条件への同意が必要 受信可能なメールアドレスを指定
Saving debug log to /var/log/letsencrypt/letsencrypt.log
Enter email address or hit Enter to skip.
 (Enter 'c' to cancel): [mail address]

- - - - - - - - - - - - - - - - - - - - - - - - - - - - - - - - - - - - - - - -
Please read the Terms of Service at:
https://letsencrypt.org/documents/LE-SA-v1.5-February-24-2025.pdf
You must agree in order to register with the ACME server. Do you agree?
- - - - - - - - - - - - - - - - - - - - - - - - - - - - - - - - - - - - - - - -
(Y)es/(N)o: y

- - - - - - - - - - - - - - - - - - - - - - - - - - - - - - - - - - - - - - - -
Would you be willing, once your first certificate is successfully issued, to
share your email address with the Electronic Frontier Foundation, a founding
partner of the Let's Encrypt project and the non-profit organization that
develops Certbot? We'd like to send you email about our work encrypting the web,
EFF news, campaigns, and ways to support digital freedom.
- - - - - - - - - - - - - - - - - - - - - - - - - - - - - - - - - - - - - - - -
(Y)es/(N)o: y
Account registered.
Requesting a certificate for [FQDN]

Successfully received certificate.
Certificate is saved at: /etc/letsencrypt/live/[FQDN]/fullchain.pem
Key is saved at:         /etc/letsencrypt/live/[FQDN]/privkey.pem
This certificate expires on 2026-08-18.
These files will be updated when the certificate renews.
Certbot has set up a scheduled task to automatically renew this certificate in the background.

- - - - - - - - - - - - - - - - - - - - - - - - - - - - - - - - - - - - - - - -
If you like Certbot, please consider supporting our work by:
 * Donating to ISRG / Let's Encrypt:   https://letsencrypt.org/donate
 * Donating to EFF:                    https://eff.org/donate-le
- - - - - - - - - - - - - - - - - - - - - - - - - - - - - - - - - - - - - - - -
「Successfully received certificate.」と表示されれば成功
メッセージ中に記載の通り [/etc/letsencrypt/live/<FQDN>/] 配下に次の証明書が取得されている
# cert.pem
# chain.pem
# fullchain.pem
# privkey.pem
Webサーバーが稼働していない場合のLet's Encrypt証明書の取得
インターネット側から当作業を実施するサーバーの 80 ポート宛てにアクセス可能であることは前提となります
# [--standalone] 指定で 簡易 Webサーバー機能を使用
# -d [証明書を取得したいFQDN]
FQDN (Fully Qualified Domain Name) : ホスト名.ドメイン名を省略なしで表記
# 証明書を取得したいFQDNが複数ある場合は、-d [証明書を取得したいFQDN] を複数指定
# certbot certonly --standalone -d [FQDN]
1.4 証明書を自動更新 (Let's Encrypt)
①登録前のテスト
まず以下の--dry-runオプションを使って自動更新をテストしてみる。このオプションでは、証明書は更新されずに動作確認のみ実施されるため、証明書の取得回数制限に引っかかる心配もない
# certbot renew --dry-run

Saving debug log to /var/log/letsencrypt/letsencrypt.log

- - - - - - - - - - - - - - - - - - - - - - - - - - - - - - - - - - - - - - - -
Processing /etc/letsencrypt/renewal/[FQDN].conf
- - - - - - - - - - - - - - - - - - - - - - - - - - - - - - - - - - - - - - - -
Account registered.
Simulating renewal of an existing certificate for [FQDN]

- - - - - - - - - - - - - - - - - - - - - - - - - - - - - - - - - - - - - - - -
Congratulations, all simulated renewals succeeded:
  /etc/letsencrypt/live/[FQDN]/fullchain.pem (success)
- - - - - - - - - - - - - - - - - - - - - - - - - - - - - - - - - - - - - - - -
②Snap版certbotをインストールすると、証明書自動更新機能も合わせてインストールされます
# systemctl list-timers | less

NEXT                          LEFT LAST                              PASSED UNIT                         ACTIVATES
Wed 2026-05-20 11:39:00 JST  18min Wed 2026-05-20 11:09:16 JST    11min ago phpsessionclean.timer        phpsessionclean.service
Wed 2026-05-20 18:54:32 JST     7h Wed 2026-05-20 10:13:15 JST  1h 7min ago apt-daily.timer              apt-daily.service
Wed 2026-05-20 21:56:00 JST    10h -                                      - snap.certbot.renew.timer     snap.certbot.renew.service
Thu 2026-05-21 00:00:00 JST    12h Wed 2026-05-20 09:31:16 JST 1h 49min ago dpkg-db-backup.timer         dpkg-db-backup.service
Thu 2026-05-21 00:00:00 JST    12h Wed 2026-05-20 09:31:16 JST 1h 49min ago locate.timer                 locate.service
Thu 2026-05-21 00:10:35 JST    12h Wed 2026-05-20 09:31:16 JST 1h 49min ago logrotate.timer              logrotate.service
Thu 2026-05-21 02:51:56 JST    15h Tue 2026-05-19 08:38:25 JST       8h ago systemd-tmpfiles-clean.timer systemd-tmpfiles-clean.service
Thu 2026-05-21 06:13:42 JST    18h Wed 2026-05-20 09:31:16 JST 1h 49min ago apt-daily-upgrade.timer      apt-daily-upgrade.service
Thu 2026-05-21 08:04:39 JST    20h Wed 2026-05-20 10:13:15 JST  1h 7min ago man-db.timer                 man-db.service
Sun 2026-05-24 03:10:11 JST 3 days Mon 2026-05-18 14:59:45 JST            - e2scrub_all.timer            e2scrub_all.service
Mon 2026-05-25 00:10:29 JST 4 days Mon 2026-05-18 14:59:45 JST            - fstrim.timer                 fstrim.service

11 timers listed.
Pass --all to see loaded but inactive timers, too.
snap.certbot.renew.timer が登録されています
snap.certbot.renew.timer のユニットファイルを確認
# vi /etc/systemd/system/snap.certbot.renew.timer

[Unit]
# Auto-generated, DO NOT EDIT
Description=Timer renew for snap application certbot.renew
Requires=snap-certbot-5603.mount
After=snap-certbot-5603.mount
X-Snappy=yes

[Timer]
Unit=snap.certbot.renew.service
OnCalendar=*-*-* 01:59
OnCalendar=*-*-* 21:56

[Install]
WantedBy=timers.target
上記設定によるとOnCalenderパラメータで指定されている毎日1時59分と21時56分に更新を試みます(ただし、更新ごとにランダムに設定時刻が変更します)
snap.certbot.renew.serviceのユニットファイルを確認
# vi /etc/systemd/system/snap.certbot.renew.service

[Unit]
# Auto-generated, DO NOT EDIT
Description=Service for snap application certbot.renew
Requires=snap-certbot-5603.mount
Wants=network.target
After=snap-certbot-5603.mount network.target snapd.apparmor.service
X-Snappy=yes

[Service]
EnvironmentFile=-/etc/environment
ExecStart=/usr/bin/snap run --timer="00:00~24:00/2" certbot.renew
SyslogIdentifier=certbot.renew
Restart=no
WorkingDirectory=/var/snap/certbot/5603
TimeoutStopSec=30s
Type=oneshot
ただし、証明書を使用するWebサーバーの再起動は行われませんので、更新後に自動的に実行されるスクリプトを設定します
# vi /etc/letsencrypt/renewal-hooks/post/web_restart.sh

下記を記述
#!/bin/bash
systemctl restart apache2
# chmod 755 /etc/letsencrypt/renewal-hooks/post/web_restart.sh
2. Apache2にSSL/TLS(Let's Encrypt) の設定
①Apache2のSSL関連設定ファイルの編集
# cd /etc/apache2/sites-available/
# cp default-ssl.conf vhost-ssl.conf ← vhost-sslは任意の名称でよい

# vi vhost-ssl.conf
2行目:管理者アドレス変更
ServerAdmin <Email Address>>
4行目:変更
DocumentRoot /var/www/html/<FQDN>/
12,13行目:変更
ErrorLog ${APACHE_LOG_DIR}/<FQDN>.error.log
CustomLog ${APACHE_LOG_DIR}/<FQDN>.access.log combined
31,32行目:[1]で取得した証明書に変更
SSLCertificateFile /etc/letsencrypt/live/<FQDN>/cert.pem
SSLCertificateKeyFile /etc/letsencrypt/live/<FQDN>/privkey.pem
43行目あたり:[1]で取得したチェインファイルに追加
SSLCertificateChainFile /etc/letsencrypt/live/<FQDN>/chain.pem
②設定ファイルの反映と有効化
# a2ensite vhost-ssl.conf
Enabling site vhost-ssl.
To activate the new configuration, you need to run:
  systemctl reload apache2

デフォルト無効化
# a2dissite default-ssl.conf

# systemctl restart apache2
③httpからhttpsリダイレクト
# a2enmod rewrite
バーチャルホスト設定ファイル"vhost.conf" に追記する
# cd /etc/apache2/sites-available/
# vi vhost.conf

<VirtualHost *:80>
RewriteEngine on ←追加
RewriteCond %{HTTPS} off ←追加
RewriteRule ^(.*)$ https://%{HTTP_HOST}%{REQUEST_URI} [R=301,L] ←追加
~省略~
ServerName <FQDN>
ServerAdmin <管理者メールアドレス>
DocumentRoot /var/www/html/<FQDN>/
~省略~
ErrorLog ${APACHE_LOG_DIR}/<FQDN>.error.log
CustomLog ${APACHE_LOG_DIR}/<FQDN>.access.log combined
~省略
</VirtualHost>
④設定反映と起動
Apache再起動
# systemctl restart apache2
ufwでhttpsポート開放
# ufw allow https
# ufw reload
3. Mail サーバーにSSL/TLS(Let's Encrypt) の設定
3.1 メールサーバー用証明書の取得
メールサーバー用の証明書を取得するが上記と同様の方法では取得できないので「--standalone」オプションをつけて下記のようにしても失敗する。
# certbot certonly --standalone -d mail.<domain>
一度web サーバーを止めてから行うと下記のとおり成功する
# systemctl stop apache2.service

# certbot certonly --standalone -d mail.<domain>
Saving debug log to /var/log/letsencrypt/letsencrypt.log
Requesting a certificate for mail.<domain>

Successfully received certificate.
Certificate is saved at: /etc/letsencrypt/live/mail.<domain>/fullchain.pem
Key is saved at:         /etc/letsencrypt/live/mail.<domain>/privkey.pem
This certificate expires on 2026-08-18.
These files will be updated when the certificate renews.
Certbot has set up a scheduled task to automatically renew this certificate in the background.

- - - - - - - - - - - - - - - - - - - - - - - - - - - - - - - - - - - - - - - -
If you like Certbot, please consider supporting our work by:
 * Donating to ISRG / Let's Encrypt:   https://letsencrypt.org/donate
 * Donating to EFF:                    https://eff.org/donate-le
- - - - - - - - - - - - - - - - - - - - - - - - - - - - - - - - - - - - - - - -
3.2 Postfixの設定
# vi /etc/postfix/main.cf
最終行に追記
smtpd_use_tls = yes
smtp_tls_mandatory_protocols = !SSLv2, !SSLv3
smtpd_tls_mandatory_protocols = !SSLv2, !SSLv3
smtpd_tls_cert_file = /etc/letsencrypt/live/mail.<domain>/fullchain.pem
smtpd_tls_key_file = /etc/letsencrypt/live/mail.<domain>/privkey.pem
smtpd_tls_session_cache_database = btree:${data_directory}/smtpd_scache
# vi /etc/postfix/master.cf
19-23行目あたり : 一部コメント解除
submission inet n - y - - smtpd
    -o syslog_name=postfix/submission
#   -o smtpd_forbid_unauth_pipelining=no
#   -o smtpd_tls_security_level=encrypt
    -o smtpd_sasl_auth_enable=yes

最終行に追加
smtps     inet  n       -       y       -       -       smtpd
    -o syslog_name=postfix/smtps
    -o smtpd_tls_wrappermode=yes
    -o smtpd_sasl_auth_enable=yes
3.3 Dovecotの設定
# vi /etc/dovecot/conf.d/10-ssl.conf
6行目:確認
ssl = yes
18,20行目:証明書/鍵ファイル指定 変更
ssl_server_cert_file = /etc/letsencrypt/live/mail.[domain]/fullchain.pem
ssl_server_key_file = /etc/letsencrypt/live/mail.[domain]/privkey.pem
※Dovecot2.4.1から証明書パスの書き方が変わっており従来の「<」記号がなくなっておりますのでご注意ください
UFWでPort 587を許可する
# ufw allow 587/tcp
# ufw reload
# systemctl restart postfix dovecot
3.4 Thunderbirdの設定
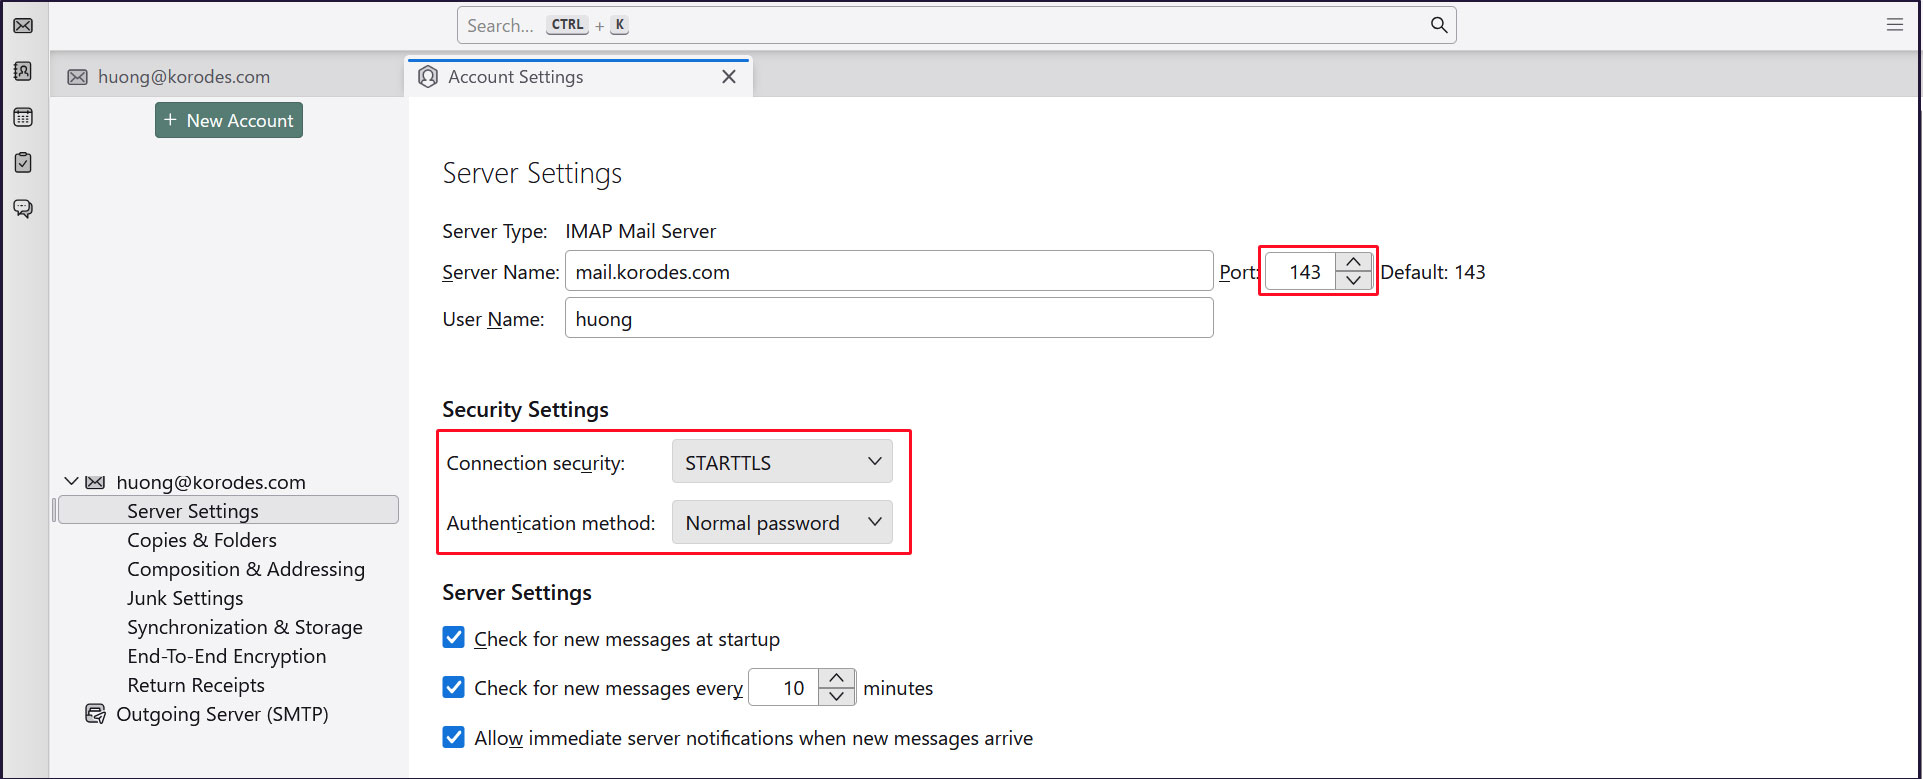
受信サーバー
Port : 143
Connection security : STARTTLS
Authentication method : Normal password
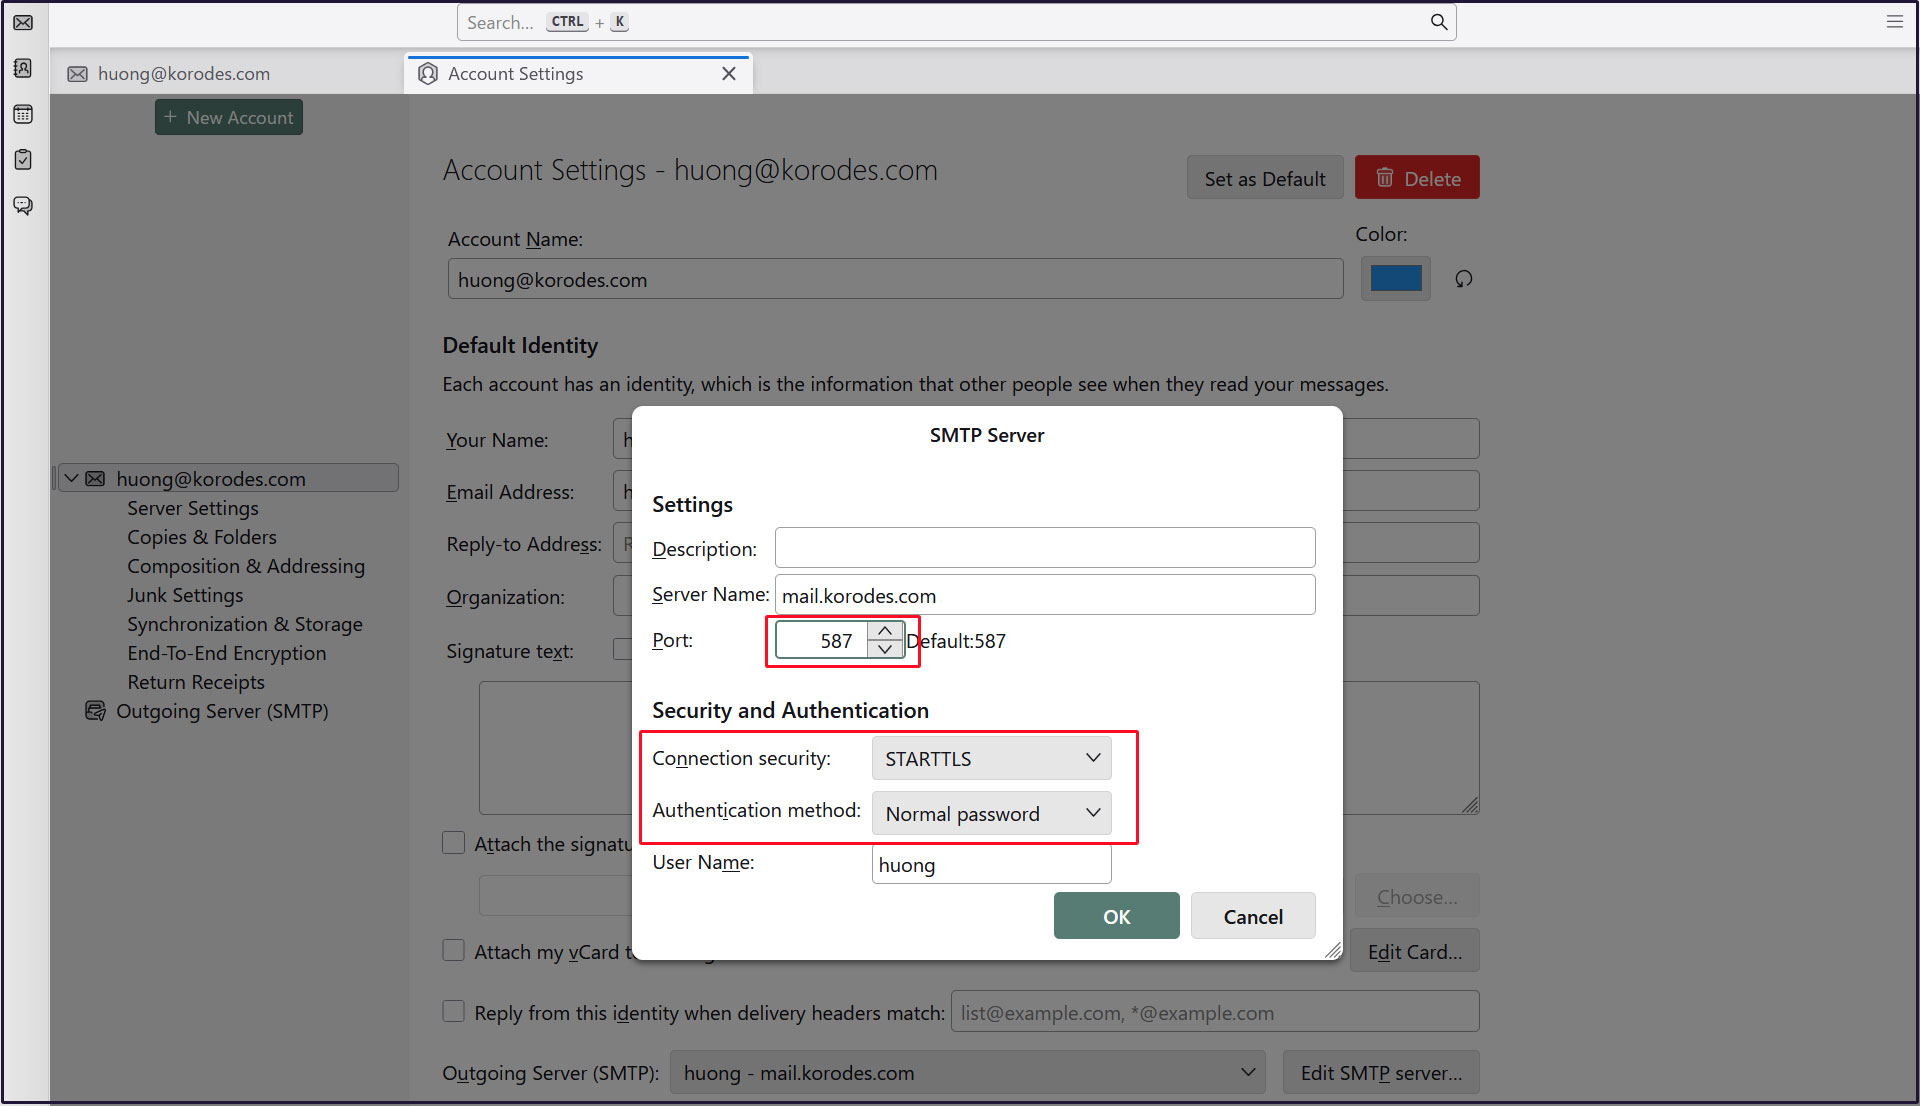
送信サーバー
Port : 587
Connection security : STARTTLS
Authentication method : Normal password