

1. Vim インストール
エディタとして使い慣れたVimを使用しますので下記の通りインストール
|
1 |
# pkg install -y vim |
Vimを標準のエディタとして利用可能するため".shrc"を編集し、再度ログインしなおすと反映する
FreeBSD14はデフォルトシェルがでshになっている
次のコマンドで現在のSHELLを確認できる
|
1 2 |
# echo $SHELL /bin/sh |
|
1 2 3 4 5 6 |
# vim ~/.shrc 以下の内容を追加する alias vi='vim' 設定反映 # shutdown -r now |
Vimの使用環境を整えるため".vimrc"を新規作成し、下記内容を記入
|
1 2 3 4 5 6 7 8 9 10 11 12 13 14 |
# vi ~/.vimrc 以下の内容を追加する set nocompatible set encoding=utf-8 set nobackup set tabstop=4 set clipboard=unnamed set number syntax on highlight Comment ctermfg=LightCyan set wrap set backspace=indent,eol,start set autoindent |
再起動すると反映される
2.locateデータベースの利用
FreeBSDではupdatedbを利用すると次のようなエラーが出ます
|
1 2 3 4 |
# /usr/libexec/locate.updatedb >>> WARNING >>> Executing updatedb as root. This WILL reveal all filenames >>> on your machine to all login users, which is a security risk. |
エラーの内容は
rootユーザで updatedb を実行してます。
これは、すべてのログインユーザにすべてのファイル名を見ることが可能になってしまいます。これは、セキュリティリスクです。
FreeBSDではperiodic の下のスクリプトがcronによって実行されるので、cronが実行してくれるlocateデータベースの更新スクリプトを利用する
|
1 2 3 |
# /etc/periodic/weekly/310.locate Rebuilding locate database: |
3. SSH接続のセキュリティ対策
3.1 SSHポートの変更、ルートユーザーのログイン不可
|
1 2 3 4 5 6 |
# vi /etc/ssh/sshd_config 16行目 : Portを変更 Port 2244 35行目 : コメント解除しルートユーザーでのログイン不可 PermitRootLogin no |
設定の反映
|
1 2 3 4 5 6 |
# service sshd restart Performing sanity check on sshd configuration. Stopping sshd. Waiting for PIDS: 795. Performing sanity check on sshd configuration. Starting sshd. |
3.2 公開鍵認証方式にする
① 公開鍵、秘密鍵ペアの作成---一般ユーザーにログインして作成する
作成先・ファイル名を指定しなければ、 /home/(ユーザ名)/.ssh/ に id_ed25519, id_eed25519.pub が作成される。 途中、鍵用のパスワードも入力する。
|
1 2 3 4 5 6 7 8 9 10 11 12 13 14 15 16 17 18 19 20 21 22 |
# su - huong $ ssh-keygen -t ed25519 Generating public/private ed25519 key pair. Enter file in which to save the key (/home/huong/.ssh/id_ed25519): Enter passphrase (empty for no passphrase): [Password] Enter same passphrase again: [Password] Your identification has been saved in /home/huong/.ssh/id_ed25519 Your public key has been saved in /home/huong/.ssh/id_ed25519.pub The key fingerprint is: SHA256:xboQ1lwuaVzf2FXCOtK2tD6Pie9c2mbG1GHvODpZ3y4 huong@Lepard The key's randomart image is: +--[ED25519 256]--+ | o .. +| | + * . +.o | | o B +.o.o | | . o +. * o | | . S + +..o| | . . o o o| | . . =.+.| | o=*E +| | .oOOo+.| +----[SHA256]-----+ |
|
1 2 3 |
$ cat ~/.ssh/id_ed25519.pub >> ~/.ssh/authorized_keys $ chmod 600 ~/.ssh/authorized_keys $ chmod 700 ~/.ssh/ |
➁作成した秘密鍵id_ed25519 をwinSCPでwindowsの適当なところに保存
Winscpを起動する
Host name : サーバーのIPアドレス
Port number : SSHポート
User name : サーバーのログインユーザー
Password : 同上ユーザーのパスワード
を入力し、「Save」

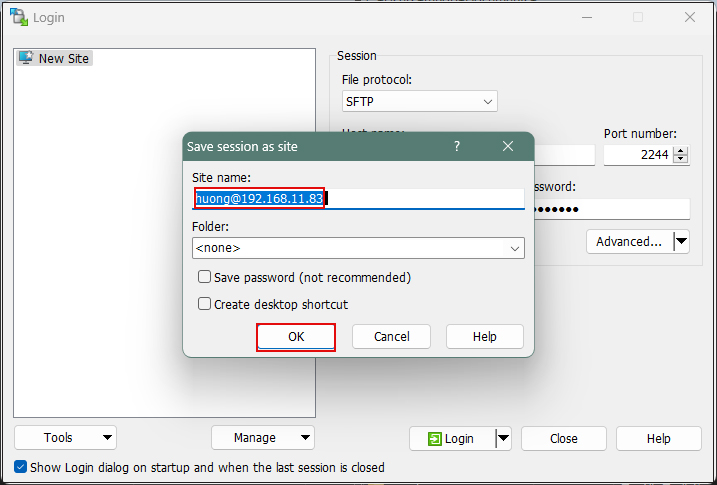
Site name : 任意の名前
「OK」クリック
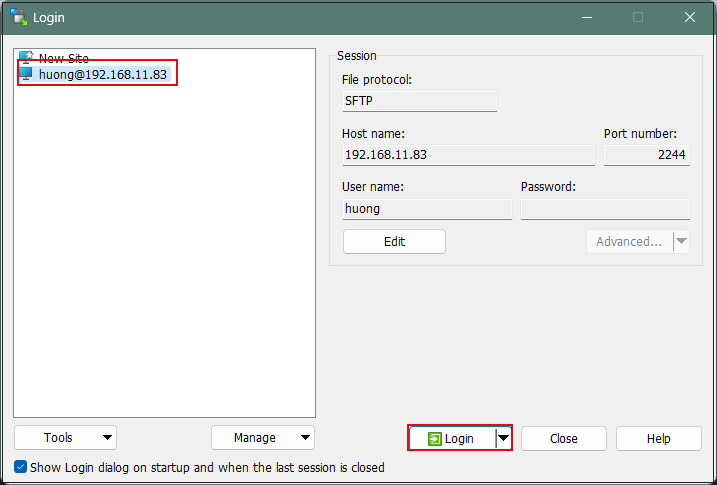
該当サーバーを確認後、「Login」クリック
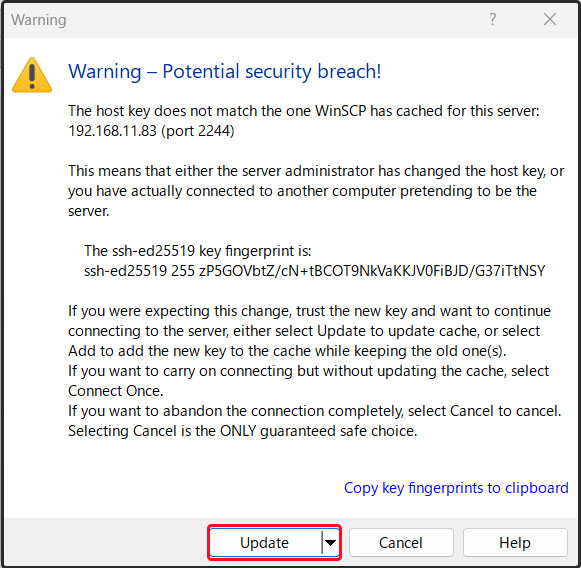
下記画面が出れば「Update」クリック
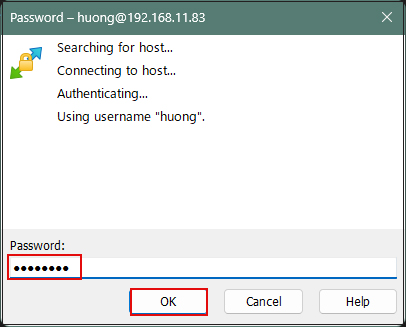
Passwordの欄にはログインユーザーのパスワード
接続されると、左欄サーバー側、右欄PC(Windows)側になる。
.sshディレクトリーにある"id_ed25519"ファイルを右欄windowsの適当なところに保存
➂SSH設定ファイルを編集
|
1 2 3 4 5 6 7 8 9 10 11 |
$ su - # vi /etc/ssh/sshd_config 40行目 : コメント解除 PubkeyAuthentication yes 61行目 : 変更 PasswordAuthentication no 68行目 : 変更 KbdInteractiveAuthentication no |
|
1 |
# service sshd restart |
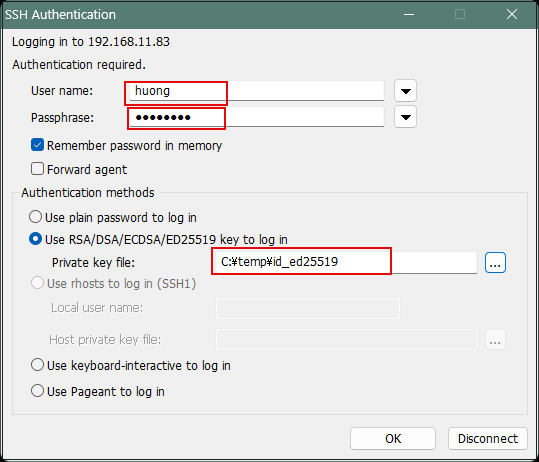
④TeraTermでの接続
User name : ログインユーザー名
Password :公開鍵、秘密鍵ペアの作成で指定したパスワード
「Use RSA/DSA….」にチェックを入れ、「Private key file」の欄には先ほどwindowsに保存した「id_ed25519」を指定する
公開鍵暗号方式を用いた認証によるSSH接続は他のLinuxと同様に行うことができますので下記を参考にしてください

4. ファイアウォール設定
FreeBSDでは以下のファイアーウォールがあります
・pf
・ipfw
・ipf
今回は、ipfwを使用してファイアーウォールの設定をします。
4.1 ipfwが動くか確認
|
1 2 3 |
# ipfw list ... Commnad not found.以外が出力されればOKです |
4.2 ipfwを使用するための設定を /etc/rc.conf に追記
/etc/rc.conf ファイルをvimエディタで編集するより、sysrcコマンドを利用するほうが良い
|
1 2 3 4 5 6 7 8 |
# sysrc firewall_enable="YES" ←サーバー起動時に有効化 firewall_enable: NO -> YES # sysrc firewall_logdeny="YES" ←拒否時に /var/log/security にログ出力 firewall_logdeny: NO -> YES # sysrc firewall_script="/usr/local/etc/ipfw.rules" ←追加設定スクリプトを指定 firewall_script: /etc/rc.firewall -> /usr/local/etc/ipfw.rules |
4.3 追加設定スクリプト(/usr/local/etc/ipfw.rules)を作成
|
1 |
# vi /usr/local/etc/ipfw.rules |
追加設定スクリプトの内容-----とりあえず次のサービスポートを開放する
ftp (20,21), 初期ssh (22), smtp (25), dns (53) , http (80), ntp(123) , https(443) pop3(110), imap(143), mail-over(587) , 変更後SSH(2244)
|
1 2 3 4 5 6 7 8 9 10 11 12 13 14 15 16 17 18 19 20 21 22 23 24 25 26 27 28 29 30 31 32 33 34 35 36 37 38 39 40 41 42 43 44 45 46 47 |
#! /bin/sh # IPF="ipfw -q add" ipfw -q -f flush #loopback $IPF 10 allow all from any to any via lo0 $IPF 20 deny all from any to 127.0.0.0/8 $IPF 30 deny all from 127.0.0.0/8 to any $IPF 40 deny tcp from any to any frag # statefull $IPF 50 check-state $IPF 60 allow tcp from any to any established $IPF 70 allow all from any to any out keep-state $IPF 80 allow icmp from any to any $IPF 90 allow tcp from any to any 20 in $IPF 100 allow tcp from any to any 20 out $IPF 110 allow tcp from any to any 21 in $IPF 120 allow tcp from any to any 21 out $IPF 130 allow tcp from any to any 22 in $IPF 140 allow tcp from any to any 22 out $IPF 150 allow tcp from any to any 25 in $IPF 160 allow tcp from any to any 25 out $IPF 170 allow udp from any to any 53 in $IPF 175 allow tcp from any to any 53 in $IPF 180 allow udp from any to any 53 out $IPF 185 allow tcp from any to any 53 out $IPF 190 allow tcp from any to any 80 in $IPF 200 allow tcp from any to any 80 out $IPF 210 allow tcp from any to any 110 in $IPF 220 allow tcp from any to any 110 out $IPF 230 allow tcp from any to any 123 in $IPF 240 allow tcp from any to any 123 out $IPF 250 allow tcp from any to any 143 in $IPF 260 allow tcp from any to any 143 out $IPF 270 allow tcp from any to any 443 in $IPF 280 allow tcp from any to any 443 out $IPF 290 allow tcp from any to any 587 in $IPF 300 allow tcp from any to any 587 out $IPF 310 allow tcp from any to any 2244 in $IPF 320 allow tcp from any to any 2244 out # deny and log everything $IPF 500 deny log all from any to any |
システムの再起動
|
1 |
# shutdown -r now |
ipfwのリストを表示
|
1 2 3 4 5 6 7 8 9 10 11 12 13 14 15 16 17 18 19 20 21 22 23 24 25 26 27 28 29 30 31 32 33 34 35 36 37 |
# ipfw list 00010 allow ip from any to any via lo0 00020 deny ip from any to 127.0.0.0/8 00030 deny ip from 127.0.0.0/8 to any 00040 deny tcp from any to any frag offset 00050 check-state :default 00060 allow tcp from any to any established 00070 allow ip from any to any out keep-state :default 00080 allow icmp from any to any 00090 allow tcp from any to any 20 in 00100 allow tcp from any to any 20 out 00110 allow tcp from any to any 21 in 00120 allow tcp from any to any 21 out 00130 allow tcp from any to any 22 in 00140 allow tcp from any to any 22 out 00150 allow tcp from any to any 25 in 00160 allow tcp from any to any 25 out 00170 allow udp from any to any 53 in 00175 allow tcp from any to any 53 in 00180 allow udp from any to any 53 out 00185 allow tcp from any to any 53 out 00190 allow tcp from any to any 80 in 00200 allow tcp from any to any 80 out 00210 allow tcp from any to any 110 in 00220 allow tcp from any to any 110 out 00230 allow tcp from any to any 123 in 00240 allow tcp from any to any 123 out 00250 allow tcp from any to any 143 in 00260 allow tcp from any to any 143 out 00270 allow tcp from any to any 443 in 00280 allow tcp from any to any 443 out 00290 allow tcp from any to any 587 in 00300 allow tcp from any to any 587 out 00310 allow tcp from any to any 2244 in 00320 allow tcp from any to any 2244 out 00500 deny log ip from any to any 65535 deny ip from any to any |
5. NTPサーバー設定
5.1 /etc/ntp.conf中の参照先NTPサーバーを書き換えます。日本にある適当なサーバーを追加します。
|
1 2 3 4 5 6 |
# vi /etc/ntp.conf 32-33行目 : コメントにして、その下に追記 #pool 0.freebsd.pool.ntp.org iburst #pool 2.freebsd.pool.ntp.org iburst pool ntp.nict.jp iburst ←追加 |
5.2 起動時にntpが自動的に起動されるよう、/etc/rc.confに追記
|
1 2 3 4 5 |
# vi /etc/rc.conf 以下を追記 ntpd_enable="YES" ntpd_sync_on_start="YES" |
5.3 時刻を修正
時刻がずれすぎると NTP デーモンが動作を停止させるのでntpdate コマンドで時刻を修正してから NTP デーモンを起動させる
|
1 2 3 4 5 |
# ntpdate ntp.nict.jp 10 Mar 13:44:17 ntpdate[1031]: step time server 61.205.120.130 offset -32400.498799 sec # /etc/rc.d/ntpd start Starting ntpd. |
5.4 時刻同期確認(少し時間をおいてから確認する)
|
1 2 3 4 5 6 7 8 9 |
# ntpq -p ============================================================================== ntp.nict.jp .POOL. 16 p - 64 0 0.000 +0.000 0.008 *ntp-a2.nict.go. .NICT. 1 u 2 64 1 12.997 -0.839 1.924 +ntp-k1.nict.jp .NICT. 1 u 1 64 1 7.779 +0.252 0.829 +ntp-a3.nict.go. .NICT. 1 u 2 64 1 12.976 -0.730 2.119 -ntp-b3.nict.go. .NICT. 1 u 1 64 1 13.631 +0.752 0.709 +ntp-b2.nict.go. .NICT. 1 u 2 64 1 12.975 -0.451 2.400 |
+ 接続テストに合格し、いつでも参照可能なサーバー
– クラスタリング検査で、参照リストから外れたサーバー
* 参照同期中であると宣言されたサーバー