1. MySQL8
1. 1インストール
|
1 |
# apt -y install mysql-server |
|
1 2 3 4 |
# systemctl start mysql # systemctl enable mysql # systemctl is-enabled mysql enabled |
バージョンチェック
|
1 2 |
# mysql --version mysql Ver 8.4.7-0ubuntu0.25.10.3 for Linux on x86_64 ((Ubuntu)) |
1.2. MySQL8のルートパスワード設定
|
1 2 3 4 5 6 7 8 9 10 11 12 13 14 15 16 17 |
# mysql Welcome to the MySQL monitor. Commands end with ; or \g. Your MySQL connection id is 8 Server version: 8.4.7-0ubuntu0.25.10.3 (Ubuntu) Copyright (c) 2000, 2025, Oracle and/or its affiliates. Oracle is a registered trademark of Oracle Corporation and/or its affiliates. Other names may be trademarks of their respective owners. Type 'help;' or '\h' for help. Type '\c' to clear the current input statement. mysql> ALTER USER root@localhost IDENTIFIED WITH caching_sha2_password BY 'Password'; Query OK, 0 rows affected (0.00 sec) mysql> |
1.3. MySQLサーバのセキュリティ設定
MySQLサーバのセキュリティ関連の設定を行うためにmysql_secure_installtionというツールを実行します。
|
1 |
# mysql_secure_installation |
Securing the MySQL server deployment.
Enter password for user root:
VALIDATE PASSWORD COMPONENT can be used to test passwords
and improve security. It checks the strength of password
and allows the users to set only those passwords which are
secure enough. Would you like to setup VALIDATE PASSWORD component?
Press y|Y for Yes, any other key for No: y
There are three levels of password validation policy:
LOW Length >= 8
MEDIUM Length >= 8, numeric, mixed case, and special characters
STRONG Length >= 8, numeric, mixed case, special characters and dictionary file
Please enter 0 = LOW, 1 = MEDIUM and 2 = STRONG: 0
Using existing password for root.
Estimated strength of the password: 100
Change the password for root ? ((Press y|Y for Yes, any other key for No) : y
New password:[Password]
Re-enter new password:[Password]
Estimated strength of the password: 100
Do you wish to continue with the password provided?(Press y|Y for Yes, any other key for No) : y
By default, a MySQL installation has an anonymous user,
allowing anyone to log into MySQL without having to have
a user account created for them. This is intended only for
testing, and to make the installation go a bit smoother.
You should remove them before moving into a production
environment.
Remove anonymous users? (Press y|Y for Yes, any other key for No) : y
Success.
Normally, root should only be allowed to connect from
'localhost'. This ensures that someone cannot guess at
the root password from the network.
Disallow root login remotely? (Press y|Y for Yes, any other key for No) : y
Success.
By default, MySQL comes with a database named 'test' that
anyone can access. This is also intended only for testing,
and should be removed before moving into a production
environment.
Remove test database and access to it? (Press y|Y for Yes, any other key for No) : y
- Dropping test database…
Success.
- Removing privileges on test database…
Success.
Reloading the privilege tables will ensure that all changes
made so far will take effect immediately.
Reload privilege tables now? (Press y|Y for Yes, any other key for No) : y
Success.
All done!
以降 MySQLにアクセスするときは
|
1 2 3 4 5 6 7 8 9 10 11 12 13 14 15 |
# mysql -u root -p Enter password: (上記で設定したパスワードを入力) Welcome to the MySQL monitor. Commands end with ; or \g. Your MySQL connection id is 11 Server version: 8.4.7-0ubuntu0.25.10.3 (Ubuntu) Copyright (c) 2000, 2025, Oracle and/or its affiliates. Oracle is a registered trademark of Oracle Corporation and/or its affiliates. Other names may be trademarks of their respective owners. Type 'help;' or '\h' for help. Type '\c' to clear the current input statement. mysql> |
2.WordPressインストール
2.1 データベース作成
Word Press 用のデータベースを作成します(例として今回はデータベース名を 「wp_db」、ユーザー名を「wp_user」、パスワードを「?Y123456y」)
|
1 2 3 4 5 6 7 8 9 10 11 12 13 14 15 16 17 18 19 20 21 22 23 24 25 26 27 28 |
# mysql -u root -p Enter password: Welcome to the MySQL monitor. Commands end with ; or \g. Your MySQL connection id is 11 Server version: 8.4.7-0ubuntu0.25.10.3 (Ubuntu) Copyright (c) 2000, 2025, Oracle and/or its affiliates. Oracle is a registered trademark of Oracle Corporation and/or its affiliates. Other names may be trademarks of their respective owners. Type 'help;' or '\h' for help. Type '\c' to clear the current input statement. mysql> CREATE DATABASE wp_db; Query OK, 1 row affected (0.01 sec) mysql> create user 'wp_user'@'localhost' identified by '?Y123456y'; Query OK, 0 rows affected (0.01 sec) mysql> grant all on wp_db.* to 'wp_user'@'localhost'; Query OK, 0 rows affected (0.00 sec) mysql> flush privileges; Query OK, 0 rows affected (0.00 sec) mysql> exit Bye |
2.2 WordPressダウンロードとインストール
①ダウンロードと展開
|
1 2 3 |
# cd /var/www/html/<FQDN> # wget http://ja.wordpress.org/latest-ja.tar.gz # tar xvf latest-ja.tar.gz |
②Wordpress設定ファイルの編集
|
1 2 3 |
# cd wordpress/ # cp wp-config-sample.php wp-config.php # vi wp-config.php |
wp-config.phpの編集内容
|
1 2 3 4 5 6 7 8 9 10 11 12 13 |
// ** Database settings - You can get this info from your web host ** // /** The name of the database for WordPress */ define('DB_NAME', 'wp_db'); ←「2.1 データベース作成」で作成したデータベース名 /** Database username */ define('DB_USER', 'wp_user'); ←「2.1 データベース作成」で作成したユーザー名 /** Database hostname */ define('DB_PASSWORD', '?Y123456y'); ←「2.1 データベース作成」で作成したユーザー用パスワード また、最終行に以下の分を追加します。 これをしないと、プラグインを追加するときにFTP接続情報なるものを聞かれます。 define('FS_METHOD', 'direct'); |
③ファイルの移動
|
1 2 |
# cd /var/www/html/<FQDN> # mv wordpress/* . |
移動されたことを確認後 wordpressディレクトリーとダウンロードしたlatest-ja.tar.gzを削除
|
1 2 |
# rm -R -f wordpress # rm latest-ja.tar.gz |
④wordpressディレクトリの所有者をapacheにします
|
1 |
# chown -R www-data:www-data /var/www/html/<FQDN> |
⑤ブラウザからアクセスする
http://[FQDN]/wp-admin にアクセスします。
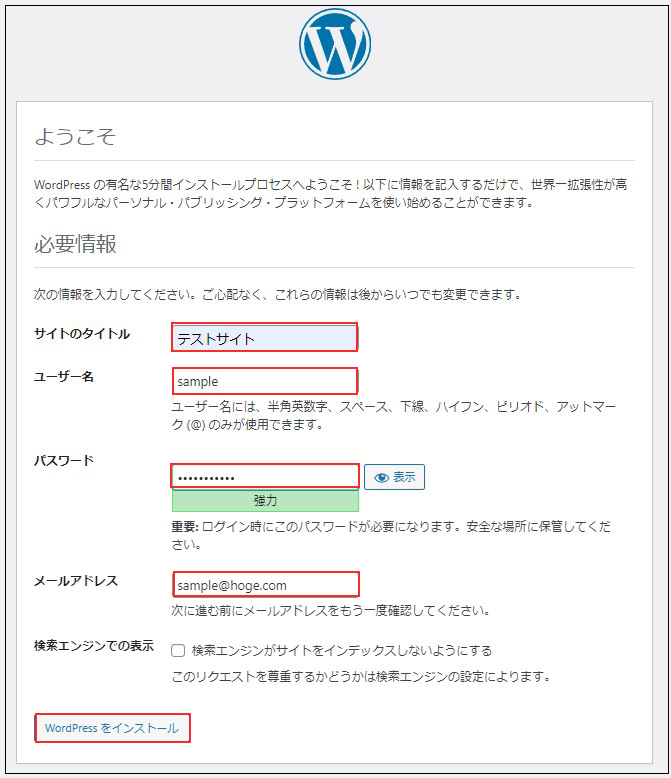
成功すると下記のWordpressインストール情報入力画面が出力されます。
Ubuntuで「お使いのサーバーの PHP では WordPress に必要な MySQL 拡張を利用できないようです。」が表示されたら
MYSQLモジュールのインストール
|
1 |
# apt -y install php-mysqli |
インストールが完了したらApacheを再起動をします。
|
1 |
# systemctl restart apache2 |
下記入力画面で
サイトのタイトル 任意の名称
ユーザー名 任意の名称
パスワード 任意のパスワード
メールアドレス 管理者用メールアドレス
を入力し、「Wordpressインストール」をクリックする。「ユーザー名」「パスワード」はwordpress管理画面にアクセスするときに必要なため忘れないようにする。