

1. ウイルス対策ソフトClamav導入
ウィルス対策としてLinux 用のフリーのアンチウィルスソフトであるClam AntiVirus を導入します。
このアンチウィルスソフトを導入することで、サーバー全体のウィルススキャンはもちろん、メールサーバーを構築し、設定を行えば、送受信するメールのウィルススキャンも行うことができます。
1.1 インストール
# apt -y install clamav clamav-daemon
尚、clamav関連の設定ファイルは、/etc/clamav/フォルダにインストールされる
1.2 ウイルス定義の更新
# sed -i -e "s/^NotifyClamd/#NotifyClamd/g" /etc/clamav/freshclam.conf
# systemctl stop clamav-freshclam

# freshclam
Wed Jul 22 17:06:57 2026 -> ClamAV update process started at Wed Jul 22 17:06:57 2026
WARNING: Wed Jul 22 17:06:57 2026 -> Your ClamAV installation is OUTDATED!
WARNING: Wed Jul 22 17:06:57 2026 -> Local version: 1.4.3 Recommended version: 1.4.5
Wed Jul 22 17:06:57 2026 -> DON'T PANIC! Read https://docs.clamav.net/manual/Installing.html
Wed Jul 22 17:06:57 2026 -> daily.cvd database is up-to-date (version: 28068, sigs: 355521, f-level: 90, builder: svc.clamav-publisher)
Wed Jul 22 17:06:57 2026 -> main.cvd database is up-to-date (version: 63, sigs: 3287027, f-level: 90, builder: tomjudge)
Wed Jul 22 17:06:57 2026 -> bytecode.cvd database is up-to-date (version: 339, sigs: 80, f-level: 90, builder: nrandolp)

# systemctl start clamav-freshclam
設定ファイルを編集
# vi /etc/logrotate.d/clamav-freshclam
7行目
create 640 clamav adm
↓
create 640 clamav clamav
ウイルス定義の自動更新確認
ウイルス定義の自動更新が行われるサービスが登録されていることを確認する。
# service clamav-freshclam status

次のように表示される
● clamav-freshclam.service - ClamAV virus database updater
     Loaded: loaded (/usr/lib/systemd/system/clamav-freshclam.service; disabled; preset: enabled)
     Active: active (running) since Wed 2026-07-22 17:07:37 JST; 46s ago
 Invocation: add96579f9ce461ebb6151ec94684577
       Docs: man:freshclam(1)
             man:freshclam.conf(5)
             https://docs.clamav.net/
   Main PID: 21807 (freshclam)
      Tasks: 1 (limit: 4562)
     Memory: 3M (peak: 3.6M)
        CPU: 15ms
     CGroup: /system.slice/clamav-freshclam.service
             └─21807 /usr/bin/freshclam -d --foreground=true

Jul 22 17:07:37 Lepard systemd[1]: Started clamav-freshclam.service - ClamAV virus database updater.
Jul 22 17:07:37 Lepard freshclam[21807]: Wed Jul 22 17:07:37 2026 -> ClamAV update process started at Wed Jul 22 17:07>
Jul 22 17:07:37 Lepard freshclam[21807]: WARNING: Wed Jul 22 17:07:37 2026 -> Your ClamAV installation is OUTDATED!
Jul 22 17:07:37 Lepard freshclam[21807]: WARNING: Wed Jul 22 17:07:37 2026 -> Local version: 1.4.3 Recommended version>
Jul 22 17:07:37 Lepard freshclam[21807]: Wed Jul 22 17:07:37 2026 -> DON'T PANIC! Read https://docs.clamav.net/manual/>
Jul 22 17:07:37 Lepard freshclam[21807]: Wed Jul 22 17:07:37 2026 -> daily.cvd database is up-to-date (version: 28068,>
Jul 22 17:07:37 Lepard freshclam[21807]: Wed Jul 22 17:07:37 2026 -> main.cvd database is up-to-date (version: 63, sig>
Jul 22 17:07:37 Lepard freshclam[21807]: Wed Jul 22 17:07:37 2026 -> bytecode.cvd database is up-to-date (version: 339
尚、/var/log/clamav/freshclam.logファイルにログが記録される。
1.3 ウイルスチェックの確認
無害ウィルスをダウンロードしてウイルス検出
# wget https://secure.eicar.org/eicar.com.txt

# clamscan --infected --remove --recursive
/root/eicar.com.txt: Eicar-Test-Signature FOUND
/root/eicar.com.txt: Removed.

----------- SCAN SUMMARY -----------
Known viruses: 3627927
Engine version: 1.4.3
Scanned directories: 2
Scanned files: 7
Infected files: 1
Data scanned: 0.02 MB
Data read: 0.01 MB (ratio 2.00:1)
Time: 12.013 sec (0 m 12 s)
Start Date: 2026:07:22 17:09:46
End Date:   2026:07:22 17:09:58
このように「FOUND」「Removed.」という表示と「Infected files: 1」という表示でウイルスを通知してくれる。又、「--remove」オプションを付けているので、テストウイルスは削除された。
1.4 フルスキャンするスクリプトファイルを作成
①事前にスクリプトファイル格納ディレクトリー(/opt/script)を作成しておく
# mkdir /opt/script
②スクリプトファイルを作成
# vi /opt/script/clam-full.sh

clam-full.sh の内容(新規作成)
#!/bin/sh

echo =========================================
date
hostname
clamscan / \
--infected \
--recursive \
--log=/var/log/clamav/clamscan.log \
--move=/var/log/clamav/virus \
--exclude-dir=^/boot \
--exclude-dir=^/sys \
--exclude-dir=^/proc \
--exclude-dir=^/dev \
--exclude-dir=^/var/log/clamav/virus
if [ $? = 0 ]; then
echo “virus undetected.”
else
echo “virus detection!!”
fi
③実行権限を与える
# chmod +x /opt/script/clam-full.sh
④ウイルス隔離用フォルダを作成
既にあればOKだが、無いと上記スクリプトで除外ディレクトリに指定しているので実行時エラーになる
# mkdir /var/log/clamav/virus
⑤実行
# /opt/script/clam-full.sh

=========================================
Wed Jul 22 05:11:35 PM JST 2026
Lepard

----------- SCAN SUMMARY -----------
Known viruses: 3627927
Engine version: 1.4.3
Scanned directories: 5285
Scanned files: 39676
Infected files: 0
Data scanned: 3409.69 MB
Data read: 1390.76 MB (ratio 2.45:1)
Time: 457.100 sec (7 m 37 s)
Start Date: 2026:07:22 17:11:35
End Date:   2026:07:22 17:19:12
“virus undetected.”
完了までけっこう時間がかかる
尚、/var/log/clamav/clamscan.logファイルにログが記録される
⑤cronでウイルススキャンの定期実行
# crontab -e
0 2 * * mon /opt/script/clam-full.sh >> /var/log/clamav/clamascan.log
上記例では、毎週月曜日の夜中2時に定期的に実行。
2. メールソフト導入
Postfix は、sendmail に代わるMTA (Mail Transport Agent)として開発されたソフトウェアで、sendmail との互換性が高く、安全、メンテナンスが容易、速い、などの特徴を兼ね備えたメールサーバーです。
また、Postfix はメールを送信するSMTP サーバーとしての機能しか無いため、後半でメール受信のPOP サーバーDovecotのインストールを別途行います。
2.1 Postfix : インストール 設定
①Postfix をインストール
Postfix をインストールして SMTPサーバーを構築します。SMTP は 25/TCP を使用します。
メール不正中継防止に、後述の Dovecot の SASL機能を利用し、送信にも認証が必要なように Postfix を設定します。
# apt -y install postfix sasl2-bin
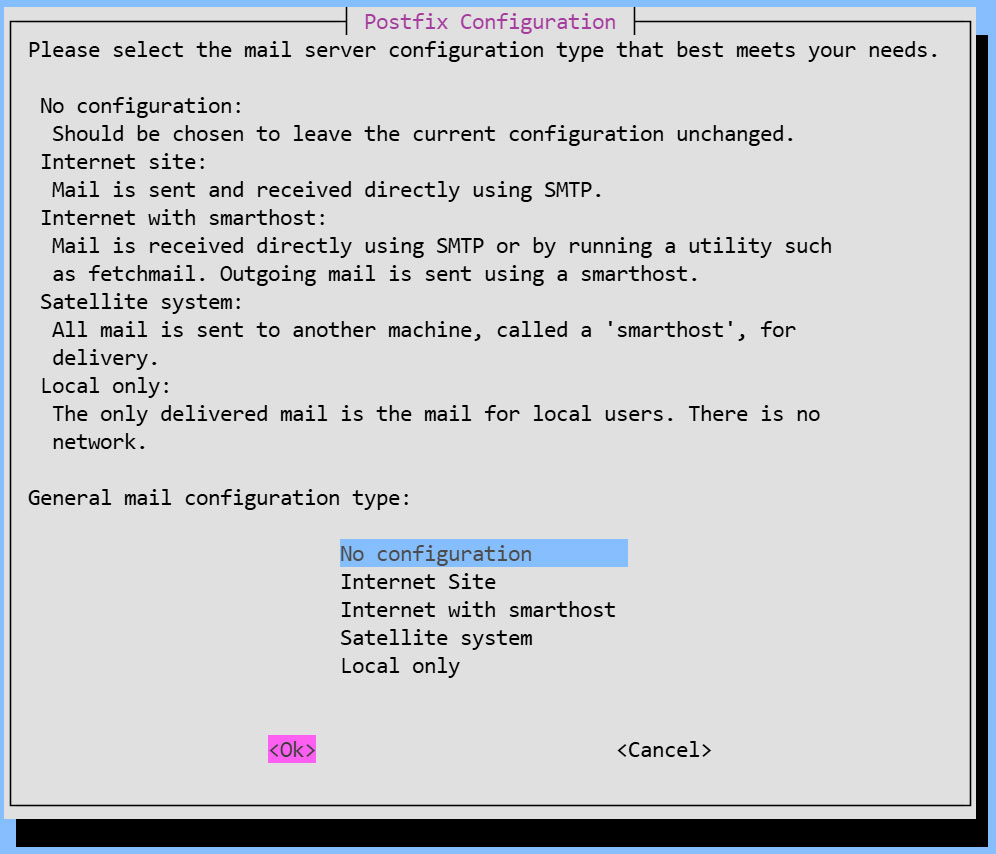
一般的な構成設定の選択を求められるが、後で手動設定するため [No configuration] を選択
②設定ファイル(main.cf)編集
# cp /usr/share/postfix/main.cf.dist /etc/postfix/main.cf
# vi /etc/postfix/main.cf

82行目:コメント解除
mail_owner = postfix

108行目:ホスト名指定追加
myhostname = mail.<domain>

115行目:ドメイン名指定追加
mydomain = <domain>

133行目 : コメント
#myorigin = /etc/mailname

135行目:コメント解除
myorigin = $mydomain

149行目:コメント解除
inet_interfaces = all

197行目:コメント解除
mydestination = $myhostname, localhost.$mydomain, localhost, $mydomain

240行目:コメント解除
local_recipient_maps = unix:passwd.byname $alias_maps

285行目:コメント解除
mynetworks_style = subnet

299行目:コメント解除し、自ネットワークに変更
mynetworks = 192.168.11.0/24, 127.0.0.0/8

423行目:コメント解除
alias_maps = hash:/etc/aliases

434行目:コメント解除
alias_database = hash:/etc/aliases

456行目:コメント解除
home_mailbox = Maildir/

592行目:コメントにしてその下に追記
#smtpd_banner = $myhostname ESMTP $mail_name (Debian)
smtpd_banner = $myhostname ESMTP

666行目:追加
sendmail_path = /usr/sbin/postfix

670行目:コメント解除
newaliases_path = /usr/bin/newaliases

675行目:コメント解除
mailq_path = /usr/bin/mailq

681行目:コメント解除
setgid_group = postdrop

最終行へ追記
SMTP VRFY コマンドは無効にする
disable_vrfy_command = yes
クライアントに対して HELO コマンドを要求する
smtpd_helo_required = yes
送受信メールサイズを10Mに制限
message_size_limit = 10485760
メールボックスサイズを1Gに制限
mailbox_size_limit = 1073741824
SMTP-Auth 設定
smtpd_sasl_type = dovecot
smtpd_sasl_path = private/auth
smtpd_sasl_auth_enable = yes
smtpd_sasl_security_options = noanonymous
smtpd_sasl_local_domain = $myhostname
smtpd_recipient_restrictions = permit_mynetworks, permit_auth_destination, permit_sasl_authenticated, reject
③設定ファイル(master.cf)編集
# vi /etc/postfix/master.cf

19,23行目 : コメント解除
submission inet n - y - - smtpd
# -o syslog_name=postfix/submission
# -o smtpd_tls_security_level=encrypt
 -o smtpd_sasl_auth_enable=yes
# -o smtpd_tls_auth_only=yes
設定反映、再起動
Debian12.xでは/etc/aliasesが作成されたが、Debian13.xでは作成されなかったので、手作業で作成した。
# vi /etc/aliases

下記内容を記述
postmaster:    root
huong:         huong
# newaliases
# systemctl restart postfix
2.2 Dovecot : インストール 設定
①Dovecot をインストール
DovecotをインストールしてPOP/IMAPサーバーを構築します。POP は 110/TCP, IMAP は 143/TCP を使用します。
# apt -y install dovecot-core dovecot-pop3d dovecot-imapd
②Postfix に SASL機能が提供できるように Dovecot を設定
# vi /etc/dovecot/dovecot.conf

24行目 : 追加
protocols = imap pop3
31行目:コメント解除
listen = *, ::
# vi /etc/dovecot/conf.d/10-auth.conf

10行目 : コメント解除
auth_allow_cleartext = yes

93行目 : コメント解除
auth_mechanisms = plain login
# vi /etc/dovecot/conf.d/10-mail.conf

26-27行目 : コメント解除
mail_driver = maildir
mail_path = ~/Maildir

36-39行目 : コメントにする
#mail_driver = mbox
#mail_home = /home/%{user|username}
#mail_path = %{home}/mail
#mail_inbox_path = /var/mail/%{user}
# vi /etc/dovecot/conf.d/10-master.conf
110-112行目:コメント解除し追記
# Postfix smtp-authi
unix_listener /var/spool/postfix/private/auth {
 mode = 0666
 user = postfix
 group = postfix
}
③設定反映、再起動
# systemctl restart dovecot
2.3 メールユーザーアカウント登録
メール用のユーザーアカウントを登録します。
OS上のユーザーアカウントでメールも利用する場合の設定です
OS上のユーザーアカウントでメールを利用する場合は、追加の設定は不要で OSユーザーを登録するのみです
①メールクライアントインストール
# apt -y install mailutils
②メールボックスは Maildir を参照するよう設定
# echo 'export MAIL=$HOME/Maildir/' >> /etc/profile.d/mail.sh
2.4 ポートの開放
# ufw allow pop3
# ufw allow imap
# ufw allow smtp
# ufw reload
2.5 動作確認 ①
①自身にテストメール送信 [mail (ユーザー名)@(ホスト名)]
ユーザー名 : huong
# su - huong
$ mail huong@localhost
Cc:
(件名)
Subject: Test Mail
(本文)
This is the first mail.
本文を終了する場合は Ctrl + D キー
受信メール確認
$ mail
"/home/huong/Maildir/": 1 message 1 new
>N   1 huong              Wed Jul 22 09:58  13/427   Test Mail
? 1
Return-Path: <huong@Lepard>
X-Original-To: huong@localhost
Delivered-To: huong@localhost
Received: by mail.korodes.com (Postfix, from userid 1000)
        id 458D520BFC; Wed, 22 Jul 2026 18:58:27 +0900 (JST)
To: <huong@localhost>
Subject: Test Mail
User-Agent: mail (GNU Mailutils 3.19)
Date: Wed, 22 Jul 2026 18:58:27 +0900
Message-Id: <20260722095827.458D520BFC@mail.korodes.com>
From: huong <huong@Lepard>

This is the first mail.
? q
Saved 1 message in /home/huong/mbox
Held 0 messages in /home/huong/Maildir/
2.6 動作確認 ②
Mozilla Thunderbirdにアカウントを設定し、確認します(メールユーザーとしてOSユーザーhuongの場合)
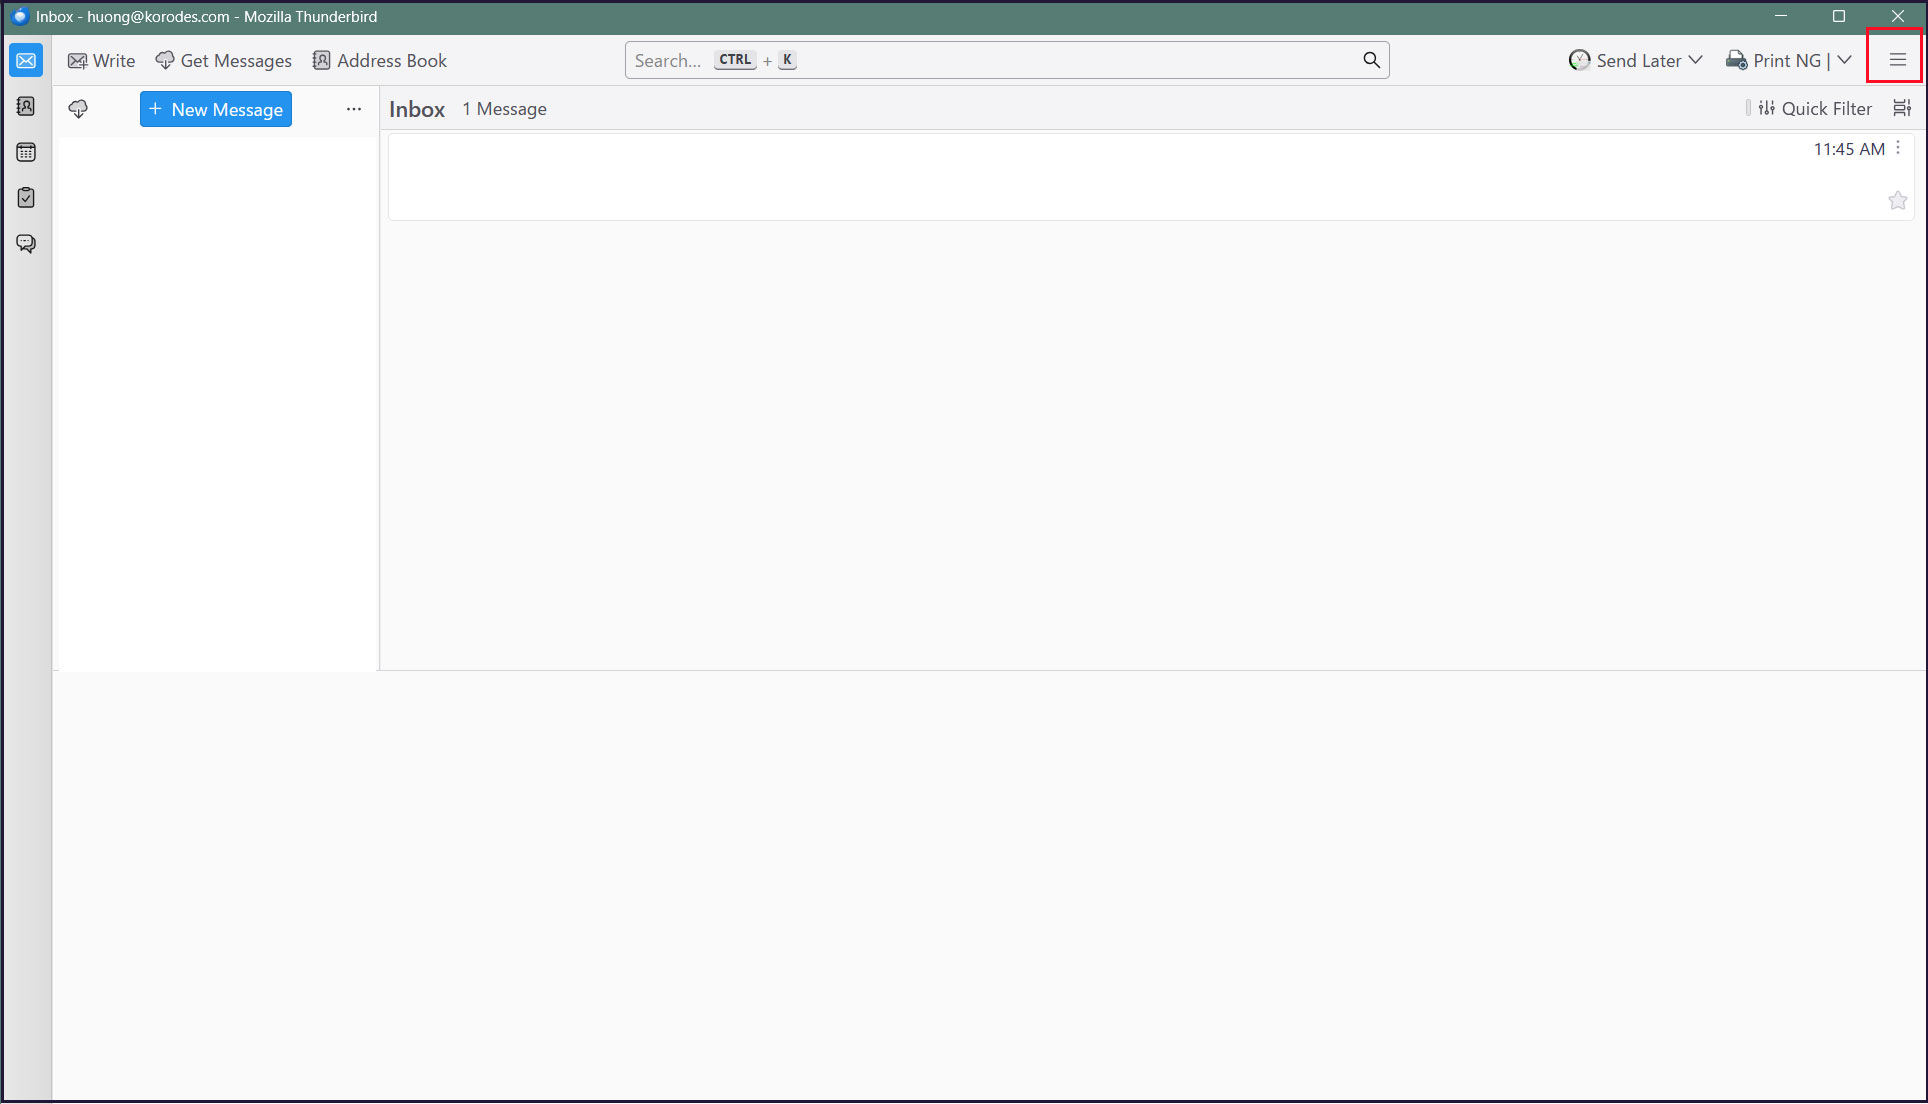
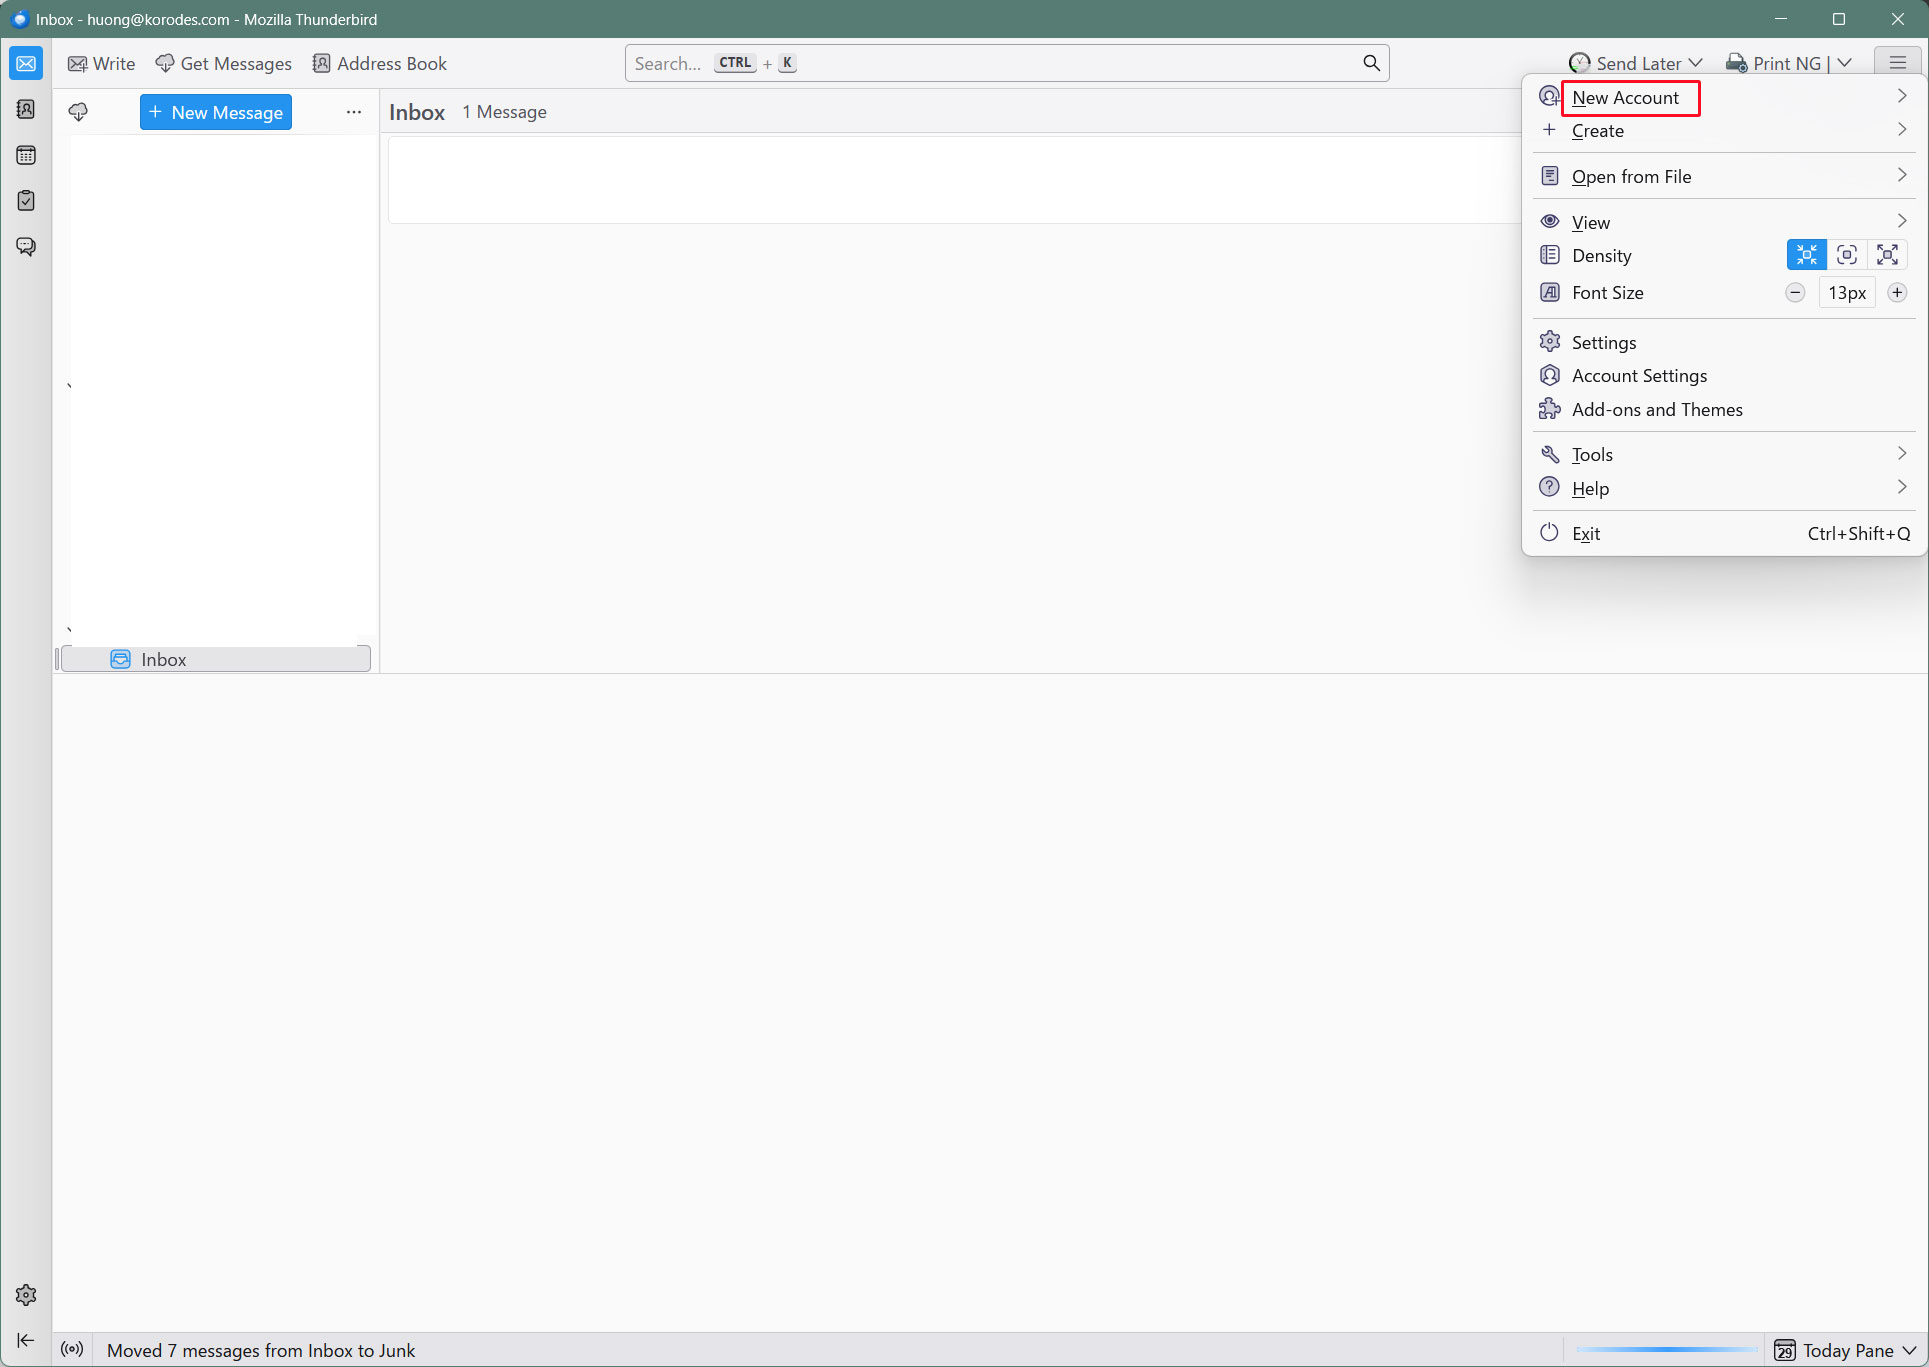
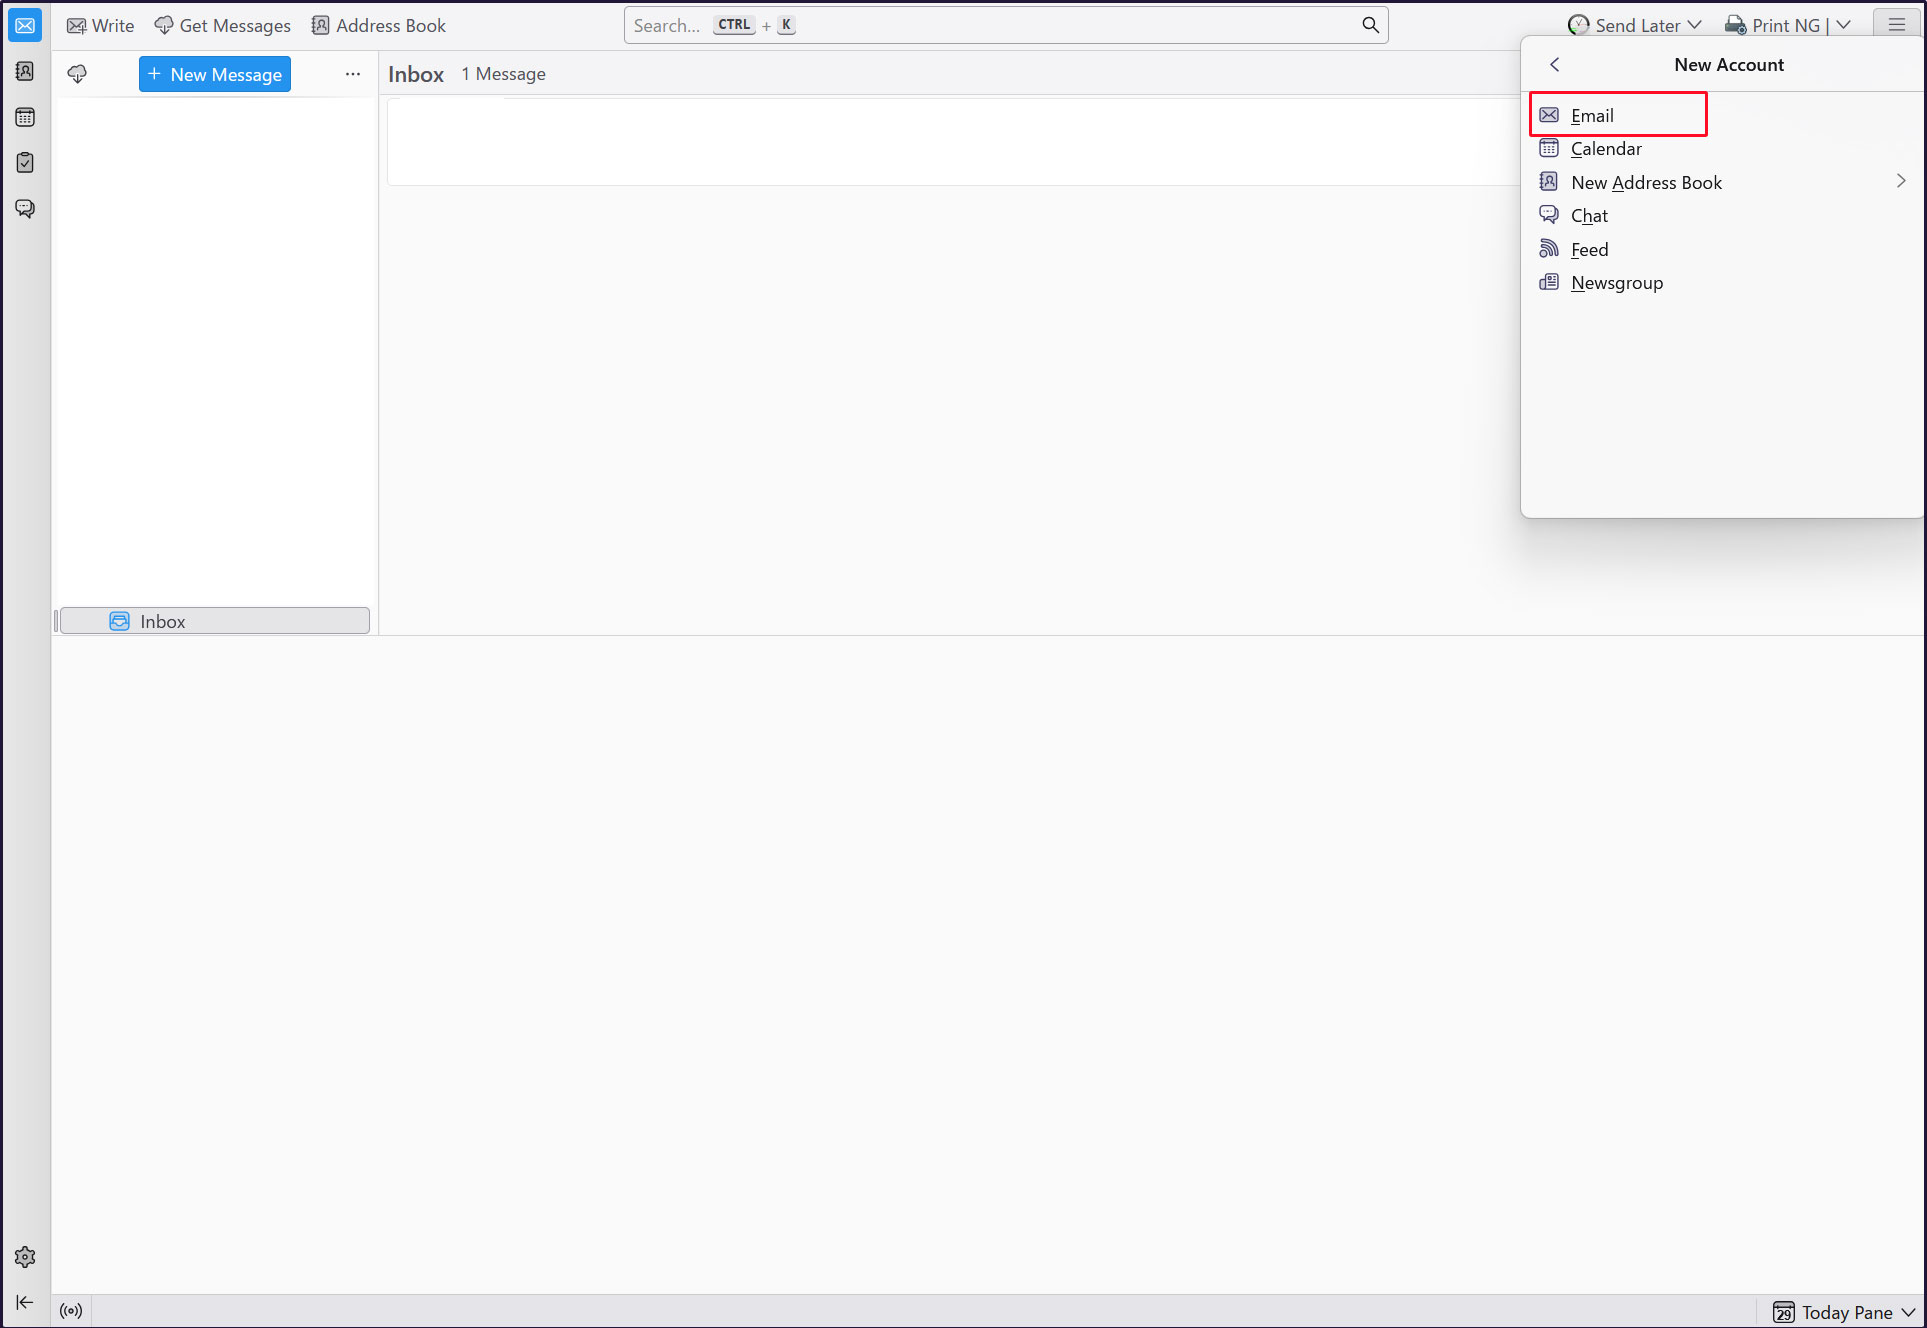
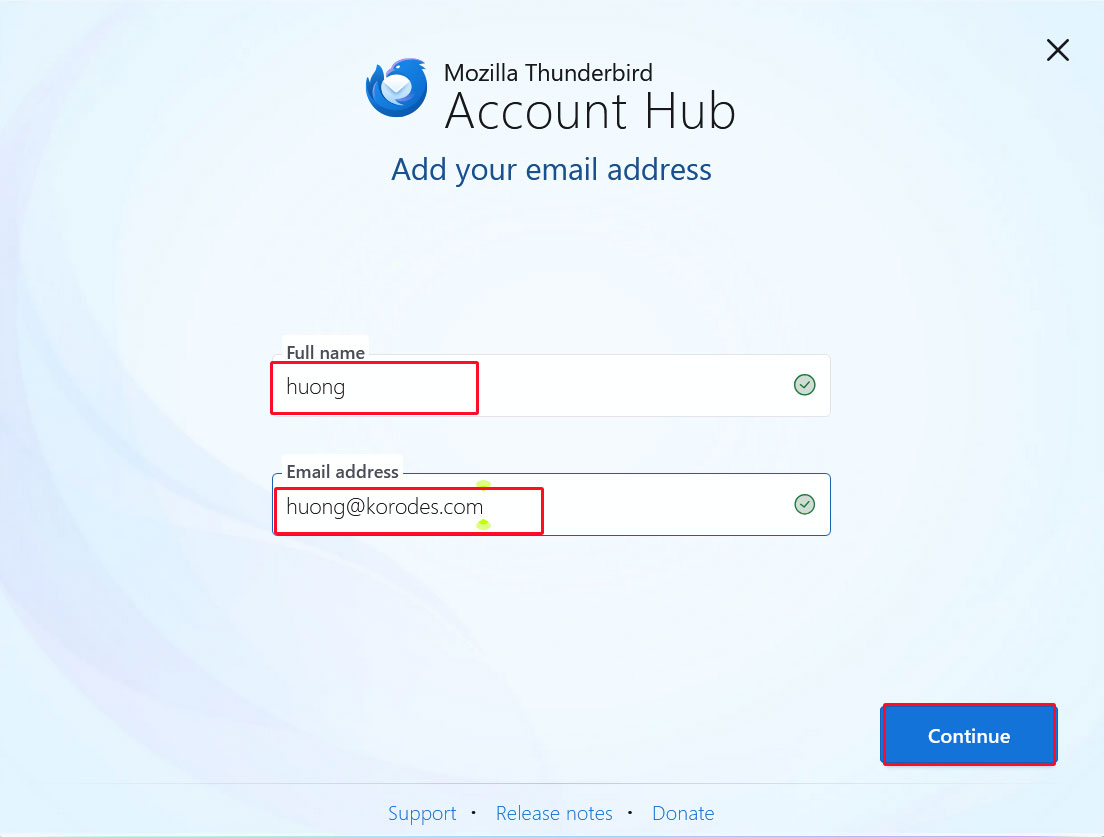
Thunderbirdを起動し、右上の[三本]メニューの[New Account][Email]をクリック
Full name : 任意の名称
Email address : huong@<domain-name>
をそれぞれ入力し、「Continue」クリック
[EDIT CONFIGURATION]をクリック
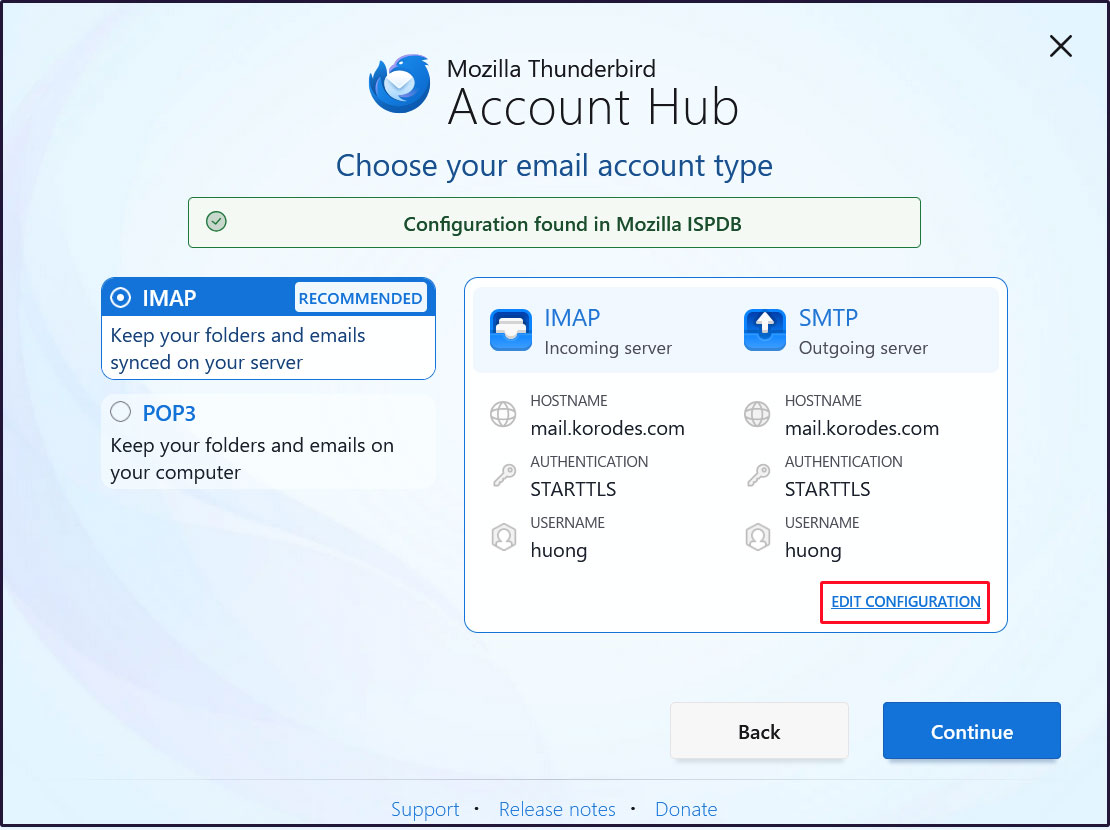
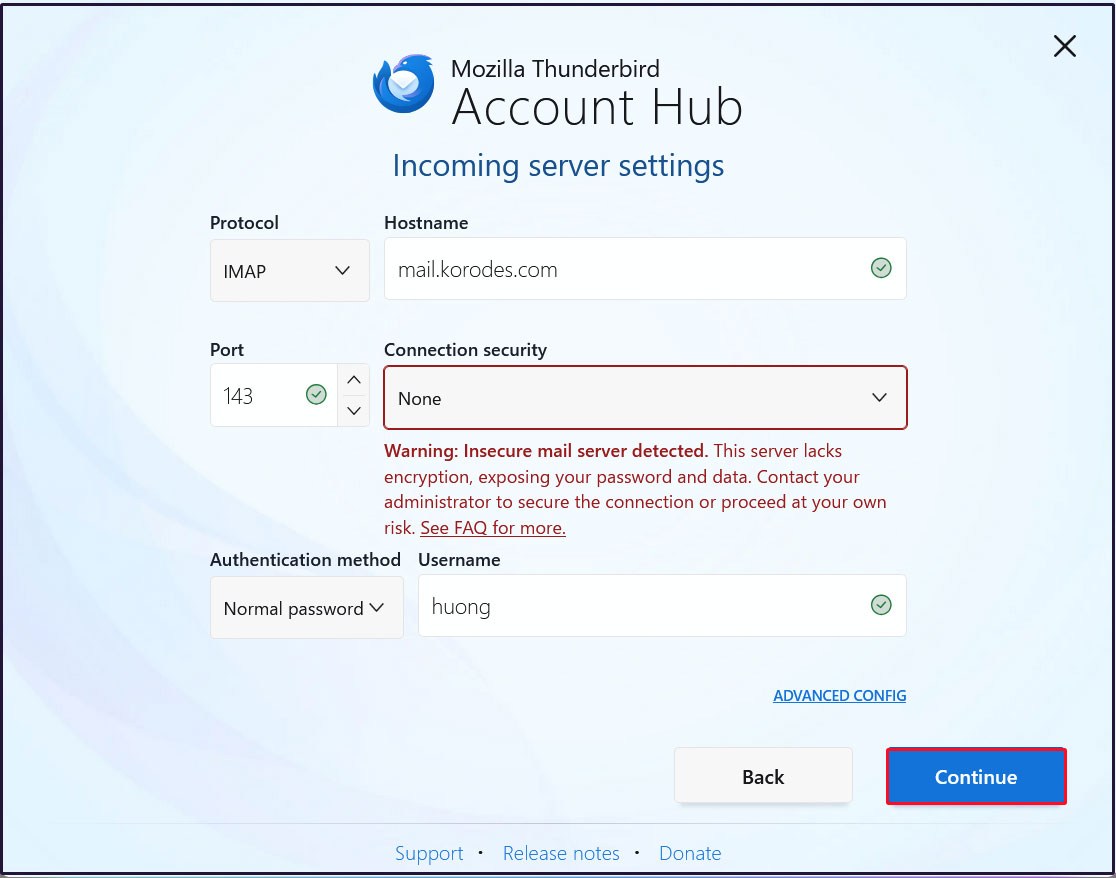
受信サーバーの設定
[Connection security]を[None]にして[Continue]をクリック
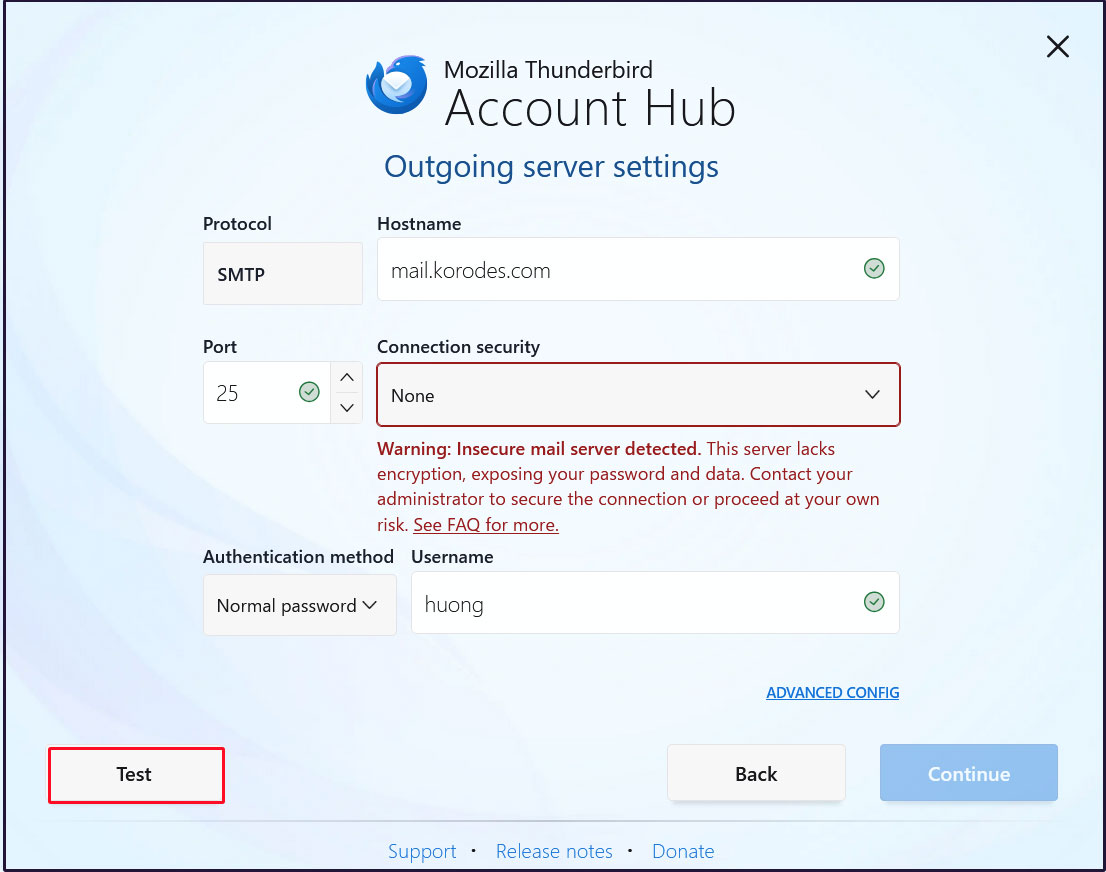
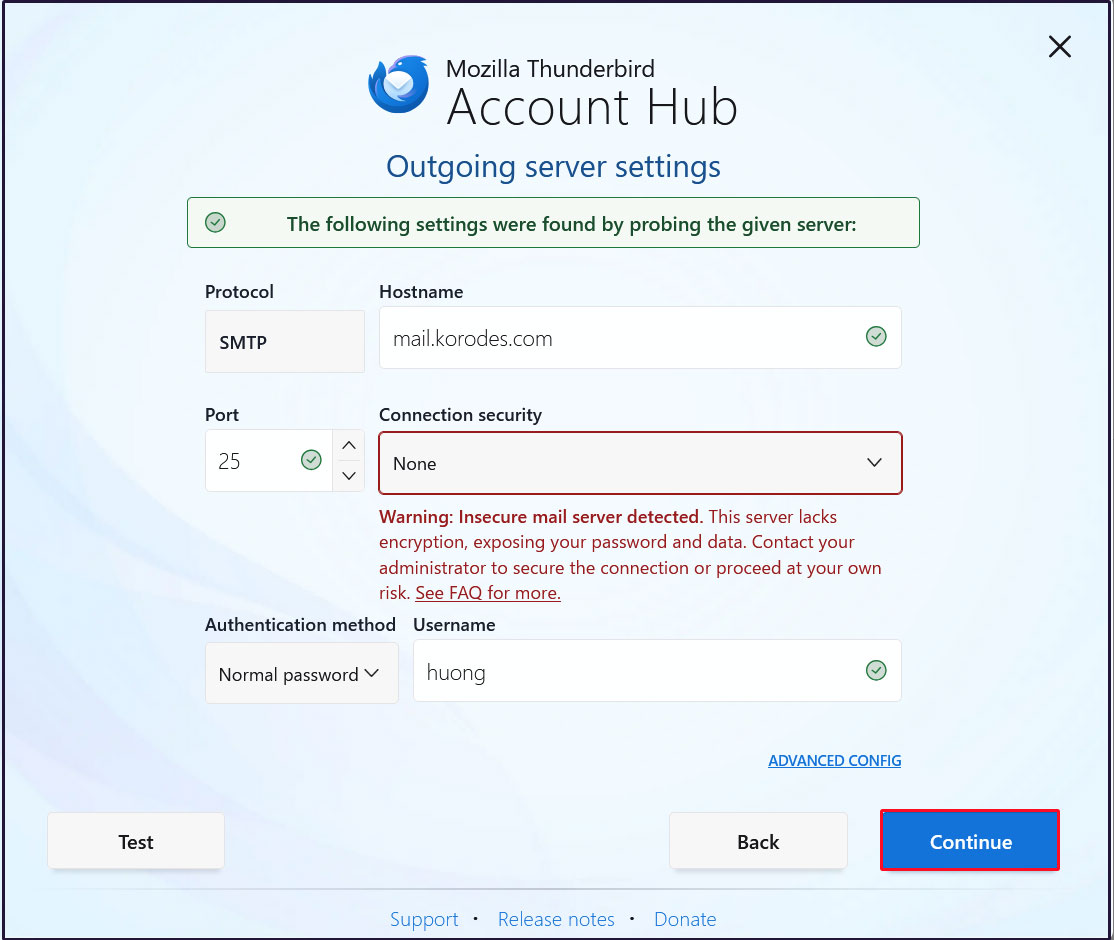
送信サーバーの設定
[Connection security]を[None]にして[Test]をクリック
[Continue]をクリック
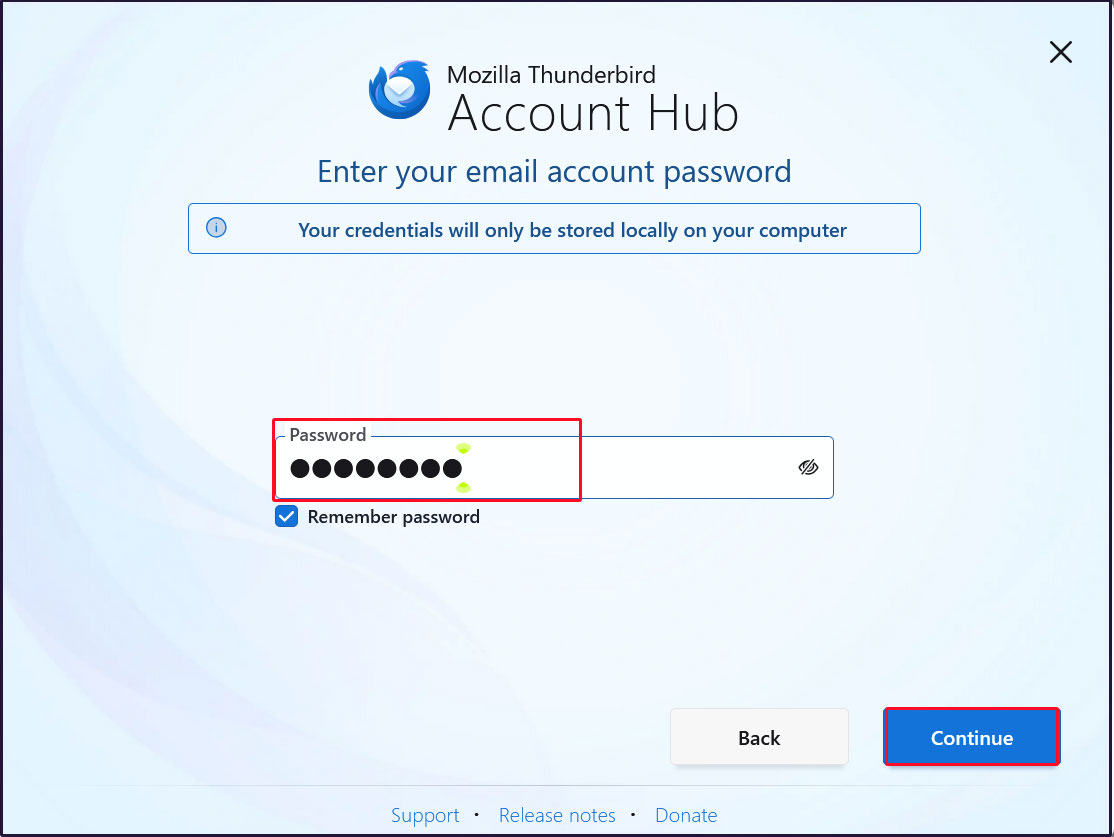
[Password]欄にユーザーのパスワードを入力し、[Continue]をクリック
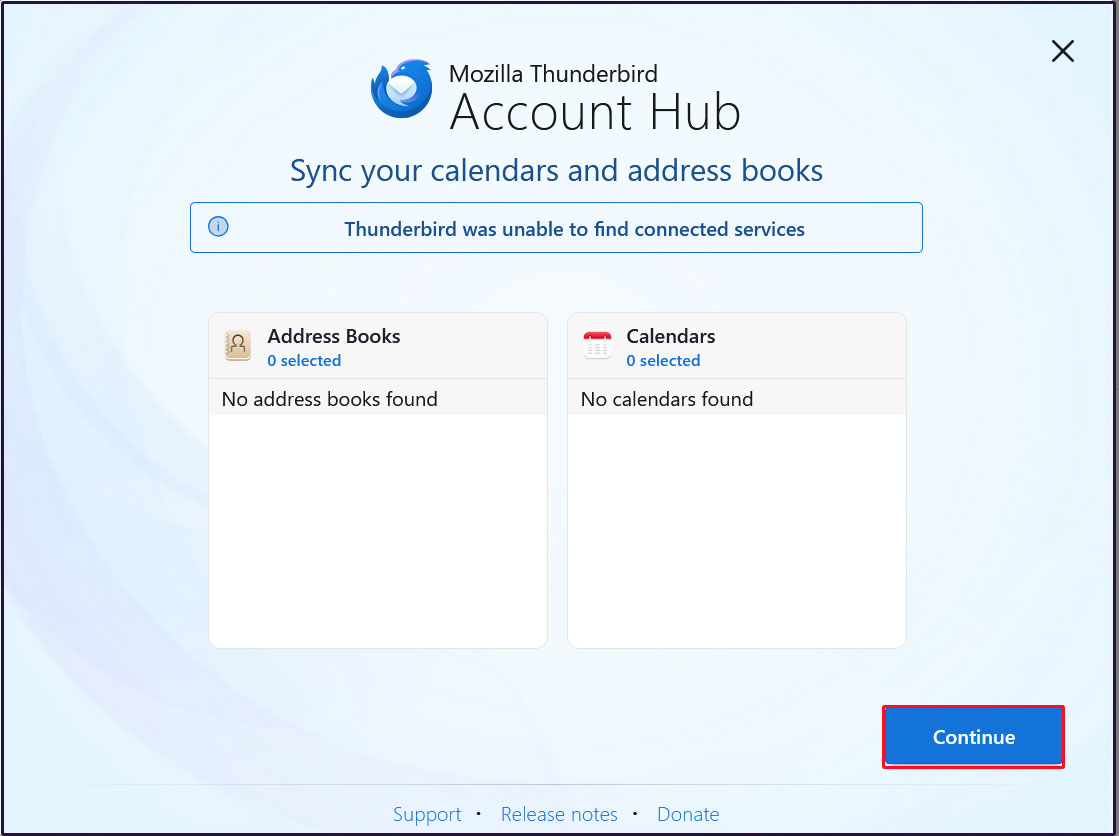
[Continue]をクリック
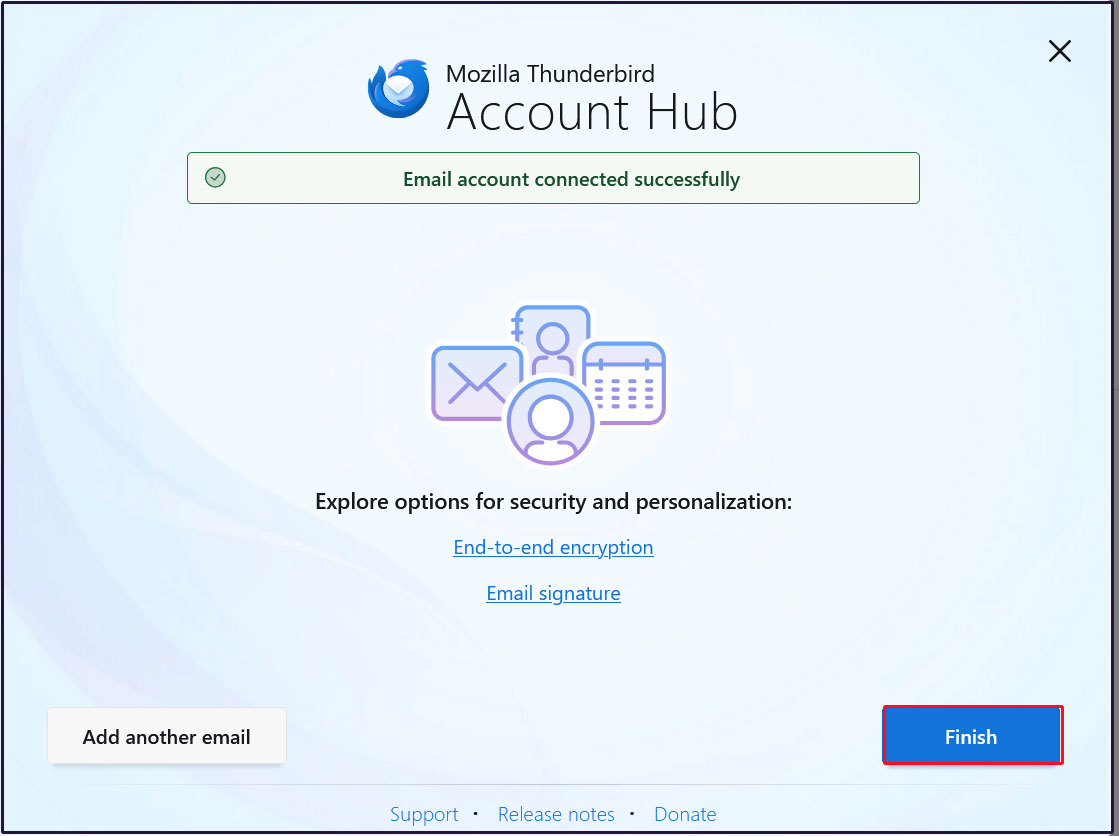
メールアカウントの作成が成功しましたので、[Finish]をクリック
3 メールサーバーPostfixに ClamAV適用
Postfix と Clamav を連携させて 送受信メールをリアルタイムスキャンできるように設定します
①Amavisd および Clamav Daemon をインストールして Clamav Daemon を起動します
# apt -y install clamav-daemon amavisd-new
サーバーがホスト名として完全修飾ドメイン名(FQDN)を使用していない場合、Amavisの起動に失敗する可能性があります。また、OSのホスト名が変更される可能性があるため、有効なホスト名をAmavis構成ファイルに直接設定します
# vi /etc/amavis/conf.d/05-node_id

 12行目に追加
use strict;
# $myhostname is used by amavisd-new for node identification, and it is
# important to get it right (e.g. for ESMTP EHLO, loop detection, and so on) .

chomp($myhostname = `hostname --fqdn`);

# To manually set $myhostname, edit the following line with the correct Full y
# Qualified Domain Name (FQDN) and remove the # at the beginning of the line .
#
#$myhostname = "mail.example.com";
$myhostname = "mail.<domain>";
1; # ensure a defined return
②ウィルススキャン有効化
# vi /etc/amavis/conf.d/15-content_filter_mode

13-14行目 : コメント解除してウィルススキャン有効化
@bypass_virus_checks_maps = (
\%bypass_virus_checks, \@bypass_virus_checks_acl, \$bypass_virus_checks_re);
③自身のドメイン名を登録
# echo '<yourDomain>' > /etc/mailname
④postfix設定ファイル(Main.cf)編集
# vi /etc/postfix/main.cf

最終行へ追記
content_filter=smtp-amavis:[127.0.0.1]:10024
⑤postfix設定ファイル(master.cf)編集
# vi /etc/postfix/master.cf

# 最終行へ以下全行追記
smtp-amavis unix - - n - 2 smtp
    -o smtp_data_done_timeout=1200
    -o smtp_send_xforward_command=yes
    -o disable_dns_lookups=yes
127.0.0.1:10025 inet n - n - - smtpd
    -o content_filter=
    -o local_recipient_maps=
    -o relay_recipient_maps=
    -o smtpd_restriction_classes=
    -o smtpd_client_restrictions=
    -o smtpd_helo_restrictions=
    -o smtpd_sender_restrictions=
    -o smtpd_recipient_restrictions=permit_mynetworks,reject
    -o mynetworks=127.0.0.0/8
    -o strict_rfc821_envelopes=yes
    -o smtpd_error_sleep_time=0
    -o smtpd_soft_error_limit=1001
    -o smtpd_hard_error_limit=1000
⑥設定反映
# usermod -G clamav amavis
# usermod -G amavis clamav
# systemctl restart clamav-daemon amavis postfix
Thuderbird等で自己宛に空メールを送ると、受信メールのヘッダーに次のようなメッセージがあれば成功です。
X-Mozilla-Status: 0001
X-Mozilla-Status2: 00000000
Return-Path: xxxxx@xxxxxxx.com
X-Original-To: xxxxx@xxxxxxx.com
Delivered-To: xxxxx@xxxxxxx.com
Received: from localhost (localhost [127.0.0.1])
by mail.xxxxxxx.com (Postfix) with ESMTP id CDF7E20C62
for xxxxx@xxxxxxx.com; Thu, 23 Jul 2026 09:17:03 +0900 (JST)
X-Virus-Scanned: Debian amavis at xxxxxxx.com
Received: from mail.xxxxxxx.com ([127.0.0.1])
by localhost (mail.xxxxxxx.com [127.0.0.1]) (amavis, port 10024) with ESMTP
id 2zNL_6R4AnYu for xxxxx@xxxxxxx.com;
Thu, 23 Jul 2026 09:17:03 +0900 (JST)
Received: from [192.168.11.14] (buffalo.setup [192.168.11.1])
by mail.xxxxxxx.com (Postfix) with ESMTPA id AC16420C23
for xxxxx@xxxxxxx.com; Thu, 23 Jul 2026 09:17:03 +0900 (JST)
Message-ID: 20246f45-6112-4cce-8a04-9556df952d2c@xxxxxxx.com
Date: Thu, 23 Jul 2026 09:17:03 +0900
MIME-Version: 1.0
User-Agent: Mozilla Thunderbird
From: xxxxx xxxxx@xxxxxxx.com
Content-Language: en-US
To: xxxxx xxxxx@xxxxxxx.com
Content-Type: text/plain; charset=UTF-8; format=flowed
Content-Transfer-Encoding: 7bit
4 メールサーバーに スパムチェック適用
4.1 spamassassinとprocmailを使用して、スパムチェック
①spamassassinとprocmailインストール
# apt -y install procmail spamassassin
➁procmailの設定
設定をユーザー全員に適用する場合は /etc/procmailrcを作成
各個人毎に設定する場合は、各ユーザホームディレクトリに ~/.procmailrc を作成
今回は/etc/procmailrc を作成する
# vi /etc/procmailrc

下記内容を記述(procmailrcの内容)
SHELL=/bin/bash
PATH=/usr/bin:/bin:/usr/local/bin
DROPPRIVS=yes
MAILDIR=$HOME/Maildir
DEFAULT=$MAILDIR/
SPAM=$MAILDIR/.Spam/
LOGFILE=$HOME/.procmail.log # ログ出力先
VERBOSE=ON # 詳細ログ出力

## メールヘッダー中に「 X-Spam-*** 」の記述がなければ spamassassin を起動します
:0fw
*!^X-Spam.*
|spamassassin

## メールヘッダー中に「 X-Spam-Status: Yes 」の記述があれば、「 .Spam 」ディレクトリにメールを格納します
:0
* ^X-Spam-Status: Yes
$SPAM
➂各ユーザの~/Maildirディレクトリに.Spamディレクトリを作成
# su - <user>
$ mkdir Maildir/.Spam
④postfixの設定ファイル編集
root権限で行う
# vi /etc/postfix/main.cf

485行目あたり コメント解除
mailbox_command = /usr/bin/procmail -a "$EXTENSION"
⑤postfix、spamassassinを有効化、再起動
# systemctl restart postfix spamd

# systemctl enable spamassassin-maintenance.timer
Created symlink '/etc/systemd/system/timers.target.wants/spamassassin-maintenance.timer' → '/usr/lib/systemd/system/spamassassin-maintenance.timer'.
⑥Thudrtbirdで確認
自分あてに空メール送信し、ヘッダーに下記のように表示されれば正常
X-Mozilla-Status: 0001
X-Mozilla-Status2: 00000000
Return-Path: xxxxx@xxxxxxx.com
X-Spam-Checker-Version: SpamAssassin 4.0.1 (2024-03-25) on Lepard
X-Spam-Level: ***
X-Spam-Status: No, score=3.1 required=5.0 tests=ALL_TRUSTED,EMPTY_MESSAGE,
MISSING_SUBJECT autolearn=no autolearn_force=no version=4.0.1
X-Original-To: xxxxx@xxxxxxx.com
Delivered-To: xxxxx@xxxxxxx.com
Received: from localhost (localhost [127.0.0.1])
by mail.xxxxxxx.com (Postfix) with ESMTP id 05AF420C71
for xxxxx@xxxxxxx.com; Thu, 23 Jul 2026 09:27:57 +0900 (JST)
X-Virus-Scanned: Debian amavis at xxxxxxx.com
Received: from mail.xxxxxxx.com ([127.0.0.1])
by localhost (mail.xxxxxxx.com [127.0.0.1]) (amavis, port 10024) with ESMTP
id C__rsI0-8PNk for xxxxx@xxxxxxx.com;
Thu, 23 Jul 2026 09:27:56 +0900 (JST)
Received: from [192.168.11.14] (buffalo.setup [192.168.11.1])
by mail.xxxxxxx.com (Postfix) with ESMTPA id E1F9420C61
for xxxxx@xxxxxxx.com; Thu, 23 Jul 2026 09:27:56 +0900 (JST)
Message-ID: d8ad7fef-4539-4856-a66e-12f107b114f6@xxxxxxx.com
Date: Thu, 23 Jul 2026 09:27:56 +0900
MIME-Version: 1.0
User-Agent: Mozilla Thunderbird
From: xxxxx xxxxx@xxxxxxx.com
Content-Language: en-US
To: xxxxx xxxxx@xxxxxxx.com
Content-Type: text/plain; charset=UTF-8; format=flowed
Content-Transfer-Encoding: 7bit
⑦スパムチェック確認
自分自身にメール本文が「XJS*C4JDBQADN1.NSBN3*2IDNEN*GTUBE-STANDARD-ANTI-UBE-TEST-EMAIL*C.34X」のメールを送るとメールは配信されずSpamフォルダへ振り分けられていることを確認する( /home/huong/Maildir/.Spam/new/ に保存されているファイル)
ヘッダーには次のような内容が含まれている
Received: from localhost by Lepard
with SpamAssassin (version 4.0.1);
Thu, 23 Jul 2026 09:33:15 +0900
From: xxxxx xxxxx@xxxxxxx.com
To: xxxxx xxxxx@xxxxxxx.com
Subject: Spam Test
Date: Thu, 23 Jul 2026 09:33:13 +0900
Message-Id: 1a794804-f627-4221-ad30-f30053146841@xxxxxxx.com
X-Spam-Checker-Version: SpamAssassin 4.0.1 (2024-03-25) on Lepard
X-Spam-Flag: YES
X-Spam-Level:**********************************************
X-Spam-Status: Yes, score=999.7 required=5.0 tests=ALL_TRUSTED,GTUBE,
HTML_MESSAGE,MPART_ALT_DIFF autolearn=no autolearn_force=no
version=4.0.1
MIME-Version: 1.0
Content-Type: multipart/mixed; boundary="----------=_6A61614B.7AED63B6"
This is a multi-part message in MIME format.
4.2 スパムメールの学習
SpamAssassin のメールの学習機能で、判定の精度を高める
①「.Spam」ディレクトリの中身を全てスパムメールとして学習
# /usr/bin/sa-learn --spam /home/*/Maildir/.Spam/cur
Learned tokens from 0 message(s) (0 message(s) examined)
➁非スパムメール(通常のメール)の学習
# /usr/bin/sa-learn --ham /home/*/Maildir/cur
Learned tokens from 7 message(s) (7 message(s) examined)
➂自動で学習させるスクリプト作成
# vi /opt/script/spam-learns.sh

下記内容を記述
#! /bin/sh
#スパムメールの学習
/usr/bin/sa-learn --spam /home/*/Maildir/.Spam/cur
#通常のメールを学習
/usr/bin/sa-learn --ham /home/*/Maildir/cur

#スパムメール保存ディレクトリの中身を強制的に消去してよいのなら以下の記述を追加
/bin/rm -f /home/*/Maildir/.Spam/cur
# chmod 750 /opt/script/spam-learns.sh
④システム起動時に SpamAssassin を自動的に起動
# systemctl enable spamd
Synchronizing state of spamd.service with SysV service script with /usr/lib/systemd/systemd-sysv-install.
Executing: /usr/lib/systemd/systemd-sysv-install enable spamd