

FTPサーバ(Vsftpd)
1. 自己署名の証明書を作成
①秘密鍵作成
# cd /etc/ssl
# openssl genrsa -des3 -out server.key 2048
Enter PEM pass phrase: [パスフレーズ]
Verifying - Enter PEM pass phrase: [パスフレーズ]
➁パスフレーズ削除
# openssl rsa -in server.key -out server.key
Enter pass phrase for server.key: ←先ほどのパスフレーズを入力
writing RSA key
➂アクセス権設定
# chmod 400 server.key
④自己証明書作成
# cd /etc/ssl/
# openssl req -new -x509 -days 3650 -key server.key -out ftp.crt
You are about to be asked to enter information that will be incorporated
into your certificate request.
What you are about to enter is what is called a Distinguished Name or a DN.
There are quite a few fields but you can leave some blank
For some fields there will be a default value,
If you enter '.', the field will be left blank.
-----
Country Name (2 letter code) [AU]:JP ←国名
State or Province Name (full name) [Some-State]:Osaka ←都道府県名
Locality Name (eg, city) []:Sakai ←市区町村名
Organization Name (eg, company) [Internet Widgits Pty Ltd]:Lepard ←ホスト名(または会社名)
Organizational Unit Name (eg, section) []: ←空エンター
Common Name (e.g. server FQDN or YOUR name) []:Admin ←ホスト名(または管理者名)
Email Address []:hoge@hoge.com ←管理者メールアドレス
# cat server.key ftp.crt > ftp.pem
# chmod 400 ftp.*
2. vsftpdインストール・設定
2.1 vsftpdインストール
# cd /usr/ports/ftp/vsftpd
# make BATCH=yes WITH_VSFTPD_SSL=yes install clean
2.2 vsftpd設定ファイル編集
# chmod 640 /usr/local/etc/vsftpd.conf

# vi /usr/local/etc/vsftpd.conf
12行目 : 変更(anonymous(匿名)のログインを許可しない)
anonymous_enable=NO

15行目 : コメント解除(ローカルログインを許可)
local_enable=YES

18行目 : コメント解除(書き込みを許可)
write_enable=YES

22行目 : コメント解除(新規ファイルのパーミッション設定)
local_umask=022

51行目 : コメント解除(ログファイルの指定)
xferlog_file=/var/log/vsftpd.log

80行目 : コメント解除(ASCIIモードでのアップロードを許可)
ascii_upload_enable=YES

81行目 : コメント解除(ASCIIモードでのダウンロードを許可)
ascii_download_enable=YES

98行目 : コメント解除
chroot_local_user=YES

99行目 : コメント解除
chroot_list_enable=YES

101行目 : コメント解除(上記ユーザー指定ファイル)
chroot_list_file=/etc/vsftpd.chroot_list

107行目 : コメント解除(ディレクトリごとの削除を許可する)
ls_recurse_enable=YES

112行目 : IPv4有効
listen=YES

134行目 : コメント解除
background=YES

# 最終行に下記を追加
# PASV モード有効
pasv_enable=YES
# pasv_address 有効
pasv_addr_resolve=YES
# pasv モードのポート番号範囲
pasv_min_port=4000
pasv_max_port=4009
# ローカルタイムを使用
use_localtime=YES
# SSL接続を許可
ssl_enable=YES
# SSL 証明書ファイルを指定
rsa_cert_file=/etc/ssl/ftp.pem
# SSL セッションを再利用しない
require_ssl_reuse=NO
# 強制 SSL 接続を解除
force_local_logins_ssl=NO
# 強制 SSL 接続を解除
force_local_data_ssl=NO
# ドットファイルを表示
force_dot_files=YES
/etc/hosts.allow編集
# echo "vsftpd: ALL" >> /etc/hosts.allow
chroot_list編集
今回は一般ユーザーhuongを書き込みました
# echo huong >> /etc/vsftpd.chroot_list
自動起動有効・起動
# sysrc vsftpd_enable="YES"

# service vsftpd start
2.3 Firewallでパッシブポート開放する
4000-4009ポートを開放する
# vi /usr/local/etc/ipfw.rules
下記を追加する、但し400~419は他と重ならないようにする
$IPF 400 allow tcp from any to any 4000 in
$IPF 401 allow tcp from any to any 4000 out
$IPF 402 allow tcp from any to any 4001 in
$IPF 403 allow tcp from any to any 4001 out
$IPF 404 allow tcp from any to any 4002 in
$IPF 405 allow tcp from any to any 4002 out
$IPF 406 allow tcp from any to any 4003 in
$IPF 407 allow tcp from any to any 4003 out
$IPF 408 allow tcp from any to any 4004 in
$IPF 409 allow tcp from any to any 4004 out
$IPF 410 allow tcp from any to any 4005 in
$IPF 411 allow tcp from any to any 4005 out
$IPF 412 allow tcp from any to any 4006 in
$IPF 413 allow tcp from any to any 4006 out
$IPF 414 allow tcp from any to any 4007 in
$IPF 415 allow tcp from any to any 4007 out
$IPF 416 allow tcp from any to any 4008 in
$IPF 417 allow tcp from any to any 4008 out
$IPF 418 allow tcp from any to any 4009 in
$IPF 419 allow tcp from any to any 4009 out
Firewallルール再読み込み
# service ipfw restart
下記ページを参照
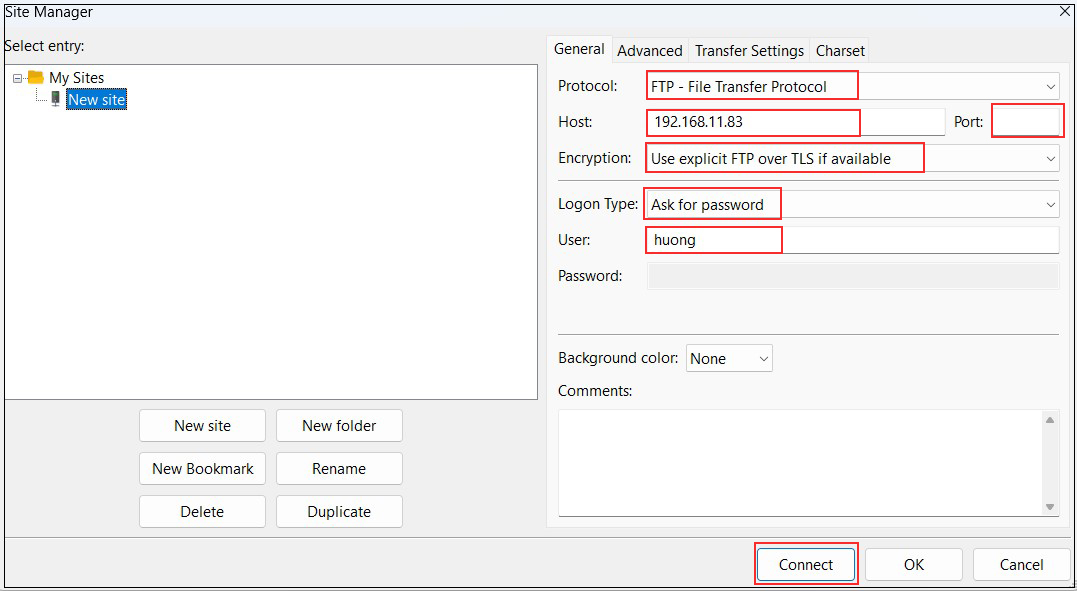
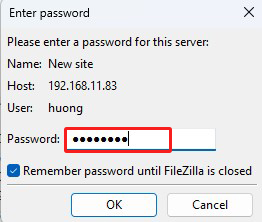
2.4 FileZilla で接続
Password : 一般ユーザーhuongのパスワード
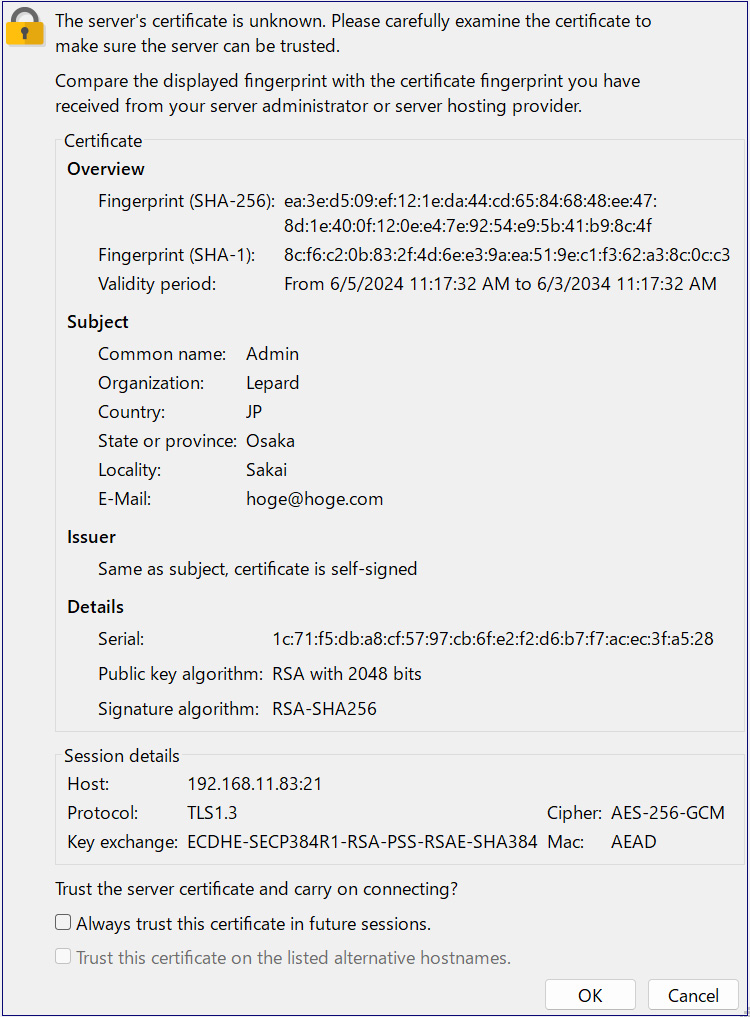
次のようなセキュリティ確認画面が表示されるのでOKをクリックするとサーバーに接続される
Sambaでファイルサーバー
WindowsやMacのファイル共有を実現するため、Sambaを使いファイルサーバーを構築する
1. Sambaのインストール
インストールできるsambaの検索
# pkg search samba
samba-nsupdate-9.16.5_3        nsupdate utility with the GSS-TSIG support
samba416-4.16.11_10            Free SMB/CIFS and AD/DC server and client for Unix
samba419-4.19.9_12             Free SMB/CIFS and AD/DC server and client for Unix
samba420-4.20.8_1              Free SMB/CIFS and AD/DC server and client for Unix
samba422-4.22.7_1              Free SMB/CIFS and AD/DC server and client for Unix
samba423-4.23.6_1              Free SMB/CIFS and AD/DC server and client for Unix
今回はsamba420をインストールします
# pkg install samba420
2. Sambaの設定
/usr/local/etc/smb4.confを新規作成
# vi /usr/local/etc/smb4.conf

[global]
#Windows クライアントとの通信に使用する文字コード
dos charset = CP932
#Samba サーバー側の FreeBSDで使われる文字コード
unix charset = UTF-8
#Windows 側で設定したワークグループ名に合わせる
workgroup = WORKGROUP
#任意の名称
server string = FreeBSD
#任意の名称
netbios name = freebsd
security = user

[share]
#共有するディレクトリのパス
path = /home/share
#共有ディレクトリに作成されるファイル/ディレクトリのパーミッション
create mask = 0770
#共有ディレクトリに作成されるファイル/ディレクトリのパーミッション
directory mask = 0770
#ゲストユーザー不可
guest only = No
#ゲストユーザー不可
guest ok = No
#共有ディレクトリを書き込み可能
browseable = No
read only = No
#共有ディレクトリを書き込み可能
writable = Yes
共有ディレクトリを作成
共有ディレクトリを /home/share とし、所有者を huong(Freebsdに登録されている一般ユーザー)、アクセス権限は、一般ユーザーと wheel グループに読み・書き・実行を許可
# mkdir /home/share
# chown huong:wheel /home/share
# chmod -R 0770 /home/share
samba自動起動設定し、起動する
# sysrc samba_server_enable="YES"

# service samba_server start
huong(Freebsdに登録されている一般ユーザー)をSamba ユーザーとして登録しパスワードを設定する(pdbedit コマンドを使用)
# pdbedit -a -u huong
new password: Password
retype new password: again Password
Unix username:        huong
NT username:
Account Flags:        [U          ]
User SID:             S-1-5-21-165518207-400400841-3263613001-1000
Primary Group SID:    S-1-5-21-165518207-400400841-3263613001-513
Full Name:            huong
Home Directory:       \\FREEBSD\huong
HomeDir Drive:
Logon Script:
Profile Path:         \\FREEBSD\huong\profile
Domain:               FREEBSD
Account desc:
Workstations:
Munged dial:
Logon time:           0
Logoff time:          Thu, 07 Feb 2036 00:06:39 JST
Kickoff time:         Thu, 07 Feb 2036 00:06:39 JST
Password last set:    Wed, 17 Jun 2026 09:25:27 JST
Password can change:  Wed, 17 Jun 2026 09:25:27 JST
Password must change: never
Last bad password   : 0
Bad password count  : 0
Logon hours         : FFFFFFFFFFFFFFFFFFFFFFFFFFFFFFFFFFFFFFFFFF
ファイアウォール有効の場合はsamba使用ポート(445)を開放しておく
xxxは他のルール番号と違うものにする
# vi /usr/local/etc/ipfw.rules
下記を追加
$IPF xxx allow tcp from any to any 445 in
$IPF xxx allow tcp from any to any 445 out

Firewallルール再読み込み
# service ipfw restart
3 Samba起動確認
Windowsの設定
・ワークグループ名が"WORKGROUP"になっていることを確認
ファイルエクスプローラーのアドレスバーに、"\\<Samba サーバーの IP アドレス>\<共有ディレクトリ名>" と入力
(今回は'\\192.168.11.83\share")するとログイン画面が表示されるので登録したユーザー名(huong)とパスワードを入力する