

1. Debian13.5
This time, we'll explain how to build a server using Debian, the foundation of the user-friendly Linux distribution Ubuntu.
The latest stable release is Debian 13.5 "Trixie," released on May 16th, 2026
No new features have been added to the "Trixie" release of Debian 13.5. This update primarily focuses on fixing bugs in specific packages and addressing security issues.
2. Download the installation image
Go to the official Debian website and download debian-13.5.0-amd64-netinst.iso
Burn the ISO image saved above to a CD or USB drive as a bootable disk using your preferred burning software.
3. Install
Change the BIOS settings to boot from the installation disk created above, then start the PC.
The installation procedure is the same as for Debian 13.1, so it will be omitted hereafter.
Please refer to the following page.

From now on, I will connect remotely via SSH from Windows and work using Tabby Terminal.
Check your IP address using the following command
# ip a
Connect to the Debian Server using the following command in Tabby Terminal
# ssh huong@<IP address>
4. Installing and Configuring the Vim Editor
Debian sets "nano" as the default editor. Since nano can be somewhat difficult to use and is less commonly used in many environments, this guide explains how to change the editor to "vim".
①Installing Vim Packages
$ su -
Password : ←The root user password created during the Debian 13 installation process
# apt install -y vim

After installation, check the vim package using the dpkg command.
# dpkg -l | grep vim
ii  vim                             2:9.1.1230-2                 amd64        Vi IMproved - enhanced vi editor
ii  vim-common                      2:9.1.1230-2                 all          Vi IMproved - Common files
ii  vim-runtime                     2:9.1.1230-2                 all          Vi IMproved - Runtime files
ii  vim-tiny                        2:9.1.1230-2                 amd64        Vi IMproved - enhanced vi editor - compact version
As shown above, Vim is installed.
➁Changing the default editor
Change the default editor from nano to the installed "vim". To change the default editor, run the "update-alternatives --set editor" command. To change to vim, execute the following:
# update-alternatives --set editor /usr/bin/vim.basic

update-alternatives: using /usr/bin/vim.basic to provide /usr/bin/editor (editor) in manual mode
If it outputs as shown above, the editor has been modified.
➂Changing Vim settings
To grant permission to all users, create a ".vimrc" file in "/root/".
To configure a Vim environment for each user individually, create a ".vimrc" file in the user's home directory.
This time, we will create a ".vimrc" file in the root user's home directory, "/root/".
# vi ~/.vimrc
"Enables pasting and copying of text
set clipboard+=autoselect
" Use vim's own extensions (not compatible with vi)
set nocompatible
" Specify character code
set encoding=utf-8
" Specify file encoding
set fileencodings=utf-8,iso-2022-jp,sjis,euc-jp
" Specify the line feed code to be automatically recognized
set fileformats=unix,dos
"Obtain a backup
set backup
" Specify the directory from which to obtain backups
set backupdir=~/backup
" Number of generations to keep search history
set history=50
" Do not distinguish between upper and lower case letters when searching
set ignorecase
" Mixing capital letters in search terms makes the search case sensitive
set smartcase
" Highlight words matching your search term
set hlsearch
" Use incremental search
(Starts searching for matching strings at any time while a search term is being entered)
set incsearch
" Display line numbers
set number
" Visualize line breaks ( $ ) and tabs ( ^I )
set list
" Highlight corresponding parentheses when entering parentheses
set showmatch
" No newlines at the end of files
set binary noeol
" Enable automatic indentation
set autoindent
" Color-coded display by syntax
syntax on
" change color of comment text in case of [ syntax on]
highlight Comment ctermfg=LightCyan
" Wrap lines by window width
set wrap
5. Network Settings
①Host Name Settings
This section describes how to change the hostname of a host that has been set during Debian installation for some reason.
To set the hostname, use the command "hostnamectl set-hostname". Execute the command as follows In this example, the hostname is set to "Lepard".
# hostnamectl set-hostname Lepard
The result of the configuration can be confirmed by referring to the "/etc/hostname" file.
Refer to the "/etc/hostname" file with the "cat" command, and if the "Lepard" value is displayed as shown below, the host name confirmation is complete.
# cat /etc/hostname
Lepard
➁Set IP address to network interface
The IP address is set to DHCP (dynamic IP address) when Debian 13 is installed, so set a fixed IP address.
Modify the "/etc/network/interfaces" file to set the IP address, and then restart the network interface (ens33 in this case).
The network interface name will vary depending on the environment in which the setup was performed, so check the interface name first.
The command to check network information is "ip addr (or ip a)". Running this command will display the network interface name and IP address information.
# ip addr
1: lo: <LOOPBACK,UP,LOWER_UP> mtu 65536 qdisc noqueue state UNKNOWN group default qlen 1000
    link/loopback 00:00:00:00:00:00 brd 00:00:00:00:00:00
    inet 127.0.0.1/8 scope host lo
       valid_lft forever preferred_lft forever
    inet6 ::1/128 scope host noprefixroute
       valid_lft forever preferred_lft forever
2: ens33: <BROADCAST,MULTICAST,UP,LOWER_UP> mtu 1500 qdisc fq_codel state UP group default qlen 1000
    link/ether 00:0c:29:8b:5d:aa brd ff:ff:ff:ff:ff:ff
    altname enp2s1
    altname enx000c298b5daa
    inet 192.168.11.4/24 brd 192.168.11.255 scope global dynamic noprefixroute ens33
       valid_lft 168039sec preferred_lft 146439sec
    inet6 fe80::48eb:a0df:d0ff:2ed3/64 scope link
       valid_lft forever preferred_lft forever
The next item displayed after the sequential number is the "network interface name.
➂Setting up a static IP address
We will proceed assuming the following information necessary for the network configuration and the parameters to be configured this time.
・IP address 192.168.11.83
・subnet mask 255.255.255.0(24bit)
・default gateway 192.168.11.1
・DNS server 192.168.11.1
Open the interfaces file with the vi command.
# vi /etc/network/interfaces
The default values are as follows
# The primary network interface
allow-hotplug ens33
iface ens33 inet dhcp

Change as follows
# The primary network interface
allow-hotplug ens33
#iface ens33 inet dhcp
# network interface settings
iface ens33 inet static
address 192.168.11.83
netmask 255.255.255.0
gateway 192.168.11.1
dns-nameservers 192.168.11.1
④Enable static IP address
# systemctl restart networking ifup@ens33
6. Set server time synchronization
①Configuration of timesyncd service
The timesyncd service is configured in the file "/etc/systemd/timesyncd.conf". Before changing the file, make a backup copy of the original file.
# cp -p /etc/systemd/timesyncd.conf /etc/systemd/timesyncd.conf.org
We will edit the configuration file.
# vi /etc/systemd/timesyncd.conf
The default values are as follows
[Time]
#NTP=
#FallbackNTP=0.debian.pool.ntp.org 1.debian.pool.ntp.org 2.debian.pool.ntp.org 3.debian.pool.ntp.org
#RootDistanceMaxSec=5
#PollIntervalMinSec=32
#PollIntervalMaxSec=2048
#ConnectionRetrySec=30
#SaveIntervalSec=60

Change this to a time server in Japan as follows
[Time]
NTP=ntp.jst.mfeed.ad.jp
FallbackNTP=ntp.nict.jp
#NTP=
#FallbackNTP=0.debian.pool.ntp.org 1.debian.pool.ntp.org 2.debian.pool.ntp.org 3.debian.pool.ntp.org
#RootDistanceMaxSec=5
#PollIntervalMinSec=32
#PollIntervalMaxSec=2048
#ConnectionRetrySec=30
#SaveIntervalSec=60
➁Reflection of timesyncd service settings
# systemctl restart systemd-timesyncd
If no error is printed, the service has restarted. Check the time synchronization. The "timedatectl status" command is used to check the time synchronization. Execute as follows
# timedatectl status
               Local time: Mon 2026-05-18 19:22:38 JST
           Universal time: Mon 2026-05-18 10:22:38 UTC
                 RTC time: Mon 2026-05-18 10:22:38
                Time zone: Asia/Tokyo (JST, +0900)
System clock synchronized: yes
              NTP service: active
          RTC in local TZ: no
If "System clock synchronized: yes" is displayed, the time is synchronized.
7. Restrict users who can su
In Debian, any user can be changed to the root user with the "su" command in the default configuration.
If multiple users are created on the server, and if any of the users' login information is known, the su command can be used to take away root user privileges after unauthorized access is gained.
Only users who belong to the wheel group can be authorized to execute su.
①Adding users to the wheel group
First, create a wheel group with the following command
# groupadd wheel
Run the usermod command to add a user to the wheel group. As an example, let us assume that the user to be added is "lan".
# useradd lan
# usermod -g wheel lan
Confirm that the wheel group is added to the wheel group using the id command.
# id lan
uid=1001(lan) gid=1001(wheel) groups=1001(wheel)
➁Edit configuration file for su command
The configuration file for the su command is /etc/pam.d/su
# vi /etc/pam.d/su
(around line 15)
# Uncomment this to force users to be a member of group wheel
# before they can use `su'. You can also add "group=foo"
# to the end of this line if you want to use a group other
# than the default "wheel" (but this may have side effect of
# denying "root" user, unless she's a member of "foo" or explicitly
# permitted earlier by e.g. "sufficient pam_rootok.so").
# (Replaces the `SU_WHEEL_ONLY' option from login.defs)
auth       required   pam_wheel.so  ← Disable comments
The "lan" user can now transition to root privileges using the "su -" command.
8. Debian Repository Mirror Settings Edit
The repository mirror configuration file is /etc/apt/sources.list, make a copy and edit it.
# cd /etc/apt/
# cp sources.list sources.list_org
# vi sources.list
The file contents are
#deb cdrom:[Debian GNU/Linux 13.5.0 _Trixie_ - Official amd64 NETINST with firmware 20260516-10:08]/ trixie contrib main non-free-firmware

deb http://deb.debian.org/debian/ trixie main non-free-firmware
deb-src http://deb.debian.org/debian/ trixie main non-free-firmware

deb http://security.debian.org/debian-security trixie-security main non-free-firmware
deb-src http://security.debian.org/debian-security trixie-security main non-free-firmware

# trixie-updates, to get updates before a point release is made;
# see https://www.debian.org/doc/manuals/debian-reference/ch02.en.html#_updates_and_backports
deb http://deb.debian.org/debian/ trixie-updates main non-free-firmware
deb-src http://deb.debian.org/debian/ trixie-updates main non-free-firmware

# This system was installed using small removable media
# (e.g. netinst, live or single CD). The matching "deb cdrom"
# entries were disabled at the end of the installation process.
# For information about how to configure apt package sources,
# see the sources.list(5) manual.
The top one is the media used during installation. It is no longer used, so it is commented out.
Add Backports repository (add the following to the last line)
deb http://deb.debian.org/debian/ trixie-backports main non-free-firmware
Update source list
# apt update
When I executed the above command, I encountered the following error, though it may only be specific to my environment:
Err:3 http://security.debian.org/debian-security trixie/security InRelease  Temporary failure resolving 'security.debian.org'
Err:2 http://ftp.jp.debian.org/debian trixie-updates InRelease Temporary failure resolving 'ftp.jp.debian.org'
Err:1 http://ftp.jp.debian.org/debian trixie InRelease Temporary failure resolving 'ftp.jp.debian.org'
It seems DNS name resolution isn't working properly, so I've explicitly added our nameserver to the resolv.conf file as follows:
# vi /etc/resolv.conf
nameserver 192.168.11.1
After updating again, it worked fine.
9. Make the locate command available
To search for a specific file on the entire Linux system, use the find command, but find is somewhat confusing in its options.
The locate command can extract all files with a specified filename.
Although a database of file and folder names must be created in advance, it has the advantage of being fast and easy to use. In this example, the "locate" command is used.
①Installing the locate package
# apt install -y locate
# dpkg -l | grep locate
ii  locate                          4.10.0-3                     amd64        maintain and query an index of a directory tree
If the locate package name appears in the execution result as shown above, the installation has been verified.
➁Create database
# updatedb
➂Executing the locate command
As an example, search for all files named "sshd".
# locate sshd
/etc/pam.d/sshd
/etc/ssh/sshd_config
/etc/ssh/sshd_config.d
/etc/systemd/system/ssh.service.wants/sshd-keygen.service
/etc/systemd/system/ssh.socket.wants/sshd-keygen.service
/etc/systemd/system/sshd.service
/etc/systemd/system/sshd.service.wants
/etc/systemd/system/sshd.service.wants/sshd-keygen.service
/etc/systemd/system/sshd@.service.wants
/etc/systemd/system/sshd@.service.wants/sshd-keygen.service
/run/sshd
/run/sshd.pid
/run/systemd/generator/sockets.target.wants/sshd-unix-local.socket
/run/systemd/generator/sockets.target.wants/sshd-vsock.socket
/run/systemd/generator/sshd-unix-local.socket
/run/systemd/generator/sshd-unix-local@.service
/run/systemd/generator/sshd-vsock.socket
/run/systemd/generator/sshd-vsock@.service
/usr/lib/openssh/sshd-auth
/usr/lib/openssh/sshd-session
/usr/lib/systemd/system/sshd-keygen.service
/usr/lib/systemd/system/sshd@.service
/usr/sbin/sshd
/usr/share/man/man5/sshd_config.5.gz
/usr/share/man/man8/sshd.8.gz
/usr/share/openssh/sshd_config
/usr/share/openssh/sshd_config.md5sum
/usr/share/vim/vim91/ftplugin/sshdconfig.vim
/usr/share/vim/vim91/syntax/sshdconfig.vim
/var/lib/systemd/deb-systemd-helper-enabled/ssh.service.wants/sshd-keygen.service
/var/lib/systemd/deb-systemd-helper-enabled/ssh.socket.wants/sshd-keygen.service
/var/lib/systemd/deb-systemd-helper-enabled/sshd-keygen.service.dsh-also
/var/lib/systemd/deb-systemd-helper-enabled/sshd.service
/var/lib/systemd/deb-systemd-helper-enabled/sshd.service.wants
/var/lib/systemd/deb-systemd-helper-enabled/sshd.service.wants/sshd-keygen.service
/var/lib/systemd/deb-systemd-helper-enabled/sshd@.service.wants
/var/lib/systemd/deb-systemd-helper-enabled/sshd@.service.wants/sshd-keygen.service
/var/lib/ucf/cache/:etc:ssh:sshd_config
A list of filenames containing sshd is now displayed.
10. Locale Settings
If you have selected Japanese as your locale when installing Debian, you are already in a Japanese environment and do not need to change it.
If your environment is "English locale" and you prefer to use Japanese locale, please do so.
①Check current locale
Check the locale set in the system. Use the "localectl status" command to check the locale.
(Currently, LANG=en_US.UTF-8 is used for English.)
# localectl status
System Locale: LANG=en_US.UTF-8
               LANGUAGE=en_US:en
    VC Keymap: (unset)
   X11 Layout: jp
    X11 Model: pc105
➁Changed to Japanese locale
Set the locale with the dpkg-reconfigure command
# dpkg-reconfigure locales
Uncheck "en_US.UTF-8 UTF-8"
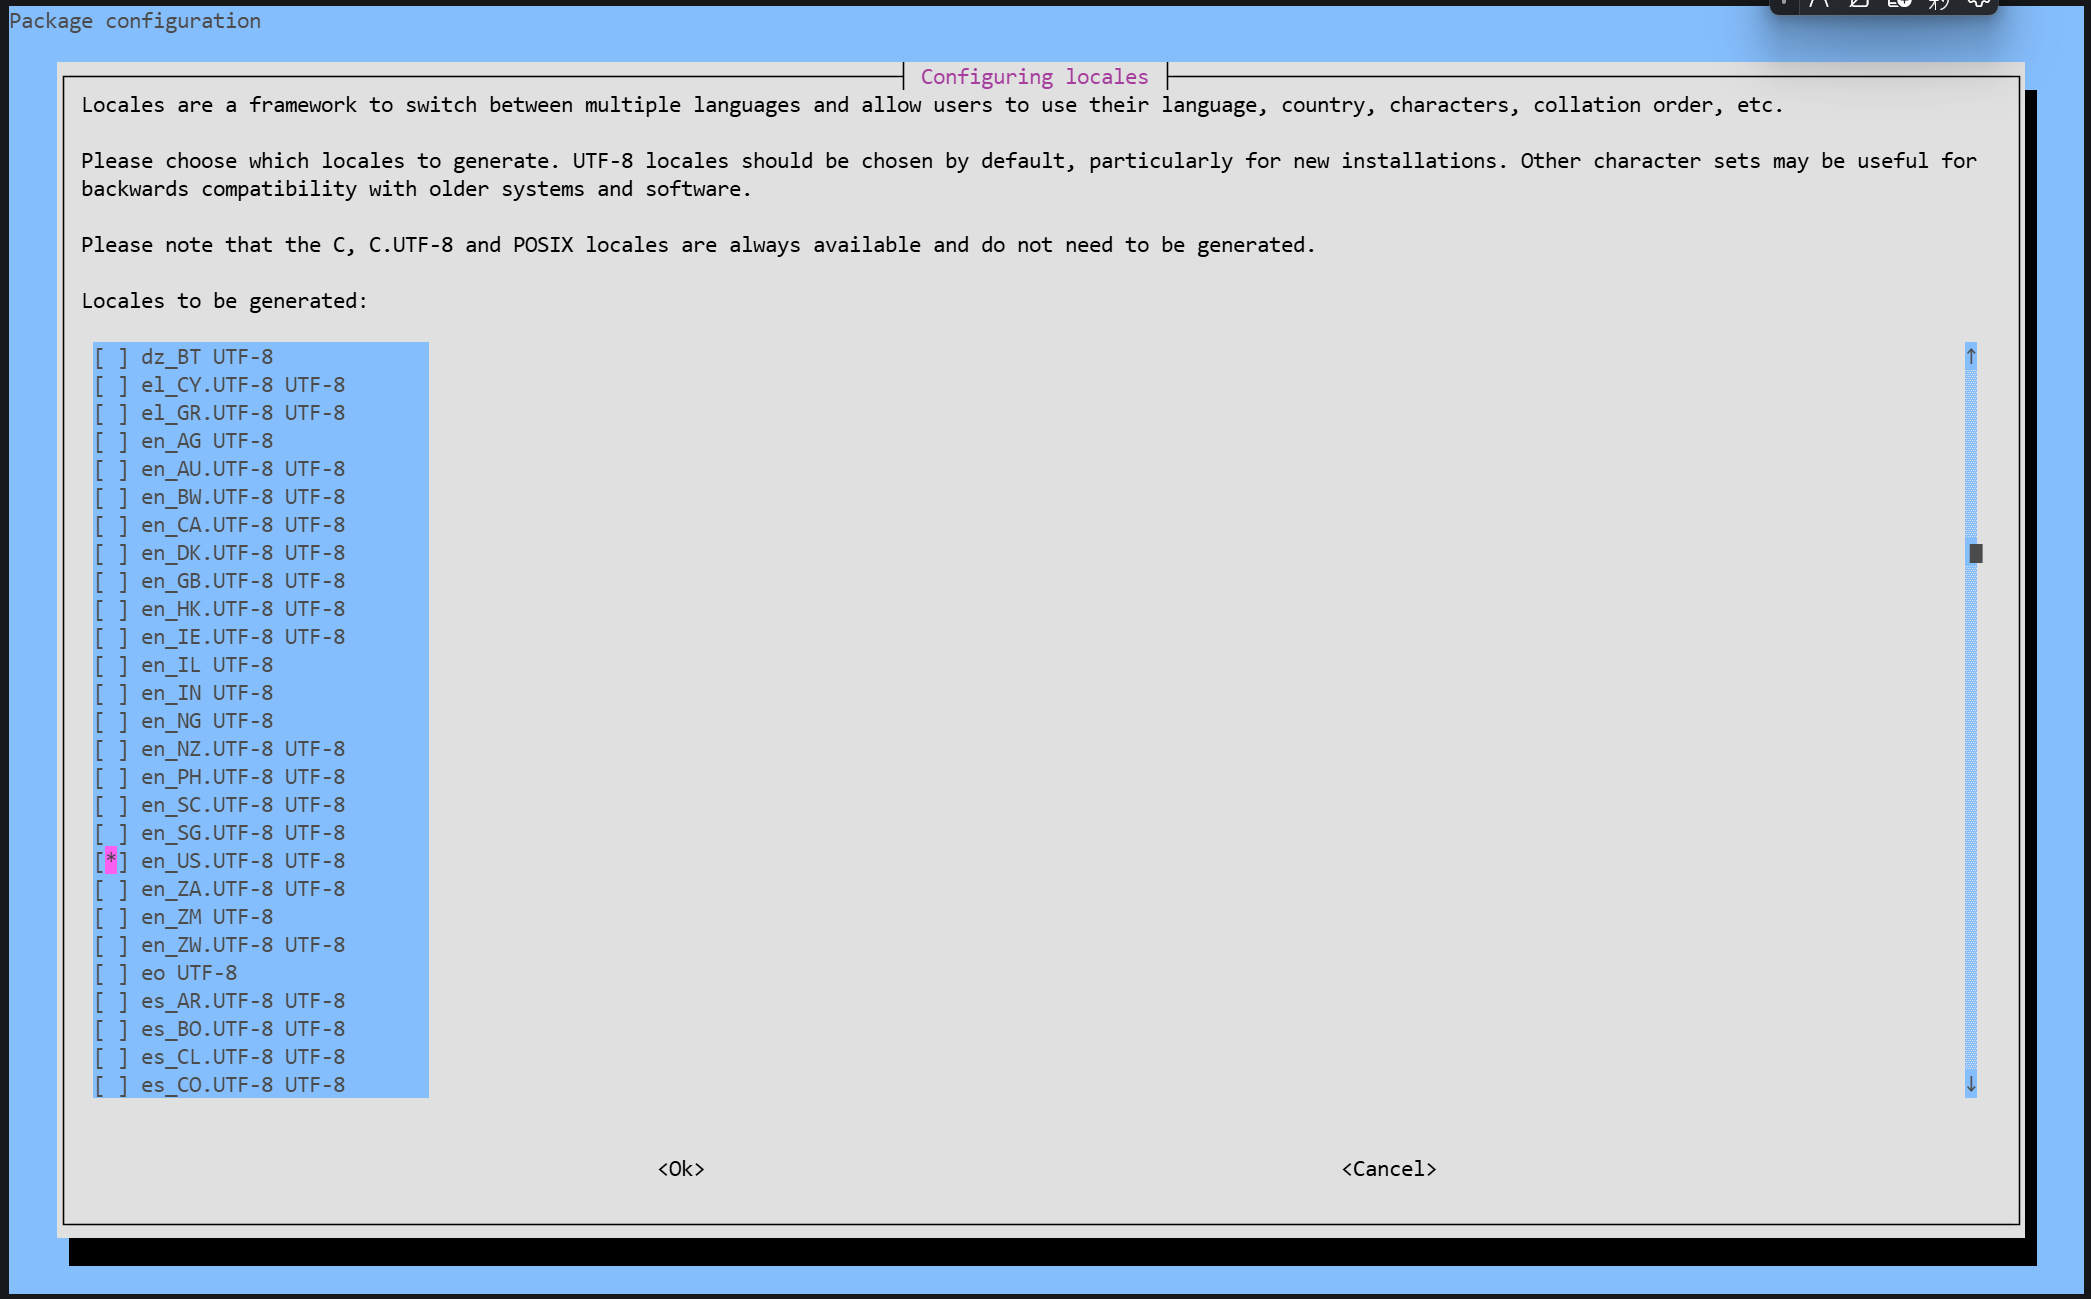
Select "ja_JP.UTF-8 UTF-8" and check the box.
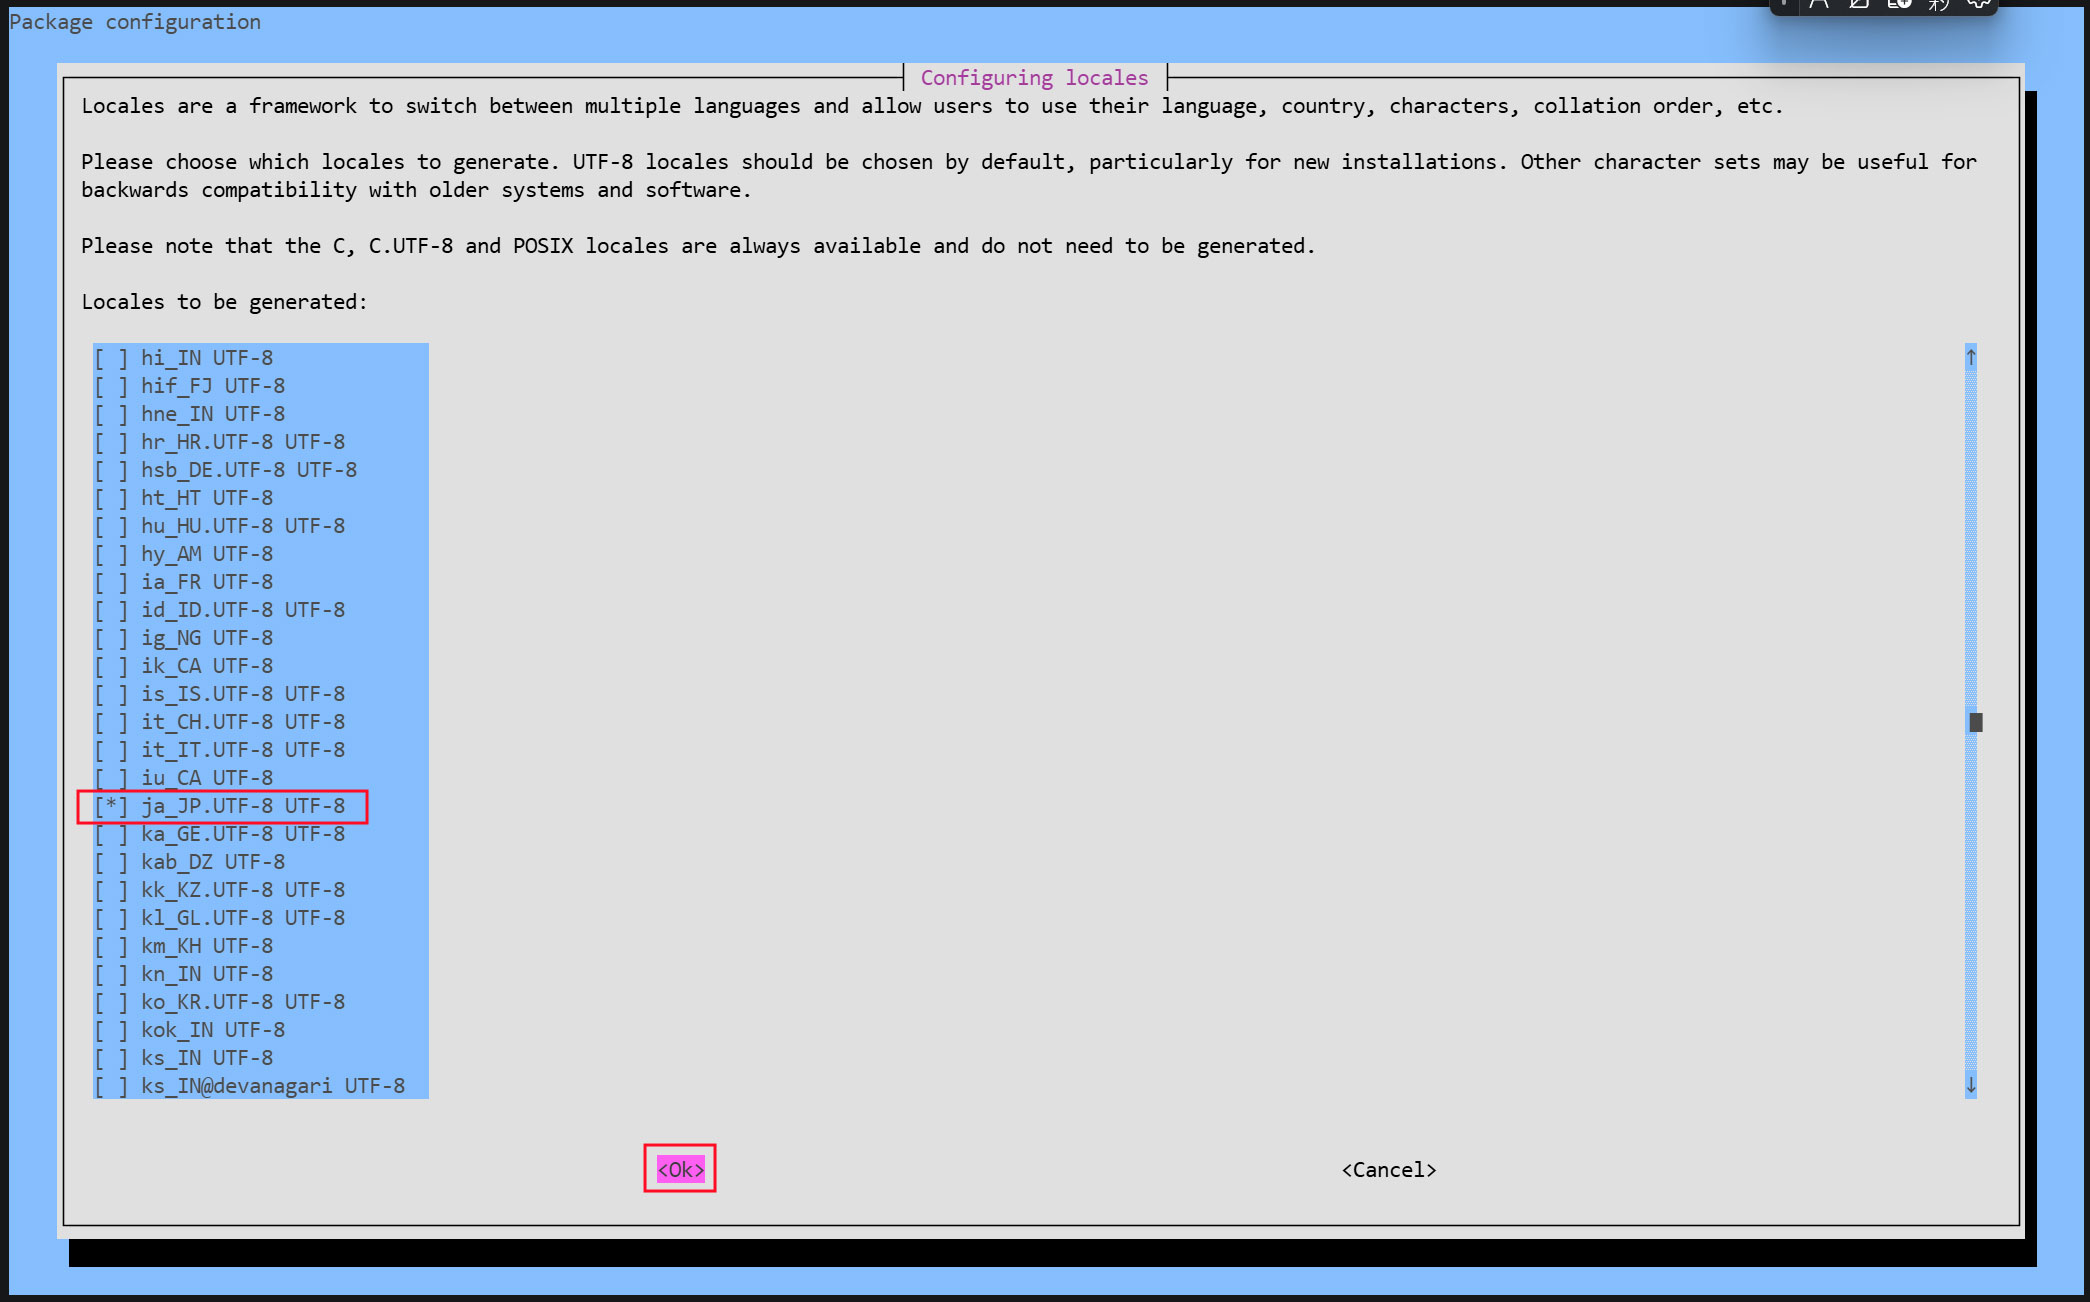
Select "ja_JP,UTF-8" and click OK
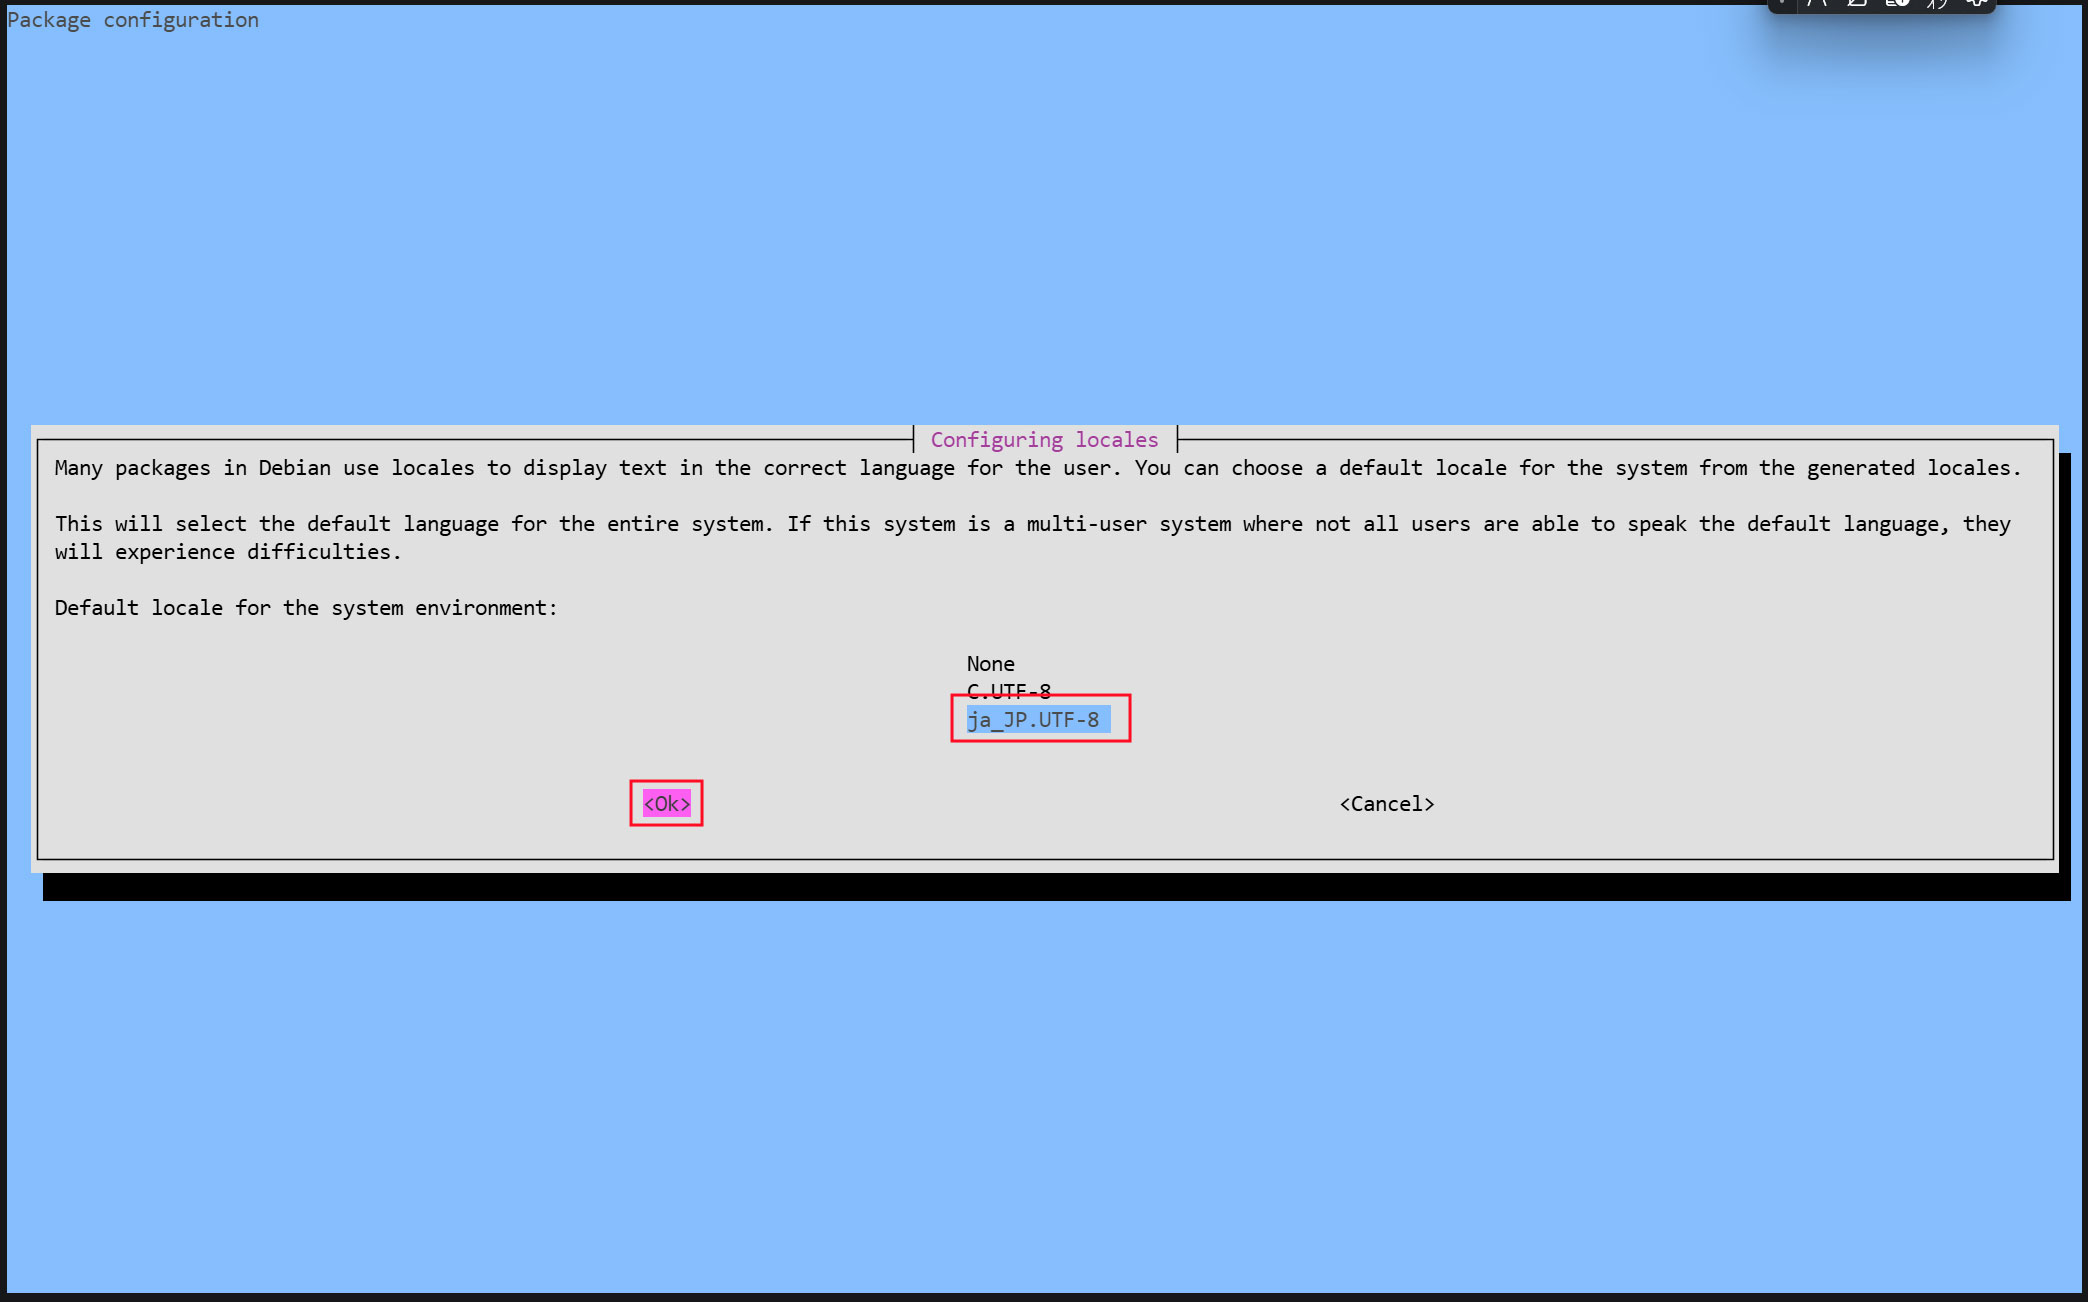
It will be displayed as follows:
Generating locales (this might take a while)…
ja_JP.UTF-8… done
Generation complete.
*** update-locale: Warning: LANGUAGE ("en_US:en") is not compatible with LANG (ja_JP.UTF-8). Disabling it.
Double-check
# localectl status
System Locale: LANG=ja_JP.UTF-8
    VC Keymap: (unset)
   X11 Layout: jp
    X11 Model: pc105
We have confirmed that the "ja_JP.UTF-8" locale is set as shown above.
11. Time Zone Settings
In most cases, the time zone for Debian is set during installation, but if the Japanese time zone "JST" is not specified, it can be changed with the "timedatectl" command.
①Display of current time zone
To check the time zone set on the server, run the "timedatectl status" command
# timedatectl status
               Local time: Mon 2026-05-18 21:17:35 JST
           Universal time: Mon 2026-05-18 12:17:35 UTC
                 RTC time: Mon 2026-05-18 12:17:35
                Time zone: Asia/Tokyo (JST, +0900)
System clock synchronized: yes
              NTP service: active
          RTC in local TZ: no
The time zone is set to "Asia/Tokyo (JST)" as shown above.
➁Change time zone to Japan
If it is not "Asia/Tokyo (JST)", you can change the time zone with the "timedatectl set-timezone" command.
# timedatectl set-timezone Asia/Tokyo
12. Update system packages
Debian systems installed from the media may contain outdated packages. Debian also uses "apt" to update all packages.
To see only the list of packages to be updated without updating the packages, run the "apt update" command. The command is executed as follows
# apt update
Hit:1 http://deb.debian.org/debian trixie InRelease
Hit:2 http://deb.debian.org/debian trixie-updates InRelease
Hit:3 http://security.debian.org/debian-security trixie-security InRelease
Hit:4 http://deb.debian.org/debian trixie-backports InRelease
All packages are up to date.
Since this is a network installation, everything is already up to date, but if there are any packages that need updating, run the "apt upgrade" command.
# apt upgrade -y
Summary:
  Upgrading: 0, Installing: 0, Removing: 0, Not Upgrading: 0