Contents
1. Mysql8 インストール
まずサーバーが最新であることを確認する
サーバーのパッケージを更新します
|
1 2 |
# zypper ref # zypper up -y |
1.1 Mysql8 インストール
①MySQL8.0リポジトリをインポートする
次のコマンドを使用して、RPMリポジトリをダウンロードします
次のコマンドを使用して、RPMリポジトリをダウンロードします
|
1 |
# wget https://dev.mysql.com/get/mysql80-community-release-sl15-4.noarch.rpm |
次に、openSUSEシステム用にダウンロードしたMySQL 8.0のバージョンを使用して、ダウンロードしたリポジトリをインポートします
|
1 |
# rpm -ivh mysql80-community-release-sl15-4.noarch.rpm |
GPG key をインポートする
|
1 |
# rpm --import /etc/RPM-GPG-KEY-mysql |
リポジトリを更新します
|
1 |
# zypper refresh |
②リストアップされたパッケージの情報を確認
リストアップされたパッケージの情報を確認し、必要なバージョンのmysqlがあることを確認
リストアップされたパッケージの情報を確認し、必要なバージョンのmysqlがあることを確認
|
1 2 3 4 5 6 7 8 9 10 11 12 13 14 15 16 17 18 19 20 21 22 23 24 25 26 |
# zypper info mysql-community-server Loading repository data... Reading installed packages... Information for package mysql-community-server: ----------------------------------------------- Repository : MySQL 8.0 Community Server Name : mysql-community-server Version : 8.0.27-1.sl15 Arch : x86_64 Vendor : Oracle and/or its affiliates Installed Size : 2.83 GiB Installed : Yes Status : up-to-date Source package : mysql-community-8.0.27-1.sl15.src Summary : A very fast and reliable SQL database server Description : The MySQL(TM) software delivers a very fast, multi-threaded, multi-user, and robust SQL (Structured Query Language) database server. MySQL Server is intended for mission-critical, heavy-load production systems as well as for embedding into mass-deployed software. MySQL is a trademark of Oracle and/or its affiliates ・・・・省略・・・ This package includes the MySQL server binary as well as related utilities to run and administer a MySQL server. |
③mysqlサーバーをインストール
|
1 |
# zypper install mysql-community-server |
④インストールされているか確認
|
1 2 3 4 5 6 7 8 9 10 11 12 13 14 15 16 17 18 19 20 21 22 23 24 |
# rpm -qi mysql-community-server Name : mysql-community-server Version : 8.0.27 Release : 1.sl15 Architecture: x86_64 Install Date: Fri Jan 7 22:45:00 2022 Group : Applications/Databases Size : 3039099718 License : Copyright (c) 2000, 2021, Oracle and/or its affiliates. Under GPLv2 license as shown in the Description field. Signature : DSA/SHA256, Wed Sep 29 16:36:37 2021, Key ID 8c718d3b5072e1f5 Source RPM : mysql-community-8.0.27-1.sl15.src.rpm Build Date : Wed Sep 29 00:13:00 2021 Build Host : pb2-opensuse15-01.appad3iad.mysql2iad.oraclevcn.com Relocations : (not relocatable) Packager : MySQL Release Engineering <mysql-build@oss.oracle.com> Vendor : Oracle and/or its affiliates URL : http://www.mysql.com/ Summary : A very fast and reliable SQL database server Description : ・・・・・省略・・・・ This package includes the MySQL server binary as well as related utilities to run and administer a MySQL server. Distribution: (none) |
⑤mysqlサービスの起動と有効化
|
1 |
# systemctl start mysql |
再起動時にサービスを開始するようにする
|
1 |
# systemctl enable mysql |
サービスの状態を確認し、実際に稼働していることを確認する
|
1 2 3 4 5 6 7 8 9 10 11 12 13 14 |
# systemctl status mysql ● mysql.service - MySQL Server Loaded: loaded (/usr/lib/systemd/system/mysql.service; enabled; vendor pre> Active: active (running) since Sat 2022-01-08 08:21:14 JST; 1h 11min ago Docs: man:mysqld(8) http://dev.mysql.com/doc/refman/en/using-systemd.html Process: 1412 ExecStartPre=/usr/bin/mysqld_pre_systemd (code=exited, status> Main PID: 1484 (mysqld) Status: "Server is operational" Tasks: 37 (limit: 2308) CGroup: /system.slice/mysql.service mq1484 /usr/sbin/mysqld Jan 08 08:21:07 Lepard systemd[1]: Starting MySQL Server... Jan 08 08:21:14 Lepard systemd[1]: Started MySQL Server. |
Active: active (running) サービスが稼働中であることを示します
⑥MySQL 8のサービスログを表示
journalctlコマンドを使用して次のようにします
journalctlコマンドを使用して次のようにします
|
1 2 |
# journalctl -u mysql -xe # tail -f /var/log/mysql/mysqld.log |
⑦mysqlのインストールのセキュリティー
Mysqlサーバーのrootユーザーのパスワードを変更しておきます。
インストール直後の'temporary password'を確認し、メモしておく確認するには次を実行する
インストール直後の'temporary password'を確認し、メモしておく確認するには次を実行する
|
1 2 |
# grep 'temporary password' /var/log/mysql/mysqld.log 2022-01-07T13:59:50.849820Z 6 [Note] [MY-010454] [Server] A temporary password is generated for root@localhost: 8LvNl4sjV9=1 |
一時的なパスワード(8LvNl4sjV9=1)でログインして、できるだけ早くルートパスワードを変更し、スーパーユーザアカウントにカスタムパスワードを設定します。
|
1 2 3 4 5 6 7 8 9 10 11 12 13 14 15 |
# mysql -u root -p Enter password: 'temporary password' Welcome to the MySQL monitor. Commands end with ; or \g. Your MySQL connection id is 17 Server version: 8.0.27 Copyright (c) 2000, 2021, Oracle and/or its affiliates. Oracle is a registered trademark of Oracle Corporation and/or its affiliates. Other names may be trademarks of their respective owners. Type 'help;' or '\h' for help. Type '\c' to clear the current input statement. mysql> ALTER USER 'root'@'localhost' IDENTIFIED BY '<任意の新規ルートパスワード>'; Query OK, 0 rows affected (0.02 sec) exit Bye |
⑧mysqlのバージョン確認
|
1 2 |
# mysql -V mysql Ver 8.0.27 for Linux on x86_64 (MySQL Community Server - GPL) |
確認方法その②
新しく指定したルートパスワードでrootユーザーでログインする。
|
1 2 3 4 5 6 7 8 9 10 11 12 13 14 15 16 17 18 19 20 21 22 23 24 25 |
# mysql -u root -p Enter password: Welcome to the MySQL monitor. Commands end with ; or \g. Your MySQL connection id is 17 Server version: 8.0.27 Copyright (c) 2000, 2021, Oracle and/or its affiliates. Oracle is a registered trademark of Oracle Corporation and/or its affiliates. Other names may be trademarks of their respective owners. Type 'help;' or '\h' for help. Type '\c' to clear the current input statement. mysql> select version(); ← mysqlのバージョン確認 +-----------+ | version() | +-----------+ | 8.0.27 | +-----------+ 1 row in set (0.00 sec) mysql> exit; Bye |
1.2 Mysql8 データベース+ユーザー作成例
次にインストールするwordpress用ユーザー、パスワード、データベースを作成してみる
データベース : wp_db
ユーザー : wp_user
パスワード : ?WHxx333Yo
データベース : wp_db
ユーザー : wp_user
パスワード : ?WHxx333Yo
|
1 2 3 4 5 6 7 8 9 10 11 12 13 14 15 16 17 18 19 20 |
# mysql -u root -p ① データベース作成 mysql> create database wp_db; Query OK, 0 rows affected (0.14 sec) ➁DBユーザー作成 ※ローカルユーザー mysql> create user 'wp_user'@'localhost' identified with mysql_native_password by '?WHxx333Yo'; Query OK, 0 rows affected (0.14 sec) ← パスワードは記号、英数大文字、小文字を含め8文字以上で設定する ➂ユーザー権限設定 mysql> grant all on wp_db.* to wp_user@'localhost' with grant option; Query OK, 0 rows affected (0.14 sec) ④権限設定反映 ※テーブルのリロード指示を行わない場合、キャッシュの破棄がされないため、DB切り替えやフラッシュしないと反映されない場合がある mysql> flush privileges; Query OK, 0 rows affected (0.22 sec) mysql>exit Bye |
2. WordPress インストール
2.1 必要なライブラリーインストール
|
1 |
# zypper install php-gd php-pdo php-mysql php-mbstring php-simplexml php-curl apache2-mod_php7 |
2.2 WordPressダウンロードとインストール
|
1 2 3 |
# cd /srv/www/htdocs/[web公開ディレクトリー] # wget http://ja.wordpress.org/latest-ja.tar.gz # tar zxvf latest-ja.tar.gz |
2.3 設定ファイルの編集
|
1 2 |
# cd /srv/www/htdocs/[web公開ディレクトリー]/wordpress/ # cp wp-config-sample.php wp-config.php\ |
|
1 2 3 4 5 6 7 8 9 10 11 12 13 14 |
# vi wp-config.php // ** MySQL 設定 - この情報はホスティング先から入手してください。 ** // /** WordPress のためのデータベース名 */ define('DB_NAME', 'wp_db'); /** MySQL データベースのユーザー名 */ define('DB_USER', 'wp_user'); /** MySQL データベースのパスワード */ define('DB_PASSWORD', '?WHxx333Yo'); また、最終行に以下の分を追加します。 これをしないと、プラグインを追加するときにFTP接続情報なるものを聞かれます。 define('FS_METHOD', 'direct'); |
|
1 2 |
# cd /srv/www/htdocs/[web公開ディレクトリー] # mv wordpress/* . |
移動されたことを確認後 wordpressディレクトリーとダウンロードしたlatest-ja.tar.gzを削除
|
1 2 3 |
# cd /srv/www/htdocs/[web公開ディレクトリー] # rm -Rf wordpress # rm latest-ja.tar.gz |
wordpressディレクトリの所有者をapacheにします。
これをしないとプラグインのインストールなどの際に、ディレクトリを作成できないとか言われてしまします。
これをしないとプラグインのインストールなどの際に、ディレクトリを作成できないとか言われてしまします。
|
1 2 |
# chown -R wwwrun:wwwrun /srv/www/htdocs/[web公開ディレクトリー] # chmod 775 -R /srv/www/htdocs/[web公開ディレクトリー] |
|
1 |
# systemctl restart apache2 |
2.4 起動確認
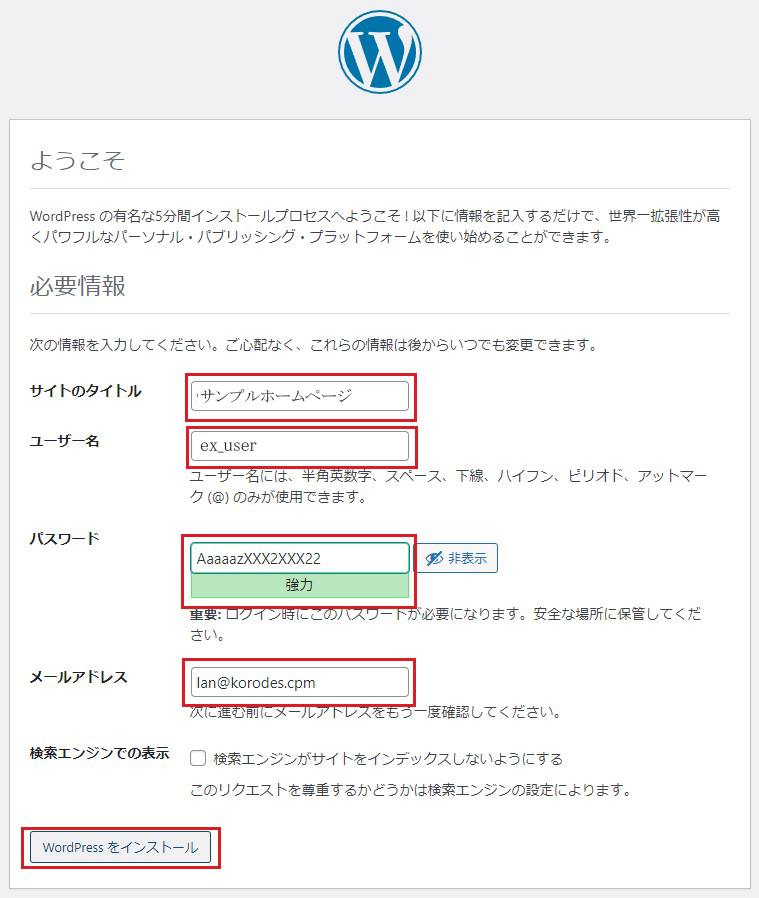
ブラウザで http://<サーバー名>/wp-admin/install.php に接続し、ユーザー名、パスワード等必要事項を入力し、インストールを開始してください
通常は、これで下図のWordpress管理画面にアクセスする「ユーザー名」「パスワード」等初期設定インストール画面が表示されますので
サイトのタイトル : 任意のタイトル
ユーザー名 : 任意のユーザー名
パスワード : 任意のパスワード
メールアドレス : 管理者のメールアドレス
を入力し、「Wordpressをインストール」クリック

通常は、これで下図のWordpress管理画面にアクセスする「ユーザー名」「パスワード」等初期設定インストール画面が表示されますので
サイトのタイトル : 任意のタイトル
ユーザー名 : 任意のユーザー名
パスワード : 任意のパスワード
メールアドレス : 管理者のメールアドレス
を入力し、「Wordpressをインストール」クリック

もし、wp-config.phpのデータベース名、ユーザー名、パスワードの設定に間違いがなく「データベース接続エラー」と表示される場合は wp-config.phpの設定で
define( 'WP_DEBUG', true ); trueに変更し、表示されるメッセージの箇所を調べてください。
ほとんどの場合設定ミスが原因ですが次の箇所を変更しなければならない場合もあります。
wp-config.phpの中で38行目にあるホスト名の設定の箇所
/** MySQL のホスト名 */
define( 'DB_HOST', 'localhost');
となっていますが、まずmysql.sockがインストールされている場所を調べる
今回の場合は /var/lib/mysql/mysql.sock にインストールされているので次のように変更する
define( 'WP_DEBUG', true ); trueに変更し、表示されるメッセージの箇所を調べてください。
ほとんどの場合設定ミスが原因ですが次の箇所を変更しなければならない場合もあります。
wp-config.phpの中で38行目にあるホスト名の設定の箇所
/** MySQL のホスト名 */
define( 'DB_HOST', 'localhost');
となっていますが、まずmysql.sockがインストールされている場所を調べる
今回の場合は /var/lib/mysql/mysql.sock にインストールされているので次のように変更する
|
1 2 |
/** MySQL のホスト名 */ define( 'DB_HOST', 'localhost:/var/lib/mysql/mysql.sock'); |
WordPress管理画面への「ユーザー名」「パスワード」の入力画面が出ます。

