Contents
1. 証明書を取得する (Let's Encrypt)
1.1 事前準備
①mod_sslを有効にする
|
1 |
# a2enmod ssl |
②Let's Encrypt証明書を取得するためのクライアントツールをインストール
|
1 |
# apt -y install certbot |
1.2 Let's Encrypt証明書の取得
Apache httpd や Nginx などの Webサーバーが稼働していることが前提となります。
作業を実施するサーバーで Webサーバーが稼働していない場合は 下記※の手順を実行。
また、インターネット側から、作業を実施するサーバー (証明書を取得したい FQDN のサーバー) の 80 ポート宛てにアクセス可能であることも前提です。
|
1 |
# certbot certonly --webroot -w /var/www/html/[FQDN] -d [FQDN] |
# [--webroot] 指定で稼働中 Web サーバーの公開ディレクトリ配下を認証用の一時領域に使用
# -w [ドキュメントルート] -d [証明書を取得したいFQDN]
# FQDN (Fully Qualified Domain Name) : ホスト名.ドメイン名を省略なしで表記
# ドキュメントルートはバーチャルホストで複数のホスト定義がある場合、該当するホスト定義のものを指定
# ドキュメントルート指定の動作としては, 指定したドキュメントルート配下に
# [.well-known] ディレクトリが作成され, 認証用のファイルが自動的,一時的に設置されるのみ
# 初回のみメールアドレスの登録と利用条件への同意が必要
# 受信可能なメールアドレスを指定
Saving debug log to /var/log/letsencrypt/letsencrypt.log
Plugins selected: Authenticator webroot, Installer None
Enter email address (used for urgent renewal and security notices) (Enter 'c' to
cancel): [Mail address]
Please read the Terms of Service at
https://letsencrypt.org/documents/LE-SA-v1.3-September-21-2022.pdf. You must
agree in order to register with the ACME server at
https://acme-v02.api.letsencrypt.org/directory
(A)gree/(C)ancel: A
Would you be willing to share your email address with the Electronic Frontier
Foundation, a founding partner of the Let's Encrypt project and the non-profit
organization that develops Certbot? We'd like to send you email about our work
encrypting the web, EFF news, campaigns, and ways to support digital freedom
(Y)es/(N)o: y
Obtaining a new certificate
Performing the following challenges:
http-01 challenge for [FQDN]
Using the webroot path /var/www/html/[FQDN] for all unmatched domains.
Waiting for verification…
Cleaning up challenges
IMPORTANT NOTES:
Congratulations! Your certificate and chain have been saved at:
/etc/letsencrypt/live/[FQDN]/fullchain.pem
Your key file has been saved at:
/etc/letsencrypt/live/[FQDN]/privkey.pem
Your cert will expire on 2023-05-11. To obtain a new or tweaked
version of this certificate in the future, simply run certbot
again. To non-interactively renew all of your certificates, run
"certbot renew"
Your account credentials have been saved in your Certbot
configuration directory at /etc/letsencrypt. You should make a
secure backup of this folder now. This configuration directory will
also contain certificates and private keys obtained by Certbot so
making regular backups of this folder is ideal.
If you like Certbot, please consider supporting our work by:
Donating to ISRG / Let's Encrypt: https://letsencrypt.org/donate
Donating to EFF: https://eff.org/donate-le
We were unable to subscribe you the EFF mailing list because your
e-mail address appears to be invalid. You can try again later by
visiting https://act.eff.org.
「Congratulations! Your certificate and chain have been saved at:」と表示されれば成功
# メッセージ中に記載の通り [/etc/letsencrypt/live/<FQDN>/] 配下に次の証明書が取得されている
# cert.pem ⇒ SSLサーバー証明書(公開鍵含む)
# chain.pem ⇒ 中間証明書
# fullchain.pem ⇒ cert.pem と chain.pem が結合されたファイル
# privkey.pem ⇒ 公開鍵に対する秘密鍵
※ Webサーバーが稼働していない場合のLet's Encrypt証明書の取得
インターネット側から当作業を実施するサーバーの 80 ポート宛てにアクセス可能であることは前提となります
# [--standalone] 指定で 簡易 Webサーバー機能を使用
# -d [証明書を取得したいFQDN]
# FQDN (Fully Qualified Domain Name) : ホスト名.ドメイン名を省略なしで表記
# 証明書を取得したいFQDNが複数ある場合は、-d [証明書を取得したいFQDN] を複数指定
|
1 |
# certbot certonly --standalone -d [FQDN] |
取得済みの証明書を更新する
# 有効期限が 30日未満の証明書を全て更新
# 有効期限の残り日数に関わらず更新したい場合は [--force-renewal] を合わせて指定
|
1 |
# certbot [--force-renewal] renew |
2. Apache2にSSL/TLS(Let's Encrypt) の設定
①Apache2のSSL関連設定ファイルの編集
|
1 2 3 4 5 6 7 8 9 10 11 12 13 14 15 |
# cd /etc/apache2/sites-available/ # cp default-ssl.conf hoge.com-ssl.conf ← hoge.com-sslは任意の名称でよい # vi hoge.com-ssl.conf # 3行目:管理者アドレス変更 ServerAdmin [管理者Email Address] # 5行目:変更 DocumentRoot /var/www/html/[FQDN]/ # 13,14行目:変更 ErrorLog ${APACHE_LOG_DIR}/[FQDN].error.log CustomLog ${APACHE_LOG_DIR}/[FQDN].access.log combined # 32,33行目:[1]で取得した証明書に変更 SSLCertificateFile /etc/letsencrypt/live/[FQDN]/cert.pem SSLCertificateKeyFile /etc/letsencrypt/live/[FQDN]/privkey.pem # 42行目:コメント解除して[1]で取得したチェインファイルに変更 SSLCertificateChainFile /etc/letsencrypt/live/[FQDN]/chain.pem |
②設定ファイルの反映と有効化
|
1 2 3 4 5 6 7 8 |
# a2ensite hoge.com-ssl.conf Enabling site hoge.com-ssl.conf. To activate the new configuration, you need to run: systemctl reload apache2 # systemctl restart apache2 # デフォルト無効化 # a2dissite default-ssl.conf # systemctl restart apache2 |
③httpからhttpsリダイレクト
|
1 |
# a2enmod rewrite |
次のいずれかの方法
|
1 2 3 4 5 6 7 8 9 10 |
1. .htaccessファイルを作成する方法 .htaccessを/var/www/html/<FQDN>/に作成して以下記入 RewriteEngine on RewriteCond %{HTTPS} off RewriteRule ^(.*)$ https://%{HTTP_HOST}%{REQUEST_URI} [R=301,L] 2.vhost.conf に記入する方法 RewriteEngine on RewriteCond %{HTTPS} off RewriteRule ^(.*)$ https://%{HTTP_HOST}%{REQUEST_URI} [R=301,L] |
④設定反映と起動
|
1 |
# a2ensite vhost-yourdomain.conf |
|
1 |
# a2enmod ssl |
|
1 2 |
Apache再起動 # systemctl restart apache2 |
3. Mail サーバーにSSL/TLS(Let's Encrypt) の設定
3.1 メールサーバー用証明書の取得
メールサーバー用の証明書を取得するが上記と同様の方法では取得できないので「--standalone」オプションをつけて下記のようにしても失敗する。
|
1 |
# certbot certonly --standalone -d mail.[domain name] |
一度web サーバーを止めてから行うと下記のとおり成功する
|
1 2 |
# systemctl stop apache2.service # certbot certonly --standalone -d mail.[domain name] |
|
1 2 3 4 5 6 7 8 9 10 11 12 13 14 15 16 17 18 19 20 21 |
Saving debug log to /var/log/letsencrypt/letsencrypt.log Plugins selected: Authenticator standalone, Installer None Obtaining a new certificate Performing the following challenges: http-01 challenge for mail.[Domain name] Waiting for verification... Cleaning up challenges IMPORTANT NOTES: - Congratulations! Your certificate and chain have been saved at: /etc/letsencrypt/live/mail.[Domain name]/fullchain.pem Your key file has been saved at: /etc/letsencrypt/live/mail.[Domain name]/privkey.pem Your cert will expire on 2023-05-12. To obtain a new or tweaked version of this certificate in the future, simply run certbot again. To non-interactively renew *all* of your certificates, run "certbot renew" - If you like Certbot, please consider supporting our work by: Donating to ISRG / Let's Encrypt: https://letsencrypt.org/donate Donating to EFF: https://eff.org/donate-le |
3.2 Postfixの設定
|
1 2 3 4 5 6 7 8 |
# vi /etc/postfix/main.cf # 最終行に追記 smtpd_use_tls = yes smtp_tls_mandatory_protocols = !SSLv2, !SSLv3 smtpd_tls_mandatory_protocols = !SSLv2, !SSLv3 smtpd_tls_cert_file = /etc/letsencrypt/live/mail.[domain name]/fullchain.pem smtpd_tls_key_file = /etc/letsencrypt/live/mail.[domain name]/privkey.pem smtpd_tls_session_cache_database = btree:${data_directory}/smtpd_scache |
|
1 2 3 4 5 6 7 8 9 10 11 |
# vi /etc/postfix/master.cf # 18-21行目 : コメント解除 submission inet n - y - - smtpd -o syslog_name=postfix/submission -o smtpd_tls_security_level=encrypt -o smtpd_sasl_auth_enable=yes # 30-33行目 : コメント解除 smtps inet n - y - - smtpd -o syslog_name=postfix/smtps -o smtpd_tls_wrappermode=yes -o smtpd_sasl_auth_enable=yes |
3.3 Dovecotの設定
|
1 2 3 4 5 6 |
# vi /etc/dovecot/conf.d/10-ssl.conf # 6行目:変更 ssl = yes # 12,13行目:コメント解除して証明書/鍵ファイル指定 ssl_cert = </etc/letsencrypt/live/mail.<domain name>/fullchain.pem ssl_key = </etc/letsencrypt/live/mail.<domain name>/privkey.pem |
|
1 |
# systemctl restart postfix dovecot |
firewallでPort 587を許可する
|
1 2 |
# ufw allow 587/tcp # ufw reload |
3.4 Thunderbirdの設定
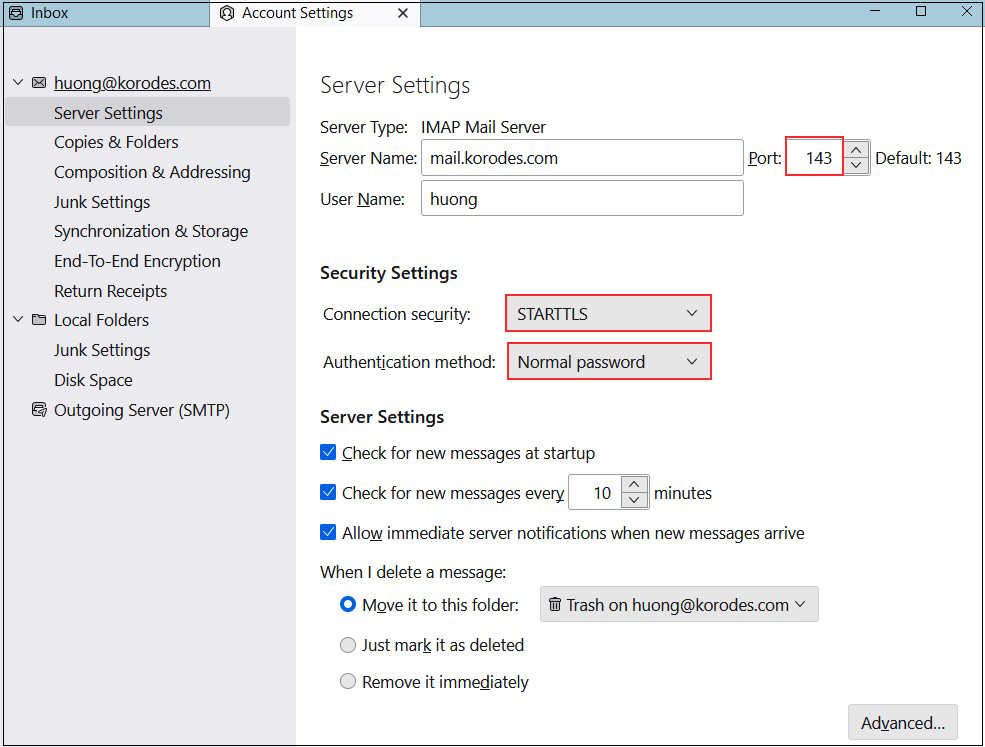
受信サーバー
Port : 143
Connection security : STARTTLS
Authentication method : Normal password

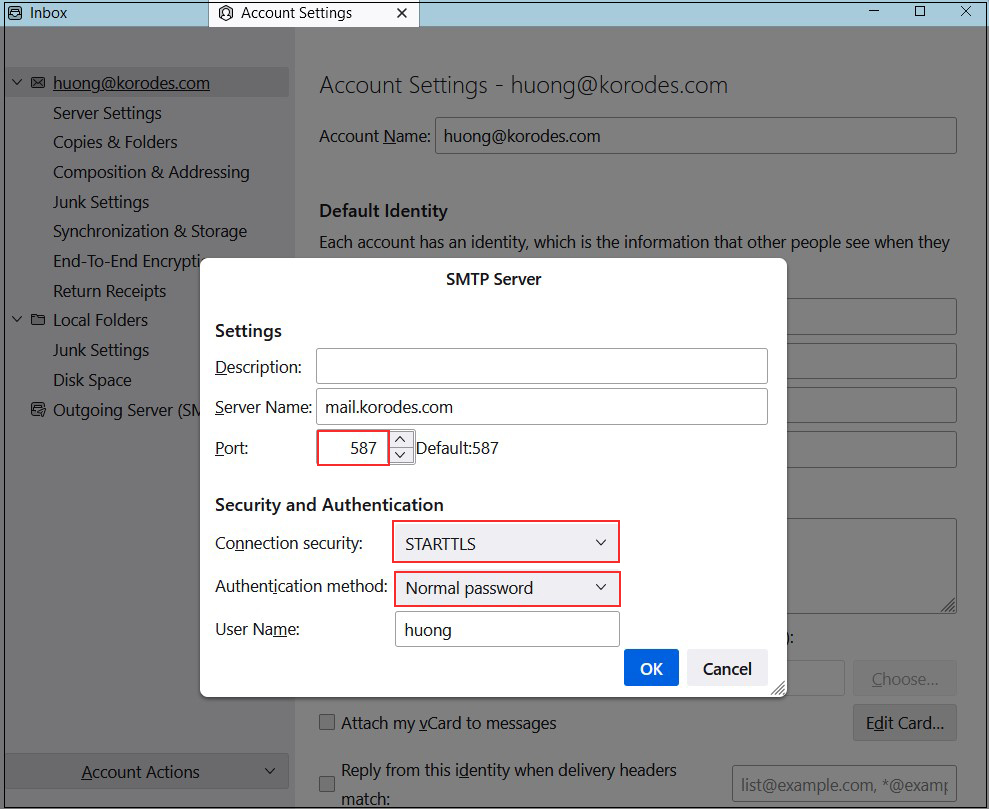
送信サーバー
Port : 587
Connection security : STARTTLS
Authentication method : Normal password


