1. MySQL8
1. 1インストール
|
1 |
# apt -y install mysql-server |
|
1 2 3 4 |
# systemctl start mysql # systemctl enable mysql # systemctl is-enabled mysql enabled |
バージョンチェック
|
1 2 |
# mysql --version mysql Ver 8.4.4-0ubuntu2 for Linux on x86_64 ((Ubuntu)) |
1.2. MySQL8のルートパスワード設定
|
1 2 3 4 5 6 7 8 9 10 11 12 13 14 15 16 17 |
# mysql Welcome to the MySQL monitor. Commands end with ; or \g. Your MySQL connection id is 12 Server version: 8.4.4-0ubuntu2 (Ubuntu) Copyright (c) 2000, 2025, Oracle and/or its affiliates. Oracle is a registered trademark of Oracle Corporation and/or its affiliates. Other names may be trademarks of their respective owners. Type 'help;' or '\h' for help. Type '\c' to clear the current input statement. mysql> ALTER USER root@localhost IDENTIFIED WITH caching_sha2_password BY '[Password]'; Query OK, 0 rows affected (0.01 sec) mysql> |
1.3. MySQLサーバのセキュリティ設定
MySQLサーバのセキュリティ関連の設定を行うためにmysql_secure_installtionというツールを実行します。
|
1 2 3 4 5 6 7 8 9 10 11 12 13 14 15 16 17 18 19 20 21 22 23 24 25 26 27 28 29 30 31 32 33 34 35 36 37 38 39 40 41 42 43 44 45 46 47 48 49 50 51 52 53 54 55 56 57 |
# mysql_secure_installation Securing the MySQL server deployment. Enter password for user root: The 'validate_password' component is installed on the server. The subsequent steps will run with the existing configuration of the component. Using existing password for root. Estimated strength of the password: 100 Change the password for root ? ((Press y|Y for Yes, any other key for No) : y New password: Re-enter new password: Estimated strength of the password: 100 Do you wish to continue with the password provided?(Press y|Y for Yes, any other key for No) : y By default, a MySQL installation has an anonymous user, allowing anyone to log into MySQL without having to have a user account created for them. This is intended only for testing, and to make the installation go a bit smoother. You should remove them before moving into a production environment. Remove anonymous users? (Press y|Y for Yes, any other key for No) : y Success. Normally, root should only be allowed to connect from 'localhost'. This ensures that someone cannot guess at the root password from the network. Disallow root login remotely? (Press y|Y for Yes, any other key for No) : y Success. By default, MySQL comes with a database named 'test' that anyone can access. This is also intended only for testing, and should be removed before moving into a production environment. Remove test database and access to it? (Press y|Y for Yes, any other key for No) : y - Dropping test database... Success. - Removing privileges on test database... Success. Reloading the privilege tables will ensure that all changes made so far will take effect immediately. Reload privilege tables now? (Press y|Y for Yes, any other key for No) : y Success. All done! |
以降 MySQLにアクセスするときは
|
1 2 3 4 5 6 7 8 9 10 11 12 13 14 15 |
# mysql -u root -p Enter password: (上記で設定したパスワードを入力) Welcome to the MySQL monitor. Commands end with ; or \g. Your MySQL connection id is 13 Server version: 8.4.4-0ubuntu2 (Ubuntu) Copyright (c) 2000, 2025, Oracle and/or its affiliates. Oracle is a registered trademark of Oracle Corporation and/or its affiliates. Other names may be trademarks of their respective owners. Type 'help;' or '\h' for help. Type '\c' to clear the current input statement. mysql> |
2.WordPressインストール
2.1 データベース作成
Word Press 用のデータベースを作成します(例として今回はデータベース名を 「wp_db」、ユーザー名を「wp_user」、パスワードを「?Y123456y」)
|
1 2 3 4 5 6 7 8 9 10 11 12 13 14 15 16 17 18 19 20 21 22 23 24 25 26 27 28 |
# mysql -u root -p Enter password: Welcome to the MySQL monitor. Commands end with ; or \g. Your MySQL connection id is 16 Server version: 8.4.4-0ubuntu2 (Ubuntu) Copyright (c) 2000, 2025, Oracle and/or its affiliates. Oracle is a registered trademark of Oracle Corporation and/or its affiliates. Other names may be trademarks of their respective owners. Type 'help;' or '\h' for help. Type '\c' to clear the current input statement. mysql> CREATE DATABASE wp_db; Query OK, 1 row affected (0.00 sec) mysql> create user 'wp_user'@'localhost' identified by '?Y123456y'; Query OK, 0 rows affected (0.01 sec) mysql> grant all on wp_db.* to 'wp_user'@'localhost'; Query OK, 0 rows affected (0.00 sec) mysql> flush privileges; Query OK, 0 rows affected (0.01 sec) mysql> exit; Bye |
2.2 WordPressダウンロードとインストール
①ダウンロードと展開
|
1 2 3 |
# cd /var/www/html/<FQDN> # wget http://ja.wordpress.org/latest-ja.tar.gz # tar xvf latest-ja.tar.gz |
②Wordpress設定ファイルの編集
|
1 2 3 |
# cd wordpress/ # cp wp-config-sample.php wp-config.php # vi wp-config.php |
wp-config.phpの編集内容
|
1 2 3 4 5 6 7 8 9 10 11 12 13 |
// ** Database settings - You can get this info from your web host ** // /** The name of the database for WordPress */ define('DB_NAME', 'wp_db'); ←「2.1 データベース作成」で作成したデータベース名 /** Database username */ define('DB_USER', 'wp_user'); ←「2.1 データベース作成」で作成したユーザー名 /** Database hostname */ define('DB_PASSWORD', '?Y123456y'); ←「2.1 データベース作成」で作成したユーザー用パスワード また、最終行に以下の分を追加します。 これをしないと、プラグインを追加するときにFTP接続情報なるものを聞かれます。 define('FS_METHOD', 'direct'); |
③ファイルの移動
|
1 2 |
# cd /var/www/html/<FQDN> # mv wordpress/* . |
移動されたことを確認後 wordpressディレクトリーとダウンロードしたlatest-ja.tar.gzを削除
|
1 2 |
# rm -R -f wordpress # rm latest-ja.tar.gz |
④wordpressディレクトリの所有者をapacheにします
|
1 |
# chown -R www-data:www-data /var/www/html/<FQDN> |
⑤ブラウザからアクセスする
http://[FQDN]/wp-admin にアクセスします。
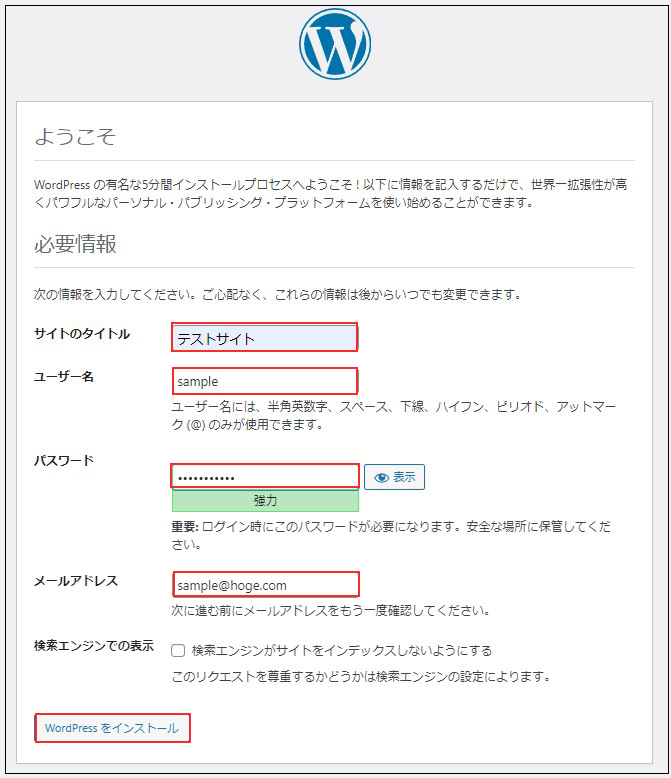
成功すると下記のWordpressインストール情報入力画面が出力されます。
Ubuntuで「お使いのサーバーの PHP では WordPress に必要な MySQL 拡張を利用できないようです。」表示されたら
UbuntuサーバーでphpやMySQLがインストール済みなのにWordpressインストール時に「お使いのサーバーの PHP では WordPress に必要な MySQL 拡張を利用できないようです。」と表示される場合は、下記を確認しましょう。ライブラリ関連がインストールされているか確認、phpのライブラリ関連をインストールしていない場合はインストールします。
|
1 |
# apt -y install php8.4-gd php8.4-mbstring |
MYSQLモジュールのインストール
WordPressはPHPのMYSQLモジュールが必要です。PHPのMYSQLモジュールをインストールしていない場合はインストールします。
|
1 |
# apt -y install php8.4-mysql libapache2-mod-php8.4 php8.4-mysql |
インストールが完了したらApacheを再起動をします。
|
1 |
# systemctl restart apache2 |
下記入力画面で
サイトのタイトル 任意の名称
ユーザー名 任意の名称
パスワード 任意のパスワード
メールアドレス 管理者用メールアドレス
を入力し、「Wordpressインストール」をクリックする。「ユーザー名」「パスワード」はwordpress管理画面にアクセスするときに必要なため忘れないようにする。