Contents
1. Setting up a remote connection via SSH
SSH is a service for connecting remotely to a server and is basically running immediately after the OS is installed, but the default settings are somewhat insecure.
Here we will configure the default settings to increase the security of SSH connections.
1.1 SSH service configuration file changes
The SSH service configuration file is "/etc/ssh/sshd_config".
|
1 |
# vi /etc/ssh/sshd_config |
|
1 2 3 4 5 6 7 8 9 10 11 12 13 14 15 16 17 18 19 20 21 22 23 24 25 26 27 28 29 30 31 32 33 34 35 36 37 38 39 40 41 42 43 44 45 46 47 48 49 50 |
# $OpenBSD: sshd_config,v 1.104 2021/07/02 05:11:21 dtucker Exp $ # This is the sshd server system-wide configuration file. See # sshd_config(5) for more information. # This sshd was compiled with PATH=/usr/local/bin:/usr/bin:/usr/local/sbin:/usr/sbin # The strategy used for options in the default sshd_config shipped with # OpenSSH is to specify options with their default value where # possible, but leave them commented. Uncommented options override the # default value. # To modify the system-wide sshd configuration, create a *.conf file under # /etc/ssh/sshd_config.d/ which will be automatically included below Include /etc/ssh/sshd_config.d/*.conf # If you want to change the port on a SELinux system, you have to tell # SELinux about this change. # semanage port -a -t ssh_port_t -p tcp #PORTNUMBER # #Port 22 Port 2244 #AddressFamily any ListenAddress 0.0.0.0 #ListenAddress :: #HostKey /etc/ssh/ssh_host_rsa_key #HostKey /etc/ssh/ssh_host_ecdsa_key #HostKey /etc/ssh/ssh_host_ed25519_key # Ciphers and keying #RekeyLimit default none # Logging #SyslogFacility AUTH #LogLevel INFO # Authentication: #LoginGraceTime 2m PermitRootLogin prohibit-password #StrictModes yes #MaxAuthTries 6 #MaxSessions 10 #PubkeyAuthentication yes # The default is to check both .ssh/authorized_keys and .ssh/authorized_keys2 # but this is overridden so installations will only check .ssh/authorized_keys AuthorizedKeysFile .ssh/authorized_keys |
Line 22 "Port 22" this time change to "Port 2244" and proceed
Delete "#" from line 24 "#ListenAddress 0.0.0.0".
Line 41, "# PermitRootLogin prohibit-password" delete "#" at the beginning of the line
Since the root user already knows the user name and can log in to the server with administrator privileges once the password is known, the setting is set to deny this.
Restart SSH
|
1 |
# systemctl restart sshd.service |
If this is not done, the next time you reboot, you will not be able to connect remotely via SSH. Please free SSH port 2244 in the following firewall settings
2.Firewall (Firewalld) settings
In Oracle, the firewall is firewalld configured by default and enabled during OS installation.
To briefly explain "firewalld," when setting communication control policies, communication permission/blocking rules are applied to predefined zones, and these zones are then assigned to each NIC (network adapter).
2.1 How to use the "firewall-cmd" command to control "firewalld
1)Command to check the status and settings of "firewalld"
①Check firewalld operation status
|
1 2 3 4 |
# firewall-cmd --state running If "firewalld" is running, the message "running" will be displayed; if it is not running, the message "not running" will be displayed. |
OR
|
1 2 3 4 5 6 7 8 9 10 11 12 13 14 15 16 |
# systemctl status firewalld ● firewalld.service - firewalld - dynamic firewall daemon Loaded: loaded (/usr/lib/systemd/system/firewalld.service; enabled; preset> Active: active (running) since Sat 2023-08-12 20:45:32 JST; 28min ago Docs: man:firewalld(1) Main PID: 731 (firewalld) Tasks: 2 (limit: 9321) Memory: 41.1M CPU: 537ms CGroup: /system.slice/firewalld.service mq731 /usr/bin/python3 -s /usr/sbin/firewalld --nofork --nopid Aug 12 20:45:31 Lepard systemd[1]: Starting firewalld - dynamic firewall daemon> Aug 12 20:45:32 Lepard systemd[1]: Started firewalld - dynamic firewall daemon. ※If stopped Active: inactive (dead) is displayed, indicating that the firewall is stopped |
➁View default zone settings
|
1 2 3 4 5 6 7 8 9 10 11 12 13 14 15 |
# firewall-cmd --list-all public (active) target: default icmp-block-inversion: no interfaces: ens160 sources: services: cockpit dhcpv6-client ssh ports: protocols: forward: no masquerade: no forward-ports: source-ports: icmp-blocks: rich rules: |
In the above example, we can see that the services "cockpit", "dhcpv6-client", "ssh" are allowed, etc.
③About the "--permanent" option
To prevent the settings from disappearing when the server is restarted or the "firewalld" service is restarted, you must use the "--permanent" option.
The "--permanent" option must be used to configure the settings.
If the "--permanent" option is specified, the setting is not reflected in "firewalld" as it is, so it is necessary to use "fiewall-cmd --reload" to reflect the setting.
|
1 2 3 |
As an example, to use the HTTP service permanently without initialization even if the system is rebooted # firewall-cmd --add-service=http --permanent # firewall-cmd --reload |
④How to start/stop
Since "firewalld" is controlled by "systemd", use the "systemctl" command to start and stop it.
|
1 2 3 4 5 |
Start firewalld # systemctl start firewalld Stopping firewalld # systemctl stop firewalld |
2.2 Release modified SSH port 2244
|
1 2 3 4 5 6 7 8 9 10 11 12 13 14 15 16 17 |
# firewall-cmd --add-port=2244/tcp --permanent # firewall-cmd --reload # firewall-cmd --list-all public (active) target: default icmp-block-inversion: no interfaces: ens160 sources: services: cockpit dhcpv6-client ssh ports: 2244/tcp protocols: forward: no masquerade: no forward-ports: source-ports: icmp-blocks: rich rules: |
2244 ports have been added
3. Remote connection from Windows
Configuration in Windows
Start the setup for remote connection from Windows, using "Tera Term" as the terminal emulator.
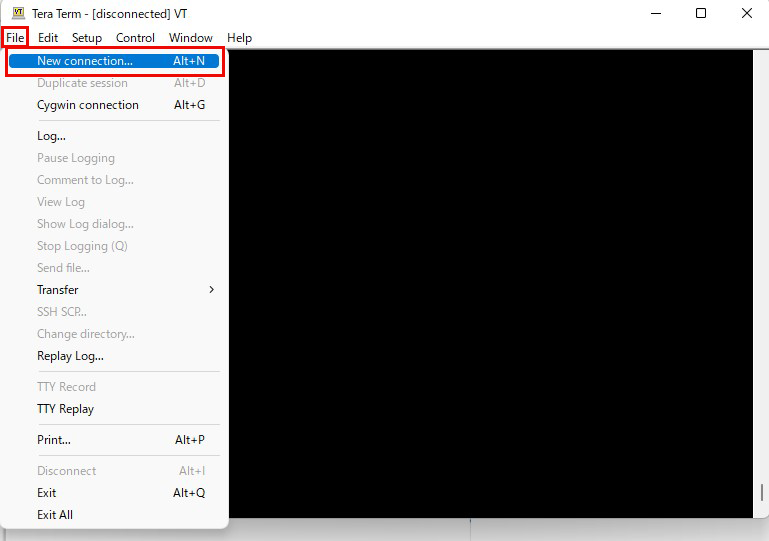
Start Tera Term, cancel the startup screen, and then select "New Connection" from "File" in the Tera Term menu.
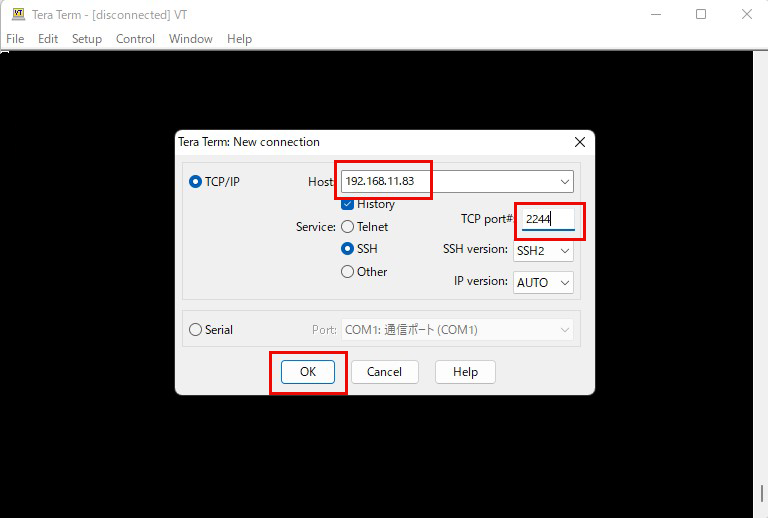
Enter your own settings in the "Server IP Address" and "TCP Port Number" fields. Finally, click "OK.
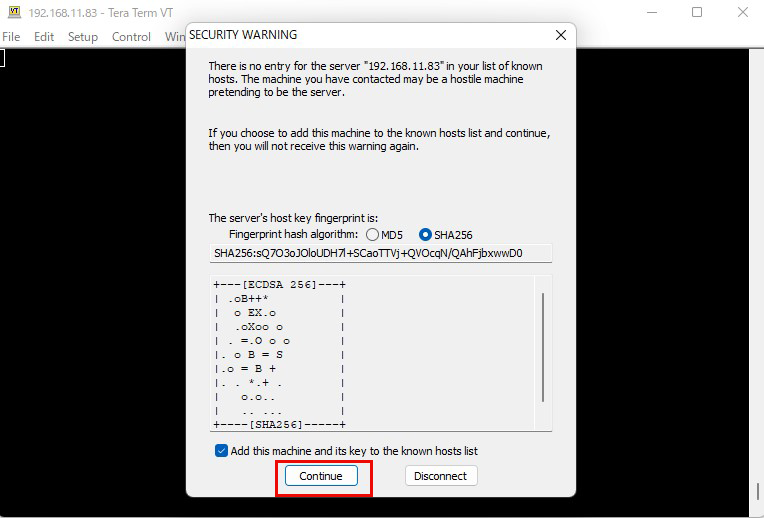
After clicking "OK," click "Continue" on the security confirmation screen.
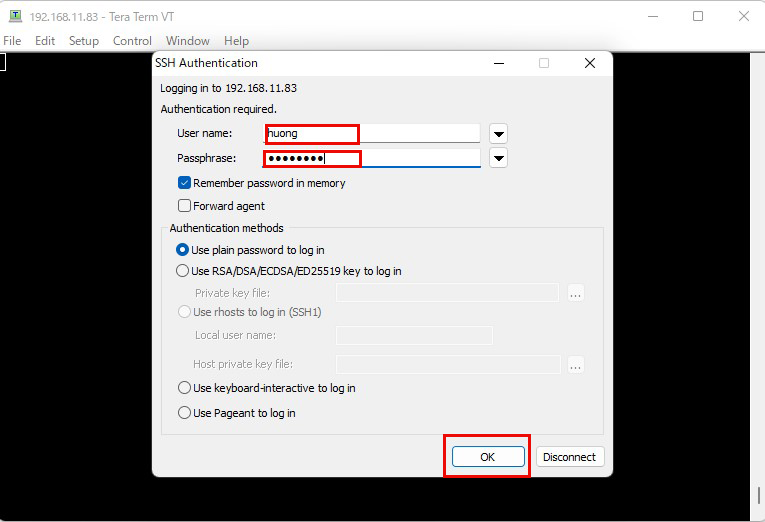
Enter "User name"" Passphrasee" and click OK.
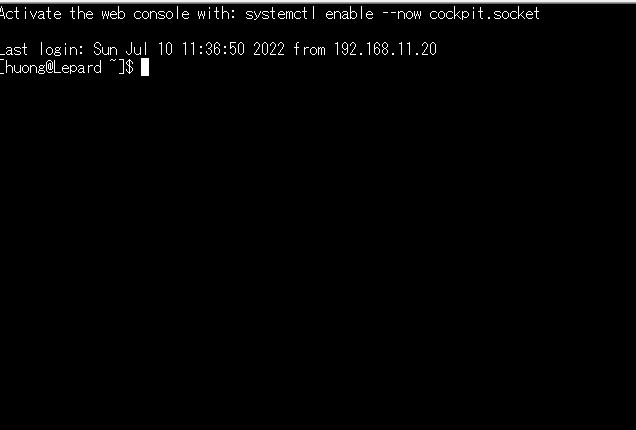
If the information is correct, you should be able to log in normally as shown below.
4.NTP Server
Build an NTP server to synchronize the server time with Japan Standard Time
①Chrony Installation and Configuration
|
1 |
# dnf -y install chrony |
|
1 2 3 4 |
# vi /etc/chrony.conf Line 3 : comment out and add under it #pool 2.pool.ntp.org iburst pool ntp.nict.jp iburst |
②Restart chrony and enable chrony after system reboot
|
1 2 |
# systemctl enable chronyd.service # systemctl restart chronyd.service |
③NTP port release in firewall
|
1 2 |
# firewall-cmd --add-service=ntp --permanent # firewall-cmd --reload |
④Check chronyd status (behavior)
|
1 2 3 4 5 6 7 |
# chronyc sources MS Name/IP address Stratum Poll Reach LastRx Last sample =============================================================================== ^- ntp-b2.nict.go.jp 1 6 17 15 +1866us[+1866us] +/- 5667us ^- ntp-k1.nict.jp 1 6 17 15 +1113us[+1113us] +/- 3752us ^- ntp-a3.nict.go.jp 1 6 17 15 +660us[ +660us] +/- 6512us ^* ntp-a2.nict.go.jp 1 6 17 15 -237us[-1643us] +/- 7428us |
If it is marked with *, it has been synchronized.


