Contents
1. Obtaining a Certificate(Let's Encrypt)
1.1 advance preparation
①Enable mod_ssl
# a2enmod ssl
②Install client tool to obtain Let's Encrypt certificate
# apt -y install certbot
1.2 Obtaining a Let's Encrypt Certificate
It is assumed that a web server such as Apache httpd or Nginx is running.
If the web server is not running on the server where the work is to be performed, follow the steps※ below.
It is also assumed that the server on which the work is to be performed (the server with the FQDN from which you want to obtain the certificate) is accessible from the Internet at port 80.
# certbot certonly --webroot -w /var/www/html/[FQDN] -d [FQDN]
#Use the directory under the public directory of the running Web server as a temporary area for authentication by specifying [--webroot].
# -w [document root] -d [FQDN to obtain certificate]
# FQDN (Fully Qualified Domain Name) : Hostname. Domain name without abbreviation
# Document root is specified for the appropriate host definition if multiple host definitions exist for a virtual host
# Registration of e-mail address and agreement to terms of use are required for the first time only.
# Specify an email address to receive
Saving debug log to /var/log/letsencrypt/letsencrypt.log
Plugins selected: Authenticator webroot, Installer None
Enter email address (used for urgent renewal and security notices) (Enter 'c' to
cancel): [Mail address]
Please read the Terms of Service at
https://letsencrypt.org/documents/LE-SA-v1.3-September-21-2022.pdf. You must
agree in order to register with the ACME server at
https://acme-v02.api.letsencrypt.org/directory
(A)gree/(C)ancel: A
Would you be willing to share your email address with the Electronic Frontier
Foundation, a founding partner of the Let's Encrypt project and the non-profit
organization that develops Certbot? We'd like to send you email about our work
encrypting the web, EFF news, campaigns, and ways to support digital freedom
(Y)es/(N)o: y
Obtaining a new certificate
Performing the following challenges:
http-01 challenge for [FQDN]
Using the webroot path /var/www/html/[FQDN] for all unmatched domains.
Waiting for verification…
Cleaning up challenges
IMPORTANT NOTES:
Congratulations! Your certificate and chain have been saved at:
/etc/letsencrypt/live/[FQDN]/fullchain.pem
Your key file has been saved at:
/etc/letsencrypt/live/[FQDN]/privkey.pem
Your cert will expire on 2023-05-11. To obtain a new or tweaked
version of this certificate in the future, simply run certbot
again. To non-interactively renew all of your certificates, run
"certbot renew"
Your account credentials have been saved in your Certbot
configuration directory at /etc/letsencrypt. You should make a
secure backup of this folder now. This configuration directory will
also contain certificates and private keys obtained by Certbot so
making regular backups of this folder is ideal.
If you like Certbot, please consider supporting our work by:
Donating to ISRG / Let's Encrypt: https://letsencrypt.org/donate
Donating to EFF: https://eff.org/donate-le
We were unable to subscribe you the EFF mailing list because your
e-mail address appears to be invalid. You can try again later by
visiting https://act.eff.org.
Success if displayed"Congratulations! Your certificate and chain have been saved at:"
# The following certificate is obtained under [/etc/letsencrypt/live//] as described in the message
# cert.pem ⇒ SSL server certificate (including public key)
# chain.pem ⇒ intermediate certificate
# fullchain.pem ⇒ File containing cert.pem and chain.pem combined
# privkey.pem ⇒ private key
※ Obtaining a Let's Encrypt certificate when the web server is not running
It is a prerequisite that the server on which the work is to be performed is accessible from the Internet at port 80.
#Use the simple Web server function by specifying [--standalone].
# -d [FQDN from which you want to obtain a certificate]
# FQDN (Fully Qualified Domain Name) : Hostname. Domain name without abbreviation
# If there are multiple FQDNs for which you want to obtain certificates, specify multiple -d [FQDNs for which you want to obtain certificates
# certbot certonly --standalone -d [FQDN]
Renewing certificates already obtained
# Renew all certificates with an expiration date of less than 30 days
# If you want to renew regardless of the number of days remaining on the expiration date, specify [--force-renewal] as well.
# certbot [--force-renewal] renew
2. SSL/TLS (Let's Encrypt) configuration for Apache2
①Edit Apache2 SSL-related configuration files
# cd /etc/apache2/sites-available/
# cp default-ssl.conf hoge.com-ssl.conf ← hoge.com-ssl can be any name
# vi hoge.com-ssl.conf
# Line 3:Administrator address change
ServerAdmin [Administrator Email Address]
# Line 5:change
DocumentRoot /var/www/html/[FQDN]/
# Line 13,14:change
ErrorLog ${APACHE_LOG_DIR}/[FQDN].error.log
CustomLog ${APACHE_LOG_DIR}/[FQDN].access.log combined
# Line 32,33:Change to the certificate obtained in [1.2].
SSLCertificateFile /etc/letsencrypt/live/[FQDN]/cert.pem
SSLCertificateKeyFile /etc/letsencrypt/live/[FQDN]/privkey.pem
# Line 42:Uncomment and change to the chain file obtained in [1.2].
SSLCertificateChainFile /etc/letsencrypt/live/[FQDN]/chain.pem
②Reflecting and activating the configuration file
# a2ensite hoge.com-ssl.conf
Enabling site hoge.com-ssl.conf.
To activate the new configuration, you need to run:
systemctl reload apache2
# systemctl restart apache2
# Default Disable
# a2dissite default-ssl.conf
# systemctl restart apache2
③http to https redirect
# a2enmod rewrite
1. How to create .htaccess files
Create .htaccess in /var/www/html/<FQDN>/ and fill in the following
RewriteEngine on
RewriteCond %{HTTPS} off
RewriteRule ^(.*)$ https://%{HTTP_HOST}%{REQUEST_URI} [R=301,L]

2.How to fill in vhost.conf
RewriteEngine on
RewriteCond %{HTTPS} off
RewriteRule ^(.*)$ https://%{HTTP_HOST}%{REQUEST_URI} [R=301,L]
④Reflection of settings and startup
# a2ensite vhost-yourdomain.conf
# a2enmod ssl
Restart Apache
# systemctl restart apache2
3. SSL/TLS (Let's Encrypt) settings on the mail server
3.1 Obtaining a certificate for the mail server
Obtain a certificate for the mail server, but it cannot be obtained in the same way as above, so the following with the "--standalone" option fails.
# certbot certonly --standalone -d mail.[domain name]
f I stop the web server once and then do it, it succeeds as follows
# systemctl stop apache2.service
# certbot certonly --standalone -d mail.[domain name]
Saving debug log to /var/log/letsencrypt/letsencrypt.log
Plugins selected: Authenticator standalone, Installer None
Obtaining a new certificate
Performing the following challenges:
http-01 challenge for mail.[Domain name]
Waiting for verification...
Cleaning up challenges

IMPORTANT NOTES:
 - Congratulations! Your certificate and chain have been saved at:
   /etc/letsencrypt/live/mail.[Domain name]/fullchain.pem
   Your key file has been saved at:
   /etc/letsencrypt/live/mail.[Domain name]/privkey.pem
   Your cert will expire on 2023-05-12. To obtain a new or tweaked
   version of this certificate in the future, simply run certbot
   again. To non-interactively renew *all* of your certificates, run
   "certbot renew"
 - If you like Certbot, please consider supporting our work by:

   Donating to ISRG / Let's Encrypt:   https://letsencrypt.org/donate
   Donating to EFF:                    https://eff.org/donate-le
3.2 Postfix Configuration
# vi /etc/postfix/main.cf
# Add to the last line
smtpd_use_tls = yes
smtp_tls_mandatory_protocols = !SSLv2, !SSLv3
smtpd_tls_mandatory_protocols = !SSLv2, !SSLv3
smtpd_tls_cert_file = /etc/letsencrypt/live/mail.[domain name]/fullchain.pem
smtpd_tls_key_file = /etc/letsencrypt/live/mail.[domain name]/privkey.pem
smtpd_tls_session_cache_database = btree:${data_directory}/smtpd_scache
# vi /etc/postfix/master.cf
# Line 18-21 : Uncomment
submission inet n - y - - smtpd
-o syslog_name=postfix/submission
-o smtpd_tls_security_level=encrypt
-o smtpd_sasl_auth_enable=yes
# Line 30-33 : Uncomment
smtps inet n - y - - smtpd
-o syslog_name=postfix/smtps
-o smtpd_tls_wrappermode=yes
-o smtpd_sasl_auth_enable=yes
3.3 Dovecot Settings
# vi /etc/dovecot/conf.d/10-ssl.conf
# Line 6:change
ssl = yes
# Line 12,13:Uncomment and specify certificate/key file
ssl_cert = </etc/letsencrypt/live/mail.<domain name>/fullchain.pem
ssl_key = </etc/letsencrypt/live/mail.<domain name>/privkey.pem
# systemctl restart postfix dovecot
Allow Port 587 in the firewall
# ufw allow 587/tcp
# ufw reload
3.4 Thunderbird Settings
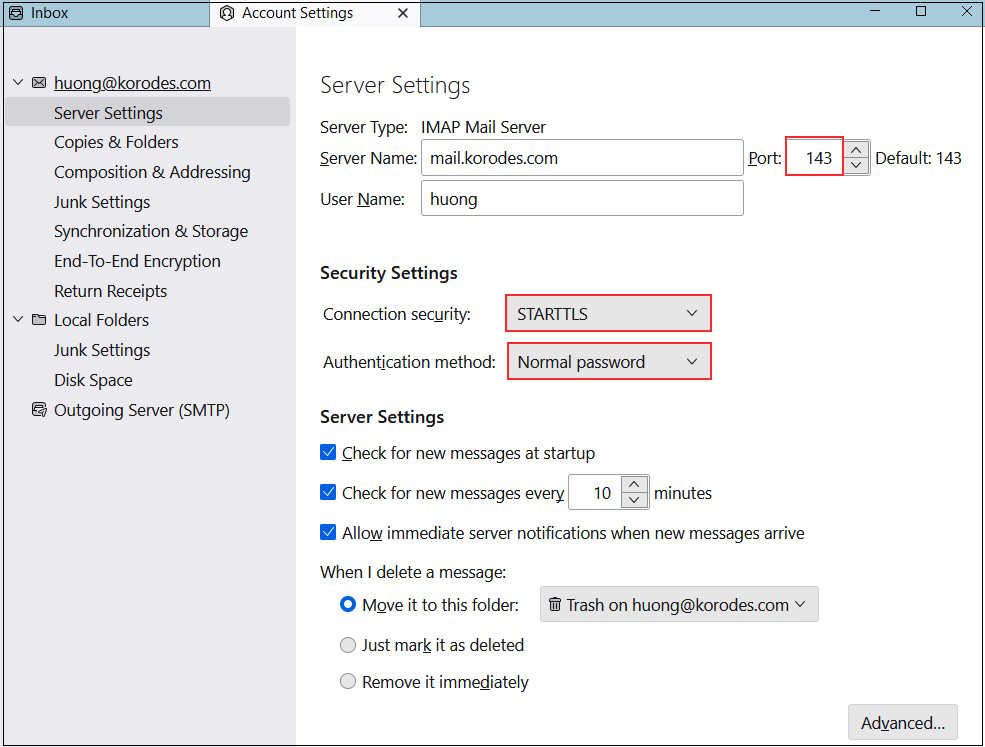
Receiving server
Port : 143
Connection security : STARTTLS
Authentication method : Normal password

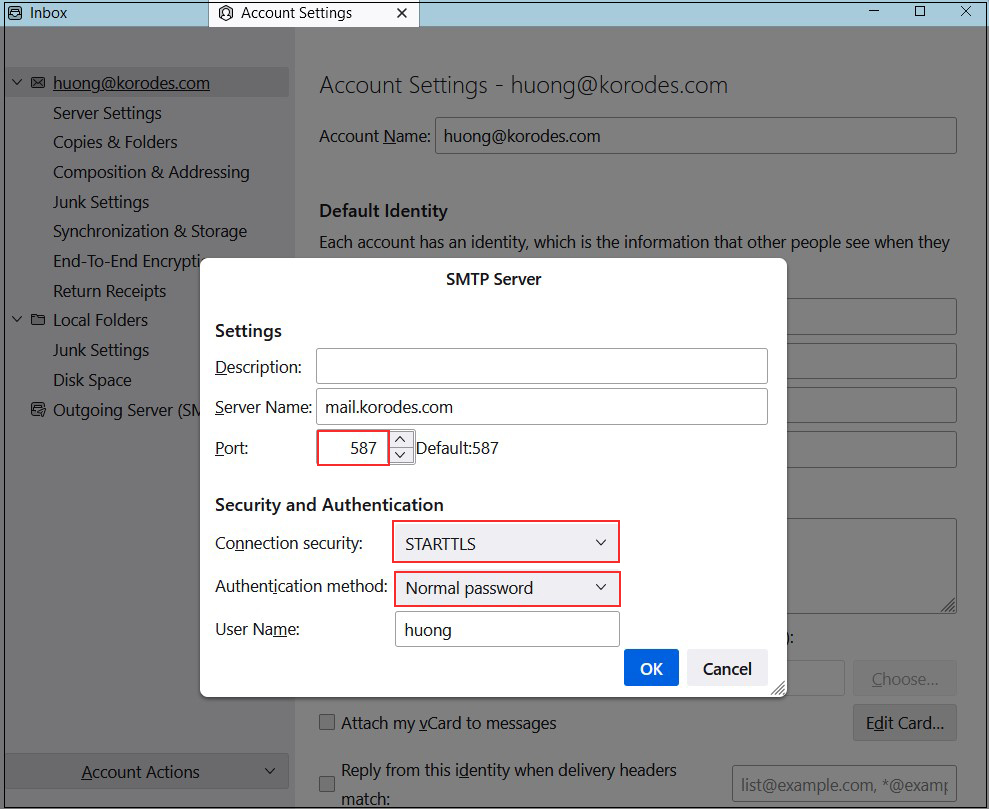
Sending server
Port : 587
Connection security : STARTTLS
Authentication method : Normal password


