Contents
1. Install an NTP server
|
1 |
# apt -y install chrony |
|
1 2 3 4 5 6 7 8 9 10 |
# vi /etc/chrony/chrony.conf # 17 to 20 lines:Comment the default settings and add an NTP server in your own timezone #pool ntp.ubuntu.com iburst maxsources 4 #pool 0.ubuntu.pool.ntp.org iburst maxsources 1 #pool 1.ubuntu.pool.ntp.org iburst maxsources 1 #pool 2.ubuntu.pool.ntp.org iburst maxsources 2 pool ntp.nict.jp iburst # Add to last line (Range of time synchronisation allowed) allow 192.168.11.0/24 |
|
1 |
# systemctl restart chrony |
|
1 2 3 4 5 6 7 8 |
# chronyc sources 10 Number of sources = 4 MS Name/IP address Stratum Poll Reach LastRx Last sample =============================================== ^- ntp-b2.nict.go.jp 1 6 37 27 +150us[ +150us] +/- 5360us ^- ntp-a2.nict.go.jp 1 6 37 26 +215us[ +215us] +/- 5529us ^* ntp-b3.nict.go.jp 1 6 37 28 +13us[ -13us] +/- 5814us ^- ntp-a3.nict.go.jp 1 6 37 28 -466us[ -466us] +/- 6069us |
2. Install the FTP server vsftpd
①Install
|
1 |
# apt install vsftpd |
②Open PORT 21 at UFW
|
1 2 |
# ufw allow ftp # ufw reload |
③Configuration file changes
|
1 2 3 4 5 6 7 8 9 10 11 12 13 14 15 16 17 18 19 20 21 22 23 24 25 26 27 28 29 30 31 32 33 34 35 36 37 38 |
# vi /etc/vsftpd.conf # Line 14. Listen=YES # Line 22. Listen_ipv6=NO # Line 25.: Do not allow anonymous users to log in anonymous_enable=NO # Line 28.: Allow local user accounts to login local_enable=YES # Line 31.:Allow the use of FTP commands to make changes to files write_enable=YES # Line 35.:Set the permission values to be applied to new files # Each digit indicates owner, group, other, and the bit indicates rwx local_umask=022 # Line 122.:Change the user's login directory to the user's root directory chroot_local_user=YES # Line 123.:Users will no longer have access outside the login directory chroot_list_enable=YES # Line 125.:Users listed in vsftpd.chroot_list are excluded from the above restrictions chroot_list_file=/etc/vsftpd.chroot_list # Line 99.:Allow ASCII uploads ascii_upload_enable=YES # Line 100.:Allow ASCII downloads ascii_download_enable=YES # Line 131.:Uncomment (enable bulk transfer of whole directories) ls_recurse_enable=YES |
④Create vsftpd.chroot_list
|
1 2 3 4 |
# vi /etc/vsftpd.chroot_list Fill in only the user name in the new file and finish saving. <user name> |
⑤Restart vsftpd
|
1 |
# systemctl restart vsftpd |
⑥Check with FTP client
This time we will use FFFTP.
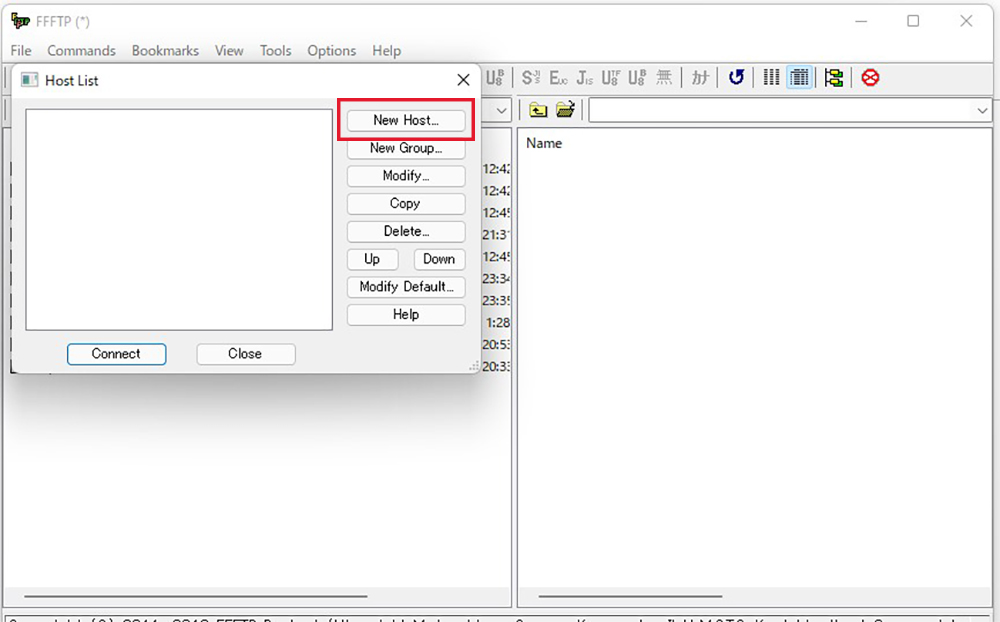
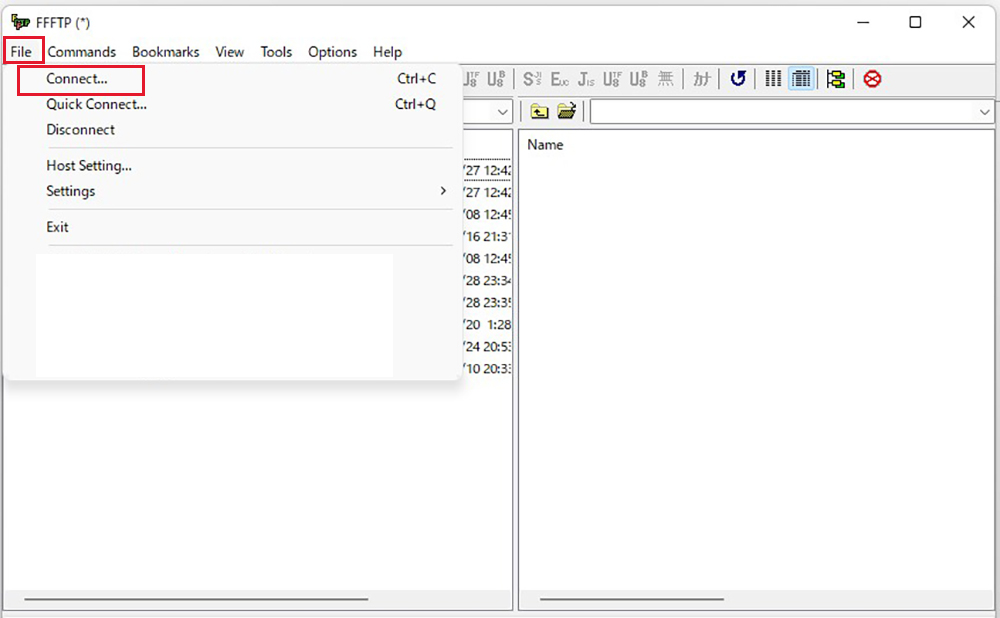
Open FFFTP and select Connect from the menu bar.
This will open a window called Host List. Please select a new host.
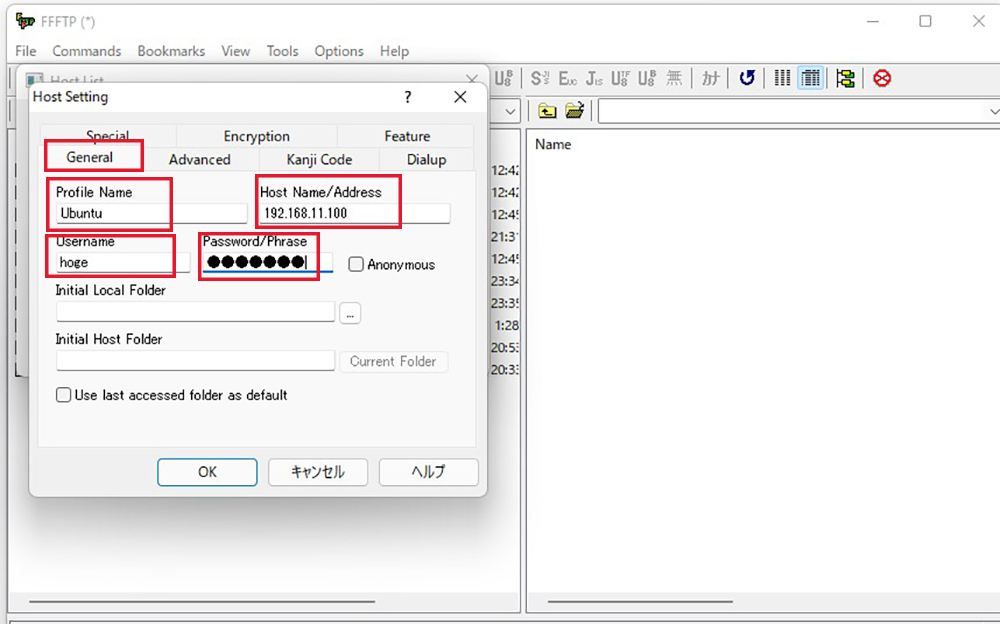
「General」tab open
Fill in the following fields
1.Profile Name (any name)
2.Host Name/Adress(Server IP address)
3.Username(General User Name)
4.Password/Phrase(General user password)
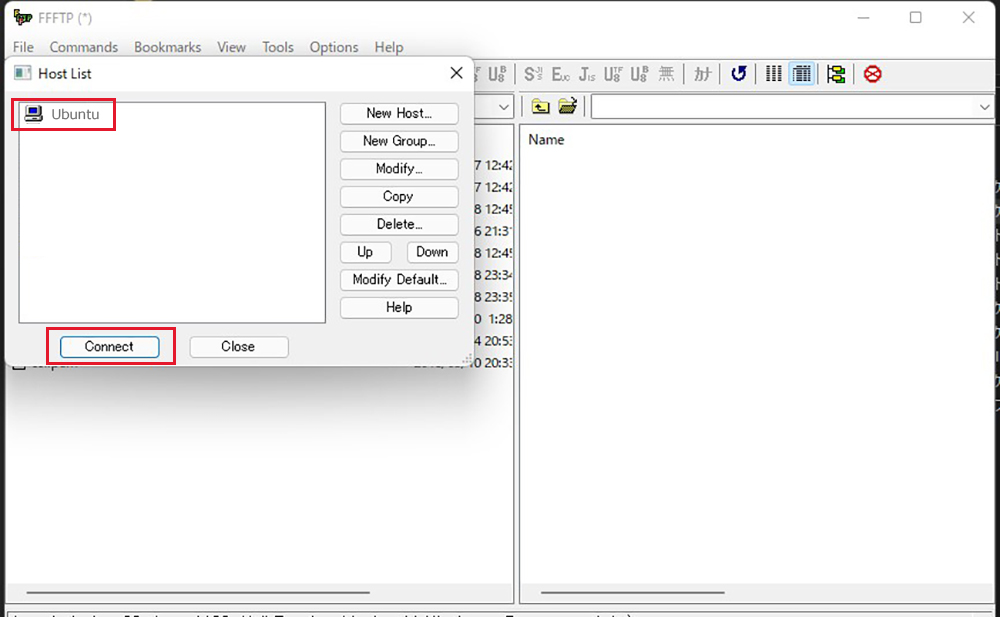
You are now back in the Host List window. Please press Connect
The window Saving the encryption status will open. Please select Yes
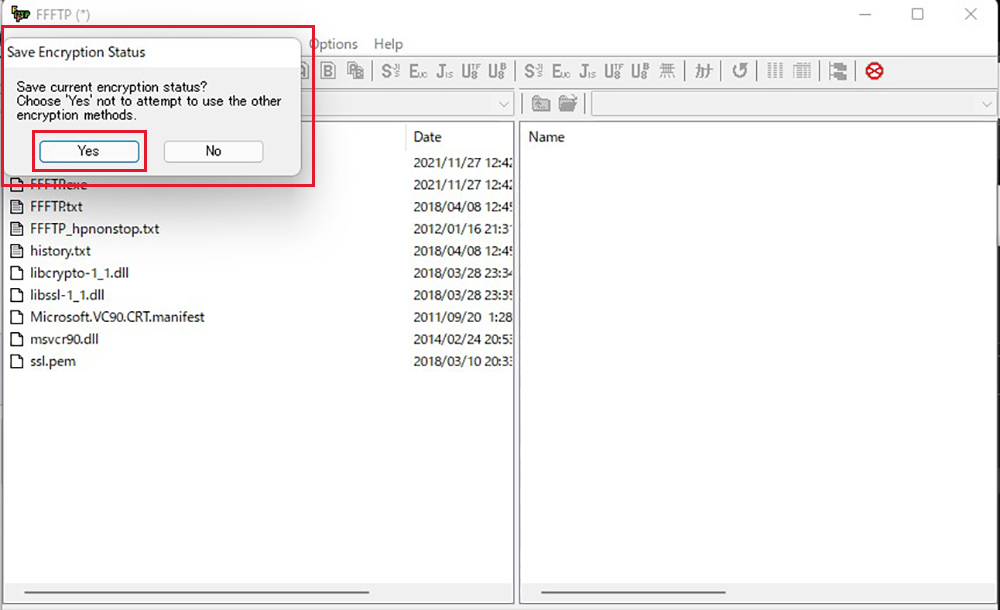
If you see the Windows directory on the left and the Ubuntu directory on the right, you have successfully connected.
If you can't get through, turn Passive mode on and off.
3. Apache2 installation
First allow port http:80 and port https:443 on UFW
|
1 2 3 |
# ufw allow http # ufw allow https # ufw reload |
3.1 Install Apache 2
|
1 |
# apt -y install apache2 |
3.2 Apache2 Basic Configuration
|
1 2 3 4 |
# vi /etc/apache2/conf-enabled/security.conf # Line 25.:change ServerTokens Prod |
|
1 2 3 4 |
# vi /etc/apache2/mods-enabled/dir.conf # Line 2.:Check which file names can be accessed by directory name only DirectoryIndex index.html index.htm index.php |
|
1 2 3 4 5 6 |
# vi /etc/apache2/apache2.conf # Line 70:Server name added ServerName <Your domain name> # Line 172:change AllowOverride ALL |
|
1 2 3 4 |
# vi /etc/apache2/sites-available/000-default.conf # Line 11:Change of administrator's address ServerAdmin <your mailaddress> |
Apache restart
|
1 |
# systemctl restart apache2 |
3.3 Apache2 : Using Perl Scripts
Enable CGI and configure it to use Perl scripts
①Install Perl
|
1 |
# apt -y install perl |
②Enable and restart the CGI module
|
1 2 |
# a2enmod cgid # systemctl restart apache2 |
③Check CGI modules are enabled
Test script creation
|
1 2 3 4 5 |
# cat > /usr/lib/cgi-bin/test_script <<'EOF' #!/usr/bin/perl print "Content-type: text/html\n\n"; print "Hello CGI\n"; EOF |
Granting permissions to script files
|
1 |
# chmod 705 /usr/lib/cgi-bin/test_script |
Operation check
|
1 |
# curl http://localhost/cgi-bin/test_script |
“curl: If you get the message "Command not found"
|
1 |
# apt install curl |
again
|
1 2 |
# curl http://localhost/cgi-bin/test_script Hello CGI |
3.4 Apache2 : Using PHP Scripts
①Install PHP
|
1 |
# apt -y install php php-cgi libapache2-mod-php php-common php-pear php-mbstring |
②Configuring Apache2
|
1 2 3 4 |
# a2enconf php7.4-cgi Enabling conf php7.4-cgi. To activate the new configuration, you need to run: systemctl reload apache2 |
|
1 |
# systemctl restart apache2 |
|
1 2 3 4 5 6 7 |
# vi /etc/php/7.4/apache2/php.ini # Line 846 : change #upload_max_filesize = 2M upload_max_filesize = 200M # Line 962:Uncomment and set time zone date.timezone = "Asia/Tokyo" |
③Create a PHP test page to see how it works
|
1 2 3 4 5 6 7 8 9 10 11 |
# vi /var/www/html/index.php <html> <body> <div style="width: 100%; font-size: 40px; font-weight: bold; text-align: center;"> <?php print "PHP Test Page"; ?> </div> </body> </html> |
Access "http://<server IP address>/index.php" in your browser
If you get a screen like this, you have succeeded
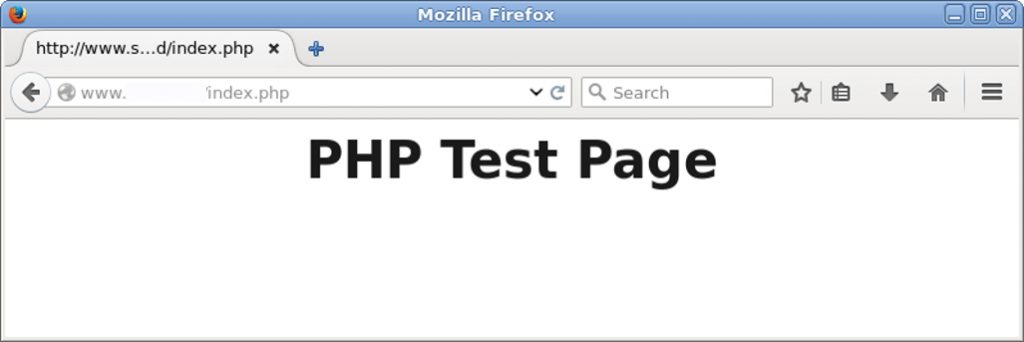
3.5 Apache2 : Virtual Host Configuration
①Copy the default configuration file(The file name is arbitrary, in this case "vhost-yourdomain.conf" as an example)
Virtual host configuration
|
1 2 |
# cd /etc/apache2/sites-available/ # cp 000-default.conf vhost-yourdomain.conf |
②Edit the configuration file you have created
|
1 2 3 4 5 6 7 8 9 10 11 12 |
# vi vhost-yourdomain.conf <VirtualHost *:80> ~omission~ ServerName <FQDN> ServerAdmin <Administrator email address> DocumentRoot /var/www/html/<FQDN>/ ~Abbreviations~ ErrorLog ${APACHE_LOG_DIR}/<FQDN>.error.log CustomLog ${APACHE_LOG_DIR}/<FQDN>.access.log combined ~Abbreviations~ </VirtualHost> |
③Disable the default configuration file by symlinking to it
|
1 2 |
# cd /etc/apache2/sites-available/ # a2ensite vhost-yourdomain.conf |
|
1 2 3 |
Default disable # a2dissite 000-default.conf # systemctl restart apache2 |
④Editing the hosts file
|
1 2 3 |
# vi /etc/hosts 127.0.0.1 <Your domain name> |
⑤Create directory
|
1 |
# mkdir /var/www/html/<FQDN> |
⑥Create a test page and check it works
|
1 2 3 4 5 6 7 8 9 |
# vi /var/www/html/<FQDN>/index.html <html> <body> <div style="width: 100%; font-size: 40px; font-weight: bold; text-align: center;"> Virtual Host Test Page </div> </body> </html> |
⑦Check by accessing "http://<FQDN>/index.html" in your browser


