Contents
1.Anti-virus Clamav installed
1.1 Install
|
1 |
# apt install clamav clamav-daemon |
The clamav-related configuration files are installed in the /etc/clamav/ folder.
1.2 Virus definition updates
# systemctl stop clamav-freshclam
# freshclam
Fri Feb 10 19:32:20 2023 -> ClamAV update process started at Fri Feb 10 19:32:20 2023
Fri Feb 10 19:32:20 2023 -> daily.cld database is up-to-date (version: 26808, sigs: 2020417, f-level: 90, builder: raynman)
Fri Feb 10 19:32:20 2023 -> main.cvd database is up-to-date (version: 62, sigs: 6647427, f-level: 90, builder: sigmgr)
Fri Feb 10 19:32:20 2023 -> bytecode.cvd database is up-to-date (version: 333, sigs: 92, f-level: 63, builder: awillia2)
If the virus definitions can be updated with the above command, but the following error occurs, change the log settings and run the command again.
ERROR: /var/log/clamav/freshclam.log is locked by another process
ERROR: Problem with internal logger (UpdateLogFile = /var/log/clamav/freshclam.log).
# rm /var/log/clamav/freshclam.log
# touch /var/log/clamav/freshclam.log
# chown clamav:clamav /var/log/clamav/freshclam.log
# systemctl start clamav-freshclam
⚫Change configuration file
|
1 2 3 4 |
# vi /etc/logrotate.d/clamav-freshclam create 640 clamav adm ↓ create 640 clamav clamav |
1.3 Virus Check Confirmation
①Running manual virus checks
|
1 2 3 4 5 6 7 8 9 10 11 12 |
# clamscan --infected --remove --recursive /home ----------- SCAN SUMMARY ----------- Known viruses: 8652350 Engine version: 0.103.7 Scanned directories: 3 Scanned files: 7 Infected files: 0 Data scanned: 0.00 MB Data read: 0.00 MB (ratio 0.00:1) Time: 14.483 sec (0 m 14 s) Start Date: 2023:02:10 19:40:26 End Date: 2023:02:10 19:40:41 |
Infected files: 0 No virus.
②Virus detection by downloading test viruses
Download a harmless virus and test it for detection.
Log in as a general user and check
|
1 2 3 4 5 6 7 8 9 10 11 12 13 14 15 16 17 |
# su - [user name] $ wget http://www.eicar.org/download/eicar.com $ clamscan --infected --remove --recursive /home /home/huong/eicar.com: Win.Test.EICAR_HDB-1 FOUND /home/huong/eicar.com: Removed. ----------- SCAN SUMMARY ----------- Known viruses: 8652350 Engine version: 0.103.7 Scanned directories: 3 Scanned files: 8 Infected files: 1 Data scanned: 0.00 MB Data read: 0.00 MB (ratio 0.00:1) Time: 13.864 sec (0 m 13 s) Start Date: 2023:02:10 19:42:24 End Date: 2023:02:10 19:42:38 |
Thus, the virus is notified with the indication "FOUND" and "Infected files: 1".
Also, the "--remove" option was added, so the test virus was removed.
1.4 Create a script file to do a full scan
|
1 2 3 4 5 |
$ su - Password: # mkdir /opt/script (If /opt/script is missing) # cd /opt/script # vi clam-full.sh |
①Contents of clam-full.sh (new)
#!/bin/sh
echo =========================================
date
hostname
clamscan / \
--infected \
--recursive \
--log=/var/log/clamav/clamscan.log \
--move=/var/log/clamav/virus \
--exclude-dir=^/boot \
--exclude-dir=^/sys \
--exclude-dir=^/proc \
--exclude-dir=^/dev \
--exclude-dir=^/var/log/clamav/virus
if [ $? = 0 ]; then
echo "virus undetected."
else
echo "Virus detection!!"
fi
②execute authorization
|
1 |
# chmod +x /opt/script/clam-full.sh |
③Create a folder for virus quarantine (if it already exists, it is OK, but if it does not, a runtime error will occur because it is specified as an excluded directory in the above script).
|
1 |
# mkdir /var/log/clamav/virus |
④Running it.
|
1 |
# /opt/script/clam-full.sh |
⑤Scheduled virus scan execution with cron
|
1 2 |
# crontab -e 0 2 * * mon /opt/script/clam-full.sh >> /var/log/clamav/clamascan.log |
2. Email software installation
2.1 Postfix : Installation/Configuration
Install Postfix and build an SMTP server; SMTP uses 25/TCP.
To prevent unauthorized mail relay, use the SASL function of Dovecot, described below, and configure Postfix so that authentication is also required for sending mail.
①Install
|
1 |
# apt -y install postfix sasl2-bin |
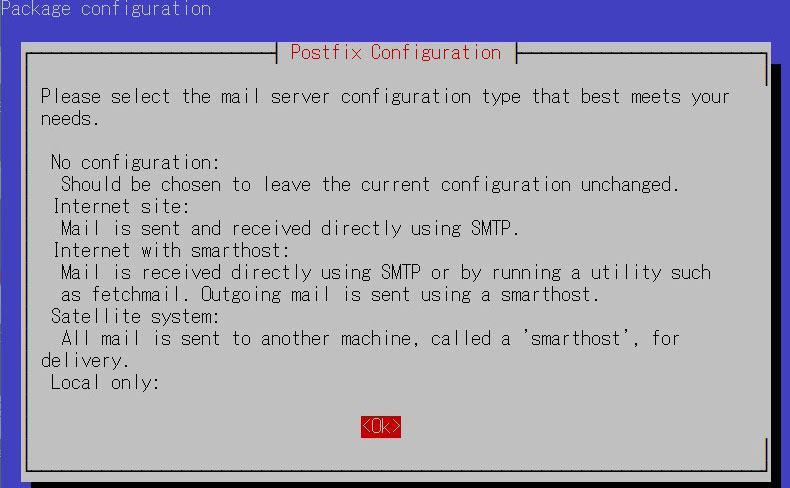
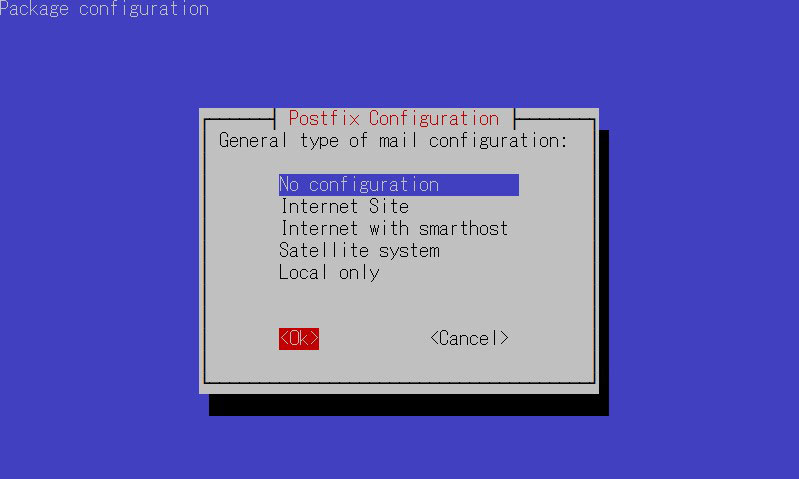
Installation Status Screen
You will be asked to select a general configuration setting, select "No Configuration" to set it manually later.
②Configuration File Editing
|
1 2 |
# cp /usr/share/postfix/main.cf.dist /etc/postfix/main.cf # vi /etc/postfix/main.cf |
Editorial content
|
1 2 3 4 5 6 7 8 9 10 11 12 13 14 15 16 17 18 19 20 21 22 23 24 25 26 27 28 29 30 31 32 33 34 35 36 37 38 39 40 41 42 43 44 45 46 47 48 49 50 51 52 53 54 |
# Line 78:Uncomment mail_owner = postfix # Line 94:Uncomment and specify hostname myhostname = mail.[domain name] # Line 102:Uncomment and specify domain name mydomain = [domain name] # Line 123:Uncomment myorigin = $mydomain # Line 137:Uncomment inet_interfaces = all # Line 185:Uncomment mydestination = $myhostname, localhost.$mydomain, localhost, $mydomain # Line 228:Uncomment local_recipient_maps = unix:passwd.byname $alias_maps # Line 270:Uncomment mynetworks_style = subnet # Line 287:self-networking addition mynetworks = 127.0.0.0/8, 192.168.11.0/24 # Line 407:Uncomment alias_maps = hash:/etc/aliases # Line 418:Uncomment alias_database = hash:/etc/aliases # Line 440:Uncomment home_mailbox = Maildir/ # Line 576:Make it a comment and add below it #smtpd_banner = $myhostname ESMTP $mail_name (Ubuntu) smtpd_banner = $myhostname ESMTP # Line 650:add sendmail_path = /usr/sbin/postfix # Line 655:add newaliases_path = /usr/bin/newaliases # Line 660:add mailq_path = /usr/bin/mailq # Line 666:add setgid_group = postdrop # Line 670:comment #html_directory = # Line 674:comment #manpage_directory = # Line 679:comment #sample_directory = # Line 683:comment #readme_directory = # Added to the last line: Limit sent/received mail size to 10M message_size_limit = 10485760 # Limit mailbox size to 1G mailbox_size_limit = 1073741824 # SMTP-Auth Settings smtpd_sasl_type = dovecot smtpd_sasl_path = private/auth smtpd_sasl_auth_enable = yes smtpd_sasl_security_options = noanonymous smtpd_sasl_local_domain = $myhostname smtpd_recipient_restrictions = permit_mynetworks, permit_auth_destination, permit_sasl_authenticated, reject |
③master.cf edit
|
1 |
# vi /etc/postfix/master.cf |
Editorial content
|
1 2 3 4 5 6 7 8 9 10 |
smtp inet n - y - - smtpd #smtp inet n - y - 1 postscreen #smtpd pass - - y - - smtpd #dnsblog unix - - y - 0 dnsblog #tlsproxy unix - - y - 0 tlsproxy submission inet n - y - - smtpd # -o syslog_name=postfix/submission # -o smtpd_tls_security_level=encrypt -o smtpd_sasl_auth_enable=yes # -o smtpd_tls_auth_only=yes |
④Reflection of settings
|
1 2 |
# newaliases # systemctl restart postfix |
2.2 Dovecot : Installation/Configuration
Install Dovecot and build a POP/IMAP server, using 110/TCP for POP and 143/TCP for IMAP
①Configure Dovecot to provide SASL functionality for Postfix
|
1 2 3 4 5 6 7 8 9 10 11 12 13 14 15 16 17 18 19 20 21 22 23 |
# apt -y install dovecot-core dovecot-pop3d dovecot-imapd # vi /etc/dovecot/dovecot.conf Line 30:Uncomment listen = *, :: # vi /etc/dovecot/conf.d/10-auth.conf Line 10:Uncomment and change (also allow plain text authentication) disable_plaintext_auth = no Line 100:add auth_mechanisms = plain login # vi /etc/dovecot/conf.d/10-mail.conf Line 30:Change to Maildir format mail_location = maildir:~/Maildir # vi /etc/dovecot/conf.d/10-master.conf Line 107-109:Uncomment and add # Postfix smtp-authi unix_listener /var/spool/postfix/private/auth { mode = 0666 user = postfix group = postfix } |
②Setting Reflection
|
1 |
# systemctl restart dovecot |
2.3 Email User Account Registration
Register a user account for e-mail.
This is a setting for when a user account on the OS is also used for e-mail.
If you want to use mail with a user account on the OS, no additional configuration is required, just register the OS user
①Mail client installation
|
1 |
# apt -y install mailutils |
②Mailboxes are set to refer to Maildir
|
1 |
# echo 'export MAIL=$HOME/Maildir/' >> /etc/profile.d/mail.sh |
2.4 Open ports
|
1 2 3 4 |
# ufw allow pop3 # ufw allow imap # ufw allow smtp # ufw reload |
2.5 operation check ①
①Send test mail to yourself [mail (user name)@(host name)].
username : huong
|
1 2 3 4 5 6 7 8 |
# su - huong $ mail huong@localhost # Cc Cc: # Subject: Test Mail # This is the first mail. |
Ctrl + D key to end a statement
Check incoming mail
|
1 2 3 4 5 6 7 8 9 10 11 12 13 14 15 |
$ mail "/home/huong/Maildir/": 1 message 1 new >N 1 huong 13/468 Test Mail ? 1 Return-Path: <huong@Lepard.debian.korodes.com> X-Original-To: huong@localhost Delivered-To: huong@localhost Received: by mail.korodes.com (Postfix, from userid 1000) id 456B1BF910; Fri, 10 Feb 2023 21:32:01 +0900 (JST) To: <huong@localhost> Subject: Test Mail X-Mailer: mail (GNU Mailutils 3.5) Message-Id: <20230210123201.456B1BF910@mail.korodes.com> Date: Fri, 10 Feb 2023 21:32:01 +0900 (JST) From: huong <huong@Lepard.debian.korodes.com> |
2.6 operation check ②
Set up and confirm your account in Mozilla Thunderbird
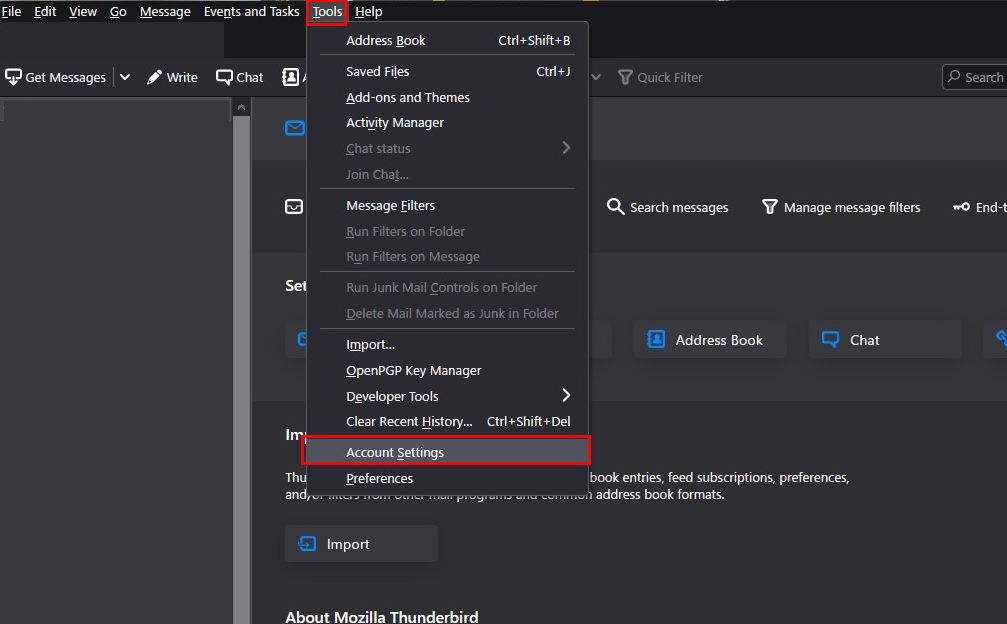
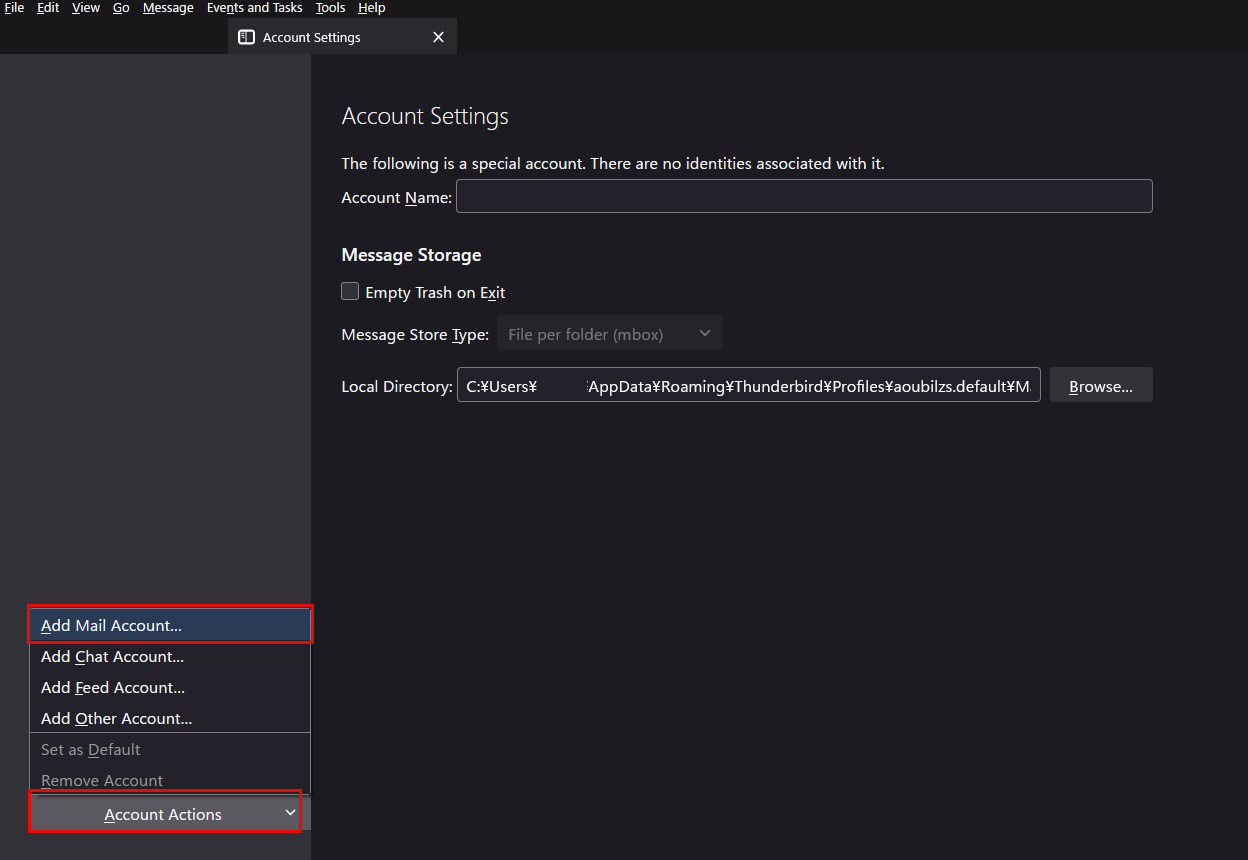
①Start Thunderbird, and click "Tools", "Account Settings".
②「Account Actions」「Add Mail Account」
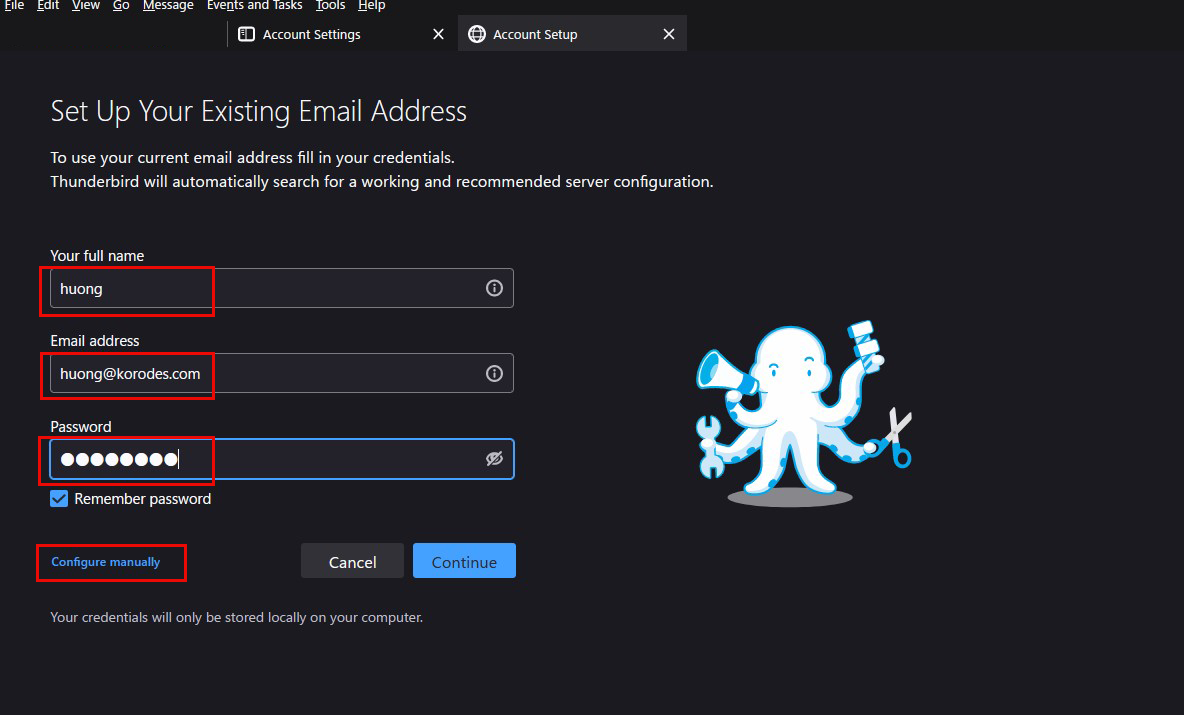
③Your full name : any name
Email addtess : huong@korodes.com
Password : Password for huong
Click on "Configure manually"
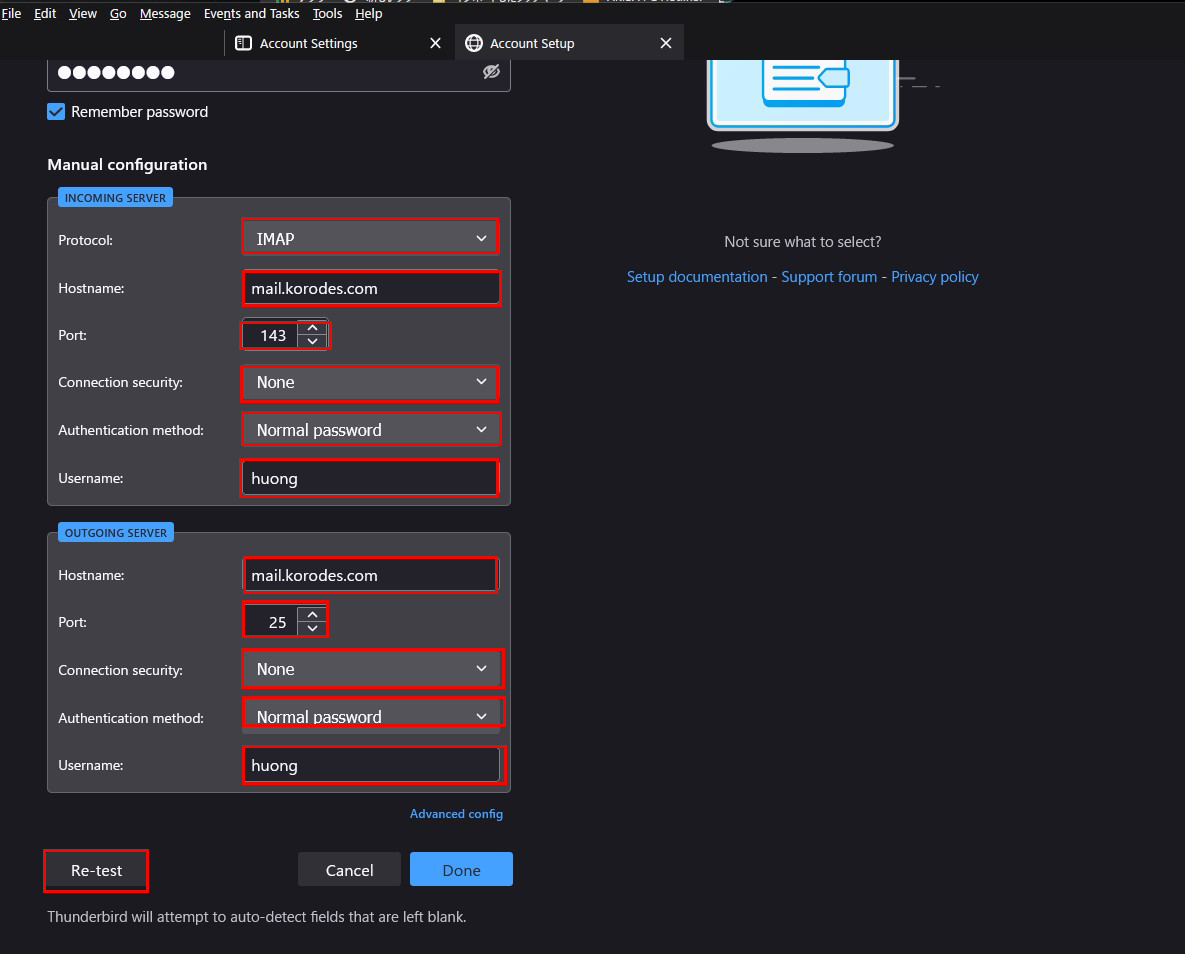
④Set "INCOMMING SERVER" and "OUTGOING SERVER" as shown below and click "Re-test".
⑤「The following settings were found by probinfg the given server」
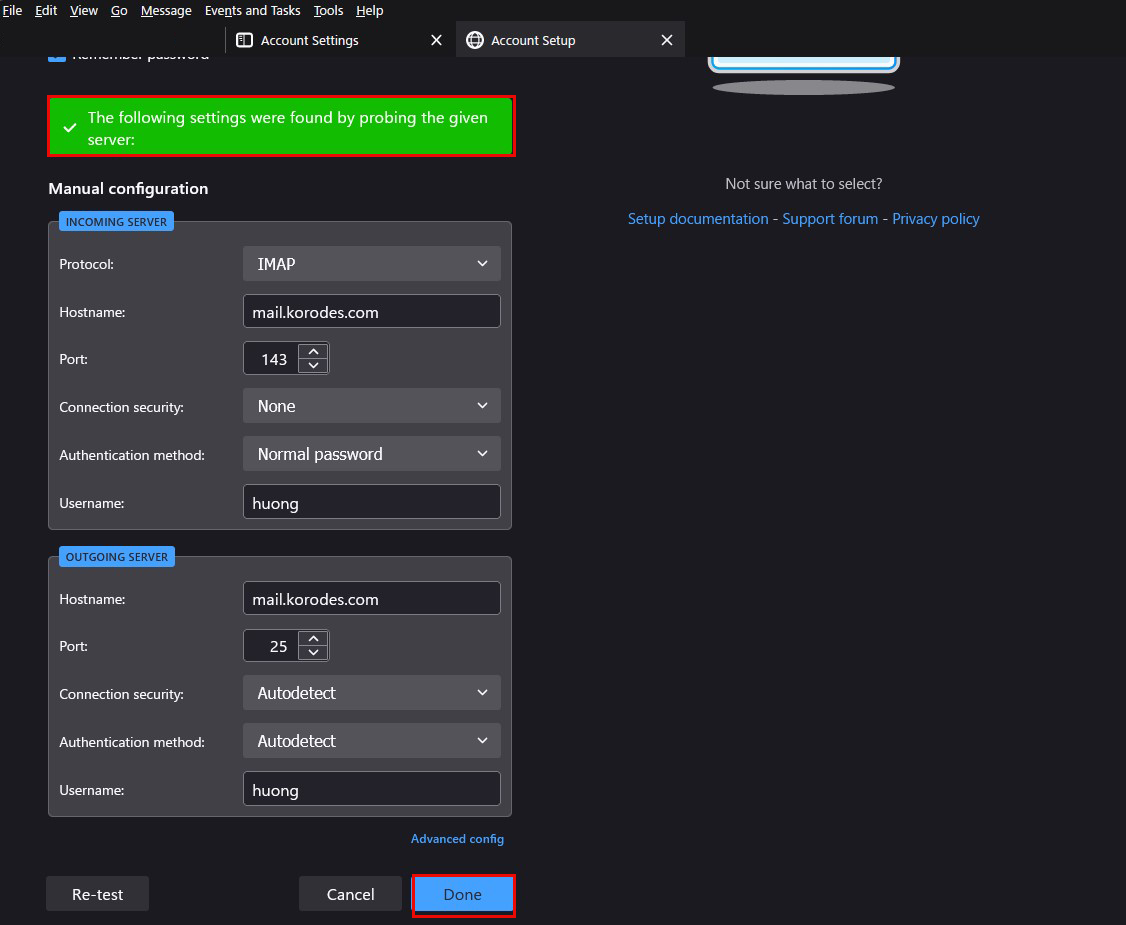
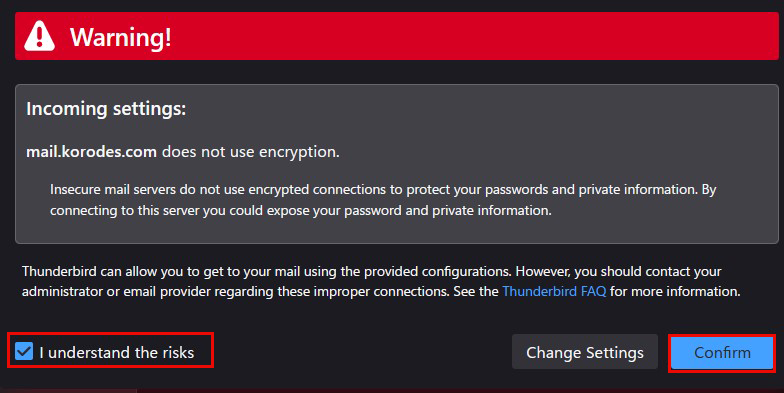
After clicking "Done", the following "Warning" appears, but there is no problem, so click "Confirm".
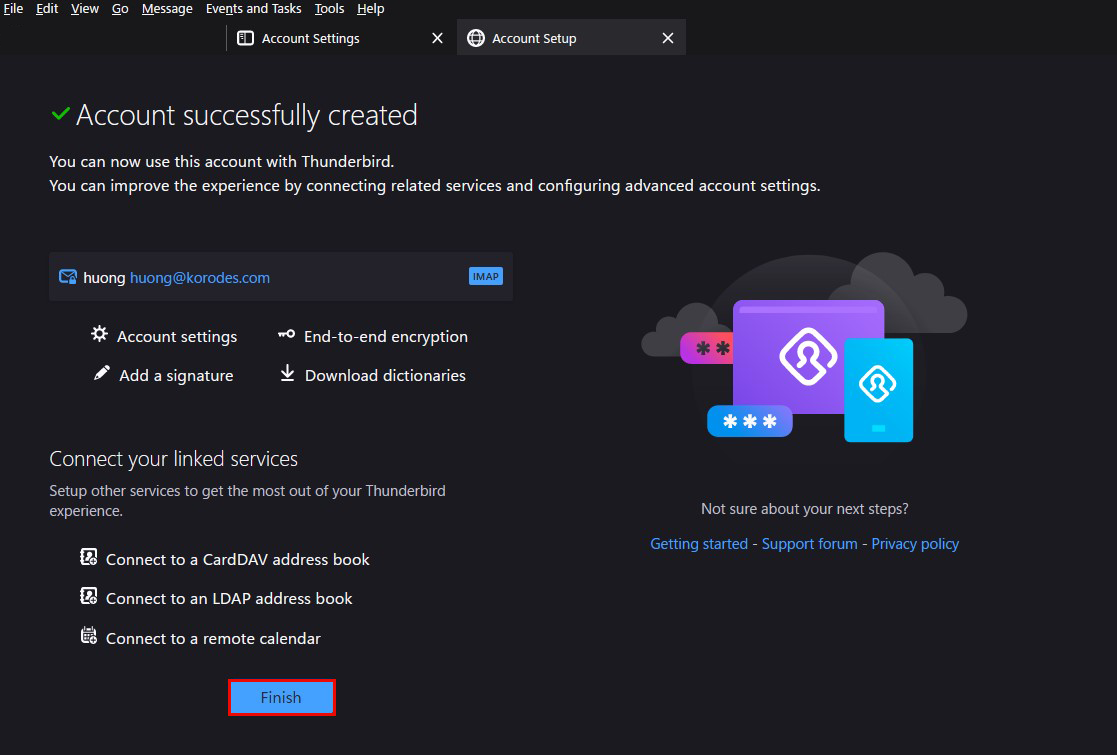
⑥"Account syccessfuly created" is displayed and click "Finish".
3 Applied ClamAV to mail server Postfix
Set up Postfix and Clamav to work together to scan incoming and outgoing mail in real time.
①Install Amavisd and Clamav Daemon and start Clamav Daemon
|
1 2 3 |
$ su - Password: # apt -y install clamav-daemon amavisd-new |
If the server does not use a fully qualified domain name (FQDN) as the host name, Amavis may fail to start.
Also, since the OS hostname may change, set a valid hostname directly in the Amavis configuration file
|
1 2 3 4 5 6 7 8 9 10 11 12 13 14 |
# vi /etc/amavis/conf.d/05-node_id use strict; # $myhostname is used by amavisd-new for node identification, and it is # important to get it right (e.g. for ESMTP EHLO, loop detection, and so on) . chomp($myhostname = `hostname --fqdn`); # To manually set $myhostname, edit the following line with the correct Full y # Qualified Domain Name (FQDN) and remove the # at the beginning of the line . # #$myhostname = "mail.example.com"; $myhostname = "mail.korodes.com"; 1; # ensure a defined return |
②15-content_filter_mode edit
|
1 2 3 4 |
# vi /etc/amavis/conf.d/15-content_filter_mode Uncomment and enable virus scan @bypass_virus_checks_maps = ( \%bypass_virus_checks, \@bypass_virus_checks_acl, \$bypass_virus_checks_re); |
③Register your own domain name
|
1 |
# echo '[yourDomain]' > /etc/mailname |
④Main.cf edit
|
1 2 3 |
# vi /etc/postfix/main.cf Add to last line content_filter=smtp-amavis:[127.0.0.1]:10024 |
⑤master.cf edit
|
1 |
# vi /etc/postfix/master.cf |
Editorial content
# Add all the following lines to the last line
smtp-amavis unix - - n - 2 smtp
    -o smtp_data_done_timeout=1200
    -o smtp_send_xforward_command=yes
    -o disable_dns_lookups=yes
127.0.0.1:10025 inet n - n - - smtpd
    -o content_filter=
    -o local_recipient_maps=
    -o relay_recipient_maps=
    -o smtpd_restriction_classes=
    -o smtpd_client_restrictions=
    -o smtpd_helo_restrictions=
    -o smtpd_sender_restrictions=
    -o smtpd_recipient_restrictions=permit_mynetworks,reject
    -o mynetworks=127.0.0.0/8
    -o strict_rfc821_envelopes=yes
    -o smtpd_error_sleep_time=0
    -o smtpd_soft_error_limit=1001
    -o smtpd_hard_error_limit=1000
⑥Configuration Reflection
|
1 2 3 |
# usermod -G clamav amavis # usermod -G amavis clamav # systemctl restart clamav-daemon amavis postfix |
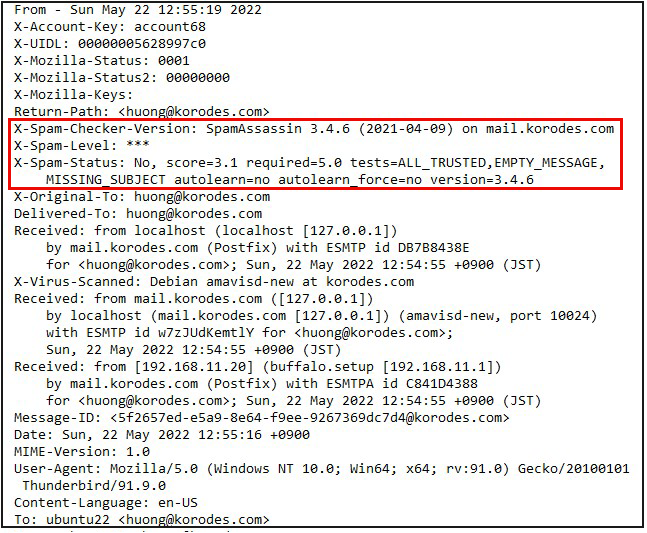
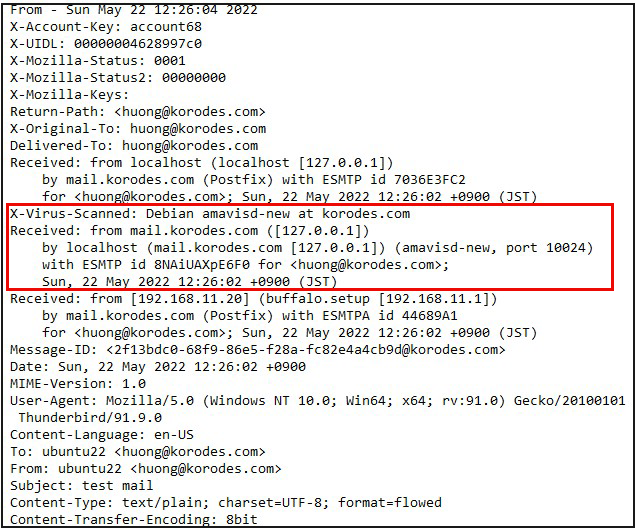
⑦When you send an e-mail to yourself on Thuderbird, etc., it is successful if you see the following message in the header of the incoming e-mail.
4 Applied spamassassin to mail server Postfix
4.1 Install spamassassin
①Install
|
1 2 3 |
# apt update # apt upgrade # apt install spamassassin |
②SpamAssassin Settings
The configuration file is "/etc/mail/spamassassin/local.cf".
Use default without additional settings
Create Maildir for storing spam mails
Create a directory in Maildir format to store spam emails
Create a directory ".Spam" in Maildir format for storing spam mails.
Creation is done by the target user.
|
1 2 3 4 5 6 7 |
# su – [user name] $ cd ~ Create a directory named ".Spam" $ cd Maildir $ /usr/bin/maildirmake.dovecot .Spam $ su – Password: |
4.2 Procmail Preparation
①Install Procmail
|
1 |
# apt install procmail |
If installed, the following results are returned
|
1 2 |
# which procmail /usr/bin/procmail |
②Procmail Settings
If you put it in "/etc/procmailrc", which is in charge of the entire mail filter, it will be applied to all users.
The filter will be applied only to that user if it is written in "/home/username/.procmailrc", which is a mail filter file for each user.
This time, to apply to all users, we will write in "/etc/procmailrc".
|
1 |
# vi /etc/procmailrc |
procmailrc description (newly created)
|
1 2 3 4 5 6 7 8 9 10 11 12 13 14 15 16 17 |
# Set path PATH=/bin:/usr/bin:/usr/local/bin # Mailbox Settings MAILDIR=$HOME/Maildir DEFAULT=$MAILDIR/ # Specify log file output destination for Procmail LOGFILE=$MAILDIR/procmaillog # Specify lock file path LOCKFILE=$HOME/.lockmail # If there is no "X-Spam-***" in the mail header, spamassassassin will be started. :0fw *!^X-Spam.* |spamassassin # If the mail header contains "X-Spam-Status: Yes", the mail will be stored in the ".Spam" directory. :0 * ^X-Spam-Status: Yes $MAILDIR/.Spam/ |
4.3 Postfix Configuration
① Edit main.cf
|
1 2 3 |
# vi /etc/postfix/main.cf Add to the last line mailbox_command = /usr/bin/procmail |
②Reflecting and activating settings
|
1 2 |
# systemctl start spamassassin # systemctl restart postfix |
4.4 Spam Email Learning
Allows all users to learn the entire contents of their ".Spam" directory as spam mail
①Spam Email Learning
|
1 2 |
# /usr/bin/sa-learn --spam /home/*/Maildir/.Spam/cur Learned tokens from 0 message(s) (0 message(s) examined).←Learned 0 emails as spam |
②Normal mail learning
|
1 2 |
# /usr/bin/sa-learn --ham /home/*/Maildir/cur Learned tokens from 4 message(s) (4 message(s) examined). ← Learned 4 emails as normal emails |
③Create a script and register it with Cron
Name the file "spam-learns.sh" and place it under /opt/script/.
After saving the script, give it executable access as "chmod 750 spam-learns.sh".
|
1 |
# vi /opt/script/spam-learns.sh |
spam-learns.sh Contents
|
1 2 3 4 5 6 7 |
#! /bin/sh # Spam Email Learning /usr/bin/sa-learn --spam /home/*/Maildir/.Spam/cur # Learning normal mail /usr/bin/sa-learn --ham /home/*/Maildir/cur # If you want to force the deletion of the contents of the spam mail storage directory, add the following statement /bin/rm -f /home/*/Maildir/.Spam/cur |
|
1 |
# chmod 750 /opt/script/spam-learns.sh |
Once pam-learns.sh is created, create a definition file directly under /lib/systemd/system. The name should end in .service, such as spam-learns.service.
Type is defined by simple
|
1 2 |
# cd /lib/systemd/system # vi spam-learns.service |
Contents of spam-learns.service
|
1 2 3 4 5 6 7 8 9 10 |
[Unit] Description=demo sample node.js program [Service] Type=simple ExecStart= /opt/script/spam-learns.sh Restart=always [Install] WantedBy=multi-user.target |
|
1 2 |
# crontab -e 0 4 * * * /opt/script/spam-learns.sh |
|
1 |
# systemctl enable spam-learns |
④If you send an e-mail to yourself in Thunderbird with the following information in the body, the following will appear in the header.
「XJSC4JDBQADN1.NSBN32IDNENGTUBE-STANDARD-ANTI-UBE-TEST-EMAILC.34X」
