Contents
このページの目的
SuricataをIDSとIPSとして利用し、Elastic StackをSuricataのログの可視化とモニタリングに利用します
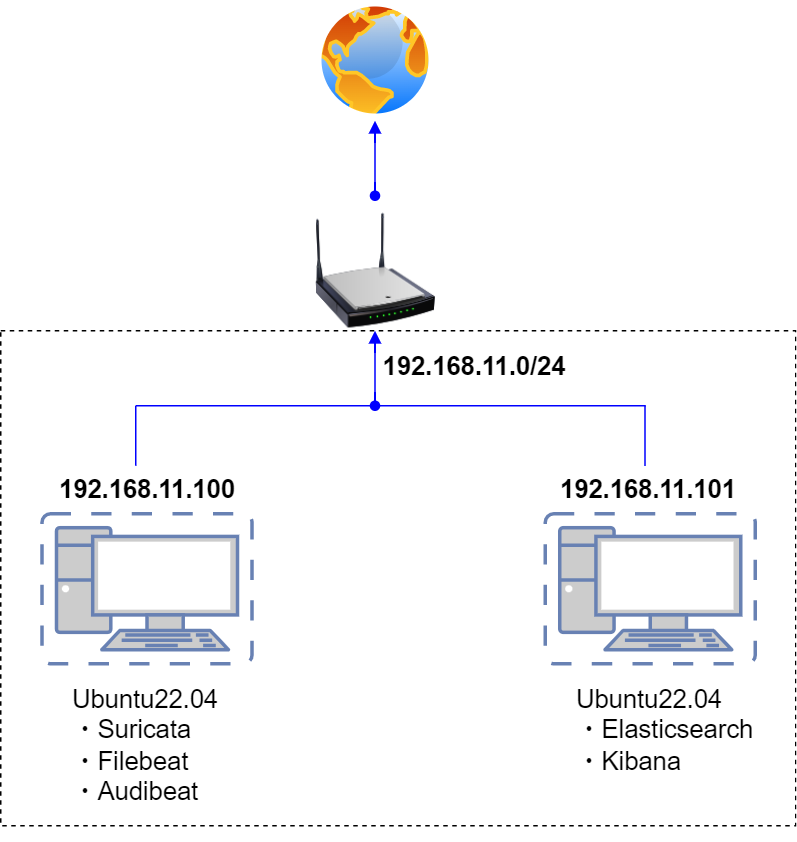
構築するイメージは下図の通りで2台のUbuntu 22.04サーバーを用意し、
・1台目のサーバーにSuricata、Auditbeat、Filebeatをインストールする
・2台目のサーバーに、KibanaとElasticsearchをインストールする
それぞれの役割は
Suricata Host IDS/IPS
ホスト侵入検知・防御システムでデフォルトでパッシブIDSとしてインストールされ、単に不審なトラフィックをスキャンし、ホスト上でアラートを生成します。今回はSURICATAをIPSとしても動作するように設定し、定義されたルールに一致する悪意のあるネットワークトラフィックのパケットをドロップして完全にブロックします
Filebeat
ログデータを転送し、一元管理するための軽量なシッパーです
Auditbeat
Linux監査フレームワークのデータを収集し、ファイルの整合性を監視します
Elasticsearch
あらゆる種類のデータを対象とした検索・分析エンジン
Kibana
Elasticsearch にインデックスされたデータの検索とデータ可視化機能を提供します
SURICATAインストールと設定
本作業は1台目のUbuntuサーバーで行う
1. SURICATAインストール
1.1 Open Information Security Foundation(OSIF)のリポジトリを追加
|
1 2 3 4 5 6 7 8 9 10 |
# add-apt-repository ppa:oisf/suricata-stable Repository: 'deb https://ppa.launchpadcontent.net/oisf/suricata-stable/ubuntu/ jammy main' Description: Suricata IDS/IPS/NSM stable packages https://suricata.io/ https://oisf.net/ Suricata IDS/IPS/NSM - Suricata is a high performance Intrusion Detection and Prevention System and Network Security Monitoring engine. ..................................................... |
リポジトリを更新
|
1 |
# apt update |
1.2 SURICATAをインストール
|
1 2 3 4 5 6 7 8 9 10 11 12 13 14 15 |
# apt install suricata Reading package lists... Done Building dependency tree... Done Reading state information... Done The following additional packages will be installed: libevent-2.1-7 libevent-pthreads-2.1-7 libhiredis0.14 libhtp2 libhyperscan5 libluajit-5.1-2 libluajit-5.1-common liblzma-dev libnet1 libnetfilter-queue1 Suggested packages: liblzma-doc The following NEW packages will be installed: libevent-2.1-7 libevent-pthreads-2.1-7 libhiredis0.14 libhtp2 libhyperscan5 libluajit-5.1-2 libluajit-5.1-common liblzma-dev libnet1 libnetfilter-queue1 suricata ............................................................................. |
1.3 suricata.serviceを起動する
|
1 2 3 |
# systemctl enable suricata.service suricata.service is not a native service, redirecting to systemd-sysv-install. Executing: /lib/systemd/systemd-sysv-install enable suricata |
起動確認
|
1 2 3 4 5 6 7 8 9 10 11 |
# systemctl status suricata.service ● suricata.service - LSB: Next Generation IDS/IPS Loaded: loaded (/etc/init.d/suricata; generated) Active: active (exited) since Sun 2024-01-07 15:00:27 JST; 3min 14s ago Docs: man:systemd-sysv-generator(8) CPU: 187ms Jan 07 15:00:27 lepard systemd[1]: Starting LSB: Next Generation IDS/IPS... Jan 07 15:00:27 lepard suricata[2719]: Starting suricata in IDS (af-packet) mod> Jan 07 15:00:27 lepard systemd[1]: Started LSB: Next Generation IDS/IPS. |
Suricataは現在IDS(af-packet)モードで起動している
2. SURICATAの設定
①SURICATAは、IDSモードでのみ有効であり、悪意のあるネットワークトラフィックをドロップあるいはブロックはしません、アラートとログを提供するだけです。SURICATAをIPSとして設定し、悪意のあるネットワークパケットをドロップするようにする
➁JSON出力にコミュニティIDを含めるようにSURICATAを設定する
2.1 デフォルトのネットワーク・インターフェイスを確認
|
1 2 3 4 5 6 7 8 |
# ip -p -j route show default [ { "dst": "default", "gateway": "192.168.11.1", "dev": "ens33", "protocol": "static", "flags": [ ] } ] |
デフォルトのネットワーク・インターフェイス名は"ens33"である
2.2 Suricataの設定ファイル編集
|
1 2 3 4 5 6 7 8 9 10 11 12 13 14 |
# vi /etc/suricata/suricata.yaml 136行目 community-id: falseこの行をcommunity-id:trueに変更する community-id: true # Seed value for the ID output. Valid values are 0-65535. community-id-seed: 0 615行目インターフェイスがデフォルトのインターフェイスに変更 - interface: ens33 SURICATAのサービスを再起動することなく、ルールの追加、削除、編集ができるようにする。 最終行に次を追加 detect-engine: - rule-reload: true |
2.3 プロセスを再起動せずにルールセットを再読み込みするようSuricataプロセスに通知し、以Suricataサービスを再起動する
|
1 2 3 |
# kill -usr2 $(pidof suricata) kill: usage: kill [-s sigspec | -n signum | -sigspec] pid | jobspec ... or kill -l [sigspec] # service suricata restart |
2.4 Suricataルールの更新
|
1 2 3 4 5 6 7 8 9 10 11 12 13 14 15 16 17 18 19 |
# suricata-update 7/1/2024 -- 15:17:47 - <Info> -- Using data-directory /var/lib/suricata. 7/1/2024 -- 15:17:47 - <Info> -- Using Suricata configuration /etc/suricata/suricata.yaml 7/1/2024 -- 15:17:47 - <Info> -- Using /usr/share/suricata/rules for Suricata provided rules. 7/1/2024 -- 15:17:47 - <Info> -- Found Suricata version 7.0.2 at /usr/bin/suricata. 7/1/2024 -- 15:17:47 - <Info> -- Loading /etc/suricata/suricata.yaml 7/1/2024 -- 15:17:47 - <Info> -- Disabling rules for protocol pgsql 7/1/2024 -- 15:17:47 - <Info> -- Disabling rules for protocol modbus 7/1/2024 -- 15:17:47 - <Info> -- Disabling rules for protocol dnp3 7/1/2024 -- 15:17:47 - <Info> -- Disabling rules for protocol enip 7/1/2024 -- 15:17:47 - <Info> -- No sources configured, will use Emerging Threats Open 7/1/2024 -- 15:17:47 - <Info> -- Fetching https://rules.emergingthreats.net/open/suricata-7.0.2/emerging.rules.tar.gz. 100% - 4189513/4189513 ............................................................................ 7/1/2024 -- 15:17:53 - <Info> -- Writing rules to /var/lib/suricata/rules/suricata.rules: total: 46598; enabled: 36018; added: 46598; removed 0; modified: 0 7/1/2024 -- 15:17:53 - <Info> -- Writing /var/lib/suricata/rules/classification.config 7/1/2024 -- 15:17:53 - <Info> -- Testing with suricata -T. 7/1/2024 -- 15:18:17 - <Info> -- Done. |
SURICATAのすべてのルールセット・プロバイダーを更新
no-check-certificateは、認証局の検証を無視する。
|
1 2 3 4 5 6 7 8 9 |
# suricata-update --no-check-certificate update-sources 7/1/2024 -- 15:23:17 - <Info> -- Using data-directory /var/lib/suricata. 7/1/2024 -- 15:23:17 - <Info> -- Using Suricata configuration /etc/suricata/suricata.yaml 7/1/2024 -- 15:23:17 - <Info> -- Using /usr/share/suricata/rules for Suricata provided rules. 7/1/2024 -- 15:23:17 - <Info> -- Found Suricata version 7.0.2 at /usr/bin/suricata. 7/1/2024 -- 15:23:17 - <Info> -- Downloading https://www.openinfosecfoundation.org/rules/index.yaml 7/1/2024 -- 15:23:18 - <Info> -- Adding all sources 7/1/2024 -- 15:23:18 - <Info> -- Saved /var/lib/suricata/update/cache/index.yaml |
SURICATAのすべてのルールセット・プロバイダーをリストアップ
|
1 2 3 4 5 6 7 8 9 10 11 12 13 14 15 16 17 18 19 20 21 22 23 24 25 26 27 28 29 30 31 32 33 34 35 36 37 38 39 40 41 42 43 44 45 46 47 48 49 50 51 52 53 54 55 56 57 58 59 |
# suricata-update list-sources Name: et/open Vendor: Proofpoint Summary: Emerging Threats Open Ruleset License: MIT Name: et/pro Vendor: Proofpoint Summary: Emerging Threats Pro Ruleset License: Commercial Replaces: et/open Parameters: secret-code Subscription: https://www.proofpoint.com/us/threat-insight/et-pro-ruleset Name: oisf/trafficid Vendor: OISF Summary: Suricata Traffic ID ruleset License: MIT Name: scwx/enhanced Vendor: Secureworks Summary: Secureworks suricata-enhanced ruleset License: Commercial Parameters: secret-code Subscription: https://www.secureworks.com/contact/ (Please reference CTU Countermeasures) Name: scwx/malware Vendor: Secureworks Summary: Secureworks suricata-malware ruleset License: Commercial Parameters: secret-code Subscription: https://www.secureworks.com/contact/ (Please reference CTU Countermeasures) Name: scwx/security Vendor: Secureworks Summary: Secureworks suricata-security ruleset License: Commercial Parameters: secret-code Subscription: https://www.secureworks.com/contact/ (Please reference CTU Countermeasures) Name: sslbl/ssl-fp-blacklist Vendor: Abuse.ch Summary: Abuse.ch SSL Blacklist License: Non-Commercial Name: sslbl/ja3-fingerprints Vendor: Abuse.ch Summary: Abuse.ch Suricata JA3 Fingerprint Ruleset License: Non-Commercial Name: etnetera/aggressive Vendor: Etnetera a.s. Summary: Etnetera aggressive IP blacklist License: MIT Name: tgreen/hunting Vendor: tgreen Summary: Threat hunting rules License: GPLv3 Name: malsilo/win-malware Vendor: malsilo Summary: Commodity malware rules License: MIT Name: stamus/lateral Vendor: Stamus Networks Summary: Lateral movement rules License: GPL-3.0-only |
License: Commercial のルールは有償です。et/openルールをフェッチする
|
1 2 3 4 5 6 7 8 |
# suricata-update enable-source et/open 7/1/2024 -- 15:28:24 - <Info> -- Using data-directory /var/lib/suricata. 7/1/2024 -- 15:28:24 - <Info> -- Using Suricata configuration /etc/suricata/suricata.yaml 7/1/2024 -- 15:28:24 - <Info> -- Using /usr/share/suricata/rules for Suricata provided rules. 7/1/2024 -- 15:28:24 - <Info> -- Found Suricata version 7.0.2 at /usr/bin/suricata. 7/1/2024 -- 15:28:24 - <Info> -- Creating directory /var/lib/suricata/update/sources 7/1/2024 -- 15:28:24 - <Info> -- Source et/open enabled |
et/openルールセットをロードし、killコマンドを実行して再起動せずにルールを更新する
|
1 2 |
# suricata-update # kill -usr2 $(pidof suricata) |
2.5 Suricataテスト
|
1 2 3 4 5 6 7 8 9 10 11 12 13 14 |
# suricata -T -c /etc/suricata/suricata.yaml -v Notice: suricata: This is Suricata version 7.0.2 RELEASE running in SYSTEM mode Info: cpu: CPUs/cores online: 2 Info: suricata: Running suricata under test mode Info: suricata: Setting engine mode to IDS mode by default Info: exception-policy: master exception-policy set to: auto Info: logopenfile: fast output device (regular) initialized: fast.log Info: logopenfile: eve-log output device (regular) initialized: eve.json Info: logopenfile: stats output device (regular) initialized: stats.log Info: detect: 1 rule files processed. 36018 rules successfully loaded, 0 rules failed Info: threshold-config: Threshold config parsed: 0 rule(s) found Info: detect: 36021 signatures processed. 1242 are IP-only rules, 4916 are inspecting packet payload, 29651 inspect application layer, 108 are decoder event only Notice: suricata: Configuration provided was successfully loaded. Exiting. |
2.6 SuricataがIDSモード動作確認テスト
TestMyNIDSのウェブサイトを使う
|
1 2 |
# curl http://testmynids.org/uid/index.html uid=0(root) gid=0(root) groups=0(root) |
Suricataのログから該当するアラートを確認
|
1 2 3 4 |
# tail /var/log/suricata/fast.log 01/07/2024-15:33:06.919915 [**] [1:2013028:7] ET POLICY curl User-Agent Outbound [**] [Classification: Attempted Information Leak] [Priority: 2] {TCP} 192.168.11.100:51686 -> 18.65.159.120:80 01/07/2024-15:33:06.935314 [**] [1:2100498:7] GPL ATTACK_RESPONSE id check returned root [**] [Classification: Potentially Bad Traffic] [Priority: 2] {TCP} 18.65.159.120:80 -> 192.168.11.100:51686 |
GPL ATTACK_RESPONSEアラートをログに記録されています
JSON形式でイベントを記録するとより読みやすい形式でログを提供します。この形式でログを表示するために、jqユーティリティをインストールする
|
1 |
# apt install jq |
上記の特定のログを検索する
|
1 2 3 4 5 6 7 8 9 10 11 12 13 14 15 16 17 18 19 20 21 22 23 24 25 26 27 28 29 30 31 32 33 34 35 36 37 38 39 40 41 42 43 44 45 46 47 48 49 50 51 52 53 54 55 56 57 58 59 60 61 62 63 64 65 |
# jq 'select(.alert .signature=="GPL ATTACK_RESPONSE id check returned root")' /var/log/suricata/eve.json { "timestamp": "2024-01-07T15:33:06.935314+0900", "flow_id": 631957865735737, "in_iface": "ens33", "event_type": "alert", "src_ip": "18.65.159.120", "src_port": 80, "dest_ip": "192.168.11.100", "dest_port": 51686, "proto": "TCP", "pkt_src": "wire/pcap", "community_id": "1:NwYdogpJoF9sxiURtdK7du2XOv4=", "alert": { "action": "allowed", "gid": 1, "signature_id": 2100498, "rev": 7, "signature": "GPL ATTACK_RESPONSE id check returned root", "category": "Potentially Bad Traffic", "severity": 2, "metadata": { "created_at": [ "2010_09_23" ], "updated_at": [ "2010_09_23" ] } }, "http": { "hostname": "testmynids.org", "url": "/uid/index.html", "http_user_agent": "curl/7.81.0", "http_content_type": "text/html", "http_method": "GET", "protocol": "HTTP/1.1", "status": 200, "length": 39 }, "files": [ { "filename": "/uid/index.html", "gaps": false, "state": "CLOSED", "stored": false, "size": 39, "tx_id": 0 } ], "app_proto": "http", "direction": "to_client", "flow": { "pkts_toserver": 6, "pkts_toclient": 5, "bytes_toserver": 496, "bytes_toclient": 876, "start": "2024-01-07T15:33:06.868035+0900", "src_ip": "192.168.11.100", "dest_ip": "18.65.159.120", "src_port": 51686, "dest_port": 80 } } |
2.7 SuricataをIPSに設定する
悪意のあるネットワーク・トラフィックをドロップするようにSuricataをIPSモードで起動するように設定する
|
1 2 3 4 5 6 7 |
# vi /etc/default/suricata 16行目LISTENMODE=af-packetを、#でコメントアウトしLISTENMODE=nfqueueを追加 #LISTENMODE=af-packet LISTENMODE=nfqueue # Interface to listen on (for pcap mode) IFACE=eth0 |
Suricataを再起動
|
1 |
# service suricata restart |
SuricataサービスのステータスでSuricataがIPSモードで動作していることを確認する
|
1 2 3 4 5 6 7 8 9 10 11 12 13 14 15 16 |
# service suricata status ● suricata.service - LSB: Next Generation IDS/IPS Loaded: loaded (/etc/init.d/suricata; generated) Active: active (running) since Sun 2024-01-07 15:41:53 JST; 11s ago Docs: man:systemd-sysv-generator(8) Process: 3272 ExecStart=/etc/init.d/suricata start (code=exited, status=0/SUCCESS) Tasks: 1 (limit: 4515) Memory: 238.2M CPU: 11.670s CGroup: /system.slice/suricata.service mq3279 /usr/bin/suricata -c /etc/suricata/suricata.yaml --pidfile /var/run/suricata.pid -q 0> Jan 07 15:41:53 lepard systemd[1]: Starting LSB: Next Generation IDS/IPS... Jan 07 15:41:53 lepard suricata[3272]: Starting suricata in IPS (nfqueue) mode... done. Jan 07 15:41:53 lepard systemd[1]: Started LSB: Next Generation IDS/IPS. |
2.8 入ってくるネットワーク・トラフィックをSuricataのNFQUEUEに向ける
|
1 2 3 4 5 6 7 8 9 10 11 12 13 14 15 16 17 18 |
# vi /etc/ufw/before.rules # Don't delete these required lines, otherwise there will be errors *filter :ufw-before-input - [0:0] :ufw-before-output - [0:0] :ufw-before-forward - [0:0] :ufw-not-local - [0:0] # End required lines 以下の行を追加する ## Start Suricata NFQUEUE rules -I INPUT 1 -p tcp --dport 22 -j NFQUEUE --queue-bypass -I OUTPUT 1 -p tcp --sport 22 -j NFQUEUE --queue-bypass -I FORWARD -j NFQUEUE -I INPUT 2 -j NFQUEUE -I OUTPUT 2 -j NFQUEUE ## End Suricata NFQUEUE rules |
ファイアウォールを有効にして、先ほど設定した新しいルールをリロードする
|
1 2 |
# ufw enable Firewall is active and enabled on system startup |
2.9 カスタムルールを作成しトラフィックがドロップされるかどうかを確認する
カスタムルール新規作成
ホストへのICMPリクエストをすべてドロップする
|
1 2 |
# vi /var/lib/suricata/rules/local.rules drop ICMP any any -> $HOME_NET any (msg: “Blocked ICMP Request”; sid:2; rev:1;) |
カスタムルールをSURICATAの設定ファイルに追加
|
1 2 3 4 5 6 |
# vi /etc/suricata/suricata.yaml 2148行目に追加 rule-files: - suricata.rules - local.rules |
Suricataのルールを再読み込み
|
1 |
# kill -usr2 $(pidof suricata) |
設定をテストする
|
1 2 3 4 5 6 7 8 9 10 11 12 13 14 |
# suricata -T -c /etc/suricata/suricata.yaml -v Notice: suricata: This is Suricata version 7.0.2 RELEASE running in SYSTEM mode Info: cpu: CPUs/cores online: 2 Info: suricata: Running suricata under test mode Info: suricata: Setting engine mode to IDS mode by default Info: exception-policy: master exception-policy set to: auto Info: logopenfile: fast output device (regular) initialized: fast.log Info: logopenfile: eve-log output device (regular) initialized: eve.json Info: logopenfile: stats output device (regular) initialized: stats.log Info: detect: 2 rule files processed. 36019 rules successfully loaded, 0 rules failed Info: threshold-config: Threshold config parsed: 0 rule(s) found Info: detect: 36022 signatures processed. 1243 are IP-only rules, 4916 are inspecting packet payload, 29651 inspect application layer, 108 are decoder event only Notice: suricata: Configuration provided was successfully loaded. Exiting. |
pingリクエストを実行し、パケットがドロップされることを確認
Windowsマシンから、Suricataホストにpingリクエストを実行する
|
1 |
# ping 192.168.1.100 |
ログを確認すると下記のようにDropされている
|
1 2 3 4 |
01/07/2024-17:38:14.382320 [Drop] [**] [1:2:1] Blocked ICMP Request [**] [Classification: (null)] [Priority: 3] {ICMP} 192.168.11.22:8 -> 192.168.11.100:0 01/07/2024-17:40:42.762828 [Drop] [**] [1:2:1] Blocked ICMP Request [**] [Classification: (null)] [Priority: 3] {ICMP} 192.168.11.22:8 -> 192.168.11.100:0 01/07/2024-17:44:36.458539 [Drop] [**] [1:2:1] Blocked ICMP Request [**] [Classification: (null)] [Priority: 3] {ICMP} 192.168.11.22:8 -> 192.168.11.100:0 01/07/2024-17:45:30.507651 [Drop] [**] [1:2:1] Blocked ICMP Request [**] [Classification: (null)] [Priority: 3] {ICMP} 192.168.11.22:8 -> 192.168.11.100:0 |
ELK StackとSURICATAの統合
Elastic Stackをインストール&設定して、SURICATAのログをより効率的に可視化&検索できるようにする
本セクションは基本的には2台目のUbuntuサーバーで行います
1. Elasticsearchのインストール
1.1 公開署名キーをダウンロードしてインストール
|
1 |
# wget -qO - https://artifacts.elastic.co/GPG-KEY-elasticsearch | gpg --dearmor -o /usr/share/keyrings/elasticsearch-keyring.gpg |
1.2 リポジトリ定義を/etc/apt/sources.list.d/elastic-8.x.listに保存
|
1 |
# echo "deb [signed-by=/usr/share/keyrings/elasticsearch-keyring.gpg] https://artifacts.elastic.co/packages/8.x/apt stable main" | tee /etc/apt/sources.list.d/elastic-8.x.list |
1.3 Elasticsearch パッケージをインストール
|
1 |
# apt update && apt install elasticsearch |
2. Elasticsearch 設定
2.1 Elasticsearch 設定ファイルを編集
|
1 2 3 4 5 6 7 8 9 10 11 12 |
# vi /etc/elasticsearch/elasticsearch.yml 57行目追加 : Elastic Stackサーバーのipアドレスを入力 network.host: 192.168.11.101 62行目コメント解除 http.port: 9200 xpack.security.enabledとxpack.security.enrollment.enabledを一時無効にする 93行目変更 xpack.security.enabled: false 95行目変更 xpack.security.enrollment.enabled: false |
ファイルを保存する
2.2 Elasticsearchサービスを有効にして確認
|
1 2 3 4 5 6 7 8 9 10 11 12 13 14 15 16 17 18 19 20 21 22 |
# systemctl start elasticsearch.service Elasticsearch Hostにcurlリクエストを送る # curl -X GET "192.168.11.101:9200" { "name" : "panser", "cluster_name" : "elasticsearch", "cluster_uuid" : "aw-y_jjzQAKnqjZdPLCFVw", "version" : { "number" : "8.11.3", "build_flavor" : "default", "build_type" : "deb", "build_hash" : "64cf052f3b56b1fd4449f5454cb88aca7e739d9a", "build_date" : "2023-12-08T11:33:53.634979452Z", "build_snapshot" : false, "lucene_version" : "9.8.0", "minimum_wire_compatibility_version" : "7.17.0", "minimum_index_compatibility_version" : "7.0.0" }, "tagline" : "You Know, for Search" } |
Elasticsearch バージョン8.11.3が稼働している
2.3 Elasticsearch 設定ファイルを再度編集
|
1 2 3 4 5 6 7 8 9 10 11 12 13 14 15 |
# vi /etc/elasticsearch/elasticsearch.yml xpack.securityを有効に戻す 93行目変更 xpack.security.enabled: true 95行目変更 xpack.security.enrollment.enabled: true 101行目に追加 xpack.security.http.ssl: enabled: true keystore.path: certs/http.p12 verification_mode: none 106行目変更 verification_mode: none |
ファイルを保存し、 elasticsearch.serviceを再起動
|
1 |
# systemctl restart elasticsearch.service |
2.4 elasticとkibana_systemのパスワードを作成
elasticユーザとkibana_systemユーザのパスワードは後で使用するので必ずコピーしておく
kibana_systemユーザはKibanaの設定に使用する
elasticユーザはFilebeat、Auditbeatの設定およびKibanaへのログインに使用する
パスワードを忘れた場合は、上記のコマンドを使用してパスワードをリセットできます。
[elastic] userのパスワード作成
|
1 2 3 4 5 6 7 8 9 |
# cd /usr/share/elasticsearch/bin # ./elasticsearch-reset-password -u elastic This tool will reset the password of the [elastic] user to an autogenerated value. The password will be printed in the console. Please confirm that you would like to continue [y/N]y Password for the [elastic] user successfully reset. New value: cVWkIEXS6jtX0HpOKekw |
[kibana_system]userのパスワード作成
|
1 2 3 4 5 6 7 8 9 |
# cd /usr/share/elasticsearch/bin # ./elasticsearch-reset-password -u kibana_system This tool will reset the password of the [kibana_system] user to an autogenerated value. The password will be printed in the console. Please confirm that you would like to continue [y/N]y Password for the [kibana_system] user successfully reset. New value: Fd3Rek+A7Q9sipbCkgWd |
3. Kibana の設定
Kibana は Elasticsearch をインストールした後にインストールする。
Kibana は Elasticsearch と同じマシンにインストールする
3.1 Kibanaインストール
|
1 2 3 4 5 6 7 8 9 10 11 12 13 14 15 16 17 18 19 20 21 |
# apt install kibana Reading package lists... Done Building dependency tree... Done Reading state information... Done The following NEW packages will be installed: kibana 0 upgraded, 1 newly installed, 0 to remove and 2 not upgraded. Need to get 315 MB of archives. After this operation, 912 MB of additional disk space will be used. Get:1 https://artifacts.elastic.co/packages/8.x/apt stable/main amd64 kibana amd64 8.11.3 [315 MB] Fetched 315 MB in 23s (13.6 MB/s) Selecting previously unselected package kibana. (Reading database ... 76544 files and directories currently installed.) Preparing to unpack .../kibana_8.11.3_amd64.deb ... Unpacking kibana (8.11.3) ... Setting up kibana (8.11.3) ... Creating kibana group... OK Creating kibana user... OK Kibana is currently running with legacy OpenSSL providers enabled! For details and instructions on how to disable see https://www.elastic.co/guide/en/kibana/8.11/production.html#openssl-legacy-provider Created Kibana keystore in /etc/kibana/kibana.keystore |
3.2 xpack.security設定と暗号化キーを作成
暗号化キーをコピーしておく
|
1 2 3 4 5 6 |
# cd /usr/share/kibana/bin/ # ./kibana-encryption-keys generate -q xpack.encryptedSavedObjects.encryptionKey: 8d8d3611446878183b8da9a3d1084978 xpack.reporting.encryptionKey: de3e90407d9dc990b5f8b448fccc0c0e xpack.security.encryptionKey: 5459621557bd7f5ef114d4f4c7f951a2 |
kibana.yml設定ファイルに暗号化キーを追加する
|
1 2 3 4 5 6 7 8 9 10 |
# vi /etc/kibana/kibana.yml 最終行に暗号化キーを追加 # Maximum number of documents loaded by each shard to generate autocomplete suggestions. # This value must be a whole number greater than zero. Defaults to 100_000 #unifiedSearch.autocomplete.valueSuggestions.terminateAfter: 100000 xpack.encryptedSavedObjects.encryptionKey: 8d8d3611446878183b8da9a3d1084978 xpack.reporting.encryptionKey: de3e90407d9dc990b5f8b448fccc0c0e xpack.security.encryptionKey: 5459621557bd7f5ef114d4f4c7f951a2 |
3.3 その他kibana.yml設定ファイル編集
|
1 2 3 4 5 6 7 8 9 10 11 12 13 14 15 16 17 |
# vi /etc/kibana/kibana.yml 6行目コメント解除 server.port: 5601 12行目 Elastic StackのIPアドレス(192.168.11.101)に置き換え server.host: "192.168.11.101" 44行目に追加 elasticsearch.hosts: ["https://192.168.11.101:9200"] 49,50行目コメント解除し、elasticsearch.username はデフォルト(kibana_system)のままで、elasticsearch.password を作成したkibana_systemのパスワードに変更 elasticsearch.username: "kibana_system" elasticsearch.password: "Fd3Rek+A7Q9sipbCkgWd" 96行目に追加 Kibana が Elasticsearch にアウトバウンド SSL/TSL 接続を行う際にホスト名の検証がスキップされる #elasticsearch.ssl.verificationMode: full elasticsearch.ssl.verificationMode: 'none' |
ファイル保存
3.4 Kibanaサービスを開始
|
1 |
# systemctl start kibana.service |
Kibana.serviceのステータスを確認
|
1 2 3 4 5 6 7 8 9 10 11 12 |
# systemctl status kibana.service ● kibana.service - Kibana Loaded: loaded (/lib/systemd/system/kibana.service; disabled; vendor prese> Active: active (running) since Mon 2024-01-08 11:43:18 JST; 40s ago Docs: https://www.elastic.co Main PID: 18337 (node) Tasks: 11 (limit: 4515) Memory: 746.5M CPU: 21.053s CGroup: /system.slice/kibana.service mq18337 /usr/share/kibana/bin/../node/bin/node /usr/share/kibana/b> |
3.5 http,httpsポート開放
|
1 2 3 |
# ufw allow http # ufw allow https # ufw reload |
4. Kibanaのウェブページ起動確認
ウェブ・ブラウザにアクセスし、Kibanaが正しく起動していることを確認する。"http://192.168.11.101:5601"と入力してKibanaにアクセスしてみる。ただし、5601ポートを開放しておく
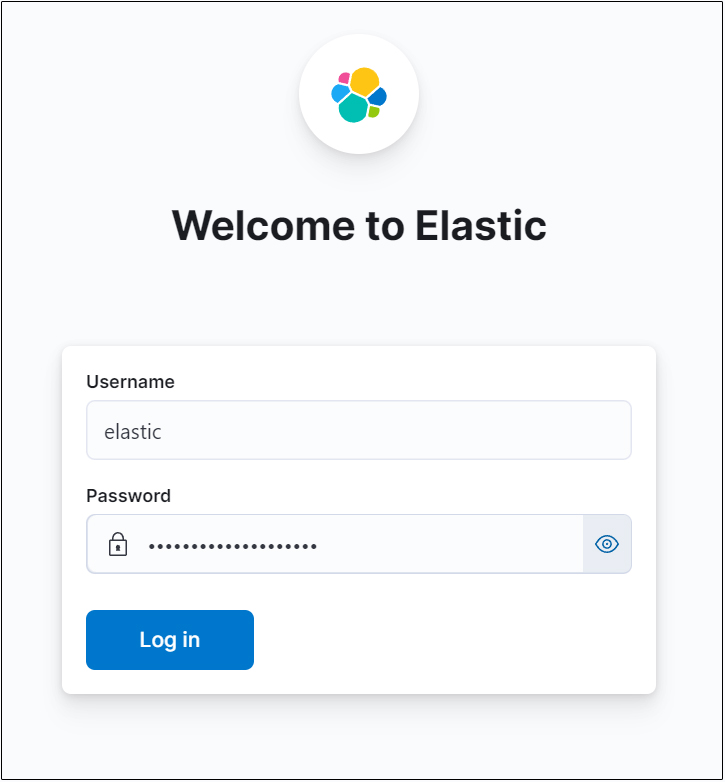
Usernameはelastic、Passwordはelastic用に作成したものでログイン

"Add integrations"選択しEnter
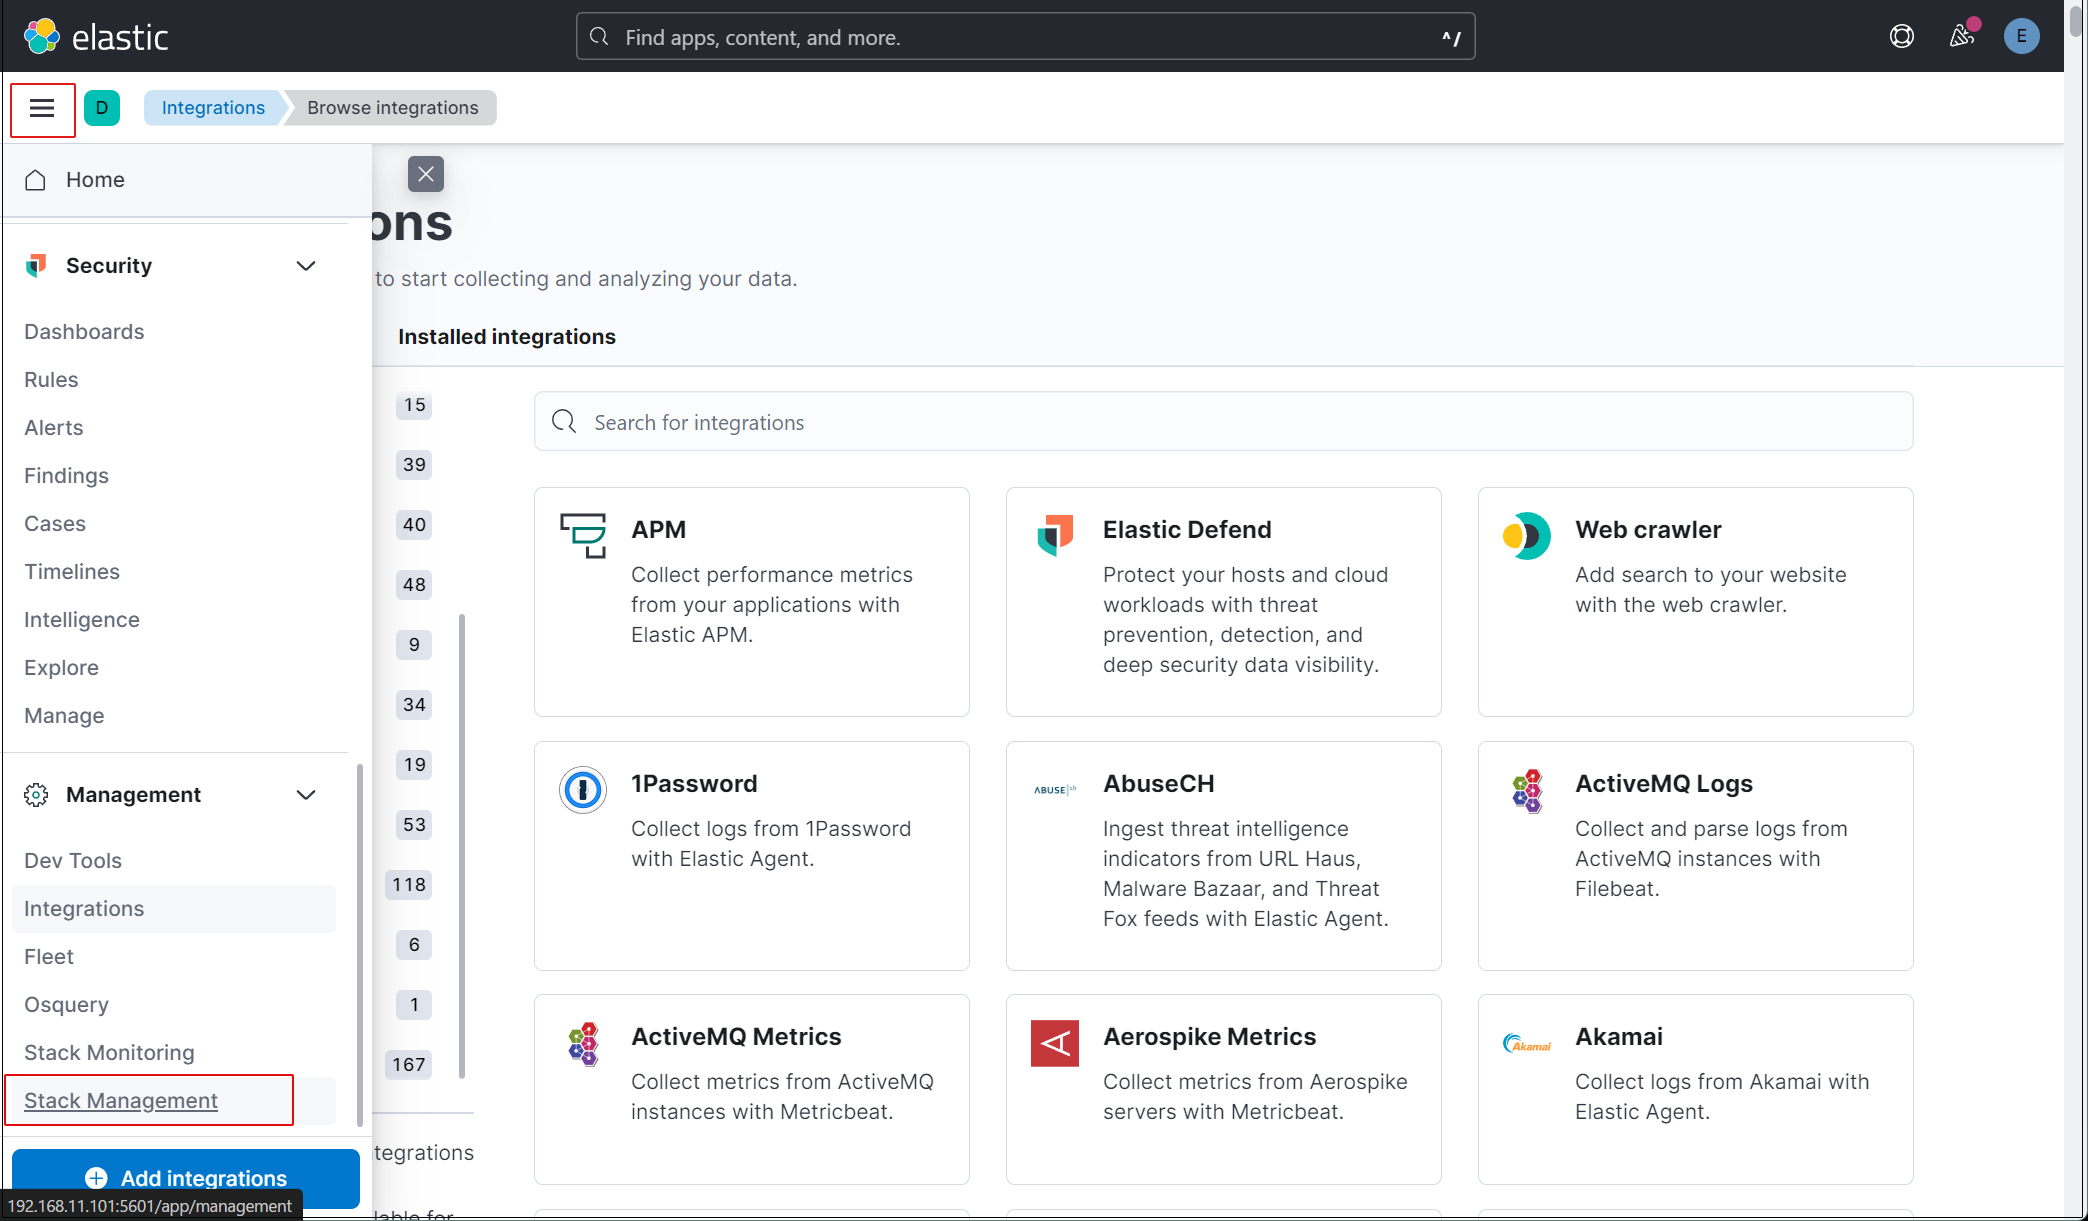
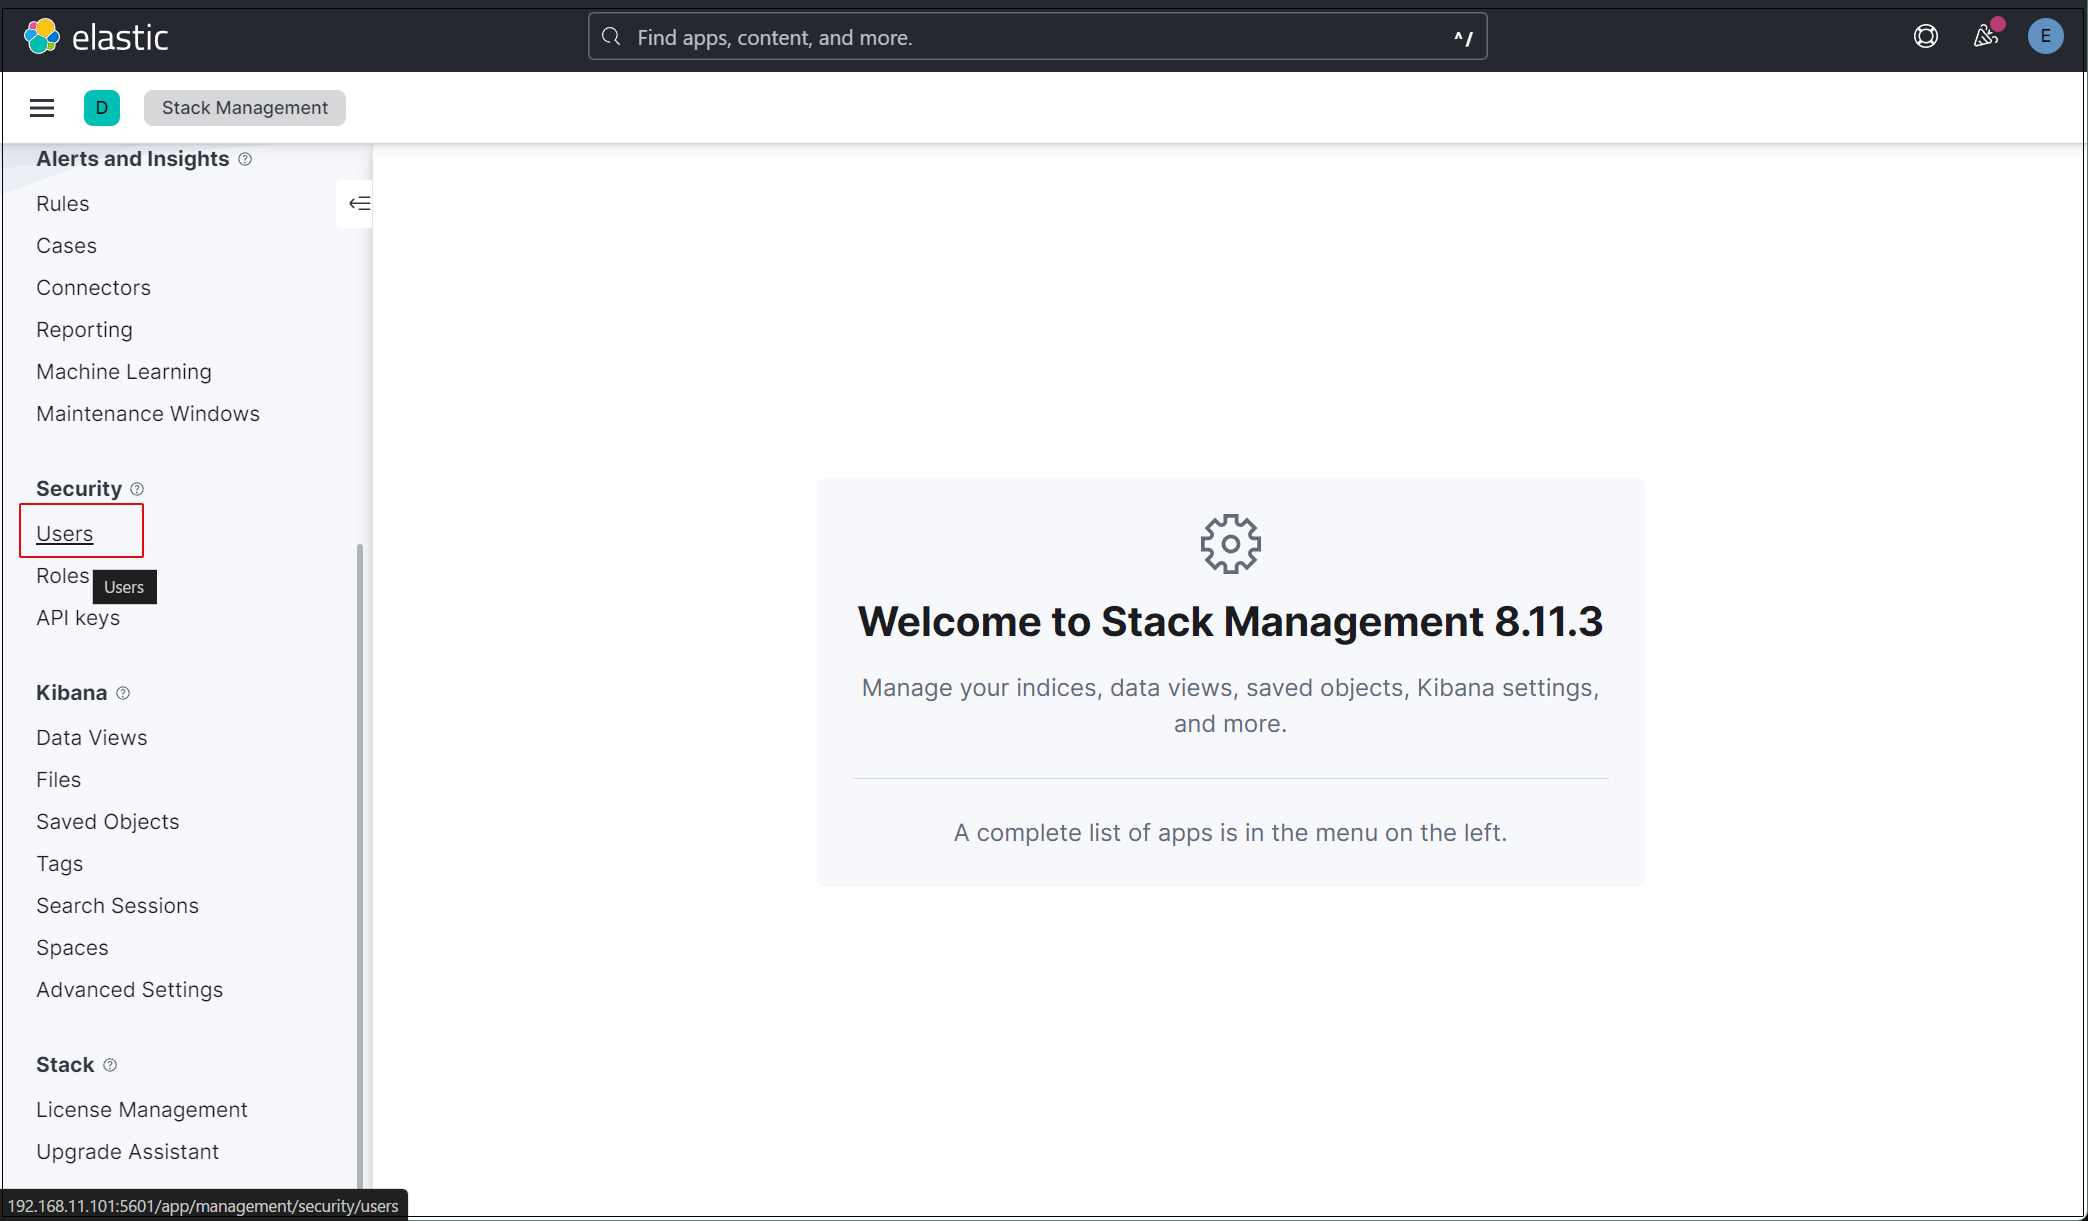
elasticスーパーユーザーアカウントを使う必要がないように、新しいユーザーアカウントを作成します。
メインメニューを開き、Stack Management > Users
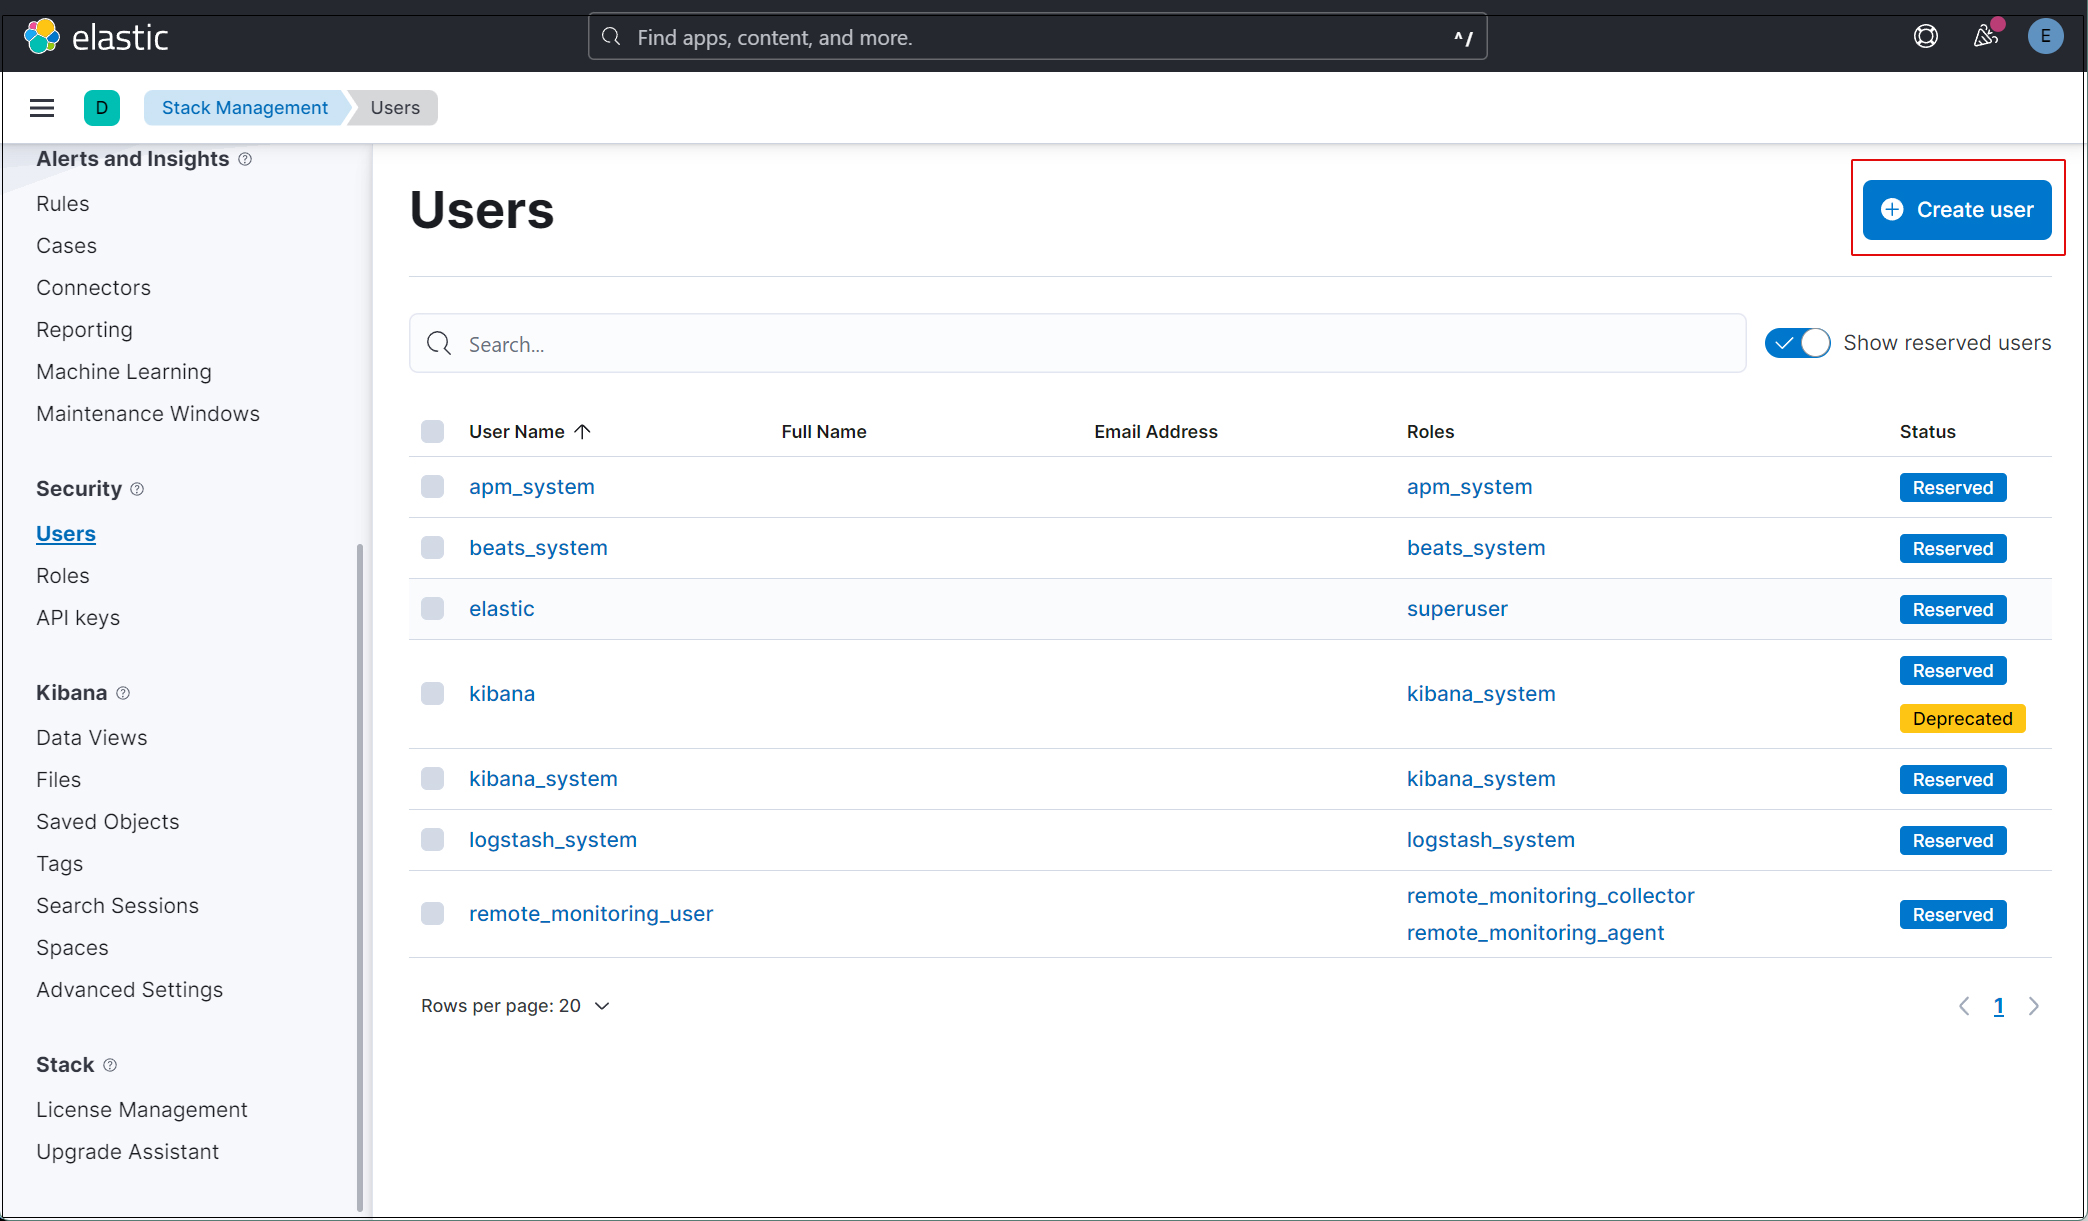
右上の"Create user"ボタンをクリック
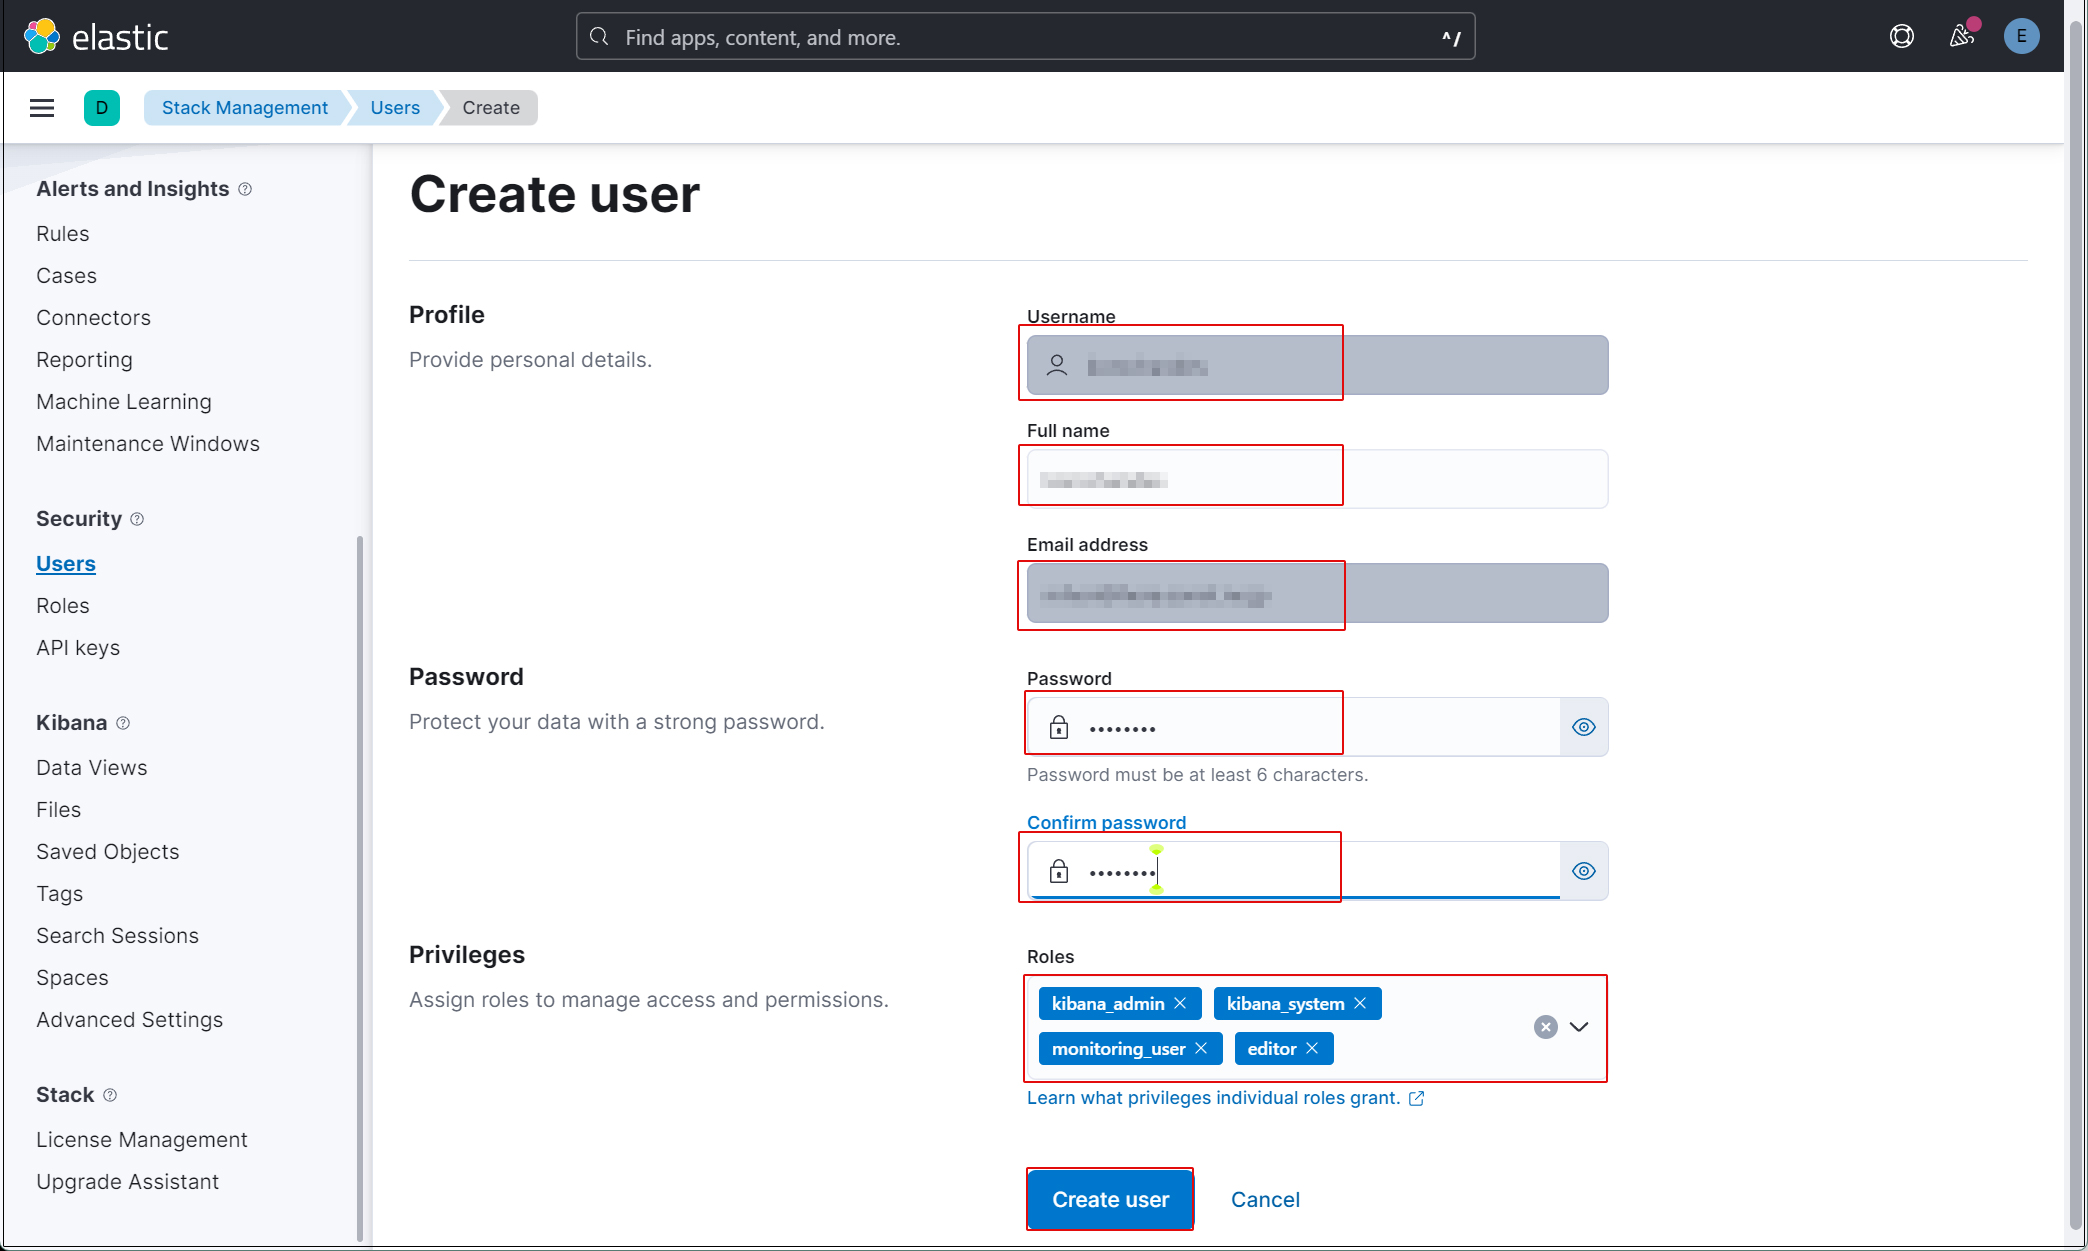
新規ユーザー情報を入力し、Privilegesでkibana_admin、kibana_system、monitoring_user、editorのロールを割り当てる
現在のプロファイルからログアウトし、新しく作成したユーザーアカウントでログインできることを確認する。現在、SURICATAのホストでFilebeatとAuditbeatを設定していないため、Kibanaで表示できるデータがありません。
Filebeat & Auditbeat インストールと設定
本作業はSuricataをインストールした1台目のUbuntuサーバーで作業する
1. Filebeat インストール
1.1 パブリック署名キーをダウンロード
|
1 |
# wget -qO - https://artifacts.elastic.co/GPG-KEY-elasticsearch | apt-key add - |
1.2 リポジトリ定義を/etc/apt/sources.list.d/elastic-8.x.listに保存
|
1 |
# echo "deb https://artifacts.elastic.co/packages/8.x/apt stable main" | tee -a /etc/apt/sources.list.d/elastic-8.x.list |
1.3 Filebeatをインストール
|
1 2 3 4 5 6 7 8 9 10 11 12 13 14 15 16 17 18 19 20 21 22 23 24 25 26 27 28 29 30 31 32 |
# apt update && apt install filebeat Get:1 https://artifacts.elastic.co/packages/8.x/apt stable InRelease [10.4 kB] Hit:2 http://jp.archive.ubuntu.com/ubuntu jammy InRelease Get:3 http://jp.archive.ubuntu.com/ubuntu jammy-updates InRelease [119 kB] Get:4 https://artifacts.elastic.co/packages/8.x/apt stable/main amd64 Packages [77.8 kB] Hit:5 https://ppa.launchpadcontent.net/oisf/suricata-stable/ubuntu jammy InRelease Hit:6 http://jp.archive.ubuntu.com/ubuntu jammy-backports InRelease Get:7 http://jp.archive.ubuntu.com/ubuntu jammy-security InRelease [110 kB] Fetched 317 kB in 3s (124 kB/s) Reading package lists... Done Building dependency tree... Done Reading state information... Done 2 packages can be upgraded. Run 'apt list --upgradable' to see them. W: https://artifacts.elastic.co/packages/8.x/apt/dists/stable/InRelease: Key is stored in legacy trusted.gpg keyring (/etc/apt/trusted.gpg), see the DEPRECATION section in apt-key(8) for details. Reading package lists... Done Building dependency tree... Done Reading state information... Done The following packages were automatically installed and are no longer required: libip6tc2 libnetfilter-conntrack3 Use 'apt autoremove' to remove them. The following NEW packages will be installed: filebeat 0 upgraded, 1 newly installed, 0 to remove and 2 not upgraded. Need to get 50.1 MB of archives. After this operation, 183 MB of additional disk space will be used. Get:1 https://artifacts.elastic.co/packages/8.x/apt stable/main amd64 filebeat amd64 8.11.3 [50.1 MB] Fetched 50.1 MB in 4s (11.7 MB/s) Selecting previously unselected package filebeat. (Reading database ... 74331 files and directories currently installed.) Preparing to unpack .../filebeat_8.11.3_amd64.deb ... Unpacking filebeat (8.11.3) ... Setting up filebeat (8.11.3) ... |
1.4 FilebeatをElasticsearchとKibanaに接続するように設定
|
1 2 3 4 5 6 7 8 9 10 11 12 13 14 15 16 17 |
# vi /etc/filebeat/filebeat.yml 114行目コメント解除し、Elastic StackのIPアドレスとKibanaのポート番号(5601)を入力 host: "192.168.11.101:5601" 141行目 Elastic Stack のipアドレスとelasticsearchのポート番号を入力 hosts: ["https://192.168.11.101:9200"] 144行目コメント解除 protocol: "https" 148,149行目コメント解除し、[username]はデフォルトのままにし、[password]は[elastic]ユーザーのパスワードを入力する username: "elastic" password: “cVWkIEXS6jtX0HpOKekw " 150行目に追加 ssl.verification_mode: “none” |
FilebeatのSuricataモジュールを有効にしますが、Elasticsearch 8.xでは、モジュールのインポートにバグがあるため、.ymlファイルからSuricataモジュールをインポートします
|
1 2 3 4 5 6 7 8 9 10 11 12 13 14 15 16 17 18 19 |
# vi /etc/filebeat/filebeat.yml 57行目当たりのFilebeatモジュールのセクションをすべてコメントアウトし、reload.periodの下に以下の行を追加する: # ============================== Filebeat modules ============================== #filebeat.config.modules: # Glob pattern for configuration loading #path: ${path.config}/modules.d/*.yml # Set to true to enable config reloading #reload.enabled: false # Period on which files under path should be checked for changes #reload.period: 10s filebeat.modules: - module: suricata eve: enabled: true var.paths: ["/var/log/suricata/eve.json"] |
SURICATAモジュールを強制的に実行
|
1 2 |
# filebeat setup --pipelines --modules suricata -M "suricata.eve.enabled=true" -c /etc/filebeat/filebeat.yml Loaded Ingest pipelines |
1.5 初期環境をセットアップ
suricata-eve-* が表示されていることを確認
|
1 2 3 4 5 6 7 8 9 |
# filebeat setup -e {"log.level":"info","@timestamp":"2024-01-08T15:12:07.067+0900","log.logger":"modules","log.origin":{"file.name":"fileset/pipelines.go","file.line":135},"message":"Elasticsearch pipeline loaded.","service.name":"filebeat","pipeline":"filebeat-8.11.3-suricata-eve-pipeline","ecs.version":"1.6.0"} {"log.level":"info","@timestamp":"2024-01-08T15:12:07.068+0900","log.logger":"modules","log.origin":{"file.name":"fileset/pipelines.go","file.line":135},"message":"Elasticsearch pipeline loaded.","service.name":"filebeat","pipeline":"filebeat-8.11.3-suricata-eve-dns","ecs.version":"1.6.0"} {"log.level":"info","@timestamp":"2024-01-08T15:12:07.069+0900","log.logger":"modules","log.origin":{"file.name":"fileset/pipelines.go","file.line":135},"message":"Elasticsearch pipeline loaded.","service.name":"filebeat","pipeline":"filebeat-8.11.3-suricata-eve-dns-answer-v1","ecs.version":"1.6.0"} {"log.level":"info","@timestamp":"2024-01-08T15:12:07.070+0900","log.logger":"modules","log.origin":{"file.name":"fileset/pipelines.go","file.line":135},"message":"Elasticsearch pipeline loaded.","service.name":"filebeat","pipeline":"filebeat-8.11.3-suricata-eve-dns-answer-v2","ecs.version":"1.6.0"} {"log.level":"info","@timestamp":"2024-01-08T15:12:07.071+0900","log.logger":"modules","log.origin":{"file.name":"fileset/pipelines.go","file.line":135},"message":"Elasticsearch pipeline loaded.","service.name":"filebeat","pipeline":"filebeat-8.11.3-suricata-eve-tls","ecs.version":"1.6.0"} {"log.level":"info","@timestamp":"2024-01-08T15:12:07.072+0900","log.logger":"modules","log.origin":{"file.name":"fileset/pipelines.go","file.line":135},"message":"Elasticsearch pipeline loaded.","service.name":"filebeat","pipeline":"filebeat-8.11.3-suricata-eve-http","ecs.version":"1.6.0"} Loaded Ingest pipelines |
1.6 Filebeatサービスを開始
|
1 |
# systemctl start filebeat.service |
2. Auditbeatをインストールと設定
2.1 Auditbeatをインストール
|
1 |
# apt update && apt install auditbeat |
2.2 auditbeat.yml設定ファイル編集
|
1 2 3 4 5 6 7 8 9 10 11 12 13 14 15 16 17 |
# vi /etc/auditbeat/auditbeat.yml 122行目 コメント解除し Elastic Stack のIPアドレスとポート番号を入力 host: "192.168.11.101:5601" 149行目 Elastic Stack のipアドレスとelasticsearchのポート番号を入力 hosts: ["https://192.168.11.101:9200"] 152行目コメント解除 protocol: "https" 156,157行目コメント解除し、[username]はデフォルトのままにし、[password]は[elastic]ユーザーのパスワードを入力する username: "elastic" password: "cVWkIEXS6jtX0HpOKekw" 158行目に追加 ssl.verification_mode: "none" |
ファイル保存
2.3 Auditbeatを開始
|
1 |
# systemctl start auditbeat.service |
3. Kibanaで確認
作成したユーザーでKibanaにログインし直します。http://192.168.1.101:5601にアクセスします。
一番上の検索フィールドに「Suricata Events Overview」と入力し、Events Overviewをクリック
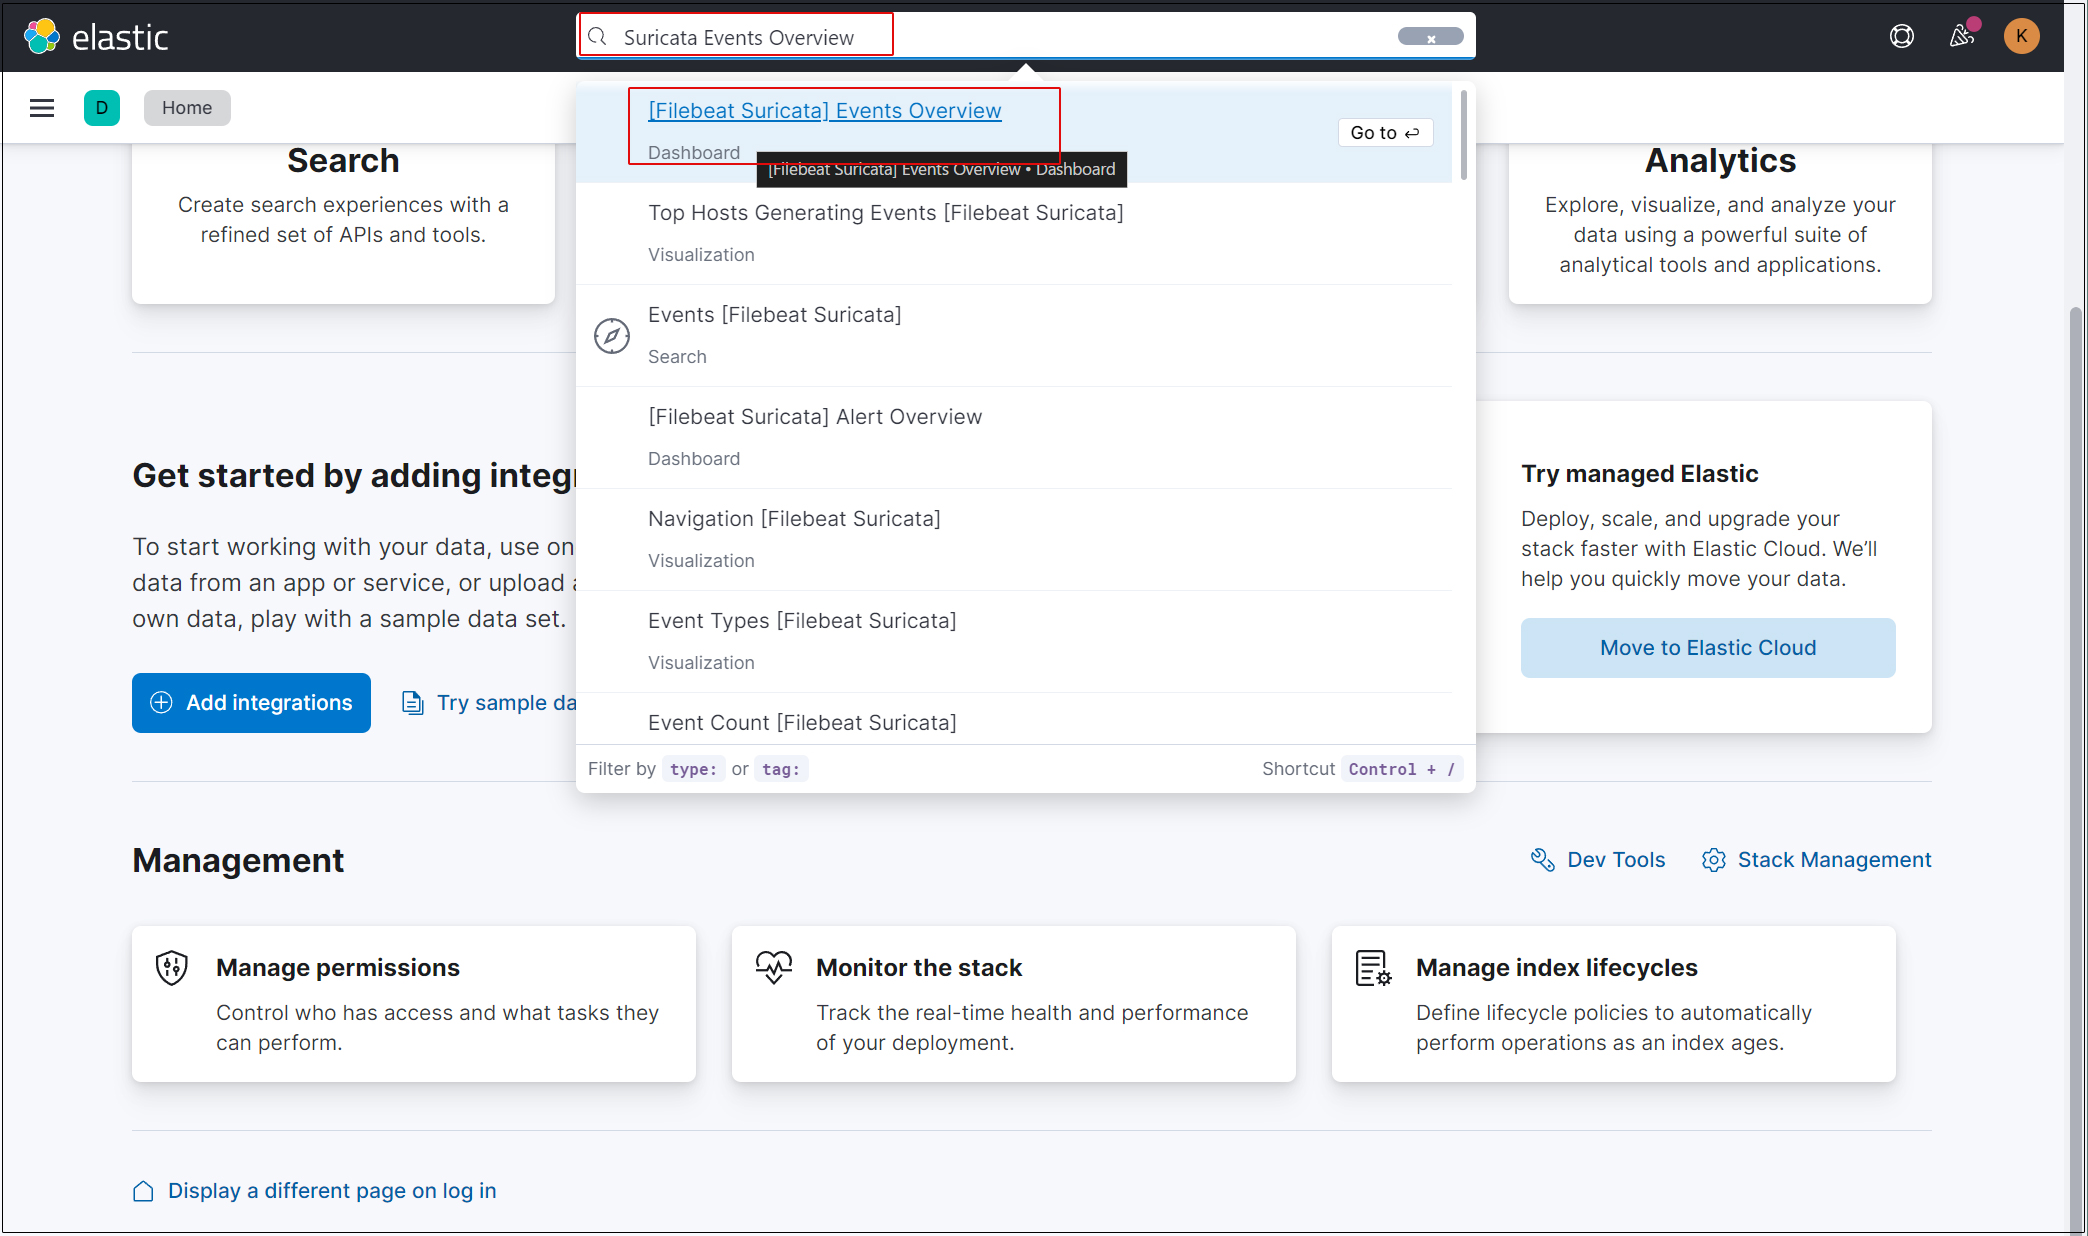
過去 15 分間のすべての Suricata イベントが表示されます
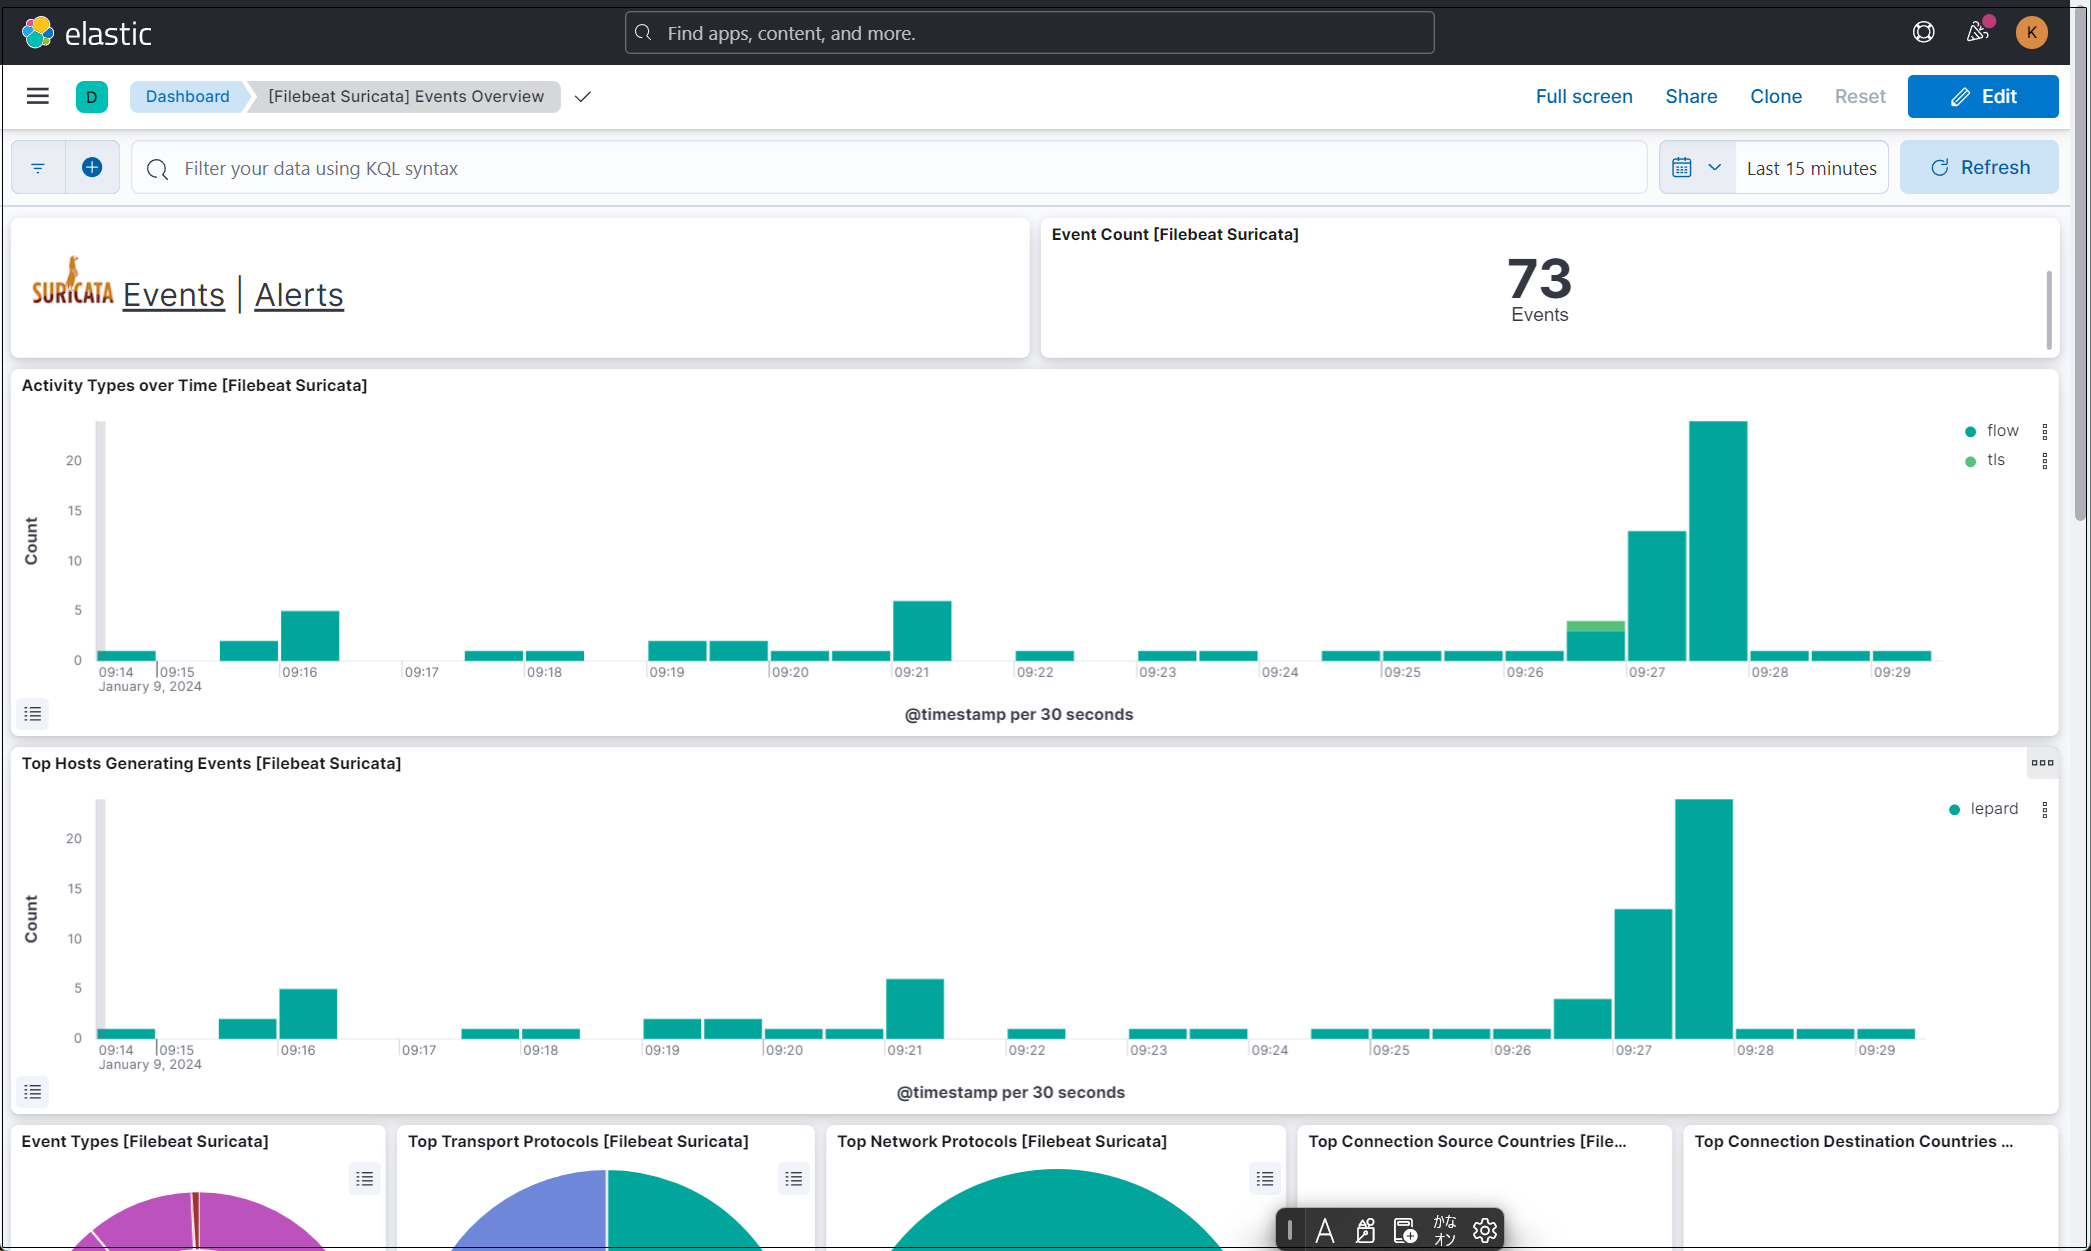
悪質なトラフィックのアラートを表示するにはSuricataロゴの横にあるAlertsテキストをクリック
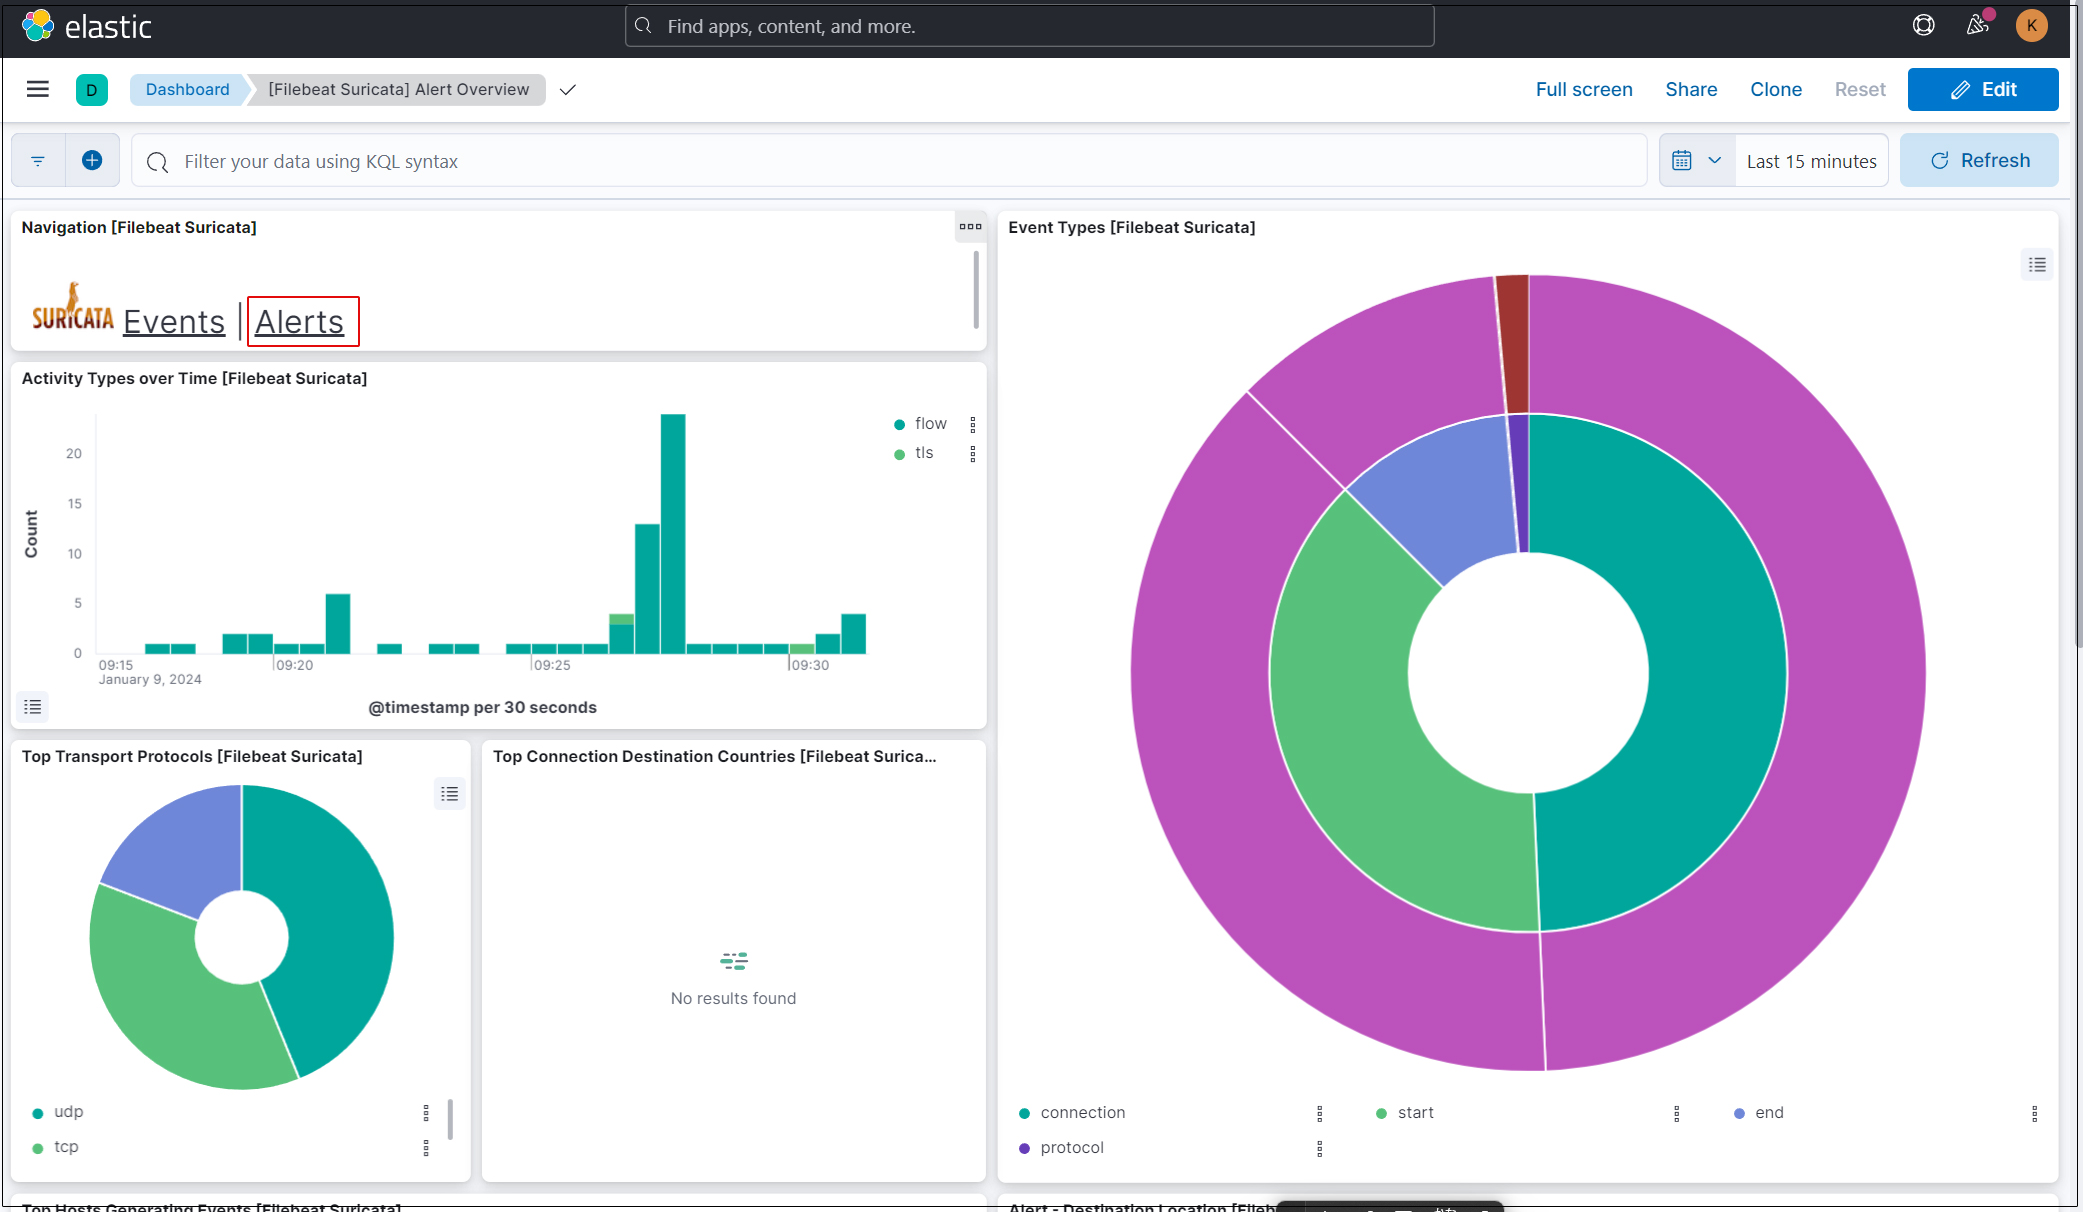
Kibana には、ログを視覚化するためのさまざまな機能とツールがありますのでいろいろと試してください。

