Nextcloudとは、DropboxやGoogle Driveのようなオンラインストレージを構築できるOSSで、PHPとJavaScriptで開発されていて、Linux上で動作します。Web画面は日本語で表示することができます。Nextcloudはオンプレミスやクラウドどちらでも構築が可能です。
今回はDebian11.7 オンプレミスサーバーに下記環境のもとにインストールします。
Apache2 SSL/TLS設定
PHP8
MariaDB
Contents
前提条件
1.Apache インストールと設定
|
1 |
# apt -y install apache2 |
|
1 2 |
# systemctl is-enabled apache2 # systemctl status apache2 |
Apache モジュールの ssl、rewrite、およびヘッダーを有効にします
|
1 2 3 4 5 6 7 8 9 10 11 12 13 14 |
# a2enmod ssl rewrite headers Considering dependency setenvif for ssl: Module setenvif already enabled Considering dependency mime for ssl: Module mime already enabled Considering dependency socache_shmcb for ssl: Enabling module socache_shmcb. Enabling module ssl. See /usr/share/doc/apache2/README.Debian.gz on how to configure SSL and create self-signed certificates. Enabling module rewrite. Enabling module headers. To activate the new configuration, you need to run: systemctl restart apache2 |
|
1 |
# systemctl restart apache2 |
新しい apache モジュールが適用されていることの確認
|
1 2 3 4 |
# apachectl -M | egrep "ssl|rewrite|headers" headers_module (shared) rewrite_module (shared) ssl_module (shared) |
2.PHP8.xインストール
2.1 パッケージをアップデート
|
1 2 |
# apt update # apt -y upgrade |
2.2 Debian システム用の PHP リポジトリを追加
|
1 |
# echo "deb https://packages.sury.org/php/ $(lsb_release -sc) main"\ | tee /etc/apt/sources.list.d/sury-php.list |
2.3 リポジトリキーをインポート
|
1 2 |
# apt install curl # curl -o /etc/apt/trusted.gpg.d/sury-php8.gpg https://packages.sury.org/php/apt.gpg |
2.4 パッケージを更新
|
1 2 |
# apt update # apt upgrade |
2.5 Nextcloud 用の PHP パッケージと追加の PHP モジュールをインストール
|
1 |
# apt install -y php php-curl php-cli php-mysql php-gd php-common php-xml php-json php-intl php-pear php-imagick php-dev php-common php-mbstring php-zip php-soap php-bz2 php-bcmath php-gmp php-apcu |
Nextcloud での SVG 画像処理のために php-imagick に必要なlibmagickcore-dev パッケージをインストール
|
1 |
# apt install -y libmagickcore-dev |
2.6 php.ini を編集
|
1 2 |
# cd /etc/php/8.2/apache2/ # vi php.ini |
|
1 2 3 4 5 6 7 8 9 10 11 12 13 14 15 16 17 18 19 20 21 22 23 24 25 26 |
846行目 file_uploads = On 866行目 allow_url_fopen = On 435行目 memory_limit = 512M 855行目 upload_max_filesize = 500M 703行目 post_max_size = 600M 409行目 max_execution_time = 300 508行目 display_errors = Off 979行目 date.timezone = Asia/Tokyo 226行目 output_buffering = Off 966行目 zend_extension=opcache オプションのコメントを外して、opcache 拡張機能をロードします。 zend_extension=opcache 1787行目 [opcache] セクションに移動し、次の構成を追加します。 [opcache] ... .... ..... 1789行目 opcache.enable = 1 1798行目 opcache.interned_strings_buffer = 8 1802行目 opcache.max_accelerated_files = 10000 1795行目 opcache.memory_consumption = 128 1827行目 opcache.save_comments = 1 1820行目 opcache.revalidate_freq = 1 |
3.MariaDB のインストール
3.1 Mariadb データベース サーバーをインストール
|
1 |
# apt install mariadb-server mariadb-client |
|
1 2 3 4 5 6 7 8 9 10 11 12 13 14 15 16 17 18 19 20 21 22 23 24 25 26 27 |
# systemctl is-enabled mariadb enabled # systemctl status mariadb ● mariadb.service - MariaDB 10.5.19 database server Loaded: loaded (/lib/systemd/system/mariadb.service; enabled; vendor prese> Active: active (running) since Sun 2023-06-11 12:36:02 JST; 9min ago Docs: man:mariadbd(8) https://mariadb.com/kb/en/library/systemd/ Process: 27278 ExecStartPre=/usr/bin/install -m 755 -o mysql -g root -d /va> Process: 27279 ExecStartPre=/bin/sh -c systemctl unset-environment _WSREP_S> Process: 27281 ExecStartPre=/bin/sh -c [ ! -e /usr/bin/galera_recovery ] &&> Process: 27346 ExecStartPost=/bin/sh -c systemctl unset-environment _WSREP_> Process: 27348 ExecStartPost=/etc/mysql/debian-start (code=exited, status=0> Main PID: 27329 (mariadbd) Status: "Taking your SQL requests now..." Tasks: 8 (limit: 2322) Memory: 74.0M CPU: 486ms CGroup: /system.slice/mariadb.service mq27329 /usr/sbin/mariadbd Jun 11 12:36:02 Lepard mariadbd[27329]: 2023-06-11 12:36:02 0 [Note] InnoDB: 10> Jun 11 12:36:02 Lepard mariadbd[27329]: 2023-06-11 12:36:02 0 [Note] Plugin 'FE> Jun 11 12:36:02 Lepard mariadbd[27329]: 2023-06-11 12:36:02 0 [Note] InnoDB: Lo> Jun 11 12:36:02 Lepard mariadbd[27329]: 2023-06-11 12:36:02 0 [Note] InnoDB: Bu> Jun 11 12:36:02 Lepard mariadbd[27329]: 2023-06-11 12:36:02 0 [Note] Server soc> |
mariadb の root パスワードを設定しセキュリティーを強化します
|
1 |
# mysql_secure_installation |
|
1 2 3 4 5 6 7 8 9 10 11 12 13 14 15 16 17 18 19 20 21 22 23 24 25 26 27 28 29 30 31 32 33 34 35 36 37 38 39 40 41 42 43 44 45 46 47 48 49 50 51 52 53 54 55 56 57 58 59 60 61 62 63 64 65 66 67 68 |
NOTE: RUNNING ALL PARTS OF THIS SCRIPT IS RECOMMENDED FOR ALL MariaDB SERVERS IN PRODUCTION USE! PLEASE READ EACH STEP CAREFULLY! In order to log into MariaDB to secure it, we'll need the current password for the root user. If you've just installed MariaDB, and haven't set the root password yet, you should just press enter here. Enter current password for root (enter for none): OK, successfully used password, moving on... Setting the root password or using the unix_socket ensures that nobody can log into the MariaDB root user without the proper authorisation. You already have your root account protected, so you can safely answer 'n'. Switch to unix_socket authentication [Y/n] Y Enabled successfully! Reloading privilege tables.. ... Success! You already have your root account protected, so you can safely answer 'n'. Change the root password? [Y/n] Y New password: Re-enter new password: Password updated successfully! Reloading privilege tables.. ... Success! By default, a MariaDB installation has an anonymous user, allowing anyone to log into MariaDB without having to have a user account created for them. This is intended only for testing, and to make the installation go a bit smoother. You should remove them before moving into a production environment. Remove anonymous users? [Y/n] Y ... Success! Normally, root should only be allowed to connect from 'localhost'. This ensures that someone cannot guess at the root password from the network. Disallow root login remotely? [Y/n] Y ... Success! By default, MariaDB comes with a database named 'test' that anyone can access. This is also intended only for testing, and should be removed before moving into a production environment. Remove test database and access to it? [Y/n] Y - Dropping test database... ... Success! - Removing privileges on test database... ... Success! Reloading the privilege tables will ensure that all changes made so far will take effect immediately. Reload privilege tables now? [Y/n] Y ... Success! Cleaning up... All done! If you've completed all of the above steps, your MariaDB installation should now be secure. Thanks for using MariaDB! |
NextCloud : インストール
1. NextCloud 用のユーザーとデータベースを作成
ユーザー[nextcloud_user]、データベース[nextcloud_db]を作成する
|
1 2 3 4 5 6 7 8 9 10 11 12 13 14 15 16 17 18 19 20 21 22 23 24 25 26 27 28 |
# mysql -u root -p Enter password: ←root パスワード入力します Welcome to the MariaDB monitor. Commands end with ; or \g. Your MariaDB connection id is 40 Server version: 10.5.19-MariaDB-0+deb11u2 Debian 11 Copyright (c) 2000, 2018, Oracle, MariaDB Corporation Ab and others. Type 'help;' or '\h' for help. Type '\c' to clear the current input statement. #Nextcloudが制御する専用のデータベースを作成 MariaDB [(none)]> CREATE DATABASE nextcloud_db; Query OK, 1 row affected (0.00 sec) #アカウントを作成し、パスワードを設定し、作成したデータベースへのアクセスを許可します MariaDB [(none)]>CREATE USER nextcloud_user@localhost IDENTIFIED BY '?Ww123456'; Query OK, 0 rows affected (0.04 sec) ユーザーがセットアップ済データベースにフルアクセスできる必要があることをデータベースに知らせます MariaDB [(none)]> GRANT ALL PRIVILEGES ON nextcloud_db.* TO nextcloud_user@localhost; Query OK, 0 rows affected (0.04 sec) #権限をリロード mysql> flush privileges; #MariaDBを終了する MariaDB [(none)]> exit; Bye |
2.NextCloud サイトを設定する
2.1 NextCloudダウンロード、サイト作成
nextcloudの最新バージョンについては各自公式サイトより最新情報を確認してください。
|
1 2 |
# cd /var/www/html # curl -o nextcloud.zip https://download.nextcloud.com/server/releases/nextcloud-26.0.2.zip |
2.2 Nextcloud ソース コード nextcloud.zipを抽出する
ディレクトリ nextcloud が作成される
nextcloud ディレクトリの所有者を www-data ユーザーに変更します
|
1 2 3 |
# apt install unzip # unzip nextcloud.zip # chown -R www-data:www-data nextcloud |
3.Nextcloud インストール用の SSL 証明書を取得
3.1 certbot ツールをインストール
|
1 |
# apt install certbot |
3.2 letsencrypt 認証用の新しいディレクトリを作成
|
1 2 3 |
# mkdir -p /var/lib/letsencrypt/.well-known # chgrp www-data /var/lib/letsencrypt # chmod g+s /var/lib/letsencrypt |
3.3 well-known.conf を作成
|
1 2 3 4 5 6 7 8 |
# cd /etc/apache2/conf-available/ # vi well-known.conf Alias /.well-known/acme-challenge/ "/var/lib/letsencrypt/.well-known/acme-challenge/" <Directory "/var/lib/letsencrypt/"> AllowOverride None Options MultiViews Indexes SymLinksIfOwnerMatch IncludesNoExec Require method GET POST OPTIONS </Directory> |
conf-enabled ディレクトリへのシンボリック リンクを作成
|
1 |
# ln -s /etc/apache2/conf-available/well-known.conf /etc/apache2/conf-enabled/ |
Apache サービスを再起動
|
1 2 3 |
# apachectl configtest Syntax OK # systemctl restart apache2 |
3.4 Letsencrypt 証明書を作成
|
1 |
# certbot certonly --agree-tos --email [E-mail] --webroot -w /var/lib/letsencrypt/ -d [Domain] |
4. Apache バーチャルホストのセット
4.1 /etc/apache2/sites-available/に構成 ファイルnextcloud.confを作成
|
1 2 |
# cd /etc/apache2/sites-available/ # vi nextcloud.conf |
|
1 2 3 4 5 6 7 8 9 10 11 12 13 14 15 16 17 18 19 20 21 22 23 24 25 26 27 28 29 30 31 32 33 34 35 36 37 38 39 40 41 42 43 44 45 46 |
<VirtualHost *:80> ServerName debian.korodes.com ServerAlias www.debian.korodes.com # auto redirect HTTP to HTTPS Redirect permanent / https://debian.korodes.com/ </VirtualHost> <VirtualHost *:443> ServerName debian.korodes.com ServerAlias www.debian.korodes.com DocumentRoot /var/www/html/nextcloud/ Protocols h2 http/1.1 # auto redirect www to non-www <If "%{HTTP_HOST} == 'www.debian.korodes.com'"> Redirect permanent / https://debian.korodes.com/ </If> # log files ErrorLog /var/log/apache2/debian.korodes.com-error.log CustomLog /var/log/apache2/debian.korodes.com-access.log combined SSLEngine On SSLCertificateFile /etc/letsencrypt/live/debian.korodes.com/fullchain.pem SSLCertificateKeyFile /etc/letsencrypt/live/debian.korodes.com/privkey.pem # HSTS <IfModule mod_headers.c> Header always set Strict-Transport-Security "max-age=15552000; includeSubDomains" </IfModule> <Directory /var/www/html/nextcloud/> Options +FollowSymlinks AllowOverride All <IfModule mod_dav.c> Dav off </IfModule> SetEnv HOME /var/www/html/nextcloud SetEnv HTTP_HOME /var/www/html/nextcloud </Directory> </VirtualHost> |
|
1 |
# a2ensite nextcloud.conf |
4.2 apache を再起動
|
1 2 |
# apachectl configtest # systemctl restart apache2 |
5. NextCloudインストール
1.ブラウザで[https://ドメイン名]または[https://サーバーIPアドレス/]にアクセスする
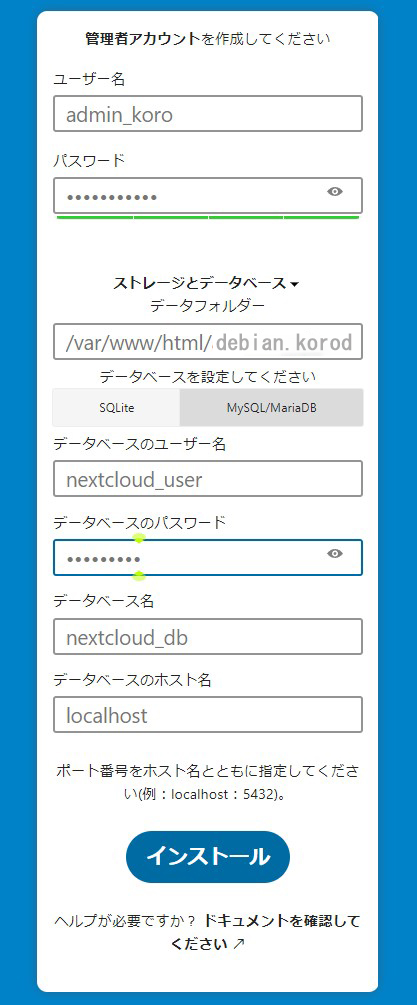
下記画面が表示されるので「ストレージとデータベース」を開き
下記の通り必要事項を入力し、インストールする
ユーザー名 : 任意の名前
パスワード : 任意のパスワード
データベースのユーザー名 : 上記「NextCloud 用のユーザーとデータベースを作成」で作成したユーザー
データベースのパスワード : 上記「NextCloud 用のユーザーとデータベースを作成」で作成したパスワード
データベース名 : 上記「NextCloud 用のユーザーとデータベースを作成」で作成したデータベース
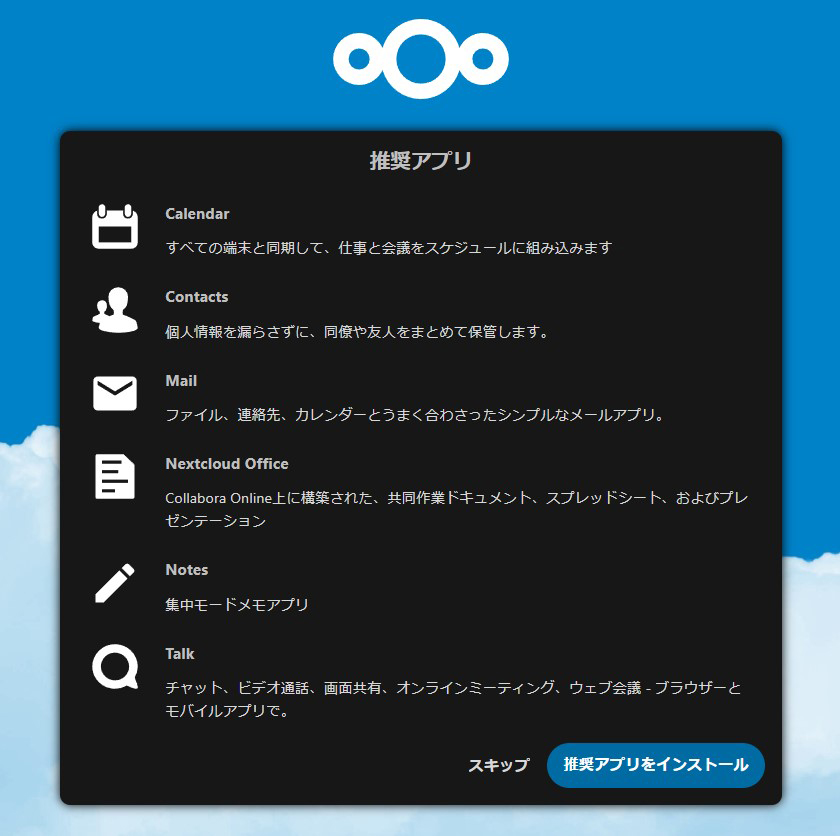
2.下記の推奨アプリをインストールする、後ほどアプリからインストールすることもできます
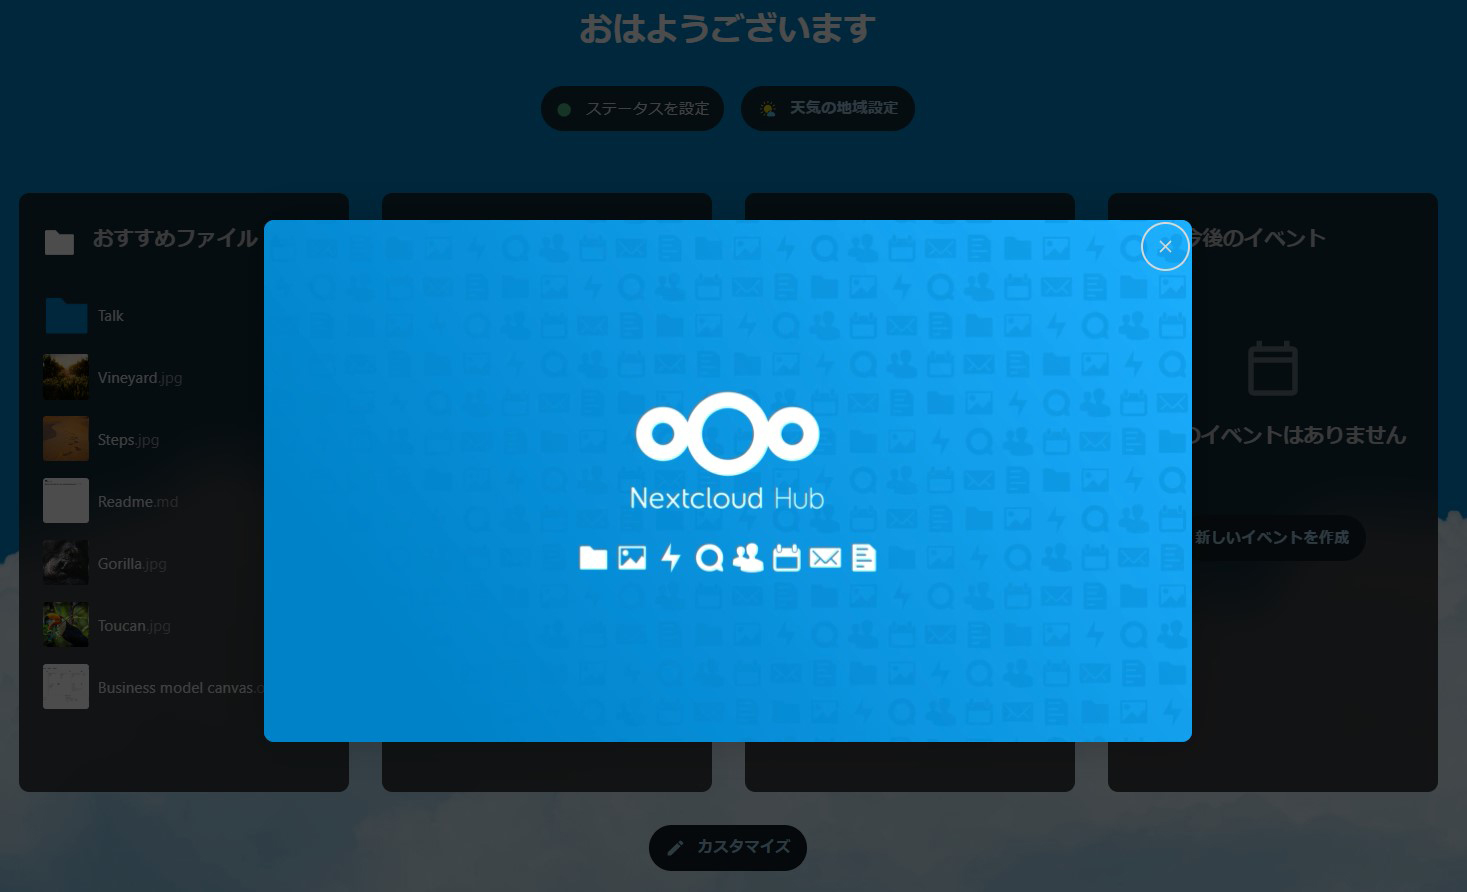
3.推奨アプリのインストールが終了すると下記の画面が表示される
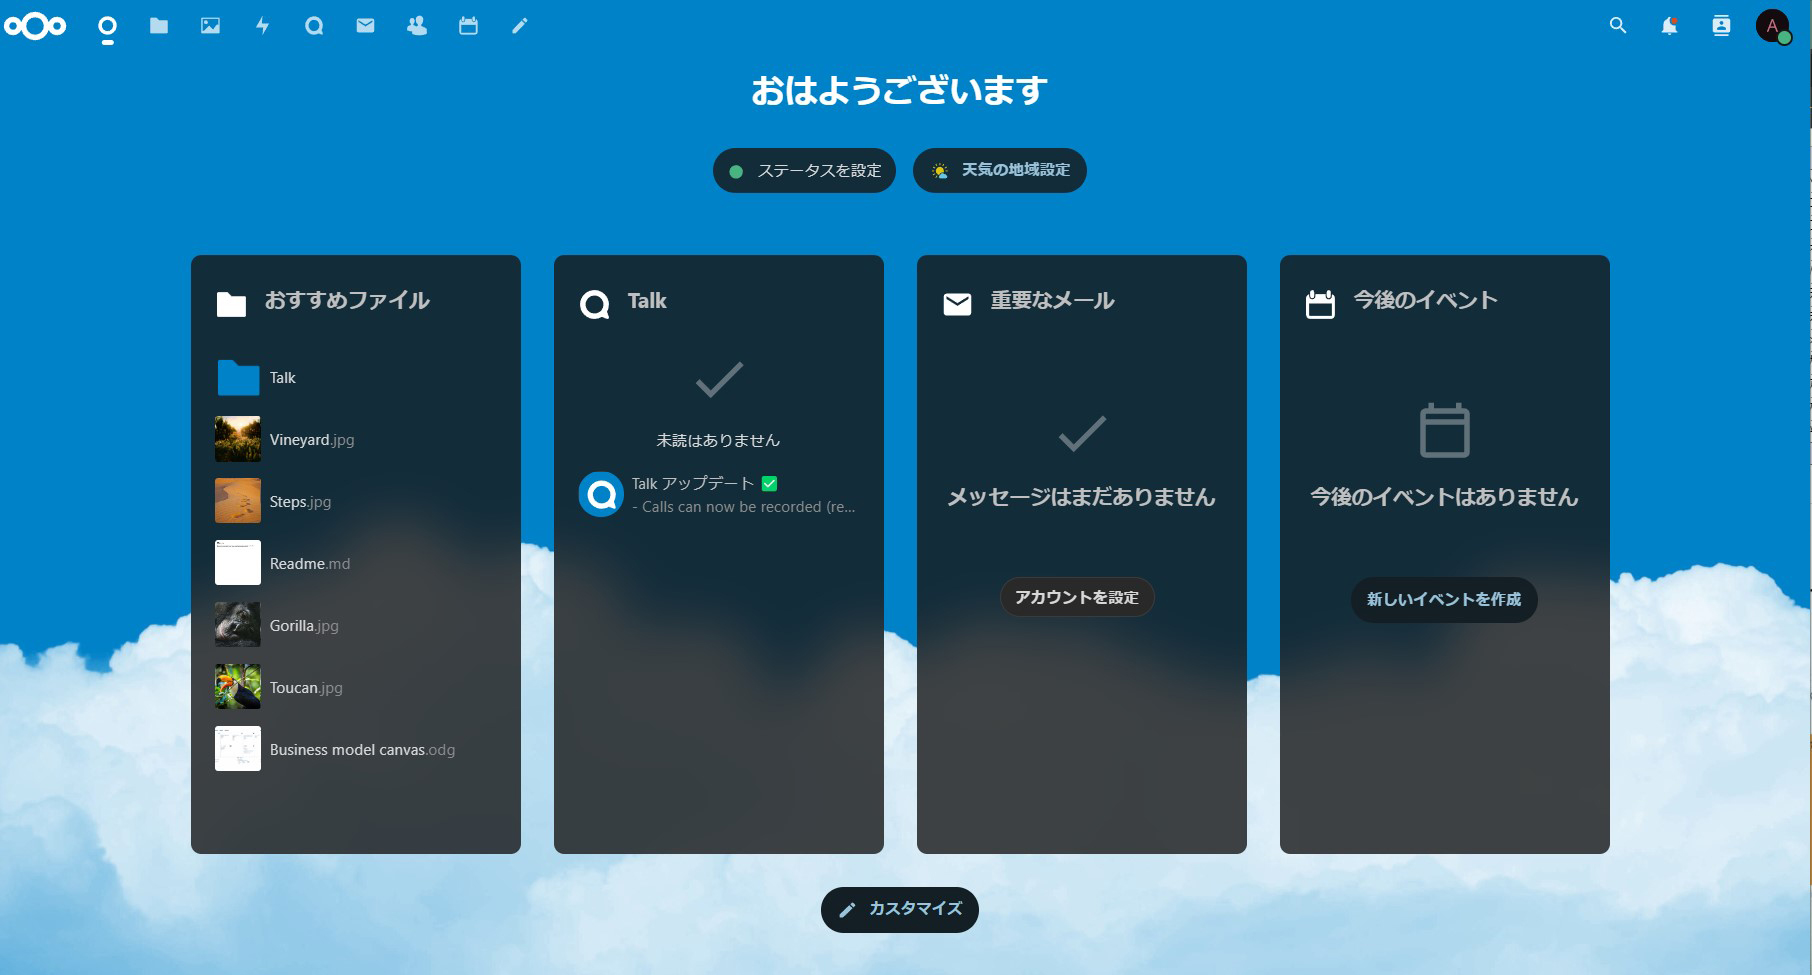
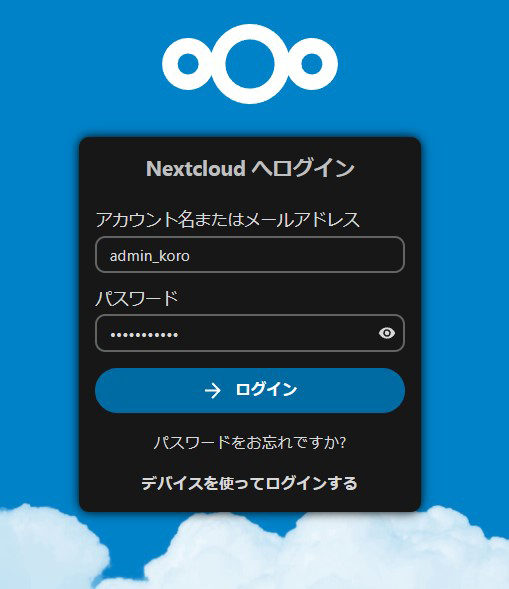
4.再度ログインする場合は、[https://ドメイン名/]にアクセスし、下記の通り、ユーザー名パスワードを入力し、ログインする
6.Nextcloud パフォーマンスを向上
6.1 Nextcloud でキャッシュを有効にする
|
1 2 3 4 5 6 7 8 9 |
# cd /var/www/html/nextcloud/config/ # vi config.php 配列内に次を追加 <?php $CONFIG = array ( .... 'memcache.local' => '\OC\Memcache\APCu', ); |
6.2 Nextcloud タスクに cronjob を使用
|
1 2 3 4 5 6 7 8 9 10 11 12 |
# crontab -u www-data -e no crontab for www-data - using an empty one Select an editor. To change later, run 'select-editor'. 1. /bin/nano <---- easiest 2. /usr/bin/vim.basic 3. /usr/bin/vim.tiny Choose 1-3 [1]: 2 最終行に次を追加 */5 * * * * php -f /var/www/nextcloud/cron.php |
7. CODEサーバの構築
Collabora Onlineの公式サイトにOSごとの作業手順が書いてあり、今回はDebian11の仕様に沿って進めます
7.1 GPG署名キーを入手
|
1 2 |
# cd /usr/share/keyrings # wget https://collaboraoffice.com/downloads/gpg/collaboraonline-release-keyring.gpg |
7.2 Collabora Onlineのリポジトリを追加
/etc/apt/sources.list.d/collaboraonline.sourcesファイルを作成し、次の内容を書き込む
|
1 2 3 4 |
Types: deb URIs: https://www.collaboraoffice.com/repos/CollaboraOnline/CODE-debian11 Suites: ./ Signed-By: /usr/share/keyrings/collaboraonline-release-keyring.gpg |
7.3 CODEサーバパッケージのインストールと設定
|
1 |
# apt update && apt install coolwsd code-brand |
7.4 CODEサーバの設定ファイル編集
/etc/coolwsd/coolwsd.xml編集
Nextcloudの管理アカウントのユーザ名とパスワードを設定
|
1 2 3 4 5 6 7 |
# vi /etc/coolwsd/coolwsd.xml 250行目 <username desc="The username of the admin console. Ignored if PAM is enabled.">管理アカウント名</username> 251行目 <password desc="The password of the admin console. Deprecated on most platforms. Instead, use PAM or coolconfig to set up a secure password.">管理アカウントのパスワード</password> |
7.5 SSL証明書のコピー
Nextcloudを構築するときに作成したSSL証明書を、CODEサーバの設定ファイルディレクトリである /etc/coolwsd 以下にコピーし、所有者ををcoolに変更
|
1 2 3 4 5 |
# cd /etc/coolwsd/ # cp /etc/letsencrypt/live/debian.korodes.com/cert.pem ./cert.pem # cp /etc/letsencrypt/live/debian.korodes.com/privkey.pem ./key.pem # cp /etc/letsencrypt/live/debian.korodes.com/fullchain.pem ./ca-chain.cert.pem # chown cool:cool *.pem |
7.6 CODEサーバ動作確認
|
1 |
# systemctl start coolwsd |
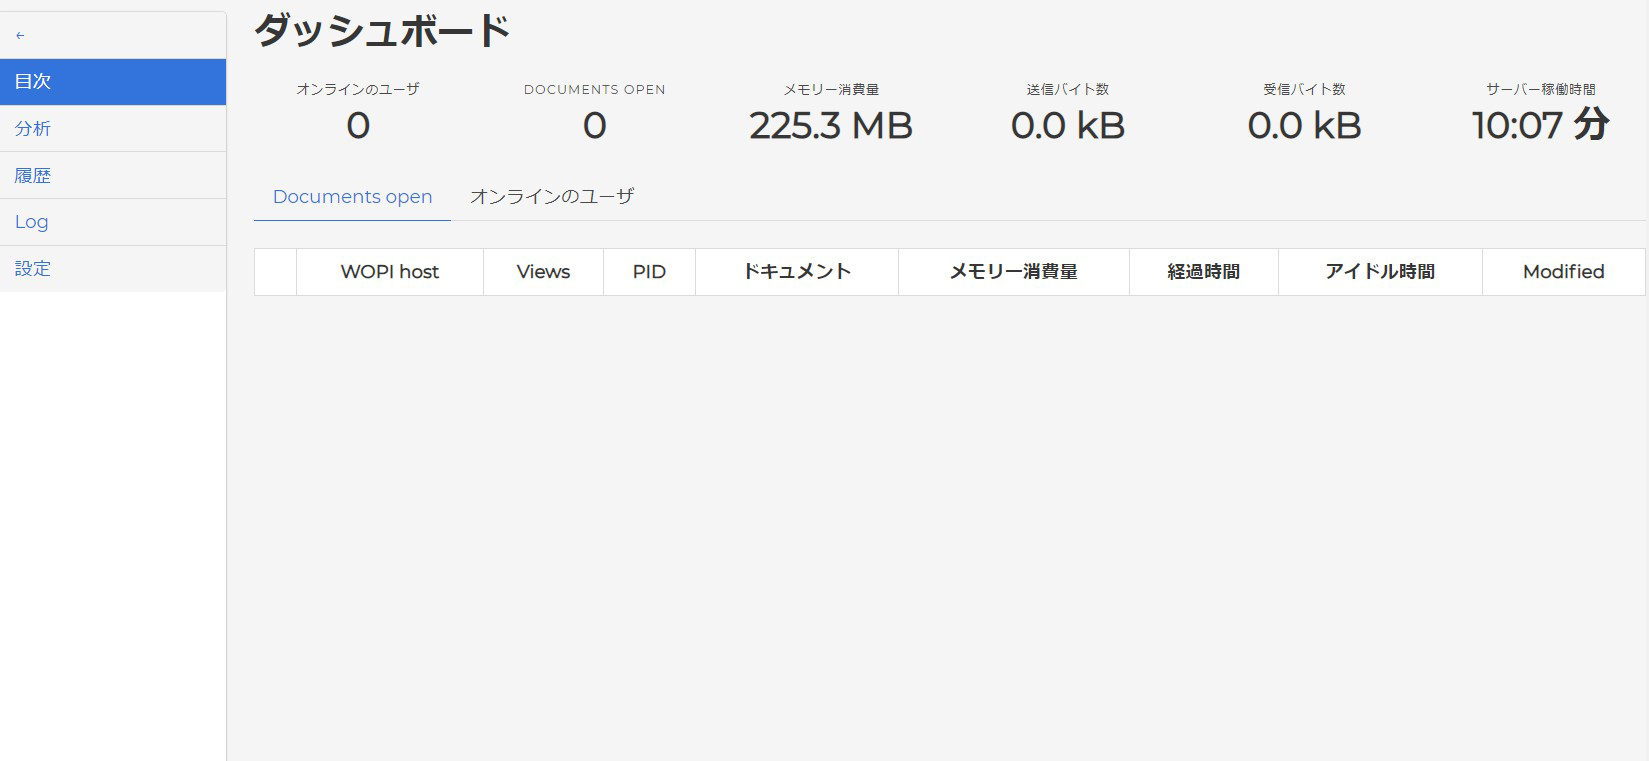
ブラウザで下記のURLにアクセス
ファイアウォール有効の場合は9980ポートを許可しておく
また、ルーターの設定で9980ポートをサーバーに向けておく必要がある場合もあります
https://[Domain name]:9980/browser/dist/admin/admin.html
7.7 Collabora Onlineの導入
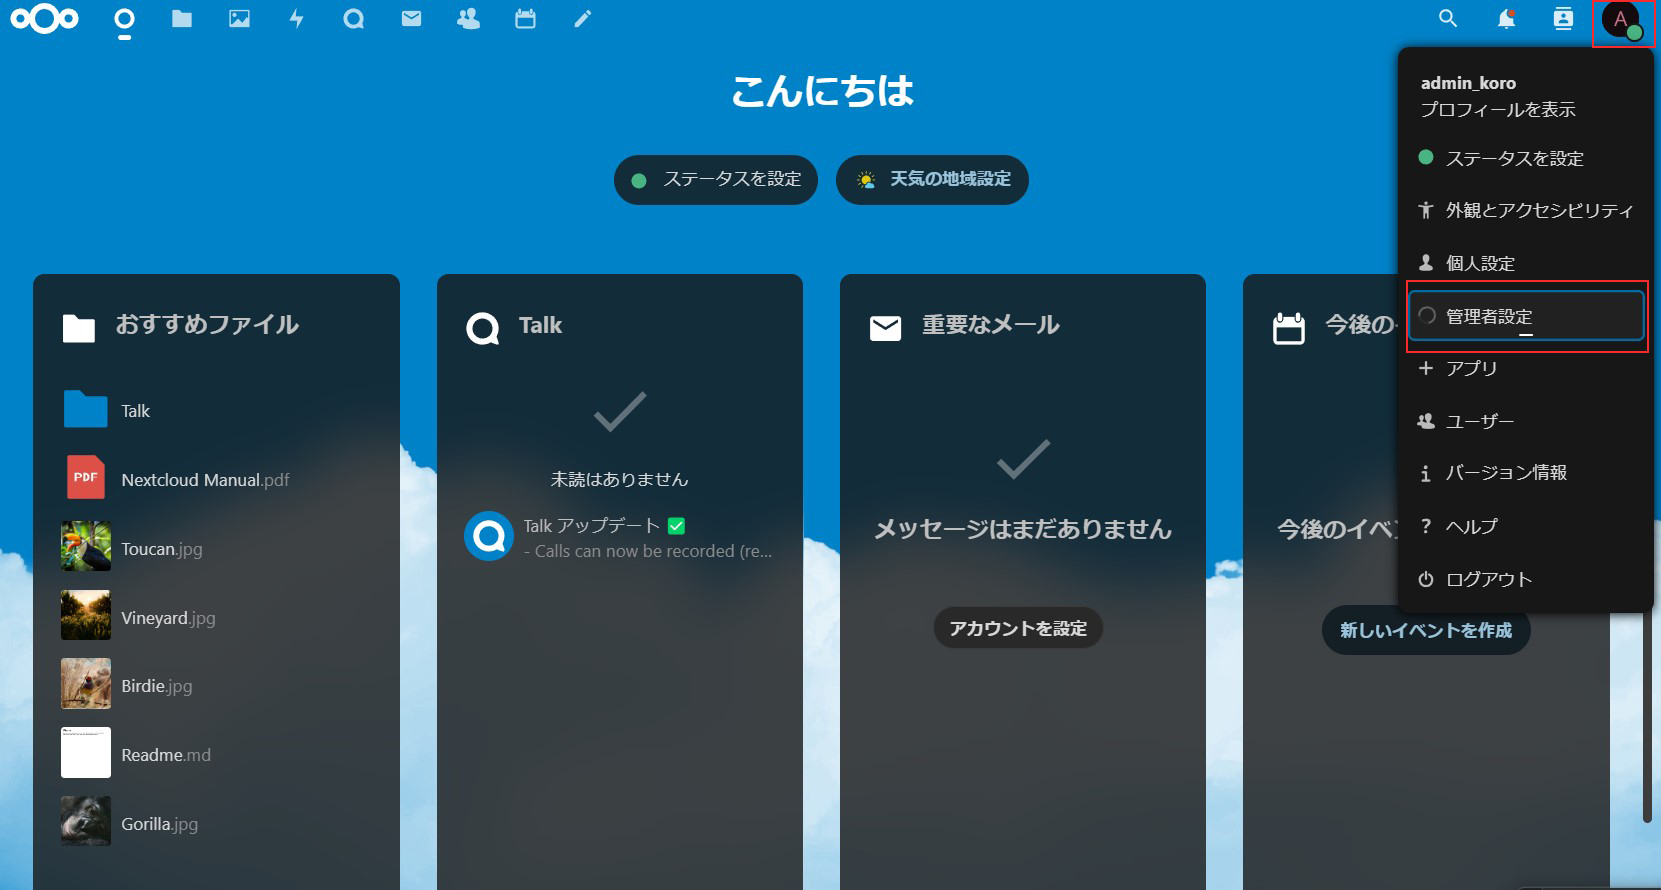
Nextcloudにログインし、構築時に設定したユーザ(今回の例ではadmin_koro)でログイン
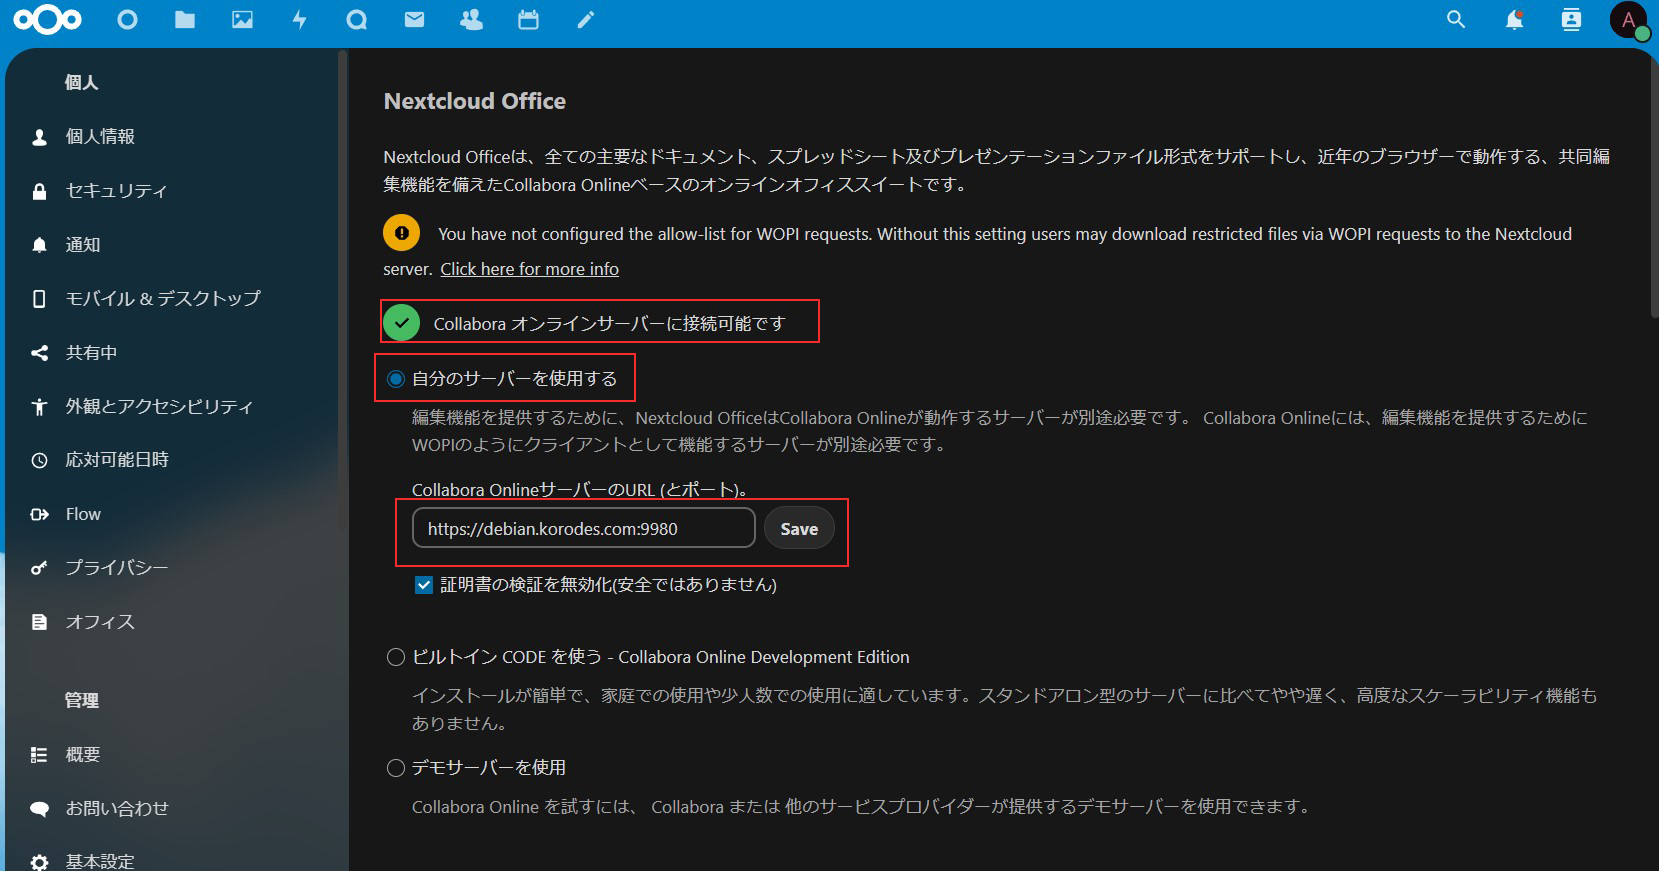
Nextcloudをインストールした際、推奨アプリをインストールした場合画面、右上のユーザアイコンをクリック→「管理者設定」をクリック→左側メニューの下の方にある「管理」→「オフィス」をクリックするとNextcloud Officeの設定画面が表示されます。
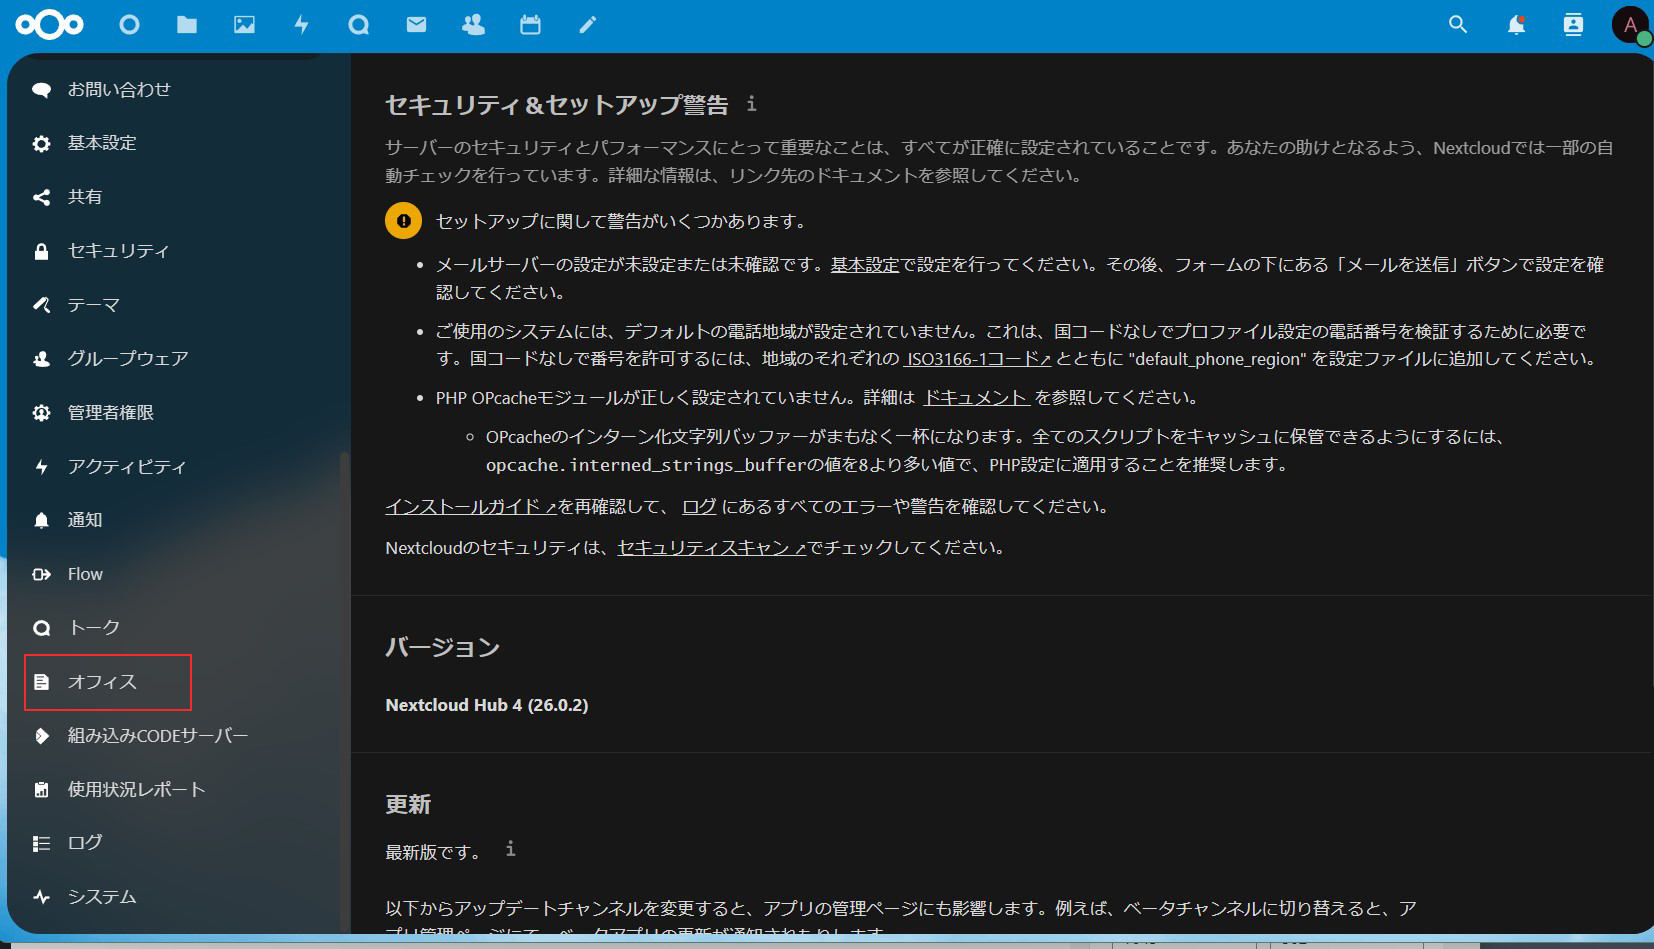
ここでNextcloud Officeが接続するサーバを設定します。まず「自分のサーバを使用する」を選択し、その下にある「Collabora OnlineサーバーのURL(とポート)」に、以下のURLを指定し、「Save」ボタンをクリック。
ページ上部が「Collaboraオンラインサーバーに接続可能です」になれば正常。
|
1 |
https://debian.korodes.com:9980 |
以上インストールまで済みました。
続いて、通常ログインして利用するためのユーザーの追加方法を挙げておきます
ユーザーの追加
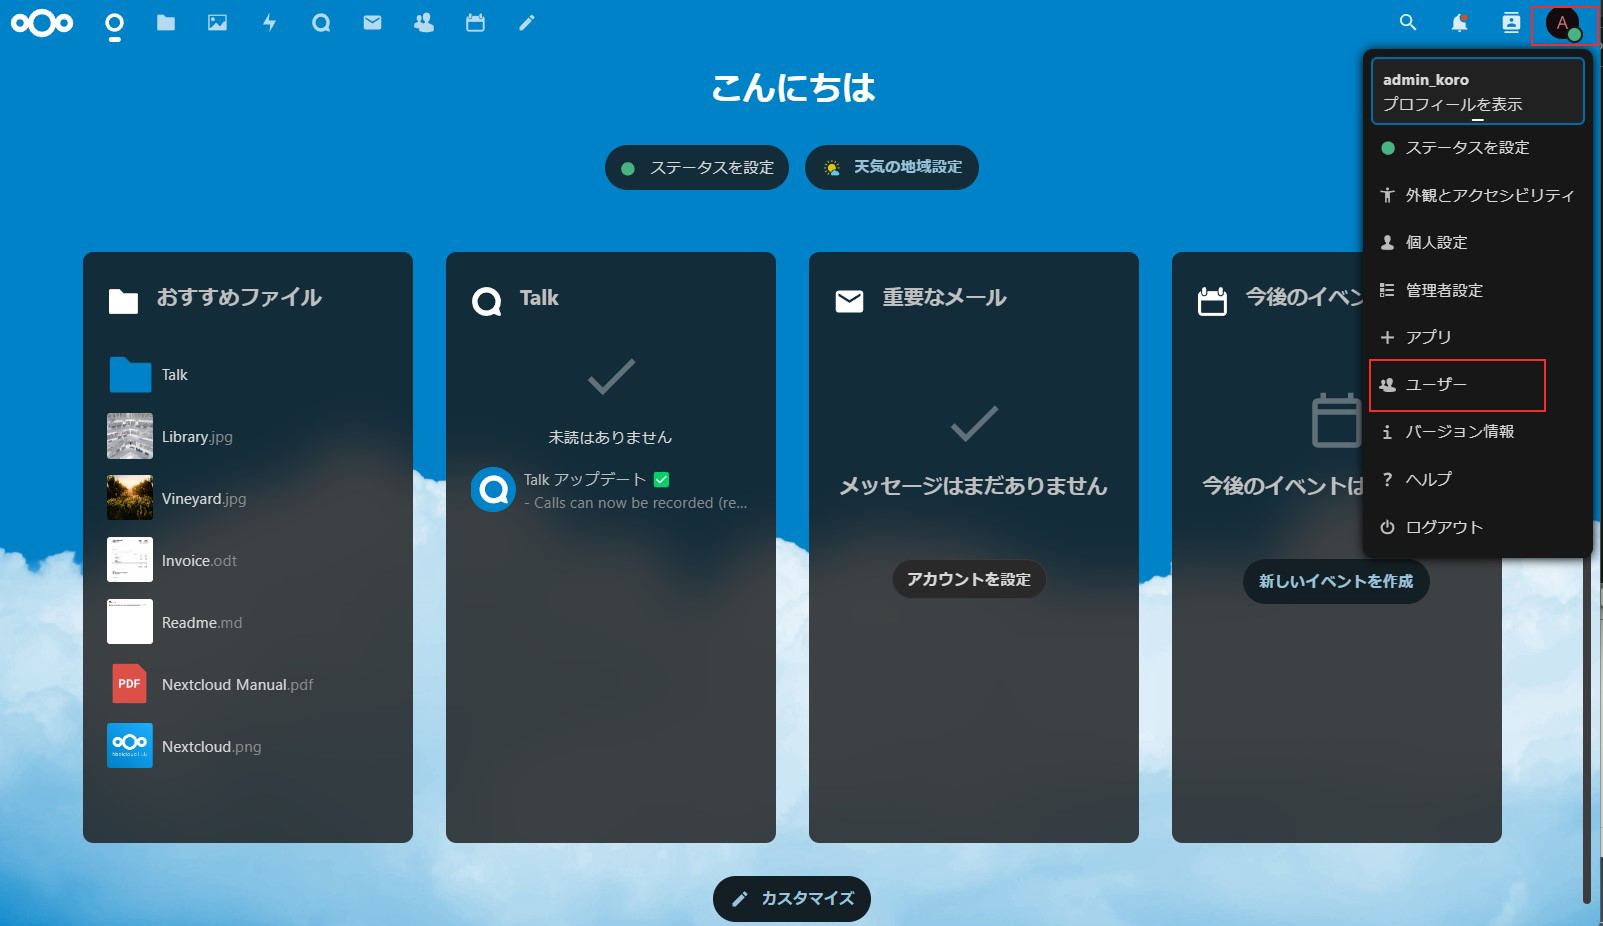
1.NextCloud に管理者アカウントでログインして、メニューから [ユーザー] を選択
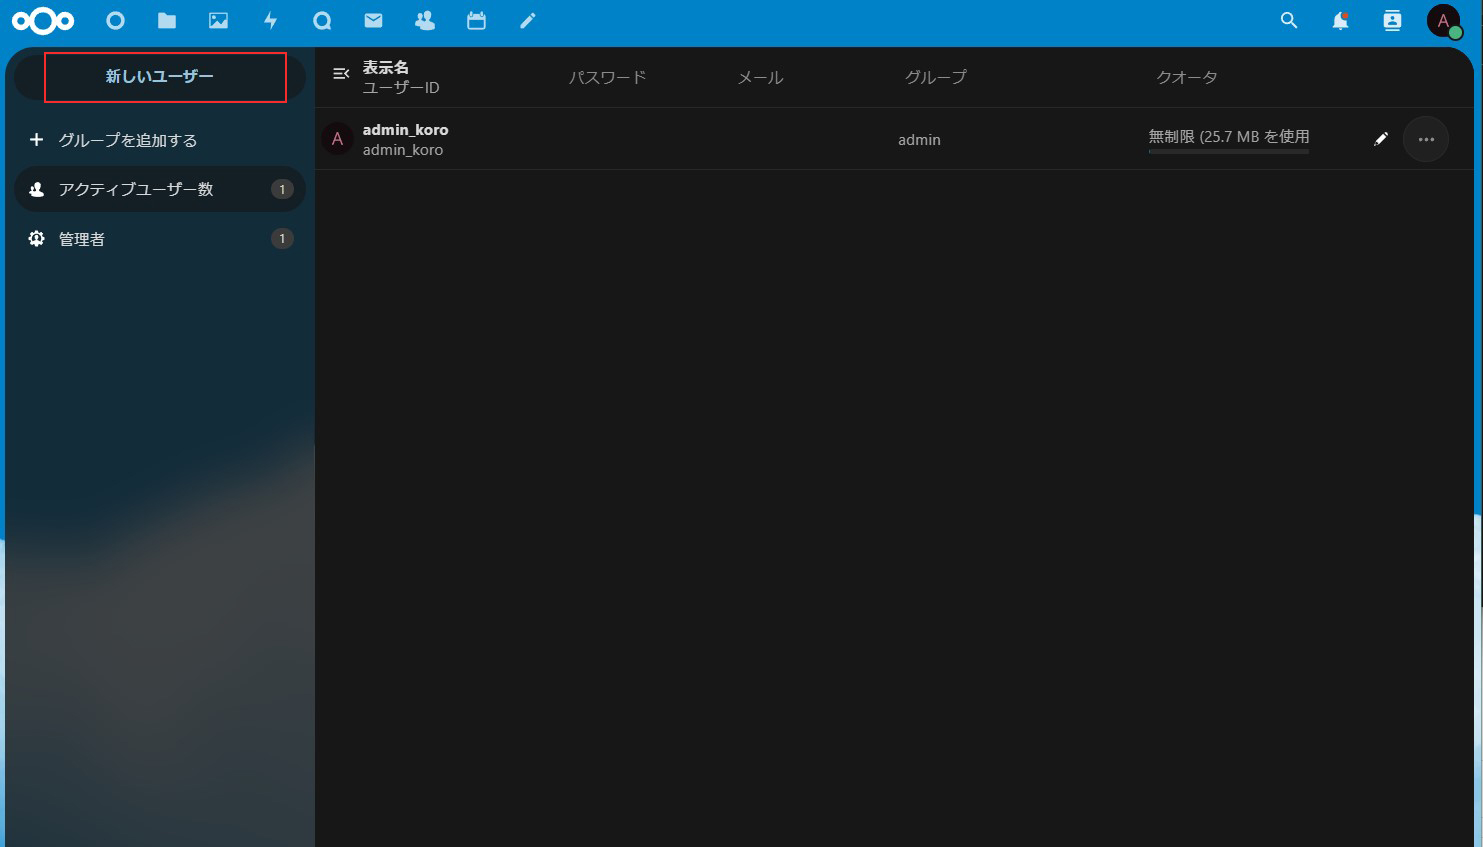
2.左上の [新しいユーザー] をクリック
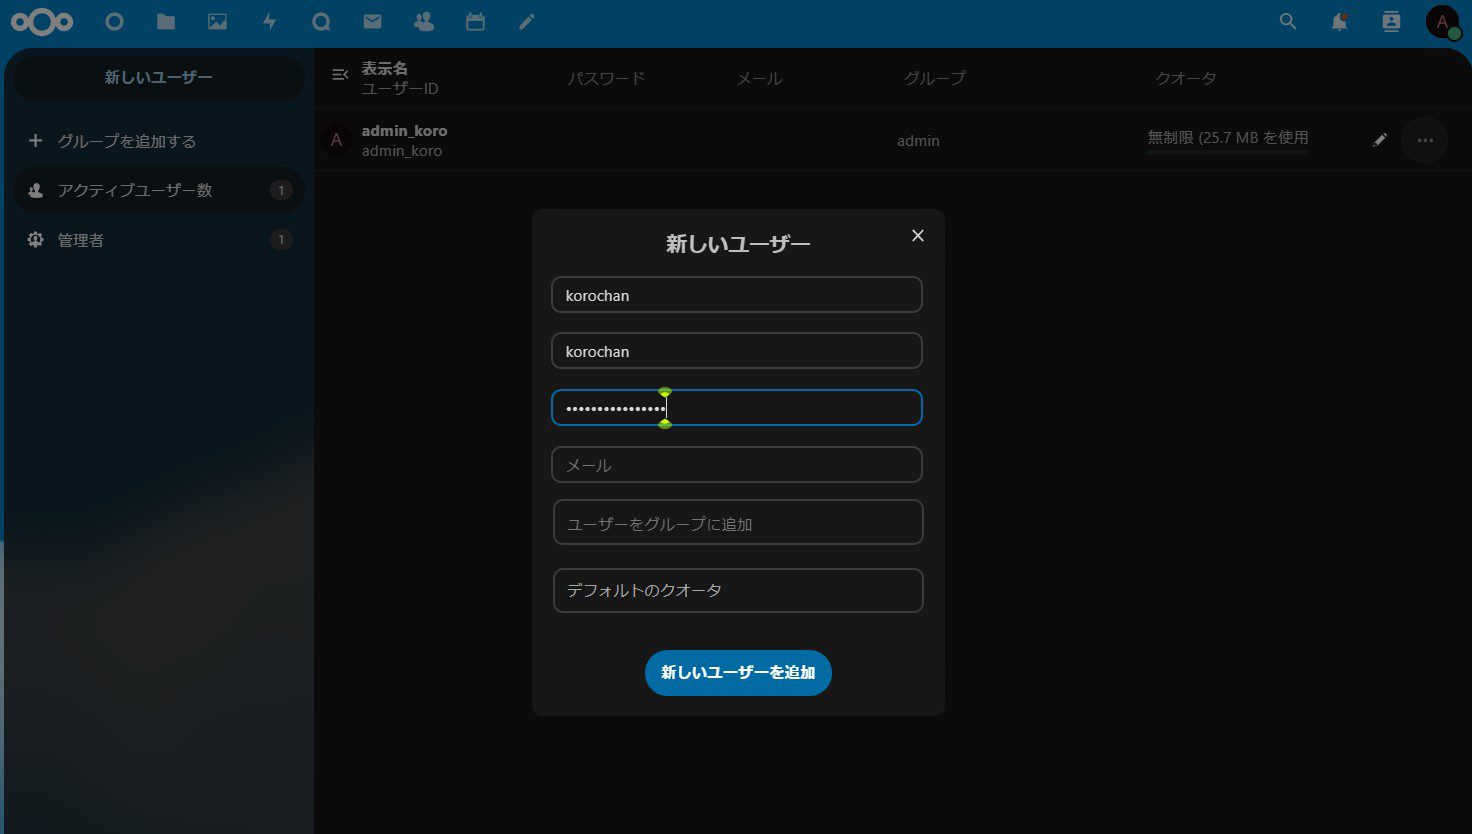
3.ユーザー名とパスワードを入力し、「新しいユーザー追加」をクリック
メールやグループの設定は任意で、後からでも設定できます
パスワードは10文字以上
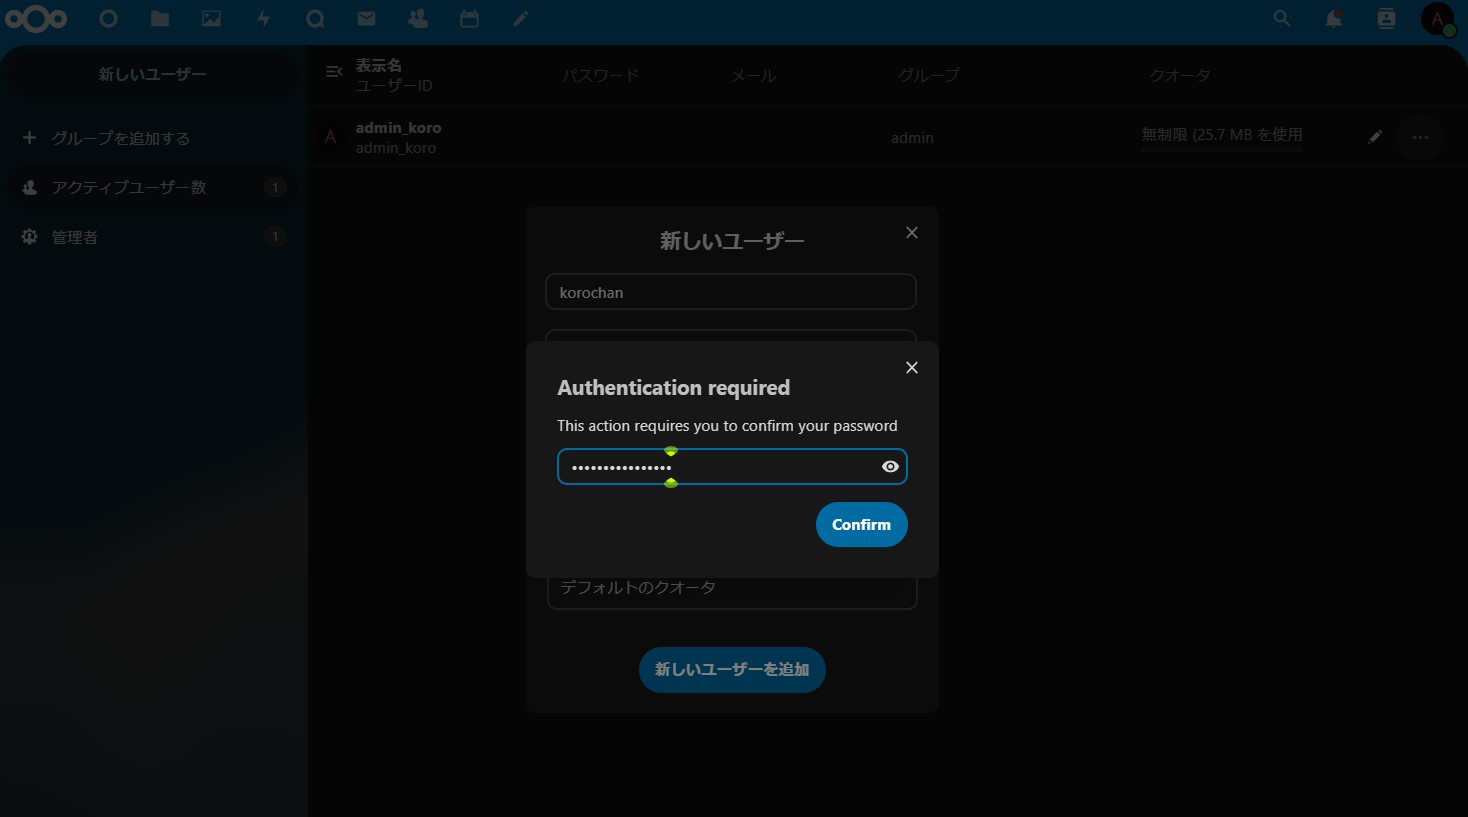
確認画面になるので、管理者アカウントのパスワードを入力し、「Confirm」をクリック
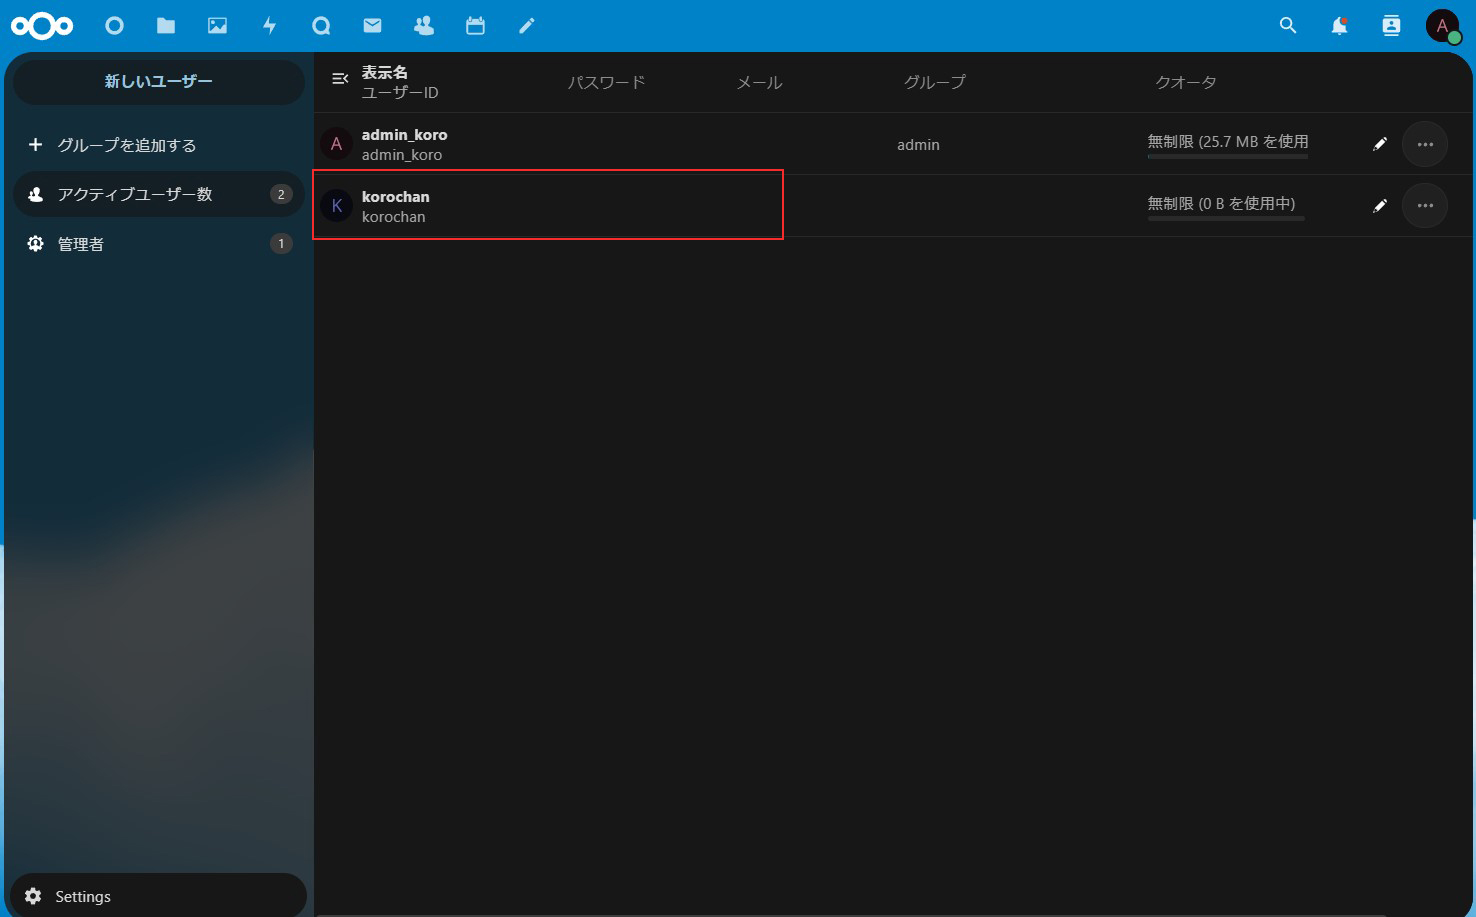
作成したユーザーが追加されている
その他いろいろと活用できますが割愛します。ネットに情報がありますので検索してください。

