Contents
VMware Workstation Pro17上にGebtoo Linuxをインストール
Gentoo Linuxとは、Linuxディストリビューションの一つである。パッケージ管理システムに Portage を採用している。
公式のインストーラーが存在しないので、インストールの難易度は最上級ともいわれる。
Gentoo Linuxを採用している代表的なものにChromeOSがある。
今回はVMware Workstation Pro上にインストールし、基本的な初期設定と、LAMPの構築まで行う。
Gentooのダウンロード
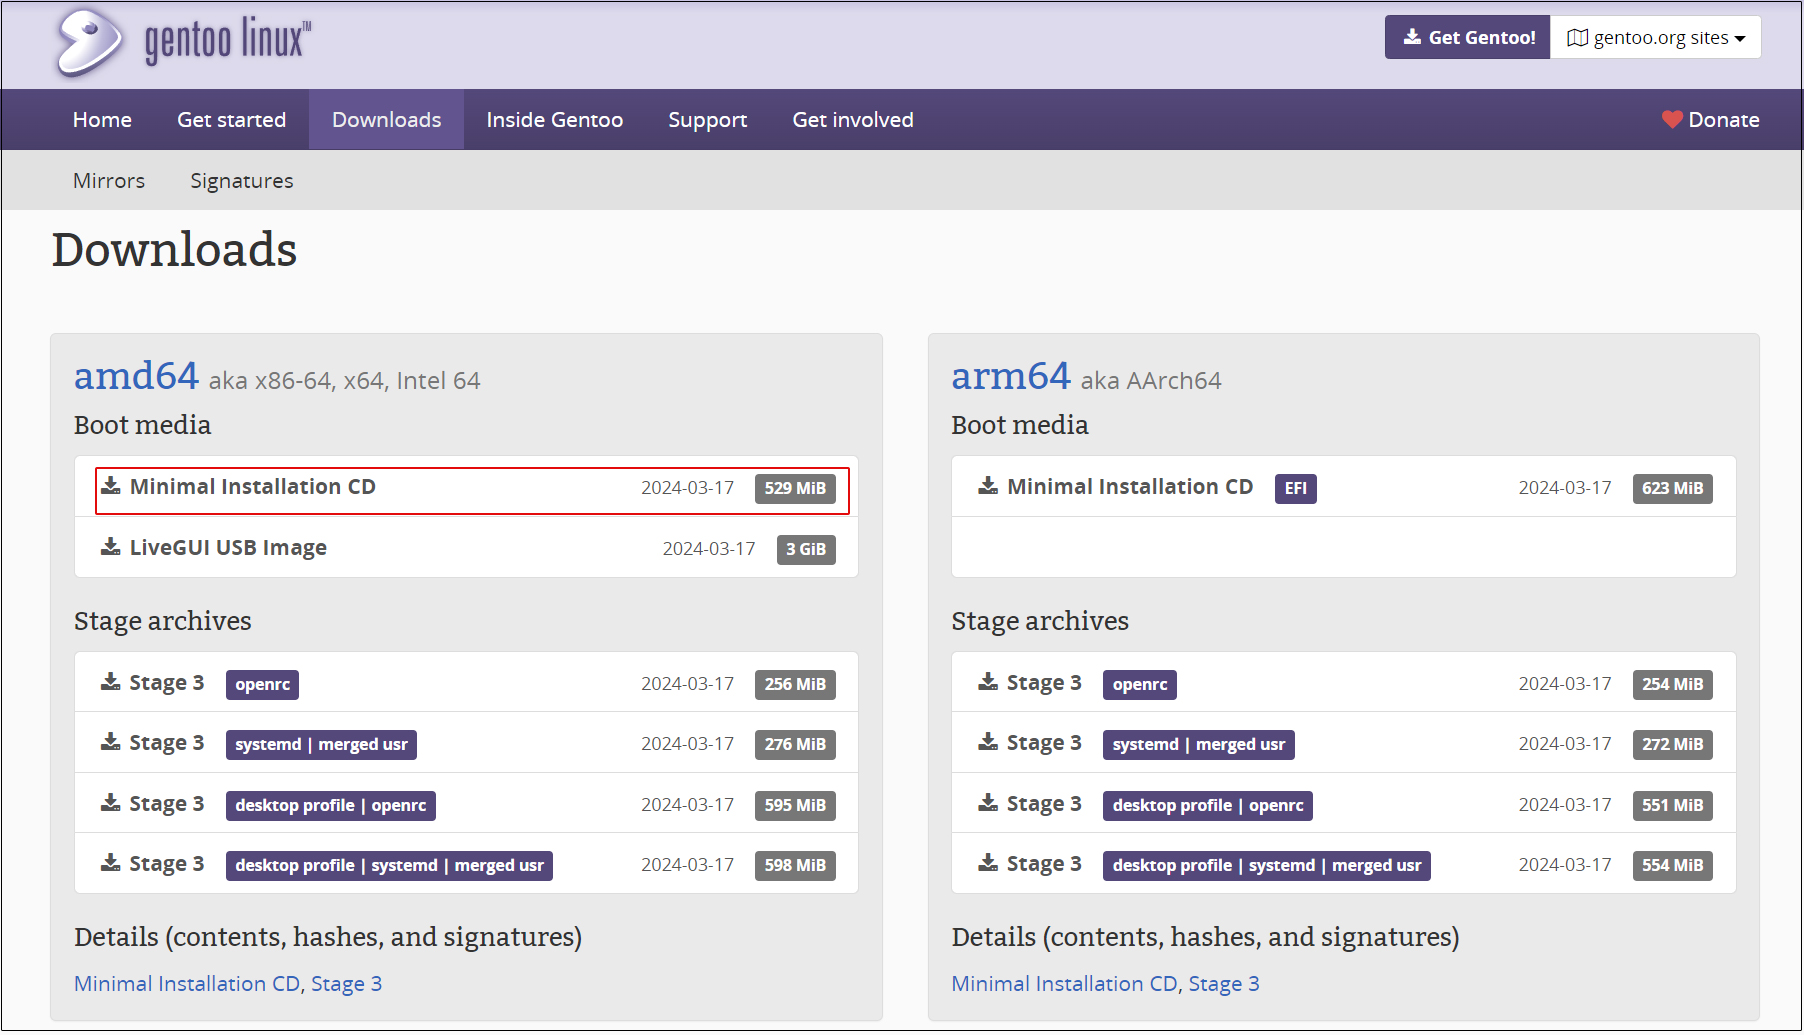
Gentooをダウンロードするには、下記ダウンロードページからAMD64 Mnimal Istallation CD. を選択
現時点でのイメージファイルは install-amd64-minimal-20250406T165023Z.isoである
https://www.gentoo.org/downloads/
VMwareマシンの設定
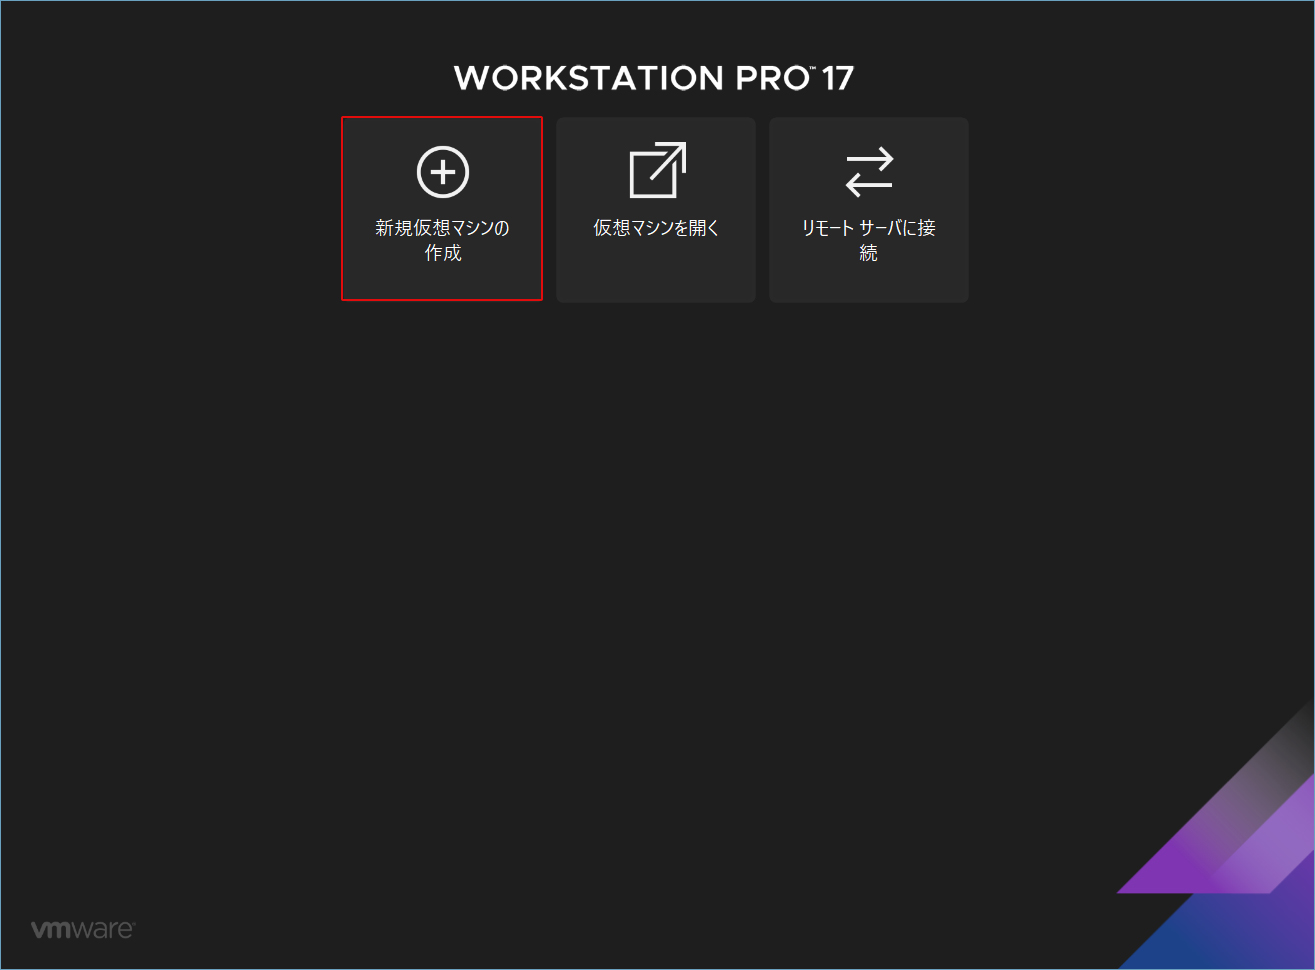
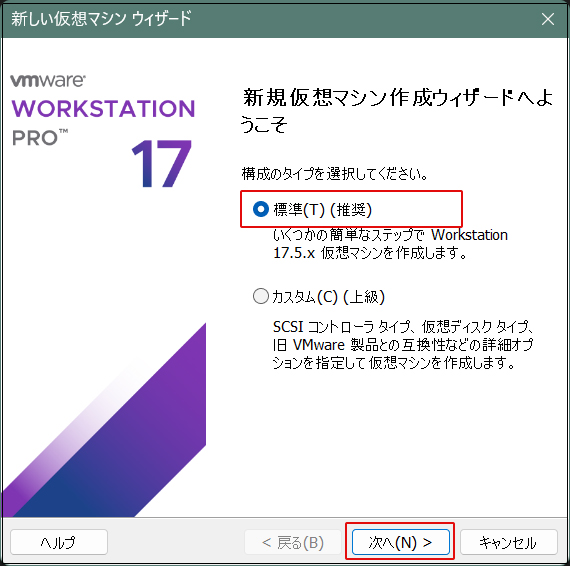
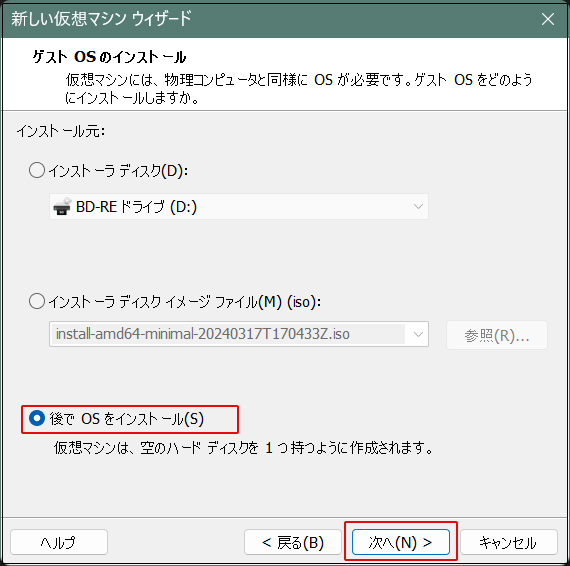
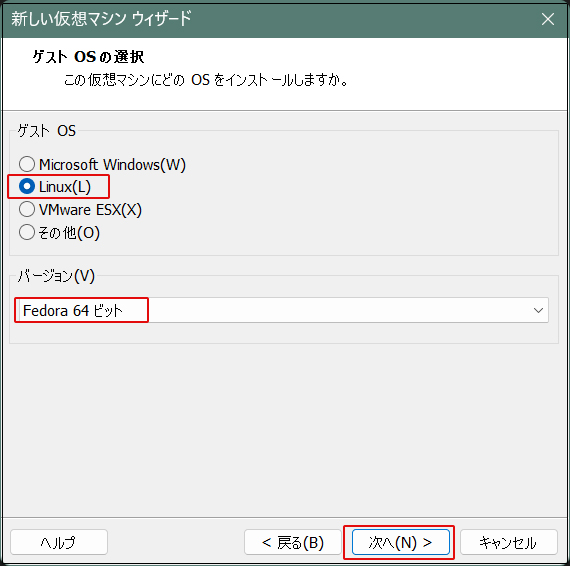
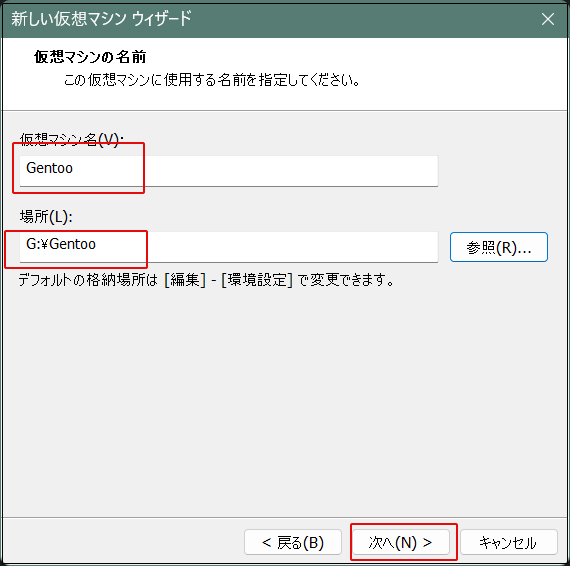
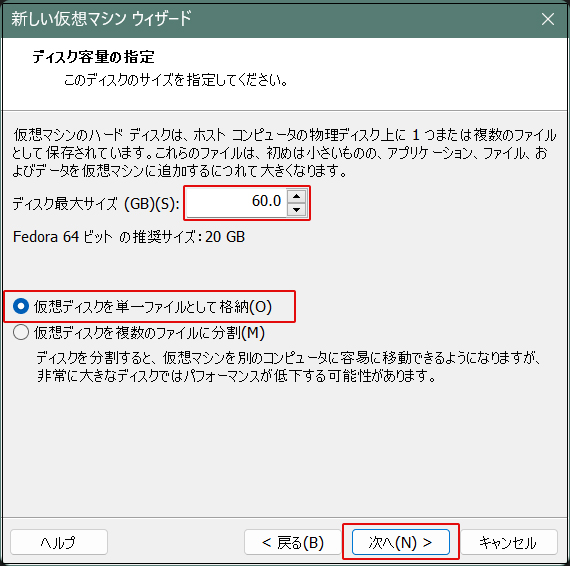
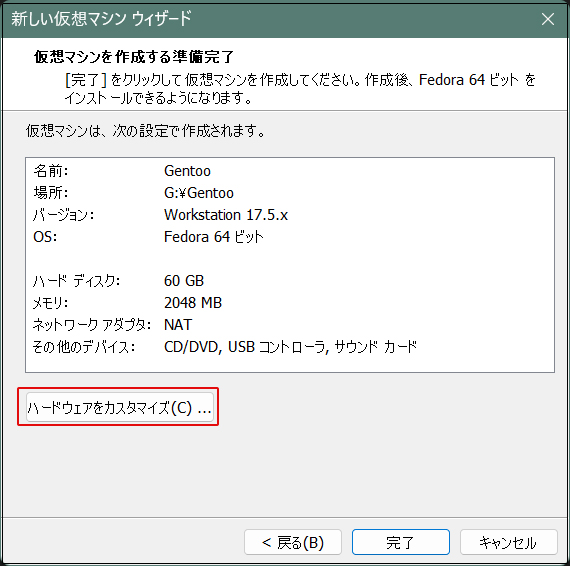
メモリ : 8GB
プロセッサ : 4
新規CD/DVD(SATA) : 上記でダウンロードした install-amd64-minimal-20250406T165023Z.iso
ネットワークアダプタ : ブリッジ(自動)
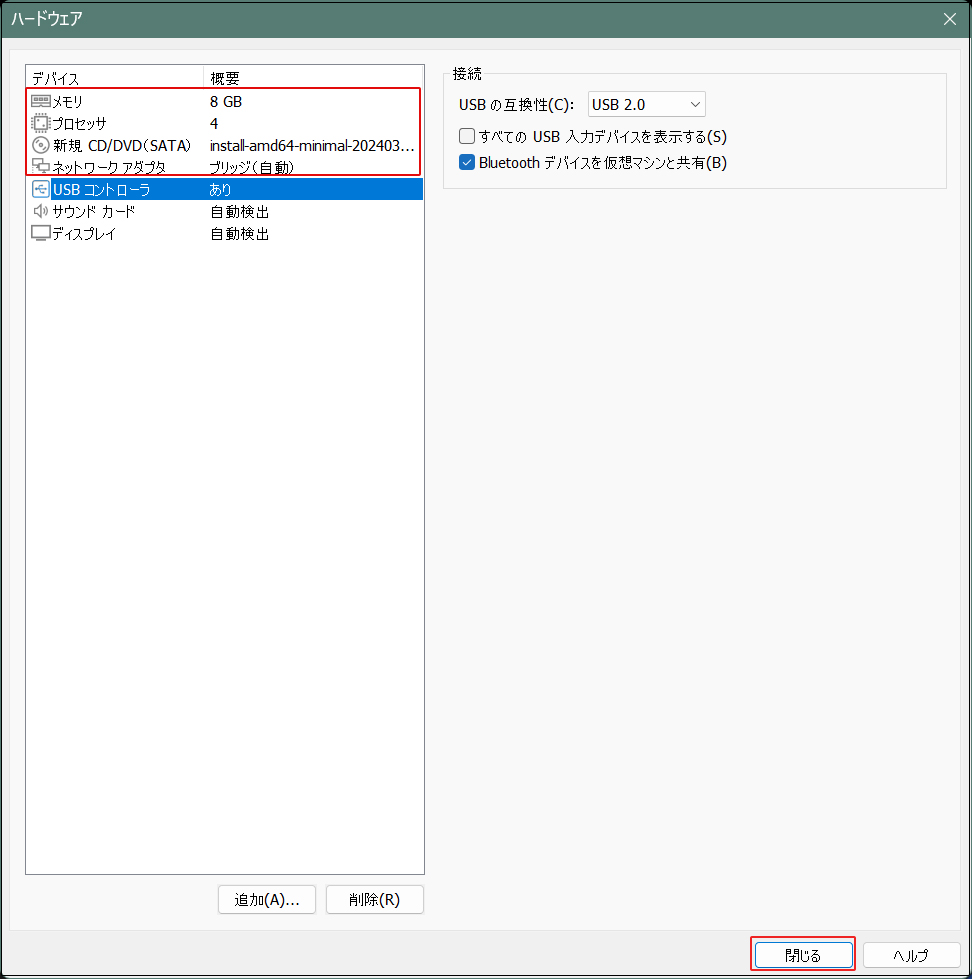
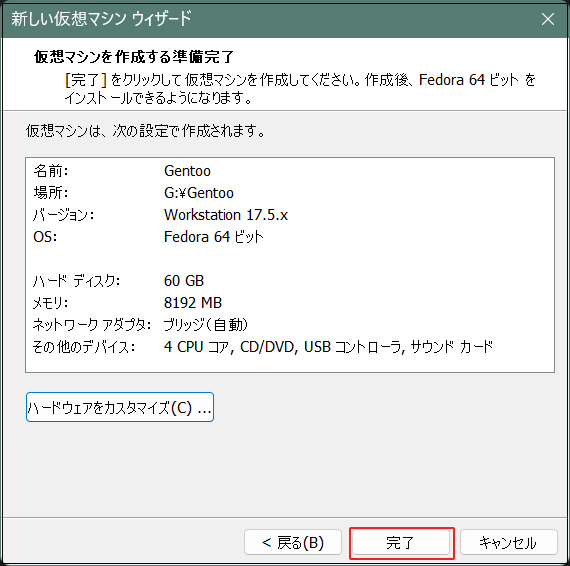
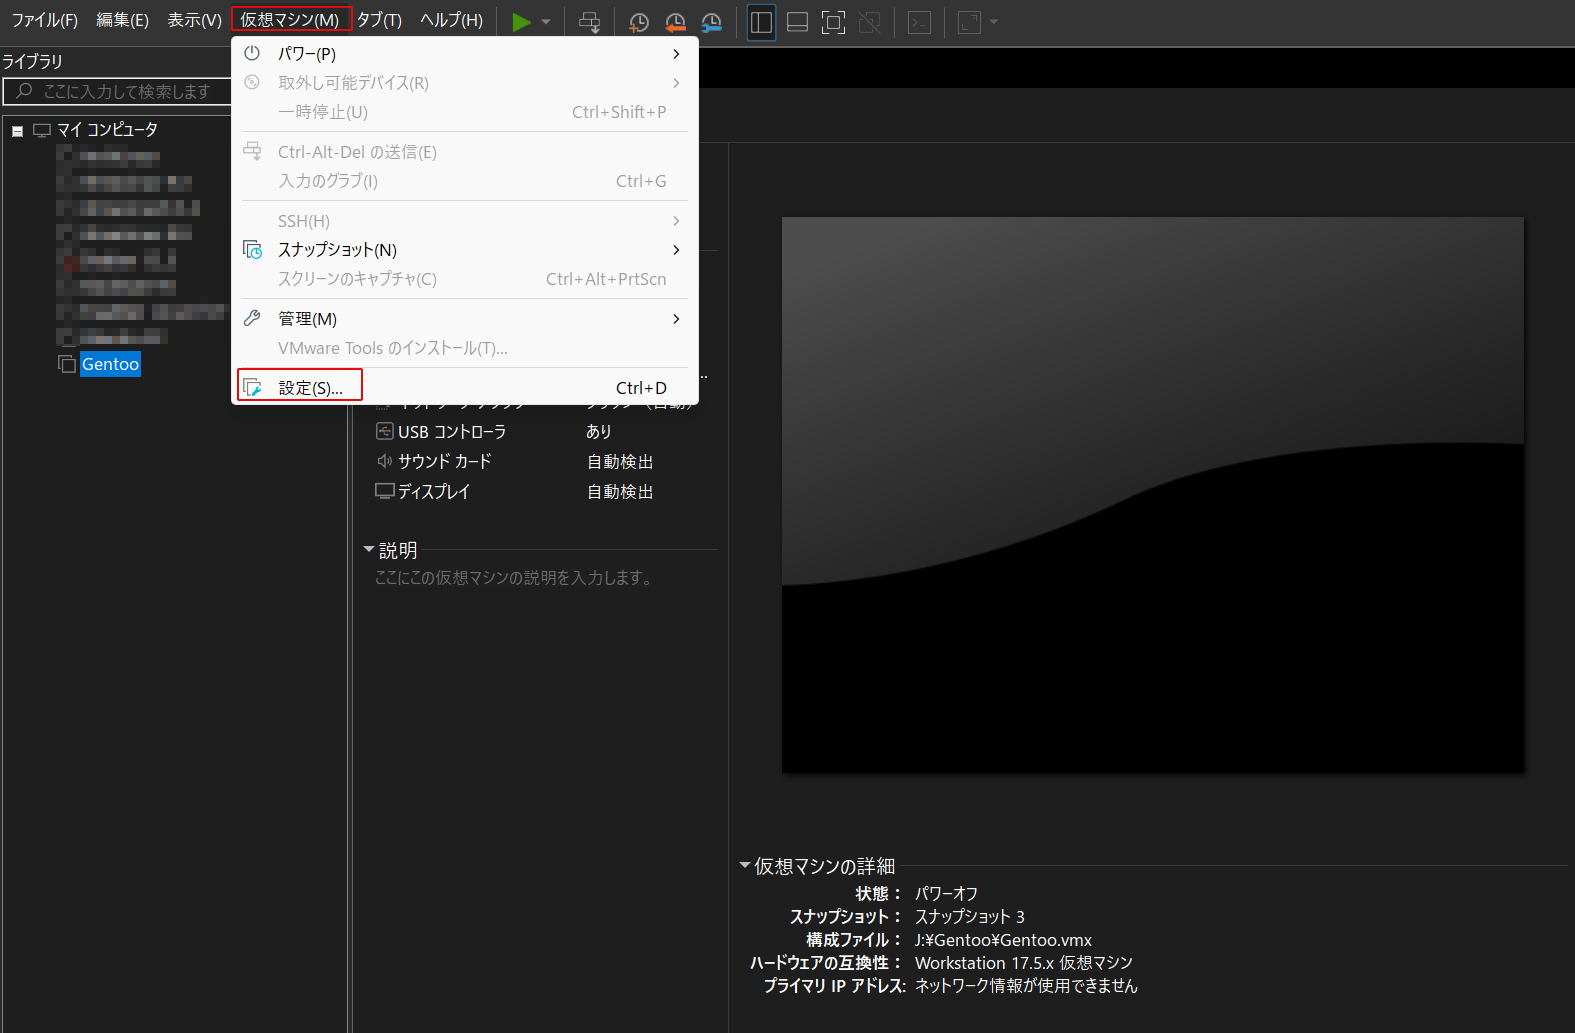
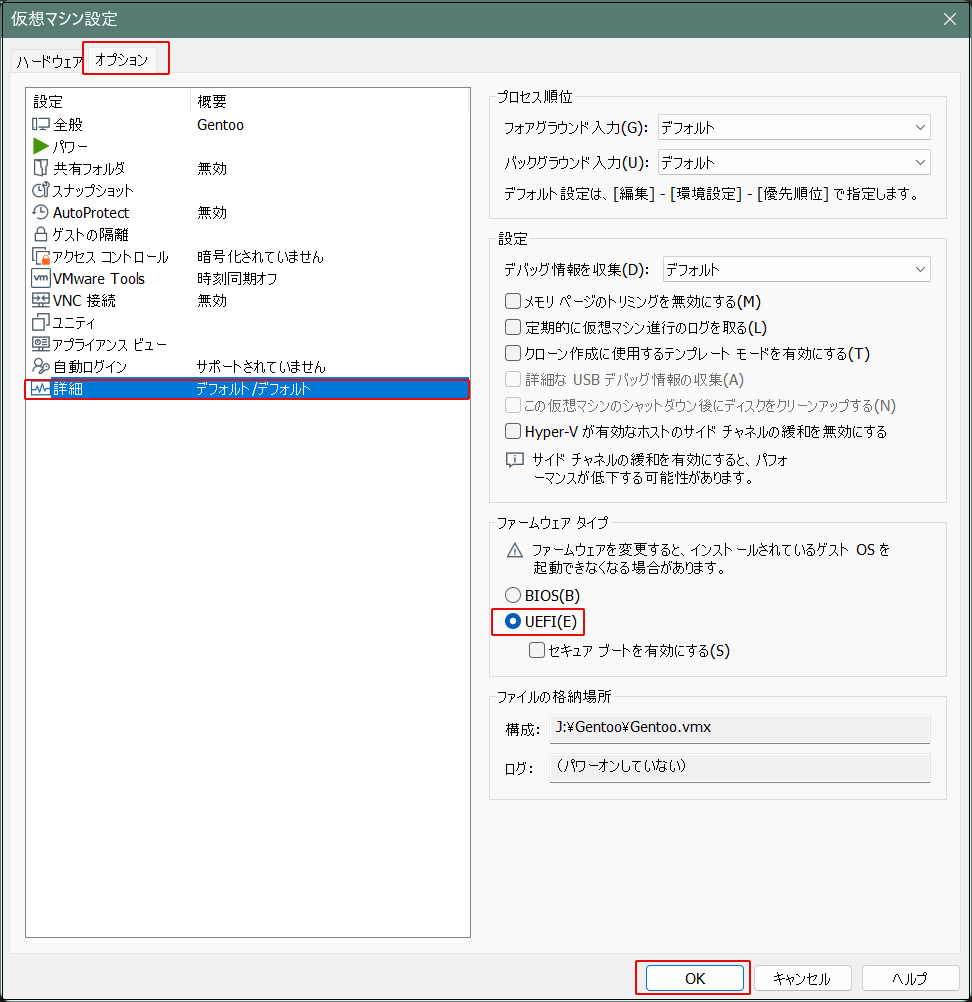
UEFIを有効にするため、[仮想マシン]の[設定]をクリック
Gentoo仮想マシンを起動する
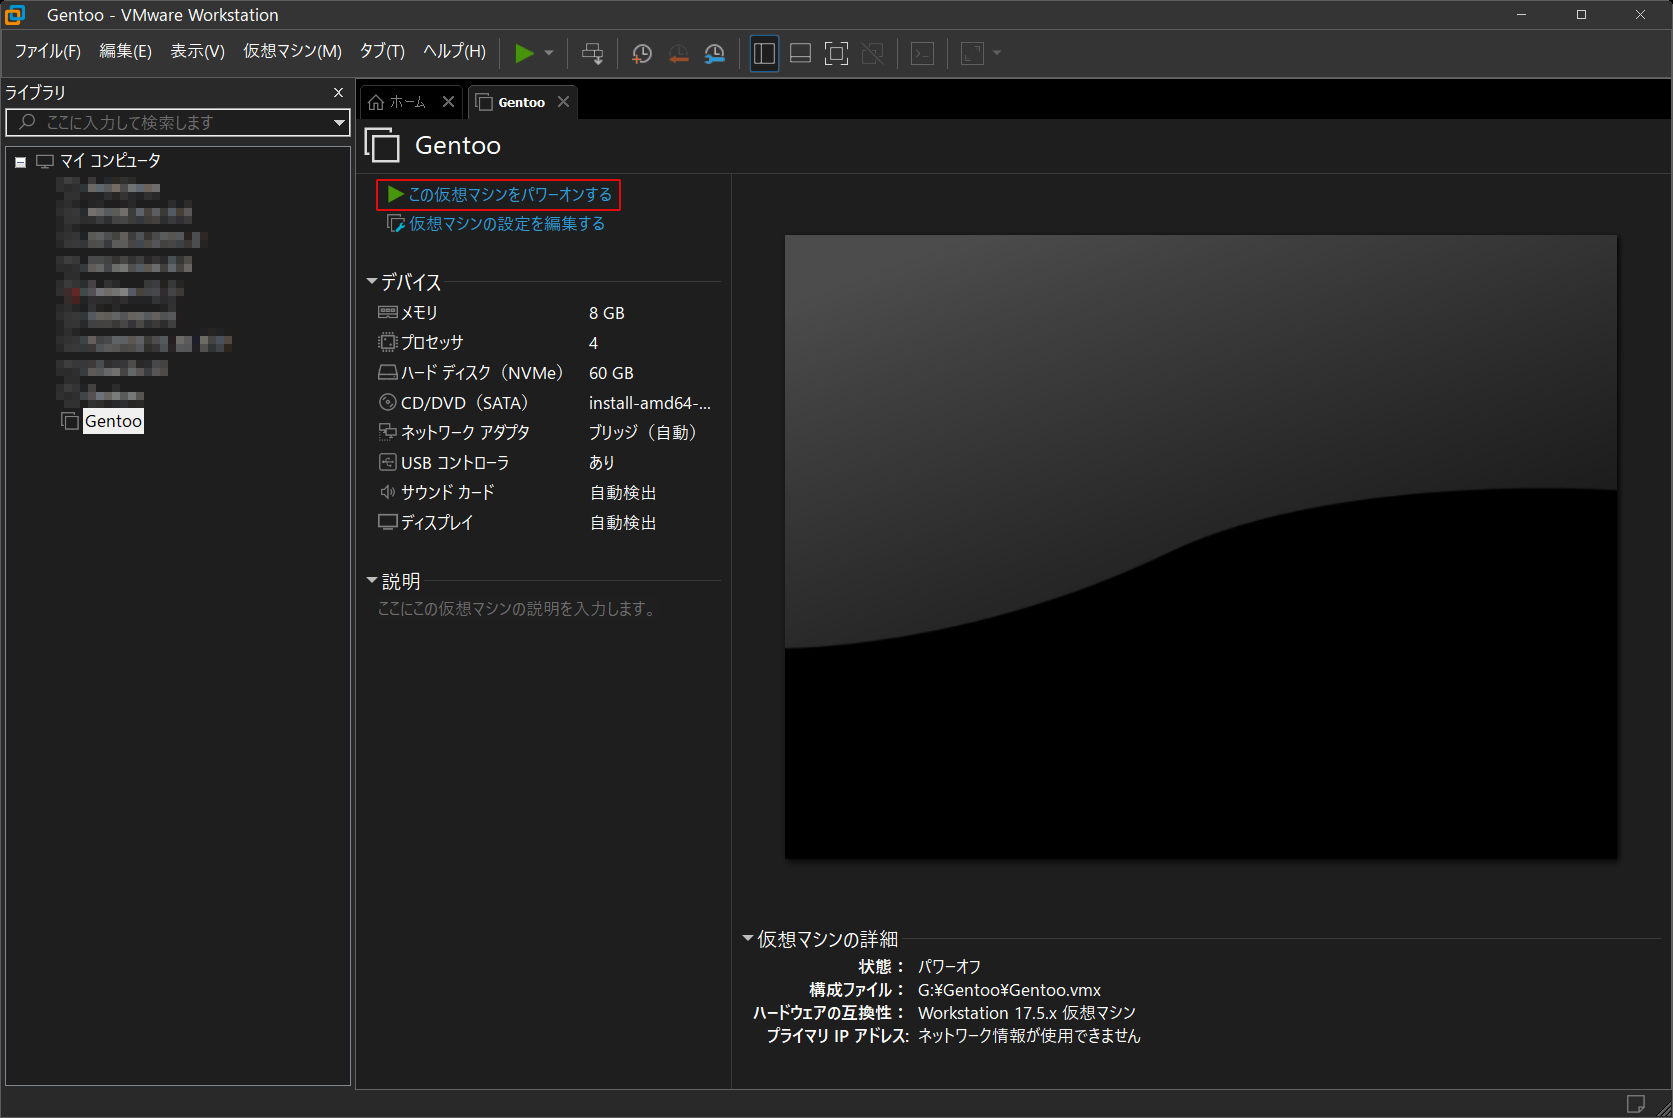
Gentooインストール
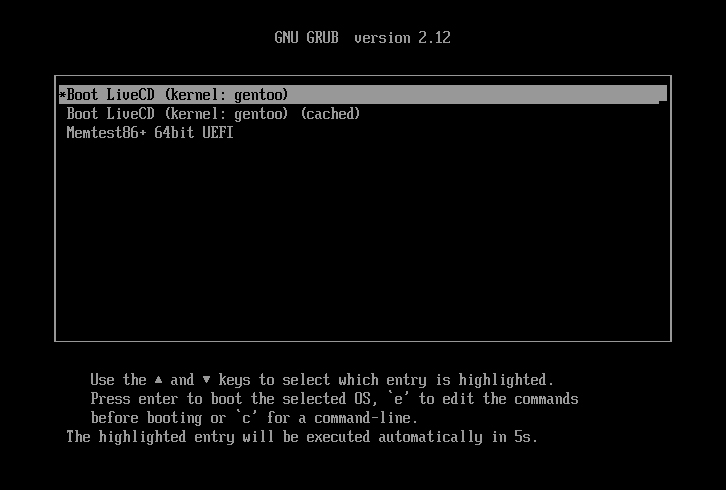
UEFI GPT でインストール
インストールプロセスの開始
途中でkey mapの選択では Key map : jp
SSH接続を有効化して、Teraterm等で作業できるようにする
|
1 2 3 4 5 6 7 8 9 10 11 12 |
rootパスワードを変更する livdcd~# passwd root ssh設定ファイル変更 livdcd~# vi /etc/ssh/sshd_config PasswordAuthentication yes sshdサービス起動 livdcd~# /etc/init.d/sshd start サーバーIP確認 livdcd~# ip a |
TeraTermで接続
Host : server IP
SSH : 22
Use name : root
Passphrase : 上記で変更したパスワード
①ディスクとパーティションセットアップ
ディスクの確認
|
1 2 3 4 5 6 7 8 9 10 11 12 |
livecd ~ # fdisk -l Disk /dev/sda: 60 GiB, 64424509440 bytes, 125829120 sectors Disk model: VMware Virtual S Units: sectors of 1 * 512 = 512 bytes Sector size (logical/physical): 512 bytes / 512 bytes I/O size (minimum/optimal): 512 bytes / 512 bytes Disk /dev/loop0: 511.46 MiB, 536309760 bytes, 1047480 sectors Units: sectors of 1 * 512 = 512 bytes Sector size (logical/physical): 512 bytes / 512 bytes I/O size (minimum/optimal): 512 bytes / 512 bytes |
➁パーティションテーブル作成
|
1 2 3 4 5 6 7 8 9 10 11 12 13 14 15 16 17 18 19 20 21 22 23 24 25 26 27 28 29 |
livecd ~ # fdisk /dev/sda Welcome to fdisk (util-linux 2.40.2). Changes will remain in memory only, until you decide to write them. Be careful before using the write command. Device does not contain a recognized partition table. Created a new DOS (MBR) disklabel with disk identifier 0xbecb0cf2. Command (m for help): p Disk /dev/sda: 60 GiB, 64424509440 bytes, 125829120 sectors Disk model: VMware Virtual S Units: sectors of 1 * 512 = 512 bytes Sector size (logical/physical): 512 bytes / 512 bytes I/O size (minimum/optimal): 512 bytes / 512 bytes Disklabel type: dos Disk identifier: 0xbecb0cf2 Command (m for help): g Created a new GPT disklabel (GUID: E3B0D737-ABD0-43B7-8F10-AE084B8B3116). Command (m for help): p Disk /dev/sda: 60 GiB, 64424509440 bytes, 125829120 sectors Disk model: VMware Virtual S Units: sectors of 1 * 512 = 512 bytes Sector size (logical/physical): 512 bytes / 512 bytes I/O size (minimum/optimal): 512 bytes / 512 bytes Disklabel type: gpt Disk identifier: E3B0D737-ABD0-43B7-8F10-AE084B8B3116 |
➂EFIシステムパーティション、swapパーティション、Linux filesystemパーティション作成とフォーマット
|
1 2 3 4 5 6 7 8 9 10 11 12 13 14 15 16 17 18 19 20 21 22 23 24 25 26 27 28 29 30 31 32 33 34 35 36 37 38 39 40 41 42 43 44 45 46 47 48 49 50 51 52 53 54 55 56 57 58 59 60 61 62 63 64 65 66 67 68 |
EFIシステムパーティション作成 Command (m for help): n Partition number (1-128, default 1): 1 First sector (2048-125829086, default 2048): Last sector, +/-sectors or +/-size{K,M,G,T,P} (2048-125829086, default 125827071): +256M Created a new partition 1 of type 'Linux filesystem' and of size 256 MiB. Command (m for help): t Selected partition 1 Partition type or alias (type L to list all): 1 Changed type of partition 'Linux filesystem' to 'EFI System'. swapパーティション作成 Command (m for help): n Partition number (2-128, default 2): 2 First sector (526336-125829086, default 526336): Last sector, +/-sectors or +/-size{K,M,G,T,P} (526336-125829086, default 125827071): +4G Created a new partition 2 of type 'Linux filesystem' and of size 4 GiB. Command (m for help): t Partition number (1,2, default 2): 2 Partition type or alias (type L to list all): 19 Changed type of partition 'Linux filesystem' to 'Linux swap'. Command (m for help): p Disk /dev/sda: 60 GiB, 64424509440 bytes, 125829120 sectors Disk model: VMware Virtual S Units: sectors of 1 * 512 = 512 bytes Sector size (logical/physical): 512 bytes / 512 bytes I/O size (minimum/optimal): 512 bytes / 512 bytes Disklabel type: gpt Disk identifier: E3B0D737-ABD0-43B7-8F10-AE084B8B3116 Device Start End Sectors Size Type /dev/sda1 2048 526335 524288 256M EFI System /dev/sda2 526336 8914943 8388608 4G Linux swap Linux filesystemパーティション作成 Command (m for help): n Partition number (3-128, default 3): 3 First sector (8914944-125829086, default 8914944): Last sector, +/-sectors or +/-size{K,M,G,T,P} (8914944-125829086, default 125827071): Created a new partition 3 of type 'Linux filesystem' and of size 55.7 GiB. Command (m for help): p Disk /dev/sda: 60 GiB, 64424509440 bytes, 125829120 sectors Disk model: VMware Virtual S Units: sectors of 1 * 512 = 512 bytes Sector size (logical/physical): 512 bytes / 512 bytes I/O size (minimum/optimal): 512 bytes / 512 bytes Disklabel type: gpt Disk identifier: E3B0D737-ABD0-43B7-8F10-AE084B8B3116 Device Start End Sectors Size Type /dev/sda1 2048 526335 524288 256M EFI System /dev/sda2 526336 8914943 8388608 4G Linux swap /dev/sda3 8914944 125827071 116912128 55.7G Linux filesystem ディスクに書き込み Command (m for help): w The partition table has been altered. Calling ioctl() to re-read partition table. Syncing disks. |
|
1 2 3 4 5 6 7 8 9 10 11 12 13 14 15 16 17 18 19 20 21 22 23 24 25 26 |
EFIパーティションフォーマット livecd ~ # mkfs.vfat -F 32 /dev/sda1 mkfs.fat 4.2 (2021-01-31) Linux Systemパーティションフォーマット livecd ~ # mkfs.ext4 /dev/sda3 mke2fs 1.47.1 (20-May-2024) Creating filesystem with 14614016 4k blocks and 3653632 inodes Filesystem UUID: 58663ba3-9f89-4cd2-a297-545a92ad866e Superblock backups stored on blocks: 32768, 98304, 163840, 229376, 294912, 819200, 884736, 1605632, 2654208, 4096000, 7962624, 11239424 Allocating group tables: done Writing inode tables: done Creating journal (65536 blocks): done Writing superblocks and filesystem accounting information: done スワップパーティションの有効化 livecd ~ # mkswap /dev/sda2 Setting up swapspace version 1, size = 4 GiB (4294963200 bytes) no label, UUID=ee0a7e9a-0616-469c-94b1-3f657578a203 livecd ~ # swapon /dev/sda2 ルートパーティションのマウント livecd ~ # mount /dev/sda3 /mnt/gentoo |
④stage tarballのダウンロード、展開
|
1 2 3 4 |
livecd ~ # cd /mnt/gentoo livecd /mnt/gentoo # wget https://gentoo.osuosl.org/releases/amd64/autobuilds/20250406T165023Z/stage3-amd64-desktop-openrc-20250406T165023Z.tar.xz livecd /mnt/gentoo # tar xpvf stage3-*.tar.xz --xattrs-include='*.*' --numeric-owner |
⑤コンパイル時のオプション
|
1 2 3 4 5 6 7 8 9 10 |
livecd /mnt/gentoo # nano -w /mnt/gentoo/etc/portage/make.conf # 下記に変更 COMMON_FLAGS="-march=native -O2 -pipe" #次の行を追加 MAKEOPTS="-j3" #次の行を追加 ACCEPT_LICENSE="* -@EULA" |
⑥高速ミラーの選択 Japanを選択
|
1 |
livecd /mnt/gentoo # mirrorselect -i -o >> /mnt/gentoo/etc/portage/make.conf |
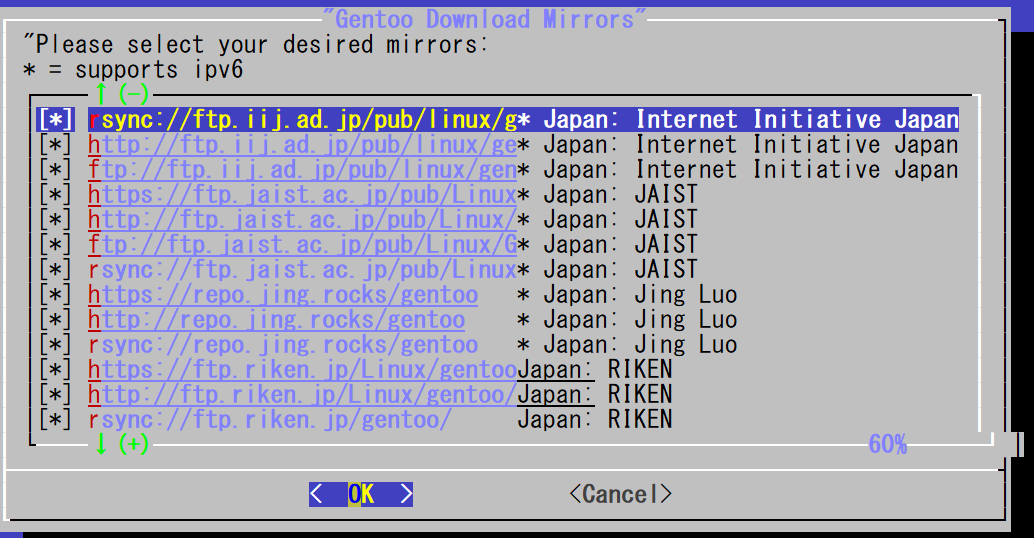
Gentoo ebuild リポジトリ
|
1 2 |
livecd /mnt/gentoo # mkdir --parents /mnt/gentoo/etc/portage/repos.conf livecd /mnt/gentoo # cp /mnt/gentoo/usr/share/portage/config/repos.conf /mnt/gentoo/etc/portage/repos.conf/gentoo.conf |
⑦DNSを設定
|
1 |
livecd /mnt/gentoo # cp --dereference /etc/resolv.conf /mnt/gentoo/etc/ |
⑧ファイルシステムのマウント
|
1 2 3 4 5 6 7 |
livecd /mnt/gentoo # mount --types proc /proc /mnt/gentoo/proc livecd /mnt/gentoo # mount --rbind /sys /mnt/gentoo/sys livecd /mnt/gentoo # mount --make-rslave /mnt/gentoo/sys livecd /mnt/gentoo # mount --rbind /dev /mnt/gentoo/dev livecd /mnt/gentoo # mount --make-rslave /mnt/gentoo/dev livecd /mnt/gentoo # mount --bind /run /mnt/gentoo/run livecd /mnt/gentoo # mount --make-slave /mnt/gentoo/run |
⑨新環境へ移行
chrootを使用して、ルートロケーションを/(インストールメディア上)から/mnt/gentoo/(パーティション上)に変更します。
|
1 2 3 4 |
livecd /mnt/gentoo # chroot /mnt/gentoo /bin/bash livecd / # source /etc/profile livecd / # export PS1="(chroot) ${PS1}" (chroot) livecd / # |
⑩ブートパーティションをマウント
|
1 |
(chroot) livecd / # mount /dev/sda1 /boot |
⑪Portage設定
|
1 |
(chroot) livecd / # emerge-webrsync |
⑫プロファイルを選択
|
1 2 3 |
今回は、[21] default/linux/amd64/23.0 (stable) を選択 (chroot) livecd / # eselect profile list (chroot) livecd / # eselect profile set 21 |
⑬@worldのセットを更新
|
1 2 |
(chroot) livecd / # emerge --ask --verbose --update --deep --newuse @world (chroot) livecd / # emerge --depclean |
⑭タイムゾーンの設定
|
1 2 3 4 5 6 7 8 9 10 11 12 13 14 15 16 17 18 19 |
(chroot) livecd / # ls /usr/share/zoneinfo Africa Cuba GMT+0 Kwajalein Poland Zulu America EET GMT-0 Libya Portugal iso3166.tab Antarctica EST GMT0 MET ROC leap-seconds.list Arctic EST5EDT Greenwich MST ROK leapseconds Asia Egypt HST MST7MDT Singapore tzdata.zi Atlantic Eire Hongkong Mexico Turkey zone.tab Australia Etc Iceland NZ UCT zone1970.tab Brazil Europe Indian NZ-CHAT US zonenow.tab CET Factory Iran Navajo UTC CST6CDT GB Israel PRC Universal Canada GB-Eire Jamaica PST8PDT W-SU Chile GMT Japan Pacific WET # timezoneを日本にする (chroot) livecd / # echo "Japan" > /etc/timezone #タイムゾーンの再設定 (chroot) livecd / # emerge --config sys-libs/timezone-data |
⑮ロケールの設定(英語表記にする)
|
1 2 3 4 5 6 7 8 9 10 11 12 13 14 15 16 17 18 19 20 21 22 23 24 25 26 |
(chroot) livecd / # nano -w /etc/locale.gen #下記追記または該当行コメント外す en_US ISO-8859-1 en_US.UTF-8 UTF-8 反映させる (chroot) livecd / # locale-gen 言語をen_US.utf8に設定する (chroot) livecd / # eselect locale list Available targets for the LANG variable: [1] C [2] C.utf8 [3] POSIX [4] en_US [5] en_US.iso88591 [6] en_US.utf8 [7] C.UTF8 * [ ] (free form) (chroot) livecd / # eselect locale set 6 Setting LANG to en_US.utf8 ... Run ". /etc/profile" to update the variable in your shell. (chroot) livecd / # env-update && source /etc/profile && export PS1="(chroot) ${PS1}" |
⑯ファイルシステムのセットアップ
|
1 2 3 4 5 6 7 8 9 10 11 12 13 14 15 16 |
既存のパーティションを一覧表示する (chroot) livecd / # blkid /dev/sr0: BLOCK_SIZE="2048" UUID="2025-01-19-18-06-14-00" LABEL="Gentoo-amd64-20250119" TYPE="iso9660" PTTYPE="PMBR" /dev/loop0: BLOCK_SIZE="131072" TYPE="squashfs" /dev/sda2: UUID="ee0a7e9a-0616-469c-94b1-3f657578a203" TYPE="swap" PARTUUID="c33cf4cc-faa7-4974-9d58-84b7077ceba3" /dev/sda3: UUID="58663ba3-9f89-4cd2-a297-545a92ad866e" BLOCK_SIZE="4096" TYPE="ext4" PARTUUID="d97c2db5-e94a-4277-9990-e5f43ce3ca7c" /dev/sda1: UUID="C509-2C32" BLOCK_SIZE="512" TYPE="vfat" PARTUUID="a32b2113-b226-4882-8d55-14404b91ff5f" ファイルシステムを編集する (chroot) livecd / # nano -w /etc/fstab /dev/sda1 /boot ext4 defaults,noatime 0 2 /dev/sda2 none swap sw 0 0 /dev/sada3 / ext4 noatime 0 1 /dev/cdrom /mnt/cdrom auto noauto,user 0 0 |
⑰カーネルのセットアップ:genkernelの使用
|
1 2 3 4 5 6 |
(chroot) livecd / # emerge -avt gentoo-sources (chroot) livecd / # emerge --ask sys-kernel/genkernel (chroot) livecd / # nano -w /etc/genkernel.conf 下記コメントアウトして、その下に追加 # DEFAULT_KERNEL_SOURCE="/usr/src/linux" DEFAULT_KERNEL_SOURCE="/usr/src/linux-6.12.21-gentoo" |
|
1 2 3 4 5 6 7 8 9 10 11 12 13 14 15 16 17 18 19 20 21 22 |
(chroot) livecd / # genkernel all #/bootディレクトリ配下にカーネルが展開される(時間がかかる) * Kernel compiled successfully! * * --no-bootloader set; Skipping bootloader update ... * * Required kernel parameter: * * root=/dev/$ROOT * * Where $ROOT is the device node for your root partition as the * one specified in /etc/fstab * If you require Genkernel's hardware detection features, you MUST * tell your bootloader to use the provided initramfs file '/boot/initramfs-6.6.21-gentoo-x86_64.img'. * WARNING... WARNING... WARNING... * Additional kernel parameters that *may* be required to boot properly: * Do NOT report kernel bugs as genkernel bugs unless your bug * is about the default genkernel configuration... * * Make sure you have the latest ~arch genkernel before reporting bugs. |
|
1 2 |
(chroot) livecd / # ls /boot/vmlinu* /boot/initramfs* /boot/initramfs-6.12.21-gentoo-x86_64.img /boot/vmlinuz-6.12.21-gentoo-x86_64 |
⑱ホストの基本設定
|
1 2 3 4 5 6 7 8 9 10 11 12 13 14 15 16 17 18 19 20 21 22 23 24 25 26 27 28 29 30 31 32 33 34 35 36 37 38 39 40 41 42 43 44 45 46 47 48 |
#ホスト名を編集(今回はLepardにする) (chroot) livecd / # nano -w /etc/conf.d/hostname Hostname="Lepard" # netifrcの設定 (chroot) livecd / # emerge --ask --noreplace net-misc/netifrc # dhcpクライアントの設定 (chroot) livecd / # emerge --ask net-misc/dhcpcd (chroot) livecd / # rc-update add dhcpcd default (chroot) livecd / # rc-service dhcpcd start # 基本的なネットワーク設定 (chroot) livecd / # nano -w /etc/conf.d/net dns_domain_lo="workgroup" config_ens33="dhcp" #起動時にネットワークを開始する。 (chroot) livecd / # cd /etc/init.d (chroot) livecd / # ln -s net.lo net.ens33 (chroot) livecd / # rc-update add net.ens33 default #必要に応じてhostsファイルを設定する。 (chroot) livecd / # nano -w /etc/hosts 127.0.0.1 Lepard #setup root password (chroot) livecd / # passwd passwd: password updated successfully #時計をローカルに合わせる (chroot) livecd / # nano -w /etc/conf.d/hwclock clock="local" #システム・ロガーの設定 (chroot) livecd / # emerge --ask app-admin/sysklogd (chroot) livecd / # rc-update add sysklogd default # cronデーモンの設定 (chroot) livecd / # emerge --ask sys-process/cronie (chroot) livecd / # rc-update add cronie default #ファイルインデックスの設定 (chroot) livecd / # emerge --ask sys-apps/mlocate (chroot) livecd / # updatedb #setup ssh (chroot) livecd / # rc-update add sshd default |
⑲grubのセットアップ
|
1 2 3 4 5 6 7 8 9 10 11 12 13 |
まず最初にefiを有効にする (chroot) livecd / # echo 'GRUB_PLATFORMS="efi-64"' >> /etc/portage/make.conf (chroot) livecd / # emerge --ask sys-boot/grub (chroot) livecd / # grub-install --target=x86_64-efi --efi-directory=/boot (chroot) livecd / # grub-mkconfig -o /boot/grub/grub.cfg システムを再起動 (chroot) livecd / # exit (chroot) livecd / # cd (chroot) livecd / # umount -l /mnt/gentoo/dev{/shm,/pts,} (chroot) livecd / # umount -R /mnt/gentoo (chroot) livecd / # reboot |
再起動すると次のメニューが表示されGentoo Linuxにログインできる
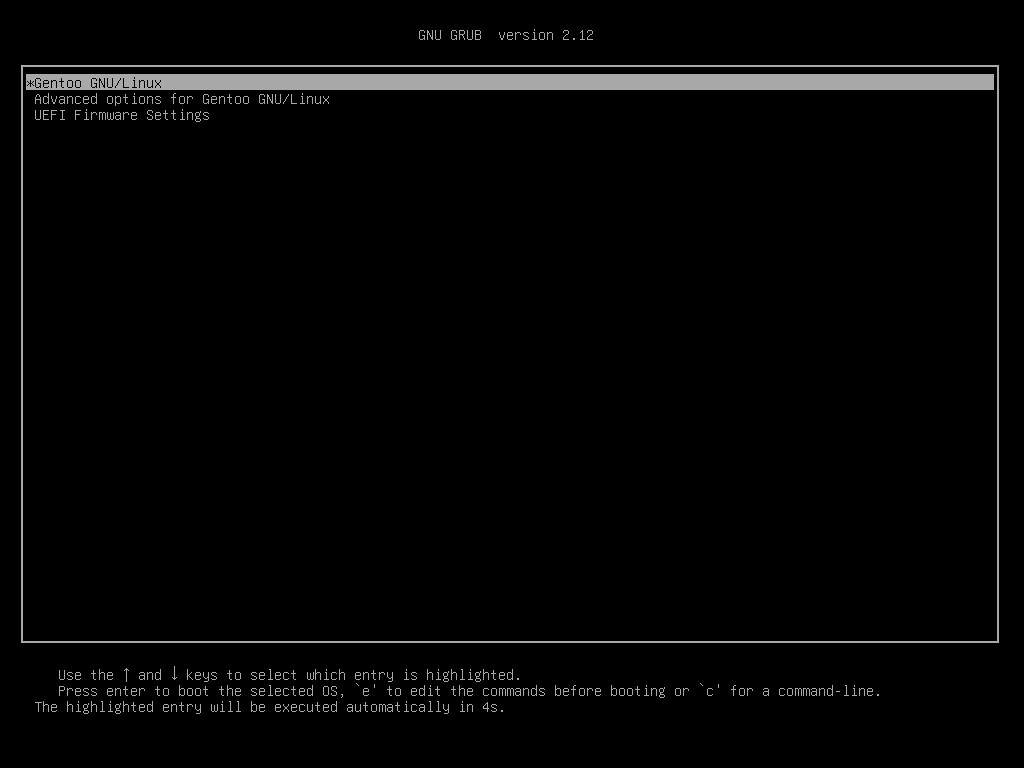

Gentoo Linuxインストール後の設定
デフォルトのエディタをvimにする
|
1 2 3 4 5 6 7 8 9 10 11 12 13 |
インストール Lepard ~# emerge --ask app-editors/vim Lepard ~# eselect editor list Available targets for the EDITOR variable: [1] nano [2] ex [3] vi [4] vim [ ] (free form) Lepard ~# eselect editor set 4 Lepard ~# . /etc/profile |
一般ユーザの追加とsudoの導入
①一般ユーザを追加してパスワードを設定する(今回は一般ユーザーhuongを作成)
|
1 2 3 4 5 |
Lepard ~# LANG='C' useradd -m -G users,portage,wheel -s /bin/bash huong Lepard ~# LANG='C' passwd huong Enter new password: Retype new password: passwd: password updated successfully |
➁sudoをインストール
|
1 2 3 4 5 6 7 8 9 10 11 12 13 14 15 16 17 18 19 20 21 22 23 |
ログアウトして一般ユーザでログインしなおす。 # exit # exit Lepard login: huong Password: huong@Lepard ~ $ suでrootになり、sudoをインストールする。 huong@Lepard ~ $ su - Password: (rootパスワードを入力) Lepard ~ # emerge -av sudo visudoでsudoを設定する。 Lepard ~# visudo 125行目コメント解除 %wheel ALL=(ALL:ALL) ALL suをぬけてsudoを試してみる。 # exit huong@Lepard ~ $ sudo echo huong (huongのパスワードを入力する) huong |
固定IPアドレス設定
192.168.11.83に設定する場合
まずインターフェース名確認
|
1 2 3 4 5 6 7 8 9 10 11 12 13 14 |
Lepard ~# ip a 1: lo: <LOOPBACK,UP,LOWER_UP> mtu 65536 qdisc noqueue state UNKNOWN group default qlen 1000 link/loopback 00:00:00:00:00:00 brd 00:00:00:00:00:00 inet 127.0.0.1/8 brd 127.255.255.255 scope host lo valid_lft forever preferred_lft forever inet6 ::1/128 scope host proto kernel_lo valid_lft forever preferred_lft forever 2: ens33: <BROADCAST,MULTICAST,UP,LOWER_UP> mtu 1500 qdisc pfifo_fast state UP group default qlen 1000 link/ether 00:0c:29:17:82:a9 brd ff:ff:ff:ff:ff:ff altname enp2s1 inet 192.168.11.43/24 brd 192.168.11.255 scope global dynamic noprefixroute ens33 valid_lft 170803sec preferred_lft 149203sec inet6 fe80::66fd:4e76:34e4:c140/64 scope link valid_lft forever preferred_lft forever |
インターフェース名はens33であり、現状ではDHCPで192.168.11.43に割り当てられている
GentooのRCシステムに反映させる
|
1 2 3 |
net.lo から net.ens33へのシンボリックリンクを /etc/init.d に作成する Lepard ~# cd /etc/init.d Lepard ~# ln -s net.lo net.ens33 |
ネットワークインターフェースの設定ファイル /etc/conf.d/net 編集
|
1 2 3 4 5 6 7 8 9 |
Lepard ~# vi /etc/conf.d/net dns_domain_lo="workgroup" config_ens33="dhcp" ↓ dns_domain_lo="workgroup" #config_ens33="dhcp" config_ens33="192.168.11.83/24" routes_ens33="default via 192.168.11.1" dns_servers_ens33="192.168.11.1" |
変更を反映し、Gentoo 起動時に開始されるように設定する
|
1 2 3 4 |
Lepard ~# /etc/init.d/net.ens33 start Lepard ~# rc-update add net.ens33 default * service net.ens33 added to runlevel default |
Apache + MySQL + PHP
Apache2インストール
①プロファイルを一覧表示し、変更 今回は[41]default/linux/amd64/23.0/hardened (stable)を使用する
|
1 2 |
Lepard ~# eselect profile list Lepard ~# eselect profile set 41 |
システムと Portage ツリーを更新
|
1 2 |
Lepard ~# emerge --sync Lepard ~# emerge --update @world |
➁Apache をインストール
Apache Web サーバーのドキュメントで USE フラグ を確認
|
1 |
Lepard ~# emerge -pv apache |
必要に応じUSE フラグを含む Portage の make.conf ファイルを編集(今回はデフォルトで進める)
|
1 |
Lepard ~# vi /etc/portage/make.conf |
インストール
|
1 |
Lepard ~# emerge --ask www-servers/apache |
➂ServerName エラーを回避し、httpd デーモンを開始
|
1 2 3 4 5 6 |
Lepard ~# vi /etc/apache2/httpd.conf 最終行に下記追加 ServerName localhost Lepard ~# /etc/init.d/apache2 start * Starting apache2 ... [ ok ] |
PHP インストール
①PHP のUSE 固有のフラグを取得
|
1 2 3 4 5 6 7 8 9 10 11 12 13 14 |
Lepard ~# emerge -pv php These are the packages that would be merged, in order: Calculating dependencies... done! Dependency resolution took 0.84 s (backtrack: 0/20). [ebuild N ] dev-libs/oniguruma-6.9.10:0/5::gentoo USE="-crnl-as-line-terminator -static-libs" ABI_X86="(64) -32 (-x32)" 957 KiB [ebuild N ] app-eselect/eselect-php-0.9.9::gentoo USE="-apache2 -fpm" 54 KiB [ebuild N ] dev-lang/php-8.2.28:8.2::gentoo USE="acl bzip2 cli ctype fileinfo filter flatfile gdbm iconv ipv6 nls opcache opcache-jit phar posix readline session simplexml ssl tokenizer unicode xml zlib -apache2 -apparmor -argon2 -avif -bcmath -berkdb -calendar -cdb -cgi -cjk -curl -debug -embed -enchant -exif -ffi -fpm -ftp -gd -gmp -imap -inifile -intl -iodbc -jit -kerberos -ldap -ldap-sasl -libedit -lmdb -mhash -mssql -mysql -mysqli (-oci8-instant-client) -odbc -pcntl -pdo -phpdbg -postgres -qdbm (-selinux) -session-mm -sharedmem -snmp -soap -sockets -sodium -spell -sqlite -systemd -sysvipc -test -threads -tidy -tokyocabinet -truetype -valgrind -webp -xmlreader -xmlwriter -xpm -xslt -zip" 11,864 KiB Total: 3 packages (3 new), Size of downloads: 12,873 KiB * IMPORTANT: 23 news items need reading for repository 'gentoo'. * Use eselect news read to view new items. |
➁/etc/portage/make.conf ファイルを編集し、PHP8.2 を指定する
|
1 2 3 4 |
Lepard ~# vi /etc/portage/make.conf 最終行に下記追加(USE="は1行で記入) USE="apache2 php pam berkdb bzip2 cli crypt ctype exif fileinfo filter gdbm hash iconv ipv6 json -ldap nls opcache phar posix readline session simplexml spell ssl tokenizer truetype unicode xml zlib -bcmath calendar -cdb cgi -cjk curl -debug -embed -enchant -firebird -flatfile -fpm (-frontbase) ftp gd -gmp imap -inifile -intl -iodbc -kerberos -ldap-sasl -libedit libmysqlclient -mhash -mssql mysql mysqli -oci8-instant-client -odbc -pcntl pdo -postgres -qdbm -recode (-selinux) -sharedmem -snmp -soap -sockets -sqlite (-sybase-ct) -systemd -sysvipc -threads -tidy -wddx -xmlreader -xmlrpc -xmlwriter -xpm -xslt zip jpeg png pcre session unicode" PHP_TARGETS="php8-2" |
➂PHPインストール(時間がかかる!)
|
1 |
Lepard ~# emerge --ask dev-lang/php |
④PHP モジュールを使用するように Apache に指示
|
1 2 3 |
Lepard ~# vi /etc/conf.d/apache2 36行目APACHE2_OPTS 行を次のようにします APACHE2_OPTS="-D DEFAULT_VHOST -D INFO -D SSL -D SSL_DEFAULT_VHOST -D LANGUAGE -D PHP" |
⑤Apache再起動
|
1 |
Lepard ~# /etc/init.d/apache2 restart |
⑥サーバー構成をテスト
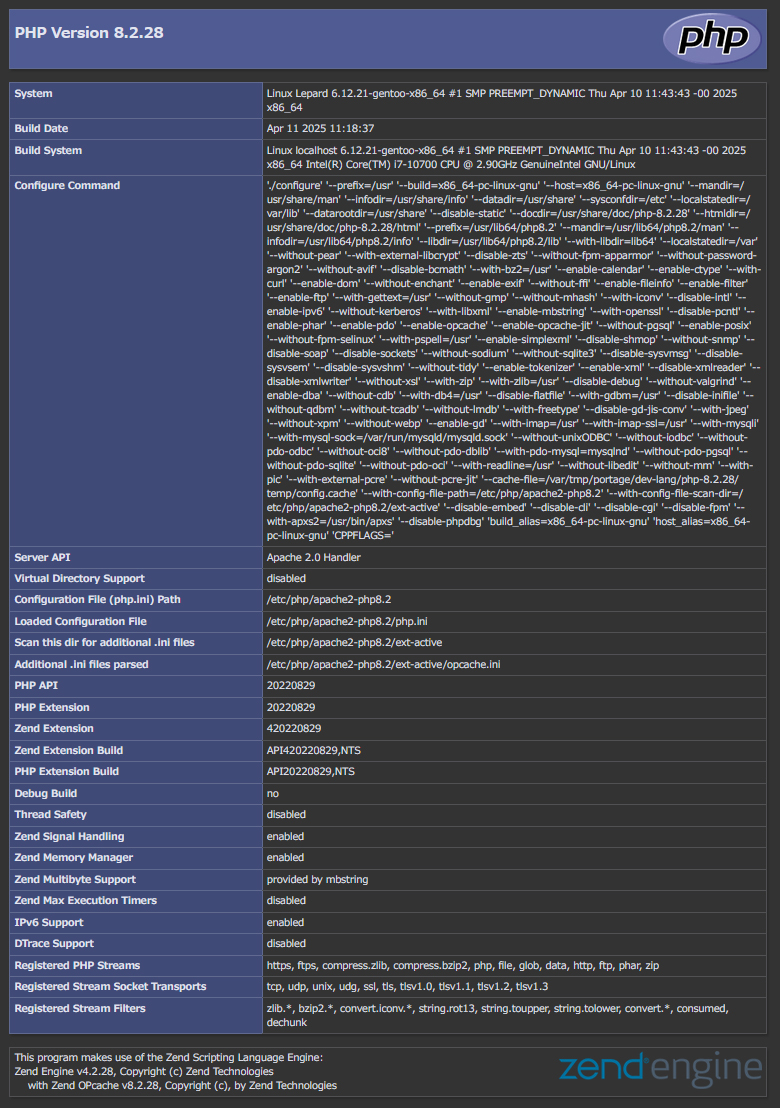
localhost のルートディレクトリ (/var/www/localhost/htdocs/) に phpinfo ファイルを作成し、 Apache サービスを再起動し、ブラウザで http://localhost/info.php または http://system_IP/info.php にアクセスすると下図が表示されればOK
|
1 2 3 4 |
Lepard ~# vi /var/www/localhost/htdocs/info.php <?php phpinfo(); ?> |
MySQL データベースをインストール
①USE フラグ を確認
|
1 |
Lepard ~# emerge -pv mysql |
➁インストール(時間がかかる!)
|
1 |
Lepard ~# emerge --ask dev-db/mysql |
➂バージョン確認
|
1 2 |
Lepard ~# mysql --version mysql Ver 8.0.37 for Linux on x86_64 (Gentoo Linux mysql-8.0.37) |
④パスワード設定
|
1 2 3 4 5 6 7 8 9 10 11 12 13 14 15 16 17 18 19 20 21 22 23 24 25 26 27 28 29 30 31 32 33 34 35 36 37 38 39 40 41 42 43 44 |
Lepard ~# emerge --config =dev-db/mysql-8.0.37 Configuring pkg... * Detected settings: * ================== * MySQL User: mysql * MySQL Group: mysql * MySQL DATA directory: /var/lib/mysql * MySQL TMP directory: /tmp/mysqld-tmp.231822123 * PID DIR: /run/mysqld * Install db log: /tmp/mysqld-tmp.231822123/install_db.612211252.log * Install server log: /tmp/mysqld-tmp.231822123/install_mysqld.221221323.log * Please select default authentication plugin (enter number or plugin name): * 1) caching_sha2_password [MySQL 8.0 default] * 2) mysql_native_password [MySQL 5.7 default] * * For details see: * https://dev.mysql.com/doc/refman/8.0/en/upgrading-from-previous-series.html#upgrade-caching-sha2-password >1 * Ensuring that default-auth is set to 'caching_sha2_password' in '/etc/mysql/mysql.d/50-distro-client.cnf' ... * Ensuring that default-authentication-plugin is set to 'caching_sha2_password' in '/etc/mysql/mysql.d/50-distro-server.cnf' ... * Trying to get password for mysql 'root' user from 'mysql' section ... * Trying to get password for mysql 'root' user from 'client' section ... * No password for mysql 'root' user was specified via environment * variable MYSQL_ROOT_PASSWORD and no password was found in config * file like '/root/.my.cnf'. * To continue please provide a password for the mysql 'root' user * now on console: * NOTE: Please avoid ["'\_%] characters in the password! >[password] * Retype the password >[again same password] * Initializing mysql data directory: /usr/sbin/mysqld --loose-skip-host-cache --loose-skip-name-resolve --loose-skip-networking --loose-skip-slave-start --loose-skip-federated --loose-skip-ssl --loose-skip-log-bin --loose-skip-relay-log --loose-skip-slow-query-log --loose-skip-external-locking --loose-skip-log-slave-updates --initialize-insecure --init-file='/tmp/mysqld-tmp.231822123/tz.122231223.sql' --basedir='/usr' --datadir='/var/lib/mysql' --tmpdir='/tmp/mysqld-tmp.231822123' --log-error='/tmp/mysqld-tmp.231822123/install_db.612211252.log' --user=mysql * Starting mysqld to finalize initialization: /usr/sbin/mysqld --loose-skip-host-cache --loose-skip-name-resolve --loose-skip-networking --loose-skip-slave-start --loose-skip-federated --loose-skip-ssl --loose-skip-log-bin --loose-skip-relay-log --loose-skip-slow-query-log --loose-skip-external-locking --loose-skip-log-slave-updates --basedir='/usr' --datadir='/var/lib/mysql' --tmpdir='/tmp/mysqld-tmp.231822123' --max_allowed_packet=8M --net_buffer_length=16K --socket='/run/mysqld/mysqld6630.sock' --pid-file='/run/mysqld/mysqld6630.pid' --log-error='/tmp/mysqld-tmp.231822123/install_mysqld.221221323.log' --user=mysql Waiting for mysqld to accept connections ..... * Setting root password ... [ ok ] Stopping the server . * mysql data directory at '/var/lib/mysql' successfully initialized! |
⑤mysqlサービスを開始
|
1 2 3 4 5 |
Lepard ~# rc-service mysql start * Caching service dependencies ... [ ok ] * Checking mysqld configuration for mysql ... [ ok ] * Starting mysql ... [ ok ] |
⑥起動時に自動的に開始されるようにする
|
1 |
Lepard ~# rc-update add mysql default |
⑦mysql_secure_installation を使用して root パスワードを変更し、ローカルホスト外での root ログインを無効にし、匿名ユーザーとテスト データベースを削除してデータベースを保護します
|
1 2 3 4 5 6 7 8 9 10 11 12 13 14 15 16 17 18 19 20 21 22 23 24 25 26 27 28 29 30 31 32 33 34 35 36 37 38 39 40 41 42 43 44 45 46 47 48 49 50 51 52 53 54 55 56 57 58 59 60 61 62 63 64 65 66 67 68 69 70 71 |
Lepard ~# mysql_secure_installation mysql_secure_installation: [Warning] unknown variable 'loose-default-auth=caching_sha2_password'. mysql_secure_installation: [ERROR] unknown variable 'character-sets-dir=/usr/share/mysql/charsets'. Securing the MySQL server deployment. Enter password for user root: VALIDATE PASSWORD COMPONENT can be used to test passwords and improve security. It checks the strength of password and allows the users to set only those passwords which are secure enough. Would you like to setup VALIDATE PASSWORD component? Press y|Y for Yes, any other key for No: y There are three levels of password validation policy: LOW Length >= 8 MEDIUM Length >= 8, numeric, mixed case, and special characters STRONG Length >= 8, numeric, mixed case, special characters and dictionary file Please enter 0 = LOW, 1 = MEDIUM and 2 = STRONG: 0 Using existing password for root. Estimated strength of the password: 100 Change the password for root ? ((Press y|Y for Yes, any other key for No) : y New password: Re-enter new password: Estimated strength of the password: 100 Do you wish to continue with the password provided?(Press y|Y for Yes, any other key for No) : y By default, a MySQL installation has an anonymous user, allowing anyone to log into MySQL without having to have a user account created for them. This is intended only for testing, and to make the installation go a bit smoother. You should remove them before moving into a production environment. Remove anonymous users? (Press y|Y for Yes, any other key for No) : y Success. Normally, root should only be allowed to connect from 'localhost'. This ensures that someone cannot guess at the root password from the network. Disallow root login remotely? (Press y|Y for Yes, any other key for No) : y Success. By default, MySQL comes with a database named 'test' that anyone can access. This is also intended only for testing, and should be removed before moving into a production environment. Remove test database and access to it? (Press y|Y for Yes, any other key for No) : y - Dropping test database... Success. - Removing privileges on test database... Success. Reloading the privilege tables will ensure that all changes made so far will take effect immediately. Reload privilege tables now? (Press y|Y for Yes, any other key for No) : y Success. All done! |
⑧MySQLサーバーにログインする
|
1 |
Lepard ~# mysql -u root -p |
PhpMyAdminインストール
①MySQL サーバーを管理するためのグラフィカル インターフェイス PhpMyAdminインストール
|
1 2 |
Lepard ~# emerge -pv phpmyadmin Lepard ~# emerge dev-db/phpmyadmin |
➁PhpMyAdmin の構成ファイルを作成し、blowfish_secret パスフレーズを固有のものに置き換える
|
1 2 3 4 5 |
Lepard~# cp /var/www/localhost/htdocs/phpmyadmin/config.sample.inc.php /var/www/localhost/htdocs/phpmyadmin/config.inc.php Lepard ~# vi /var/www/localhost/htdocs/phpmyadmin/config.inc.php 16行目 $cfg['blowfish_secret'] = '[password]'; /* YOU MUST FILL IN THIS FOR COOKIE AUTH! */ |
➂PhpMyAdmin ログイン プロセスをテスト
任意のブラウザで http://[Server IP Address]/phpmyadmin にアクセスすると下図ログイン画面になる
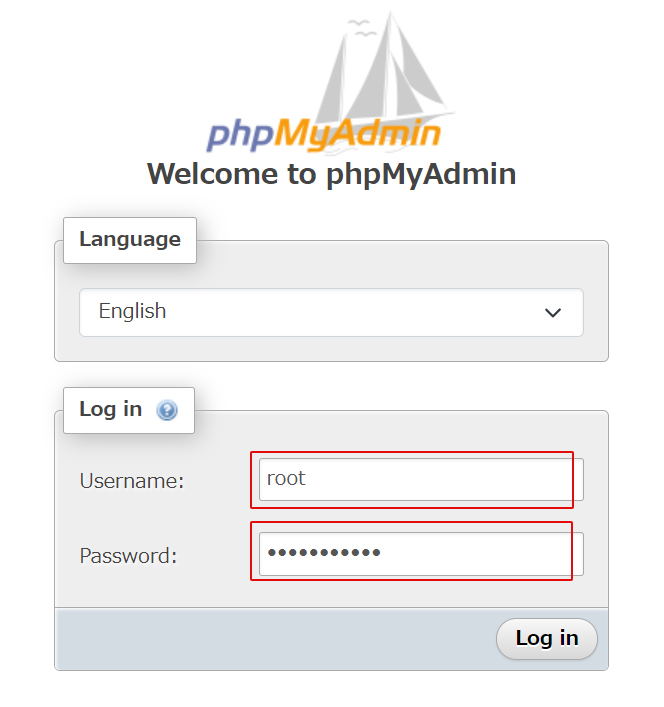
Username : root
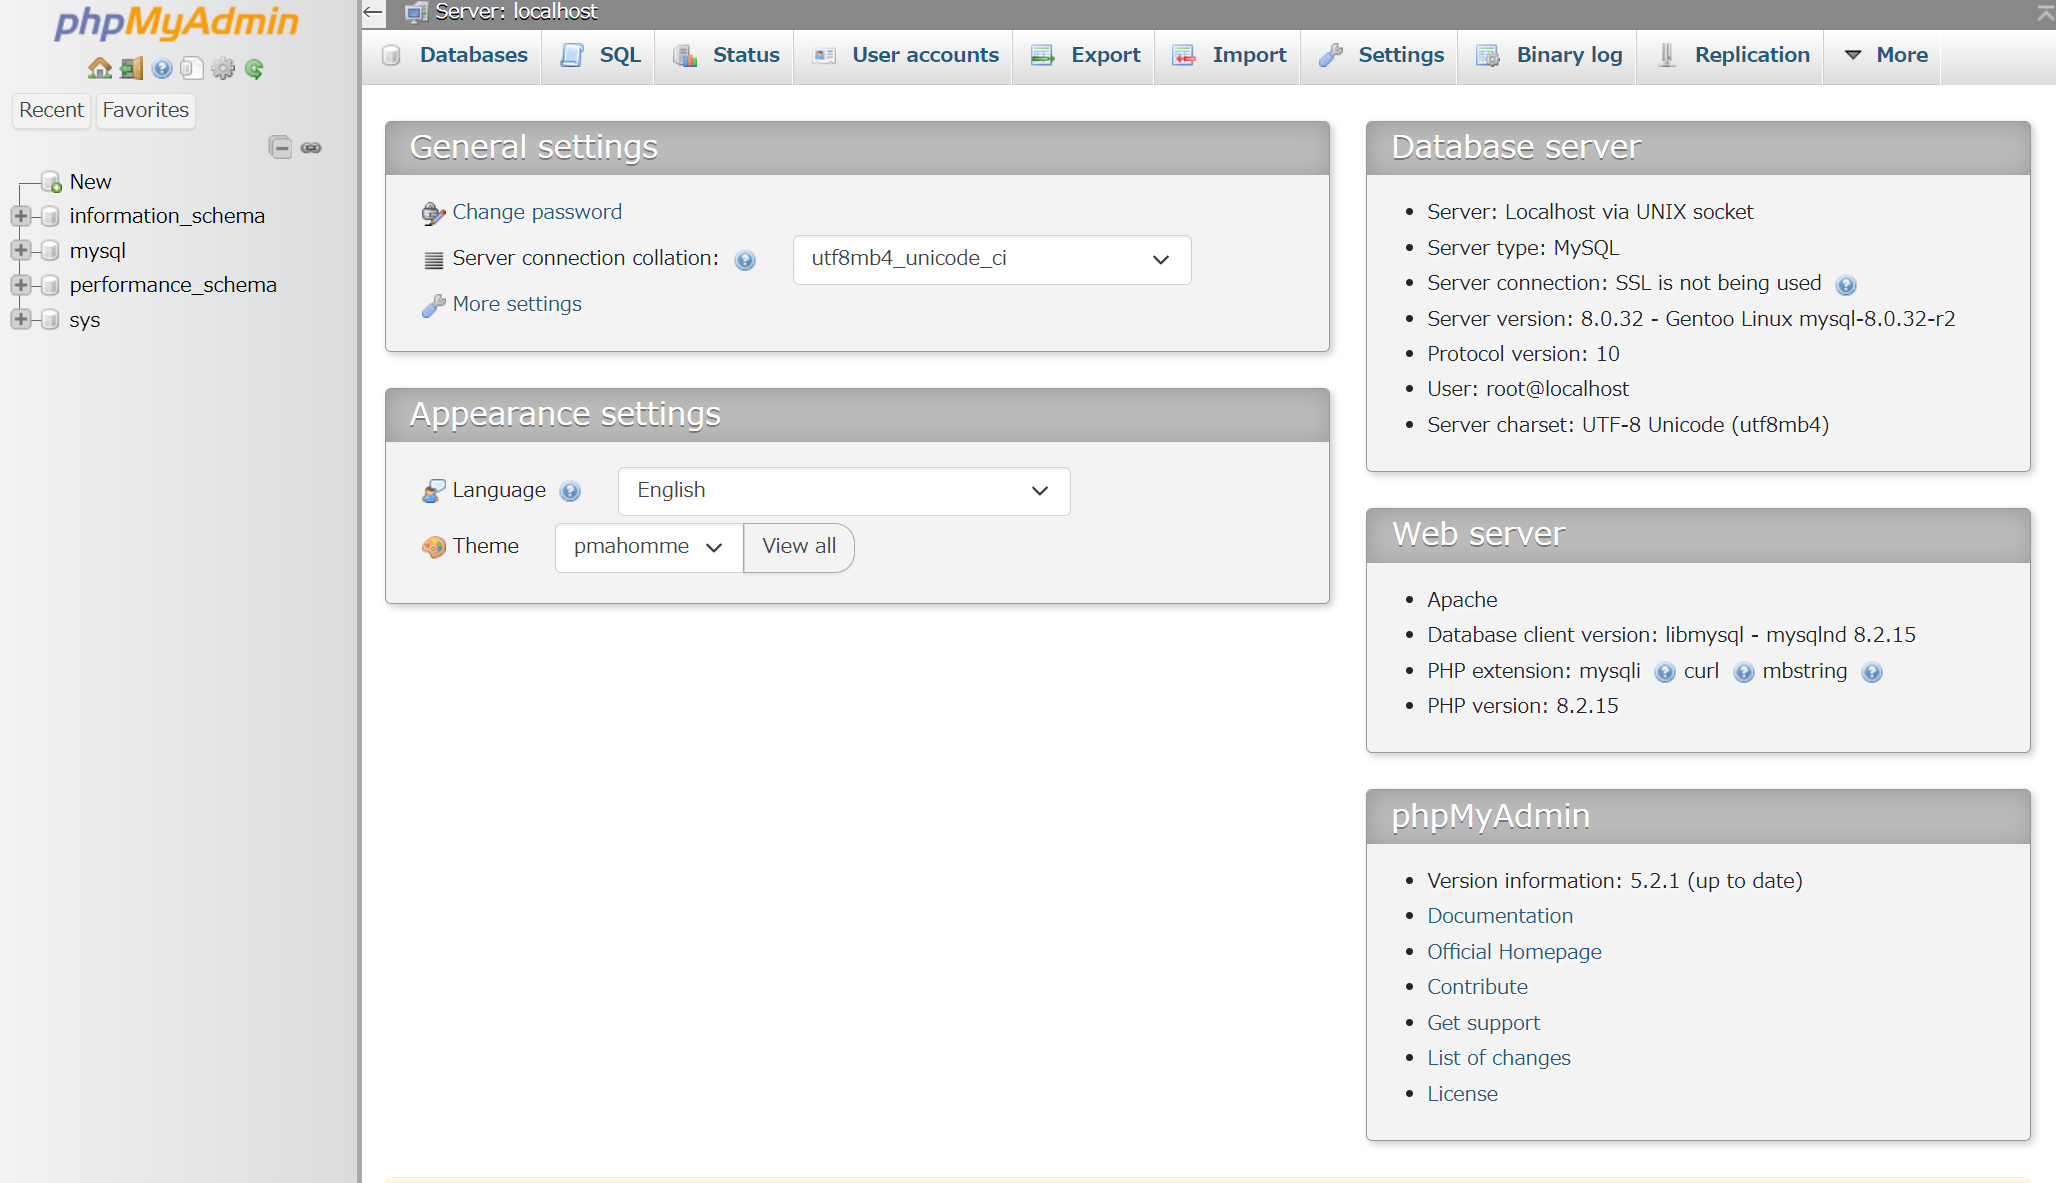
Password : 上記➁で設定したパスワード でログインすると下図ダッシュボードが表示
FTP Server (Proftpd) over SSL/TLS インストール
proftpdインストール
①インストール
|
1 |
Lepard ~ # emerge --ask proftpd |
➁ホームディレクトリを持たないftpuserを作成
今回は
ユーザー : ftpuser
パスワード : 123456
|
1 |
Lepard ~ # useradd -g ftp -s /bin/false -p 123456 --no-create-home ftpuser |
➂proftpd.conf設定サンプルファイルをリネームして/etc/proftpd/ディレクトリにコピー
|
1 |
Lepard ~ # cp /etc/proftpd/proftpd.conf.sample /etc/proftpd/proftpd.conf |
④/etc/proftpd/proftpd.confファイル編集
|
1 2 3 4 5 6 7 8 9 10 11 12 13 14 15 16 17 18 19 20 21 |
Lepard ~ # vi /etc/proftpd/proftpd.conf 匿名ユーザーによるアクセスが不要な場合は、ファイル末尾の行をコメントにする #<Anonymous ~ftp> # User ftp # Group ftp # # # Clients can login with the username "anonymous" and "ftp". # UserAlias anonymous ftp # # # Limit the maximum number of parallel anonymous logins to 10. # MaxClients 10 # # # Prohibit the WRITE command for the anonymous users. # <Limit WRITE> # DenyAll # </Limit> #</Anonymous> ファイルの最後には、ユーザー・アクセス設定のファイルも含める Include /etc/proftpd/users.conf |
⑤/etc/proftpd/users.conf ファイルを作成
|
1 2 3 4 5 6 |
Lepard ~ # vi /etc/proftpd/users.conf <Anonymous ~ftp> User ftpuser Group ftp MaxClients 10 </Anonymous> |
⑥/home/ftp/ディレクトリに書き込み権限を与える
|
1 |
Lepard ~ # chmod 777 /home/ftp/ |
ProFTPD over SSL
①/etc/proftpd/ssl/ディレクトリを作成
|
1 |
Lepard ~ # mkdir /etc/proftpd/ssl |
➁証明書を生成
|
1 2 3 |
Lepard ~ # cd /etc/proftpd/ssl/ Lepard /etc/proftpd/ssl # openssl req -x509 -nodes -days 365 -newkey rsa:2048 -out proftpd-rsa.pem -keyout proftpd-key.pem Lepard /etc/proftpd/ssl # chmod 440 proftpd-key.pem |
➂/etc/proftpd/proftpd.conf を編集
|
1 2 3 4 5 6 7 8 9 10 11 |
Lepard /etc/proftpd/ssl # vi /etc/proftpd/proftpd.conf 末尾に下記を追加 TLSEngine on TLSRequired on TLSRSACertificateFile /etc/proftpd/ssl/proftpd-rsa.pem TLSRSACertificateKeyFile /etc/proftpd/ssl/proftpd-key.pem TLSLog /var/log/proftpd-tls.log <IfModule mod_tls.c> TLSEngine on </IfModule> |
④proftpdを再起動
|
1 2 |
Lepard /etc/proftpd/ssl # /etc/init.d/proftpd restart Lepard /etc/proftpd/ssl # rc-update add proftpd default |
systemdの場合
|
1 2 |
Lepard /etc/proftpd/ssl # systemctl restart proftpd Lepard /etc/proftpd/ssl # systemctl enable proftpd |
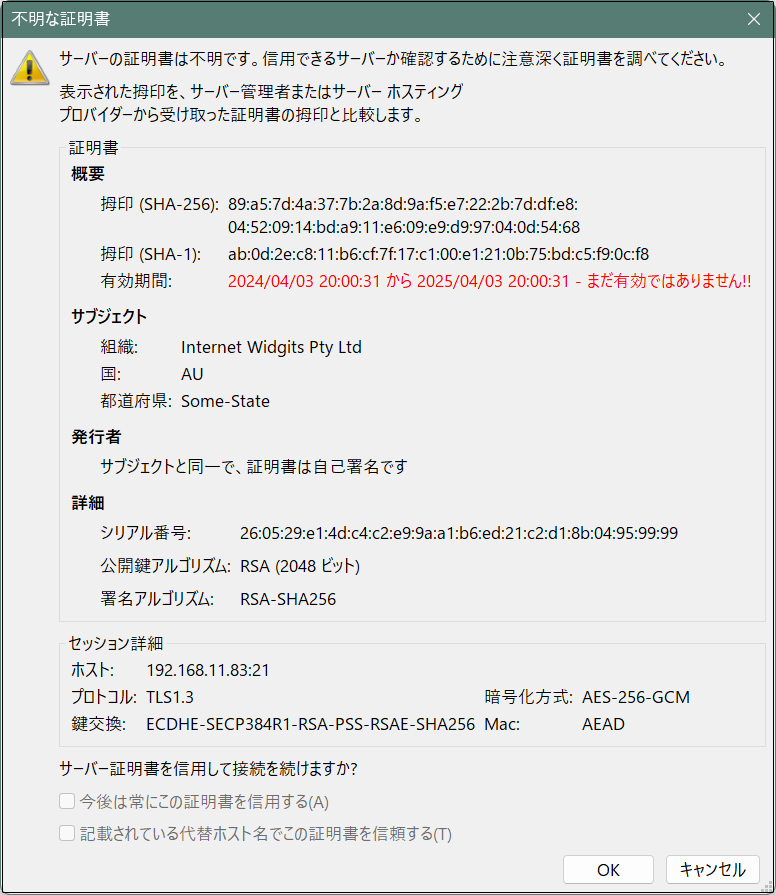
FileZillaで接続すると下図のようなセキュリティ画面が出ればSSL/TLSが設定されている。
このページはGentoo LinuxをOpenRCでインストールしておりますがGentoo LinuxをLVM,systemdでインストールする場合は次ページを参照してください

