Contents
1. FTPサーバ(Vsftpd)
1.1 事前準備
①秘密鍵作成
|
1 2 3 4 5 6 7 8 |
# cd /etc/ssl # openssl genrsa -des3 -out server.key 2048 Generating RSA private key, 2048 bit long modulus (2 primes) .........................................................................................................................................+++++ .................................................+++++ e is 65537 (0x010001) Enter pass phrase for server.key: Verifying - Enter pass phrase for server.key: |
➁パスフレーズ削除
|
1 2 3 |
# openssl rsa -in server.key -out server.key Enter pass phrase for server.key: ←先ほどのパスフレーズを入力 writing RSA key |
➂アクセス権変更
|
1 |
# chmod 400 server.key |
④自己証明書作成
|
1 2 3 4 5 6 7 8 9 10 11 12 13 14 15 16 |
# cd /etc/ssl/ # openssl req -new -x509 -days 3650 -key server.key -out ftp.crt You are about to be asked to enter information that will be incorporated into your certificate request. What you are about to enter is what is called a Distinguished Name or a DN. There are quite a few fields but you can leave some blank For some fields there will be a default value, If you enter '.', the field will be left blank. ----- Country Name (2 letter code) [AU]:JP ←国名 State or Province Name (full name) [Some-State]:Osaka ←都道府県名 Locality Name (eg, city) []:Sakai ←市区町村名 Organization Name (eg, company) [Internet Widgits Pty Ltd]:Lepard ←ホスト名(または会社名) Organizational Unit Name (eg, section) []: ←空エンター Common Name (e.g. server FQDN or YOUR name) []:Admin ←ホスト名(または管理者名) Email Address []:hoge@hoge.com ←管理者メールアドレス |
|
1 2 |
# cat server.key ftp.crt > ftp.pem # chmod 400 ftp.* |
1.2 vsftpdインストール
1.1 vsftpdインストール
|
1 2 |
# cd /usr/ports/ftp/vsftpd # make BATCH=yes WITH_VSFTPD_SSL=yes install clean |
1.2 vsftpd設定ファイル編集
|
1 2 3 4 5 6 7 8 9 10 11 12 13 14 15 16 17 18 19 20 21 22 23 24 25 26 27 28 29 30 31 32 33 34 35 36 37 38 39 40 41 42 43 44 45 46 47 48 49 50 51 52 53 54 55 56 57 58 59 60 61 62 63 64 65 66 67 68 69 70 71 72 73 74 75 76 |
# chmod 640 /usr/local/etc/vsftpd.conf # vi /usr/local/etc/vsftpd.conf 12行目 anonymous_enable=YES ↓ anonymous_enable=NO ←変更(anonymous(匿名)のログインを許可しない) 15行目 #local_enable=YES ↓ local_enable=YES ←コメント解除(ローカルログインを許可) 18行目 #write_enable=YES ↓ write_enable=YES ←コメント解除(書き込みを許可) 22行目 #local_umask=022 ↓ local_umask=022 ←コメント解除(新規ファイルのパーミッション設定) 51行目 #xferlog_file=/var/log/vsftpd.log ↓ xferlog_file=/var/log/vsftpd.log ←コメント解除(ログファイルの指定) 80行目 #ascii_upload_enable=YES ↓ ascii_upload_enable=YES ←コメント解除(ASCIIモードでのアップロードを許可) 81行目 #ascii_download_enable=YES ↓ ascii_download_enable=YES ←コメント解除(ASCIIモードでのダウンロードを許可) 98行目 #chroot_local_user=YES ↓ chroot_local_user=YES ←コメント解除(ホームディレクトリより上への移動を禁止) 99行目 #chroot_list_enable=YES ↓ chroot_list_enable=YES ←コメント解除(ホームディレクトリより上の移動を禁止) 101行目 #chroot_list_file=/etc/vsftpd.chroot_list ↓ chroot_list_file=/etc/vsftpd.chroot_list ←コメント解除(上記ユーザー指定ファイル) 107行目 #ls_recurse_enable=YES ↓ ls_recurse_enable=YES ←コメント解除(ディレクトリごとの削除を許可する) 112行目 listen=YES ←IPv4有効 134行目 background=YES ←コメント解除 # 最終行に下記を追加 pasv_enable=YES # <= PASV モード有効 pasv_addr_resolve=YES # <= pasv_address 有効 pasv_min_port=4000 # <= PAXV モードの最小ポート番号 pasv_max_port=4009 # <= PAXV モードの最大ポート番号 use_localtime=YES # <= ローカルタイムを使用 ssl_enable=YES # <= SSL接続を許可 rsa_cert_file=/etc/ssl/ftp.pem # <= SSL 証明書ファイルを指定 require_ssl_reuse=NO # <= SSL セッションを再利用しない force_local_logins_ssl=NO # <= 強制 SSL 接続を解除 force_local_data_ssl=NO # <= 強制 SSL 接続を解除 force_dot_files=YES # <= ドットファイルを表示 |
/etc/hosts.allow編集
|
1 |
# echo "vsftpd: ALL" >> /etc/hosts.allow |
chroot_list編集
今回は一般ユーザーhuongを書き込みました
|
1 |
# echo huong >> /etc/vsftpd.chroot_list |
自動起動有効
|
1 2 3 4 |
# vi /etc/rc.conf vsftpd_enable="YES" ←追加 # service vsftpd start |
1.3 Firewallでパッシブポート開放する
下記ページを参考にし、4000-4009ポートを開放する
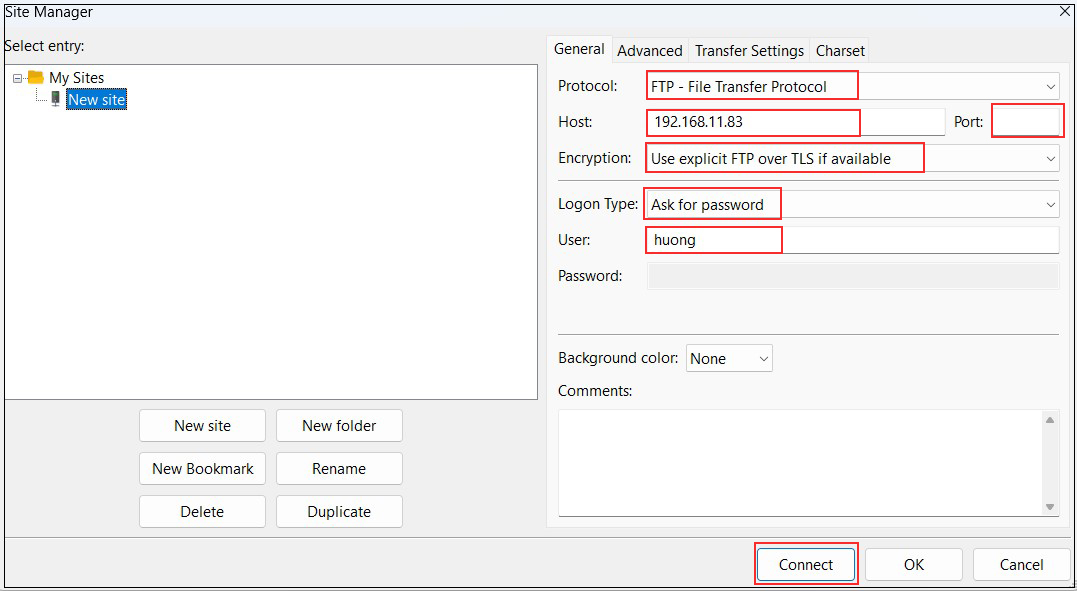
1.4 FileZilla で接続

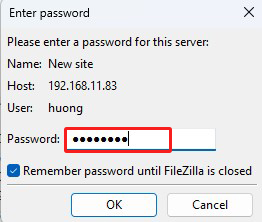
Password : 一般ユーザーhuongのパスワード

2. Sambaでファイルサーバー
WindowsやMacのファイル共有を実現するため、Sambaを使いファイルサーバーを構築する
2.1 Sambaのインストール
|
1 2 |
# cd /usr/ports/net/samba413/ # make |
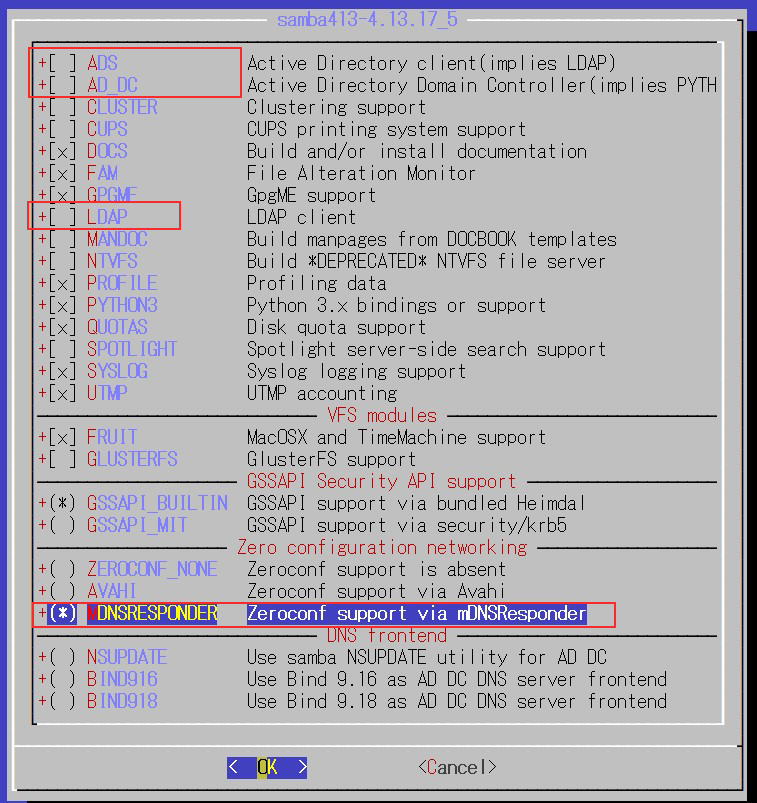
ADS,AD_DCのアクティブ・ディレクトリ関係は、今回は使わないので外す。
LDAPもアカウント管理をLDAPで行わないので外す。
デフォルトではZeroconf SupportはAVAHIにチェックがついていますが、MDNSRESPONDERに変更します

その他オプションはデフォルトでインストール
|
1 2 3 4 5 6 7 8 |
---------- ---------- /usr/bin/strip /usr/ports/net/samba413/work/stage/usr/local/lib/nss_winbind.so.1 /bin/mkdir -p /usr/ports/net/samba413/work/stage/usr/local/share/doc/samba413 Install -m 0644 /usr/ports/net/samba413/work/README.FreeBSD /usr/ports/net/samba413/work/stage/usr/local/share/doc/samba413 ====> Compressing man pages (compress-man) ===> Staging rc.d startup script(s) ===> Installing ldconfig configuration file |
コンパイル完了すれば、インストールします
|
1 2 3 4 5 6 7 8 9 10 11 12 13 14 15 16 17 18 19 20 21 22 23 24 25 26 27 28 29 30 31 32 33 34 35 36 37 38 |
# make install ===> Installing for samba413-4.13.17_5 ===> Checking if samba413 is already installed ===> Registering installation for samba413-4.13.17_5 Installing samba413-4.13.17_5... How to start: http://wiki.samba.org/index.php/Samba4/HOWTO * Your configuration is: /usr/local/etc/smb4.conf * All the relevant databases are under: /var/db/samba4 * All the logs are under: /var/log/samba4 For additional documentation check: http://wiki.samba.org/index.php/Samba4 Bug reports should go to the: https://bugzilla.samba.org/ ===> SECURITY REPORT: This port has installed the following files which may act as network servers and may therefore pose a remote security risk to the system. /usr/local/lib/samba4/private/libsamba-sockets-samba4.so /usr/local/lib/samba4/private/libsmb-transport-samba4.so /usr/local/bin/nmblookup /usr/local/lib/samba4/private/libgse-samba4.so /usr/local/lib/samba4/private/libkrb5-samba4.so.26 /usr/local/sbin/winbindd /usr/local/lib/samba4/private/libsmbd-base-samba4.so /usr/local/lib/samba4/libsmbconf.so.0 /usr/local/sbin/smbd If there are vulnerabilities in these programs there may be a security risk to the system. FreeBSD makes no guarantee about the security of ports included in the Ports Collection. Please type 'make deinstall' to deinstall the port if this is a concern. For more information, and contact details about the security status of this software, see the following webpage: https://www.samba.org/ |
2.2 Sambaの設定
/usr/local/etc/smb4.confを新規作成
|
1 2 3 4 5 6 7 8 9 10 11 12 13 14 15 16 17 18 19 20 |
# cd /usr/local/etc/ # vi smb4.conf [global] dos charset = CP932 ←Windows クライアントとの通信に使用する文字コード unix charset = UTF-8 ←Samba サーバー側の FreeBSDで使われる文字コード workgroup = WORKGROUP ←Windows 側で設定したワークグループ名に合わせる server string = FreeBSD ←任意の名称 netbios name = freebsd ←任意の名称 security = user [share] path = /home/share ←共有するディレクトリのパス create mask = 0770 ←共有ディレクトリに作成されるファイル/ディレクトリのパーミッション directory mask = 0770 ←共有ディレクトリに作成されるファイル/ディレクトリのパーミッション guest only = No ←ゲストユーザー不可 guest ok = No ←ゲストユーザー不可 browseable = No read only = No ←共有ディレクトリを書き込み可能 writable = Yes ←共有ディレクトリを書き込み可能 |
共有ディレクトリを作成
共有ディレクトリを /home/share とし、所有者を huong(Freebsdに登録されている一般ユーザー)、アクセス権限は、一般ユーザーと wheel グループに読み・書き・実行を許可
|
1 2 3 |
# mkdir /home/share # chown huong:wheel /home/share # chmod -R 0770 /home/share |
/etc/rc.confを開いて、samba_server_enable="YES"を追加する
huong(Freebsdに登録されている一般ユーザー)をSamba ユーザーとして登録しパスワードを設定する(pdbedit コマンドを使用)
|
1 2 3 |
# pdbedit -a -u huong new password: Password retype new password: again Password |
ファイアウォール有効の場合はsamba使用ポート(445)を開放しておく
xxxは他のルール番号と違うものにする
|
1 2 3 4 5 6 7 |
# vi /usr/local/etc/ipfw.rules 下記を追加 $IPF xxx allow tcp from any to any 445 in $IPF xxx allow tcp from any to any 445 out システム再起動 # shutdown -r now |
sambaを起動
|
1 2 3 4 |
# service samba_server start Performing sanity check on Samba configuration: OK Starting nmbd. Starting smbd. |
2.3 Samba起動確認
Windowsの設定
・ワークグループ名が"WORKGROUP"になっていることを確認
ファイルエクスプローラーのアドレスバーに、"\\<Samba サーバーの IP アドレス>\<共有ディレクトリ名>" と入力
(今回は'\\192.168.11.83\share")するとログイン画面が表示されるので登録したユーザー名とパスワードを入力する


