1. su コマンド利用
インストール時点でrootパスワードを設定した場合は不要
もし、rootパスワードを設定する場合、次のように設定する
一般ユーザーでログイン後
|
1 2 3 4 5 6 7 8 9 10 11 12 |
huong@localhost:~>sudo passwd root We trust you have received the usual lecture from the local System Administrator. It usually boils down to these three things: #1) Respect the privacy of others. #2) Think before you type. #3) With great power comes great responsibility. [sudo] password for root: New password: Retype new password: passwd: password updated successfully |
|
1 2 3 |
huong@localhost:~>su – Password: <上記で設定したrootユーザーのパスワード> localhost:~ # |
2. システムを最新化
システムを最新化するには以下のようにコマンド入力します。
|
1 |
# zypper -n update && reboot |
3. locateインストール
Linuxシステム全体を対象として、特定のファイルを検索するのにはfindコマンドを利用する場合が多いと思いますが、findはオプションの指定がやや分かりにくいところがあります。そんなときはlocateコマンドが利用できると便利です。locateコマンドは指定したファイル名をもつファイルを全て抽出することが可能です
インストール
|
1 |
# zypper -n install mlocate |
データベースを作成
|
1 |
# updatedb |
locateコマンドの実行
|
1 2 3 4 5 6 7 8 9 10 11 12 13 14 15 16 17 18 19 |
# locate sshd /etc/pam.d/sshd /etc/ssh/sshd_config /etc/sysconfig/SuSEfirewall2.d/services/sshd /etc/systemd/system/multi-user.target.wants/sshd.service /usr/lib/systemd/system/sshd.service /usr/lib/sysusers.d/sshd.conf /usr/lib64/ruby/gems/2.5.0/gems/ruby-augeas-0.5.0/tests/root/etc/ssh/sshd_config /usr/sbin/rcsshd /usr/sbin/sshd /usr/sbin/sshd-gen-keys-start /usr/share/YaST2/scrconf/etc_ssh_sshd_config.scr /usr/share/apparmor/extra-profiles/usr.sbin.sshd /usr/share/augeas/lenses/dist/sshd.aug /usr/share/man/man5/sshd_config.5.gz /usr/share/man/man8/sshd.8.gz /usr/share/vim/vim90/syntax/sshdconfig.vim /var/lib/sshd /var/lib/sshd/is-enabled.rpmtmp |
4. セキュリティ対策のため停止したサービス
不要と思われるサービスを停止 及び 再起動後も停止にしています
|
1 2 3 4 5 6 7 8 9 10 |
# systemctl stop auditd.service # systemctl disable auditd.service # systemctl stop mdmonitor.service # systemctl disable mdmonitor.service # systemctl stop smartd.service # systemctl disable smartd.service # systemctl stop tuned.service # systemctl disable tuned.service # systemctl stop dm-event.socket # systemctl disable dm-event.socket |
5. Vim インストールと設定
5.1. インストール
|
1 |
# zypper install vim |
5.2. 設定
①コマンドエイリアスを自身のユーザー固有環境として適用
|
1 2 3 |
# vi ~/.bashrc # 最終行にエイリアス追記 alias vi='vim' |
# 変更を反映
|
1 |
# source ~/.bashrc |
②Vim の設定
ユーザー個別に適用。全ユーザーに適用するならば「/etc/vimrc」に記述
|
1 2 3 4 5 6 7 8 9 10 11 12 13 14 15 16 17 18 19 20 21 22 23 24 25 26 27 28 29 30 31 32 33 34 35 36 37 38 39 40 41 42 43 44 45 46 47 |
# vi ~/.vimrc " vim の独自拡張機能を使用(viとの互換性無し) set nocompatible " 文字コードを指定 set encoding=utf-8 " ファイルエンコードを指定(先頭から順に成功するまで読み込む) set fileencodings=utf-8,iso-2022-jp,sjis,euc-jp " 自動認識させる改行コードを指定 set fileformats=unix,dos " バックアップを取得 " 逆は [ set nobackup ] set backup " バックアップを取得するディレクトリを指定 set backupdir=~/backup " 検索履歴を残す世代数 set history=50 " 検索時に大文字小文字を区別しない set ignorecase " 検索語に大文字を混ぜると検索時に大文字を区別する set smartcase " 検索語にマッチした単語をハイライト " 逆は [ set nohlsearch ] set hlsearch " インクリメンタルサーチを使用 (検索語の入力最中から随時マッチする文字列の検索を開始) " 逆は [ set noincsearch ] set incsearch " 行番号を表示 " 逆は [ set nonumber ] set number " 改行 ( $ ) やタブ ( ^I ) を可視化 set list " 括弧入力時に対応する括弧を強調 set showmatch " ファイルの末尾に改行を入れない set binary noeol " 自動インデントを有効にする " 逆は [ noautoindent ] set autoindent " 構文ごとに色分け表示 " 逆は [ syntax off ] syntax on " [ syntax on ] の場合のコメント文の色を変更 highlight Comment ctermfg=LightCyan " ウィンドウ幅で行を折り返す " 逆は [ set nowrap ] set wrap |
6. ネットワークの設定
6.1 ホスト名及び固定IPアドレス設定
・ホスト名をLepardに変更
・IPアドレスを固定にする(192.168.11.83)
まず自ネットワークインターフェースの名称を下記コマンドで調べる
今回は「eth0」である
|
1 2 3 4 5 6 7 8 9 10 11 12 13 14 15 |
# ip addr 1: lo: <LOOPBACK,UP,LOWER_UP> mtu 65536 qdisc noqueue state UNKNOWN group default qlen 1000 link/loopback 00:00:00:00:00:00 brd 00:00:00:00:00:00 inet 127.0.0.1/8 scope host lo valid_lft forever preferred_lft forever inet6 ::1/128 scope host valid_lft forever preferred_lft forever 2: eth0: <BROADCAST,MULTICAST,UP,LOWER_UP> mtu 1500 qdisc pfifo_fast state UP group default qlen 1000 link/ether 00:0c:29:d3:68:5d brd ff:ff:ff:ff:ff:ff altname enp2s1 altname ens33 inet 192.168.11.10/24 brd 192.168.11.255 scope global eth0 valid_lft forever preferred_lft forever inet6 fe80::20c:29ff:fed3:685d/64 scope link valid_lft forever preferred_lft forever |
ほとんどの場合ルーターのアドレスは「192.168.11.1」「192.168.0.1.」のようになっている、今回は「192.168.11.1」を例に進めます
|
1 |
# yast |
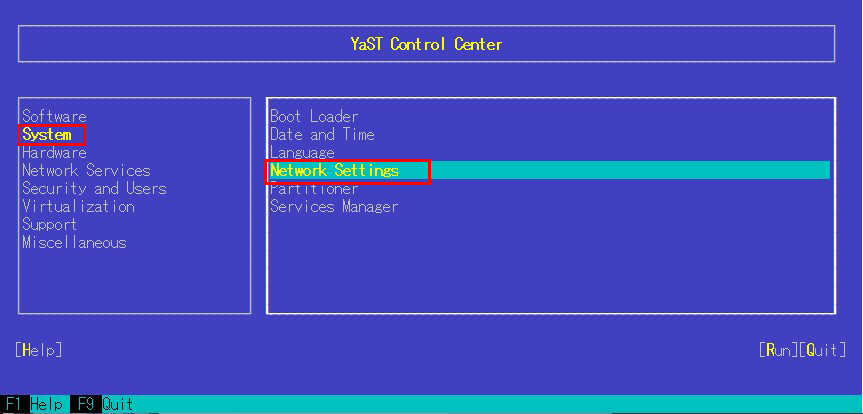
yastの初期メニューで"System" → "Network Settings"を選択する
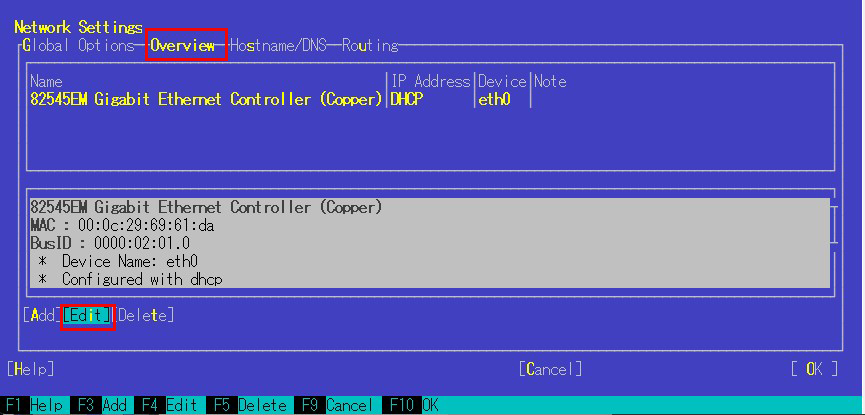
"Network Settings"の"OverView" で "Edit"をクリック
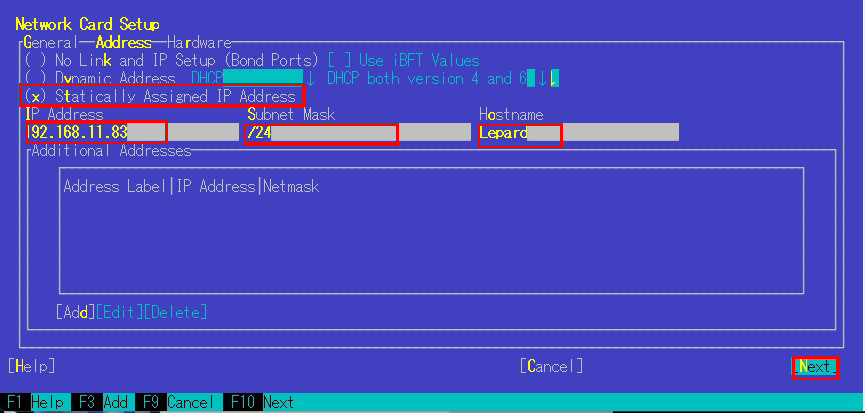
"Network Card Setup" で "Statically Assigned IP Address" にチェックし下記のように入力する
IP Address : 192.168.11.83
Subnet Mask : /24
Hostname : Lepard
[next]クリック
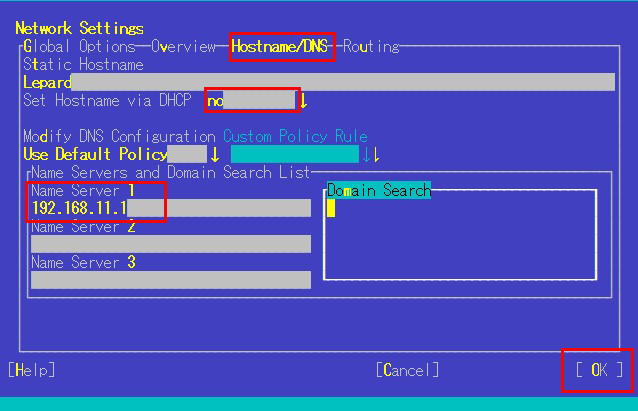
””Network Settings"の"Hostname/DNS"で
Static Hostname : Lepard
Set Hostname via DHCP : no にする
Name Server 1 : 192.168.11.1(ルーターのアドレス)
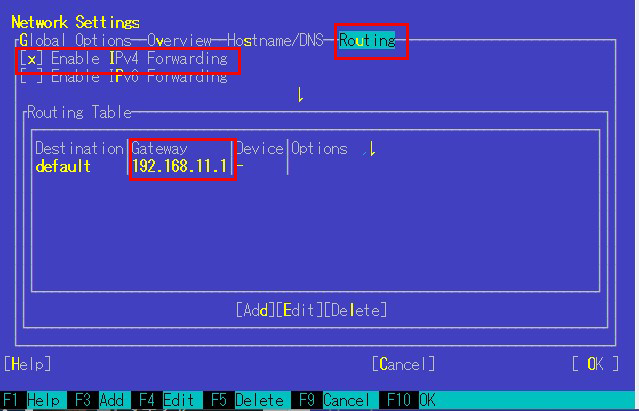
””Network Settings"の"Routing"で
Enable IPv4 Fowarding : チェックを入れる
Gateway : 192.168.11.1(ルーターのアドレス)
[OK]クリック後、システムリブート
6.2 IPv6無効化
|
1 2 3 4 |
# vi /etc/default/grub # 12行目: 追記 GRUB_CMDLINE_LINUX="ipv6.disable=1" |
# 変更を反映
|
1 2 3 4 5 6 7 8 |
# grub2-mkconfig -o /boot/grub2/grub.cfg Generating grub configuration file ... Found theme: /boot/grub2/themes/openSUSE/theme.txt Found linux image: /boot/vmlinuz-5.14.21-150500.53-default Found initrd image: /boot/initrd-5.14.21-150500.53-default Warning: os-prober will be executed to detect other bootable partitions. Its output will be used to detect bootable binaries on them and create new boot entries. done |

