Contents
1. clamav ( アンチウィルスソフト )の導入
1.1 Clamav をインストール
|
1 |
# zypper -n install clamav |
1.2 定義ファイル更新
①ウイルス定義ファイル更新設定
|
1 2 3 4 5 6 |
# vi /etc/freshclam.conf ← ウイルス定義ファイル更新設定ファイル編集 ■71行目 「DatabaseMirror database.clamav.net」の行頭に「#」を挿入し、 「DatabaseMirror db.jp.clamav.net」を追加 #DatabaseMirror database.clamav.net DatabaseMirror db.jp.clamav.net |
|
1 2 3 4 5 6 7 8 9 10 11 12 13 14 15 16 17 18 19 |
# freshclam ClamAV update process started at Fri Jan 7 12:57:13 2022 daily database available for download (remote version: 26414) Time: 0.8s, ETA: 0.0s [========================>] 54.80MiB/54.80MiB Testing database: '/var/lib/clamav/tmp.30881f985c/clamav-53eb2ff94f8ff97aee1ef1931e2bfb93.tmp-daily.cvd' ... Database test passed. daily.cvd updated (version: 26414, sigs: 1969520, f-level: 90, builder: raynman) main database available for download (remote version: 62) Time: 1.8s, ETA: 0.0s [========================>] 162.58MiB/162.58MiB Testing database: '/var/lib/clamav/tmp.30881f985c/clamav-d7a663194ed38ed1910f2b29641e9b05.tmp-main.cvd' ... Database test passed. main.cvd updated (version: 62, sigs: 6647427, f-level: 90, builder: sigmgr) bytecode database available for download (remote version: 333) Time: 0.0s, ETA: 0.0s [========================>] 286.79KiB/286.79KiB Testing database: '/var/lib/clamav/tmp.30881f985c/clamav-c959fafa36ee9ae598991e3821d1ad6e.tmp-bytecode.cvd' ... Database test passed. bytecode.cvd updated (version: 333, sigs: 92, f-level: 63, builder: awillia2) WARNING: Clamd was NOT notified: Can't connect to clamd through /run/clamav/clamd-socket: No such file or directory |
1.3 動作確認
|
1 2 3 4 5 6 7 8 9 10 11 12 13 |
# cd # clamscan --infected --remove --recursive ----------- SCAN SUMMARY ----------- Known viruses: 8633494 Engine version: 0.103.6 Scanned directories: 7 Scanned files: 7 Infected files: 0 Data scanned: 0.05 MB Data read: 0.03 MB (ratio 1.86:1) Time: 23.445 sec (0 m 23 s) Start Date: 2022:09:11 15:56:59 End Date: 2022:09:11 15:57:22 |
テスト用ウィルスをダウンロードし、スキャンする
|
1 2 3 4 5 6 7 8 9 10 11 12 13 14 15 16 |
# wget http://www.eicar.org/download/eicar.com # clamscan --infected --remove --recursive /root/eicar.com: Win.Test.EICAR_HDB-1 FOUND ← ウィルス検知 /root/eicar.com: Removed. ← ウィルス削除 ----------- SCAN SUMMARY ----------- Known viruses: 8633494 Engine version: 0.103.6 Scanned directories: 7 Scanned files: 8 Infected files: 1 Data scanned: 0.05 MB Data read: 0.03 MB (ratio 1.86:1) Time: 23.004 sec (0 m 23 s) Start Date: 2022:09:11 15:58:58 End Date: 2022:09:11 15:59:21 |
1.4 ウィルススキャン自動実行スクリプトの導入
①スクリプト保存ディレクトリーの作成
|
1 |
# mkdir -p /srv/www/system |
|
1 |
# cd /srv/www/system |
clamscan.sh を次の内容で/srv/www/systemに作成
|
1 2 3 4 5 6 7 8 9 10 11 12 13 14 15 16 17 18 19 20 21 |
# vi /srv/www/system/clamscan.sh #!/bin/bash PATH=/usr/bin:/bin # excludeopt setup excludelist=/srv/www/system/clamscan.exclude if [ -s $excludelist ]; then for i in `cat $excludelist` do if [ $(echo "$i"|grep \/$) ]; then i=`echo $i|sed -e 's/^\([^ ]*\)\/$/\1/p' -e d` excludeopt="${excludeopt} --exclude-dir=$i" else excludeopt="${excludeopt} --exclude=$i" fi done fi # signature update freshclam # virus scan clamscan --recursive --remove ${excludeopt} / |
スクリプトに実行権限を与える
|
1 |
# chmod 700 clamscan.sh |
|
1 2 3 |
# echo "/sys/" >> /srv/www/system/clamscan.exclude # echo "/proc/" >> /srv/www/system/clamscan.exclude # echo "/.snapshots/" >> /srv/www/system/clamscan.exclude |
|
1 2 |
# crontab -e 0 1 * * * /srv/www/system/clamscan.sh > /dev/null 2>& |
|
1 |
# /srv/www/system/clamscan.sh |
2. メールサーバー インストール
2.1 Postfixインストール
①Postfix をインストールして SMTPサーバーを構築します
|
1 |
# zypper -n install postfix |
|
1 2 3 4 5 6 7 8 9 10 11 12 13 14 15 16 17 18 19 20 21 22 23 24 25 26 27 28 29 30 31 32 33 34 35 36 37 38 39 40 41 42 |
# vi /etc/postfix/main.cf # 114行目:コメント解除しドメイン名指定 mydomain = korodes.com ←自ドメイン名 # 130行目:コメント解除 myorigin = $mydomain # 294行目:コメント解除し自ネットワーク追記 mynetworks = 127.0.0.0/8, 192.168.11.0/24 ←自ネットワーク # 451行目:コメント解除しMaildir形式 home_mailbox = Maildir/ # 705行目:変更 inet_interfaces = all # 719行目:追記 mydestination = $myhostname, localhost.$mydomain, localhost, $mydomain # 201行目:ホスト名指定 myhostname = mail.korodes.com ←自ホスト名 # 734,735行目 # 必要に応じてメールボックスサイズを制限 (下例は 1G) mailbox_size_limit = 1073741824 # 必要に応じて送受信メールサイズを制限 (下例は 10M) message_size_limit = 10485760 # 747行目:追記 smtpd_recipient_restrictions = permit_mynetworks, permit_auth_destination, permit_sasl_authenticated, reject # 756行目:変更 smtpd_sasl_auth_enable = yes # 761,762行目あたり:コメントアウトにして、その下に追加 #smtpd_sasl_type = cyrus #smtpd_sasl_path = smtpd smtpd_sasl_type = dovecot smtpd_sasl_path = private/auth smtpd_sasl_security_options = noanonymous smtpd_sasl_local_domain = $myhostname |
|
1 2 |
# systemctl start postfix # systemctl enable postfix |
|
1 2 3 4 |
# firewall-cmd --add-service=smtp --permanent success # firewall-cmd --reload success |
2.3 Dovecot インストール
|
1 |
# zypper -n install dovecot |
Postfix に SASL 機能が提供できるよう Dovecot を設定します。
|
1 2 3 |
# vi /etc/dovecot/dovecot.conf # 30行目:コメント解除(IPv6をリスンしない場合「, ::」削除) listen = * |
|
1 2 3 4 5 6 |
# vi /etc/dovecot/conf.d/10-auth.conf # 10行目:コメント解除し変更(プレーンテキスト認証も許可する) disable_plaintext_auth = no # 100行目:追記 auth_mechanisms = plain login |
|
1 2 3 |
# vi /etc/dovecot/conf.d/10-mail.conf # 30行目:コメント解除し、追記 mail_location = maildir:~/Maildir |
|
1 2 3 4 5 6 7 8 |
# vi /etc/dovecot/conf.d/10-master.conf # 106-108行目:コメント解除し追記 # Postfix smtp-auth unix_listener /var/spool/postfix/private/auth { mode = 0666 user = postfix group = postfix } |
③Dovecot起動と自動実行
|
1 2 3 |
# systemctl start dovecot # systemctl enable dovecot Created symlink /etc/systemd/system/multi-user.target.wants/dovecot.service → /usr/lib/systemd/system/dovecot.service. |
POP は 110/TCP, IMAP は 143/TCP を使用します
|
1 2 3 4 |
# firewall-cmd --add-service={pop3,imap} --permanent success # firewall-cmd --reload success |
2.4 ユーザーアカウント登録
今回はOSユーザー"suse"を登録します。
①メールクライアントインストール
|
1 |
# zypper -n install mailx |
②メールボックスは Maildir を参照するよう設定
|
1 |
# echo 'export MAIL=$HOME/Maildir' >> /etc/profile.d/mail.sh |
2.5 作動確認
ただし、お使いのプロバイダーによっては送信サーバーに587番ポートを使用する場合がありますので
firewall設定で587を解放しておきます。
|
1 2 |
# firewall-cmd --add-port=587/tcp --permanent # firewall-cmd --reload |
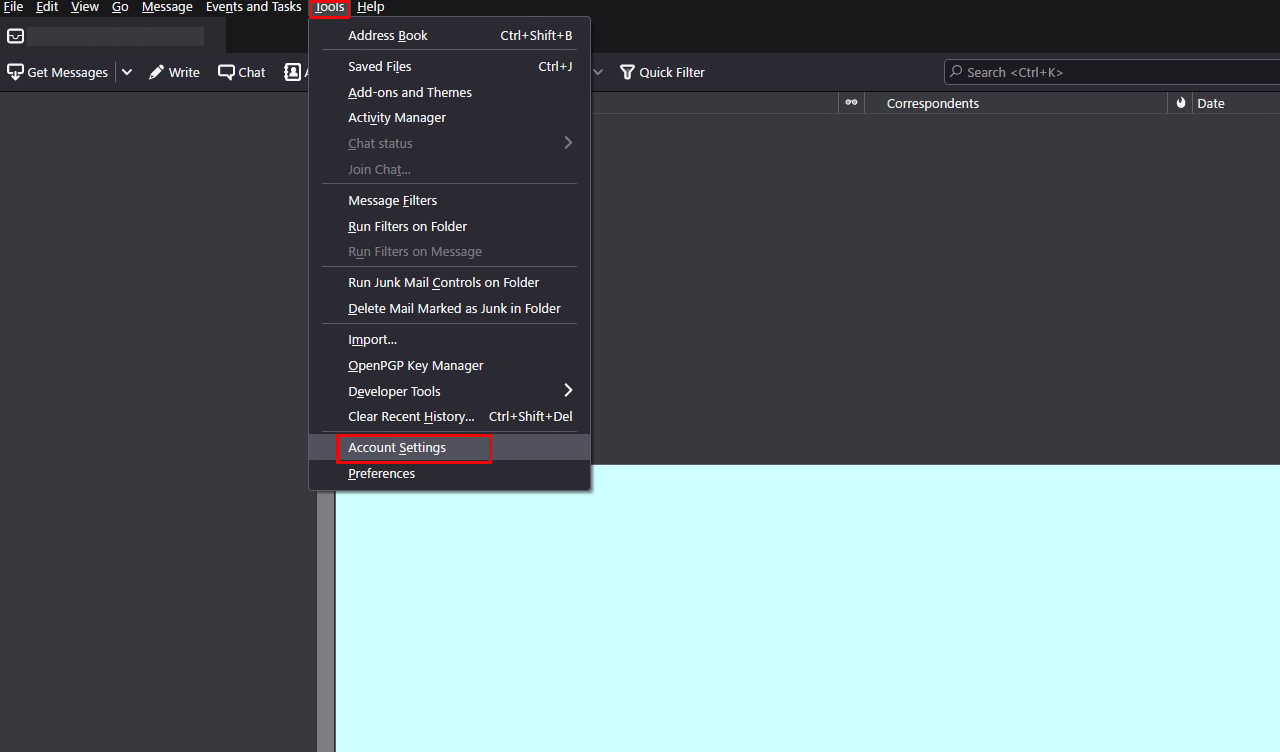
Thunderbirdを起動し、「Tools」メニューから「Account Settings」選択
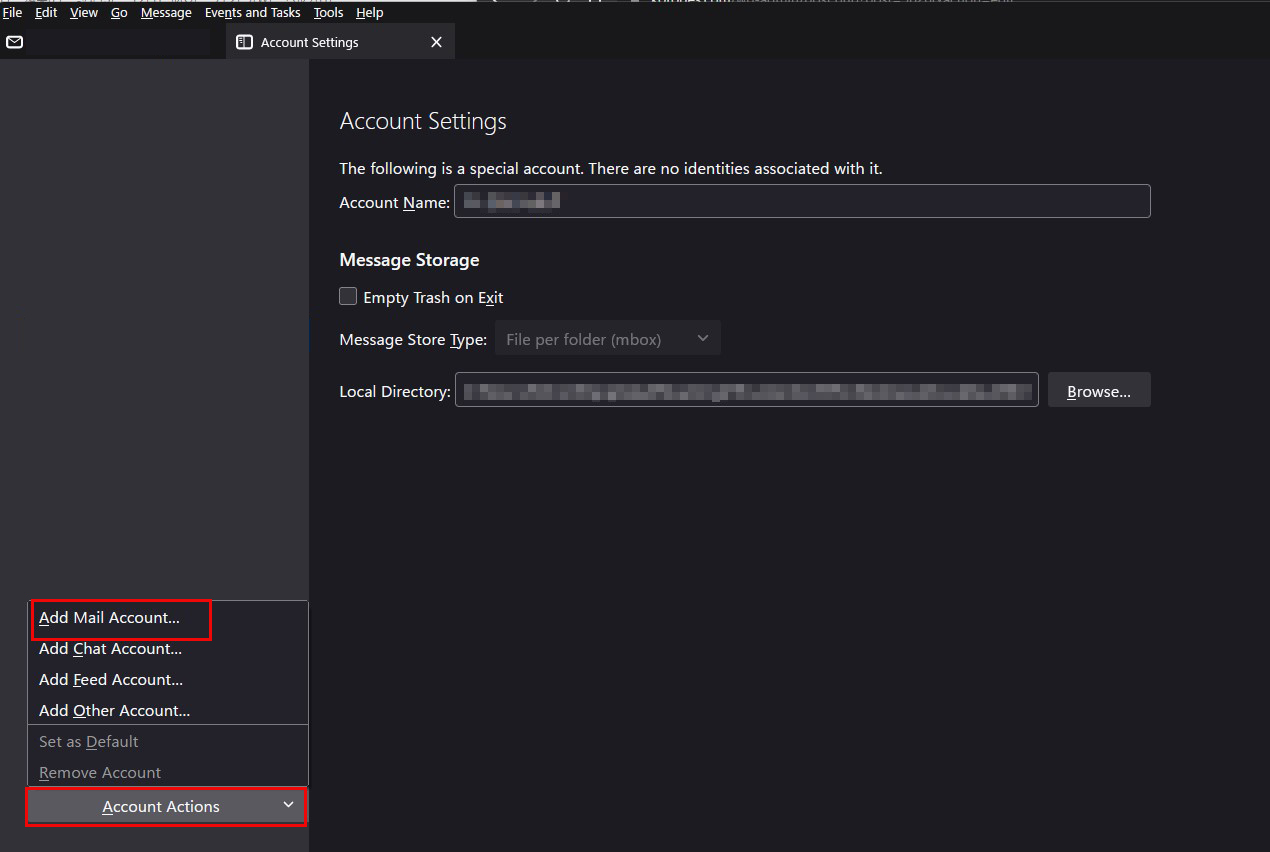
「Account Actions」の「Add Mail Account...」選択
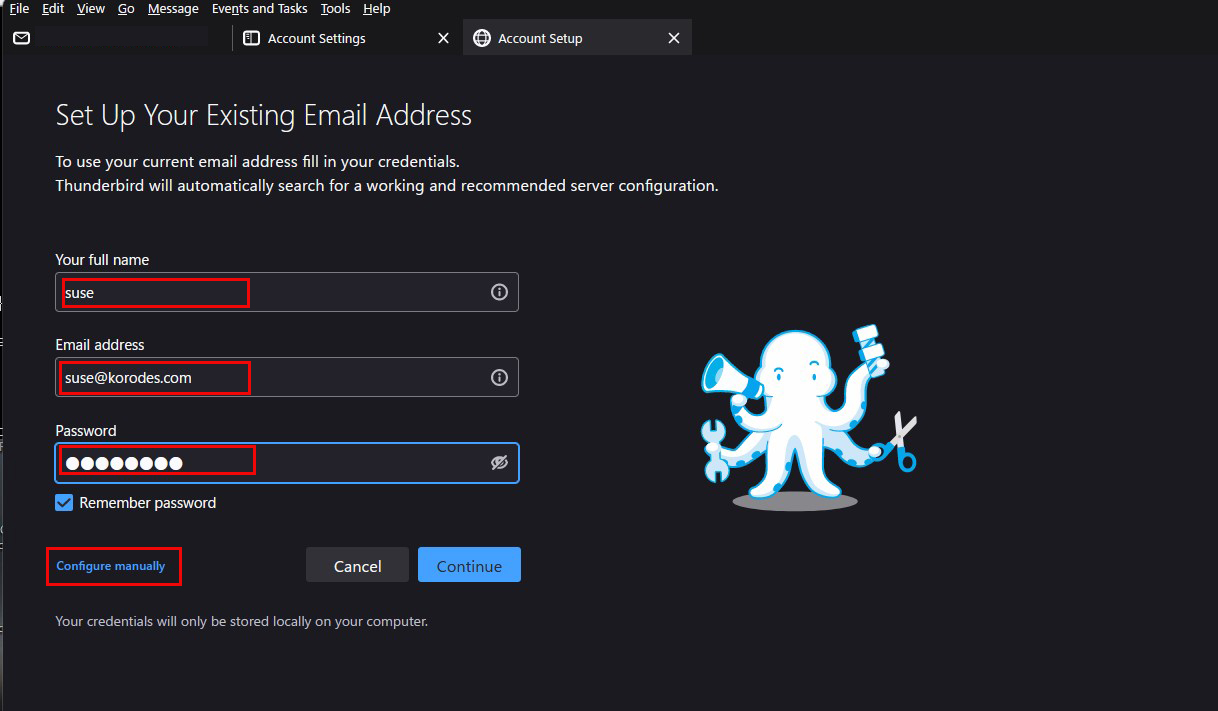
次の通り各項目に入力し、「Configure manually」クリック
Your full name : 任意の名前
Email address : <メールサーバのユーザー名>@<ドメイン名>
Password : メールサーバのユーザー名のパスワード
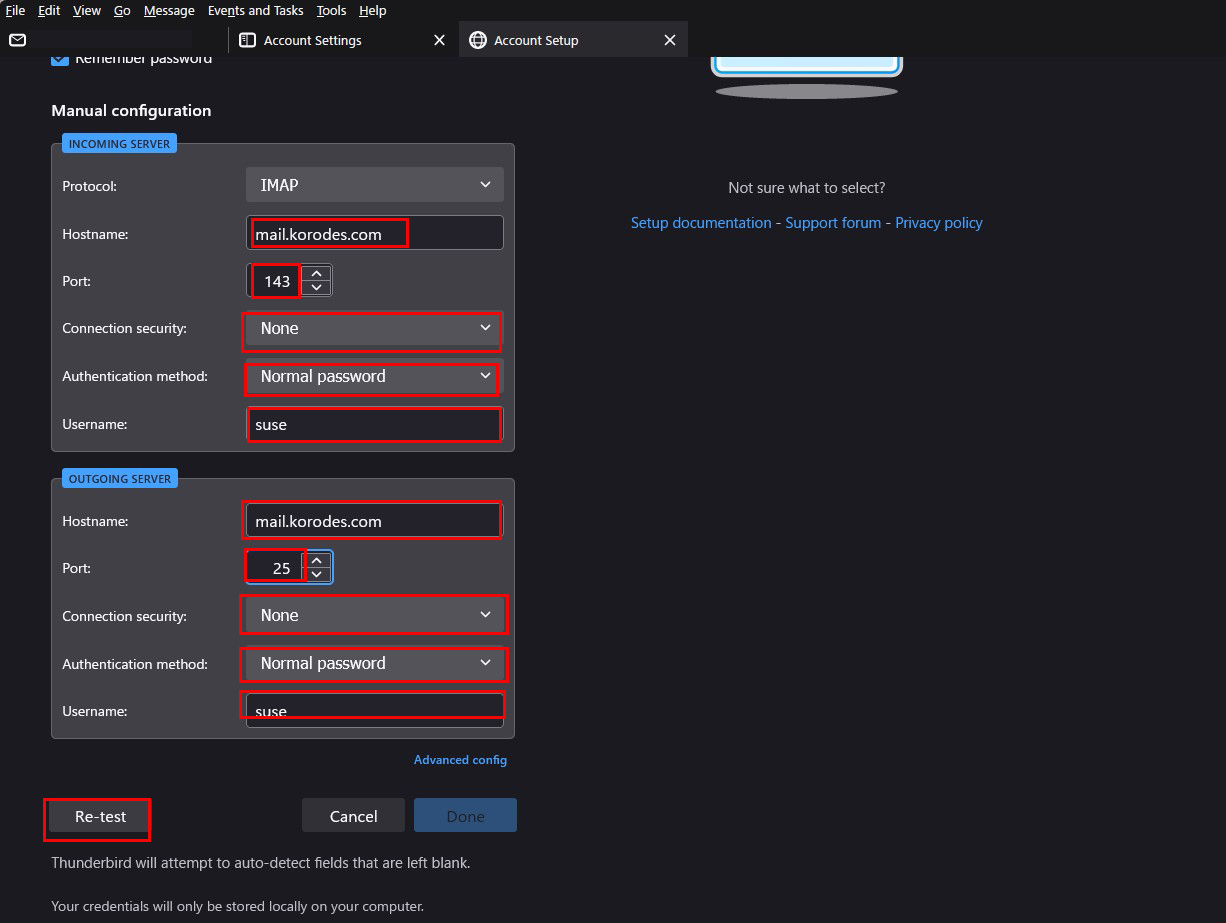
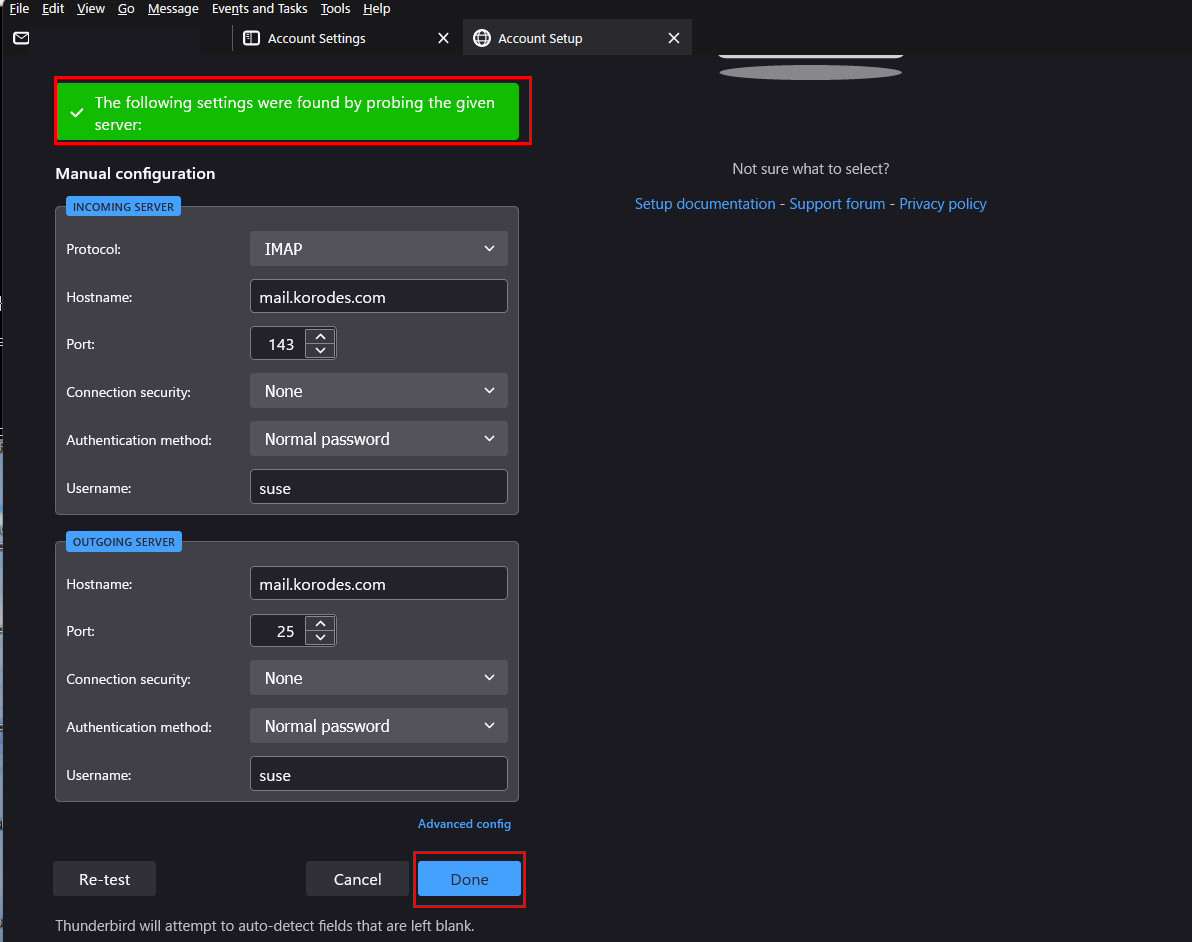
下図の通り設定するが、お使いのプロバイダが送信サーバーで25番ポートが許されている場合は「587」のかわりに「25」でもよい。「Re-test」をクリック
「メールサーバーが見つかり、アカウントが有効である」という表示が出るので、「Done」クリック
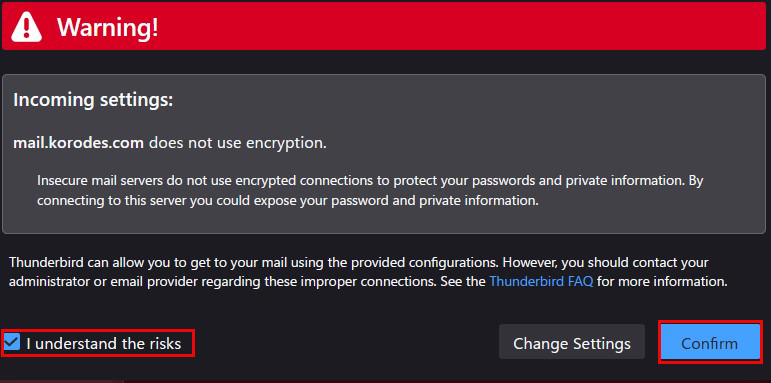
警告画面が出ますが下図のようにチェックを入れ「Confirm」をクリック
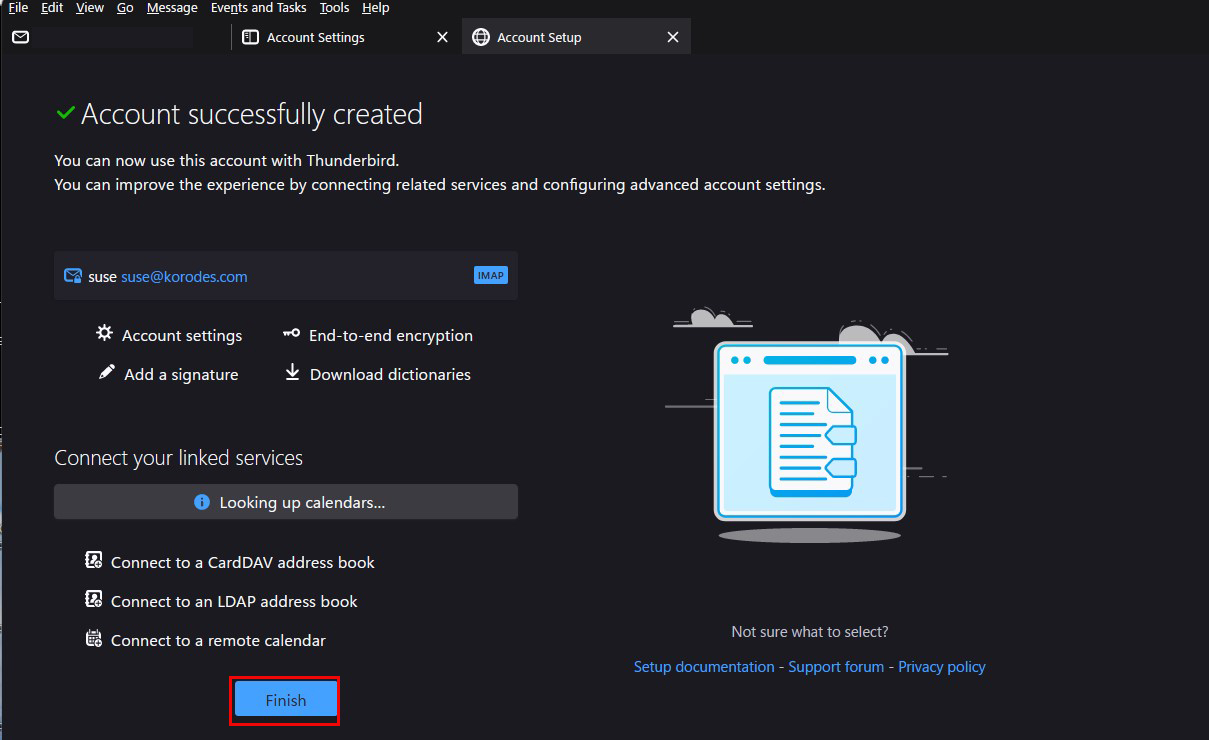
次の画面になれば成功
3. Mail サーバー : Postfix + Clamav + Amavisd
Postfix と Clamav を連携させて 送受信メールをリアルタイムスキャンできるように設定します
3.1 Amavisd および Clamav Server をインストール
|
1 2 3 4 |
# zypper -n install amavisd-new spamassassin # systemctl start clamd # systemctl enable clamd Created symlink /etc/systemd/system/multi-user.target.wants/clamd.service → /usr/lib/systemd/system/clamd.service. |
上記エラーが出る場合、下記コマンドでインストールする
|
1 |
# zypper install https://download.opensuse.org/repositories/server:/mail/15.4/x86_64/libmilter1_0-8.17.1-lp154.330.3.x86_64.rpm |
3.2 Amavisd を設定
①設定ファイル編集
|
1 2 3 4 5 6 7 8 |
# vi /etc/amavisd.conf # 23行目:自ドメイン名に変更 $mydomain = 'korodes.com'; # 155行目:コメント解除して自ホスト名に変更 $myhostname = 'mail.korodes.com'; # 157,158行目:コメント解除 $notify_method = 'smtp:[127.0.0.1]:10025'; $forward_method = 'smtp:[127.0.0.1]:10025'; |
|
1 2 3 4 5 |
# sa-update # systemctl start amavis spamd # systemctl enable amavis spamd Created symlink /etc/systemd/system/multi-user.target.wants/amavis.service → /usr/lib/systemd/system/amavis.service. Created symlink /etc/systemd/system/multi-user.target.wants/spamd.service → /usr/lib/systemd/system/spamd.service. |
3.3 Postfix の設定
|
1 2 3 4 5 6 7 8 9 10 11 12 13 14 15 16 17 18 19 20 21 |
# vi /etc/postfix/master.cf # 最終行に下記を追記 smtp-amavis unix - - n - 2 smtp -o smtp_data_done_timeout=1200 -o smtp_send_xforward_command=yes -o disable_dns_lookups=yes 127.0.0.1:10025 inet n - n - - smtpd -o content_filter= -o local_recipient_maps= -o relay_recipient_maps= -o smtpd_restriction_classes= -o smtpd_client_restrictions= -o smtpd_helo_restrictions= -o smtpd_sender_restrictions= -o smtpd_recipient_restrictions=permit_mynetworks,reject -o mynetworks=127.0.0.0/8 -o strict_rfc821_envelopes=yes -o smtpd_error_sleep_time=0 -o smtpd_soft_error_limit=1001 -o smtpd_hard_error_limit=1000 |
|
1 2 3 |
# vi /etc/postfix/main.cf # 最終行に追記 content_filter=smtp-amavis:[127.0.0.1]:10024 |
|
1 |
# systemctl restart postfix |
3.4 Thunderbirdで確認
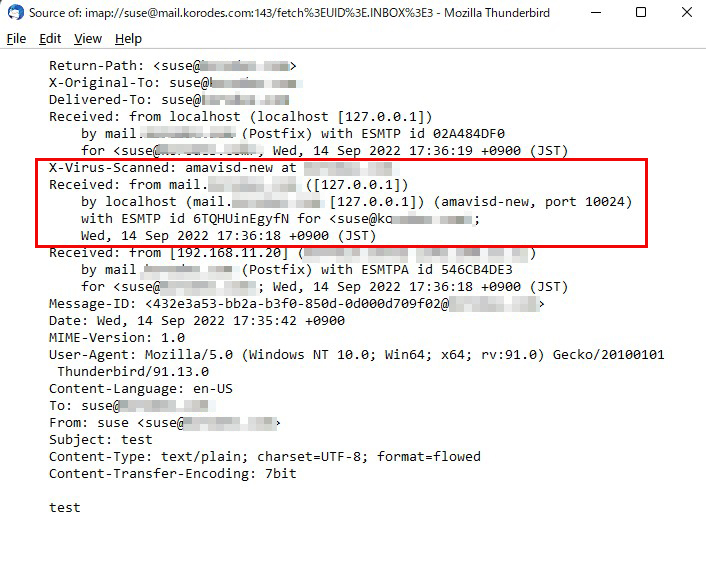
自分宛にメールを送信し、メールのヘッダーに下記の表示があれば成功
4.ウィルススキャンスクリプト置換
|
1 2 3 4 5 |
# cd /srv/www/system/ # vi clamscan.exclude /sys/ /proc/ /.snapshots ← openSUSEは大量のsnapshotをとるように設定されておりますので、もし、必要がない方は設定しておく |
|
1 2 3 |
# cd /srv/www/system/ # mv clamscan.sh clamscan.sh_bak # vi clamscan.sh |
|
1 2 3 4 5 6 7 8 9 10 11 12 13 14 15 16 17 18 19 20 21 22 23 24 25 26 27 28 29 30 31 32 |
#!/bin/bash PATH=/usr/bin:/bin MAILTO="<任意のメールアドレス>" # excludeopt setup excludelist=/srv/www/system/clamscan.exclude if [ -s $excludelist ]; then for i in `cat $excludelist` do if [ $(echo "$i"|grep \/$) ]; then i=`echo $i|sed -e 's/^\([^ ]*\)\/$/\1/p' -e d` excludeopt="${excludeopt} --exclude-dir=^$i" else excludeopt="${excludeopt} --exclude=^$i" fi done fi # signature update freshclam 2>&1 > /dev/null # virus scan CLAMSCANTMP=`mktemp` #clamscan --recursive --remove ${excludeopt} / > $CLAMSCANTMP 2>&1 clamscan --recursive ${excludeopt} / > $CLAMSCANTMP 2>&1 [ ! -z "$(grep FOUND$ $CLAMSCANTMP)" ] && \ # report mail send grep FOUND$ $CLAMSCANTMP | mail -s "Virus Found in `hostname`" $MAILTO rm -f $CLAMSCANTMP |
|
1 |
# chmod 700 clamscan.sh |

