
Contents
1.Postfix : Installation / Configuration
Postfix is a software developed as an MTA (Mail Transport Agent) to replace Sendmail, and is a mail server with features such as high compatibility with Sendmail, security, easy maintenance, and speed.
Also, since Postfix only functions as an SMTP server for sending mails, you will need to install a POP server for receiving mails separately as described later.
1.1 Install
Install Postfix and build an SMTP server. 25/TCP is used for SMTP.
|
1 2 3 4 5 6 7 8 9 10 11 12 13 14 15 |
# apt -y install postfix sasl2-bin # You will be prompted to select a general configuration setting, but select "No Configuration" to set it manually later. +------+ Postfix Configuration +-------+ | General type of mail configuration | | | |No configuration | |Internet with smarthost | | Satellite system | | Local only | | | || | <Ok> <Cancel> | | | +--------------------------------------+ |
1.2 Edit configuration file
①Edit main.cf
|
1 |
# cp /usr/share/postfix/main.cf.dist /etc/postfix/main.cf |
|
1 2 3 4 5 6 7 8 9 10 11 12 13 14 15 16 17 18 19 20 21 22 23 24 25 26 27 28 29 30 31 32 33 34 35 36 37 38 39 40 41 42 43 44 45 46 47 48 49 50 51 52 53 54 55 56 |
# vi /etc/postfix/main.cf # Line 78: uncomment mail_owner = postfix # Line 94: uncomment and specify host name myhostname = mail.korodes.com # Line 102: Uncomment and specify domain name mydomain = korodes.com # Line 123: Uncomment myorigin = $mydomain # Line 137: Uncomment inet_interfaces = all # Line 185: Uncomment mydestination = $myhostname, localhost.$mydomain, localhost, $mydomain # Line 228: Uncomment local_recipient_maps = unix:passwd.byname $alias_maps # Line 270: Uncomment mynetworks_style = subnet # Line 287: Add your own network. mynetworks = 127.0.0.0/8, 192.168.11.0/24 # Line 407: uncomment alias_maps = hash:/etc/aliases # Line 418: Uncomment alias_database = hash:/etc/aliases # Line 440: uncomment home_mailbox = Maildir/ # Line 576: Make it a comment and add it below. #smtpd_banner = $myhostname ESMTP $mail_name (Ubuntu) smtpd_banner = $myhostname ESMTP # Line 650:Add a note sendmail_path = /usr/sbin/postfix # Line 655:Add a note newaliases_path = /usr/bin/newaliases # Line 660:Add a note mailq_path = /usr/bin/mailq # Line 666:Add a note setgid_group = postdrop # Line 670:comment #html_directory = # Line 674:comment #manpage_directory = # Line 679:comment #sample_directory = # Line 683:comment #readme_directory = # Limit sending and receiving mail size to 10M. message_size_limit = 10485760 # Limit mailbox size to 1G. mailbox_size_limit = 1073741824# Add to last line # SMTP-Auth 設定 smtpd_sasl_type = dovecot smtpd_sasl_path = private/auth smtpd_sasl_auth_enable = yes smtpd_sasl_security_options = noanonymous smtpd_sasl_local_domain = $myhostname smtpd_recipient_restrictions = permit_mynetworks, permit_auth_destination, permit_sasl_authenticated, reject |
Reflect and activate the settings.
|
1 2 |
# newaliases # systemctl restart postfix |
②Edit master.cf
|
1 2 3 4 5 6 7 8 9 10 11 12 13 14 |
# vi /etc/postfix/master.cf # Comment out some of the information about submission and smtps. submission inet n - y - - smtpd -o syslog_name=postfix/submission # -o smtpd_tls_security_level=encrypt -o smtpd_sasl_auth_enable=yes -o smtpd_tls_auth_only=yes # smtps inet n - y - - smtpd -o syslog_name=postfix/smtps -o smtpd_tls_wrappermode=yes |
Reflect and activate the settings.
|
1 2 |
# newaliases # systemctl restart postfix |
2. Dovecot : Installation/Configuration
Dovecot is a server for receiving mail (POP).
Install Dovecot and set up a POP/IMAP server, using 110/TCP for POP and 143/TCP for IMAP.
2.1 Install
①Configure Dovecot so that Postfix can provide SASL functionality.
|
1 |
# apt -y install dovecot-core dovecot-pop3d dovecot-imapd |
②Edit the configuration file "dovecot.conf".
|
1 2 3 4 |
# vi /etc/dovecot/dovecot.conf # Line 30: uncomment listen = *, :: |
③Edit the configuration file "10-auth.conf".
|
1 2 3 4 5 6 7 |
# vi /etc/dovecot/conf.d/10-auth.conf # Line 10: uncomment and change(Allow plain text authentication as well.) disable_plaintext_auth =no # Line 100:Add a note auth_mechanisms = plain login |
④Edit the configuration file "10-mail.conf
|
1 2 3 4 |
# vi /etc/dovecot/conf.d/10-mail.conf # Line 30: Change to Maildir format. mail_location =maildir:~/Maildir |
⑤Edit the configuration file "10-master.conf
|
1 2 3 4 5 6 7 8 9 |
# vi /etc/dovecot/conf.d/10-master.conf # Lines 96-98: uncommented and added # Postfix smtp-auth unix_listener /var/spool/postfix/private/auth { mode = 0666 user = postfix group = postfix } |
⑥restart
|
1 |
# systemctl restart dovecot |
3. Register for an email user account
Register for an email user account
This is the setting to use a user account on the OS for email as well.
If you want to use e-mail with a user account on the OS, no additional settings are required, just register the OS user
①Mail client installation
|
1 |
# apt -y install mailutils |
②Configure mailboxes to refer to Maildir.
|
1 |
# echo 'export MAIL=$HOME/Maildir/' >> /etc/profile.d/mail.sh |
③Add an OS user [e.g., hoge]
|
1 2 |
# adduser hoge password : ****** |
④Test sending email
Log in with the user account you added and test sending mail.
Send a test mail to yourself [mail (user name)@(host name)]
|
1 2 3 4 5 6 |
# su - hoge $ cd ~ $ mail hoge@localhost Cc: Subject: Test Mail This is the first mail. ← # To exit the main text, press Ctrl + D. |
Confirmation of incoming mail
|
1 2 3 |
$ mail "/home/hoge/Maildir/": 1 message 1 new >N 1 hoge Test Mail |
4. Apply ClamAV to mail server Postfix
Configure Postfix and Clamav to work together to scan incoming and outgoing mails in real time.
It is assumed that Clamav is already installed.
Install Amavisd and Clamav Daemon and start Clamav Daemon.
① Install
|
1 |
# apt -y install clamav-daemon amavisd-new |
② Enable virus scan
|
1 2 3 4 5 |
# vi /etc/amavis/conf.d/15-content_filter_mode # Uncomment and enable virus scanning. @bypass_virus_checks_maps = ( \%bypass_virus_checks, \@bypass_virus_checks_acl, \$bypass_virus_checks_re); |
③ Register your own domain name
|
1 |
# echo 'korodes.com' > /etc/mailname |
④ Edit the configuration file "main.cf".
|
1 2 3 4 |
# vi /etc/postfix/main.cf # Add to last line content_filter=smtp-amavis:[127.0.0.1]:10024 |
⑤ Edit the configuration file "master.cf".
|
1 2 3 4 5 6 7 8 9 10 11 12 13 14 15 16 17 18 19 20 21 |
# vi /etc/postfix/master.cf # Add to last line smtp-amavis unix - - n - 2 smtp -o smtp_data_done_timeout=1200 -o smtp_send_xforward_command=yes -o disable_dns_lookups=yes 127.0.0.1:10025 inet n - n - - smtpd -o content_filter= -o local_recipient_maps= -o relay_recipient_maps= -o smtpd_restriction_classes= -o smtpd_client_restrictions= -o smtpd_helo_restrictions= -o smtpd_sender_restrictions= -o smtpd_recipient_restrictions=permit_mynetworks,reject -o mynetworks=127.0.0.0/8 -o strict_rfc821_envelopes=yes -o smtpd_error_sleep_time=0 -o smtpd_soft_error_limit=1001 -o smtpd_hard_error_limit=1000 |
⑥ restart
|
1 |
# systemctl restart clamav-daemon amavis postfix |
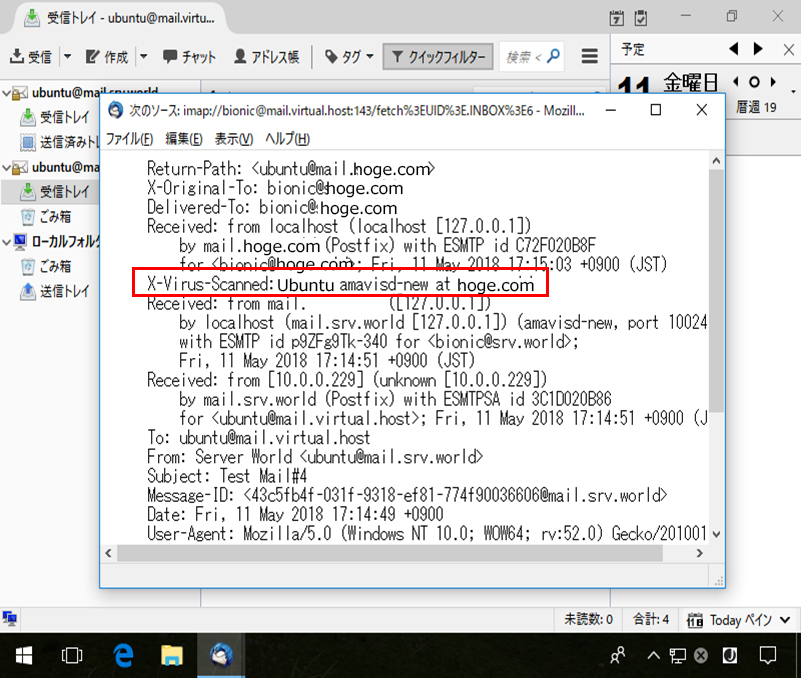
⑦ Check with Thundwebird and npop.
The following header is added to the incoming and outgoing e-mails. If a virus is detected, it will be removed and not delivered to the client.
5. Install spamassassin on Postfix
① Install
|
1 2 3 |
# apt-get update # apt-get upgrade # apt-get install spamassassin |
There is a file "/etc/mail/spamassassin/local.cf", so use it by default without any additional settings.
② Create a Maildir for storing spam mails
Create a directory ".Spam" in the Maildir format for storing spam mails.
To create it, use the target user (e.g., hoge).
Log in as the target user.
|
1 2 3 4 |
# su - hoge $ cd ~ $ cd Maildir $ /usr/bin/maildirmake.dovecot .Spam Maildir |
③ Prep for Procmail
Check if Procmail is installed on the server machine.
|
1 |
# apt list procmail |
If it is installed, the following results will be returned.
procmail/bionic,now 3.22-26 amd64 [installed]
Find the path to Procmail with the following command
|
1 |
# which procmail |
The path to Procmail is shown.
/usr/bin/procmail
④ Procmail Configuration
If you put it in "/etc/procmailrc", which controls the entire mail filter, it will be applied to all users.
If you put it in "/home/<username>/.procmailrc", which is a mail filter file for each user, the filter will be applied only to that user.
In this case, we will write it in "/etc/procmailrc" in order to apply it to all users.
|
1 2 3 4 5 6 7 8 9 10 11 12 13 14 15 16 17 18 19 20 21 22 23 24 |
# vi /etc/procmailrc # Set the path PATH=/bin:/usr/bin:/usr/local/bin # Setting up a mailbox MAILDIR=$HOME/Maildir DEFAULT=$MAILDIR/ # Specify the output destination of the Procmail log file. LOGFILE=$MAILDIR/procmaillog # Specify the path to the lock file LOCKFILE=$HOME/.lockmail # If there is no "X-Spam-***" in the mail header, spamassassin will be started. :0fw *!^X-Spam.* |spamassassin # If "X-Spam-Status: Yes" is written in the mail header, the mail will be stored in the ".Spam" directory. :0 * ^X-Spam-Status: Yes $MAILDIR/.Spam/ |
⑤ Postfix Configuration
|
1 2 3 4 |
# vi /etc/postfix/main.cf # Add to last line mailbox_command = /usr/bin/procmail |
⑥ Start SpamAssassin and restart Postfix.
|
1 2 |
# systemctl start spamassassin # systemctl restart postfix |
⑦ confirmation
Send an email to your domain.
If you see the following description in the header of the mail, the settings have been made correctly.
The following header is a description of a mail that is judged to be spam.
| ・・Abbreviation・・・ X-Spam-Flag: YES X-Spam-Checker-Version: SpamAssassin 2.64 (2004-01-11) on mail.example.com X-Spam-Report: * 0.1 HTML_60_70 BODY: Message is 60% to 70% HTML * 0.0 HTML_MESSAGE BODY: HTML included in message ・・Abbreviation・・・ X-Spam-Status: Yes, hits=8.2 required=5.5 tests=CLICK_BELOW, FORGED_RCVD_NET_HELO,HTML_60_70,HTML_FONTCOLOR_UNSAFE, HTML_IMAGE_ONLY_08,HTML_LINK_CLICK_HERE,HTML_MESSAGE,QENCTXT autolearn=no version=2.64 X-Spam-Level: ******** ・・・Abbreviation・・・ |
If you see the above "X-Spam-***" in the mail header, SpamAssassin is working properly.
If you see "X-Spam-Status: Yes", the message is considered spam.
On the other hand, if the message has "X-Spam-Status: No", it will be judged as a normal message.
⑧ Learning about spam emails
SpamAssassin has the ability to learn about your email and improve the accuracy of its decisions.
|
1 2 3 |
# /usr/bin/sa-learn --spam /home/*/Maildir/.Spam/cur Learned from 89 message(s) (80 message(s) examined). ←Learned 80 emails as spam. |
⑨ Learning to send regular emails
|
1 2 3 |
# /usr/bin/sa-learn --ham /home/*/Maildir/cur Learned from 157 message(s) (35 message(s) examined). ←Learn 35 emails as normal emails. |
⑩ Automatic execution of mail judgment
Create a mail judgment script and register it to Cron.
Save the file as "/usr/local/bin" and name it "spam-learns.sh".
After saving the script, give it executable access as "chmod 750 spam-learns.sh".
|
1 2 3 4 5 6 7 8 9 10 11 12 |
# vi /usr/local/bin/ spam-learns.sh #! /bin/sh # Learning about spam emails /usr/bin/sa-learn --spam /home/*/Maildir/.Spam/cur # Learn normal mail /usr/bin/sa-learn --ham /home/*/Maildir/cur # Forcibly delete the contents of the spam mail storage directory. /bin/rm -f /home/*/Maildir/.Spam/cu |
|
1 |
# cd /lib/systemd/system |
|
1 2 3 4 5 6 7 8 9 |
# vi spam-learns.service [Unit] Description=demo sample node.js program [Service] Type=simple ExecStart= /usr/local/bin/spam-learns.sh Restart=always [Install] WantedBy=multi-user.targe |
|
1 2 |
# crontab -e 0 4 * * * /usr/local/bin/spam-learns.sh ← add |
|
1 |
# systemctl enable spam-learns |